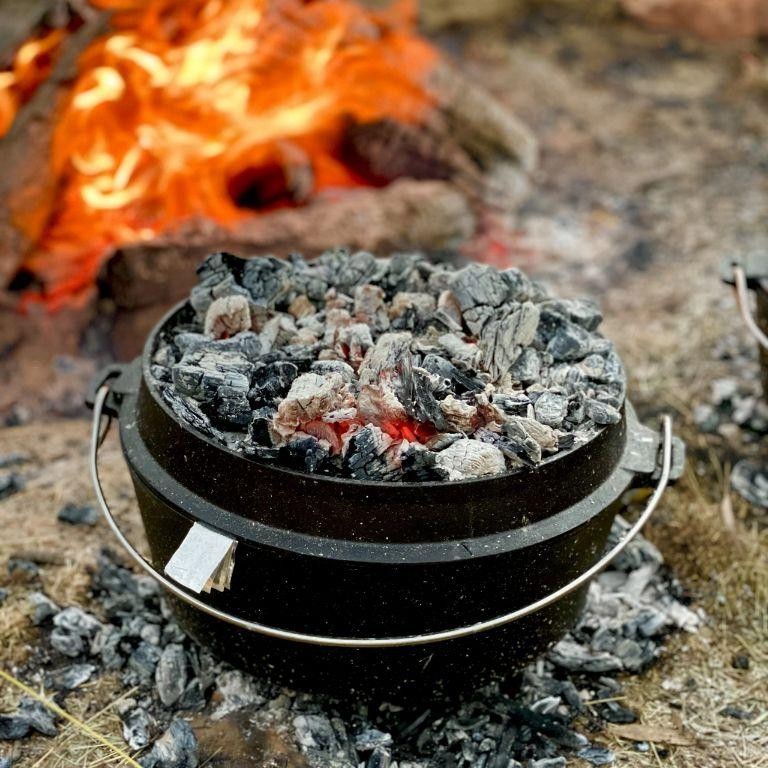
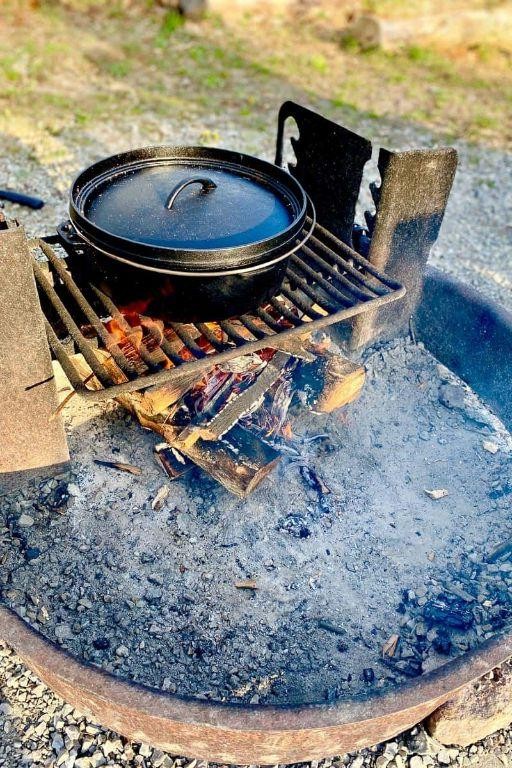
Whether you’re a seasoned camper or just love the idea of cooking under the stars, these 21 delicious Dutch oven camping recipes are sure to spark your outdoor culinary adventures. From hearty stews to sweet treats, we’ve gathered a mix of quick dinners and comfort food favorites that’ll make your next camping trip unforgettable. Dive in and discover your next campfire masterpiece!
Dutch Oven Campfire Chili
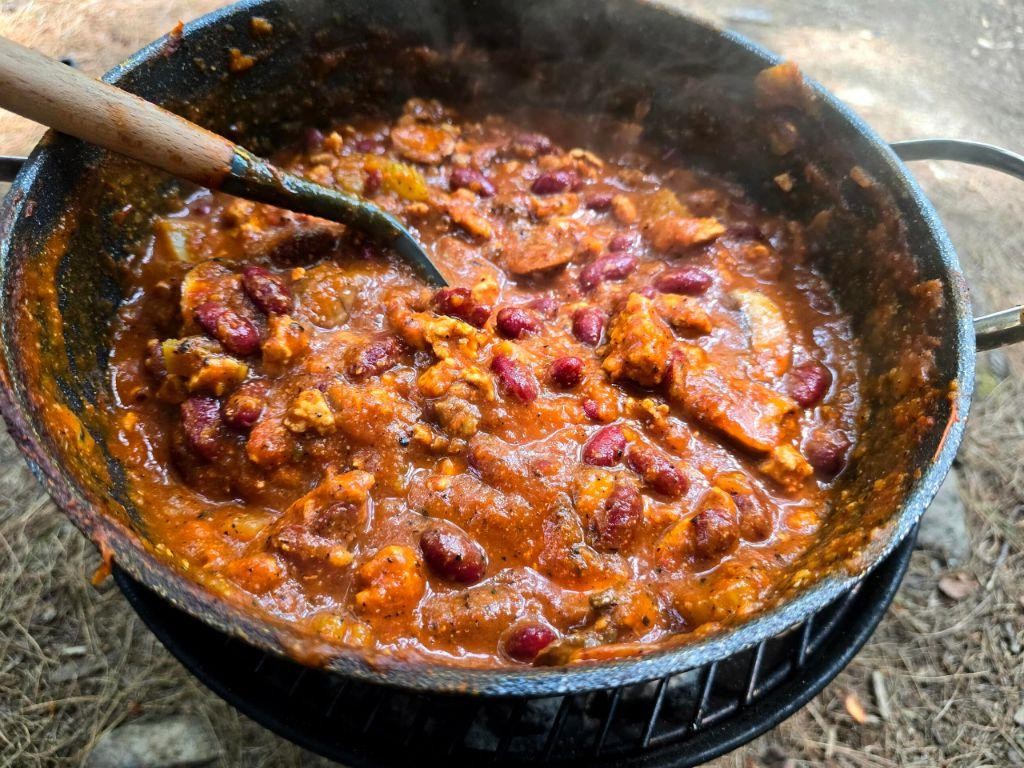
Amidst the crisp embrace of the great outdoors, there’s nothing quite as comforting as a hearty bowl of Dutch Oven Campfire Chili, a dish that marries rustic charm with deep, layered flavors. This recipe is a testament to the simplicity of campfire cooking, yet it delivers a complexity that belies its humble preparation.
Ingredients
- For the chili base:
- 2 tbsp olive oil
- 1 large onion, diced
- 3 cloves garlic, minced
- 1 lb ground beef
- 1 tsp salt
- 1/2 tsp black pepper
- For the spices and tomatoes:
- 2 tbsp chili powder
- 1 tsp cumin
- 1 tsp smoked paprika
- 1 can (28 oz) crushed tomatoes
- 1 can (15 oz) kidney beans, drained and rinsed
- For finishing:
- 1 cup water
- 1/2 cup shredded cheddar cheese
- 2 green onions, sliced
Instructions
- Heat the olive oil in a Dutch oven over medium heat until shimmering, about 2 minutes.
- Add the diced onion and minced garlic, sautéing until translucent, approximately 5 minutes.
- Increase the heat to medium-high and add the ground beef, breaking it apart with a spoon. Cook until no pink remains, about 7 minutes. Season with salt and pepper.
- Stir in the chili powder, cumin, and smoked paprika, cooking for 1 minute to toast the spices.
- Pour in the crushed tomatoes and kidney beans, stirring to combine. Bring to a simmer.
- Add 1 cup of water to adjust the consistency, then reduce the heat to low. Cover and simmer for 30 minutes, stirring occasionally.
- Remove from heat and let stand for 5 minutes. Serve topped with shredded cheddar cheese and sliced green onions.
This chili boasts a robust texture, with the beans and beef offering a satisfying chew against the velvety tomato base. The smoky undertones from the paprika and cumin elevate the dish, making it a standout at any campfire gathering. Try serving it with a side of cornbread for a complete meal that’s as nourishing as it is delicious.
Camping Dutch Oven Cornbread
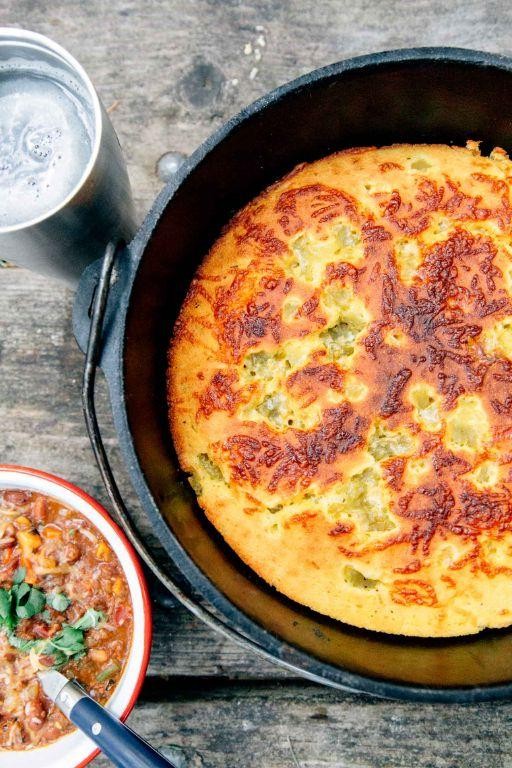
Whisking together the rustic charm of camping with the comfort of homemade bread, this Dutch Oven Cornbread emerges as a golden, buttery delight, perfect for savoring under the open sky or at your kitchen table. Its crisp edges and tender crumb are a testament to the simplicity and richness of traditional American baking.
Ingredients
- For the batter:
- 1 cup all-purpose flour
- 1 cup yellow cornmeal
- 1/4 cup granulated sugar
- 1 tbsp baking powder
- 1/2 tsp salt
- 1 cup whole milk
- 1/3 cup unsalted butter, melted
- 1 large egg
Instructions
- Preheat your Dutch oven by placing it over medium heat for 5 minutes, ensuring even heat distribution for a perfectly baked cornbread.
- In a large bowl, whisk together the flour, cornmeal, sugar, baking powder, and salt until well combined.
- In a separate bowl, mix the milk, melted butter, and egg until smooth. Tip: Ensure the butter is cooled slightly to avoid cooking the egg.
- Pour the wet ingredients into the dry ingredients, stirring just until combined. Tip: Overmixing can lead to dense cornbread, so mix until the ingredients are just incorporated.
- Pour the batter into the preheated Dutch oven, smoothing the top with a spatula. Cover with the lid.
- Bake for 20-25 minutes, or until the top is golden brown and a toothpick inserted into the center comes out clean. Tip: For a crispier top, remove the lid during the last 5 minutes of baking.
Perfectly balancing sweetness and texture, this cornbread boasts a moist interior with a delightfully crisp crust. Serve it warm with a drizzle of honey or a pat of butter for an extra indulgent treat, or pair it with your favorite chili for a hearty meal.
Dutch Oven Beef Stew for Camping

Venturing into the great outdoors doesn’t mean you have to compromise on savoring a hearty, home-cooked meal. This Dutch Oven Beef Stew is a testament to the fact that camping cuisine can be both rustic and refined, offering a symphony of flavors that meld beautifully under the open sky.
Ingredients
- For the stew:
- 2 lbs beef chuck, cut into 1-inch cubes
- 2 tbsp olive oil
- 1 large onion, diced
- 3 cloves garlic, minced
- 4 carrots, peeled and sliced into 1-inch pieces
- 3 celery stalks, sliced into 1-inch pieces
- 4 cups beef broth
- 2 tbsp tomato paste
- 1 tsp dried thyme
- 1 tsp dried rosemary
- Salt and pepper to taste
- For thickening:
- 2 tbsp all-purpose flour
- 1/4 cup water
Instructions
- Heat the olive oil in a Dutch oven over medium-high heat until shimmering, about 2 minutes.
- Add the beef cubes in a single layer, working in batches if necessary, and sear until browned on all sides, about 3-4 minutes per batch. Remove and set aside.
- In the same pot, add the diced onion and minced garlic, sautéing until translucent and fragrant, about 2 minutes.
- Stir in the carrots and celery, cooking for an additional 3 minutes to soften slightly.
- Return the beef to the pot, along with any accumulated juices.
- Pour in the beef broth and stir in the tomato paste, thyme, and rosemary. Bring to a simmer.
- Reduce heat to low, cover, and let simmer for 1.5 hours, stirring occasionally, until the beef is tender.
- In a small bowl, whisk together the flour and water to create a slurry. Stir this into the stew to thicken, cooking for an additional 10 minutes.
- Season with salt and pepper to taste before serving.
When the stew is ready, the beef should be fork-tender, and the vegetables perfectly softened, creating a harmonious blend of textures. Serve it with a crusty bread to soak up the rich, savory broth, or over a bed of creamy mashed potatoes for an extra comforting meal under the stars.
Dutch Oven Camping Pizza
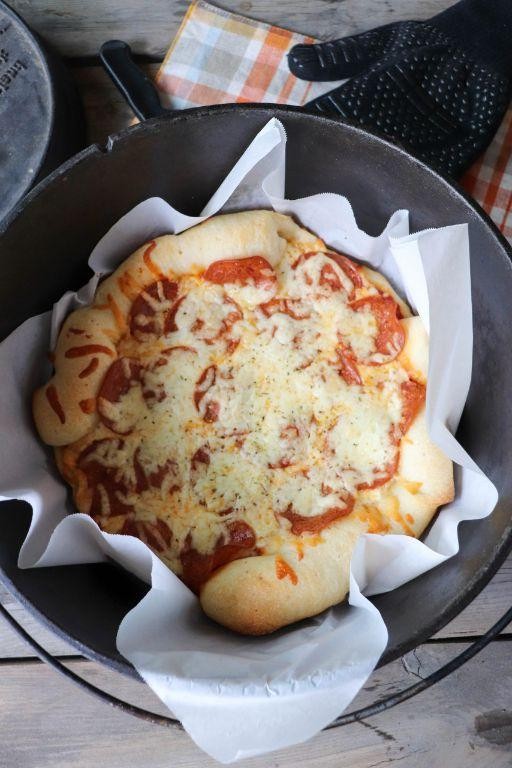
Savory aromas wafting through the crisp outdoor air signal the beginning of a culinary adventure with this Dutch Oven Camping Pizza, a rustic yet refined dish that marries the simplicity of campfire cooking with the sophistication of artisanal pizza.
Ingredients
- For the crust:
- 2 cups all-purpose flour
- 1 tbsp sugar
- 1 tsp salt
- 1 tbsp active dry yeast
- 3/4 cup warm water (110°F)
- 2 tbsp olive oil
- For the sauce:
- 1 cup tomato sauce
- 1 tsp dried oregano
- 1/2 tsp garlic powder
- For the toppings:
- 1 cup shredded mozzarella cheese
- 1/2 cup pepperoni slices
- 1/4 cup sliced black olives
Instructions
- In a large bowl, combine the flour, sugar, salt, and yeast for the crust.
- Gradually add the warm water and olive oil to the dry ingredients, stirring until a dough forms.
- Knead the dough on a floured surface for 5 minutes until smooth and elastic. Tip: The dough should spring back when lightly pressed.
- Cover the dough with a damp cloth and let it rise in a warm place for 1 hour, or until doubled in size.
- Preheat your Dutch oven over the campfire to 400°F for about 10 minutes.
- Punch down the dough and press it into the bottom of the preheated Dutch oven to form the crust.
- Spread the tomato sauce evenly over the crust, then sprinkle with oregano and garlic powder.
- Layer the mozzarella cheese, pepperoni, and black olives on top of the sauce.
- Cover the Dutch oven with its lid and bake over the campfire for 20 minutes, or until the crust is golden and the cheese is bubbly. Tip: Rotate the Dutch oven occasionally for even cooking.
- Remove the pizza from the Dutch oven and let it cool for 5 minutes before slicing. Tip: Use a pizza cutter or sharp knife for clean slices.
Unbelievably crispy on the outside yet tender within, this Dutch Oven Camping Pizza boasts a smoky flavor profile that’s perfectly complemented by the tangy tomato sauce and rich, melted cheese. Serve it straight from the Dutch oven for a communal dining experience under the stars.
Dutch Oven Chicken and Dumplings

Brimming with comfort and nostalgia, this Dutch Oven Chicken and Dumplings recipe transforms simple ingredients into a hearty, soul-warming meal. Perfect for chilly evenings, it combines tender chicken, fluffy dumplings, and a rich, savory broth that’s sure to delight.
Ingredients
- For the chicken:
- 1 whole chicken (about 4 lbs), cut into pieces
- 2 tbsp olive oil
- 1 tsp salt
- 1/2 tsp black pepper
- For the broth:
- 6 cups water
- 1 onion, chopped
- 2 carrots, sliced
- 2 celery stalks, sliced
- 2 garlic cloves, minced
- 1 tsp thyme
- 1 bay leaf
- For the dumplings:
- 2 cups all-purpose flour
- 1 tbsp baking powder
- 1/2 tsp salt
- 3/4 cup milk
- 2 tbsp unsalted butter, melted
Instructions
- Heat the olive oil in a large Dutch oven over medium-high heat. Season the chicken pieces with salt and pepper, then brown them in the oil, about 5 minutes per side. Remove and set aside.
- In the same pot, add the onion, carrots, celery, and garlic. Sauté until softened, about 5 minutes.
- Return the chicken to the pot. Add water, thyme, and bay leaf. Bring to a boil, then reduce heat to low, cover, and simmer for 1 hour.
- While the chicken cooks, prepare the dumplings. In a bowl, whisk together flour, baking powder, and salt. Stir in milk and melted butter until just combined.
- After the chicken has simmered, remove it from the pot. Shred the meat, discarding bones and skin, then return the meat to the broth.
- Drop tablespoon-sized portions of the dumpling dough into the simmering broth. Cover and cook for 15 minutes without lifting the lid.
- Remove the bay leaf before serving. Tip: For extra flavor, garnish with fresh parsley.
Unbelievably tender and flavorful, this dish offers a perfect balance of textures, from the silky broth to the pillowy dumplings. Serve it in deep bowls with a side of crusty bread for dipping into the rich broth.
Camping Dutch Oven Lasagna
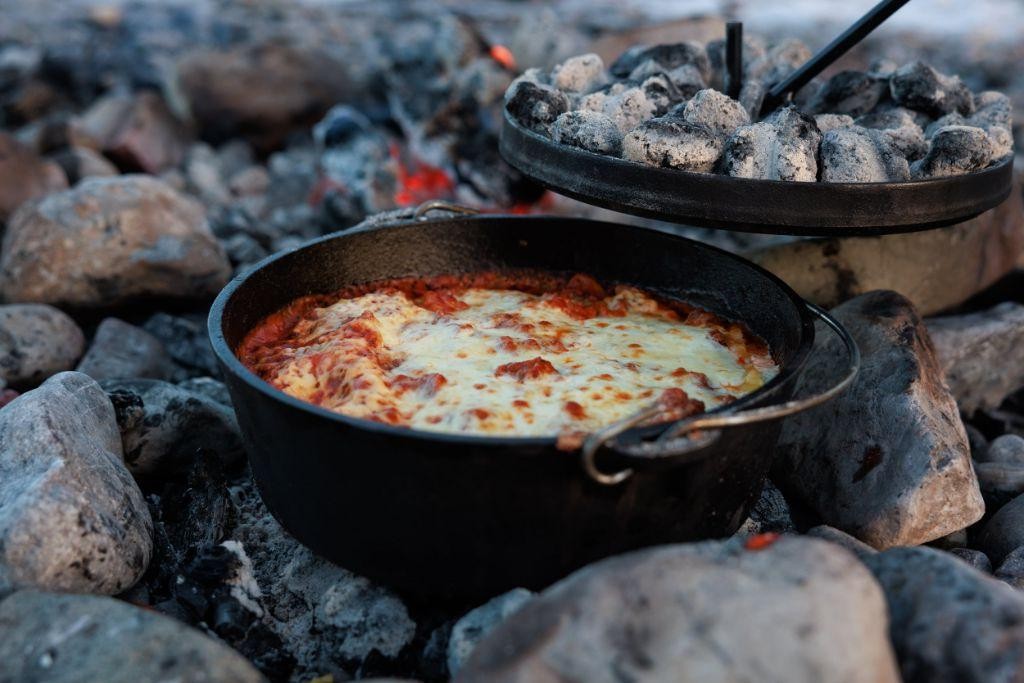
There’s something undeniably magical about combining the rustic charm of camping with the comforting layers of a classic lasagna, all crafted in the great outdoors with a Dutch oven.
Ingredients
- For the sauce:
- 1 tbsp olive oil
- 1 lb ground beef
- 1/2 cup diced onions
- 2 cloves garlic, minced
- 24 oz marinara sauce
- 1 tsp dried basil
- 1 tsp dried oregano
- For the lasagna:
- 9 lasagna noodles, uncooked
- 15 oz ricotta cheese
- 1 egg
- 2 cups shredded mozzarella cheese
- 1/2 cup grated Parmesan cheese
Instructions
- Heat the olive oil in a Dutch oven over medium heat until shimmering, about 2 minutes.
- Add the ground beef, breaking it apart with a spoon, and cook until no longer pink, approximately 5 minutes.
- Stir in the diced onions and minced garlic, cooking until the onions are translucent, about 3 minutes.
- Pour in the marinara sauce, basil, and oregano, stirring to combine. Simmer for 10 minutes, then remove from heat.
- In a separate bowl, mix the ricotta cheese and egg until well combined.
- Layer 3 lasagna noodles at the bottom of the Dutch oven, breaking them to fit if necessary.
- Spread half of the ricotta mixture over the noodles, followed by a third of the mozzarella and Parmesan cheeses.
- Repeat the layers, ending with a final layer of noodles and the remaining sauce and cheeses.
- Cover the Dutch oven and bake at 375°F for 45 minutes, then uncover and bake for an additional 15 minutes until the cheese is bubbly and golden.
- Let the lasagna rest for 10 minutes before serving to allow the layers to set.
Every bite of this camping Dutch oven lasagna offers a harmonious blend of creamy ricotta, savory beef, and tangy marinara, all encased in tender noodles. Serve it straight from the Dutch oven under the stars for an unforgettable outdoor dining experience.
Dutch Oven Campfire Cobbler

Zestfully combining the rustic charm of campfire cooking with the sophistication of a classic dessert, this Dutch Oven Campfire Cobbler marries juicy, bubbling fruit with a golden, biscuit-like topping. Perfect for al fresco dining, it’s a testament to the magic that happens when simplicity meets elegance under the open sky.
Ingredients
- For the fruit filling:
- 4 cups mixed berries (strawberries, blueberries, raspberries)
- 1/2 cup granulated sugar
- 1 tbsp lemon juice
- 1 tsp vanilla extract
- For the cobbler topping:
- 1 cup all-purpose flour
- 1/4 cup granulated sugar
- 1 1/2 tsp baking powder
- 1/4 tsp salt
- 1/2 cup milk
- 1/4 cup unsalted butter, melted
Instructions
- Prepare your campfire to have a steady, medium heat, ensuring you have a good bed of coals for even cooking.
- In the Dutch oven, combine the mixed berries, 1/2 cup sugar, lemon juice, and vanilla extract, stirring gently to mix.
- Place the Dutch oven over the campfire, allowing the fruit mixture to come to a simmer, stirring occasionally, for about 10 minutes until the berries soften and release their juices.
- While the fruit cooks, in a separate bowl, whisk together the flour, 1/4 cup sugar, baking powder, and salt for the topping.
- Add the milk and melted butter to the dry ingredients, stirring just until combined to avoid overworking the dough.
- Drop spoonfuls of the dough over the simmering fruit, covering as much surface area as possible.
- Cover the Dutch oven with its lid and place it over the campfire, using coals on the lid to create an oven-like environment. Cook for 20-25 minutes, or until the topping is golden and a toothpick inserted comes out clean.
- Remove from heat and let stand for 5 minutes before serving to allow the filling to thicken slightly.
Velvety and vibrant, this cobbler boasts a contrast of textures from the tender fruit to the crisp topping. Serve it warm with a dollop of whipped cream or a scoop of vanilla ice cream for an indulgent twist under the stars.
Dutch Oven Breakfast Bake for Camping
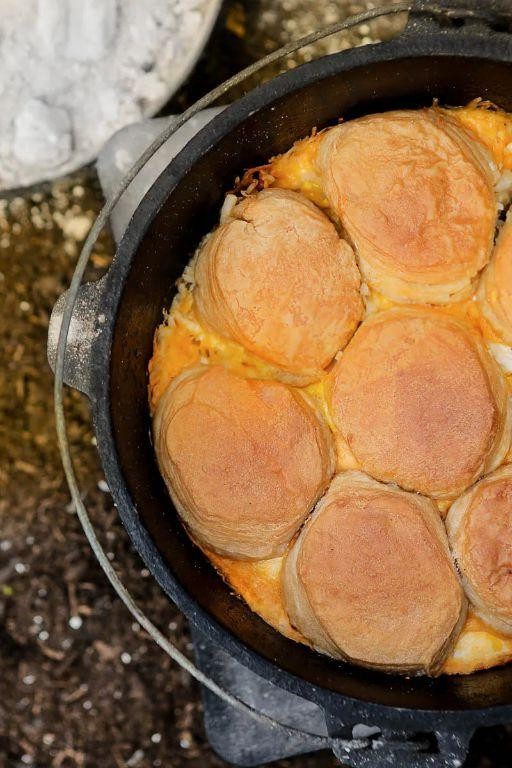
Zestfully embracing the great outdoors doesn’t mean sacrificing a gourmet breakfast. This Dutch Oven Breakfast Bake combines the rustic charm of camping with the sophistication of a brunch-worthy dish, layered with flavors that awaken the senses as beautifully as the dawn.
Ingredients
- For the base:
- 6 large eggs
- 1 cup whole milk
- 1 tbsp olive oil
- For the filling:
- 1 cup diced potatoes
- 1/2 cup diced onions
- 1/2 cup diced bell peppers
- 1 cup shredded cheddar cheese
- 1/2 lb cooked sausage, crumbled
- For seasoning:
- 1 tsp salt
- 1/2 tsp black pepper
- 1/2 tsp garlic powder
Instructions
- Preheat your Dutch oven over medium heat (about 350°F) for 5 minutes to ensure even cooking.
- Add 1 tbsp olive oil to the Dutch oven, followed by diced potatoes, onions, and bell peppers. Sauté for 10 minutes until the vegetables are tender, stirring occasionally to prevent sticking.
- In a large bowl, whisk together 6 large eggs, 1 cup whole milk, 1 tsp salt, 1/2 tsp black pepper, and 1/2 tsp garlic powder until fully combined.
- Layer the cooked sausage and shredded cheddar cheese over the sautéed vegetables in the Dutch oven.
- Pour the egg mixture evenly over the sausage and cheese, ensuring all ingredients are submerged.
- Cover the Dutch oven with its lid and bake at 350°F for 25 minutes, or until the eggs are set and the top is lightly golden.
- Let the bake rest for 5 minutes before serving to allow the layers to set properly, making it easier to slice.
Yieldingly rich and hearty, this breakfast bake offers a delightful contrast between the creamy egg base and the crispy, cheese-laden top. Serve it straight from the Dutch oven for a communal camping feast, or plate it with a side of fresh fruit for a touch of brightness.
Dutch Oven Camping Mac and Cheese
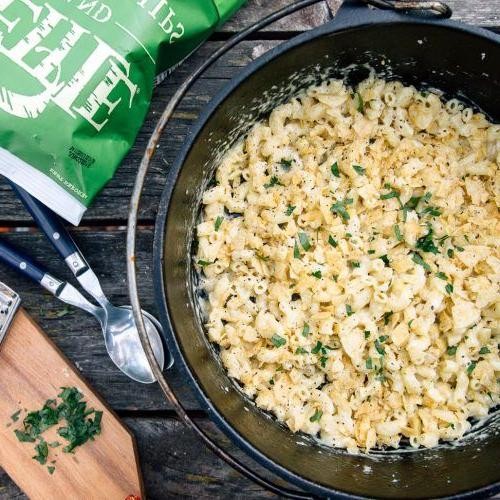
Venturing into the great outdoors doesn’t mean you have to compromise on indulgent, home-style cooking. This Dutch Oven Camping Mac and Cheese combines the rustic charm of campfire cooking with the creamy, comforting flavors of a classic macaroni and cheese, elevated with a smoky depth that only an open flame can provide.
Ingredients
- For the pasta:
- 1 pound elbow macaroni
- 4 quarts water
- 1 tablespoon salt
- For the sauce:
- 4 tablespoons unsalted butter
- 1/4 cup all-purpose flour
- 2 cups whole milk
- 2 cups heavy cream
- 1 teaspoon mustard powder
- 1/2 teaspoon smoked paprika
- 1/2 teaspoon garlic powder
- Salt to taste
- For the cheese mixture:
- 2 cups sharp cheddar cheese, shredded
- 1 cup Gruyère cheese, shredded
- For the topping:
- 1/2 cup panko breadcrumbs
- 2 tablespoons melted butter
Instructions
- Bring 4 quarts of water to a rolling boil in a large pot over your campfire or camping stove. Add 1 tablespoon of salt and the elbow macaroni. Cook for 8 minutes, stirring occasionally, until al dente. Drain and set aside.
- In the same pot, melt 4 tablespoons of unsalted butter over medium heat. Whisk in 1/4 cup of all-purpose flour to form a roux, cooking for 2 minutes until golden.
- Gradually whisk in 2 cups of whole milk and 2 cups of heavy cream, ensuring no lumps remain. Stir in 1 teaspoon of mustard powder, 1/2 teaspoon of smoked paprika, and 1/2 teaspoon of garlic powder. Simmer for 5 minutes until the sauce thickens.
- Remove the pot from the heat and stir in 2 cups of sharp cheddar cheese and 1 cup of Gruyère cheese until fully melted and smooth. Season with salt to taste.
- Fold the cooked macaroni into the cheese sauce until evenly coated. Transfer the mixture to a greased Dutch oven.
- In a small bowl, mix 1/2 cup of panko breadcrumbs with 2 tablespoons of melted butter. Sprinkle evenly over the mac and cheese.
- Cover the Dutch oven with its lid and place it over a bed of hot coals. Bake for 20 minutes, then remove the lid and bake for an additional 5 minutes until the topping is golden and crispy.
Hearty and rich, this Dutch Oven Camping Mac and Cheese boasts a velvety sauce enveloping each noodle, crowned with a buttery, crisp topping. Serve it straight from the Dutch oven under the stars, or alongside a crisp green salad for a touch of freshness.
Dutch Oven Pork Roast for Camping
Elevate your outdoor dining experience with this Dutch Oven Pork Roast, a dish that marries the rustic charm of camping with the sophistication of gourmet cooking. Perfectly tender and infused with aromatic herbs, this roast promises to be the centerpiece of your alfresco feast.
Ingredients
- For the marinade:
- 1/4 cup olive oil
- 2 tbsp apple cider vinegar
- 1 tbsp Dijon mustard
- 2 cloves garlic, minced
- 1 tsp salt
- 1/2 tsp black pepper
- 1 tsp dried rosemary
- For the roast:
- 3 lbs pork shoulder
- 1 large onion, sliced
- 2 carrots, chopped
- 2 cups chicken broth
Instructions
- In a bowl, whisk together olive oil, apple cider vinegar, Dijon mustard, minced garlic, salt, black pepper, and dried rosemary to create the marinade.
- Place the pork shoulder in a large resealable bag and pour the marinade over it. Seal the bag and refrigerate for at least 4 hours, or overnight for best results.
- Preheat your Dutch oven over medium-high heat. Remove the pork from the marinade, reserving the marinade, and sear the pork on all sides until golden brown, about 3-4 minutes per side.
- Add the sliced onion and chopped carrots around the pork in the Dutch oven. Pour the reserved marinade and chicken broth over the pork and vegetables.
- Cover the Dutch oven with its lid and transfer to a preheated 350°F campfire or grill. Cook for 2.5 to 3 hours, or until the pork is fork-tender.
- For a crispy exterior, remove the lid during the last 30 minutes of cooking to allow the pork to brown further.
- Let the roast rest for 10 minutes before slicing. This allows the juices to redistribute, ensuring a moist and flavorful dish.
This Dutch Oven Pork Roast emerges succulent and richly flavored, with the vegetables offering a sweet contrast to the savory meat. Try serving it atop a bed of creamy polenta or with a side of crusty bread to soak up the delicious juices.
Dutch Oven Camping Potatoes
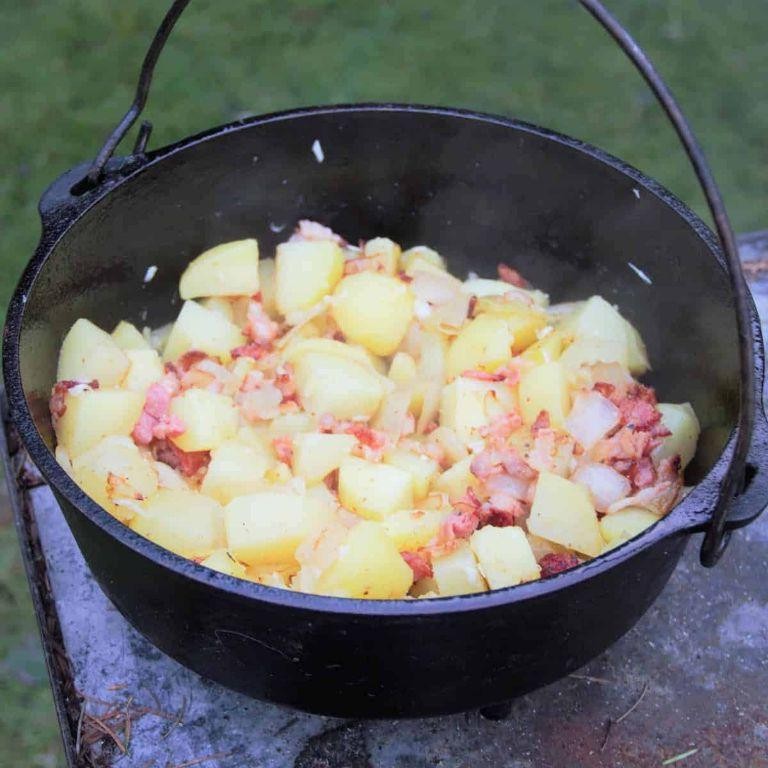
Venturing into the great outdoors doesn’t mean leaving behind the comforts of gourmet cooking. These Dutch Oven Camping Potatoes are a testament to that, offering a harmonious blend of rustic charm and refined flavors, perfect for elevating your campfire dining experience.
Ingredients
- For the potatoes:
- 2 lbs baby potatoes, halved
- 2 tbsp olive oil
- 1 tsp salt
- 1/2 tsp black pepper
- For the seasoning:
- 1 tbsp garlic powder
- 1 tbsp onion powder
- 1 tsp smoked paprika
- For garnish:
- 1/4 cup fresh parsley, chopped
Instructions
- Preheat your Dutch oven over medium campfire coals for about 10 minutes to ensure even cooking.
- In a large bowl, toss the halved baby potatoes with olive oil, salt, and black pepper until evenly coated.
- Add the garlic powder, onion powder, and smoked paprika to the bowl, tossing again to ensure the potatoes are well seasoned.
- Transfer the seasoned potatoes to the preheated Dutch oven, spreading them out in a single layer for optimal crispiness.
- Cover the Dutch oven with its lid and cook for 20 minutes, then stir the potatoes to promote even browning.
- Continue cooking covered for another 20 minutes, or until the potatoes are fork-tender and golden brown.
- Remove from heat, sprinkle with chopped fresh parsley, and serve immediately.
Perfectly crisp on the outside yet tender within, these Dutch Oven Camping Potatoes boast a smoky depth that pairs wonderfully with grilled meats or as a standalone vegetarian delight. For an extra touch of luxury, drizzle with truffle oil before serving.
Dutch Oven Campfire Bread
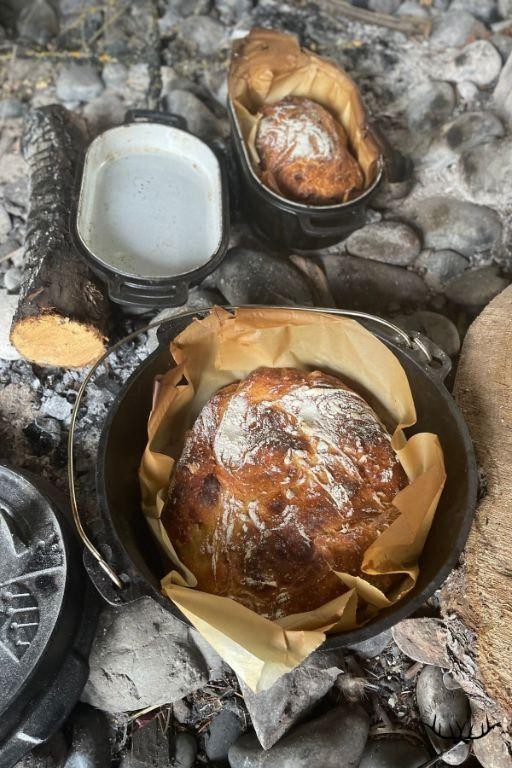
Yearning for the rustic charm of homemade bread with the smoky allure of a campfire? This Dutch Oven Campfire Bread combines the simplicity of traditional baking with the adventurous spirit of outdoor cooking, resulting in a loaf that’s irresistibly crusty on the outside and tender within.
Ingredients
- For the dough:
- 3 cups all-purpose flour
- 1 tsp salt
- 1 tbsp sugar
- 1 packet (2 1/4 tsp) active dry yeast
- 1 1/4 cups warm water (110°F)
- 2 tbsp olive oil
Instructions
- In a large bowl, whisk together the flour, salt, and sugar.
- Dissolve the yeast in warm water (110°F) and let it sit for 5 minutes until frothy.
- Add the yeast mixture and olive oil to the dry ingredients, stirring until a shaggy dough forms.
- Turn the dough onto a floured surface and knead for 10 minutes until smooth and elastic.
- Place the dough in a greased bowl, cover with a damp cloth, and let rise in a warm place for 1 hour or until doubled in size.
- Punch down the dough and shape it into a round loaf. Let it rest for 10 minutes.
- Preheat a Dutch oven over a campfire or grill to 450°F for 10 minutes.
- Place the dough in the preheated Dutch oven, cover with the lid, and bake for 30 minutes.
- Remove the lid and bake for an additional 10-15 minutes until the bread is golden brown and sounds hollow when tapped.
- Transfer the bread to a wire rack to cool for at least 15 minutes before slicing.
Fresh from the oven, this bread boasts a crackling crust and a soft, airy interior, perfect for slathering with butter or dipping into hearty stews. For an extra touch, serve warm with a drizzle of honey or a sprinkle of sea salt.
Dutch Oven Camping Goulash
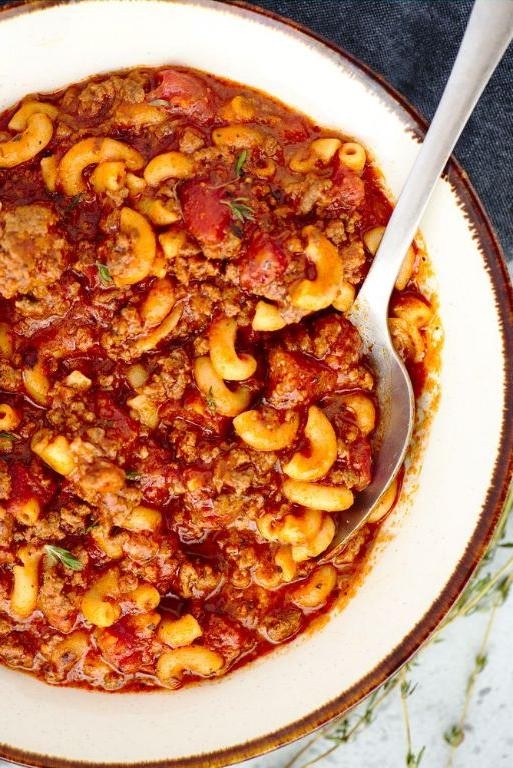
Kickstart your outdoor culinary adventure with this Dutch Oven Camping Goulash, a hearty and flavorful dish that combines the rustic charm of campfire cooking with the sophistication of gourmet flavors. Perfect for chilly evenings under the stars, this goulash is a testament to the magic of simple ingredients transformed into something extraordinary.
Ingredients
- For the base:
- 2 tbsp olive oil
- 1 large onion, diced
- 2 cloves garlic, minced
- 1 lb ground beef
- For the seasoning:
- 1 tbsp paprika
- 1 tsp caraway seeds
- Salt and pepper
- For the vegetables and liquid:
- 2 bell peppers, diced
- 2 cups diced tomatoes
- 2 cups beef broth
- 2 cups elbow macaroni
Instructions
- Heat the olive oil in a Dutch oven over medium heat until shimmering, about 2 minutes.
- Add the diced onion and minced garlic, sautéing until translucent, approximately 5 minutes.
- Increase the heat to medium-high and add the ground beef, breaking it apart with a spoon, and cook until browned, about 7 minutes.
- Stir in the paprika, caraway seeds, salt, and pepper, coating the beef evenly, for 1 minute.
- Add the diced bell peppers and tomatoes, cooking until the peppers soften, about 5 minutes.
- Pour in the beef broth and bring the mixture to a boil, then reduce the heat to a simmer.
- Add the elbow macaroni, stirring occasionally, and cook until al dente, about 10 minutes. Tip: Ensure the macaroni is submerged in the liquid for even cooking.
- Remove from heat and let stand for 5 minutes before serving. Tip: The goulash will thicken as it cools slightly.
Savor the rich, smoky flavors and tender textures of this Dutch Oven Camping Goulash, a dish that promises warmth and satisfaction with every bite. Serve it with a sprinkle of fresh parsley or a side of crusty bread to soak up the savory sauce.
Dutch Oven Chicken Pot Pie for Camping
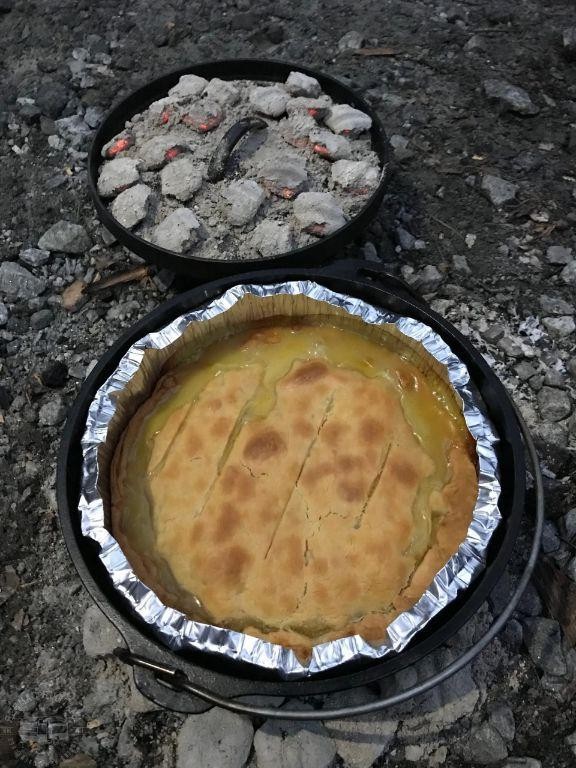
Just imagine the comfort of a homemade chicken pot pie, but with the rustic charm of being cooked over a campfire. This Dutch Oven Chicken Pot Pie combines the heartiness of tender chicken, vibrant vegetables, and a flaky crust, all melded together under the open sky.
Ingredients
- For the filling:
- 2 cups cooked chicken, shredded
- 1 cup carrots, diced
- 1 cup potatoes, diced
- 1/2 cup peas
- 1/4 cup butter
- 1/4 cup all-purpose flour
- 2 cups chicken broth
- 1/2 cup heavy cream
- 1 tsp salt
- 1/2 tsp black pepper
- For the crust:
- 2 cups all-purpose flour
- 2/3 cup shortening
- 1/2 tsp salt
- 6-8 tbsp ice water
Instructions
- Melt butter in a Dutch oven over medium heat. Stir in flour to create a roux, cooking for 2 minutes until golden.
- Gradually whisk in chicken broth and heavy cream, ensuring no lumps remain. Bring to a simmer.
- Add chicken, carrots, potatoes, peas, salt, and pepper. Simmer for 15 minutes, stirring occasionally, until vegetables are tender.
- While the filling simmers, prepare the crust. Mix flour and salt, then cut in shortening until the mixture resembles coarse crumbs.
- Add ice water one tablespoon at a time, mixing until the dough comes together. Roll out on a floured surface to fit the Dutch oven.
- Pour the filling into the Dutch oven, then place the crust on top. Cut slits in the crust to vent.
- Cover with the Dutch oven lid and bake at 375°F for 25 minutes, or until the crust is golden brown.
Zesty and satisfying, this Dutch Oven Chicken Pot Pie offers a delightful contrast between the creamy filling and the crisp, buttery crust. Serve it straight from the Dutch oven for a truly communal camping meal, or pair with a light salad for a balanced feast under the stars.
Dutch Oven Camping Jambalaya
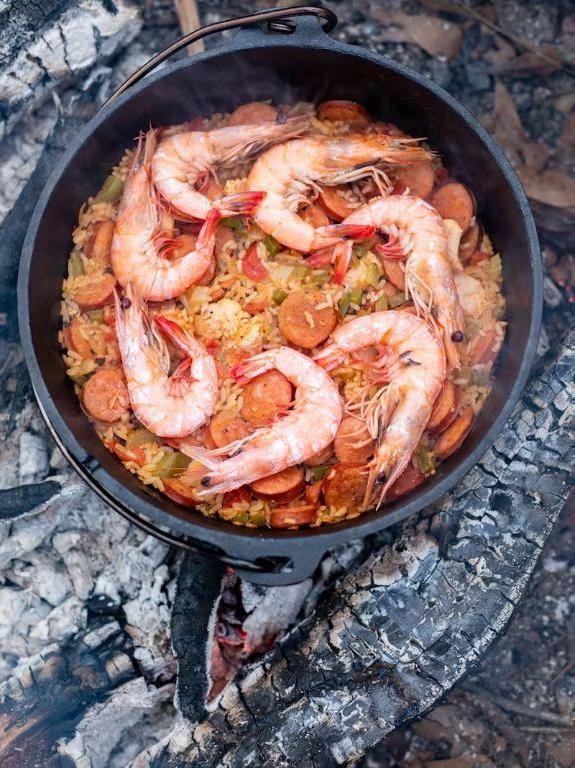
Amidst the serene backdrop of a crackling campfire, our Dutch Oven Camping Jambalaya emerges as a symphony of flavors, blending the rustic charm of outdoor cooking with the sophistication of Creole cuisine. This one-pot wonder is a testament to the art of simplicity, where each ingredient plays a pivotal role in creating a dish that’s as vibrant as the flames it’s cooked over.
Ingredients
- For the base: 2 tbsp olive oil, 1 cup diced onion, 1 cup diced green bell pepper, 1 cup diced celery, 3 cloves minced garlic
- For the protein: 1 lb andouille sausage, sliced, 1 lb chicken thighs, diced
- For the rice: 2 cups long-grain white rice, 4 cups chicken broth
- For the seasoning: 1 tbsp smoked paprika, 1 tsp cayenne pepper, 1 tsp dried thyme, 1 tsp dried oregano, 1 bay leaf, salt to taste
- For garnish: 1/4 cup chopped green onions, 1/4 cup chopped fresh parsley
Instructions
- Heat the olive oil in a Dutch oven over medium heat until shimmering, about 2 minutes.
- Add the onion, bell pepper, celery, and garlic, sautéing until softened, approximately 5 minutes.
- Push the vegetables to one side and add the andouille sausage and chicken thighs, browning on all sides, about 5 minutes per side.
- Stir in the rice, ensuring it’s well-coated with the oil and juices, for about 2 minutes.
- Pour in the chicken broth, then add the smoked paprika, cayenne pepper, thyme, oregano, bay leaf, and salt, stirring to combine.
- Bring the mixture to a boil, then reduce the heat to low, cover, and simmer for 25 minutes, or until the rice is tender and the liquid is absorbed.
- Remove from heat and let stand, covered, for 5 minutes to allow the flavors to meld.
- Discard the bay leaf, then fluff the jambalaya with a fork before garnishing with green onions and parsley.
Lusciously layered with smoky, spicy, and herbaceous notes, this jambalaya boasts a texture that’s perfectly al dente, with each grain of rice distinct yet harmoniously united. Serve it straight from the Dutch oven for a communal dining experience that’s as unforgettable as the great outdoors.
Dutch Oven Campfire Nachos
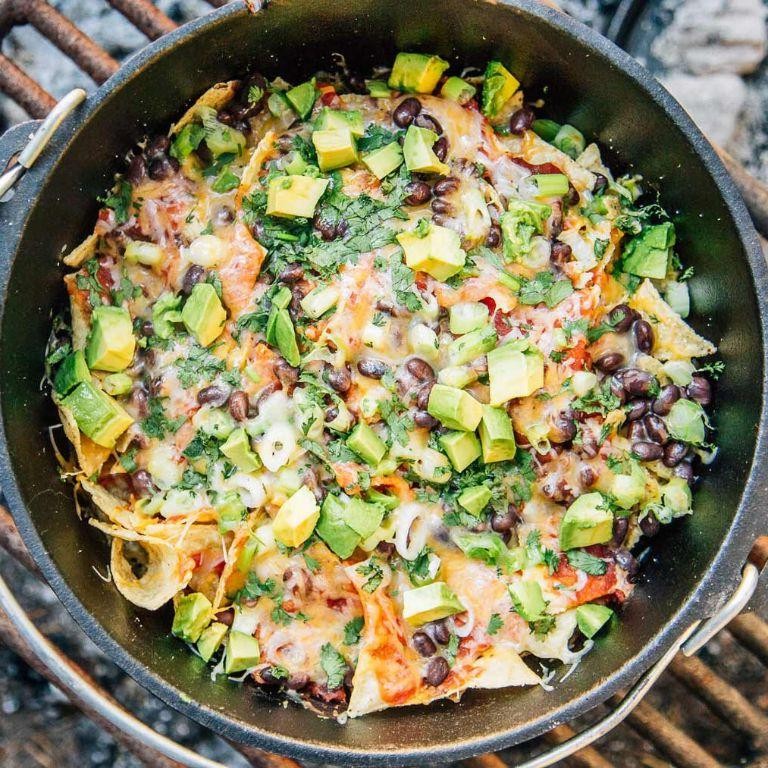
Perfect for those evenings under the stars, Dutch Oven Campfire Nachos combine the rustic charm of outdoor cooking with the indulgent flavors of a beloved snack. Layered with crisp tortilla chips, melted cheese, and a medley of toppings, this dish is a celebration of texture and taste, designed to bring people together around the fire.
Ingredients
- For the base:
- 1 bag (13 oz) tortilla chips
- 2 cups shredded cheddar cheese
- 1 cup shredded Monterey Jack cheese
- For the toppings:
- 1/2 cup diced tomatoes
- 1/4 cup sliced black olives
- 1/4 cup diced red onion
- 1/4 cup chopped cilantro
- 1 jalapeño, thinly sliced (optional)
- For serving:
- 1/2 cup sour cream
- 1/2 cup guacamole
Instructions
- Preheat your Dutch oven by placing it over the campfire for about 10 minutes, ensuring it’s hot enough to melt the cheese but not burn the chips.
- Layer half of the tortilla chips at the bottom of the Dutch oven, followed by half of the cheddar and Monterey Jack cheeses. Repeat the layers with the remaining chips and cheeses.
- Cover the Dutch oven with its lid and let the nachos cook over the campfire for 5-7 minutes, or until the cheese is fully melted and bubbly.
- Carefully remove the lid and evenly distribute the diced tomatoes, black olives, red onion, cilantro, and jalapeño slices over the melted cheese.
- Replace the lid and cook for an additional 2-3 minutes, just enough to warm the toppings.
- Serve the nachos directly from the Dutch oven, accompanied by sour cream and guacamole on the side for dipping.
Delightfully crunchy with a gooey cheese pull, these nachos offer a smoky depth from the campfire, balanced by the freshness of the toppings. For an extra touch, drizzle with hot sauce or sprinkle with lime zest before serving to elevate the flavors further.
Dutch Oven Camping Beef Brisket
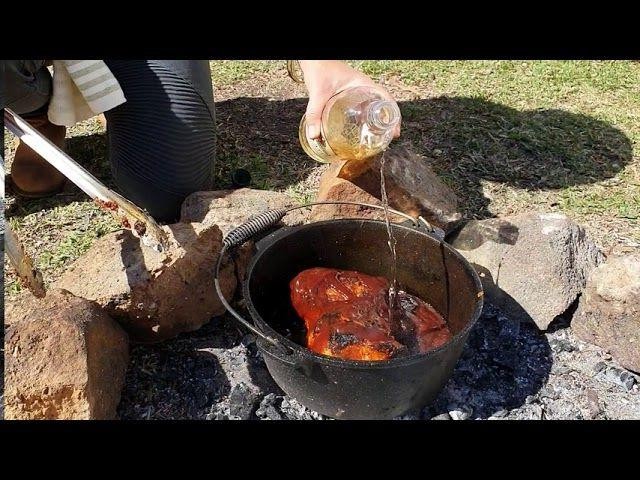
Perfectly tender and richly flavored, this Dutch Oven Camping Beef Brisket transforms outdoor cooking into a gourmet experience, melding smoky depth with succulent meat that falls apart at the touch of a fork.
Ingredients
- For the brisket:
- 1 (4 to 5-pound) beef brisket
- 2 tbsp olive oil
- 1 tbsp salt
- 1 tbsp black pepper
- 1 tbsp garlic powder
- 1 tbsp onion powder
- For the sauce:
- 1 cup beef broth
- 1/2 cup apple cider vinegar
- 1/4 cup brown sugar
- 2 tbsp Worcestershire sauce
- 1 tbsp smoked paprika
Instructions
- Preheat your Dutch oven over medium-high heat for 5 minutes until it’s evenly hot.
- Rub the brisket evenly with olive oil, then season all sides with salt, black pepper, garlic powder, and onion powder.
- Sear the brisket in the Dutch oven for 3-4 minutes per side until a deep brown crust forms, enhancing flavor.
- In a bowl, whisk together beef broth, apple cider vinegar, brown sugar, Worcestershire sauce, and smoked paprika to create the sauce.
- Pour the sauce over the brisket in the Dutch oven, ensuring it’s well-coated.
- Cover the Dutch oven with its lid and simmer over low heat for 4-5 hours, or until the brisket reaches an internal temperature of 200°F for perfect tenderness.
- Let the brisket rest for 15 minutes before slicing against the grain to serve.
Kick back and savor the melt-in-your-mouth texture of this brisket, its smoky sweetness balanced by a tangy undertone. Serve it atop a bed of creamy mashed potatoes or tucked into a crusty roll for a hearty sandwich that celebrates the great outdoors.
Dutch Oven Camping Apple Crisp
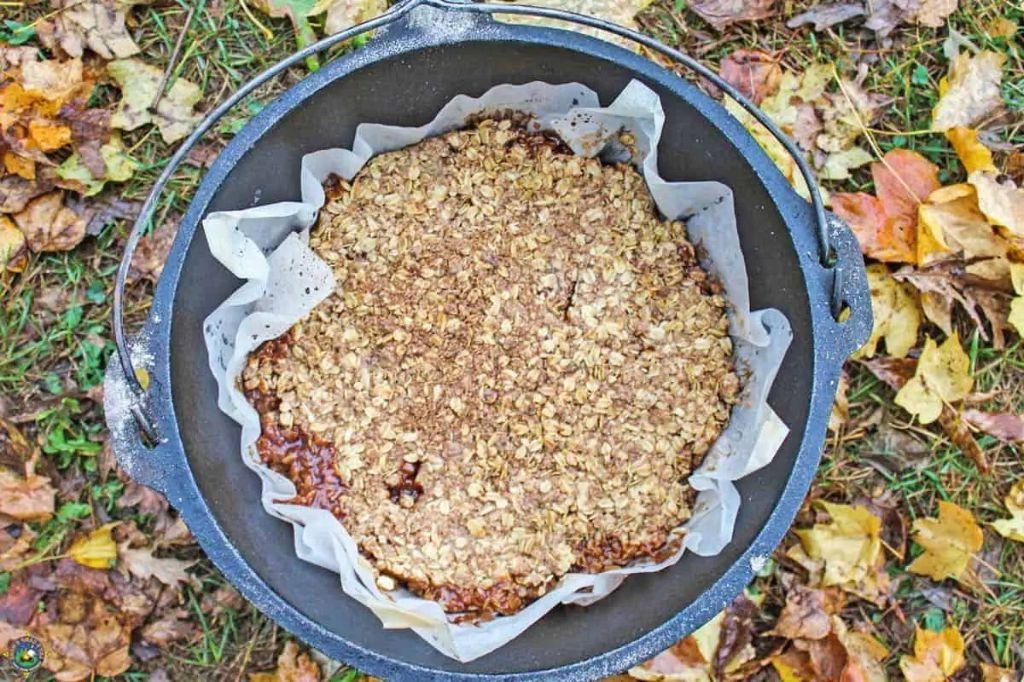
Harvest the essence of autumn with this Dutch Oven Camping Apple Crisp, a dessert that marries the simplicity of rustic cooking with the sophistication of flavor. Perfectly portable for your outdoor adventures, this dish promises a delightful contrast of tender, spiced apples beneath a golden, buttery crumble.
Ingredients
- For the apple filling:
- 6 cups thinly sliced apples (about 6 medium apples)
- 1/2 cup granulated sugar
- 1 tbsp lemon juice
- 2 tsp ground cinnamon
- 1/4 tsp ground nutmeg
- For the crisp topping:
- 1 cup all-purpose flour
- 1/2 cup rolled oats
- 1/2 cup packed brown sugar
- 1/2 cup unsalted butter, chilled and cubed
- 1/4 tsp salt
Instructions
- Preheat your Dutch oven over medium heat for 5 minutes to ensure even cooking.
- In a large bowl, combine the sliced apples, granulated sugar, lemon juice, cinnamon, and nutmeg, tossing gently to coat the apples evenly.
- Transfer the apple mixture to the preheated Dutch oven, spreading it into an even layer.
- In the same bowl, mix the flour, oats, brown sugar, and salt for the topping. Add the cubed butter, using your fingers to rub it into the dry ingredients until the mixture resembles coarse crumbs.
- Sprinkle the topping evenly over the apples in the Dutch oven.
- Cover the Dutch oven with its lid and place it over a campfire or on coals, cooking for 30 minutes. Then, remove the lid and cook for an additional 10 minutes to crisp the topping, checking occasionally to prevent burning.
- Remove from heat and let it sit for 5 minutes before serving to allow the filling to set slightly.
Zestfully served warm, this apple crisp offers a symphony of textures—from the soft, spiced apples to the crunchy, oat-laden topping. For an indulgent twist, drizzle with caramel sauce or serve alongside a scoop of vanilla ice cream under the stars.
Dutch Oven Camping Shrimp Boil
Elevate your outdoor dining experience with this Dutch Oven Camping Shrimp Boil, a dish that marries the simplicity of campfire cooking with the sophistication of a seafood feast. Perfectly seasoned shrimp, tender potatoes, and sweet corn come together in a flavorful broth that’s as easy to make as it is impressive to serve.
Ingredients
- For the broth: 4 cups water, 1/2 cup Old Bay seasoning, 2 tbsp salt
- For the vegetables: 1 lb small red potatoes, halved, 2 ears corn, shucked and halved
- For the shrimp: 1 lb large shrimp, peeled and deveined, 1 tbsp olive oil
- For serving: 1/4 cup melted butter, 1 tbsp chopped parsley
Instructions
- In a large Dutch oven, combine water, Old Bay seasoning, and salt. Bring to a boil over medium-high heat, stirring occasionally to dissolve the salt.
- Add the potatoes to the boiling broth. Cover and cook for 10 minutes, or until the potatoes are just tender when pierced with a fork.
- Add the corn to the Dutch oven. Cover and cook for another 5 minutes, ensuring the vegetables are submerged in the broth for even cooking.
- While the vegetables cook, toss the shrimp with olive oil in a bowl. This prevents them from sticking together and adds a slight richness.
- Add the shrimp to the Dutch oven, stirring gently to submerge. Cover and cook for 2-3 minutes, or until the shrimp are pink and opaque.
- Remove the Dutch oven from the heat. Drain the broth, reserving 1/2 cup for serving if desired.
- Transfer the shrimp boil to a large serving platter. Drizzle with melted butter and sprinkle with chopped parsley for a fresh, colorful finish.
Succulent shrimp, buttery potatoes, and crisp corn are the stars of this dish, each bite bursting with the bold flavors of the sea and spice. Serve it straight from the Dutch oven for a rustic presentation, or plate it elegantly with a side of crusty bread to soak up the delicious broth.
Dutch Oven Campfire Quesadillas
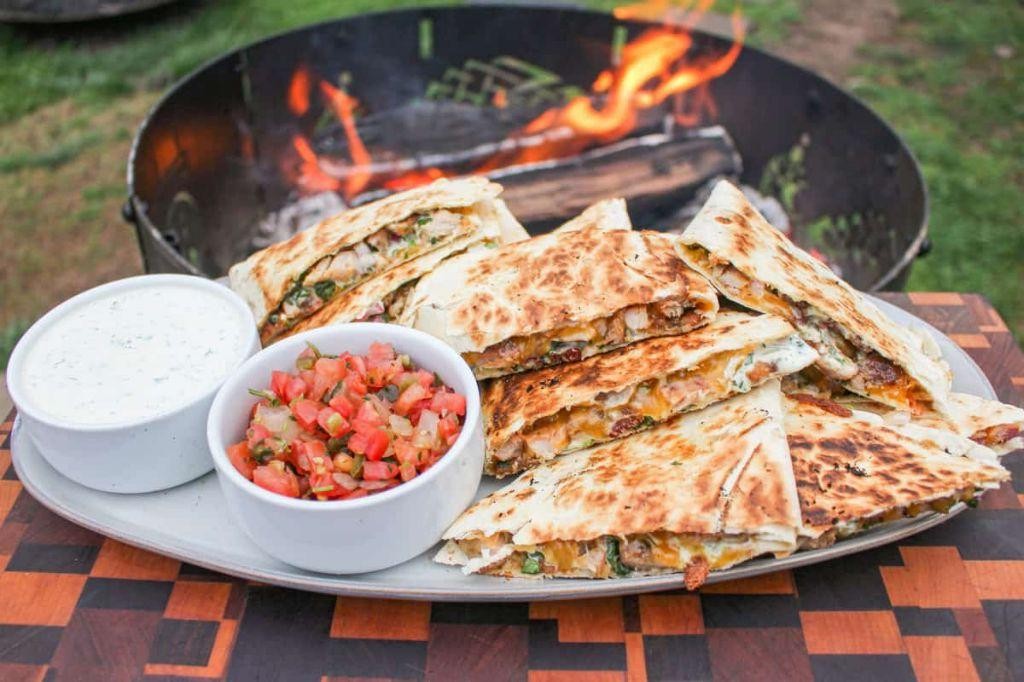
On a crisp evening under the stars, there’s nothing quite like the comforting embrace of a Dutch Oven Campfire Quesadilla, with its golden, crispy exterior giving way to a molten, cheesy interior. This dish marries the rustic charm of campfire cooking with the refined flavors of a gourmet meal, making it a standout choice for any outdoor gathering.
Ingredients
- For the quesadillas:
- 4 large flour tortillas (10-inch diameter)
- 2 cups shredded Monterey Jack cheese
- 1 cup cooked, shredded chicken
- 1/2 cup diced red bell pepper
- 1/4 cup chopped cilantro
- 2 tbsp olive oil
- For serving:
- 1/2 cup sour cream
- 1/4 cup salsa
Instructions
- Preheat your Dutch oven over the campfire to medium heat, about 350°F, for 10 minutes.
- Brush one side of each tortilla lightly with olive oil to ensure a crispy finish.
- Place one tortilla, oiled side down, in the preheated Dutch oven.
- Sprinkle 1/2 cup of Monterey Jack cheese evenly over the tortilla.
- Distribute 1/4 cup of shredded chicken, 2 tbsp of diced red bell pepper, and 1 tbsp of chopped cilantro over the cheese.
- Top with another tortilla, oiled side up, pressing down gently to adhere.
- Cover the Dutch oven and cook for 3-4 minutes, or until the bottom tortilla is golden and crispy.
- Carefully flip the quesadilla using a spatula, cover, and cook for an additional 3-4 minutes on the other side.
- Remove from the Dutch oven and let it rest for 1 minute before cutting into wedges.
- Repeat the process with the remaining ingredients to make a second quesadilla.
- Serve hot with sour cream and salsa on the side.
As the quesadilla cools slightly, the cheese achieves the perfect pull, while the cilantro adds a fresh contrast to the smoky flavors. For an extra touch of elegance, garnish with thin slices of avocado or a drizzle of lime crema before serving.
Dutch Oven Camping Pulled Pork
Perfectly tender and bursting with flavor, Dutch Oven Camping Pulled Pork is a rustic yet refined dish that transforms simple ingredients into a mouthwatering feast. Prepared over an open flame, this recipe promises a smoky depth and succulent texture that’s ideal for al fresco dining.
Ingredients
- For the rub:
- 2 tbsp brown sugar
- 1 tbsp smoked paprika
- 1 tsp garlic powder
- 1 tsp onion powder
- 1 tsp salt
- 1/2 tsp black pepper
- For the pork:
- 3 lbs pork shoulder
- 1 tbsp olive oil
- For the braising liquid:
- 1 cup apple cider vinegar
- 1/2 cup water
- 2 tbsp Worcestershire sauce
Instructions
- In a small bowl, combine all the rub ingredients: brown sugar, smoked paprika, garlic powder, onion powder, salt, and black pepper.
- Pat the pork shoulder dry with paper towels, then rub the olive oil all over it to help the spices adhere.
- Generously apply the rub mixture to the pork shoulder, ensuring it’s evenly coated on all sides.
- Heat your Dutch oven over medium-high heat until hot, about 3 minutes, then sear the pork shoulder on all sides until a golden crust forms, approximately 4 minutes per side.
- Remove the pork from the Dutch oven and set aside. Pour in the apple cider vinegar, water, and Worcestershire sauce, scraping the bottom to loosen any browned bits for added flavor.
- Return the pork to the Dutch oven, cover with the lid, and reduce the heat to low. Let it simmer gently for 4 hours, or until the pork is fork-tender.
- Once cooked, remove the pork from the Dutch oven and let it rest for 10 minutes before shredding with two forks.
- Tip: For an extra smoky flavor, add a few wood chips to the coals if cooking over a campfire. Tip: Ensure the Dutch oven is well-sealed to retain moisture during the long cooking process. Tip: Shred the pork directly in the braising liquid for added juiciness.
Unbelievably tender, the pulled pork boasts a perfect balance of sweetness and smokiness, with a melt-in-your-mouth texture that’s irresistible. Serve it piled high on soft buns with a side of tangy coleslaw, or atop a crisp green salad for a lighter option.
Conclusion
Outdoor cooking just got easier and more exciting with these 21 delicious Dutch oven camping recipes! Perfect for home cooks and outdoor enthusiasts across North America, this roundup offers something for every taste. We invite you to try these recipes on your next adventure, share your favorites in the comments, and don’t forget to pin this article on Pinterest for your future camping trips. Happy cooking!