Hosting a dinner party should be as delightful as attending one, and with our collection of 18 Elegant Dinner Party Recipes, you’re guaranteed to impress. Whether you’re crafting a cozy winter feast or a light summer soirée, these dishes are designed to dazzle your guests without keeping you tied to the kitchen. Let’s turn your next gathering into a culinary celebration that’s both effortless and unforgettable!
Herb-Crusted Rack of Lamb

Mmm, let’s talk about turning a humble rack of lamb into the star of your dinner table with a herb crust that’s so good, it’ll have your guests whispering sweet nothings to their plates.
Ingredients
- 1 rack of lamb (about 1.5 lbs) – because size does matter when it comes to impressing.
- 2 tbsp extra virgin olive oil – my liquid gold for that perfect sear.
- 1 cup breadcrumbs – the crunchier, the better, folks.
- 2 tbsp Dijon mustard – for that tangy kick that says ‘hello’.
- 2 cloves garlic, minced – vampire repellent optional.
- 1 tbsp rosemary, finely chopped – because every dish needs a little green.
- 1 tbsp thyme, finely chopped – its earthy vibe is everything.
- Salt and pepper – the dynamic duo of seasoning.
Instructions
- Preheat your oven to 375°F – let’s get this party started.
- Season the rack of lamb generously with salt and pepper – no shyness allowed.
- Heat olive oil in a skillet over medium-high heat. Sear the lamb for 2 minutes per side – we’re going for golden, not charcoal.
- Brush the lamb with Dijon mustard – this is the glue for our herb crust, so be thorough.
- Mix breadcrumbs, garlic, rosemary, thyme, salt, and pepper in a bowl. Press this mixture onto the mustard-coated lamb – pat it like you mean it.
- Transfer the lamb to a baking sheet and roast for 20 minutes for medium-rare, or until your thermometer reads 130°F – because guessing is so last season.
- Let the lamb rest for 10 minutes before slicing – patience is a virtue, especially with juicy meat.
You’ll be rewarded with a rack of lamb that’s crusty on the outside, tender on the inside, and bursting with flavors that dance. Serve it with a side of roasted veggies or atop a creamy polenta bed for that ‘wow’ factor.
Truffle Mac and Cheese
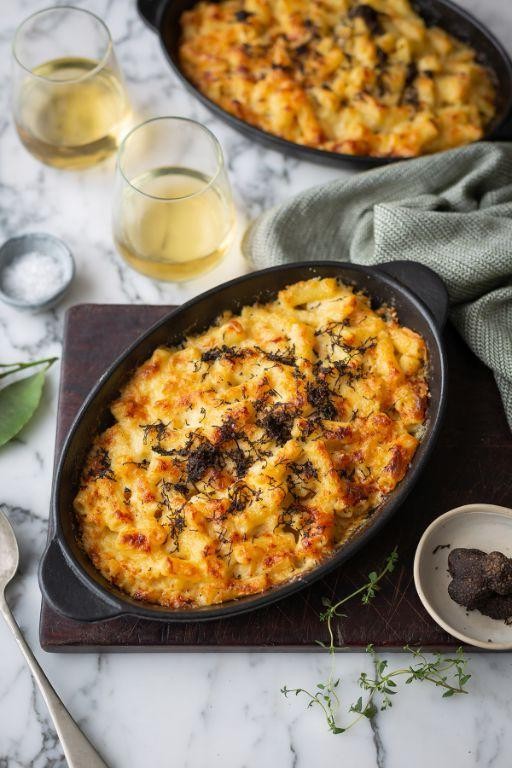
Venture into the realm of decadence with this Truffle Mac and Cheese, where comfort meets luxury in a dish that’s as indulgent as it is Instagram-worthy. Perfect for those days when you’re feeling a little fancy but still want that hug-in-a-bowl experience.
Ingredients
- 8 oz elbow macaroni (because those curves hold the cheese like a dream)
- 2 cups heavy cream (go big or go home, right?)
- 2 cups shredded sharp cheddar cheese (the sharper, the better for that punch of flavor)
- 1 cup grated Parmesan cheese (the salty, nutty backbone of our dish)
- 2 tbsp truffle oil (the star of the show, make it good quality)
- 1 tsp salt (just enough to make the flavors pop)
- 1/2 tsp black pepper (freshly ground, because we’re not savages)
- 1/2 cup panko breadcrumbs (for that irresistible crunch)
- 2 tbsp unsalted butter (because everything’s better with butter)
Instructions
- Preheat your oven to 375°F (190°C) – no one likes a lukewarm mac and cheese.
- Cook the macaroni according to package instructions until al dente, then drain and set aside. Tip: Salt your pasta water like the sea for maximum flavor.
- In a large saucepan, heat the heavy cream over medium heat until it just begins to simmer. Keep an eye on it – cream has a tendency to throw a party and boil over when you’re not looking.
- Reduce the heat to low and gradually whisk in the cheddar and Parmesan cheeses until smooth and creamy. Tip: Add the cheese slowly to avoid a clumpy mess.
- Stir in the truffle oil, salt, and pepper, then fold in the cooked macaroni until every nook and cranny is coated in cheesy goodness.
- Transfer the mixture to a greased baking dish. Tip: A light spray of cooking oil ensures your mac and cheese doesn’t stick around longer than you want it to.
- In a small bowl, mix the panko breadcrumbs with melted butter, then sprinkle evenly over the macaroni. This is your golden ticket to crunch town.
- Bake for 20-25 minutes, or until the top is golden and the sauce is bubbly. Let it rest for 5 minutes before serving – patience is a virtue, especially with cheese.
Out of the oven, this Truffle Mac and Cheese is a masterpiece of creamy, cheesy, truffle-y bliss with a crispy top that’ll have you digging in for seconds. Serve it straight from the dish for that family-style charm or plate it up with a drizzle of extra truffle oil for those extra fancy nights.
Beef Wellington
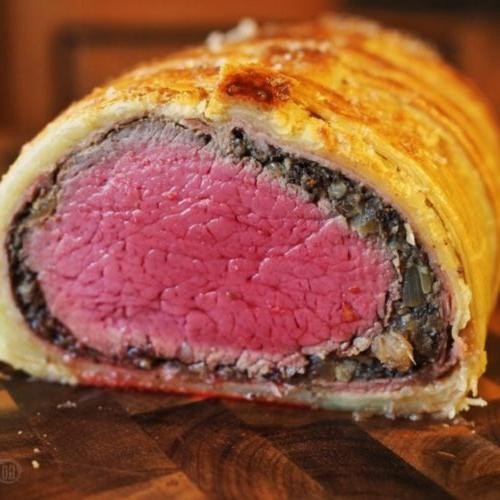
Ever tried wrapping your dinner in a blanket and baking it to perfection? That’s Beef Wellington for you—a luxurious, buttery pastry hug around a juicy, herb-crusted beef tenderloin. It’s the kind of dish that makes you want to wear a chef’s hat just to serve it.
Ingredients
- 1.5 lbs beef tenderloin (center-cut, because we’re fancy like that)
- 2 tbsp Dijon mustard (the secret handshake between the beef and pastry)
- 1 lb puff pastry (store-bought is fine, no judgment here)
- 8 oz mushrooms (cremini, because they’re the beef’s best friend)
- 2 tbsp extra virgin olive oil (my kitchen’s liquid gold)
- 2 cloves garlic (minced, because size matters)
- 1 tsp thyme (fresh, because we’re not savages)
- 1 egg (room temp, it’s just better that way)
- Salt and pepper (to make everything right in the world)
Instructions
- Preheat your oven to 425°F—because this dish demands a hot entrance.
- Season the beef tenderloin generously with salt and pepper. Sear it in olive oil over high heat for 2 minutes per side, then brush with Dijon mustard. Tip: Let the beef rest after searing to keep those juices in.
- Blitz mushrooms, garlic, and thyme in a food processor until finely chopped. Sauté in olive oil until dry. Tip: Squeeze out excess moisture with a paper towel—soggy mushrooms are a no-go.
- Roll out the puff pastry on a floured surface. Spread the mushroom mixture in the center, place the beef on top, and wrap it up like a present. Tip: Trim excess pastry to avoid doughy ends.
- Whisk the egg and brush it over the pastry for that golden, shiny finish. Bake for 25-30 minutes until the pastry is puffed and golden. Tip: Use a baking sheet lined with parchment paper for easy cleanup.
Now, the moment of truth: slicing into that Beef Wellington reveals a medium-rare center, enveloped in crispy, flaky pastry. Serve it with a side of roasted veggies or a bold red wine, and watch as your dining companions’ eyes light up with every bite.
Lobster Thermidor
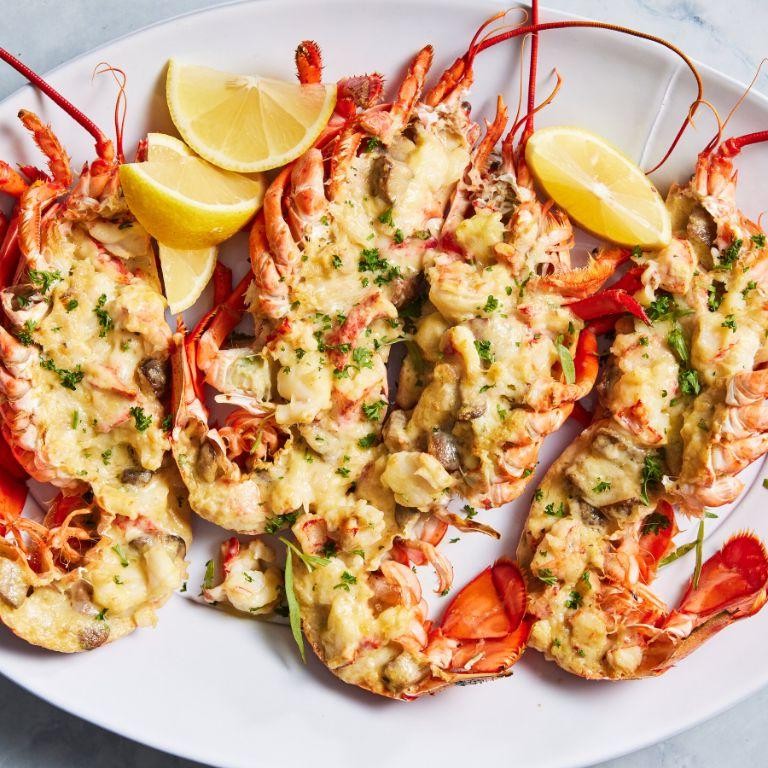
Kick off your culinary adventure with Lobster Thermidor, a dish so decadent it’ll make your taste buds throw a party. Imagine succulent lobster meat swathed in a creamy, cheesy sauce, then broiled to golden perfection—it’s like the lobster put on its fanciest outfit just for you.
Ingredients
- 2 live lobsters (1.5 lbs each) – because freshness is non-negotiable.
- 1/4 cup unsalted butter – I’m a firm believer that butter makes everything better.
- 1/4 cup all-purpose flour – the unsung hero of thickening sauces.
- 1 cup whole milk – skim milk is for the faint-hearted.
- 1/2 cup heavy cream – go big or go home.
- 1/2 cup grated Gruyère cheese – the nuttier, the better.
- 2 tbsp Dijon mustard – for that tangy kick.
- 1/4 cup dry white wine – cook with what you’d drink.
- 1 tbsp lemon juice – fresh, because bottled lemon juice is a crime.
- Salt and pepper – to season, but don’t be shy.
- 1/4 cup breadcrumbs – for that irresistible crunch.
- 2 tbsp chopped parsley – because we eat with our eyes first.
Instructions
- Preheat your oven to 375°F – no one likes a cold oven surprise.
- Bring a large pot of salted water to a boil. Add the lobsters and cook for 8 minutes. Tip: Listen for the lobster to stop moving; it’s a grim but effective timer.
- Remove lobsters from the pot and let them cool. Once cool, crack the shells and remove the meat, chopping it into bite-sized pieces.
- In a saucepan, melt the butter over medium heat. Whisk in the flour to create a roux, cooking for 2 minutes until golden. Tip: Constant whisking prevents lumps – your arm workout for the day.
- Gradually add the milk and heavy cream, whisking continuously until the sauce thickens, about 5 minutes.
- Stir in the Gruyère cheese, Dijon mustard, white wine, and lemon juice. Season with salt and pepper. Tip: Taste as you go; you’re the boss of your sauce.
- Fold in the lobster meat, then spoon the mixture back into the lobster shells or a baking dish.
- Sprinkle with breadcrumbs and bake for 10 minutes, then broil for 2 minutes until the top is golden and bubbly.
- Garnish with chopped parsley before serving.
Zesty and luxurious, this Lobster Thermidor boasts a creamy interior with a crispy top, a textural dream. Serve it straight from the shell for drama, or alongside a crisp salad to cut through the richness – because balance is key, even in indulgence.
Roasted Duck with Cherry Sauce
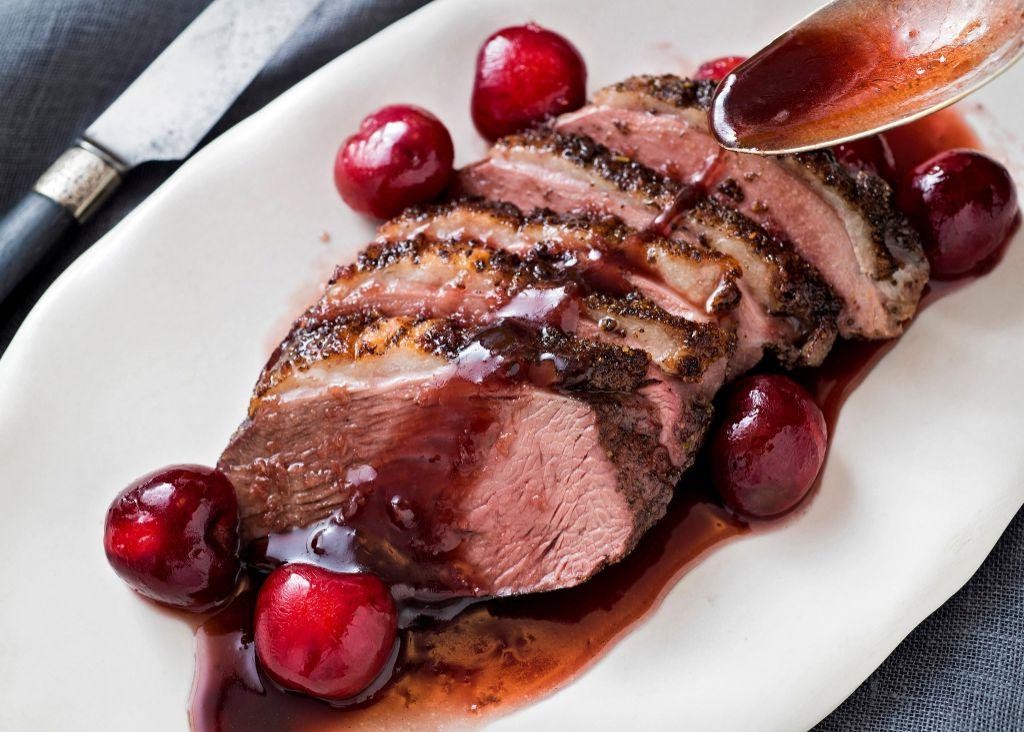
Feast your eyes (and eventually your stomach) on this show-stopping Roasted Duck with Cherry Sauce that’s about to become the star of your dinner table. It’s the perfect blend of fancy and approachable, like wearing a tiara with your pajamas.
Ingredients
- 1 whole duck (about 5 lbs) – because size does matter here, folks.
- 1 cup fresh cherries, pitted – unless you enjoy a surprise crunch.
- 1/2 cup red wine – drink the rest while cooking, chef’s orders.
- 2 tbsp honey – for that sweet, sweet love.
- 1 tbsp balsamic vinegar – the secret tangy weapon.
- 1 tsp salt – to make everything pop.
- 1/2 tsp black pepper – for a little kick.
- 2 cloves garlic, minced – because garlic makes everything better.
Instructions
- Preheat your oven to 375°F – no peeking until it’s ready!
- Pat the duck dry with paper towels – we’re roasting, not steaming.
- Season the duck inside and out with salt and pepper – like a spa day, but tastier.
- Place the duck breast-side up on a rack in a roasting pan – let it bask in its own glory.
- Roast for 2 hours, or until the skin is golden and crispy – patience is a virtue.
- Meanwhile, combine cherries, red wine, honey, balsamic vinegar, and garlic in a saucepan over medium heat – stir like you mean it.
- Simmer for 15 minutes until the sauce thickens – it’s like magic in a pot.
- Let the duck rest for 10 minutes before carving – good things come to those who wait.
- Serve the duck drizzled with cherry sauce – because presentation is key.
Lusciously crispy skin meets a sauce that’s the perfect balance of sweet and tangy, making every bite a little celebration. Try serving it with a side of roasted veggies or over a bed of wild rice for a meal that’s as Instagram-worthy as it is delicious.
Scallop and Chorizo Skewers
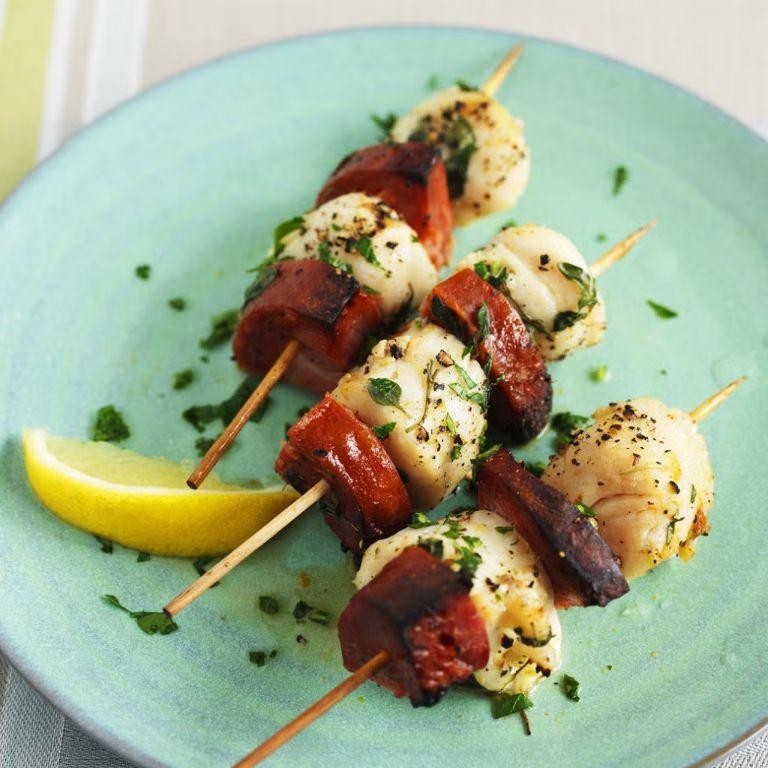
Dive into the sea of flavor with these Scallop and Chorizo Skewers, where the ocean meets the farm in a fiery tango that’ll have your taste buds doing the cha-cha. Perfect for those who like their parties with a side of panache and a dash of daring.
Ingredients
- 1 lb fresh sea scallops (the bigger, the better – we’re not here to play small ball)
- 1/2 lb chorizo sausage, sliced into 1/2-inch thick coins (spicy or mild, your call, but live a little)
- 2 tbsp extra virgin olive oil (the liquid gold of my kitchen)
- 1 tbsp lemon juice (freshly squeezed, because we’re fancy like that)
- 1 tsp smoked paprika (for that whisper of campfire romance)
- Salt to taste (but let’s be honest, you’re going to taste as you go, right?)
Instructions
- Preheat your grill to a medium-high heat of 375°F – we’re aiming for a sear, not a char.
- Thread the scallops and chorizo alternately onto skewers, giving each piece its moment to shine.
- Brush the skewers generously with olive oil; this is their spa treatment before the heat.
- Sprinkle with smoked paprika and a pinch of salt – like fairy dust, but tastier.
- Grill for 2-3 minutes per side, or until the scallops are just opaque and the chorizo is sizzling. Tip: Don’t overcrowd the grill; these skewers need their personal space.
- Drizzle with lemon juice right off the grill for a zesty finish. Tip: The acid brightens the dish, so don’t skip this step unless you’re a rebel without a cause.
- Let them rest for a minute – patience is a virtue, especially when it comes to juicy scallops.
Bite into these skewers and you’ll get the perfect contrast: the scallops are tender and sweet, while the chorizo brings a smoky, spicy kick. Serve them atop a bed of quinoa for a fancy twist, or just hand them out straight from the grill – no judgment here.
Wild Mushroom Risotto
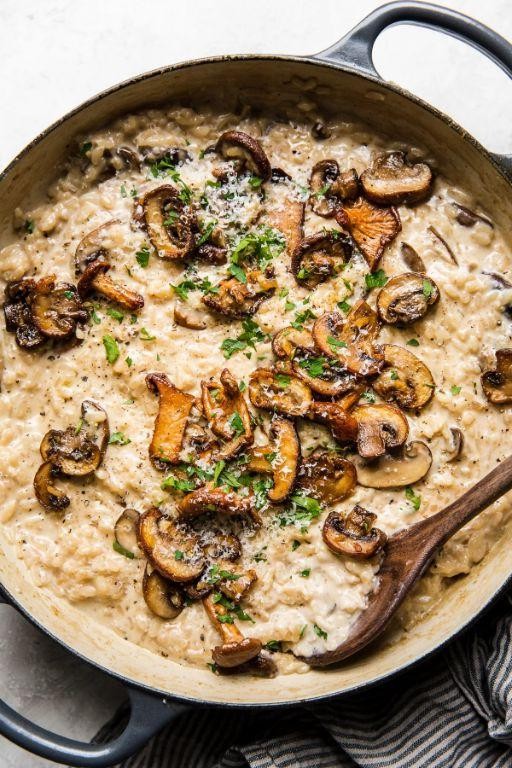
Zesty and earthy, this Wild Mushroom Risotto is like a cozy blanket for your taste buds, wrapping them in creamy, umami goodness that’s just begging to be devoured. Perfect for those days when you want to feel fancy without putting in too much effort.
Ingredients
- 1 cup Arborio rice – the star of the show, no substitutions!
- 4 cups chicken or vegetable broth – homemade if you’re feeling extra, but no judgment here.
- 1/2 cup dry white wine – because if you wouldn’t drink it, why cook with it?
- 1/2 cup grated Parmesan cheese – the more, the merrier, I always say.
- 2 tbsp extra virgin olive oil – my kitchen staple.
- 1 tbsp unsalted butter – for that irresistible richness.
- 1/2 lb wild mushrooms, sliced – mix and match for fun flavors.
- 1 small onion, finely diced – the unsung hero of flavor.
- 2 cloves garlic, minced – because everything’s better with garlic.
- Salt and freshly ground black pepper – to make everything pop.
Instructions
- Heat the broth in a saucepan over medium heat until simmering, then reduce the heat to low to keep it warm. Tip: A warm broth is key to a creamy risotto.
- In a large pan, heat olive oil and butter over medium heat. Add the onions and garlic, sautéing until translucent, about 3 minutes. Tip: Don’t let the garlic brown or it’ll turn bitter.
- Add the mushrooms and cook until they’re golden and have released their juices, about 5 minutes. Season with salt and pepper.
- Stir in the Arborio rice, coating it well with the oil and butter, and toast for 1-2 minutes until slightly translucent.
- Pour in the white wine, stirring constantly until it’s fully absorbed. Tip: This is where the flavor starts to build, so don’t rush it.
- Begin adding the warm broth, one ladle at a time, stirring frequently and waiting until each addition is absorbed before adding the next. This process should take about 18-20 minutes.
- Once the rice is al dente and the mixture is creamy, remove from heat. Stir in the Parmesan cheese, adjusting seasoning if necessary.
Delightfully creamy with a slight bite, this risotto is a masterpiece of textures and flavors. Serve it in a shallow bowl with a drizzle of truffle oil for that extra ‘wow’ factor, or keep it simple and let the risotto shine on its own.
Filet Mignon with Blue Cheese Butter

Hold onto your hats, food lovers, because we’re about to dive into a dish that’s as luxurious as it is laughably easy to make. Filet Mignon with Blue Cheese Butter is the kind of meal that’ll have you feeling like a gourmet chef without the stress of a culinary degree.
Ingredients
- 2 filet mignon steaks (about 6 oz each) – because size does matter here.
- 2 tbsp unsalted butter, softened – I like to pretend it’s sunbathing on the counter.
- 1/4 cup crumbled blue cheese – the stinkier, the better, in my opinion.
- 1 tsp fresh thyme leaves – because dried thyme is so last season.
- Salt and freshly ground black pepper – to make everything right in the world.
- 1 tbsp extra virgin olive oil – my kitchen’s liquid gold.
Instructions
- Preheat your oven to 400°F because we’re about to get steamy.
- In a small bowl, mix the softened butter, blue cheese, and thyme until it’s as harmonious as a boy band. Set aside.
- Season both sides of the filet mignon with salt and pepper like you’re seasoning your life with good vibes.
- Heat olive oil in an oven-safe skillet over medium-high heat until it’s shimmering like a disco ball.
- Sear the steaks for 3 minutes per side to get that gorgeous crust we all crave.
- Transfer the skillet to the oven and cook for about 5 minutes for medium-rare, or until your steak is as perfect as your playlist.
- Remove the steaks from the oven and let them rest for 5 minutes because even steak needs a breather.
- Top each steak with a generous dollop of the blue cheese butter and watch it melt like your worries.
Kick back and savor the melt-in-your-mouth tenderness of the filet mignon, perfectly complemented by the bold, tangy blue cheese butter. Serve it with a side of roasted veggies or over a bed of arugula for a meal that’s as Instagram-worthy as it is delicious.
Grilled Salmon with Dill Sauce
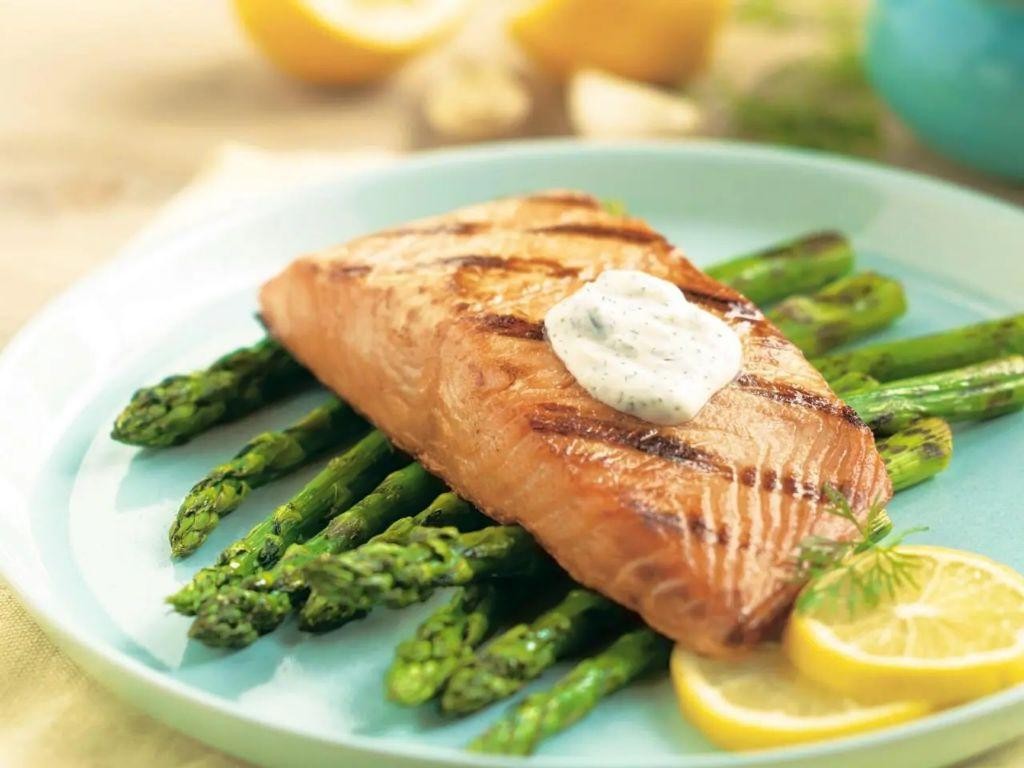
Now, let’s dive into a dish that’s as easy to love as it is to make—grilled salmon with a dill sauce that’ll have your taste buds doing a happy dance. Perfect for those evenings when you want to impress without the stress, this recipe is your ticket to a deliciously effortless dinner.
Ingredients
- 1.5 lbs salmon fillet (skin-on for that perfect grill marks drama)
- 2 tbsp extra virgin olive oil (my kitchen MVP)
- 1 tsp salt (because seasoning is the soul of the dish)
- 1/2 tsp black pepper (freshly ground, please—your pepper mill deserves a workout)
- 1/2 cup sour cream (full-fat for maximum creaminess)
- 2 tbsp fresh dill, chopped (no dried stuff here—we’re fancy)
- 1 tbsp lemon juice (for that zesty kick)
- 1 tsp honey (a sweet surprise to balance the tang)
Instructions
- Preheat your grill to medium-high heat, about 375°F, because we’re not cooking salmon in a sauna.
- Brush the salmon fillet with extra virgin olive oil on both sides—this is its sunscreen for the grill.
- Sprinkle the salt and black pepper evenly over the salmon. Pretend you’re seasoning the last slice of pizza—generously.
- Place the salmon skin-side down on the grill. Close the lid and let it cook for 6 minutes. No peeking—grills are like teenagers; they need their space.
- Flip the salmon carefully with a spatula. Grill for another 4 minutes. The salmon should flake easily with a fork when it’s done—no guesswork needed.
- While the salmon is grilling, mix the sour cream, fresh dill, lemon juice, and honey in a bowl. Stir until smooth. Taste and adjust the honey if you like it sweeter—this is your sauce, after all.
- Serve the grilled salmon hot with the dill sauce on the side or drizzled on top. Because why choose when you can have both?
Velvety salmon meets a creamy, herby sauce in this dish that’s all about contrast and harmony. Serve it atop a bed of quinoa or with a side of roasted asparagus for a meal that’s as nutritious as it is delicious. And remember, the best meals are those shared—so maybe don’t hoard all the salmon for yourself.
Pomegranate Glazed Chicken
Feast your eyes (and eventually your stomach) on this pomegranate glazed chicken that’s about to become the star of your dinner table. It’s sweet, it’s tangy, and it’s got just the right amount of sass to make your taste buds dance.
Ingredients
- 4 chicken breasts (because thighs are great, but we’re keeping it lean today)
- 1 cup pomegranate juice (the real deal, none of that ‘juice cocktail’ nonsense)
- 1/4 cup honey (local if you can swing it, your taste buds will thank you)
- 2 tbsp olive oil (extra virgin, because we’re fancy like that)
- 1 tbsp apple cider vinegar (for that little kick)
- 1 tsp garlic powder (or fresh if you’re feeling extra)
- Salt and pepper to taste (but let’s be honest, you’ll use more than you think)
Instructions
- Preheat your oven to 375°F because we’re not savages—we cook at the right temp.
- In a saucepan over medium heat, combine pomegranate juice, honey, olive oil, apple cider vinegar, and garlic powder. Stir like you mean it until it boils, then reduce to a simmer for 10 minutes until it thickens into a glaze that’ll make you weak in the knees.
- Season chicken breasts with salt and pepper like you’re the salt bae of your kitchen.
- Heat a skillet over medium-high heat and sear the chicken for 3 minutes per side until it’s got those gorgeous grill marks.
- Brush the chicken with your now legendary pomegranate glaze, then pop it in the oven for 15 minutes. Tip: Baste halfway through for maximum flavor penetration.
- Let the chicken rest for 5 minutes before serving—patience is a virtue, especially when it comes to juicy chicken.
Marvel at the glossy, sticky perfection of your pomegranate glazed chicken. The glaze caramelizes into a sweet and tangy armor, while the inside stays juicier than a gossip magazine. Serve it over a bed of wild rice or alongside some roasted veggies for a meal that’ll have everyone asking for seconds.
Shrimp Scampi Linguine
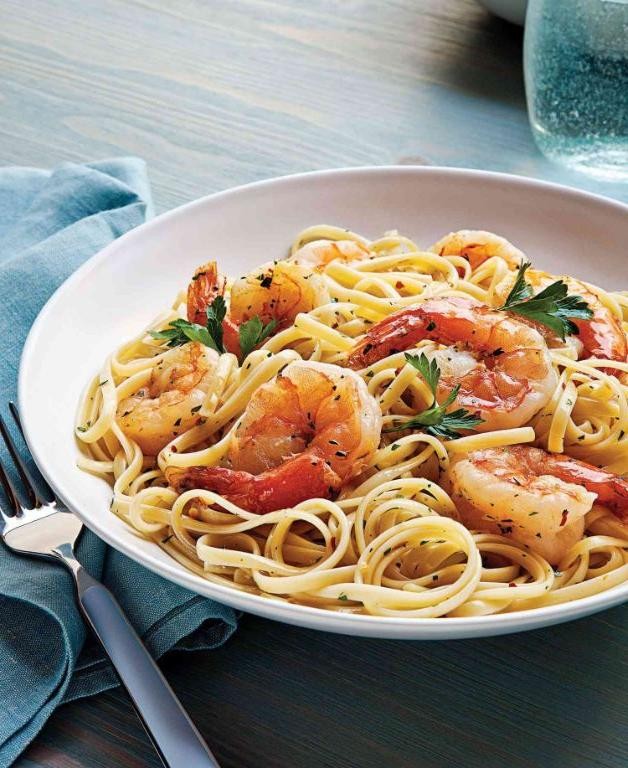
Hold onto your hats, pasta lovers, because we’re about to dive fork-first into a dish that’s as easy to make as it is to devour—Shrimp Scampi Linguine. This garlicky, buttery, and slightly lemony masterpiece is the answer to your ‘what’s for dinner’ woes, and trust me, your taste buds will thank you.
Ingredients
- 1 pound linguine (because life’s too short for skimpy portions)
- 1 pound large shrimp, peeled and deveined (fresh is fab, but frozen works in a pinch)
- 4 tablespoons unsalted butter (the real MVP of this dish)
- 4 cloves garlic, minced (more if you’re a garlic fiend like me)
- 1/2 cup dry white wine (pick something you’d drink—it matters)
- 1/4 cup fresh lemon juice (bottled is a no-go here, folks)
- 1/4 teaspoon red pepper flakes (for that gentle kick)
- Salt to taste (but don’t be shy)
- 1/4 cup chopped fresh parsley (for that pop of color and freshness)
Instructions
- Bring a large pot of salted water to a rolling boil and cook the linguine according to package instructions until al dente. Tip: Save a cup of pasta water before draining—it’s liquid gold for sauces.
- While the pasta cooks, melt butter in a large skillet over medium heat. Add the garlic and red pepper flakes, sautéing until fragrant, about 1 minute. Tip: Don’t let the garlic brown, or it’ll turn bitter.
- Add the shrimp to the skillet, cooking until they’re pink and opaque, about 2 minutes per side. Tip: Overcooked shrimp are rubbery—no one wants that.
- Pour in the white wine and lemon juice, simmering for 2 minutes to let the flavors marry.
- Toss in the drained linguine and parsley, adding reserved pasta water as needed to loosen the sauce. Give everything a good stir to coat.
Gorgeous, isn’t it? The linguine should be perfectly slick with sauce, the shrimp juicy, and the whole dish bursting with bright, garlicky flavors. Serve it straight from the skillet for that ‘chef’s kitchen’ vibe, or plate it up with a sprinkle of extra parsley and a lemon wedge for Instagram glory.
Vegetable Wellington
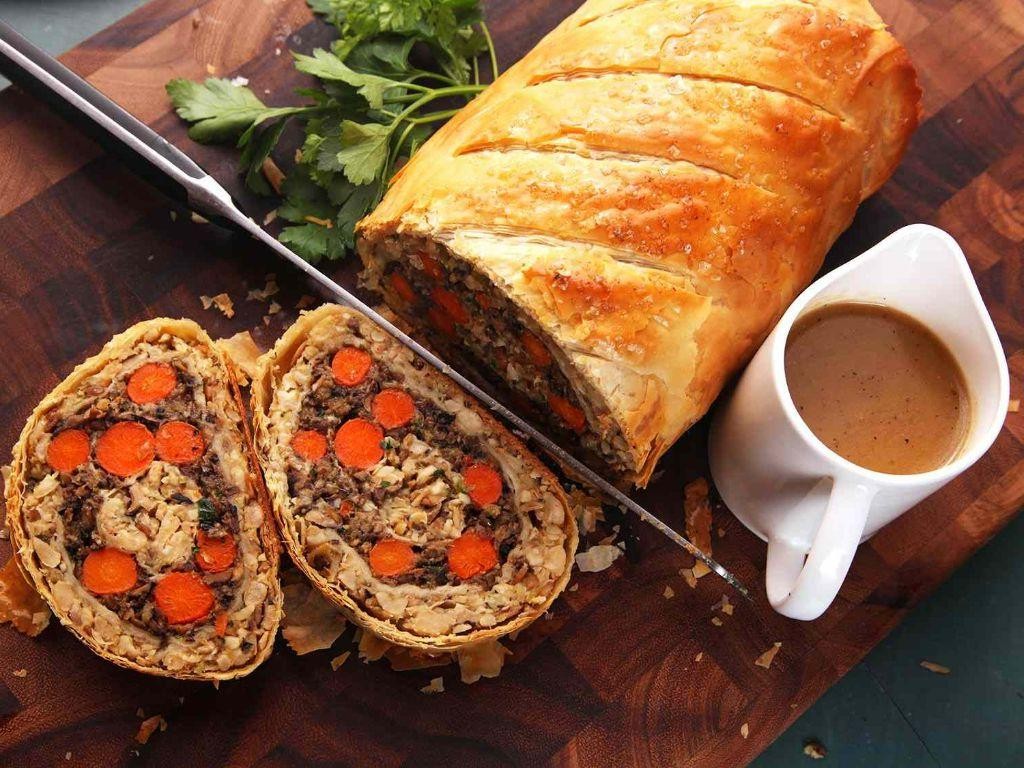
Look no further for a show-stopping centerpiece that’ll have your guests thinking you’ve been taking secret cooking classes from Gordon Ramsay. This Vegetable Wellington is a vegetarian twist on the classic, packed with so much flavor and flair, even the most devout carnivores won’t miss the meat.
Ingredients
- 2 cups of finely chopped mushrooms (cremini are my MVP for their earthy depth)
- 1 large sweet potato, peeled and diced into 1/2-inch cubes (because size matters here)
- 1 tbsp extra virgin olive oil (the good stuff, don’t skimp)
- 1/2 cup frozen spinach, thawed and squeezed dry (no one likes a soggy Wellington)
- 1 sheet of puff pastry, thawed (because we’re fancy but not ‘make our own pastry’ fancy)
- 1 egg, beaten (room temp eggs blend smoother, just saying)
- 1/2 tsp garlic powder (for that quick flavor win)
- Salt and pepper to taste (but let’s be honest, you’ll taste as you go)
Instructions
- Preheat your oven to 400°F (because precision is key to golden, flaky perfection).
- Heat olive oil in a pan over medium heat, add mushrooms and sweet potato, cooking until the sweet potato is tender, about 10 minutes (tip: cover the pan to speed up the process).
- Stir in the spinach, garlic powder, salt, and pepper, cooking for another 2 minutes (tip: this is when you taste and adjust seasoning).
- Roll out the puff pastry on a floured surface to a 12×14 inch rectangle (tip: keep it cold for easier handling).
- Spread the vegetable mixture down the center of the pastry, leaving a 2-inch border.
- Fold the pastry over the filling, sealing the edges with the beaten egg (this is your edible glue).
- Brush the top with more beaten egg for that Instagram-worthy shine.
- Bake for 25-30 minutes, until the pastry is puffed and golden (trust me, you’ll know when it’s ready).
Now, this beauty emerges from the oven with a crispy, buttery crust giving way to a hearty, savory filling. Serve it sliced with a side of roasted veggies or atop a bed of arugula for a pop of color and peppery bite. No matter how you plate it, it’s a guaranteed crowd-pleaser.
Braised Short Ribs
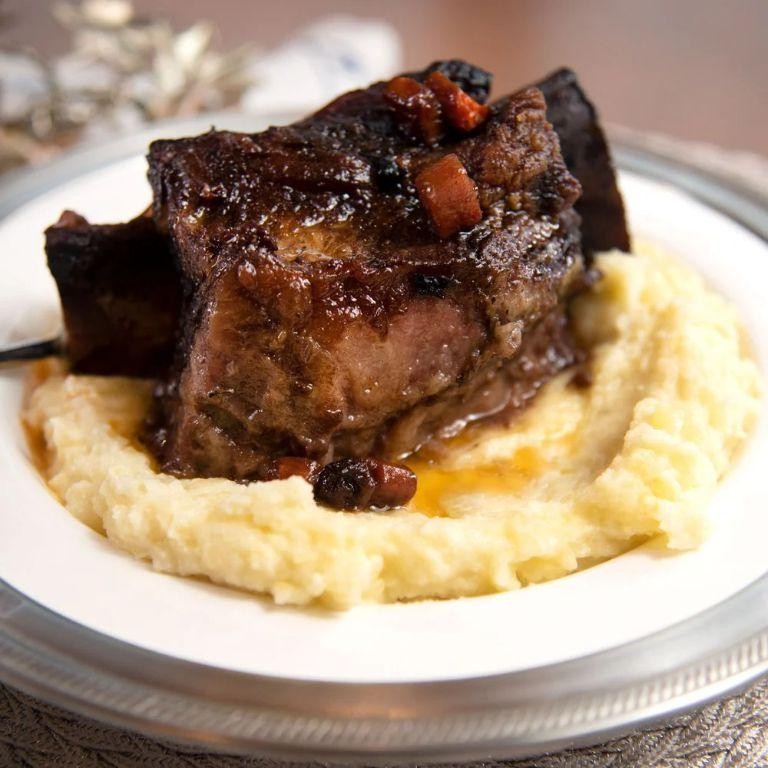
Unbelievably tender and packed with flavor, these braised short ribs are the culinary equivalent of a warm hug on a chilly evening. Perfect for impressing your in-laws or just treating yourself because, let’s be honest, you deserve it.
Ingredients
- 4 lbs beef short ribs (because more is always better)
- 2 tbsp extra virgin olive oil (my go-to for that rich, fruity depth)
- 1 large onion, diced (tears are optional but likely)
- 3 garlic cloves, minced (the more, the merrier, I say)
- 2 cups red wine (choose something you’d drink, not cook with)
- 2 cups beef broth (homemade if you’re fancy, store-bought if you’re human)
- 2 tbsp tomato paste (the secret umami booster)
- 1 tbsp fresh thyme leaves (because dried herbs are so last season)
- Salt and pepper to taste (but be generous, life’s too short for bland food)
Instructions
- Preheat your oven to 325°F because low and slow is the name of the game.
- Season the short ribs generously with salt and pepper. Think of it as their spa treatment before the plunge.
- Heat olive oil in a large Dutch oven over medium-high heat. Once hot, sear the ribs on all sides until they’re beautifully browned, about 3-4 minutes per side. This is where the flavor magic happens.
- Remove the ribs and set aside. In the same pot, sauté the onion and garlic until they’re soft and fragrant, about 5 minutes. No need to wipe the pot; those browned bits are flavor gold.
- Stir in the tomato paste and cook for another minute to deepen the flavor.
- Pour in the red wine and beef broth, scraping up any stuck-on bits from the bottom of the pot. This is called deglazing, and it’s basically culinary archaeology.
- Return the ribs to the pot, add the thyme, and bring everything to a simmer. Cover and transfer to the oven to braise for 3 hours. The wait will test your patience, but the result is worth it.
- After 3 hours, the meat should be fork-tender. If it’s not, give it more time. Good things come to those who wait.
The ribs will be so tender they’ll practically fall off the bone, with a rich, deep flavor that’s both complex and comforting. Serve them over creamy polenta or mashed potatoes to soak up all that glorious sauce, and watch as your dinner guests silently thank you with every bite.
Caprese Stuffed Chicken
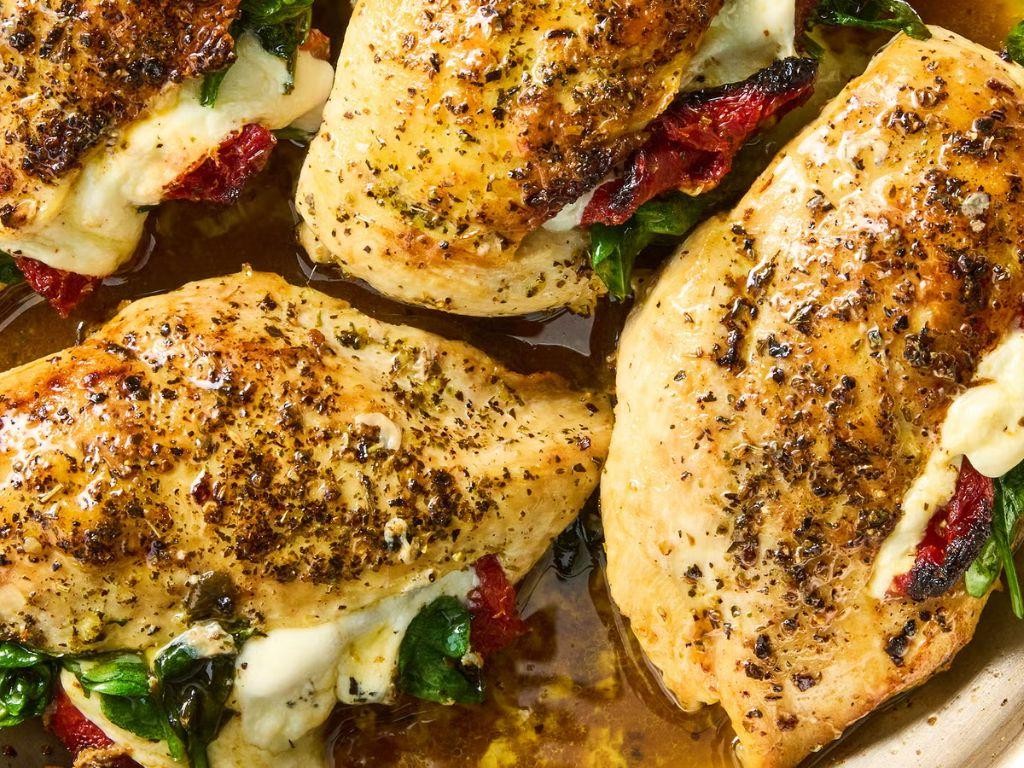
Picture this: a chicken breast so stuffed with cheesy, herby goodness, it’s practically bursting at the seams—welcome to your new dinner obsession. Perfect for when you’re craving something fancy but are, let’s be honest, too lazy to deal with actual fuss.
Ingredients
- 4 boneless, skinless chicken breasts (because nobody has time for bones)
- 1 cup fresh mozzarella, diced (the fresher, the meltier)
- 1 cup cherry tomatoes, halved (they’re like nature’s candy)
- 1/4 cup fresh basil, chopped (tear it like you’re mad at it for extra flavor)
- 2 tbsp extra virgin olive oil (my kitchen MVP)
- 1 tsp garlic powder (because garlic makes everything better)
- Salt and pepper to taste (but let’s be real, you’ll use more salt)
Instructions
- Preheat your oven to 375°F—no rushing this, or you’ll have sad, undercooked chicken.
- Using a sharp knife, cut a pocket into each chicken breast. Think of it as giving them a little purse for all their cheesy treasures.
- In a bowl, mix mozzarella, tomatoes, basil, and garlic powder. This is where the magic happens.
- Stuff each chicken breast with the mixture. Pack it in like you’re preparing for a cheese apocalypse.
- Season the outside with salt and pepper. Don’t be shy; seasoning is key.
- Heat olive oil in an oven-safe skillet over medium-high heat. When it shimmers, it’s showtime.
- Sear the chicken for 3-4 minutes per side until golden. This isn’t just for looks—it locks in the juices.
- Transfer the skillet to the oven and bake for 20-25 minutes. The cheese should be bubbly, and the chicken no longer pink.
- Let it rest for 5 minutes. I know it’s hard, but patience prevents a cheese burn.
You’ll love the juicy chicken paired with the gooey, herby center—it’s a flavor explosion. Serve it over a bed of greens or with a side of crusty bread to soak up all the cheesy goodness.
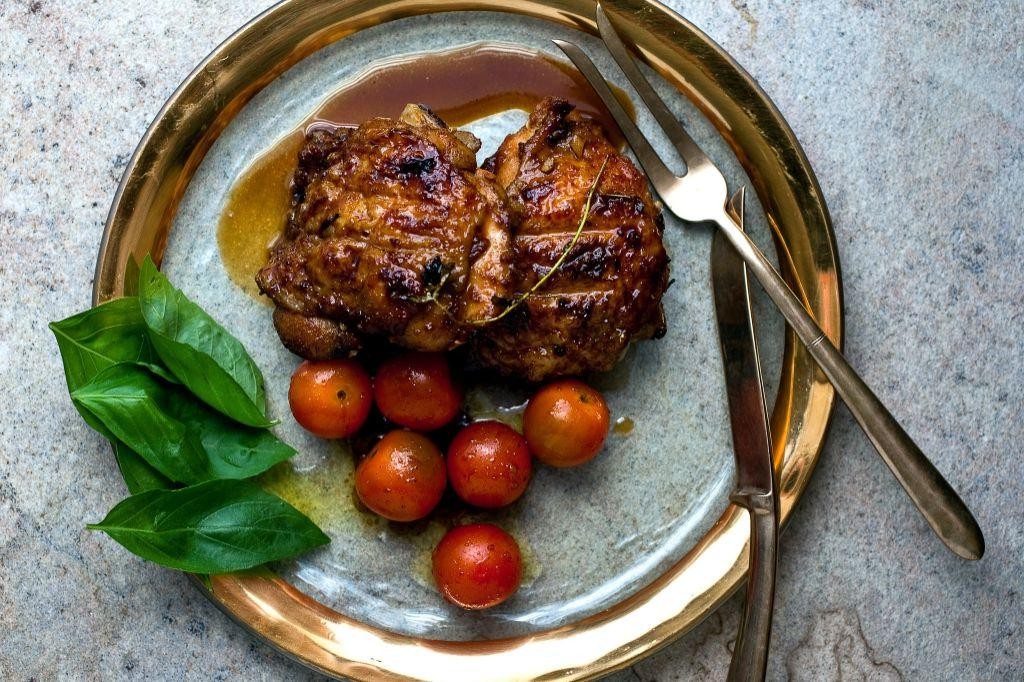
Garlic Butter Steak Bites
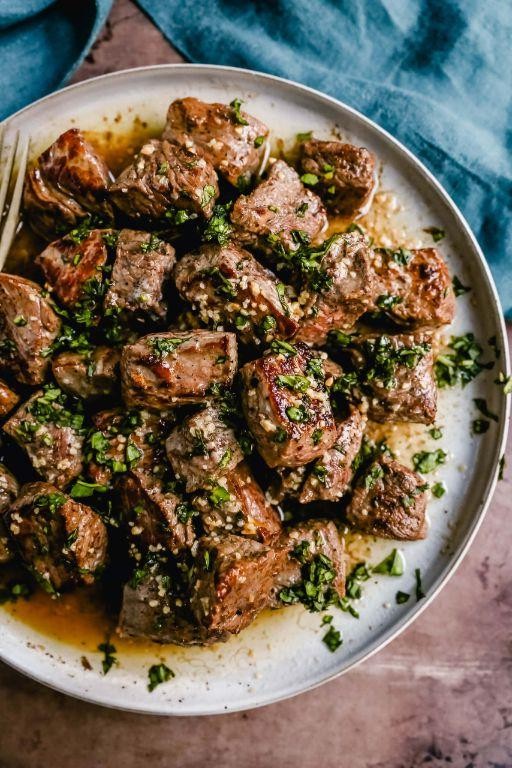
Ever find yourself staring into the fridge, dreaming of something that’s both ridiculously easy to make and outrageously delicious? Well, stop dreaming and start cooking these Garlic Butter Steak Bites—because your taste buds deserve this kind of happiness.
Ingredients
- 1.5 lbs sirloin steak, cut into bite-sized pieces (because who has time to chew all day?)
- 3 tbsp unsalted butter (the real MVP of this dish)
- 4 garlic cloves, minced (more is always better, fight me)
- 1 tbsp olive oil (extra virgin, because we’re fancy like that)
- 1 tsp salt (don’t be shy, it’s what makes everything pop)
- 1/2 tsp black pepper (freshly ground, unless you’re into disappointment)
- 1/2 tsp paprika (for that sneaky little kick)
- 2 tbsp fresh parsley, chopped (because we eat with our eyes first)
Instructions
- Heat olive oil in a large skillet over medium-high heat until it’s shimmering like a disco ball—about 2 minutes.
- Add the steak bites in a single layer (no overcrowding, unless you’re into steaming instead of searing). Cook for 2 minutes without touching them—let them get a nice crust.
- Flip the steak bites and cook for another 2 minutes for medium-rare. If you like your steak more done, well, we can’t be friends.
- Reduce the heat to low and push the steak bites to one side of the skillet. Add butter and garlic to the empty side and let the butter melt—about 1 minute.
- Stir the garlic and butter together, then mix everything in the skillet to coat the steak bites. Cook for 1 more minute because garlic burns faster than your last relationship.
- Sprinkle with salt, pepper, paprika, and parsley. Toss to combine like you’re mixing a killer playlist.
These Garlic Butter Steak Bites are juicy, packed with flavor, and perfect for when you want to feel fancy without putting in fancy effort. Serve them over mashed potatoes or with a side of crusty bread to soak up all that buttery goodness—because let’s be real, you’re going to want every last drop.
Spinach and Artichoke Stuffed Shells

Just when you thought pasta couldn’t get any more indulgent, along comes this cheesy, creamy, veggie-packed masterpiece that’ll have you doing a happy dance in your kitchen. Spinach and artichoke stuffed shells are the love child of your favorite dip and pasta night, and trust me, they’re here to steal the show.
Ingredients
- 12 oz jumbo pasta shells (because bigger is always better, right?)
- 2 cups ricotta cheese (full-fat for that creamy dreaminess)
- 1 cup shredded mozzarella cheese (plus extra for sprinkling on top because cheese)
- 1/2 cup grated Parmesan cheese (the salty, nutty kick we all crave)
- 10 oz frozen spinach, thawed and squeezed dry (no one likes a soggy shell)
- 14 oz artichoke hearts, drained and chopped (the star of the show)
- 2 cloves garlic, minced (because flavor is non-negotiable)
- 1 tbsp extra virgin olive oil (my go-to for sautéing)
- 1 tsp salt (to make all the flavors pop)
- 1/2 tsp black pepper (for a little kick)
- 1/4 tsp red pepper flakes (optional, for those who like it hot)
- 2 cups marinara sauce (homemade or store-bought, no judgment here)
Instructions
- Preheat your oven to 375°F because we’re about to get this party started.
- Bring a large pot of salted water to a boil and cook the jumbo shells according to package instructions until al dente, then drain and set aside. Tip: Stir occasionally to prevent sticking.
- In a skillet over medium heat, warm the olive oil and sauté the garlic until fragrant, about 30 seconds. Tip: Don’t let it brown or it’ll taste bitter.
- In a large bowl, mix together the ricotta, mozzarella, Parmesan, spinach, artichokes, sautéed garlic, salt, pepper, and red pepper flakes until well combined. Tip: Taste and adjust seasoning before stuffing the shells.
- Spread a thin layer of marinara sauce on the bottom of a 9×13 inch baking dish to prevent sticking.
- Carefully stuff each shell with the spinach and artichoke mixture and arrange them in the baking dish.
- Pour the remaining marinara sauce over the stuffed shells and sprinkle with extra mozzarella cheese.
- Bake for 25-30 minutes, or until the cheese is bubbly and golden. Tip: Let it sit for 5 minutes before serving to set.
Creamy, cheesy, and packed with flavor, these stuffed shells are a textural dream with a slight crunch from the artichokes. Serve them with a crisp salad and garlic bread for the ultimate comfort food feast.
Roasted Garlic Mashed Potatoes
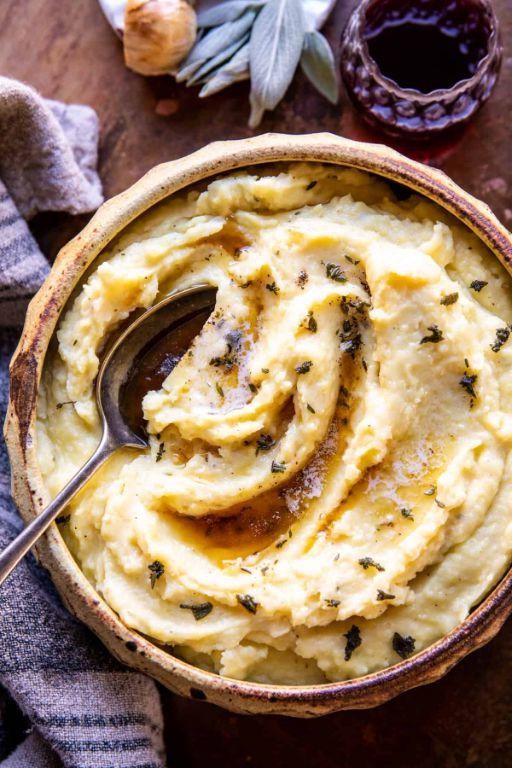
Get ready to elevate your mashed potato game to legendary status with this roasted garlic version that’s so good, it’ll make your taste buds do a happy dance. Perfect for when you’re craving comfort food with a gourmet twist, this dish is a game-changer for any meal.
Ingredients
- 2 lbs Yukon Gold potatoes (because their buttery texture is unmatched)
- 1 whole garlic head (for that deep, caramelized flavor)
- 1/2 cup unsalted butter (I like to use European-style for its richness)
- 1/2 cup heavy cream (warmed up to avoid a chilly surprise)
- 1 tsp salt (don’t be shy, potatoes love salt)
- 1/2 tsp black pepper (freshly ground, please)
Instructions
- Preheat your oven to 400°F because we’re about to roast some garlic to perfection.
- Slice the top off the garlic head, drizzle with a bit of olive oil, wrap in foil, and roast for 40 minutes until it’s soft and golden. Tip: Roasting garlic mellows its sharpness and brings out a sweet, nutty flavor.
- While the garlic is roasting, peel and chop the potatoes into even chunks for uniform cooking.
- Boil the potatoes in salted water for 15-20 minutes until they’re fork-tender. Tip: Start with cold water to ensure even cooking.
- Drain the potatoes and return them to the pot to evaporate any excess water. Tip: Dry potatoes mash better and absorb more butter and cream.
- Squeeze the roasted garlic cloves out of their skins and mash them into a paste.
- Add the butter, cream, salt, and pepper to the potatoes and mash until smooth. For extra creaminess, use a potato ricer.
- Fold in the roasted garlic paste until well combined.
Fluffy, creamy, and packed with the deep, sweet flavor of roasted garlic, these mashed potatoes are a showstopper. Serve them with a drizzle of truffle oil or a sprinkle of chives for an extra touch of elegance.
Chocolate Lava Cake

Hold onto your spoons, folks, because we’re diving fork-first into the molten magic of Chocolate Lava Cake—a dessert that’s as dramatic as your Aunt Linda at a family reunion. Perfect for when you need to impress or just really, really love chocolate.
Ingredients
- 1/2 cup unsalted butter (plus a smidge more for greasing—because butter makes everything better)
- 6 oz high-quality semi-sweet chocolate (the kind you hide from your kids)
- 1/4 cup all-purpose flour (because we’re fancy, but not that fancy)
- 1/2 cup powdered sugar (for that sweet, sweet illusion of health)
- 2 large eggs (room temp, unless you enjoy the suspense of waiting)
- 2 egg yolks (because sometimes, more is more)
- 1 tsp vanilla extract (the good stuff—none of that imitation nonsense)
- A pinch of salt (to balance out the impending sugar rush)
Instructions
- Preheat your oven to 425°F—because this cake likes it hot, hot, hot.
- Butter up four ramekins like you’re preparing them for a starring role in your dessert dreams.
- Melt the butter and chocolate together in a double boiler, stirring until smooth. Tip: No double boiler? A heatproof bowl over simmering water works just as well.
- Whisk in the powdered sugar until it’s all lovey-dovey with the chocolate mixture.
- Add the eggs and yolks one at a time, whisking after each addition like you’re conducting a symphony.
- Gently fold in the flour and salt until just combined—overmixing is the enemy of lava.
- Divide the batter evenly among the ramekins. Tip: A cookie scoop makes this step a breeze and keeps your hands clean(ish).
- Bake for 12-14 minutes. The edges should be set, but the center will jiggle like your resolve to eat just one.
- Let them sit for a minute—patience is a virtue, especially when molten chocolate is involved.
- Tip: Run a knife around the edge to loosen, then invert onto a plate with a confident flip. If it sticks, just pretend you meant to serve it in the ramekin.
Every bite is a gooey, chocolatey revelation—crisp on the outside, with a heart that flows like a river of deliciousness. Serve with a scoop of vanilla ice cream for the ultimate hot-and-cold love story, or eat it straight from the ramekin because no one’s judging here.
Conclusion
With these 18 elegant dinner party recipes, hosting has never been easier or more delightful. Whether you’re a seasoned chef or a first-time host, there’s something here to impress every guest. We’d love to hear which dishes become your go-to favorites—drop us a comment below! And don’t forget to share the inspiration on Pinterest. Happy cooking and even happier hosting!


