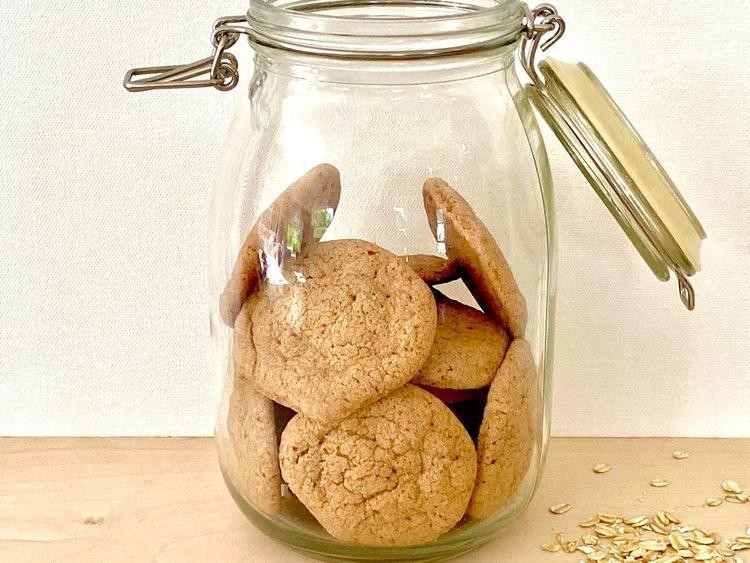
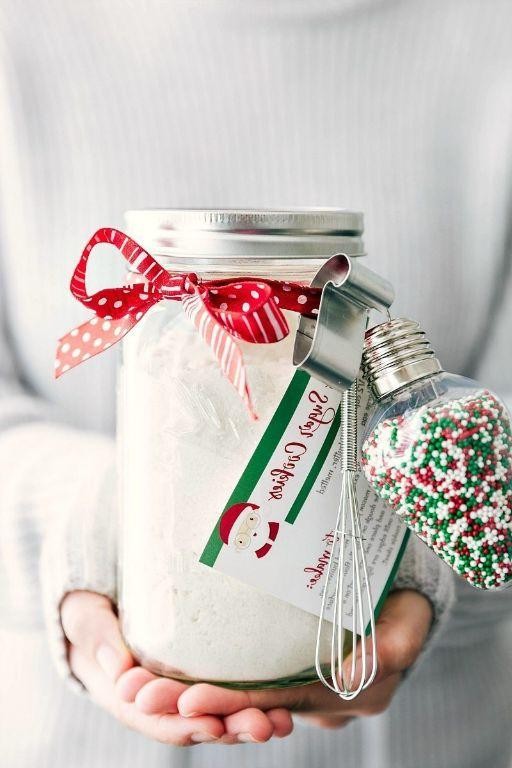
Mmm, who can resist the sweet allure of freshly baked cookies? Especially when they come straight from a jar, ready to mix, bake, and enjoy in no time! Our roundup of 22 Delicious Cookies in a Jar Recipes is your ticket to effortless baking magic. Whether you’re craving classic chocolate chip or something uniquely creative, these recipes promise to delight your taste buds and simplify your baking routine. Let’s dive in!
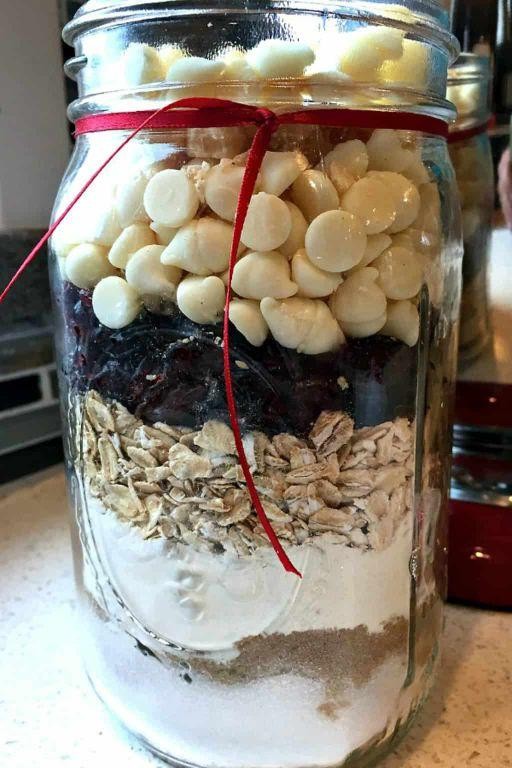
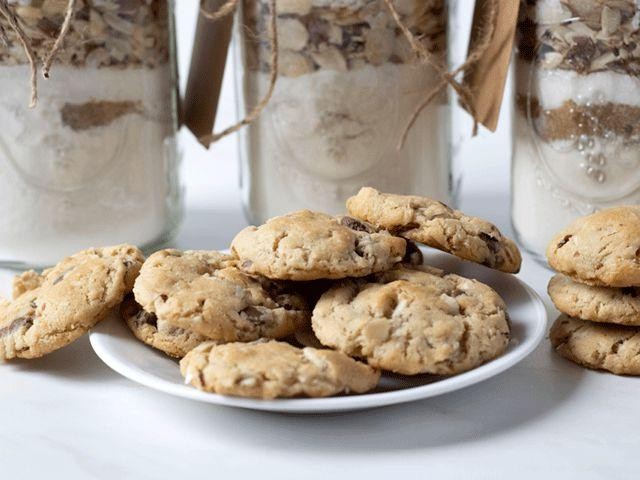
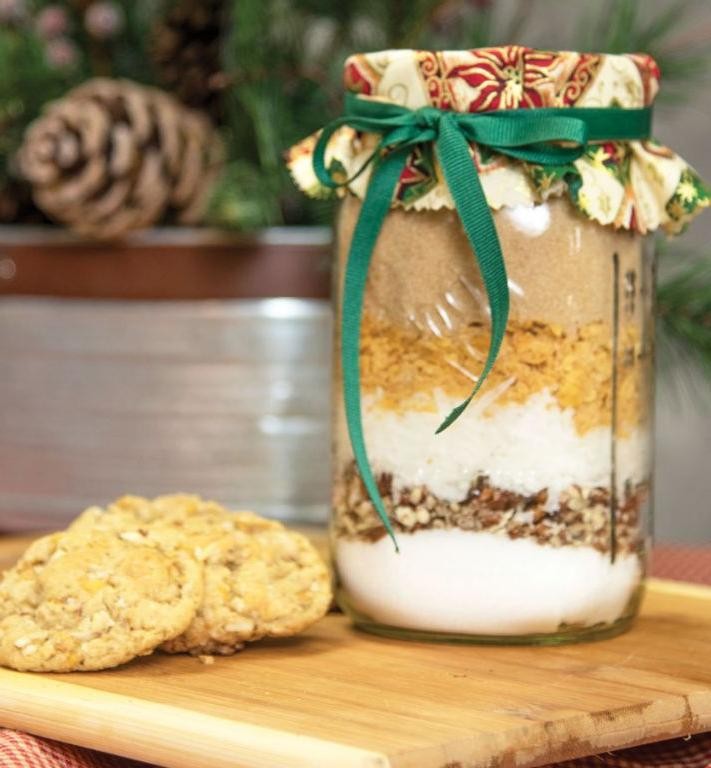
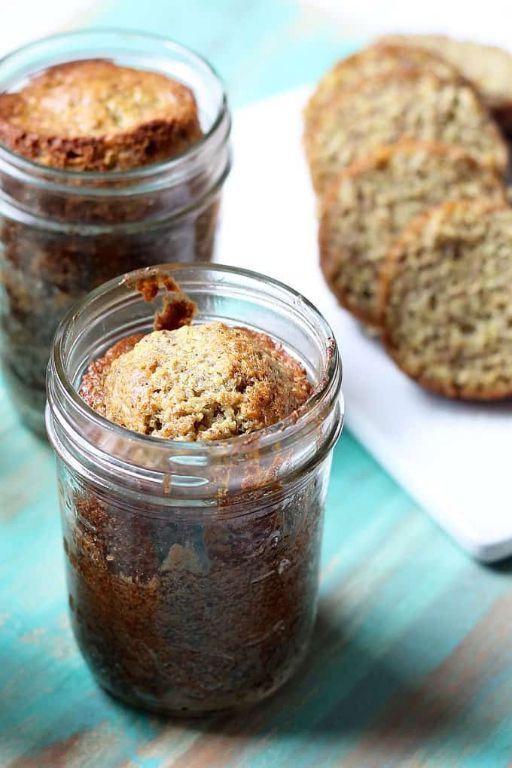
Chocolate Chip Cookies in a Jar
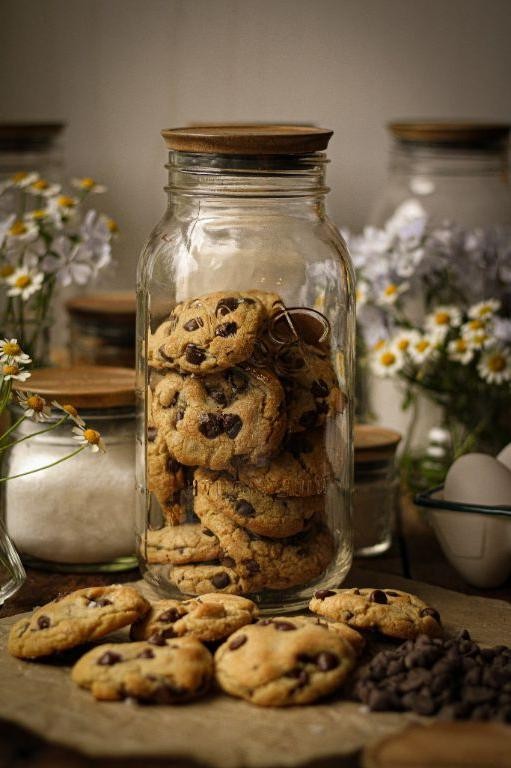
Guess what? I stumbled upon the most adorable gift idea that doubles as a baking project—Chocolate Chip Cookies in a Jar. It’s perfect for those days when you want to spread a little joy without spending hours in the kitchen. Plus, who can resist the charm of a homemade cookie mix layered like a sand art project?
Ingredients
- 1 3/4 cups of all-purpose flour (because sometimes, you just need that classic texture)
- 3/4 teaspoon of baking soda (a little goes a long way to puff them up just right)
- 3/4 teaspoon of salt (to balance all that sweetness)
- 3/4 cup of packed brown sugar (for that deep, molasses-y sweetness)
- 1/2 cup of granulated sugar (because a little sparkle never hurt anybody)
- 1 cup of chocolate chips (go ahead, toss in a few extra—I won’t tell)
- 1/2 cup of chopped walnuts (optional, but they add a nice crunch)
Instructions
- Start by layering the flour, baking soda, and salt in your jar. Give it a gentle shake to settle the layers—it’s like making a parfait, but for cookies.
- Next, add the brown sugar and granulated sugar. Pro tip: packing the brown sugar tightly ensures your cookies have that chewy center we all love.
- Toss in the chocolate chips and walnuts (if using). Here’s a little secret: pressing them down slightly helps prevent them from sticking to the jar’s sides.
- Seal the jar with a cute lid and attach a tag with baking instructions: mix with 1 stick of melted butter, 1 egg, and 1 teaspoon of vanilla extract. Bake at 375°F for 10-12 minutes.
- Another tip: if you’re gifting these, include a note suggesting to let the dough chill for an hour before baking—it makes all the difference in flavor.
- Finally, bake until the edges are golden but the centers are still soft. They’ll firm up as they cool, promise.
Absolutely divine when warm, these cookies have a crispy edge with a gooey middle that’s packed with chocolatey goodness. Try serving them with a cold glass of milk or crumbled over vanilla ice cream for an extra indulgent treat.
Oatmeal Raisin Cookies in a Jar
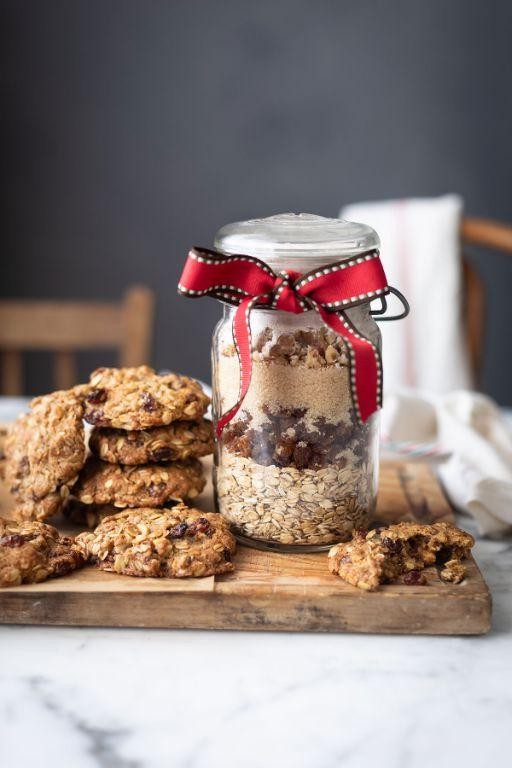
Remember those lazy Sunday afternoons when the smell of cinnamon and sugar would waft through the house? That’s exactly the vibe I’m going for with these Oatmeal Raisin Cookies in a Jar. Perfect for gifting or treating yourself, this recipe brings back all the cozy feels with minimal fuss.
Ingredients
- 1 cup of old-fashioned oats (because they hold up better, trust me)
- 1/2 cup of flour (I sometimes sneak in whole wheat for extra fiber)
- A generous 1/2 cup of brown sugar (pack it in like you mean it)
- A couple of dashes of cinnamon (more if you’re a cinnamon fiend like me)
- A pinch of salt (just to balance the sweetness)
- 1/2 cup of raisins (soak them in warm water for 10 minutes if you like them plump)
- 1/4 cup of melted butter (because everything’s better with butter)
- A splash of vanilla extract (the good stuff, please)
- 1 egg (room temperature is key here)
Instructions
- Preheat your oven to 350°F (175°C) and line a baking sheet with parchment paper. This little step saves so much cleanup time later.
- In a large bowl, mix the oats, flour, brown sugar, cinnamon, and salt. Tip: Give it a good whisk to break up any sugar clumps.
- Stir in the raisins, making sure they’re evenly distributed. No one wants a cookie without raisins, right?
- In a separate bowl, whisk together the melted butter, vanilla extract, and egg until smooth. Pro tip: If your butter’s too hot, it’ll cook the egg, so let it cool a bit first.
- Pour the wet ingredients into the dry ingredients and mix until just combined. Overmixing is the enemy of tender cookies.
- Drop tablespoon-sized balls of dough onto the prepared baking sheet, spacing them about 2 inches apart. They’ll spread, I promise.
- Bake for 10-12 minutes, or until the edges are golden but the centers are still soft. They’ll firm up as they cool, so resist the urge to overbake.
- Let the cookies cool on the baking sheet for 5 minutes before transferring to a wire rack. This patience-testing step prevents cookie breakage.
Now, these cookies are everything you want in an oatmeal raisin—chewy edges, soft centers, and just the right amount of sweetness. Try serving them warm with a glass of cold milk for the ultimate comfort food moment. Not that I’ve done that… more than once.
Peanut Butter Cookies in a Jar
Last weekend, I found myself staring at an almost empty peanut butter jar, and instead of tossing it, I decided to whip up something magical. That’s how these Peanut Butter Cookies in a Jar came to life—a perfect blend of nostalgia and simplicity.
Ingredients
- 1 cup of creamy peanut butter (the last bit in the jar works great!)
- 1 cup of sugar (because life’s sweet, right?)
- 1 large egg (room temperature, please)
- A tiny splash of vanilla extract (just for that extra oomph)
- A pinch of salt (to balance the sweetness)
Instructions
- Preheat your oven to 350°F (175°C). This is the perfect temp for cookies that are crispy on the outside and chewy inside.
- In a large bowl, mix the peanut butter, sugar, egg, vanilla extract, and salt until smooth. Tip: If the mixture feels too sticky, a little flour can help, but it’s not necessary.
- Roll the dough into 1-inch balls and place them on a baking sheet lined with parchment paper. Tip: For uniform cookies, use a small ice cream scoop.
- Flatten each ball with a fork, making a crisscross pattern. This isn’t just for looks; it helps the cookies bake evenly.
- Bake for 10-12 minutes, until the edges are just starting to brown. Tip: They’ll look soft when they come out, but they’ll firm up as they cool.
- Let them cool on the baking sheet for 5 minutes, then transfer to a wire rack to cool completely.
You’ll love how these cookies strike the perfect balance between crunchy and chewy, with a rich peanut butter flavor that’s not too sweet. Try serving them with a glass of cold milk or crumbled over vanilla ice cream for an indulgent treat.
Double Chocolate Cookies in a Jar
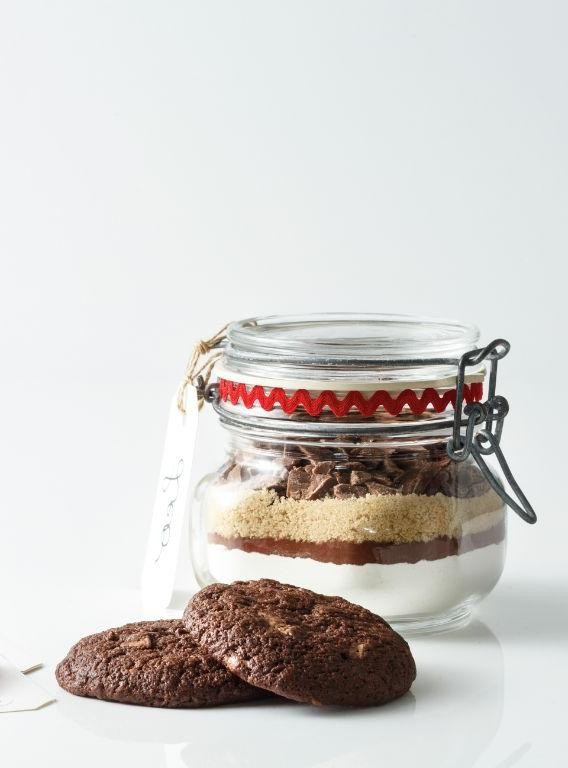
Nothing beats the joy of baking, especially when it involves chocolate. I remember the first time I made these Double Chocolate Cookies in a Jar; it was a rainy afternoon, and the aroma of chocolate filled my tiny apartment, making everything feel cozier. These cookies are not just a treat; they’re a hug in edible form.
Ingredients
- 1 cup of all-purpose flour (because every good cookie starts here)
- A generous 1/2 cup of cocoa powder (the darker, the better)
- A pinch of salt (just to balance the sweetness)
- 1/2 teaspoon of baking soda (for that perfect rise)
- 1/2 cup of softened butter (unsalted, so we control the salt)
- 3/4 cup of packed brown sugar (for that deep, molasses-y sweetness)
- 1/4 cup of granulated sugar (because a little crispness is nice)
- 1 large egg (room temperature, always)
- A splash of vanilla extract (the secret weapon)
- A handful of chocolate chips (because more chocolate is always better)
Instructions
- Preheat your oven to 350°F (175°C) and line a baking sheet with parchment paper. This prevents sticking and makes cleanup a breeze.
- In a medium bowl, whisk together the flour, cocoa powder, salt, and baking soda. Tip: Sifting the cocoa powder prevents lumps in your batter.
- In a larger bowl, cream the butter and both sugars together until light and fluffy. This should take about 3 minutes with an electric mixer.
- Beat in the egg and vanilla extract until just combined. Overmixing here can make the cookies tough.
- Gradually mix in the dry ingredients until a dough forms. Then, fold in the chocolate chips. Tip: Reserve a few chips to press on top of the cookies before baking for a professional look.
- Scoop tablespoon-sized balls of dough onto the prepared baking sheet, spacing them about 2 inches apart. They’ll spread as they bake.
- Bake for 10-12 minutes, until the edges are set but the centers are still soft. They’ll firm up as they cool. Tip: For chewier cookies, pull them out at the 10-minute mark.
- Let the cookies cool on the baking sheet for 5 minutes before transferring to a wire rack to cool completely.
These cookies are a chocolate lover’s dream, with a crispy edge and a fudgy center. Try serving them warm with a scoop of vanilla ice cream for an irresistible dessert.
Snickerdoodle Cookies in a Jar
Afternoon cravings hit me hard today, and all I could think about was the comforting aroma of cinnamon and sugar wafting through my kitchen. That’s when I remembered the Snickerdoodle Cookies in a Jar recipe I’ve been meaning to try—a perfect blend of sweet, spicy, and everything nice, all layered beautifully in a jar for that homemade touch.
Ingredients
- 1 1/2 cups of all-purpose flour
- 1/2 teaspoon of baking soda
- 1/4 teaspoon of cream of tartar
- A pinch of salt
- 1/2 cup of unsalted butter, softened
- 3/4 cup of granulated sugar
- 1 large egg
- A splash of vanilla extract
- A couple of tablespoons of cinnamon sugar mix (just mix 2 tablespoons of sugar with 1 teaspoon of cinnamon)
Instructions
- Preheat your oven to 350°F (175°C) and line a baking sheet with parchment paper.
- In a medium bowl, whisk together the flour, baking soda, cream of tartar, and salt. This ensures your cookies have the perfect rise and texture.
- In a larger bowl, cream together the softened butter and granulated sugar until light and fluffy. Tip: Don’t rush this step; creaming properly incorporates air, making your cookies lighter.
- Beat in the egg and vanilla extract until just combined. Overmixing can make the cookies tough.
- Gradually add the dry ingredients to the wet, mixing until a dough forms. It should be soft but not sticky.
- Roll the dough into 1-inch balls, then roll each in the cinnamon sugar mix until fully coated. Tip: For extra flavor, let the coated balls sit for 10 minutes before baking.
- Place the balls on the prepared baking sheet, spacing them about 2 inches apart. They’ll spread as they bake.
- Bake for 10-12 minutes, or until the edges are just starting to turn golden but the centers are still soft. Tip: They’ll firm up as they cool, so don’t overbake.
- Let the cookies cool on the baking sheet for 5 minutes before transferring to a wire rack to cool completely.
Zesty and warm, these Snickerdoodle Cookies in a Jar are a delightful treat with their soft centers and slightly crispy edges. Serve them with a cold glass of milk or crumble them over vanilla ice cream for an extra special dessert.
White Chocolate Macadamia Nut Cookies in a Jar
Unwrapping the joy of homemade cookies, especially when they’re as indulgent as white chocolate macadamia nut, is one of life’s simple pleasures. I remember the first time I tried making these cookies in a jar; it was a game-changer for my gifting game and my late-night snack cravings.
Ingredients
- 1 cup of all-purpose flour (because sometimes, simple is best)
- A pinch of salt (just to balance the sweetness)
- 1/2 cup of unsalted butter, softened (room temp is key here)
- 1/2 cup of brown sugar (for that deep, molasses-y sweetness)
- 1/4 cup of granulated sugar (because we love a little crunch)
- 1 large egg (fresh from the fridge is fine)
- A splash of vanilla extract (the good stuff makes a difference)
- 1 cup of white chocolate chips (go for the chunks if you’re feeling extra)
- 1/2 cup of macadamia nuts, roughly chopped (because texture is everything)
Instructions
- Preheat your oven to 350°F (175°C) – no guessing here, use an oven thermometer if you’re unsure.
- In a medium bowl, whisk together the flour and salt. This isn’t just mixing; it’s ensuring every bite is perfectly seasoned.
- In a larger bowl, cream the butter and both sugars until light and fluffy. This should take about 3 minutes – set a timer, it’s worth it.
- Beat in the egg and vanilla extract until just combined. Overmixing is the enemy of tender cookies.
- Gradually add the dry ingredients to the wet, mixing until the dough comes together. It should be soft but not sticky.
- Fold in the white chocolate chips and macadamia nuts. This is where the magic happens, so don’t skimp.
- Drop tablespoon-sized balls of dough onto a baking sheet lined with parchment paper, spacing them about 2 inches apart. They’ll spread, promise.
- Bake for 10-12 minutes, or until the edges are just golden but the centers are still soft. They’ll firm up as they cool.
- Let them cool on the baking sheet for 5 minutes before transferring to a wire rack. Patience is a virtue, especially with cookies.
Kicking back with one of these cookies, you’ll notice the perfect balance of crunchy edges and chewy centers, with bursts of creamy white chocolate and buttery macadamia nuts. Try serving them slightly warm with a glass of cold milk for the ultimate comfort food moment.
Sugar Cookies in a Jar
Every time I think about sugar cookies, I’m transported back to my grandma’s kitchen, where the smell of vanilla and sugar filled the air. There’s something magical about creating these sweet treats, and today, I’m sharing how to make ‘Sugar Cookies in a Jar’—a perfect gift or a quick bake for yourself.
Ingredients
- 2 cups of all-purpose flour (because who has time to measure precisely?)
- 1 cup of granulated sugar (for that sweet, sweet crunch)
- 1/2 cup of brown sugar (to add a little depth)
- 1 tsp of baking soda (the lift in every bite)
- 1/2 tsp of baking powder (for extra fluffiness)
- A pinch of salt (to balance the sweetness)
- 1 cup of unsalted butter, softened (the secret to melt-in-your-mouth cookies)
- 1 large egg (binding it all together)
- 2 tsp of vanilla extract (for that classic cookie aroma)
- A splash of milk (just to bring it all together)
Instructions
- Preheat your oven to 350°F (175°C) – no guessing here, precision is key.
- In a large bowl, cream together the softened butter, granulated sugar, and brown sugar until light and fluffy. Tip: If your butter isn’t soft enough, microwave it for 5-10 seconds.
- Beat in the egg and vanilla extract until well combined. The mixture should look smooth and smell amazing.
- In another bowl, whisk together the flour, baking soda, baking powder, and salt. Gradually add this to the wet ingredients, mixing just until combined. Tip: Overmixing leads to tough cookies, so stop when you no longer see flour streaks.
- If the dough feels too dry, add a splash of milk. The dough should be soft but not sticky.
- Roll the dough into 1-inch balls and place them on a baking sheet lined with parchment paper, about 2 inches apart. Tip: For uniform cookies, use a cookie scoop.
- Bake for 10-12 minutes, or until the edges are just starting to turn golden. The centers will look soft but will firm up as they cool.
- Let the cookies cool on the baking sheet for 5 minutes before transferring to a wire rack to cool completely.
These sugar cookies are delightfully soft with a slight crispness at the edges, bursting with vanilla flavor. Try sandwiching them with a dollop of jam or frosting for an extra special treat.
Gingerbread Cookies in a Jar
There’s something magical about the smell of gingerbread that takes me right back to my grandma’s kitchen during the holidays. Today, I’m sharing how to capture that magic in a jar with these adorable Gingerbread Cookies in a Jar—perfect for gifting or keeping all to yourself!
Ingredients
- 2 cups of all-purpose flour (because who has time to measure exactly?)
- A generous cup of brown sugar, packed like you mean it
- A splash of molasses for that deep, rich flavor
- A couple of teaspoons of ground ginger, because we’re making gingerbread, after all
- Just a pinch of cinnamon and cloves to spice things up
- 1 teaspoon of baking soda to keep things light
- A half teaspoon of salt to balance the sweetness
Instructions
- Start by whisking together the flour, brown sugar, ginger, cinnamon, cloves, baking soda, and salt in a large bowl. Tip: Sifting the flour can make your cookies extra tender.
- Pour in the molasses and mix until the dough comes together. It might be sticky, but that’s okay—that’s what flour-dusted hands are for!
- Roll the dough into small balls, about the size of a walnut, and place them on a parchment-lined baking sheet. Tip: Leaving space between the cookies lets them spread just right.
- Bake in a preheated 350°F oven for 10-12 minutes, or until the edges are just starting to brown. Tip: They’ll continue to firm up as they cool, so don’t overbake!
- Let them cool on the baking sheet for a couple of minutes before moving to a wire rack to cool completely.
Keep these cookies in a jar to enjoy their chewy texture and spicy-sweet flavor anytime. Or, tie a ribbon around the jar and give it as a gift—because sharing is caring, but I won’t judge if you keep them all for yourself.
Red Velvet Cookies in a Jar
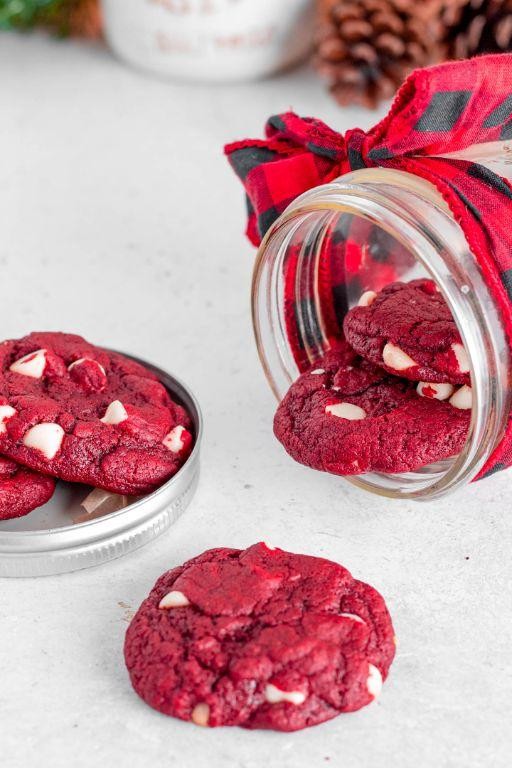
Very few things bring me as much joy as the sight of a beautifully layered jar of red velvet cookie mix, ready to be transformed into delicious treats. It’s like giving someone a jar full of love and the promise of sweet, tangy cookies with just a bit of effort. I remember the first time I made these for a friend’s birthday; the look on her face was priceless!
Ingredients
- 1 1/2 cups of all-purpose flour (because every great cookie starts here)
- 1/4 cup of cocoa powder (for that deep, chocolatey base)
- 1 tsp of baking soda (to give them a little lift)
- A pinch of salt (to balance the sweetness)
- 3/4 cup of granulated sugar (for the perfect sweetness)
- 1/4 cup of brown sugar (for a hint of molasses goodness)
- A splash of vanilla extract (because vanilla makes everything better)
- 1/2 cup of unsalted butter, softened (for richness)
- 1 large egg (to bind it all together)
- A couple of tbsp of red food coloring (for that iconic red velvet look)
- 1/2 cup of white chocolate chips (for a creamy contrast)
Instructions
- Preheat your oven to 350°F (175°C) and line a baking sheet with parchment paper. Tip: This ensures your cookies don’t stick and bake evenly.
- In a medium bowl, whisk together the flour, cocoa powder, baking soda, and salt. Tip: Sifting these together can prevent lumps in your batter.
- In a larger bowl, cream together the softened butter, granulated sugar, and brown sugar until light and fluffy. Tip: Room temperature butter creams better, so take it out of the fridge ahead of time.
- Beat in the egg and vanilla extract until well combined, then mix in the red food coloring until you achieve that vibrant red velvet color.
- Gradually add the dry ingredients to the wet, mixing just until combined. Overmixing can lead to tough cookies.
- Fold in the white chocolate chips evenly throughout the dough.
- Drop tablespoon-sized balls of dough onto the prepared baking sheet, spacing them about 2 inches apart. They’ll spread as they bake.
- Bake for 10-12 minutes, or until the edges are set but the centers are still soft. Tip: They’ll continue to cook a bit on the sheet out of the oven, so don’t overbake.
- Let the cookies cool on the baking sheet for 5 minutes before transferring to a wire rack to cool completely.
Just out of the oven, these cookies are a dream—crispy edges with a soft, chewy center, and the white chocolate chips add a lovely creamy texture. Serve them stacked high on a vintage plate for a picture-perfect dessert, or pack them in a cute box for a heartfelt homemade gift.
Lemon Crinkle Cookies in a Jar

Goodness, have I got a treat for you today! These Lemon Crinkle Cookies in a Jar are not just a delight to make but also a joy to give. I remember the first time I tried them; the tangy lemon paired with the sweet, crumbly texture had me hooked instantly.
Ingredients
- 1 1/2 cups all-purpose flour
- 1/2 teaspoon baking powder
- 1/4 teaspoon salt
- 1 cup granulated sugar
- 1/2 cup unsalted butter, softened
- 1 large egg
- 1 tablespoon lemon zest
- 2 tablespoons fresh lemon juice
- a splash of vanilla extract
- 1/2 cup powdered sugar for rolling
Instructions
- Preheat your oven to 350°F and line a baking sheet with parchment paper.
- In a medium bowl, whisk together the flour, baking powder, and salt. Set aside.
- In a large bowl, cream together the softened butter and granulated sugar until light and fluffy. Tip: This step is crucial for getting that perfect cookie texture, so don’t rush it.
- Beat in the egg, then mix in the lemon zest, lemon juice, and vanilla extract.
- Gradually add the dry ingredients to the wet ingredients, mixing until just combined. Tip: Overmixing can lead to tough cookies, so stop as soon as the flour disappears.
- Roll the dough into 1-inch balls, then roll each ball in powdered sugar until fully coated. Tip: For extra crinkle, roll the balls in powdered sugar a second time right before baking.
- Place the balls on the prepared baking sheet, spacing them about 2 inches apart.
- Bake for 10-12 minutes, or until the edges are just starting to turn golden. The centers should still be soft.
- Let the cookies cool on the baking sheet for 5 minutes before transferring to a wire rack to cool completely.
Every bite of these cookies is a little burst of sunshine, with the perfect balance of sweet and tart. Serve them with a cup of tea for a delightful afternoon treat, or pack them in a pretty jar as a heartfelt homemade gift.
M&M Cookies in a Jar
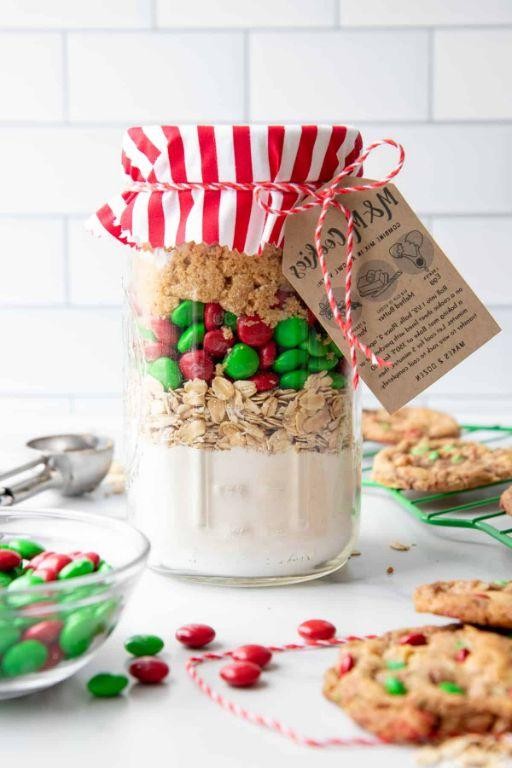
Just the other day, I was rummaging through my pantry, and it hit me—why not make those adorable M&M Cookies in a Jar I’ve been seeing all over Pinterest? Perfect for gifting or treating yourself, these cookies are as fun to make as they are to eat. Plus, who can resist the colorful crunch of M&Ms in every bite?
Ingredients
- 1 3/4 cups of all-purpose flour
- 3/4 cup of packed brown sugar
- 1/2 cup of granulated sugar
- 1/2 teaspoon of baking soda
- 1/2 teaspoon of salt
- 1/2 cup of M&Ms (plus a handful more for topping)
- 1/2 cup of chocolate chips
- 1/2 cup of softened butter
- 1 large egg
- 1 teaspoon of vanilla extract
Instructions
- Preheat your oven to 350°F (175°C) and line a baking sheet with parchment paper. Tip: This ensures your cookies won’t stick and makes cleanup a breeze.
- In a large bowl, cream together the softened butter, brown sugar, and granulated sugar until light and fluffy. Tip: Room temperature butter mixes better, so take it out of the fridge ahead of time.
- Beat in the egg and vanilla extract until well combined.
- Gradually mix in the flour, baking soda, and salt until just combined. Overmixing can lead to tough cookies, so stop when you no longer see flour streaks.
- Fold in the M&Ms and chocolate chips. Tip: Save some M&Ms to press on top of the cookies before baking for that picture-perfect look.
- Drop tablespoon-sized balls of dough onto the prepared baking sheet, spacing them about 2 inches apart.
- Bake for 10-12 minutes, or until the edges are golden but the centers are still soft. They’ll firm up as they cool.
- Let the cookies cool on the baking sheet for 5 minutes before transferring to a wire rack to cool completely.
Fresh out of the oven, these cookies are a delightful mix of chewy and crispy, with bursts of chocolate and candy in every bite. Try serving them warm with a glass of cold milk for the ultimate comfort food experience.
Almond Joy Cookies in a Jar
Craving something sweet but don’t want to spend hours in the kitchen? These Almond Joy Cookies in a Jar are your ticket to a quick, delicious treat that combines the classic flavors of almond, coconut, and chocolate in a no-fuss cookie form. I stumbled upon this idea during a lazy Sunday when my sweet tooth was calling, but my energy for baking was at an all-time low.
Ingredients
- 1 cup of all-purpose flour (because sometimes, simple is best)
- A generous 1/2 cup of shredded coconut (for that tropical vibe)
- 1/2 cup of chopped almonds (because crunch is everything)
- 1/2 cup of chocolate chips (a mix of dark and milk chocolate is my go-to)
- 1/2 cup of granulated sugar (to sweeten the deal)
- 1/4 cup of brown sugar (for that deep, caramel-like flavor)
- A pinch of salt (to balance the sweetness)
- 1/2 tsp of baking soda (the lift in your cookie)
- 1/2 cup of melted butter (because butter makes everything better)
- 1 egg (the binder that holds it all together)
- A splash of vanilla extract (for that aromatic touch)
Instructions
- Preheat your oven to 350°F (175°C) and line a baking sheet with parchment paper. This prevents sticking and makes cleanup a breeze.
- In a large bowl, whisk together the flour, baking soda, and salt. This ensures your dry ingredients are evenly distributed.
- In another bowl, mix the melted butter, granulated sugar, brown sugar, egg, and vanilla extract until smooth. Pro tip: Let the melted butter cool slightly to avoid cooking the egg.
- Gradually add the dry ingredients to the wet ingredients, stirring until just combined. Overmixing can lead to tough cookies.
- Fold in the shredded coconut, chopped almonds, and chocolate chips. This is where the magic happens, so make sure every bite is packed with goodies.
- Drop tablespoon-sized balls of dough onto the prepared baking sheet, spacing them about 2 inches apart. They’ll spread as they bake.
- Bake for 10-12 minutes, or until the edges are golden but the centers are still soft. They’ll firm up as they cool.
- Let the cookies cool on the baking sheet for 5 minutes before transferring to a wire rack. This patience-testing step ensures they don’t fall apart.
Last but not least, these cookies are a dreamy mix of chewy, crunchy, and chocolatey. Serve them slightly warm with a glass of cold milk, or crumble them over ice cream for an extra decadent dessert. Either way, they’re bound to disappear fast!
Pumpkin Spice Cookies in a Jar
Last fall, I stumbled upon the coziest way to gift homemade treats—Pumpkin Spice Cookies in a jar. It’s like capturing the essence of autumn in a glass, and honestly, who wouldn’t love that? I’ve made these for friends, and the joy on their faces is worth every sprinkle of spice.
Ingredients
- 1 3/4 cups of all-purpose flour (because sometimes, you just need that perfect cookie texture)
- 1 teaspoon of baking soda (the little lift that makes all the difference)
- 1/2 teaspoon of salt (just a pinch to balance the sweetness)
- 1 teaspoon of ground cinnamon (for that warm, spicy hug)
- 1/2 teaspoon of ground nutmeg (a whisper of nuttiness)
- 1/2 teaspoon of ground cloves (tiny but mighty)
- 1/2 teaspoon of ground ginger (for a little zing)
- 1/2 cup of unsalted butter, softened (because everything’s better with butter)
- 1/2 cup of granulated sugar (for that sweet, sweet crunch)
- 1/2 cup of packed brown sugar (hello, molasses goodness)
- 1 cup of canned pumpkin puree (the star of the show)
- 1 large egg (the binder that brings it all together)
- 1 teaspoon of vanilla extract (a splash of love)
Instructions
- Preheat your oven to 350°F (175°C). This is the sweet spot for golden edges and soft centers.
- In a medium bowl, whisk together the flour, baking soda, salt, cinnamon, nutmeg, cloves, and ginger. Tip: Sifting the flour can prevent lumps for a smoother dough.
- In a large bowl, beat the butter, granulated sugar, and brown sugar until fluffy. This usually takes about 2 minutes—don’t rush it!
- Add the pumpkin puree, egg, and vanilla extract to the butter mixture. Mix until just combined. Tip: Overmixing can lead to tough cookies, so gentle does it.
- Gradually add the dry ingredients to the wet ingredients, mixing until a soft dough forms. Tip: If the dough feels too sticky, a little extra flour can help, but add it sparingly.
- Drop tablespoon-sized balls of dough onto a baking sheet lined with parchment paper, spacing them about 2 inches apart.
- Bake for 10-12 minutes, or until the edges are just starting to turn golden. They’ll look soft in the middle, but that’s perfect—they’ll firm up as they cool.
- Let the cookies cool on the baking sheet for 5 minutes before transferring them to a wire rack to cool completely.
Kind of magical how these cookies balance the warmth of pumpkin spice with a texture that’s both chewy and tender. Try serving them with a dollop of whipped cream for an extra indulgent treat, or just enjoy them as is with a cup of tea on a crisp fall morning.
Coconut Cookies in a Jar
Every time I think about coconut cookies, I’m transported back to my grandma’s kitchen, where the smell of toasted coconut and vanilla filled the air. It’s a recipe that’s close to my heart, and today, I’m sharing my version of Coconut Cookies in a Jar, perfect for gifting or treating yourself.
Ingredients
- 1 cup of all-purpose flour
- 1/2 cup of granulated sugar
- 1/2 cup of packed brown sugar
- 1/2 cup of shredded coconut
- 1/4 cup of chopped pecans
- 1/2 tsp of baking soda
- A pinch of salt
- 1/2 cup of melted butter
- 1 egg
- A splash of vanilla extract
Instructions
- Preheat your oven to 350°F (175°C) and line a baking sheet with parchment paper.
- In a large bowl, whisk together the flour, granulated sugar, brown sugar, shredded coconut, chopped pecans, baking soda, and salt.
- Add the melted butter, egg, and vanilla extract to the dry ingredients. Mix until just combined. Tip: Don’t overmix to keep the cookies tender.
- Using a tablespoon, scoop the dough and roll into balls. Place them on the prepared baking sheet, spacing about 2 inches apart.
- Bake for 10-12 minutes, or until the edges are golden but the centers are still soft. Tip: They’ll firm up as they cool, so don’t wait for them to look ‘done’.
- Let the cookies cool on the baking sheet for 5 minutes before transferring to a wire rack to cool completely. Tip: This prevents them from breaking.
Zesty and sweet, these coconut cookies have a delightful crunch from the pecans and a chewy center. Serve them with a cold glass of milk or package them in a jar with a ribbon for a heartfelt homemade gift.
Espresso Chocolate Cookies in a Jar
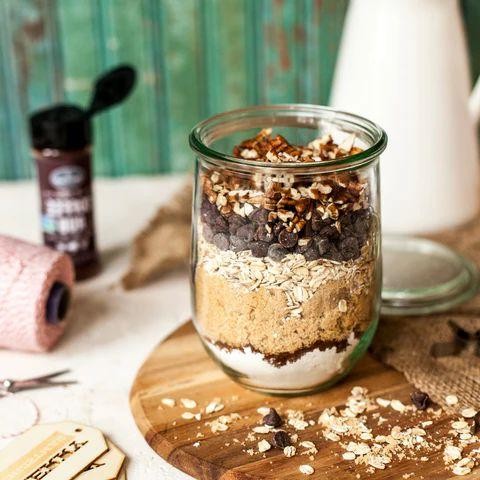
Finally, a cookie recipe that combines my two greatest loves: coffee and chocolate. These Espresso Chocolate Cookies in a Jar are not just a treat; they’re a little jar of happiness that I love to gift to friends during the holidays or keep all to myself for those late-night cravings.
Ingredients
- 1 cup of all-purpose flour (because that’s what I always have on hand)
- 1/2 cup of unsweetened cocoa powder (the darker, the better in my book)
- 1/2 tsp of baking soda (just enough to give them a little lift)
- A pinch of salt (to balance all that sweetness)
- 1/2 cup of softened butter (I like to leave mine out overnight)
- 3/4 cup of granulated sugar (for that perfect crunch)
- 1/4 cup of packed brown sugar (because it adds a lovely moisture)
- 1 large egg (room temperature is key here)
- 1 tbsp of instant espresso powder (this is where the magic happens)
- A splash of vanilla extract (I always add a little extra)
- 1 cup of semi-sweet chocolate chips (because why not?)
Instructions
- Preheat your oven to 350°F (175°C) and line a baking sheet with parchment paper. Trust me, it makes cleanup a breeze.
- In a medium bowl, whisk together the flour, cocoa powder, baking soda, and salt. This ensures everything is evenly distributed.
- In a larger bowl, cream together the butter, granulated sugar, and brown sugar until light and fluffy. This usually takes me about 3 minutes with my hand mixer.
- Beat in the egg, espresso powder, and vanilla extract until well combined. The espresso powder should dissolve completely.
- Gradually mix in the dry ingredients until just combined. Overmixing is the enemy of tender cookies.
- Fold in the chocolate chips. I like to reserve a few to press on top of the cookies before baking for that bakery-style look.
- Drop tablespoon-sized balls of dough onto the prepared baking sheet, spacing them about 2 inches apart. They’ll spread as they bake.
- Bake for 10-12 minutes, or until the edges are set but the centers are still soft. They’ll firm up as they cool.
- Let the cookies cool on the baking sheet for 5 minutes before transferring to a wire rack. This patience-testing step is worth it.
Velvety with a crackly top, these cookies are a coffee lover’s dream. Serve them warm with a glass of cold milk or crumble them over vanilla ice cream for an indulgent dessert.
Maple Bacon Cookies in a Jar
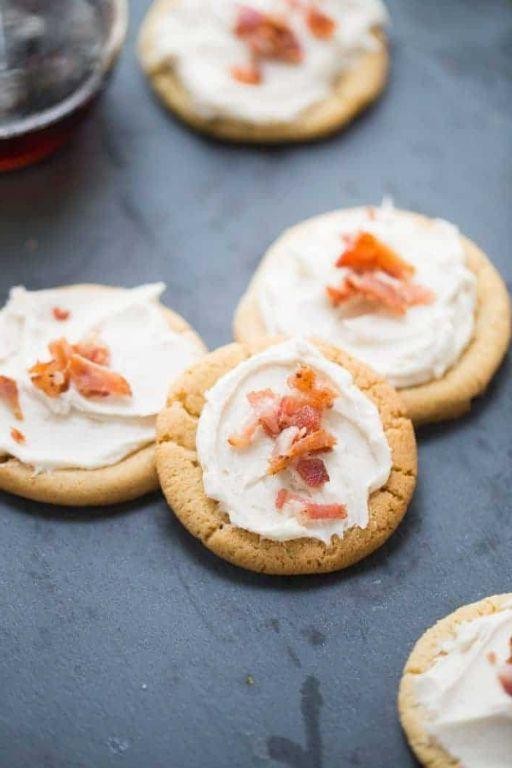
Zesty mornings call for something sweet, smoky, and utterly irresistible, which is exactly why I fell in love with making Maple Bacon Cookies in a Jar. It’s the perfect blend of breakfast and dessert, and let me tell you, the first time I tried this combo, it was a game-changer for my cookie repertoire.
Ingredients
- 1 cup of all-purpose flour (because sometimes, simple is best)
- A generous 1/2 cup of brown sugar (for that deep, molasses-y sweetness)
- A couple of strips of crispy bacon, chopped (go for the thick-cut, it’s worth it)
- 1/4 cup of pure maple syrup (the real deal, none of that pancake syrup stuff)
- A splash of vanilla extract (because vanilla makes everything better)
- 1/2 tsp of baking soda (for that perfect rise)
- A pinch of salt (to balance all that sweetness)
- 1/2 cup of softened butter (unsalted, so you’re the boss of the salt)
- 1 egg (room temperature, please, for even mixing)
Instructions
- Preheat your oven to 350°F (175°C) – no guessing here, precision is key for perfect cookies.
- In a large bowl, cream together the softened butter and brown sugar until it’s light and fluffy. This is where the magic starts, so don’t rush it.
- Beat in the egg, maple syrup, and vanilla extract until everything is well combined. Tip: scrape down the sides of the bowl to make sure every bit gets mixed in.
- Whisk together the flour, baking soda, and salt in a separate bowl. This ensures your leavening agents are evenly distributed.
- Gradually mix the dry ingredients into the wet ingredients. Tip: do this in batches to avoid a flour explosion all over your kitchen.
- Fold in the chopped bacon. Yes, it’s as glorious as it sounds.
- Drop tablespoon-sized balls of dough onto a baking sheet lined with parchment paper, spacing them about 2 inches apart. They’ll spread, so give them room to breathe.
- Bake for 10-12 minutes, or until the edges are golden but the centers are still soft. Tip: they’ll firm up as they cool, so resist the urge to overbake.
- Let them cool on the baking sheet for 5 minutes before transferring to a wire rack. Patience is a virtue, especially with cookies.
Every bite of these cookies is a little adventure – the smokiness of the bacon plays so well with the sweet maple, and the texture? Chewy with just the right amount of crunch from the bacon. Serve them warm with a cold glass of milk, or get fancy and crumble them over vanilla ice cream for an epic dessert.
Carrot Cake Cookies in a Jar
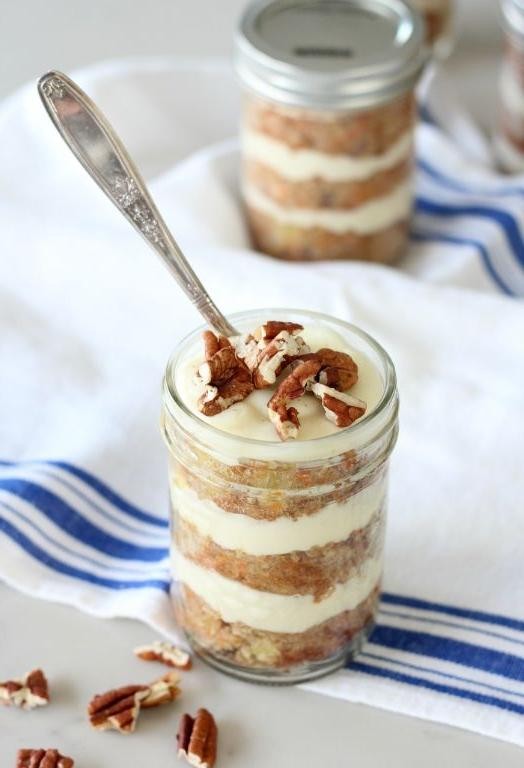
Unbelievably, these Carrot Cake Cookies in a Jar are the perfect blend of convenience and homemade goodness. I stumbled upon this idea during a hectic week when I craved something sweet but didn’t have the time to bake from scratch. It’s become my go-to for last-minute gifts or when I need a quick dessert fix.
Ingredients
- 1 cup of all-purpose flour (because, let’s be honest, it’s the backbone of most cookies)
- A generous 1/2 cup of brown sugar (for that deep, molasses-y sweetness)
- A couple of teaspoons of cinnamon (because what’s carrot cake without it?)
- A pinch of salt (to balance the sweetness)
- 1/2 cup of grated carrots (the star of the show, obviously)
- A splash of vanilla extract (for that warm, bakery aroma)
- 1/2 cup of softened butter (it’s all about that rich texture)
- 1 egg (to bind everything together beautifully)
Instructions
- Preheat your oven to 350°F (175°C) – no guessing here, precision is key for perfect cookies.
- In a large bowl, cream together the softened butter and brown sugar until it’s light and fluffy. Tip: If your butter isn’t soft enough, microwave it for 10 seconds – but no more!
- Beat in the egg and vanilla extract until the mixture is smooth. This is where the magic starts to happen.
- Gradually mix in the flour, cinnamon, and salt. Tip: Sifting the flour can prevent lumps, but let’s keep it real – a whisk does the job too.
- Fold in the grated carrots. Tip: Squeeze out excess moisture from the carrots with a paper towel to avoid soggy cookies.
- Drop tablespoon-sized balls of dough onto a baking sheet lined with parchment paper, spacing them about 2 inches apart.
- Bake for 12-15 minutes, or until the edges are just starting to turn golden. The center should still be soft – they’ll firm up as they cool.
- Let them cool on the baking sheet for 5 minutes before transferring to a wire rack. Patience is a virtue here.
Just out of the oven, these cookies are a delightful mix of chewy and soft, with the carrots adding a subtle sweetness and moisture. Serve them with a dollop of cream cheese frosting on top for an extra indulgent treat, or enjoy them as is with your afternoon coffee.
Banana Bread Cookies in a Jar
Guess what I stumbled upon while cleaning out my pantry last weekend? A forgotten jar of banana bread mix that inspired these delightful Banana Bread Cookies in a Jar. They’re the perfect blend of convenience and homemade goodness, and I can’t wait to share how you can whip them up too.
Ingredients
- 1 cup of mashed bananas (about 2 ripe ones)
- 1/2 cup of unsalted butter, softened
- 3/4 cup of brown sugar, packed
- 1 egg
- 1 tsp of vanilla extract
- 1 1/2 cups of all-purpose flour
- 1/2 tsp of baking soda
- 1/4 tsp of salt
- A generous handful of chocolate chips (because why not?)
Instructions
- Preheat your oven to 350°F (175°C) and line a baking sheet with parchment paper.
- In a large bowl, cream together the softened butter and brown sugar until light and fluffy. Tip: Make sure your butter is at room temperature to avoid a lumpy mixture.
- Beat in the egg, then stir in the mashed bananas and vanilla extract. The riper the bananas, the sweeter your cookies will be!
- In another bowl, whisk together the flour, baking soda, and salt. Gradually add this to the banana mixture, mixing just until combined.
- Fold in the chocolate chips. Tip: Reserve a few chips to press on top of each cookie before baking for a prettier finish.
- Drop tablespoon-sized balls of dough onto the prepared baking sheet, spacing them about 2 inches apart.
- Bake for 10-12 minutes, or until the edges are golden but the centers are still soft. Tip: They’ll firm up as they cool, so don’t overbake!
- Let the cookies cool on the baking sheet for 5 minutes before transferring to a wire rack.
These cookies are wonderfully soft with a chewy texture and bursts of chocolate in every bite. Serve them warm with a glass of milk, or pack them in a jar for a sweet gift that’s sure to impress.
Cherry Almond Cookies in a Jar
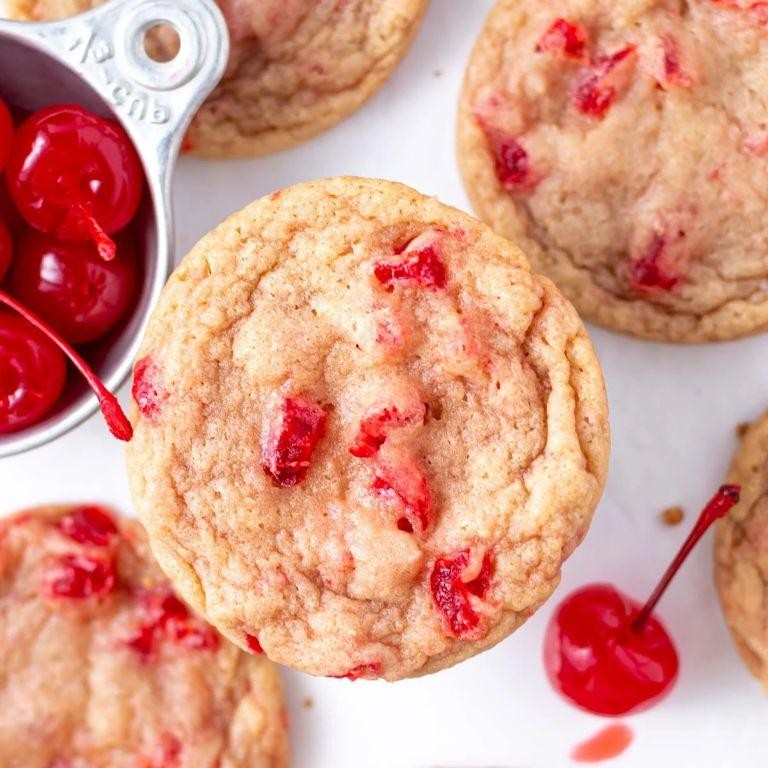
Craving something sweet but don’t want to spend hours in the kitchen? These Cherry Almond Cookies in a Jar are your answer. I stumbled upon this recipe during a lazy Sunday afternoon, and it’s been my go-to for quick, delicious treats ever since.
Ingredients
- 1 cup of all-purpose flour (because sometimes, simple is best)
- A generous pinch of salt (to balance the sweetness)
- 1/2 cup of unsalted butter, softened (for that melt-in-your-mouth texture)
- 1/2 cup of granulated sugar (for just the right amount of sweetness)
- 1 large egg (the binder that holds everything together)
- A splash of almond extract (for that unmistakable nutty flavor)
- 1/2 cup of dried cherries (for a chewy, tangy contrast)
- 1/4 cup of sliced almonds (because crunch is everything)
Instructions
- Preheat your oven to 350°F (175°C) and line a baking sheet with parchment paper. This ensures your cookies won’t stick and makes cleanup a breeze.
- In a medium bowl, whisk together the flour and salt. This step is crucial for evenly distributing the salt throughout the dough.
- In a larger bowl, cream together the softened butter and sugar until light and fluffy. This should take about 2 minutes with an electric mixer.
- Beat in the egg and almond extract until well combined. The almond extract is potent, so a little goes a long way.
- Gradually mix in the dry ingredients until just combined. Overmixing can lead to tough cookies, so stop as soon as the flour disappears.
- Fold in the dried cherries and sliced almonds. This is where the magic happens, so make sure they’re evenly distributed.
- Drop tablespoon-sized balls of dough onto the prepared baking sheet, spacing them about 2 inches apart. They’ll spread as they bake.
- Bake for 10-12 minutes, or until the edges are just starting to turn golden. The centers might look soft, but they’ll firm up as they cool.
- Let the cookies cool on the baking sheet for 5 minutes before transferring them to a wire rack. This patience-testing step prevents them from falling apart.
What makes these cookies stand out is the perfect balance of chewy and crunchy, with the almond and cherry flavors playing off each other beautifully. Try serving them with a dollop of vanilla ice cream for an extra indulgent treat.
Raspberry White Chocolate Cookies in a Jar
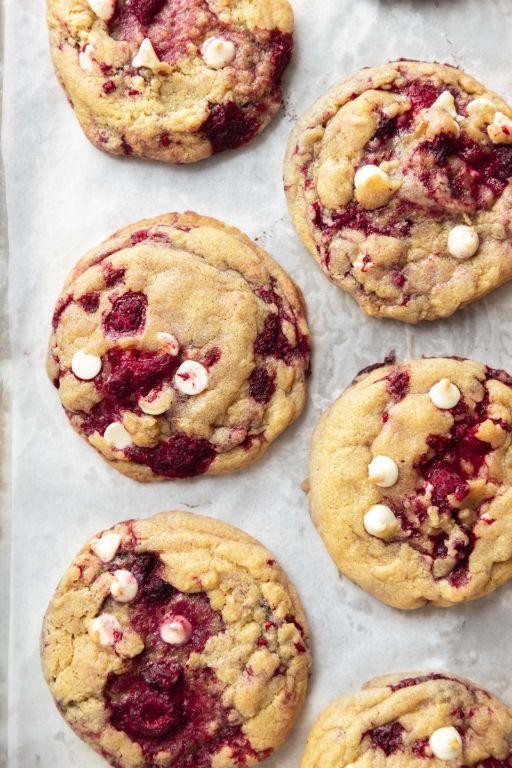
How many times have you stumbled upon a recipe that’s not only easy to make but also looks adorable as a gift? That’s exactly what happened to me with these Raspberry White Chocolate Cookies in a Jar. Perfect for those last-minute gift ideas or when you’re craving something sweet but don’t want to spend hours in the kitchen.
Ingredients
- 1 cup of all-purpose flour
- 1/2 cup of granulated sugar
- 1/4 cup of brown sugar, packed
- 1/2 tsp of baking powder
- 1/4 tsp of salt
- 1/2 cup of white chocolate chips
- 1/3 cup of freeze-dried raspberries
- 1/2 cup of unsalted butter, melted
- 1 large egg
- 1 tsp of vanilla extract
Instructions
- Preheat your oven to 350°F (175°C) and line a baking sheet with parchment paper.
- In a large bowl, whisk together the flour, granulated sugar, brown sugar, baking powder, and salt.
- Stir in the white chocolate chips and freeze-dried raspberries until evenly distributed.
- In another bowl, mix the melted butter, egg, and vanilla extract until smooth.
- Combine the wet ingredients with the dry ingredients, stirring just until the dough comes together. Tip: Don’t overmix to keep the cookies tender.
- Scoop tablespoon-sized balls of dough onto the prepared baking sheet, spacing them about 2 inches apart.
- Bake for 10-12 minutes, or until the edges are just starting to turn golden. Tip: The cookies will look soft but will firm up as they cool.
- Let the cookies cool on the baking sheet for 5 minutes before transferring to a wire rack to cool completely. Tip: For extra gooey cookies, slightly underbake them.
Last but not least, these cookies are a delightful mix of sweet and tart, with the white chocolate balancing the raspberries perfectly. Serve them warm with a glass of cold milk for the ultimate comfort food experience, or pack them in a cute jar tied with a ribbon for a heartfelt homemade gift.
Mint Chocolate Chip Cookies in a Jar
Back when I was a kid, my grandma used to surprise us with the most delightful treats, and these Mint Chocolate Chip Cookies in a Jar remind me so much of her kitchen adventures. They’re perfect for gifting or when you’re in the mood for something sweet with a refreshing twist.
Ingredients
- 1 cup of all-purpose flour (because who has time to measure precisely?)
- A generous 1/2 cup of brown sugar, packed like you mean it
- 1/4 cup of granulated sugar, for that sweet crunch
- 1/2 tsp of baking soda, to keep things light
- 1/4 tsp of salt, just a pinch to balance the sweetness
- 1/2 cup of mint chocolate chips, because more is always better
- 1/4 cup of unsalted butter, melted and slightly cooled
- 1 large egg, because it’s the glue that holds everything together
- A splash of vanilla extract, for that aromatic touch
Instructions
- Preheat your oven to 350°F (175°C) – no guessing, this temp is key for perfect cookies.
- In a large bowl, whisk together the flour, brown sugar, granulated sugar, baking soda, and salt. Tip: Sifting the flour can prevent lumps for a smoother dough.
- Stir in the mint chocolate chips until they’re evenly distributed. This ensures every bite is packed with minty chocolate goodness.
- In another bowl, mix the melted butter, egg, and vanilla extract until well combined. Tip: Let the melted butter cool a bit to avoid cooking the egg.
- Combine the wet and dry ingredients, mixing just until the dough comes together. Overmixing can lead to tough cookies, so be gentle.
- Drop tablespoon-sized balls of dough onto a baking sheet lined with parchment paper, spacing them about 2 inches apart. They’ll spread, so give them room to grow.
- Bake for 10-12 minutes, or until the edges are just starting to turn golden but the centers are still soft. Tip: They’ll firm up as they cool, so don’t overbake.
- Let the cookies cool on the baking sheet for 5 minutes before transferring them to a wire rack to cool completely.
How these cookies turn out is nothing short of magical – crisp on the edges, chewy in the middle, with bursts of mint chocolate that make them irresistible. Serve them with a cold glass of milk or crumble them over ice cream for an extra special treat.
Toffee Pecan Cookies in a Jar
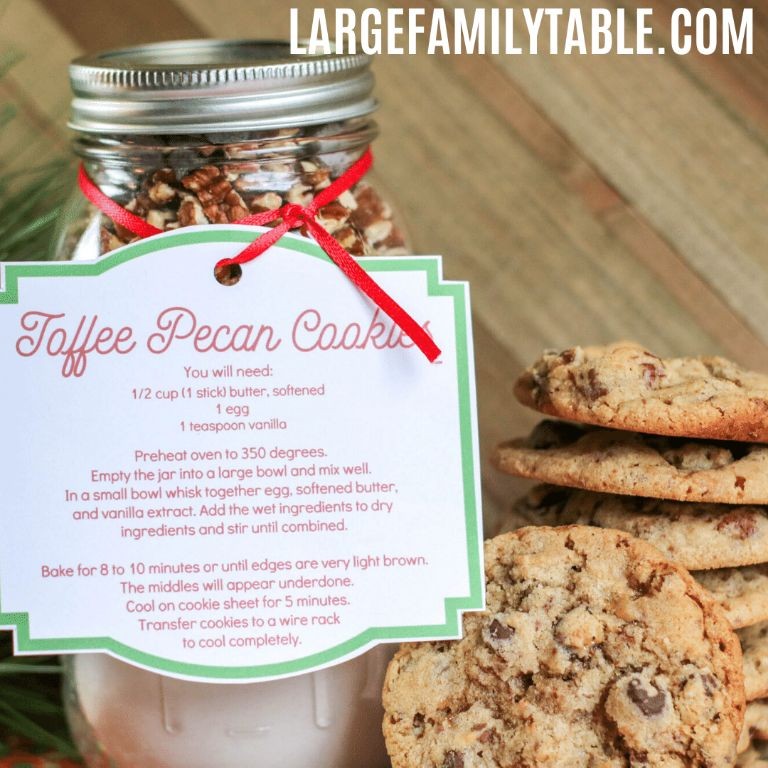
Every time I think about the holidays, my mind immediately jumps to baking—specifically, these Toffee Pecan Cookies in a Jar. There’s something so comforting about the process, not to mention the heavenly aroma that fills the house. I love making these as gifts because they’re not just delicious; they’re a little piece of home.
Ingredients
- 1 cup of all-purpose flour (because sometimes, simple is best)
- A generous 1/2 cup of packed brown sugar (for that deep, molasses-y sweetness)
- 1/4 cup of granulated sugar (to balance things out)
- A pinch of salt (trust me, it makes all the difference)
- 1/2 cup of toffee bits (the star of the show)
- 3/4 cup of chopped pecans (for that irresistible crunch)
- 1/2 cup of unsalted butter, melted (because everything’s better with butter)
- 1 large egg (to bind it all together)
- A splash of vanilla extract (for that warm, aromatic flavor)
Instructions
- Preheat your oven to 350°F (175°C) and line a baking sheet with parchment paper. This ensures your cookies won’t stick and makes cleanup a breeze.
- In a large bowl, whisk together the flour, brown sugar, granulated sugar, and salt. Tip: Sifting the flour can prevent lumps for a smoother dough.
- Stir in the toffee bits and chopped pecans until they’re evenly distributed throughout the dry ingredients.
- Add the melted butter, egg, and vanilla extract to the bowl. Mix until just combined—overmixing can lead to tough cookies.
- Drop tablespoon-sized balls of dough onto the prepared baking sheet, spacing them about 2 inches apart. They’ll spread as they bake.
- Bake for 10-12 minutes, or until the edges are golden but the centers are still soft. Tip: They’ll firm up as they cool, so don’t overbake.
- Let the cookies cool on the baking sheet for 5 minutes before transferring them to a wire rack to cool completely. Tip: This step is crucial for achieving the perfect texture.
Perfectly chewy with a delightful crunch from the pecans and toffee, these cookies are a dream. I love serving them slightly warm with a glass of cold milk for the ultimate comfort food experience.
Conclusion
Concluding our sweet journey, these 22 Delicious Cookies in a Jar Recipes offer a treasure trove of creativity and convenience for every home cook. Whether you’re gifting or treating yourself, each recipe promises joy in every jar. We’d love to hear which ones become your favorites—drop us a comment below! Don’t forget to share the love by pinning this article on Pinterest. Happy baking!