Who can resist the sweet, comforting embrace of a freshly baked cookie? Whether you’re a seasoned baker or just starting out, our roundup of 20 Delicious Cookie Dessert Recipes is sure to inspire your next baking adventure. From classic chocolate chip to innovative twists, these recipes promise to satisfy every craving. So, preheat your oven and let’s dive into a world of irresistible treats that are perfect for any occasion!
Chocolate Chip Cookie Dough Cheesecake
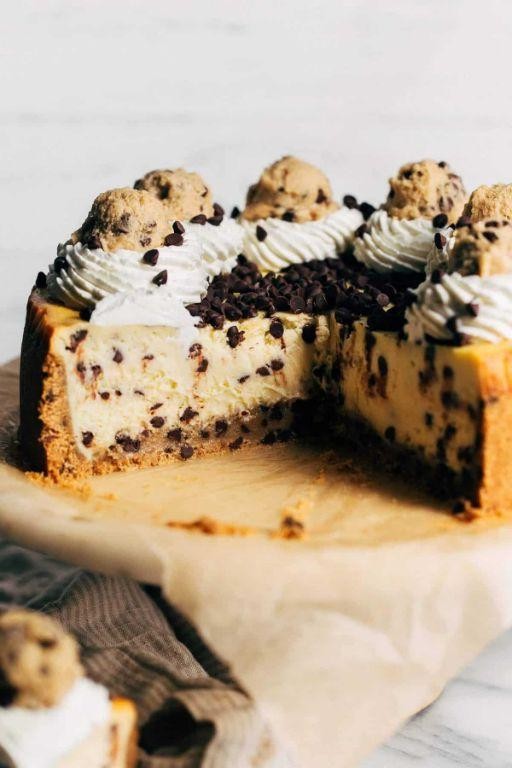
Who doesn’t love the classic combination of chocolate chip cookies and cheesecake? I remember the first time I decided to merge these two favorites; it was a game-changer in my dessert repertoire. This Chocolate Chip Cookie Dough Cheesecake is a dream come true for anyone who’s ever sneaked a spoonful of cookie dough from the mixing bowl.
Ingredients
- 1 1/2 cups graham cracker crumbs (I always go for the honey-flavored ones for that extra sweetness)
- 1/4 cup granulated sugar (because a little extra sweetness never hurt anyone)
- 1/2 cup unsalted butter, melted (I prefer using unsalted to control the saltiness)
- 2 packages (8 oz each) cream cheese, softened (room temperature is key for a smooth filling)
- 1/2 cup granulated sugar (yes, more sugar, but trust me, it’s worth it)
- 2 large eggs (room temp eggs blend better, in my experience)
- 1 tsp vanilla extract (the real deal, not imitation)
- 1 cup chocolate chip cookie dough (store-bought or homemade, no judgment here)
- 1/2 cup mini chocolate chips (because more chocolate is always better)
Instructions
- Preheat your oven to 350°F (175°C). This ensures a perfectly baked cheesecake without overdoing it.
- In a medium bowl, mix the graham cracker crumbs, 1/4 cup sugar, and melted butter until well combined. Press this mixture firmly into the bottom of a 9-inch springform pan to create the crust. Tip: Use the bottom of a measuring cup to press the crust evenly.
- In a large bowl, beat the softened cream cheese and 1/2 cup sugar until smooth. Add the eggs one at a time, then stir in the vanilla extract. Tip: Scrape the sides of the bowl to ensure everything is well incorporated.
- Drop spoonfuls of the cookie dough into the cream cheese mixture, then gently fold in the mini chocolate chips. Be careful not to overmix to keep those delightful cookie dough chunks intact.
- Pour the filling over the crust in the springform pan, spreading it evenly with a spatula.
- Bake for 40-45 minutes, or until the center is almost set but still slightly wobbly. Tip: A toothpick inserted near the center should come out mostly clean, with a few moist crumbs.
- Let the cheesecake cool in the pan on a wire rack for 10 minutes, then run a knife around the edge to loosen it. Chill in the refrigerator for at least 4 hours, or overnight for best results.
Decadent doesn’t even begin to describe this cheesecake. The creamy texture paired with chunks of cookie dough and bursts of chocolate chips is pure bliss. Serve it with a drizzle of caramel or a scoop of vanilla ice cream for an extra indulgent treat.
Peanut Butter Cookie Ice Cream Sandwich
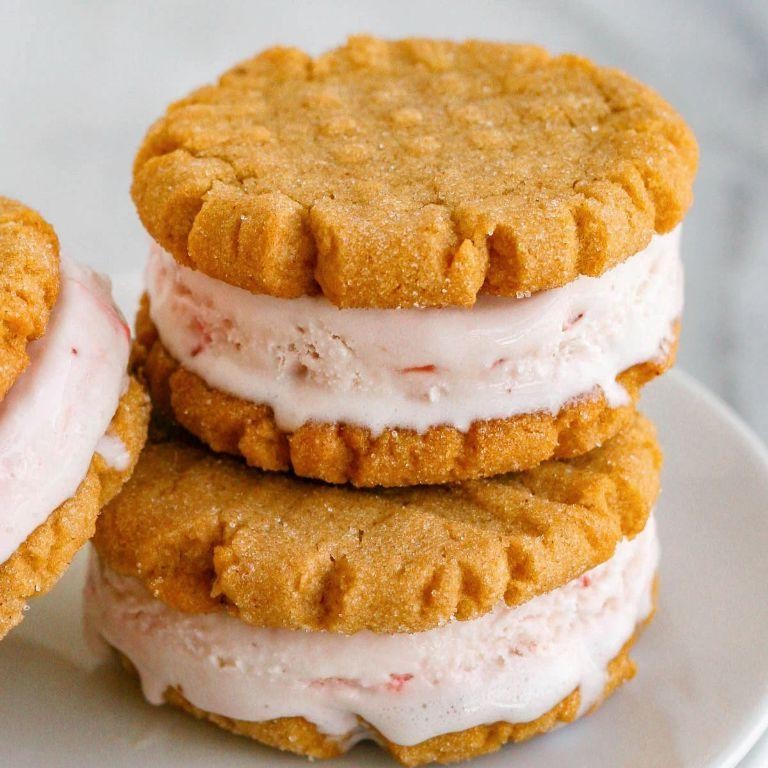
How many times have you found yourself torn between the chewy goodness of peanut butter cookies and the creamy delight of ice cream? I’ve been there more times than I can count, which is why I decided to marry these two loves into one irresistible treat: the Peanut Butter Cookie Ice Cream Sandwich. It’s the perfect blend of textures and flavors that’ll have you reaching for seconds.
Ingredients
- 1 cup creamy peanut butter (I swear by the natural kind for its rich flavor)
- 1 cup granulated sugar (because life’s too short for less sweet)
- 1 large egg (room temp eggs blend smoother, trust me)
- 1 tsp vanilla extract (the real deal, not imitation)
- 1 pint vanilla ice cream (or your favorite flavor, but vanilla is classic)
Instructions
- Preheat your oven to 350°F (177°C) and line a baking sheet with parchment paper. This prevents sticking and makes cleanup a breeze.
- In a mixing bowl, combine 1 cup peanut butter, 1 cup sugar, 1 egg, and 1 tsp vanilla extract. Mix until smooth. Tip: If the dough feels too sticky, chilling it for 30 minutes makes it easier to handle.
- Roll the dough into 12 equal-sized balls and place them on the prepared baking sheet. Flatten each ball with a fork, creating a crisscross pattern. This not only looks pretty but helps them bake evenly.
- Bake for 10-12 minutes, or until the edges are just starting to brown. They’ll firm up as they cool, so don’t overbake. Tip: Let them cool on the baking sheet for 5 minutes before transferring to a wire rack to cool completely.
- Once cooled, scoop 1/4 cup of vanilla ice cream onto the flat side of one cookie and top with another cookie, pressing gently to form a sandwich. Tip: Work quickly to prevent the ice cream from melting too much.
- Place the sandwiches in the freezer for at least 1 hour to firm up before serving.
Perfect for those lazy summer afternoons or as a sweet ending to any meal, these sandwiches offer a delightful contrast between the soft, chewy cookies and the cold, creamy ice cream. Try rolling the edges in mini chocolate chips or crushed peanuts for an extra crunch!
Double Chocolate Cookie Brownies
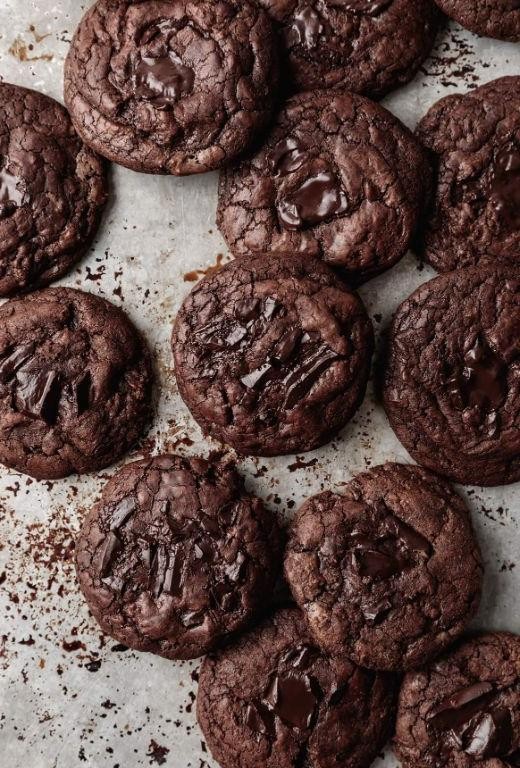
Deliciously decadent and irresistibly rich, these Double Chocolate Cookie Brownies are my go-to when I need a serious chocolate fix. I remember the first time I made them; my kitchen smelled like a bakery, and my family couldn’t resist sneaking bites before they even cooled!
Ingredients
- 1 cup unsalted butter, melted (I always use unsalted to control the sweetness)
- 2 cups granulated sugar (because life’s too short for less sugar)
- 4 large eggs, room temperature (they blend better when not cold)
- 1 tsp vanilla extract (the real deal, not imitation)
- 1 cup all-purpose flour (sifted to avoid lumps)
- 1/2 cup cocoa powder (I prefer Dutch-processed for a deeper flavor)
- 1/4 tsp salt (just a pinch to balance the sweetness)
- 1 cup semi-sweet chocolate chips (because double chocolate means double the fun)
Instructions
- Preheat your oven to 350°F (175°C) and line a 9×13 inch baking pan with parchment paper, leaving an overhang for easy removal.
- In a large bowl, whisk together the melted butter and sugar until well combined. Tip: The mixture should look shiny and smooth.
- Add the eggs one at a time, whisking well after each addition. Stir in the vanilla extract.
- Sift in the flour, cocoa powder, and salt, then fold gently until just combined. Tip: Overmixing can lead to tough brownies.
- Fold in the chocolate chips, saving a handful to sprinkle on top before baking.
- Pour the batter into the prepared pan, smoothing the top with a spatula. Sprinkle the reserved chocolate chips over the top.
- Bake for 25-30 minutes, or until a toothpick inserted into the center comes out with a few moist crumbs. Tip: Don’t overbake; the brownies will continue to set as they cool.
- Let the brownies cool completely in the pan before lifting them out using the parchment overhang.
Just out of the oven, these brownies are a perfect mix of fudgy and chewy, with pockets of melted chocolate in every bite. Serve them warm with a scoop of vanilla ice cream for an extra indulgent treat, or enjoy them as is with a cold glass of milk.
Snickerdoodle Cookie Bars
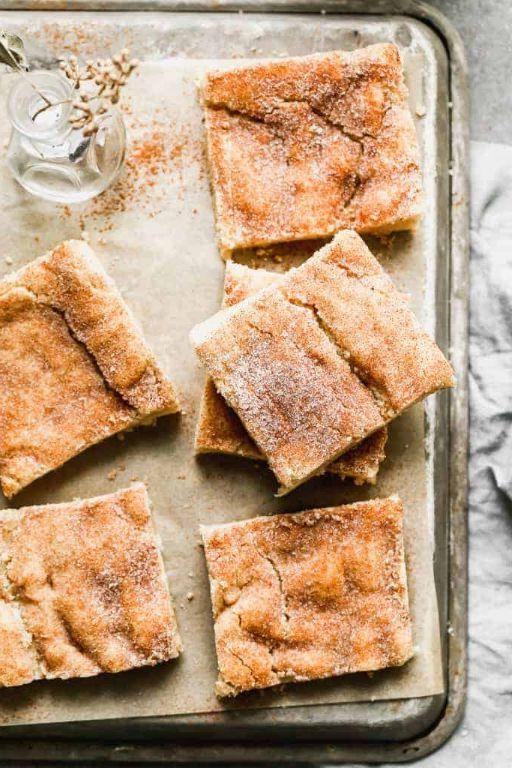
Every time I think about Snickerdoodle Cookie Bars, I’m transported back to my grandma’s kitchen, where the smell of cinnamon and sugar was a constant. These bars are my go-to when I need a quick, comforting treat that feels like a hug in every bite.
Ingredients
- 1 cup unsalted butter, softened (I always leave mine out overnight for perfect softness)
- 1 1/2 cups granulated sugar (because life’s too short for less sugar)
- 2 large eggs, room temperature (they blend better when not cold)
- 2 tsp vanilla extract (the real deal, none of that imitation stuff)
- 2 3/4 cups all-purpose flour (I swear by King Arthur for consistency)
- 2 tsp cream of tartar (this is the secret to that classic snickerdoodle tang)
- 1 tsp baking soda
- 1/2 tsp salt
- 1/4 cup granulated sugar + 1 tbsp cinnamon mixed together for topping (because the more cinnamon, the better)
Instructions
- Preheat your oven to 350°F and line a 9×13 inch baking pan with parchment paper, leaving some overhang for easy removal.
- In a large bowl, cream together the softened butter and 1 1/2 cups sugar until light and fluffy, about 3 minutes. Tip: Scrape down the sides of the bowl to ensure everything is evenly mixed.
- Beat in the eggs one at a time, then stir in the vanilla extract. Tip: Adding eggs one at a time prevents the mixture from curdling.
- In a separate bowl, whisk together the flour, cream of tartar, baking soda, and salt. Gradually add this to the wet ingredients, mixing until just combined. Tip: Overmixing can lead to tough bars, so stop as soon as the flour disappears.
- Spread the dough evenly into the prepared pan. Sprinkle the cinnamon-sugar mixture generously over the top.
- Bake for 20-25 minutes, or until the edges are golden but the center is still slightly soft. They’ll firm up as they cool.
- Let the bars cool in the pan for 10 minutes, then use the parchment overhang to lift them out onto a wire rack to cool completely.
Chewy in the middle with a slight crisp around the edges, these Snickerdoodle Cookie Bars are a cinnamon lover’s dream. Try serving them warm with a scoop of vanilla ice cream for an extra indulgent treat.
Oatmeal Raisin Cookie Pudding
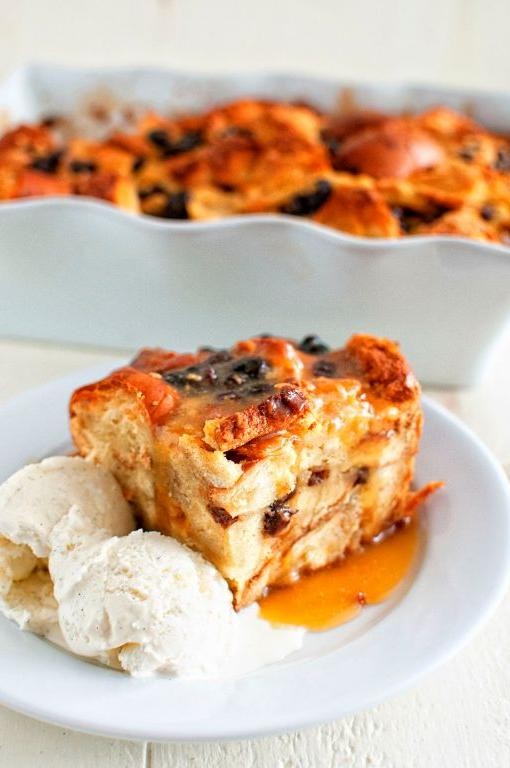
My kitchen smells like a cozy autumn afternoon whenever I whip up this Oatmeal Raisin Cookie Pudding. It’s my go-to comfort dessert, especially when I’m craving something sweet but not overly indulgent.
Ingredients
- 1 cup old-fashioned oats (I love the texture they bring)
- 1/2 cup raisins (soaked in warm water for 10 minutes to plump up)
- 2 cups whole milk (for that creamy richness)
- 1/4 cup brown sugar (packed, because it’s all about that molasses flavor)
- 1 tbsp unsalted butter (I always use unsalted to control the sweetness)
- 1 tsp vanilla extract (the real deal, none of that imitation stuff)
- 1/2 tsp cinnamon (because it’s not oatmeal without it)
- A pinch of salt (to balance the sweetness)
Instructions
- In a medium saucepan, combine the oats, milk, brown sugar, butter, vanilla extract, cinnamon, and salt over medium heat.
- Stir continuously for about 5 minutes until the mixture begins to thicken. Tip: Keep the heat medium to avoid scalding the milk.
- Add the plumped raisins and continue to cook for another 3 minutes, stirring occasionally. Tip: The pudding should coat the back of a spoon when it’s ready.
- Remove from heat and let it sit for 2 minutes to thicken further. Tip: Covering it with a lid will prevent a skin from forming on top.
Enjoy this pudding warm for a comforting dessert or chill it for a firmer texture. The cinnamon and raisins make every bite a little celebration of flavors.
White Chocolate Macadamia Nut Cookie Tart
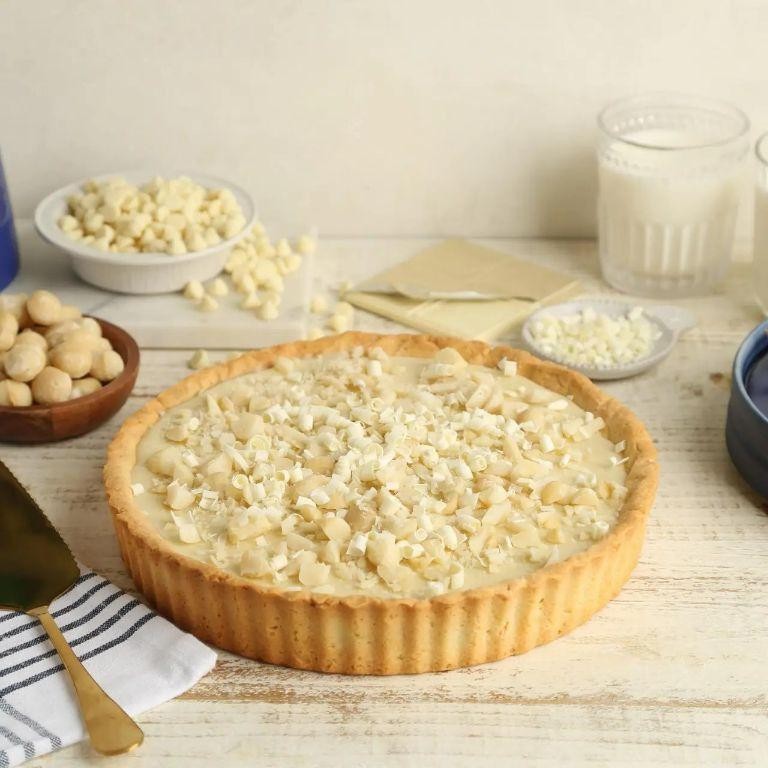
Craving something sweet but want to impress your guests with more than just a batch of cookies? This White Chocolate Macadamia Nut Cookie Tart is my go-to when I need a showstopper dessert that’s as delicious as it is beautiful. It combines the chewy goodness of a cookie with the elegance of a tart, and trust me, it’s easier to make than you might think.
Ingredients
- 1 1/2 cups all-purpose flour (I always sift mine to avoid lumps)
- 1/2 cup unsalted butter, softened (room temp is key for a smooth dough)
- 1/2 cup granulated sugar (for that perfect sweetness)
- 1/4 cup brown sugar (adds a lovely depth of flavor)
- 1 large egg (room temp eggs blend better, in my experience)
- 1 tsp vanilla extract (the real deal, not imitation)
- 1/2 tsp baking soda (for just the right lift)
- 1/4 tsp salt (to balance the sweetness)
- 1 cup white chocolate chips (I prefer the chunks for more texture)
- 1/2 cup macadamia nuts, roughly chopped (toasted for extra crunch)
Instructions
- Preheat your oven to 350°F (175°C) and lightly grease a 9-inch tart pan with a removable bottom.
- In a large bowl, cream together the softened butter, granulated sugar, and brown sugar until light and fluffy, about 3 minutes.
- Beat in the egg and vanilla extract until fully incorporated.
- In a separate bowl, whisk together the sifted flour, baking soda, and salt.
- Gradually add the dry ingredients to the wet ingredients, mixing just until combined.
- Fold in the white chocolate chips and chopped macadamia nuts with a spatula.
- Press the dough evenly into the prepared tart pan, making sure to push it up the sides.
- Bake for 20-25 minutes, or until the edges are golden but the center is still slightly soft.
- Let the tart cool in the pan for 10 minutes before removing the rim to cool completely on a wire rack.
Go ahead and slice this beauty while it’s still slightly warm for the ultimate indulgence. The contrast between the crispy edges and the gooey center, packed with creamy white chocolate and crunchy macadamia nuts, is simply irresistible. Serve it with a scoop of vanilla ice cream for an extra special treat.
Red Velvet Cookie Cake
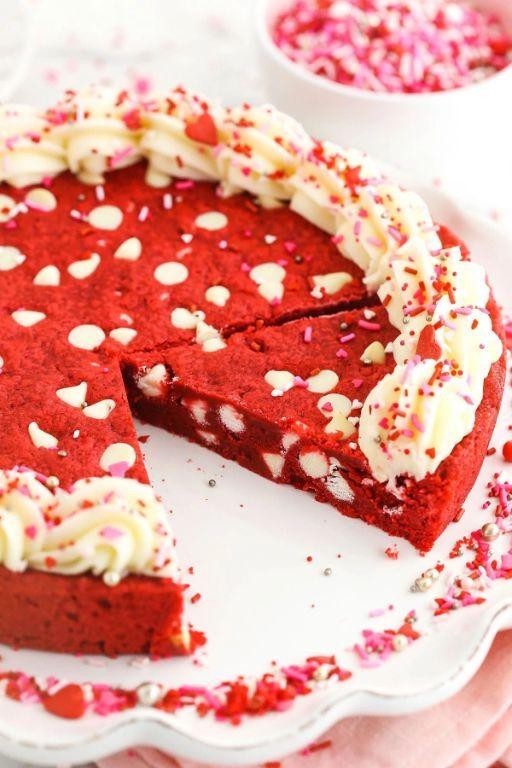
Delightfully decadent and irresistibly soft, this Red Velvet Cookie Cake is my go-to when I need a show-stopping dessert that’s as fun to make as it is to eat. I remember the first time I baked this for a friend’s birthday; the vibrant red against the creamy frosting was an instant hit!
Ingredients
- 1 1/2 cups all-purpose flour (I always sift mine for that extra light texture)
- 1/4 cup unsweetened cocoa powder (the darker, the better for that rich color)
- 1 tsp baking soda (freshness is key here, so I check the date)
- 1/2 tsp salt (I use sea salt for a subtle crunch)
- 1/2 cup unsalted butter, room temperature (softened butter creams like a dream)
- 1 cup granulated sugar (for that perfect sweetness)
- 1 large egg, room temperature (I’ve found room temp eggs blend better)
- 1 tbsp red food coloring (the gel kind gives the deepest red)
- 1 tsp vanilla extract (pure extract makes all the difference)
- 1/2 cup buttermilk (for that signature tang and tenderness)
Instructions
- Preheat your oven to 350°F (175°C) and grease a 9-inch round cake pan. I like to line the bottom with parchment for easy removal.
- In a medium bowl, whisk together the flour, cocoa powder, baking soda, and salt. This ensures no lumps and even distribution.
- In a large bowl, cream the butter and sugar together until light and fluffy, about 3 minutes. Tip: Scrape the bowl sides to incorporate everything evenly.
- Beat in the egg, then the red food coloring and vanilla extract. The color should be a deep red now.
- Alternately add the dry ingredients and buttermilk to the butter mixture, starting and ending with the dry. Mix just until combined to avoid overworking the batter.
- Pour the batter into the prepared pan and smooth the top. Bake for 25-30 minutes, or until a toothpick comes out clean. Tip: Ovens vary, so start checking at 25 minutes.
- Let the cake cool in the pan for 10 minutes, then transfer to a wire rack to cool completely. Tip: Cooling prevents the frosting from melting when applied.
Kick back and admire your masterpiece! The cake should be moist with a slight crumb, and the cocoa gives it a subtle depth. Serve it with a dollop of cream cheese frosting or a scoop of vanilla ice cream for an extra indulgent treat.
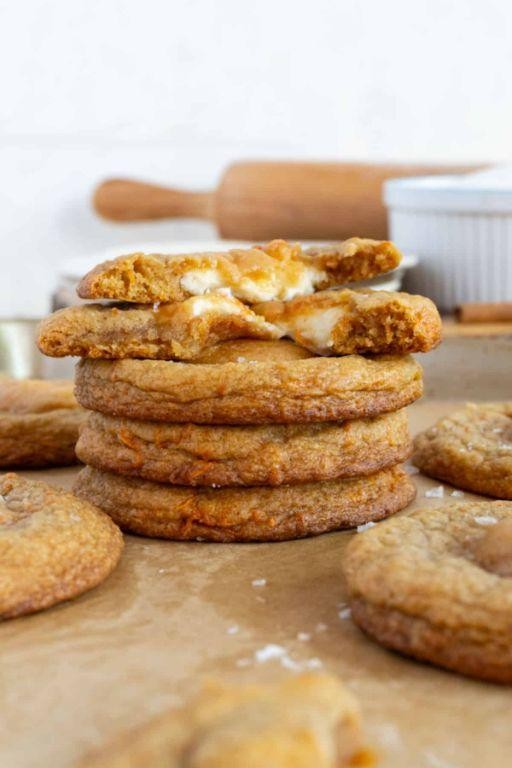
Salted Caramel Cookie Skillet
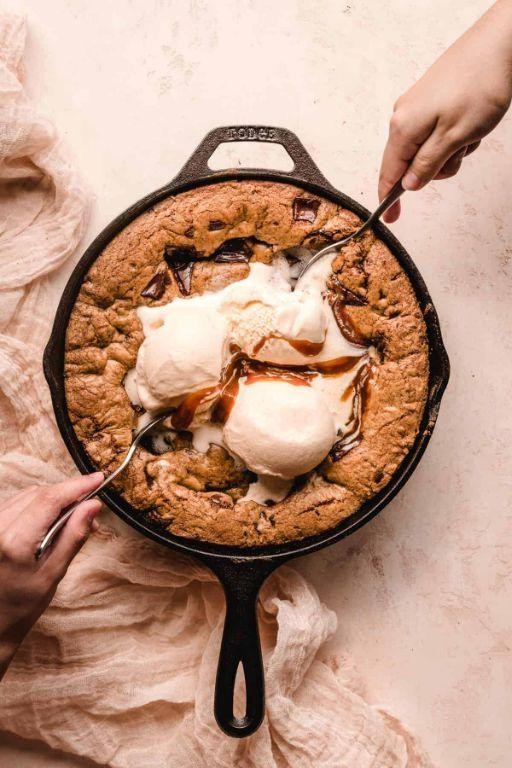
Goodness, have I got a treat for you today! Picture this: a warm, gooey skillet cookie with ribbons of salted caramel running through it, just begging to be dug into with a spoon. It’s the kind of dessert that turns any ordinary night into a celebration, and trust me, once you try it, you’ll be making excuses to whip it up all the time.
Ingredients
- 1 cup all-purpose flour (I swear by King Arthur for consistent results)
- 1/2 tsp baking soda (freshness is key here, so check the date)
- 1/4 tsp salt (I like to use sea salt for a bit of extra texture)
- 1/2 cup unsalted butter, melted (let it cool slightly so it doesn’t cook the eggs)
- 1/2 cup brown sugar (pack it tight for that rich molasses flavor)
- 1/4 cup granulated sugar (because a little extra sweetness never hurt anyone)
- 1 large egg (room temp eggs blend so much better, don’t skip this)
- 1 tsp vanilla extract (the real stuff makes all the difference)
- 1/2 cup salted caramel sauce (homemade or store-bought, no judgment here)
Instructions
- Preheat your oven to 350°F and lightly grease a 6-inch cast iron skillet with butter.
- In a medium bowl, whisk together the flour, baking soda, and salt until well combined.
- In a separate large bowl, mix the melted butter, brown sugar, and granulated sugar until smooth.
- Beat in the egg and vanilla extract until the mixture is light and fluffy.
- Gradually fold the dry ingredients into the wet ingredients until just combined—overmixing is the enemy of tender cookies.
- Spread half of the cookie dough into the prepared skillet, then drizzle with half of the salted caramel sauce.
- Top with the remaining cookie dough, then finish with the rest of the caramel sauce, swirling it slightly with a knife for a marbled effect.
- Bake for 20-25 minutes, or until the edges are golden but the center is still slightly soft—remember, it will continue to cook as it cools.
- Let the skillet cool for about 10 minutes before serving; this allows the caramel to set just enough so it’s gooey but not lava-hot.
Let me tell you, the contrast between the crisp edges and the soft, caramel-filled center is nothing short of magical. Serve it warm with a scoop of vanilla ice cream melting over the top, and watch as it becomes the star of the table.
Lemon Cookie Tiramisu

Kind of like stumbling upon a hidden gem in your grandma’s recipe box, this Lemon Cookie Tiramisu is a twist on the classic that’ll have your taste buds dancing. I remember the first time I tried it at a friend’s potluck, and let me tell you, it was love at first bite. The zesty lemon paired with the creamy mascarpone is a match made in dessert heaven.
Ingredients
- 1 cup heavy cream (I always chill the bowl and beaters first for extra fluffy peaks)
- 8 oz mascarpone cheese (room temperature blends smoother, trust me)
- 1/2 cup granulated sugar (I like to use organic for a cleaner taste)
- 1 tbsp lemon zest (freshly grated, because the bottled stuff just doesn’t compare)
- 2 tbsp lemon juice (squeezed from the lemons you just zested, no waste here)
- 1 tsp vanilla extract (the real deal, not imitation)
- 24 lemon cookies (I use store-bought for convenience, but homemade would be divine)
- 1/2 cup strong brewed coffee, cooled (I opt for a light roast to keep it from overpowering the lemon)
Instructions
- In your chilled bowl, whip the heavy cream on high speed until stiff peaks form, about 3 minutes.
- In a separate bowl, beat the mascarpone, sugar, lemon zest, lemon juice, and vanilla extract until smooth and creamy.
- Gently fold the whipped cream into the mascarpone mixture until fully incorporated. Tip: Overmixing can deflate the cream, so be gentle.
- Quickly dip each lemon cookie into the cooled coffee and layer them in the bottom of an 8×8 inch dish.
- Spread half of the mascarpone mixture over the cookies. Tip: Use an offset spatula for an even layer.
- Repeat the layers with the remaining cookies and mascarpone mixture.
- Cover and refrigerate for at least 4 hours, preferably overnight. Tip: The longer it chills, the more the flavors meld together.
My first bite into this dessert always takes me back to that potluck. The layers are perfectly balanced, with the cookies softening just enough to meld with the creamy mascarpone, while the lemon keeps everything bright and fresh. Serve it with a sprinkle of extra lemon zest on top for a pop of color and flavor.
Matcha Green Tea Cookie Mousse

Every now and then, I stumble upon a recipe that not only challenges my baking skills but also introduces me to flavors I never thought would work together. That’s exactly what happened when I first tried making Matcha Green Tea Cookie Mousse. It’s a delightful twist on traditional desserts, combining the earthy tones of matcha with the creamy sweetness of mousse.
Ingredients
- 1 cup heavy cream (I always chill the bowl and beaters first for fluffier peaks)
- 1/2 cup powdered sugar (sifted to avoid lumps, because nobody likes biting into sugar chunks)
- 2 tbsp matcha green tea powder (go for culinary grade; the color and flavor are unbeatable)
- 1 tsp vanilla extract (the real deal, not imitation—it makes all the difference)
- 1 cup crushed vanilla cookies (I use a zip-top bag and rolling pin for even crumbs)
Instructions
- In a chilled bowl, whip the heavy cream on medium speed until soft peaks form, about 3 minutes.
- Gradually add the powdered sugar and matcha powder, continuing to whip until stiff peaks form, about 2 more minutes. Tip: Stop to scrape the sides of the bowl to ensure everything is evenly mixed.
- Gently fold in the vanilla extract with a spatula, being careful not to deflate the whipped cream.
- Layer the bottom of your serving glasses with half of the crushed cookies, then spoon the matcha mousse on top.
- Finish with the remaining crushed cookies on top of the mousse for a crunchy contrast. Tip: For an elegant touch, dust a little extra matcha powder on top before serving.
- Chill in the refrigerator for at least 1 hour before serving to let the flavors meld. Tip: If you’re short on time, 30 minutes in the freezer will do in a pinch.
After the final step, wrap up with 2–3 natural sentences about the texture, flavor, or a creative way to serve it — no generic conclusions. A bite of this Matcha Green Tea Cookie Mousse is like a cloud of earthy sweetness, with the crunchy cookie layer adding a perfect texture contrast. Serve it in clear glasses to show off the beautiful layers, or top with fresh berries for a pop of color and acidity.
Cookie Dough Stuffed Cupcakes

Last weekend, I found myself staring at a bowl of leftover cookie dough, wondering how to turn it into something even more indulgent. That’s when the idea of Cookie Dough Stuffed Cupcakes hit me—a perfect treat for anyone who can’t resist licking the spoon clean.
Ingredients
- 1 1/2 cups all-purpose flour (I always sift mine to avoid lumps)
- 1 cup granulated sugar (because life’s too short for less sweet)
- 1/2 cup unsalted butter, softened (room temp is key for that perfect creaminess)
- 2 large eggs (I crack mine into a separate bowl first, just in case)
- 1 tsp vanilla extract (the real deal, none of that imitation stuff)
- 1/2 cup milk (whole milk makes them extra moist)
- 1/2 cup chocolate chips (because more chocolate is always better)
- 1/2 cup cookie dough (leftover from your last batch, or store-bought if you’re in a pinch)
Instructions
- Preheat your oven to 350°F (175°C) and line a muffin tin with cupcake liners.
- In a large bowl, cream together the butter and sugar until light and fluffy. Tip: This takes about 3 minutes with an electric mixer.
- Beat in the eggs one at a time, then stir in the vanilla extract.
- Alternately add the flour and milk to the creamed mixture, starting and ending with flour. Tip: Don’t overmix to keep the cupcakes tender.
- Fold in the chocolate chips gently with a spatula.
- Fill each cupcake liner halfway with batter. Tip: An ice cream scoop makes this mess-free.
- Place a small ball of cookie dough in the center of each, then cover with more batter until 3/4 full.
- Bake for 20-22 minutes, or until a toothpick inserted into the cake part comes out clean.
- Let cool in the pan for 5 minutes, then transfer to a wire rack to cool completely.
Velvety soft cupcakes with a gooey cookie dough center—these are a dream come true for cookie dough lovers. Serve them slightly warm to get that melty center, or chill them for a firmer bite. Either way, they’re bound to disappear fast.
Espresso Chocolate Cookie Truffles

Sometimes, all you need is a little pick-me-up that combines the rich flavors of coffee and chocolate in a bite-sized treat. That’s exactly what these Espresso Chocolate Cookie Truffles offer—a perfect blend of energy and indulgence. I remember whipping these up during a late-night baking session, and they’ve been a hit ever since.
Ingredients
- 1 cup chocolate cookie crumbs (I use Oreos for that extra chocolatey goodness)
- 1/2 cup cream cheese, softened (room temp blends smoother)
- 1 tbsp espresso powder (for that robust coffee kick)
- 1 cup semi-sweet chocolate chips (melted, for dipping)
- 1 tsp vanilla extract (my secret for depth of flavor)
Instructions
- In a medium bowl, combine the chocolate cookie crumbs, softened cream cheese, espresso powder, and vanilla extract. Mix until well blended. Tip: Use a fork to break down any cream cheese lumps for a smoother texture.
- Roll the mixture into 1-inch balls and place them on a parchment-lined baking sheet. Chill in the freezer for 15 minutes to firm up. Tip: Wet your hands slightly to prevent sticking while rolling.
- Melt the semi-sweet chocolate chips in a microwave-safe bowl in 30-second intervals, stirring in between, until smooth. Tip: Avoid overheating the chocolate to prevent seizing.
- Using a fork, dip each chilled truffle into the melted chocolate, ensuring it’s fully coated. Let excess chocolate drip off before returning to the parchment paper.
- Chill the truffles in the refrigerator for at least 30 minutes, or until the chocolate coating is set.
Now, these truffles boast a delightful contrast between the crunchy exterior and the creamy, espresso-infused center. Serve them alongside a cup of coffee for an extra caffeine boost, or gift them in a pretty box for a homemade present that’s sure to impress.
Pumpkin Spice Cookie Parfait
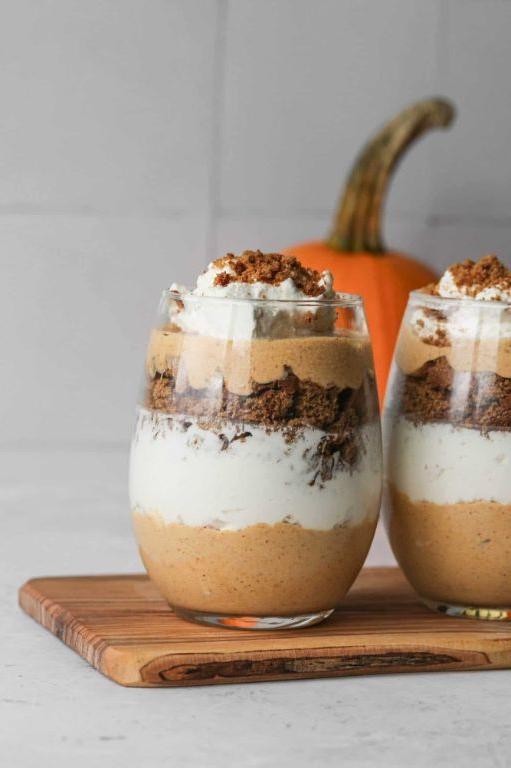
Kicking off the fall season with a dessert that combines all the cozy vibes, I’m sharing my Pumpkin Spice Cookie Parfait recipe. It’s a layered masterpiece that brings together the warmth of pumpkin spice with the creamy delight of whipped cream, perfect for those crisp autumn evenings.
Ingredients
- 1 cup pumpkin puree (I always go for the organic kind, it just tastes richer)
- 2 cups all-purpose flour (sifted, because nobody likes lumpy cookies)
- 1 tsp pumpkin spice (homemade or store-bought, both work wonders)
- 1/2 cup unsalted butter, softened (room temp is key for that perfect creaminess)
- 1 cup granulated sugar (because sweetness is non-negotiable here)
- 2 large eggs (room temp eggs blend so much better)
- 1 tsp vanilla extract (the real deal, not imitation)
- 2 cups heavy cream (for whipping into fluffy clouds)
- 1/4 cup powdered sugar (to sweeten the whipped cream just right)
Instructions
- Preheat your oven to 350°F (175°C) and line a baking sheet with parchment paper.
- In a large bowl, cream together the softened butter and granulated sugar until light and fluffy. Tip: This usually takes about 3 minutes with an electric mixer.
- Beat in the eggs one at a time, then stir in the vanilla extract and pumpkin puree until well combined.
- In another bowl, whisk together the sifted flour and pumpkin spice. Gradually add this to the wet ingredients, mixing until just combined. Tip: Overmixing leads to tough cookies, so stop as soon as the flour disappears.
- Drop tablespoon-sized balls of dough onto the prepared baking sheet, spacing them about 2 inches apart. Bake for 10-12 minutes, or until the edges are just starting to brown. Tip: They’ll continue to cook a bit on the sheet out of the oven, so don’t overbake.
- Let the cookies cool completely on a wire rack. Meanwhile, whip the heavy cream and powdered sugar together until stiff peaks form.
- To assemble the parfaits, crumble a cookie into the bottom of each glass, top with a layer of whipped cream, and repeat. Finish with a sprinkle of pumpkin spice on top.
Finally, this Pumpkin Spice Cookie Parfait is a dreamy combination of soft, spiced cookies and airy whipped cream. Serve it in clear glasses to show off those beautiful layers, or enjoy it straight from the bowl—no judgment here.
Raspberry Almond Thumbprint Cookie Tarts
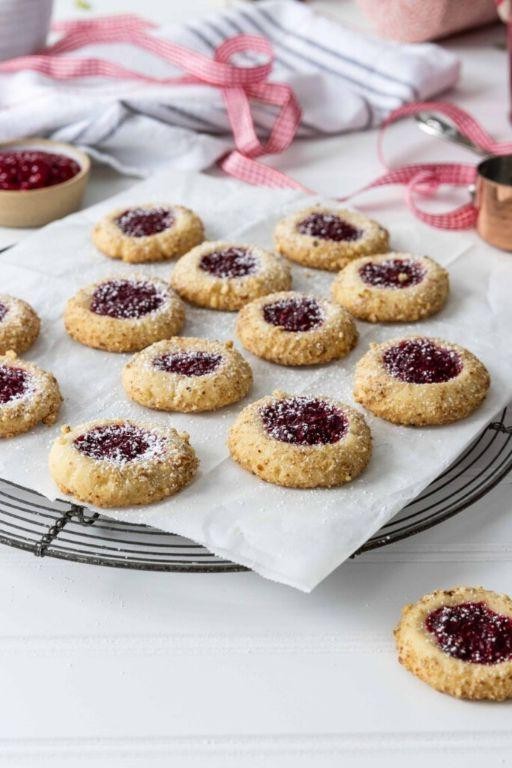
Zesty and vibrant, these Raspberry Almond Thumbprint Cookie Tarts are my go-to when I need a little pick-me-up. They remind me of the summers I spent at my grandma’s, where the raspberries were always fresh and the cookies never lasted long enough on the cooling rack.
Ingredients
- 1 cup unsalted butter, softened (I always leave mine out the night before to ensure it’s perfectly soft)
- 1/2 cup granulated sugar (I sometimes swap this for coconut sugar for a deeper flavor)
- 2 cups all-purpose flour (sifted, because nobody likes lumpy dough)
- 1/2 tsp almond extract (the secret ingredient that makes these tarts sing)
- 1/2 cup raspberry jam (homemade is best, but store-bought works in a pinch)
- 1/4 cup sliced almonds (for that perfect crunch on top)
Instructions
- Preheat your oven to 350°F (175°C) and line a baking sheet with parchment paper. This prevents sticking and makes cleanup a breeze.
- In a large bowl, cream together the softened butter and granulated sugar until light and fluffy. Tip: This should take about 3 minutes with an electric mixer for the best texture.
- Mix in the sifted flour and almond extract until the dough comes together. It should be soft but not sticky. If it’s too dry, a teaspoon of cold water can help.
- Roll the dough into 1-inch balls and place them on the prepared baking sheet. Use your thumb to make an indentation in the center of each ball. Tip: Dust your thumb with flour to prevent sticking.
- Fill each indentation with about 1/2 teaspoon of raspberry jam. Be generous but don’t overfill, or it will bubble over.
- Sprinkle the sliced almonds around the edges of each tart for a nutty crunch.
- Bake for 12-15 minutes, or until the edges are just starting to turn golden. Tip: Rotate the baking sheet halfway through for even baking.
- Let the tarts cool on the baking sheet for 5 minutes before transferring to a wire rack to cool completely.
Yieldingly tender with a buttery crumb and a sweet-tart raspberry center, these tarts are a dream. Serve them with a dollop of whipped cream or alongside a cup of Earl Grey for an afternoon treat that feels like a hug.
Banana Bread Cookie Pudding
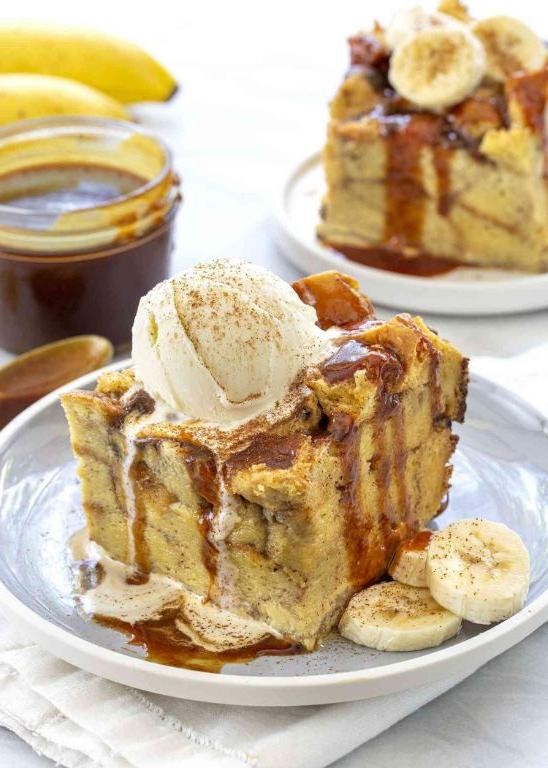
Every now and then, I stumble upon a recipe that feels like a warm hug, and this Banana Bread Cookie Pudding is just that. It’s my go-to when I have overripe bananas and a craving for something comforting yet indulgent.
Ingredients
- 2 cups mashed ripe bananas (about 4 medium bananas) – the spottier, the sweeter!
- 1 cup granulated sugar – I sometimes reduce this to 3/4 cup if the bananas are very ripe.
- 1/2 cup unsalted butter, melted – I prefer using unsalted to control the saltiness.
- 2 large eggs – room temperature eggs blend better, in my experience.
- 1 tsp vanilla extract – pure vanilla makes all the difference.
- 1 1/2 cups all-purpose flour – I’ve tried whole wheat, but all-purpose gives the best texture.
- 1 tsp baking soda – make sure it’s fresh for the best rise.
- 1/2 tsp salt – just enough to balance the sweetness.
- 1 cup chocolate chips – because everything’s better with chocolate.
Instructions
- Preheat your oven to 350°F (175°C) and grease a 9×13 inch baking dish. A well-greased dish ensures easy serving later.
- In a large bowl, mix the mashed bananas, sugar, melted butter, eggs, and vanilla extract until well combined. Tip: A fork works great for mashing bananas right in the bowl.
- Add the flour, baking soda, and salt to the banana mixture, stirring just until combined. Overmixing can lead to tough pudding, so stop when you no longer see flour streaks.
- Fold in the chocolate chips gently. They’re the surprise in every bite!
- Pour the batter into the prepared baking dish, spreading it evenly with a spatula.
- Bake for 25-30 minutes, or until the top is golden and a toothpick inserted in the center comes out clean. Tip: Ovens vary, so start checking at 25 minutes.
- Let the pudding cool for at least 10 minutes before serving. This wait is tough but worth it for the perfect texture.
Banana Bread Cookie Pudding is wonderfully moist with a slightly crisp top, and the chocolate chips add a delightful meltiness. Serve it warm with a scoop of vanilla ice cream for an extra special treat.
Coconut Lime Cookie Bites
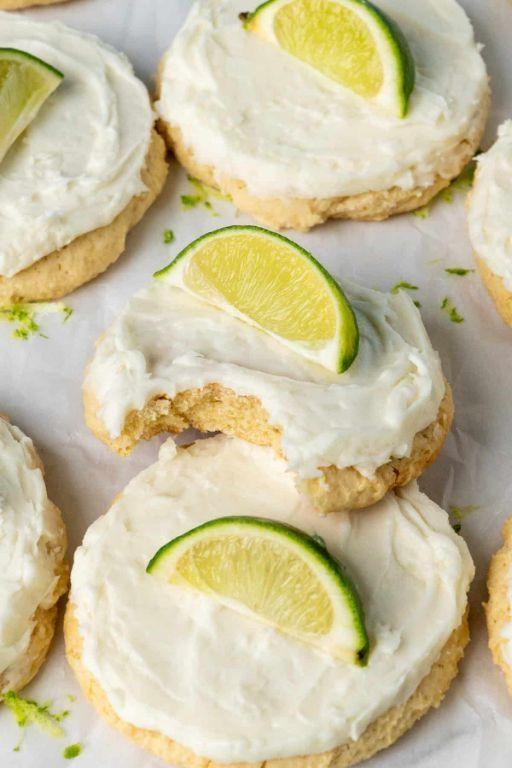
Perfect for those lazy Sunday afternoons or when you’re craving something sweet but not too heavy, these Coconut Lime Cookie Bites are a game-changer. I stumbled upon this recipe during a beach vacation, and now, it’s my go-to for a quick, tropical-inspired treat.
Ingredients
- 1 cup all-purpose flour (I swear by King Arthur for consistent results)
- 1/2 cup shredded coconut (toasted for extra flavor, if you’re feeling fancy)
- 1/2 cup granulated sugar (because life’s too short for less sweet)
- 1/4 cup unsalted butter, softened (room temp is key for that perfect creaminess)
- 1 large egg (room temp, as always, for better incorporation)
- 2 tbsp lime zest (about 2 limes, and yes, it’s worth the effort)
- 1 tbsp fresh lime juice (for that zing!)
- 1/2 tsp baking powder (the silent hero of fluffiness)
- 1/4 tsp salt (to balance the sweetness)
Instructions
- Preheat your oven to 350°F (175°C) and line a baking sheet with parchment paper. This little step saves so much cleanup time.
- In a medium bowl, whisk together the flour, baking powder, and salt. A quick sift here can make your cookies lighter, but it’s not a deal-breaker.
- In a larger bowl, cream the butter and sugar together until light and fluffy. This is where your arm workout pays off—about 3 minutes with a hand mixer.
- Beat in the egg, then stir in the lime zest and juice. The aroma at this point is heavenly.
- Gradually mix in the dry ingredients until just combined. Overmixing is the enemy of tender cookies.
- Fold in the shredded coconut. If you toasted it earlier, the flavor depth here is incredible.
- Drop tablespoon-sized balls of dough onto the prepared baking sheet, spacing them about 2 inches apart. They don’t spread much, but everyone needs their space.
- Bake for 10-12 minutes, or until the edges are just golden. The centers will look soft, but they’ll firm up as they cool—trust the process.
- Let them cool on the baking sheet for 5 minutes before transferring to a wire rack. Patience is a virtue, especially with cookies.
Out of the oven, these bites are a delightful mix of chewy and crisp, with the lime shining through and the coconut adding a subtle crunch. Serve them with a dollop of lime curd or alongside a cup of herbal tea for an extra special treat.
Mint Chocolate Cookie Icebox Cake
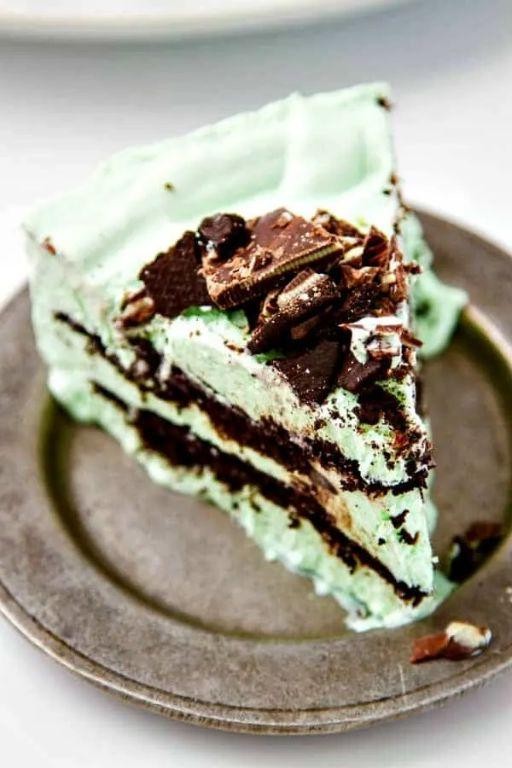
Zesty and refreshing, this Mint Chocolate Cookie Icebox Cake is my go-to dessert when I need something quick yet impressive. It reminds me of those summer evenings when my grandma would surprise us with a chilled treat straight from the fridge.
Ingredients
- 2 cups heavy cream (I always chill the bowl and beaters first for peak whipped cream)
- 1/4 cup powdered sugar (sifted to avoid lumps, because nobody likes gritty cream)
- 1 tsp pure peppermint extract (the real deal makes all the difference)
- 1 package (14.3 oz) chocolate wafer cookies (I’ve found that the thinner the cookie, the better the layers)
- Green food coloring (just a drop or two for that minty hue)
- 1/2 cup mini chocolate chips (for that extra chocolatey crunch)
Instructions
- In your chilled bowl, whip the heavy cream on medium-high speed until soft peaks form, about 3 minutes.
- Gradually add the powdered sugar and peppermint extract, then continue whipping until stiff peaks form, about 2 more minutes. Tip: Overbeating can turn your cream to butter, so keep an eye on it!
- Add a drop or two of green food coloring and fold gently until evenly colored. Tip: Use a spatula for folding to maintain the cream’s fluffiness.
- On a serving plate, arrange a layer of chocolate wafer cookies, slightly overlapping. Spread a generous layer of mint whipped cream over the cookies.
- Sprinkle a handful of mini chocolate chips over the cream. Repeat the layers until all ingredients are used, ending with a cream layer and a final sprinkle of chocolate chips.
- Cover loosely with plastic wrap and refrigerate for at least 4 hours, or overnight. Tip: The longer it chills, the softer the cookies become, mimicking the texture of cake layers.
Velvety and cool, this cake slices beautifully to reveal those stunning layers. Serve it with a drizzle of chocolate sauce or a side of fresh berries for an extra touch of elegance.
Black Forest Cookie Trifle
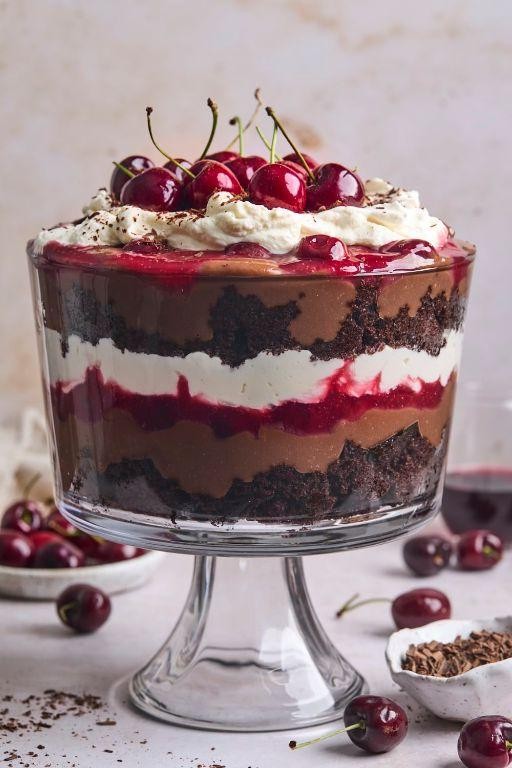
Finally, a dessert that combines the rich flavors of Black Forest cake with the convenience of a no-bake trifle. I stumbled upon this idea during a hectic week when I craved something decadent but didn’t have the time to bake. It’s become my go-to for impromptu gatherings, and trust me, it’s always a hit.
Ingredients
- 1 package (18 oz) chocolate cake mix – I swear by the devil’s food variety for its deep chocolate flavor.
- 1 can (21 oz) cherry pie filling – Look for one with whole cherries for that authentic Black Forest feel.
- 2 cups heavy whipping cream – Cold cream whips up fluffier, so I always chill my bowl and beaters too.
- 1/4 cup powdered sugar – This sweetens the cream just right without making it grainy.
- 1 tsp vanilla extract – A splash of vanilla adds a lovely aroma to the whipped cream.
- 1/2 cup chocolate shavings – I use a vegetable peeler on a chocolate bar for rustic, uneven shavings.
Instructions
- Prepare the chocolate cake mix according to the package instructions, baking it in a 9×13 inch pan at 350°F for 25-30 minutes, or until a toothpick inserted comes out clean. Let it cool completely.
- Once cooled, cut the cake into 1-inch cubes. This size is perfect for layering without making the trifle too dense.
- In a large bowl, whip the heavy cream, powdered sugar, and vanilla extract on high speed until stiff peaks form, about 3-4 minutes. Tip: Don’t overwhip, or you’ll end up with butter!
- In a trifle bowl or large glass dish, layer half the cake cubes, followed by half the cherry pie filling, and then half the whipped cream. Repeat the layers once more.
- Sprinkle the top with chocolate shavings. For an extra touch, I like to add a few whole cherries on top.
- Chill the trifle in the refrigerator for at least 2 hours before serving. This allows the flavors to meld beautifully.
Just imagine digging into layers of moist chocolate cake, tart cherries, and fluffy whipped cream, all topped with delicate chocolate shavings. Serve it in individual glasses for a chic presentation, or keep it casual with a big spoon and the whole bowl on the table.
Carrot Cake Cookie Stack
Believe it or not, the first time I tried making these Carrot Cake Cookie Stacks, I was skeptical about how they’d turn out. But oh boy, was I in for a surprise! They’re the perfect blend of soft, spiced carrot cake and creamy frosting, all stacked into a bite-sized treat that’s impossible to resist.
Ingredients
- 1 cup all-purpose flour (I always sift mine to avoid lumps)
- 1/2 tsp baking soda (freshness is key for that perfect rise)
- 1/4 tsp salt (I use sea salt for a cleaner taste)
- 1/2 cup unsalted butter, softened (room temp blends smoother)
- 1/2 cup brown sugar (packed tightly for that rich molasses flavor)
- 1 large egg (room temp eggs incorporate better)
- 1 tsp vanilla extract (pure vanilla makes all the difference)
- 1 cup finely grated carrots (I prefer organic for sweetness)
- 1/2 cup cream cheese frosting (homemade or store-bought, your choice)
Instructions
- Preheat your oven to 350°F (175°C) and line a baking sheet with parchment paper.
- In a medium bowl, whisk together the flour, baking soda, and salt. Set aside.
- In a large bowl, beat the butter and brown sugar together until light and fluffy, about 2 minutes. Tip: Scrape down the sides of the bowl to ensure everything is evenly mixed.
- Add the egg and vanilla extract to the butter mixture, beating until fully incorporated.
- Gradually mix in the dry ingredients, then fold in the grated carrots. Tip: Don’t overmix to keep the cookies tender.
- Drop tablespoon-sized portions of dough onto the prepared baking sheet, spacing them about 2 inches apart.
- Bake for 10-12 minutes, or until the edges are just golden. Tip: They’ll continue to cook a bit on the tray, so don’t wait for them to brown.
- Let the cookies cool on the baking sheet for 5 minutes, then transfer to a wire rack to cool completely.
- Once cooled, spread a layer of cream cheese frosting on the flat side of one cookie and top with another to create a stack.
So there you have it! These Carrot Cake Cookie Stacks are wonderfully moist with a hint of spice, and the cream cheese frosting adds a delightful tang. Try serving them at your next brunch for a sweet surprise that pairs perfectly with coffee.
S’mores Cookie Dip
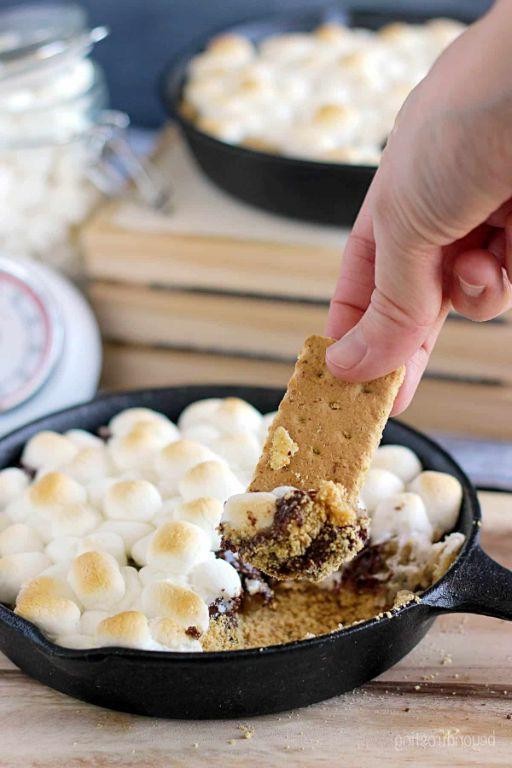
Unbelievably easy and irresistibly delicious, this S’mores Cookie Dip is my go-to when I need a quick dessert that feels like a hug in a bowl. I remember the first time I made it for a last-minute potluck, and it was gone before I even got a bite!
Ingredients
- 1 cup graham cracker crumbs (I always crush mine a bit extra for that perfect texture)
- 1/2 cup unsalted butter, melted (because let’s be honest, everything’s better with butter)
- 1/4 cup granulated sugar (just enough to sweeten the deal)
- 1 cup mini marshmallows (the more, the merrier, I say)
- 1/2 cup milk chocolate chips (I sometimes sneak in a few extra for good measure)
- 1/2 cup heavy cream (this is what makes it luxuriously creamy)
Instructions
- Preheat your oven to 350°F (175°C) and grab a 9-inch pie dish—no need to grease it, the butter in the crust will do that for us.
- In a medium bowl, mix the graham cracker crumbs, melted butter, and sugar until it feels like wet sand. Tip: Press the mixture firmly into the pie dish to avoid a crumbly mess later.
- Sprinkle the chocolate chips evenly over the crust, then layer the marshmallows on top. Tip: If you’re feeling fancy, toast the marshmallows under the broiler for 30 seconds before adding the cream for an extra smoky flavor.
- Warm the heavy cream in a small saucepan over medium heat until it’s just about to simmer, then pour it gently over the marshmallows. Tip: This step melts everything together into gooey perfection, so don’t skip it!
- Bake for 10 minutes, or until the marshmallows are golden and the dip is bubbly. Let it cool for 5 minutes before diving in.
Best served warm, this dip is a dreamy mix of crunchy, creamy, and oh-so-chocolatey. Try it with extra graham crackers or even apple slices for a fun twist!
Conclusion
We hope you’ve enjoyed exploring these 20 delicious cookie dessert recipes as much as we loved rounding them up for you! Each one is a testament to the joy of baking and the sweet moments it creates. Don’t forget to try your favorites, share your thoughts in the comments, and pin this article to your Pinterest boards for your next baking adventure. Happy baking!