Imagine transforming your kitchen into a Venetian bacaro, where bite-sized delights known as cicchetti bring friends and family together with minimal fuss and maximum flavor. Whether you’re hosting a lively gathering or simply spicing up weeknight dinners, our roundup of 20 Delicious Cicchetti Recipes for Every Occasion is your ticket to effortless elegance. Dive in and discover how these little bites can make every meal a celebration!
Baccalà Mantecato on Crostini

Finally, a dish that brings the taste of the Venetian canals right to your kitchen! Baccalà Mantecato on Crostini is my go-to when I want something luxurious yet surprisingly simple to make. It’s a creamy, dreamy spread that’s perfect for those impromptu gatherings or when you’re just treating yourself.
Ingredients
- 1 lb salted cod (soaked for 48 hours, changing the water every 12 hours) – trust me, the soaking is non-negotiable for that perfect texture.
- 1 cup whole milk – I find that whole milk adds a richness that skim just can’t match.
- 1/2 cup extra virgin olive oil – my kitchen staple for almost everything.
- 2 cloves garlic, minced – because what’s Italian cooking without garlic?
- 1/2 tsp freshly ground black pepper – freshly ground makes all the difference.
- 1 baguette, sliced and toasted – I like mine extra crispy for that satisfying crunch.
Instructions
- Start by gently simmering the soaked cod in milk over medium heat for about 15 minutes, until it flakes easily with a fork. Tip: Keep the heat low to avoid toughening the fish.
- Remove the cod from the milk and let it cool slightly before flaking it into a large bowl, discarding any bones or skin.
- Using an electric mixer, beat the flaked cod on low speed, gradually adding the olive oil until the mixture becomes light and creamy. Tip: Patience is key here; add the oil slowly for the best emulsion.
- Fold in the minced garlic and black pepper, adjusting the seasoning as needed. Tip: Taste as you go to ensure the flavors are balanced.
- Spread the Baccalà Mantecato generously on each toasted crostini and serve immediately.
Light as air yet packed with flavor, this Baccalà Mantecato is a testament to the magic of simple ingredients done right. Try it with a sprinkle of fresh parsley or a drizzle of chili oil for an extra kick. Either way, it’s bound to disappear fast!
Sarde in Saor
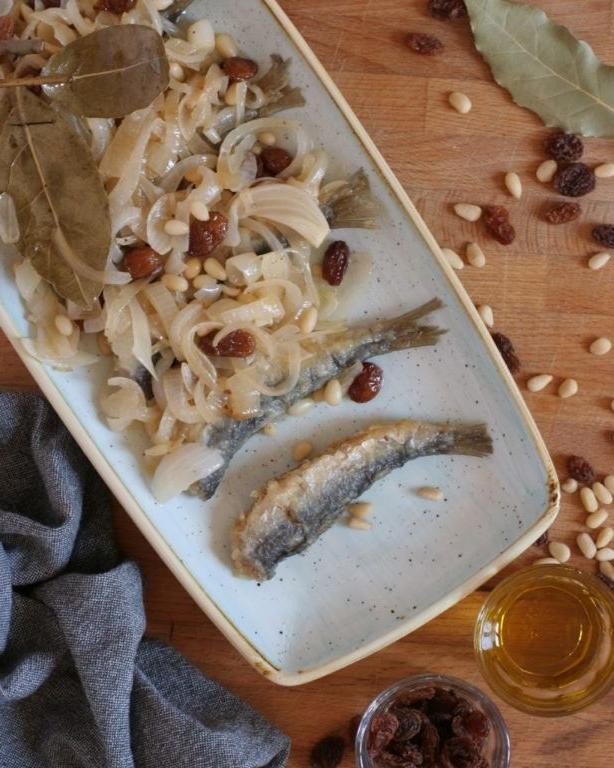
My first encounter with Sarde in Saor was during a cozy dinner at a friend’s place, where the sweet and sour flavors of this Venetian classic left me utterly fascinated. It’s a dish that beautifully marries the simplicity of sardines with the complexity of caramelized onions and vinegar, creating a melody of flavors that’s hard to forget.
Ingredients
- 1 lb fresh sardines, cleaned and deboned (I find that smaller sardines have a more delicate flavor)
- 2 large onions, thinly sliced (yellow onions work best for their sweetness)
- 1/2 cup extra virgin olive oil (my go-to for its fruity notes)
- 1/2 cup white wine vinegar (a good quality vinegar makes all the difference)
- 1/4 cup raisins (soaked in warm water for 10 minutes to plump up)
- 1/4 cup pine nuts (lightly toasted for extra crunch)
- 1 tbsp sugar (to balance the acidity)
- Salt to taste (I prefer sea salt for its mineral quality)
Instructions
- Heat the olive oil in a large skillet over medium heat until shimmering but not smoking.
- Add the sliced onions and a pinch of salt, cooking slowly for about 20 minutes until they’re golden and caramelized, stirring occasionally to prevent burning.
- Stir in the sugar and vinegar, cooking for another 5 minutes until the mixture has slightly thickened. Tip: The vinegar will mellow as it cooks, so don’t worry about the sharpness.
- Layer half of the sardines in a deep dish, cover with half of the onion mixture, then sprinkle with half of the raisins and pine nuts. Repeat the layers with the remaining ingredients.
- Cover the dish and let it marinate in the refrigerator for at least 24 hours. Tip: This resting period is crucial for the flavors to meld beautifully.
- Serve at room temperature to appreciate the full spectrum of flavors. Tip: A slice of crusty bread on the side is perfect for soaking up the delicious juices.
Finished with a flourish, this Sarde in Saor offers a delightful contrast between the tender sardines and the crunchy pine nuts, all brought together by the sweet and tangy onion sauce. It’s a dish that tastes even better the next day, making it a fantastic make-ahead option for gatherings.
Polpette di Melanzane

After a recent trip to Italy, I fell in love with the simplicity and depth of flavors in Italian cuisine, especially the humble yet incredibly satisfying Polpette di Melanzane. These eggplant balls are a testament to how a few ingredients can come together to create something magical. I remember making these on a lazy Sunday afternoon, the aroma filling my kitchen, and I knew this recipe was a keeper.
Ingredients
- 2 large eggplants – I always look for ones that feel heavy for their size, a sign they’re packed with moisture.
- 1 cup breadcrumbs – I prefer panko for that extra crunch, but any will do.
- 1/2 cup grated Parmesan cheese – The real deal, none of that pre-grated stuff.
- 2 eggs – Room temperature eggs blend better, in my experience.
- 2 cloves garlic, minced – Because garlic makes everything better.
- 1/4 cup extra virgin olive oil – My go-to for frying, it adds a nice flavor.
- Salt and pepper to taste – I’m generous with the pepper for a bit of a kick.
Instructions
- Preheat your oven to 375°F. Prick the eggplants all over with a fork and roast them on a baking sheet for about 45 minutes, until they’re completely soft. Tip: Roasting brings out the eggplant’s sweetness.
- Let the eggplants cool slightly, then peel off the skin and chop the flesh finely. Squeeze out any excess moisture with your hands. Tip: Removing moisture helps the balls hold their shape.
- In a large bowl, mix the eggplant with breadcrumbs, Parmesan, eggs, garlic, salt, and pepper until well combined. Tip: Let the mixture sit for 10 minutes to absorb the flavors.
- Heat the olive oil in a large skillet over medium heat. Form the eggplant mixture into small balls and fry them in batches until golden brown on all sides, about 3-4 minutes per side.
Let these golden beauties cool slightly before serving. The outside is delightfully crispy, while the inside remains soft and flavorful. I love serving them with a simple marinara sauce for dipping, or even as a unique topping for spaghetti. Last night, I tossed a few into a salad for a surprising twist, and it was a hit!
Crostini with Artichoke Cream

Nothing says ‘elegant appetizer’ quite like crostini with artichoke cream. I remember the first time I served these at a dinner party; the creamy, tangy topping paired with the crisp bread had everyone asking for the recipe. It’s become my go-to for impressing guests with minimal effort.
Ingredients
- 1 baguette, sliced into 1/2 inch pieces – I like to pick one that’s slightly stale for extra crunch.
- 1 cup marinated artichoke hearts, drained – The marinated ones add so much flavor, no need for extra seasoning.
- 8 oz cream cheese, softened – Room temp blends smoother, trust me.
- 1/4 cup grated Parmesan cheese – The sharper, the better in my book.
- 2 tbsp extra virgin olive oil – My go-to for brushing the bread.
- 1 clove garlic, minced – Fresh is best, but I won’t judge if you use pre-minced.
Instructions
- Preheat your oven to 375°F. This ensures your crostini get perfectly golden without burning.
- Arrange the baguette slices on a baking sheet. Brush each slice lightly with olive oil on both sides. Tip: Don’t skip the bottom side; it adds an extra layer of flavor.
- Bake for 10 minutes, then flip each slice and bake for another 5 minutes until golden and crisp. Tip: Keep an eye on them after flipping; they can go from golden to burnt quickly.
- While the bread bakes, blend the artichoke hearts, cream cheese, Parmesan, and garlic in a food processor until smooth. Tip: Scrape down the sides halfway through to ensure everything is evenly mixed.
- Once the bread is cool enough to handle, spread a generous amount of the artichoke cream on each slice.
Mmm, the contrast between the creamy topping and the crispy bread is irresistible. Try topping these with a sprinkle of red pepper flakes or a drizzle of balsamic glaze for an extra flavor kick.
Fried Mozzarella Sandwiches
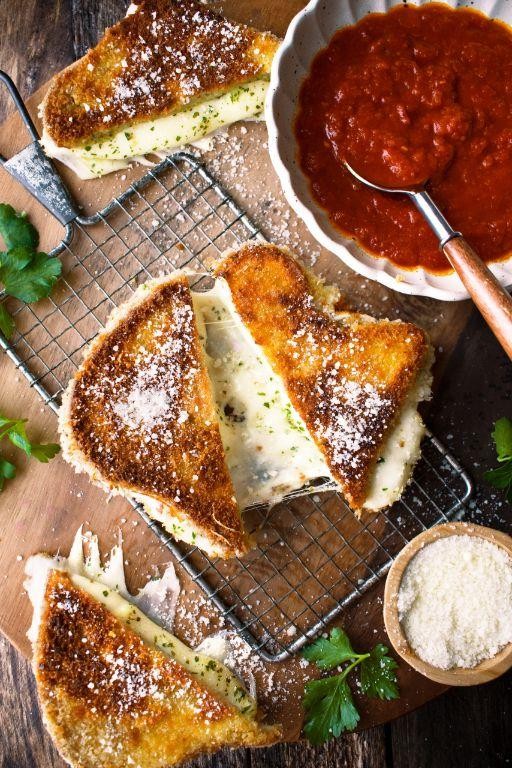
There’s something utterly comforting about biting into a crispy, gooey Fried Mozzarella Sandwich. It’s my go-to when I need a quick, satisfying meal that feels like a hug from the inside. I remember the first time I made these; the kitchen was a mess, but the smiles around the table made it all worth it.
Ingredients
- 4 slices of sourdough bread (I love the tangy flavor it adds, but any bread you have on hand works)
- 8 oz fresh mozzarella cheese, sliced (the fresher, the better for that perfect melt)
- 1/2 cup all-purpose flour (I always keep a little extra for dusting)
- 2 large eggs, beaten (room temperature eggs blend more smoothly)
- 1 cup Italian-style breadcrumbs (for that extra crunch and flavor)
- 1/2 cup vegetable oil (or enough to cover the bottom of your skillet)
- 1 tsp garlic powder (because everything’s better with garlic)
- Salt to taste (I use sea salt for a cleaner taste)
Instructions
- Lay out your sourdough slices and place mozzarella slices between two pieces to form sandwiches.
- Press the edges gently to seal the cheese inside. A little trick I’ve learned is to wet your fingers with water to help seal the edges better.
- Dredge each sandwich first in flour, shaking off any excess. This helps the egg wash stick better.
- Dip the floured sandwiches into the beaten eggs, ensuring they’re fully coated.
- Coat the sandwiches in breadcrumbs mixed with garlic powder, pressing lightly to adhere. For an extra crispy crust, I sometimes double coat by repeating the egg and breadcrumb steps.
- Heat vegetable oil in a skillet over medium heat until it reaches 350°F. A candy thermometer is handy here to get the temperature just right.
- Fry the sandwiches for about 2-3 minutes on each side or until golden brown and crispy. Don’t overcrowd the pan; fry in batches if necessary.
- Remove from oil and let drain on a paper towel-lined plate. Sprinkle with a pinch of sea salt while still hot.
Here’s how these sandwiches turn out: the crust is irresistibly crispy, giving way to the most divine, stretchy mozzarella center. Serve them with a side of marinara sauce for dipping, or get creative and add some basil leaves inside before frying for an herby twist.
Stuffed Zucchini Flowers
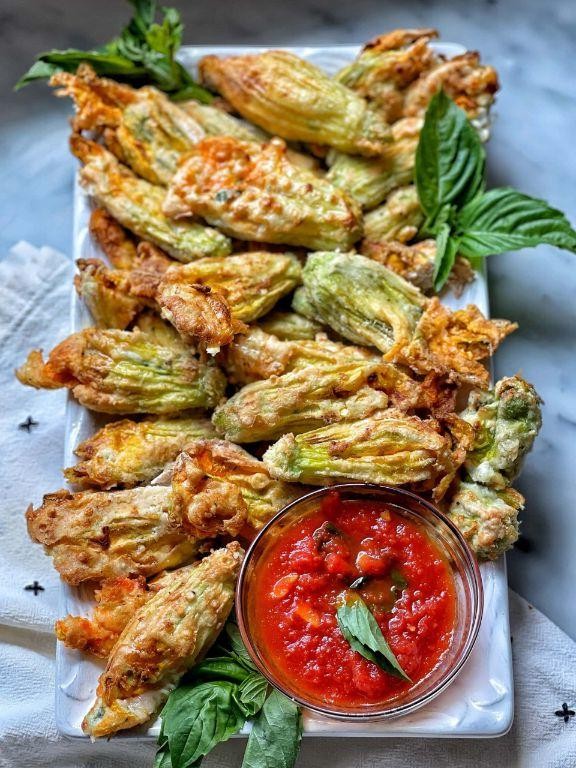
Just last weekend, I found myself wandering through the farmers’ market, my eyes instantly drawn to the vibrant zucchini flowers. There’s something about their delicate petals and bright yellow hue that makes me want to stuff them with something equally delightful. So, I did, and here’s how you can too.
Ingredients
- 12 fresh zucchini flowers – gently rinsed and patted dry, because nobody likes a soggy flower.
- 1 cup ricotta cheese – I swear by the whole milk variety for its creaminess.
- 1/2 cup grated Parmesan cheese – because everything’s better with Parmesan.
- 1 egg – room temperature, it blends better with the cheeses.
- 1 tbsp fresh basil, chopped – fresh is key here, dried just doesn’t do it justice.
- 1/2 tsp salt – to bring all those flavors together.
- 1/4 tsp black pepper – for a little kick.
- Extra virgin olive oil – my go-to for frying, it adds a nice flavor.
Instructions
- In a mixing bowl, combine the ricotta cheese, Parmesan cheese, egg, basil, salt, and pepper. Mix until well blended.
- Carefully open each zucchini flower and remove the stamen inside. This makes room for our delicious filling.
- Using a small spoon, gently fill each flower with the cheese mixture, about 1 tablespoon per flower. Be careful not to overfill; they’re delicate.
- Twist the petals at the top to seal the filling inside. This keeps everything nice and tidy during frying.
- Heat about 1/2 inch of olive oil in a skillet over medium heat (350°F if you’re using a thermometer). The right temperature ensures a crispy exterior without burning.
- Fry the stuffed flowers in batches for about 2 minutes per side, or until golden brown. Don’t crowd the pan; they need space to cook evenly.
- Transfer to a paper towel-lined plate to drain any excess oil. This step is crucial for that perfect texture.
Perfectly crispy on the outside with a creamy, herby center, these stuffed zucchini flowers are a summer delight. Serve them atop a bed of arugula for a pop of color and a peppery contrast, or alongside a chilled glass of white wine for the ultimate al fresco dining experience.
Anchovy and Butter Canapés
Every time I host a gathering, I find myself reaching for this anchovy and butter canapés recipe—it’s a crowd-pleaser that’s surprisingly simple to whip up. The salty bite of anchovies paired with creamy butter on a crisp slice of baguette is a combination that never fails to impress.
Ingredients
- 1 baguette, sliced into 1/2-inch thick rounds (I like mine slightly toasted for extra crunch)
- 1/2 cup unsalted butter, softened (trust me, room temperature butter spreads like a dream)
- 1 can (2 oz) anchovy fillets in olive oil, drained (I always have a few cans in my pantry for emergencies)
- 1 tbsp fresh parsley, finely chopped (for a pop of color and freshness)
Instructions
- Preheat your oven to 350°F (175°C) to get it ready for toasting the baguette slices.
- Arrange the baguette slices on a baking sheet in a single layer. Toast in the oven for about 5 minutes, or until they’re just golden around the edges. Tip: Keep an eye on them to prevent over-toasting.
- While the bread is toasting, take your softened butter and give it a quick whip with a fork to make it extra fluffy. This makes spreading a breeze.
- Once the baguette slices are toasted and slightly cooled, spread a generous layer of the whipped butter on each slice. Tip: The butter acts as a glue for the anchovies, so don’t skimp!
- Top each buttered slice with an anchovy fillet. If you’re feeling fancy, you can fold them for a more elegant presentation.
- Sprinkle the chopped parsley over the top for a fresh finish. Tip: The parsley not only adds flavor but also cuts through the richness of the butter and anchovies.
Offering these canapés at your next party? The contrast between the crispy bread, creamy butter, and salty anchovies is irresistible. I love serving them alongside a crisp white wine—it’s a match made in heaven.
Tuna and Olive Skewers
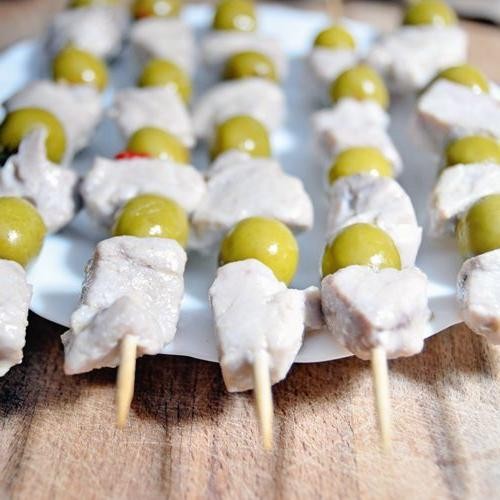
Last summer, I stumbled upon the perfect beach picnic snack that’s as easy to make as it is delicious—Tuna and Olive Skewers. It’s become my go-to for quick gatherings, and I love how the flavors meld together with minimal effort.
Ingredients
- 1 lb fresh tuna, cut into 1-inch cubes (I always ask my fishmonger for sushi-grade, just to be safe)
- 1 cup pitted kalamata olives (their briny flavor is unmatched)
- 2 tbsp extra virgin olive oil (my kitchen staple for everything)
- 1 tbsp lemon juice (freshly squeezed, please—it makes all the difference)
- 1 tsp dried oregano (from my little herb garden)
- Salt and pepper to taste (I’m generous with the pepper for a bit of heat)
Instructions
- Preheat your grill or grill pan to medium-high heat, about 375°F. A well-heated surface ensures those beautiful grill marks.
- In a bowl, gently toss the tuna cubes with olive oil, lemon juice, oregano, salt, and pepper. Let it marinate for 10 minutes—no longer, or the lemon will start to cook the tuna.
- Thread the tuna cubes and olives alternately onto skewers. If using wooden skewers, soak them in water for 30 minutes first to prevent burning.
- Grill the skewers for 2 minutes per side. Tuna cooks quickly, and you want it medium-rare for the best texture.
- Remove from the grill and let rest for a minute. This allows the juices to redistribute, making every bite succulent.
Each skewer is a burst of flavors—the meaty tuna, tangy olives, and aromatic oregano create a harmony that’s hard to resist. Serve them over a bed of arugula for a light meal, or alongside grilled veggies for a fuller spread.
Prosciutto-Wrapped Breadsticks
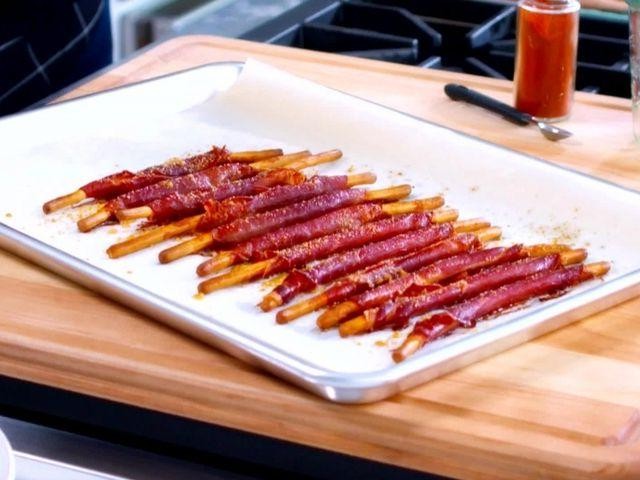
Oh, the joy of discovering a snack that’s as elegant as it is easy to make! These Prosciutto-Wrapped Breadsticks are my go-to when I need something quick yet impressive for guests or just a treat for myself. Inspired by a lazy afternoon in Italy, where simplicity meets flavor, this recipe is a testament to how little effort can yield big rewards.
Ingredients
- 8 thin slices of prosciutto (I love the delicate saltiness of Prosciutto di Parma)
- 16 breadsticks (the thinner, the better for that perfect crunch)
- 1 tbsp extra virgin olive oil (my kitchen staple for that fruity depth)
- 1/2 cup grated Parmesan cheese (because everything’s better with cheese, right?)
Instructions
- Preheat your oven to 375°F (190°C) to get it ready for toasting perfection.
- Lay out the prosciutto slices on a clean surface. If they’re too long, tear them in half for easier wrapping.
- Brush each breadstick lightly with extra virgin olive oil. This not only adds flavor but helps the prosciutto stick.
- Sprinkle grated Parmesan cheese over the oiled breadsticks. Don’t be shy; the cheese is what makes them irresistible.
- Carefully wrap each breadstick with a slice of prosciutto, starting at one end and spiraling to the other. The prosciutto should overlap slightly for full coverage.
- Place the wrapped breadsticks on a baking sheet lined with parchment paper, ensuring they’re not touching.
- Bake for 10-12 minutes, or until the prosciutto is slightly crispy and the cheese is golden. Keep an eye on them to prevent burning.
- Let them cool for a minute before serving. They’re hot and the flavors need a moment to settle.
Perfectly crisp with a salty, cheesy bite, these breadsticks are a dream. Serve them alongside a chilled glass of Prosecco for an effortless yet chic appetizer that’ll have everyone asking for the recipe.
Marinated Mushrooms

Yesterday, I found myself staring at a basket of fresh mushrooms at the farmers’ market, and I knew exactly what I wanted to make—marinated mushrooms. There’s something about their earthy flavor and meaty texture that makes them a perfect appetizer or side dish, especially during these warmer months.
Ingredients
- 1 pound fresh mushrooms (I like cremini for their depth of flavor, but button mushrooms work great too)
- 1/2 cup extra virgin olive oil (my go-to for its fruity notes)
- 1/4 cup red wine vinegar (for that perfect tangy kick)
- 2 cloves garlic, minced (because garlic makes everything better)
- 1 teaspoon dried oregano (I always crush it between my fingers to release the oils)
- 1/2 teaspoon salt (I prefer sea salt for its clean taste)
- 1/4 teaspoon black pepper (freshly ground, please)
- 1/4 cup fresh parsley, chopped (for a bright, fresh finish)
Instructions
- Clean the mushrooms by wiping them with a damp paper towel—never soak them, as they’ll absorb water like a sponge.
- In a large skillet, heat the olive oil over medium heat. Add the mushrooms and sauté for about 5 minutes, until they start to soften but still hold their shape.
- Add the minced garlic to the skillet and cook for another minute, just until fragrant—be careful not to let it burn.
- Remove the skillet from the heat and stir in the red wine vinegar, oregano, salt, and black pepper. The vinegar will sizzle a bit, which is exactly what you want.
- Transfer the mixture to a bowl and let it cool to room temperature. This is when the magic happens, and the mushrooms really soak up the flavors.
- Once cooled, stir in the chopped parsley. Taste and adjust the seasoning if necessary, but I find the balance is usually just right.
Before you know it, you’ll have a bowl of marinated mushrooms that are bursting with flavor. The olive oil and vinegar create a luscious marinade that clings to each mushroom, while the garlic and herbs add layers of complexity. Serve them alongside crusty bread or as part of an antipasto platter, and watch them disappear.
Grilled Polenta with Gorgonzola
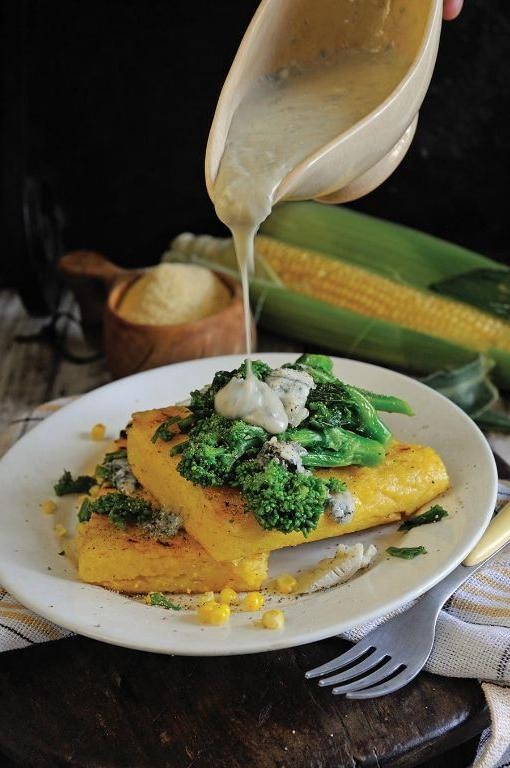
Zesty flavors and creamy textures define this Grilled Polenta with Gorgonzola dish, a personal favorite that never fails to impress at dinner parties. I remember the first time I tried it at a friend’s gathering, and I’ve been tweaking the recipe to perfection ever since.
Ingredients
- 1 cup polenta (I love the coarse grind for extra texture)
- 4 cups water (always start with cold to avoid lumps)
- 1 tsp salt (I use sea salt for a cleaner taste)
- 1/2 cup Gorgonzola cheese, crumbled (the creamier, the better)
- 2 tbsp extra virgin olive oil (my go-to for richness)
- 1/4 tsp black pepper (freshly ground, please)
Instructions
- Bring 4 cups of cold water to a boil in a medium saucepan over high heat.
- Gradually whisk in 1 cup of polenta and 1 tsp salt, reducing the heat to low to maintain a gentle simmer.
- Cook for 30 minutes, stirring frequently to prevent sticking and ensure even cooking. Tip: A wooden spoon works best for stirring.
- Remove from heat and stir in 1/2 cup crumbled Gorgonzola until melted and fully incorporated.
- Pour the polenta into a greased 9-inch square pan, smoothing the top with a spatula. Let it cool and set for at least 1 hour.
- Preheat your grill to medium-high heat (about 375°F) and brush the grates with olive oil to prevent sticking.
- Cut the set polenta into squares or triangles and brush each piece lightly with olive oil on both sides.
- Grill each piece for 3-4 minutes per side, until you see distinct grill marks and the edges are slightly crispy. Tip: Don’t move them too soon; let the grill do its magic.
- Serve immediately, sprinkled with freshly ground black pepper. Tip: A drizzle of honey can add a delightful contrast to the Gorgonzola’s tanginess.
Unbelievably creamy with a smoky char, this dish pairs wonderfully with a crisp white wine or a bold red. Try serving it atop a bed of arugula for a peppery crunch that complements the polenta’s richness.
Tomato and Basil Bruschetta

Mmm, there’s nothing quite like the fresh, vibrant flavors of Tomato and Basil Bruschetta to kick off a summer meal. I remember the first time I made this dish; it was a hot July evening, and I was looking for something light yet satisfying. This recipe never fails to bring back those warm, fuzzy memories.
Ingredients
- 1 French baguette, sliced into 1/2 inch pieces – I like mine slightly toasted for that perfect crunch.
- 4 ripe tomatoes, diced – The juicier, the better!
- 1/4 cup fresh basil, chopped – Nothing beats the aroma of fresh basil.
- 2 cloves garlic, minced – Because garlic makes everything better.
- 1/4 cup extra virgin olive oil – My go-to for that rich, smooth flavor.
- 1 tbsp balsamic vinegar – Adds a lovely tangy sweetness.
- Salt and pepper to taste – I’m generous with the pepper for a little kick.
Instructions
- Preheat your oven to 375°F. This ensures your bruschetta gets that ideal crispy texture.
- Arrange the baguette slices on a baking sheet. Lightly brush each slice with olive oil. Tip: Don’t skip the edges for even browning.
- Bake for 5-7 minutes until golden and crisp. Keep an eye on them to prevent burning.
- In a bowl, combine the diced tomatoes, chopped basil, minced garlic, remaining olive oil, and balsamic vinegar. Mix gently to avoid crushing the tomatoes. Tip: Let this sit for 10 minutes to meld the flavors.
- Season the mixture with salt and pepper, adjusting to your preference.
- Spoon the tomato mixture onto the toasted baguette slices just before serving. Tip: For an extra touch, drizzle with a bit more olive oil.
Delight in the contrast of the crispy bread against the juicy, flavorful topping. This bruschetta is perfect as a starter or a light lunch, especially when paired with a crisp white wine. Trust me, your guests will be asking for the recipe!
Fried Calamari Rings
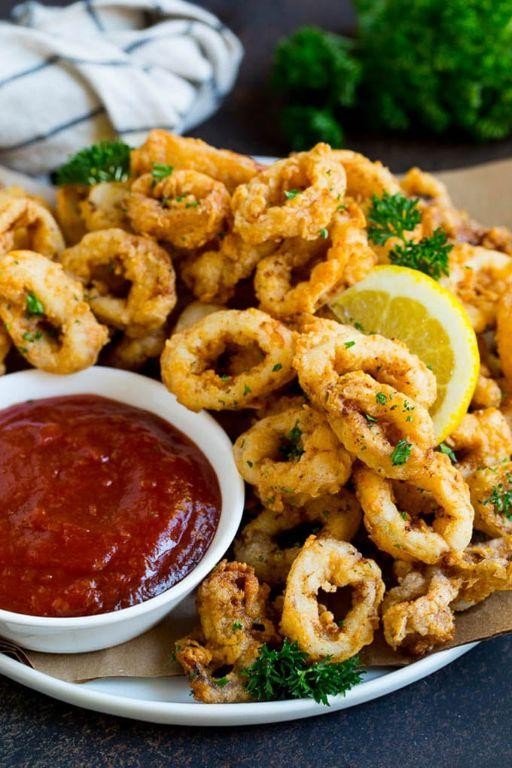
Fried calamari rings are one of those dishes that remind me of summer evenings by the beach, where the air is salty and the food is irresistibly crispy. I remember the first time I tried making them at home, thinking it would be a daunting task, but to my surprise, it turned out to be a breeze with the right ingredients and a bit of patience.
Ingredients
- 1 pound squid rings (fresh or thawed, but fresh makes all the difference)
- 1 cup all-purpose flour (I like to sift mine for extra crispiness)
- 1 teaspoon salt (sea salt is my preference for its subtle brininess)
- 1/2 teaspoon black pepper (freshly ground, please)
- 1 cup buttermilk (this is the secret to tender rings)
- 2 cups vegetable oil for frying (I always have a thermometer handy to monitor the temperature)
Instructions
- Start by patting the squid rings dry with paper towels; moisture is the enemy of crispiness.
- In a shallow bowl, whisk together the flour, salt, and pepper. This is your dry mix.
- Pour the buttermilk into another shallow bowl. Dip each squid ring into the buttermilk, letting the excess drip off.
- Dredge the buttermilk-coated rings in the flour mixture, ensuring they’re fully coated. Shake off any excess.
- Heat the vegetable oil in a deep fryer or large pot to 375°F. Use a thermometer to keep the temperature steady.
- Fry the rings in batches to avoid overcrowding, about 2-3 minutes per batch, until golden brown and crispy.
- Transfer the fried rings to a paper towel-lined plate to drain any excess oil.
Here’s the thing about these fried calamari rings: they’re perfectly crispy on the outside, tender on the inside, and have this incredible lightness that makes them irresistible. Serve them with a squeeze of lemon or your favorite dipping sauce, and watch them disappear before your eyes.
Caprese Skewers

Back when I first stumbled upon the simplicity and elegance of Caprese skewers at a summer potluck, I knew I had to make them a staple in my entertaining repertoire. They’re not just a dish; they’re a conversation starter, perfect for those lazy afternoons when you want something both beautiful and effortless.
Ingredients
- 1 pint cherry tomatoes (I look for the brightest red ones; they just seem to taste better)
- 8 oz fresh mozzarella balls (the smaller, the better for skewering)
- 1 bunch fresh basil leaves (trust me, fresh makes all the difference)
- 2 tbsp extra virgin olive oil (my go-to for its fruity notes)
- 1 tbsp balsamic glaze (for that sweet, tangy finish)
- Salt to taste (I like a flaky sea salt here for texture)
Instructions
- Start by washing the cherry tomatoes and patting them dry to ensure the olive oil sticks.
- Drain the mozzarella balls if they’re packed in water, and pat them dry as well. Tip: Dry ingredients mean better skewer assembly.
- On each skewer, alternate threading a cherry tomato, a basil leaf, and a mozzarella ball until the skewer is full. Tip: Fold the basil leaves gently to prevent tearing.
- Arrange the skewers on a serving platter, drizzle with extra virgin olive oil, and sprinkle with salt. Tip: Let them sit for 5 minutes before serving to let the flavors meld.
- Just before serving, drizzle the balsamic glaze over the skewers for that final touch of sweetness and acidity.
Delightfully simple, these Caprese skewers offer a burst of freshness with every bite, thanks to the juicy tomatoes, creamy mozzarella, and aromatic basil. Serve them on a rustic wooden board for an Instagram-worthy presentation that’s as delicious as it is beautiful.
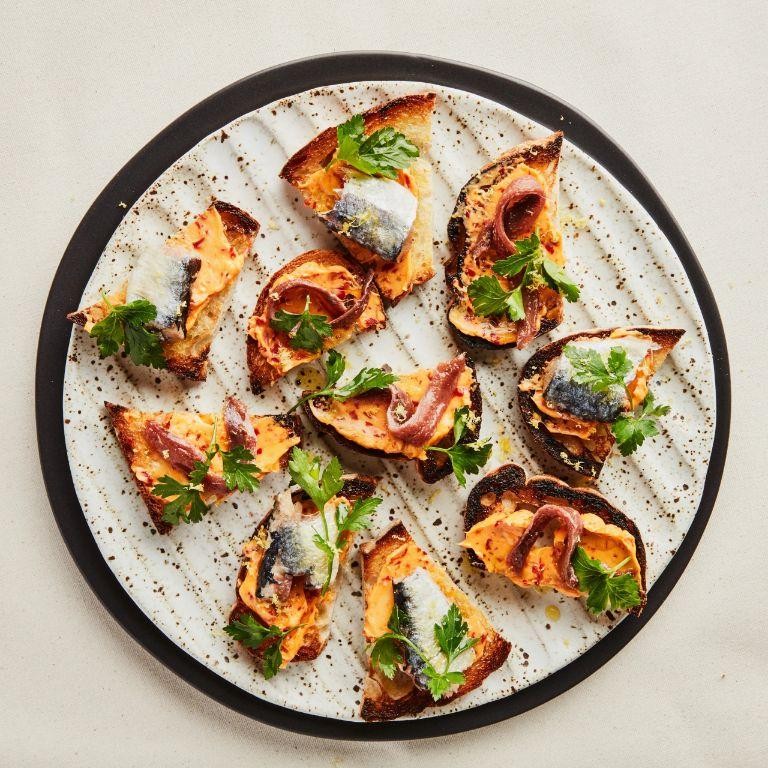
Roasted Pepper and Anchovy Bites
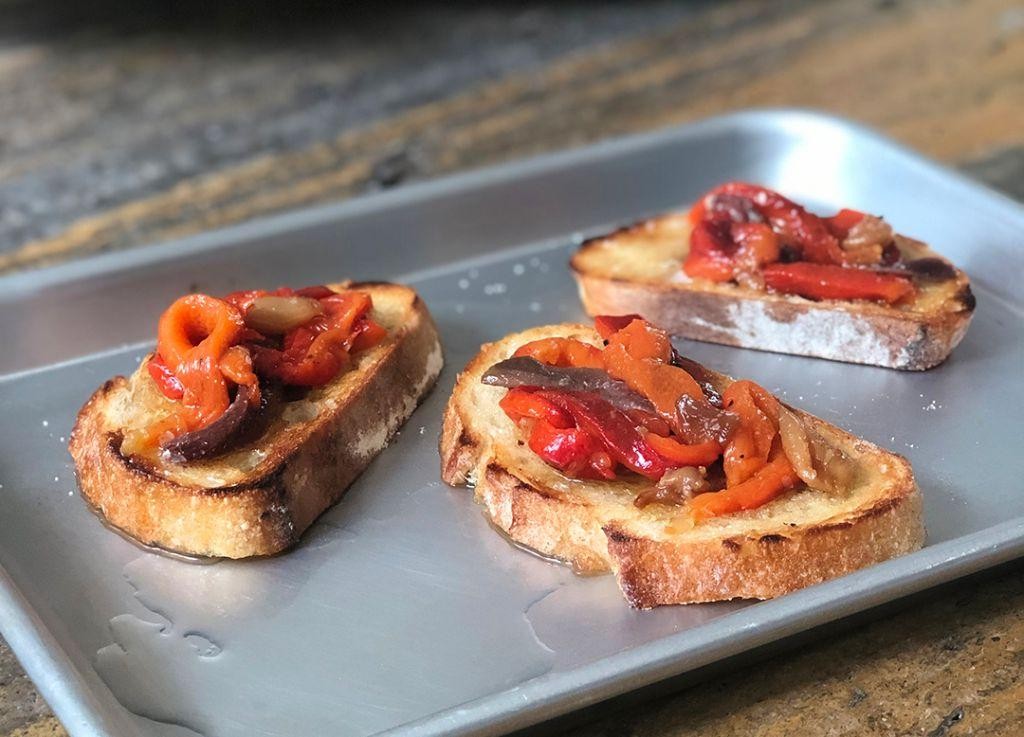
Growing up, my family always had a thing for bold flavors, and these Roasted Pepper and Anchovy Bites are a testament to that love. Perfect for gatherings, they’re a quick way to impress with minimal fuss.
Ingredients
- 1 cup roasted red peppers, sliced into strips (I find jarred ones work just fine, but grilling your own adds a smoky depth)
- 1/2 cup anchovy fillets in oil, drained (don’t shy away; they’re the umami bomb here)
- 1 tbsp extra virgin olive oil (my kitchen staple for almost everything)
- 1/2 tsp crushed red pepper flakes (adjust based on your heat tolerance)
- 1 baguette, sliced into 1/2-inch rounds (stale bread? Even better for toasting)
Instructions
- Preheat your oven to 375°F. Line a baking sheet with parchment paper for easy cleanup.
- Arrange the baguette slices on the prepared sheet. Lightly brush each with olive oil. This ensures they crisp up nicely.
- Toast in the oven for 5 minutes, or until the edges are golden. Keep an eye on them; they go from perfect to burnt quickly.
- Top each toast with a strip of roasted pepper and an anchovy fillet. The contrast in textures is key here.
- Sprinkle with red pepper flakes for a kick. I like to add a drizzle of olive oil at this stage for extra richness.
- Return to the oven for another 3 minutes, just to warm everything through. The anchovies should glisten slightly.
Crunchy, salty, with a hint of sweetness from the peppers, these bites are irresistible. Try serving them with a crisp white wine for a match made in heaven.
Eggplant Rollatini
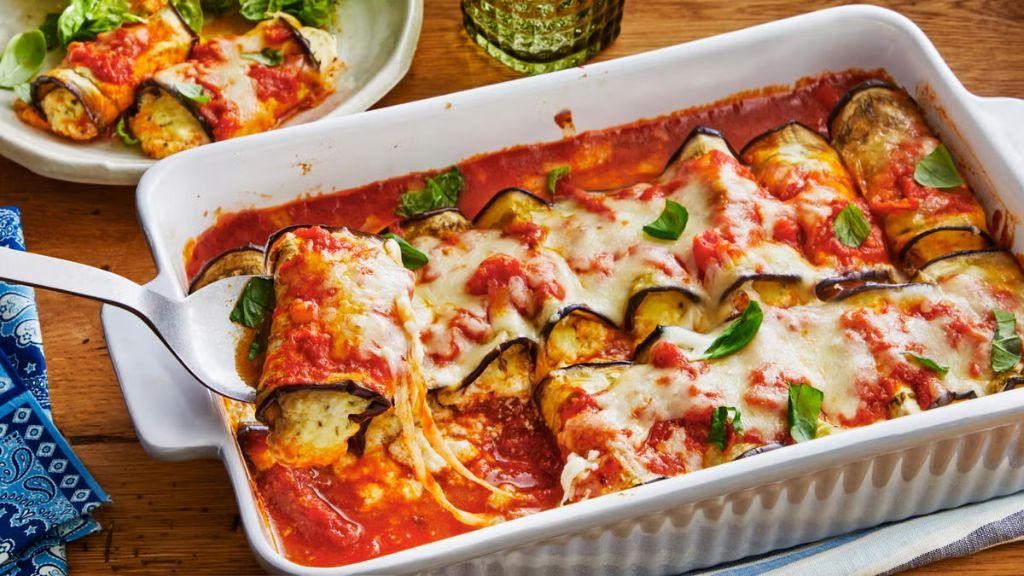
Last weekend, I found myself staring at a pile of eggplants at the farmers’ market, and suddenly, Eggplant Rollatini was all I could think about. There’s something about rolling up those tender slices with a cheesy filling that feels like a little culinary hug.
Ingredients
- 2 large eggplants, sliced lengthwise into 1/4-inch thick pieces (I always look for eggplants that feel heavy for their size.)
- 1 cup ricotta cheese (Whole milk ricotta gives the creamiest texture.)
- 1/2 cup grated Parmesan cheese (I like to grate mine fresh for that sharp flavor.)
- 1 cup shredded mozzarella cheese (This is the glue that holds everything together.)
- 1 large egg (Room temperature eggs blend more smoothly into the filling.)
- 2 cups marinara sauce (Homemade or your favorite store-bought brand works.)
- 2 tbsp extra virgin olive oil (My go-to for its fruity notes.)
- 1 tsp salt (Just enough to enhance all the flavors.)
- 1/2 tsp black pepper (Freshly ground makes all the difference.)
- 1 tbsp fresh basil, chopped (For that pop of color and freshness.)
Instructions
- Preheat your oven to 375°F. This ensures even cooking and a golden top.
- Brush both sides of the eggplant slices with olive oil and sprinkle with salt. Lay them on a baking sheet in a single layer.
- Roast the eggplant slices for 15 minutes, flipping halfway through, until they’re pliable but not crispy. Tip: Keep an eye on them to prevent over-browning.
- In a bowl, mix ricotta, Parmesan, mozzarella, egg, salt, pepper, and basil until well combined. Tip: Letting the mixture sit for 5 minutes helps the flavors meld.
- Spread a thin layer of marinara sauce at the bottom of a baking dish. This prevents sticking and adds moisture.
- Place a tablespoon of the cheese mixture at one end of each eggplant slice and roll up tightly. Arrange the rolls seam side down in the baking dish.
- Cover the rolls with the remaining marinara sauce and sprinkle with extra mozzarella. Tip: For a crispy top, broil for the last 2 minutes of baking.
- Bake for 25 minutes, until the sauce is bubbly and the cheese is melted.
Serve these rollatini straight from the oven, where the cheese is gloriously stretchy and the eggplant melts in your mouth. They’re perfect alongside a crisp green salad or over a bed of al dente spaghetti for a heartier meal.
Shrimp and Garlic Crostini

Deliciously simple yet impressively flavorful, Shrimp and Garlic Crostini has become my go-to appetizer for gatherings. There’s something about the combination of crispy bread, succulent shrimp, and that punch of garlic that always gets compliments.
Ingredients
- 1 baguette, sliced into 1/2-inch pieces (I like to pick one with a crispy crust for that perfect crunch)
- 1/2 cup extra virgin olive oil (my kitchen staple for its fruity notes)
- 4 cloves garlic, minced (because more garlic means more love)
- 1 lb medium shrimp, peeled and deveined (freshness is key here)
- 1/4 tsp red pepper flakes (for a subtle kick that surprises)
- Salt to taste (I swear by sea salt for its clean flavor)
- 2 tbsp fresh parsley, chopped (adds a fresh pop of color and taste)
Instructions
- Preheat your oven to 375°F (190°C) to get it ready for toasting the bread.
- Arrange the baguette slices on a baking sheet in a single layer. Brush each slice lightly with olive oil. Toast in the oven for 5-7 minutes until golden and crisp. Tip: Keep an eye on them to prevent burning.
- In a large skillet, heat 2 tablespoons of olive oil over medium heat. Add the minced garlic and red pepper flakes, sautéing for about 1 minute until fragrant. Tip: Don’t let the garlic brown to avoid bitterness.
- Increase the heat to medium-high and add the shrimp to the skillet. Cook for 2-3 minutes on each side until they turn pink and opaque. Tip: Shrimp cook quickly, so timing is crucial to avoid rubberiness.
- Season the shrimp with salt to taste and sprinkle with chopped parsley.
- Top each toasted baguette slice with a shrimp and a drizzle of the garlic oil from the skillet.
The crostini are best served warm, with the shrimp tender and the bread perfectly crisp. For an extra touch, a squeeze of lemon right before serving brightens up the flavors beautifully.
Ricotta and Honey Crostini

Delightfully simple yet elegantly delicious, these Ricotta and Honey Crostini have become my go-to appetizer for impromptu gatherings. There’s something about the creamy ricotta paired with the sweet drizzle of honey that always leaves guests asking for the recipe.
Ingredients
- 1 baguette, sliced into 1/2-inch pieces (I like mine slightly on the thicker side for extra crunch)
- 1 cup whole milk ricotta (room temperature blends smoother)
- 3 tablespoons extra virgin olive oil (my pantry staple for its fruity notes)
- 2 tablespoons honey, plus extra for drizzling (local honey adds a lovely floral touch)
- 1/2 teaspoon sea salt (I swear by Maldon for its crisp texture)
- Fresh thyme leaves, for garnish (because a little green makes everything prettier)
Instructions
- Preheat your oven to 375°F. This ensures your crostini get perfectly golden without burning.
- Arrange the baguette slices on a baking sheet in a single layer. Drizzle with 2 tablespoons of olive oil and sprinkle with sea salt. Tip: Flipping the slices to coat both sides ensures even crispiness.
- Bake for 10-12 minutes, or until the edges are golden brown. Keep an eye on them after the 8-minute mark to prevent over-browning.
- Let the crostini cool for a few minutes. This step is crucial for the ricotta to not melt upon contact.
- Spread a generous layer of ricotta on each crostini. Tip: Using the back of a spoon helps create a smooth, even layer.
- Drizzle with honey and garnish with thyme leaves. Tip: Warming the honey slightly makes it easier to drizzle.
Buttery crisp crostini topped with velvety ricotta and a sweet honey finish make these bites irresistible. Serve them on a wooden board for a rustic touch, or alongside a glass of Prosecco for an elevated appetizer experience.
Meatball Sliders

Back when I was hosting my first game night, I stumbled upon the perfect crowd-pleaser: meatball sliders. They’re the ultimate comfort food, easy to make, and even easier to disappear from the plate. I’ve tweaked the recipe over the years, but the joy it brings has never changed.
Ingredients
- 1 lb ground beef (I like an 80/20 mix for juicy meatballs)
- 1/2 cup breadcrumbs (I always have panko in my pantry for that extra crunch)
- 1/4 cup grated Parmesan cheese (the real deal, please)
- 1 large egg (room temp eggs blend better, trust me)
- 2 cloves garlic, minced (because garlic is life)
- 1 tsp salt (I use sea salt for a cleaner taste)
- 1/2 tsp black pepper (freshly ground makes all the difference)
- 1 tbsp extra virgin olive oil (my go-to for frying)
- 12 slider buns (I opt for Hawaiian rolls for a sweet contrast)
- 1 cup marinara sauce (homemade if you have the time)
- 1 cup shredded mozzarella cheese (because more cheese is always better)
Instructions
- Preheat your oven to 375°F (190°C) to get it ready for toasting the sliders later.
- In a large bowl, combine the ground beef, breadcrumbs, Parmesan, egg, garlic, salt, and pepper. Mix until just combined; overmixing can make the meatballs tough.
- Shape the mixture into 12 small meatballs, about 1.5 inches in diameter. Tip: Wet your hands slightly to prevent sticking.
- Heat the olive oil in a large skillet over medium heat. Add the meatballs and cook until browned on all sides, about 10 minutes. They don’t need to be fully cooked through yet.
- Place the meatballs in a baking dish, pour the marinara sauce over them, and sprinkle with mozzarella.
- Bake for 15 minutes, or until the cheese is bubbly and golden. Tip: Broil for the last 2 minutes for an extra crispy top.
- While the meatballs bake, lightly toast the slider buns in the oven for about 5 minutes. Tip: Brush them with a little butter for extra flavor.
- Assemble the sliders by placing a meatball and some sauce in each bun. Serve immediately.
Serve these sliders straight from the oven when the cheese is at its gooey best. The combination of the juicy meatball, tangy marinara, and sweet Hawaiian roll is a flavor explosion that’ll have everyone reaching for seconds. Perfect for game night or any gathering where good food and good times are on the menu.
Olive and Citrus Tapenade
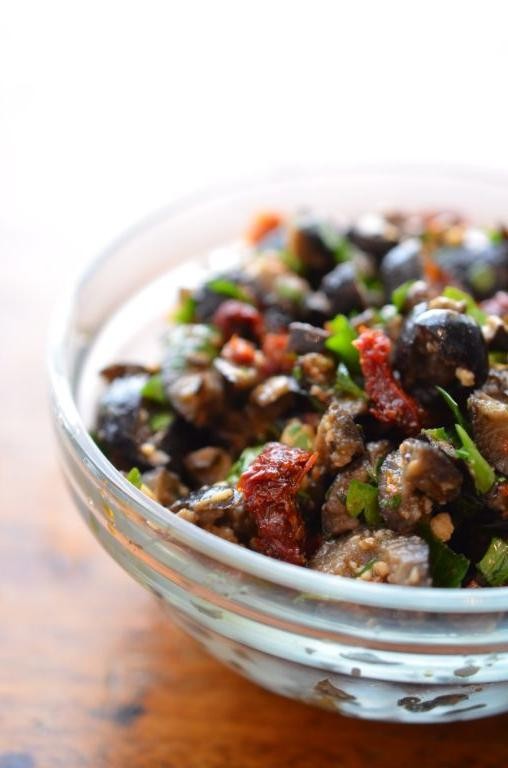
Craving something zesty and briny to jazz up your appetizer spread? I recently whipped up this Olive and Citrus Tapenade for a last-minute gathering, and it was such a hit that I’ve been making it weekly. The combination of tangy citrus and salty olives is unexpectedly addictive, especially when paired with a crisp white wine.
Ingredients
- 1 cup pitted Kalamata olives (I love their deep flavor, but feel free to mix in some green olives for a brighter taste)
- 1/2 cup extra virgin olive oil (my go-to for its fruity notes)
- 2 tbsp fresh lemon juice (straight from my backyard tree, if you can get it fresh, it makes all the difference)
- 1 tbsp orange zest (I use a microplane to get those perfect, fragrant strands)
- 2 cloves garlic (minced finely—no one wants a big chunk of raw garlic)
- 1/4 tsp freshly ground black pepper (I grind it right into the mix for the freshest flavor)
Instructions
- In a food processor, combine the Kalamata olives, extra virgin olive oil, fresh lemon juice, orange zest, minced garlic, and freshly ground black pepper.
- Pulse the mixture 5-7 times until the olives are finely chopped but not pureed. You want a bit of texture for that perfect tapenade consistency.
- Scrape down the sides of the food processor with a spatula to ensure everything is evenly mixed, then pulse 2-3 more times.
- Transfer the tapenade to a serving bowl and let it sit at room temperature for at least 30 minutes before serving. This resting time allows the flavors to meld beautifully.
- Serve with toasted baguette slices, crackers, or even as a vibrant topping for grilled chicken or fish. The tapenade’s bold, briny flavor and slightly chunky texture make it incredibly versatile.
The tapenade’s vibrant citrus notes cut through the richness of the olives, creating a balanced and refreshing condiment. I love spreading it on a warm piece of sourdough or dolloping it over a creamy goat cheese log for an easy yet impressive appetizer.
Conclusion
We hope this roundup of 20 delicious cicchetti recipes inspires your next gathering or cozy night in. Each bite-sized dish is a celebration of flavor, perfect for any occasion. Don’t forget to try your favorites, share your thoughts in the comments, and pin the recipes you love on Pinterest. Happy cooking!


