Get ready to dazzle your holiday table with our roundup of 20 Delicious Christmas Sides Recipes! Whether you’re crafting a feast for a crowd or keeping it cozy with family, these festive favorites are sure to bring joy and flavor to your celebrations. From creamy mashed potatoes to vibrant roasted veggies, there’s something for every taste. Let’s make this Christmas dinner unforgettable—keep reading for the recipes!
Roasted Garlic Mashed Potatoes
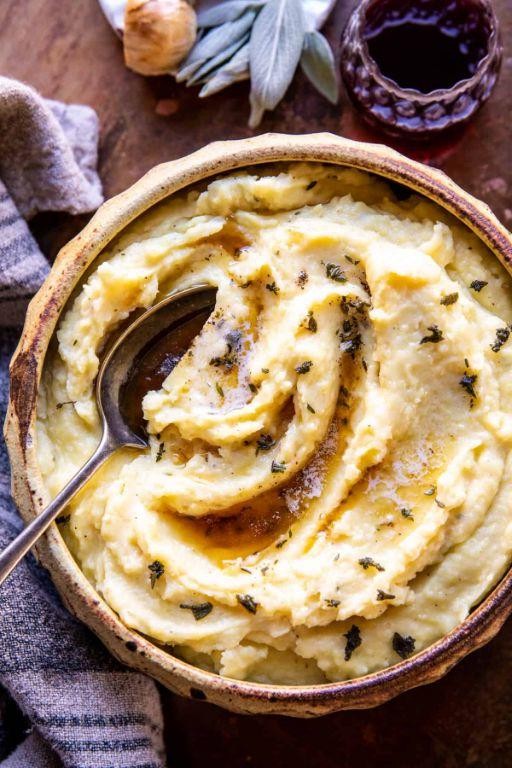
Back when I first started experimenting in the kitchen, roasted garlic mashed potatoes were my go-to comfort dish. There’s something about the creamy texture and the deep, caramelized flavor of roasted garlic that turns a simple side into the star of the meal. Over the years, I’ve tweaked the recipe to perfection, and now, it’s a staple at my family gatherings.
Ingredients
- 3 pounds of Yukon Gold potatoes, peeled and quartered
- A whole head of garlic, because why not?
- A stick of unsalted butter, because we’re not monsters
- A splash of whole milk, for that creamy dreaminess
- A couple of sprigs of fresh thyme, because it’s fancy
- Salt, to make everything better
Instructions
- Preheat your oven to 400°F. Cut the top off the head of garlic, drizzle it with a bit of olive oil, wrap it in foil, and roast for about 30 minutes until it’s soft and golden. Tip: Roasting garlic mellows its sharpness and brings out a sweet, nutty flavor.
- While the garlic is doing its thing, boil the potatoes in salted water until they’re fork-tender, about 15-20 minutes. Drain them well.
- Once the garlic is cool enough to handle, squeeze the cloves out of their skins into a small bowl. Mash them into a paste with the back of a fork.
- Return the potatoes to the pot and mash them with the butter until smooth. Stir in the garlic paste, milk, and thyme leaves. Season with salt to taste. Tip: For extra creamy potatoes, warm the milk before adding it.
- Give everything a good stir until it’s all combined and fluffy. Tip: If you like your mashed potatoes extra smooth, pass them through a ricer or food mill before adding the other ingredients.
Golden and glorious, these roasted garlic mashed potatoes are the epitome of comfort food. The roasted garlic adds a depth of flavor that’s unmatched, and the creamy texture makes them irresistible. Serve them alongside a juicy steak or under a hearty stew for a meal that feels like a hug.
Honey Glazed Carrots
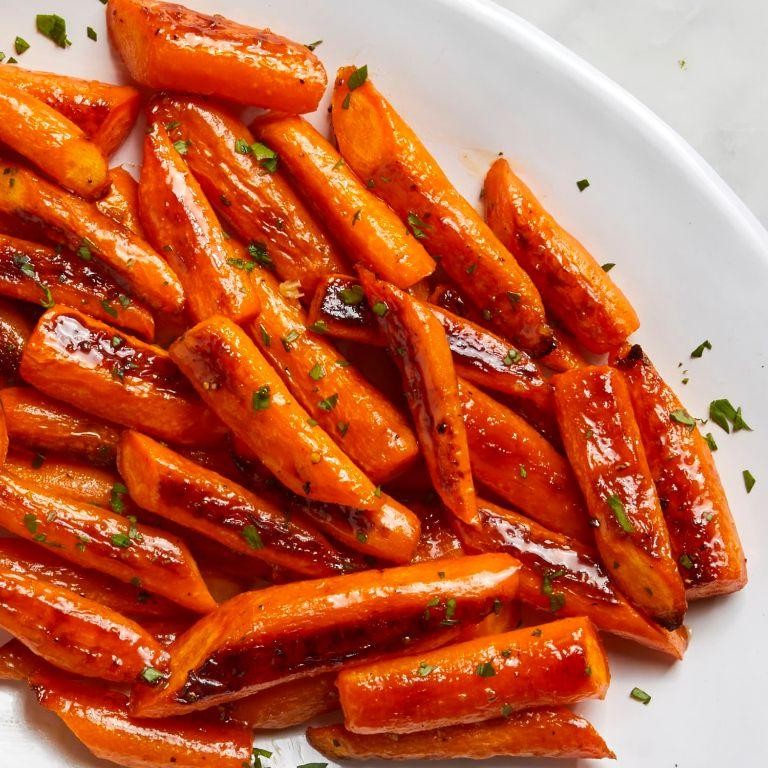
Diving into the world of side dishes, I stumbled upon this gem that’s become a staple in my kitchen—honey glazed carrots. There’s something about the sweet and savory combo that just hits the spot, especially when I’m looking for a quick yet impressive side. Plus, it’s a great way to get the kids to eat their veggies without a fuss!
Ingredients
- A bunch of carrots (about 1 lb), peeled and sliced into sticks
- 2 tbsp of butter
- A generous drizzle of honey (about 2 tbsp)
- A splash of orange juice (about 1/4 cup)
- A pinch of salt
- A couple of thyme sprigs for that herby touch
Instructions
- Start by melting the butter in a large skillet over medium heat. Tip: Keep the heat medium to avoid burning the butter.
- Add the carrot sticks to the skillet, tossing them to coat evenly with the butter. Let them cook for about 5 minutes, stirring occasionally.
- Drizzle the honey and pour the orange juice over the carrots, stirring to combine. Tip: The orange juice adds a lovely brightness to the dish, balancing the sweetness of the honey.
- Sprinkle a pinch of salt and add the thyme sprigs. Continue cooking for another 5-7 minutes, or until the carrots are tender but still have a bit of crunch. Tip: Don’t overcook the carrots; you want them to retain some texture.
- Once done, remove the thyme sprigs and transfer the carrots to a serving dish.
Kicking back with these honey glazed carrots is always a delight. They’re perfectly tender with a glossy, sticky glaze that’s irresistible. Try serving them alongside a roast chicken or mixed into a grain bowl for a pop of color and sweetness.
Green Bean Casserole
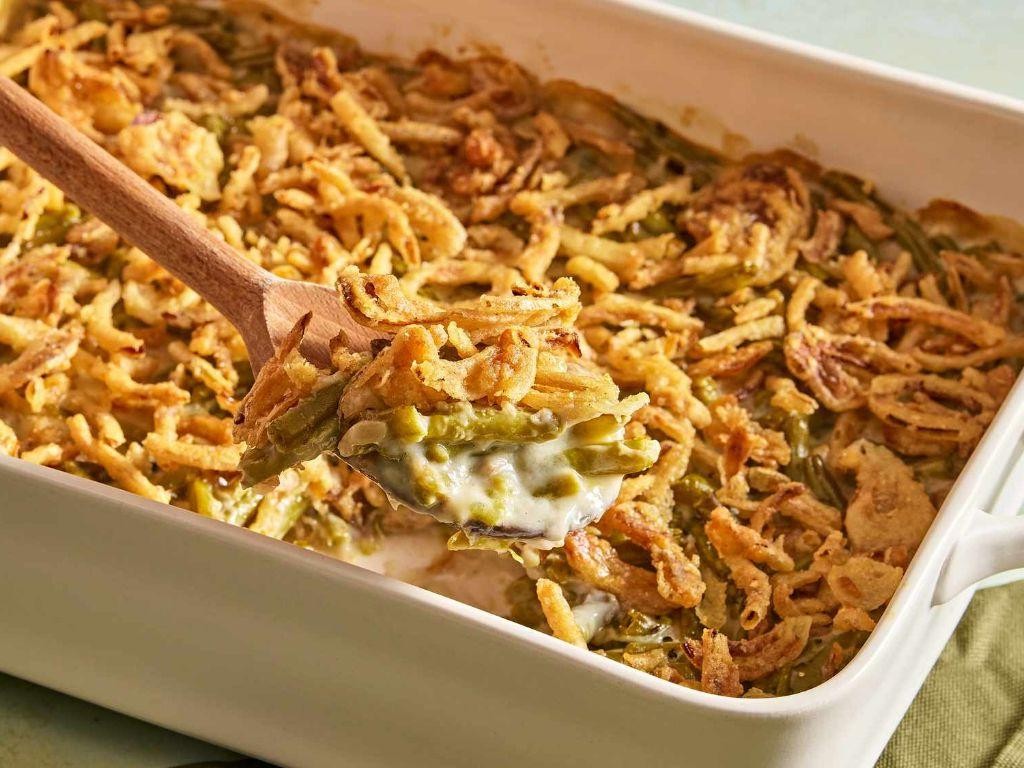
Zesty and comforting, green bean casserole has been my go-to dish for potlucks and family dinners ever since I can remember. There’s something about the creamy texture and crispy topping that makes it a crowd-pleaser every time.
Ingredients
- 2 cans of green beans (because fresh is great, but canned is what gives it that classic taste)
- A can of cream of mushroom soup (the secret to its creamy goodness)
- A splash of milk (to loosen up the soup just right)
- A couple of cups of fried onions (for that irresistible crunch)
- A pinch of salt and pepper (because seasoning is key)
Instructions
- Preheat your oven to 350°F (175°C) – no guessing here, it’s the perfect temp for baking.
- Drain the green beans and mix them with the cream of mushroom soup and a splash of milk in a bowl. Tip: If you like it extra creamy, add a tad more milk.
- Season the mixture with a pinch of salt and pepper. Tip: Always taste as you go to adjust the seasoning.
- Transfer the mixture to a baking dish and spread it evenly. Tip: A glass dish gives you the best view of the golden top forming.
- Bake for 25 minutes, then sprinkle the fried onions on top and bake for another 5 minutes until they’re golden and crispy.
How the creamy center contrasts with the crispy onions is nothing short of magical. Serve it straight from the oven when the onions are at their crispiest, or pair it with a juicy roast for the ultimate comfort meal.
Cranberry Orange Sauce
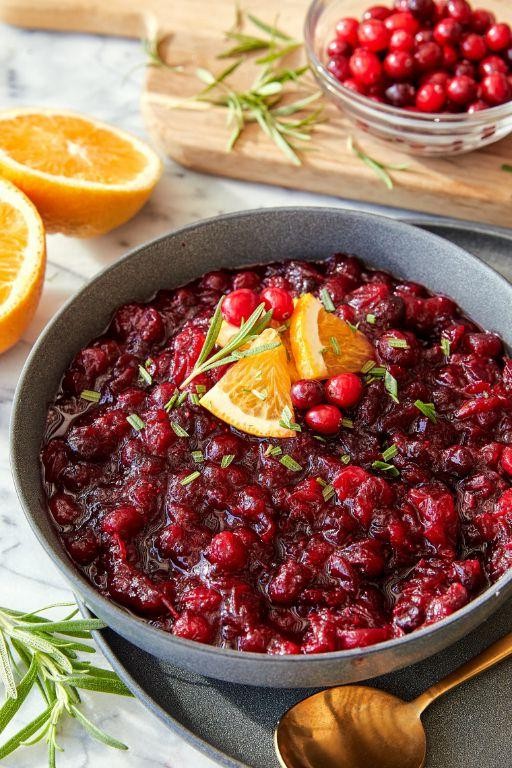
Ah, cranberry orange sauce—the unsung hero of holiday dinners and my personal favorite to whip up when I want to add a little zing to the meal. It’s a recipe that’s as simple as it is versatile, and today, I’m sharing my go-to version that never fails to impress.
Ingredients
- 12 ounces of fresh cranberries (because frozen just doesn’t give the same pop)
- 1 cup of granulated sugar (trust me, it’s the perfect amount of sweet)
- 1 cup of orange juice (freshly squeezed if you’re feeling fancy)
- The zest of one orange (for that extra citrusy kick)
- A splash of water (just to get things moving in the pot)
Instructions
- Rinse the cranberries under cold water and pick out any stems or squishy ones—no one wants those in their sauce.
- In a medium saucepan, combine the cranberries, sugar, orange juice, orange zest, and that splash of water.
- Bring the mixture to a boil over medium-high heat, then reduce to a simmer. Stir occasionally to prevent sticking.
- Let it simmer for about 10 minutes, or until the cranberries have burst and the sauce has thickened to your liking. Tip: If you prefer a smoother sauce, give it a quick blend with an immersion blender.
- Remove from heat and let it cool slightly before serving. Tip: The sauce will thicken more as it cools, so don’t worry if it seems a bit thin at first.
- Taste and adjust the sweetness if needed, but remember, the tartness is part of its charm. Tip: For a deeper flavor, let the sauce sit in the fridge overnight before serving.
Out of all the sides on the table, this cranberry orange sauce is the one that always disappears first. Its vibrant color and tangy-sweet flavor make it a standout, whether it’s spooned over turkey, swirled into yogurt, or even spread on toast the next morning.
Sweet Potato Casserole with Marshmallows

Many of us have that one dish that screams ‘home’ louder than any other, and for me, it’s this sweet potato casserole with marshmallows. It’s the perfect blend of sweet and savory, with a texture that’s just right—creamy underneath with those gooey, toasted marshmallows on top. I remember my grandma making it every Thanksgiving, and now, it’s a staple in my kitchen too.
Ingredients
- 3 large sweet potatoes, peeled and cubed
- A splash of milk (about 1/4 cup)
- A couple of tablespoons of butter (2 tbsp)
- 1/2 cup of brown sugar
- A pinch of salt
- 1 teaspoon of vanilla extract
- A dash of cinnamon
- 2 cups of mini marshmallows
Instructions
- Preheat your oven to 375°F (190°C) and grease a baking dish lightly with butter.
- Boil the sweet potatoes in a large pot of water until they’re fork-tender, about 15-20 minutes. Tip: Cutting them into uniform sizes ensures they cook evenly.
- Drain the potatoes and return them to the pot. Add the milk, butter, brown sugar, salt, vanilla, and cinnamon. Mash everything together until smooth. Tip: For extra creaminess, warm the milk and butter before adding.
- Spread the sweet potato mixture into the prepared baking dish and top evenly with the mini marshmallows.
- Bake for about 10 minutes, or until the marshmallows are golden and puffy. Tip: Keep an eye on them; marshmallows can go from perfectly toasted to burnt in seconds.
Nothing beats the contrast of the creamy sweet potatoes against the sticky, sweet marshmallows. Try serving it with a sprinkle of pecans for an extra crunch, or enjoy it as is for that classic, comforting flavor.
Brussels Sprouts with Bacon
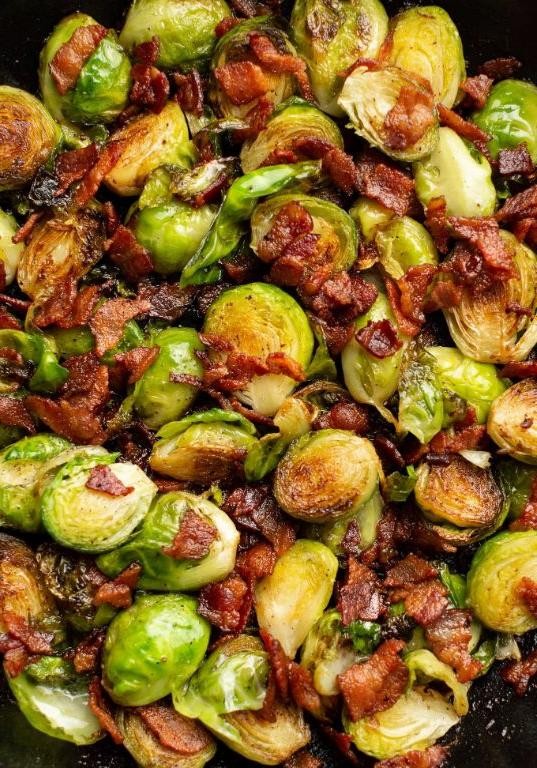
Finally, a dish that turns the often-misunderstood Brussels sprout into a star, thanks to the magic of bacon. I remember the first time I tried this combo at a friend’s dinner party—skeptical at first, but one bite was all it took to convert me. Now, it’s my go-to side when I need something quick, flavorful, and a little indulgent.
Ingredients
- A pound of Brussels sprouts, trimmed and halved
- 4 slices of thick-cut bacon, chopped
- A couple of tablespoons of olive oil
- A splash of balsamic vinegar
- A pinch of salt and freshly ground black pepper
Instructions
- Preheat your oven to 400°F (200°C) to get it nice and hot for roasting.
- Toss the halved Brussels sprouts with olive oil, salt, and pepper on a baking sheet. Make sure they’re in a single layer for even cooking.
- Roast in the preheated oven for about 20 minutes. You’ll know they’re ready when they’re golden and slightly crispy on the edges.
- While the sprouts are roasting, cook the chopped bacon in a skillet over medium heat until it’s crispy. This usually takes about 5-7 minutes.
- Once the bacon is done, remove it with a slotted spoon and drain on paper towels, but leave that delicious bacon fat in the skillet.
- When the Brussels sprouts are done, toss them in the skillet with the bacon fat and a splash of balsamic vinegar for that sweet and tangy kick.
- Add the crispy bacon back into the skillet and give everything a good stir to combine.
Rich in flavor with a perfect balance of crispy and tender textures, these Brussels sprouts with bacon are a game-changer. Serve them alongside a roasted chicken or mix them into a warm grain bowl for a hearty meal.
Cheesy Scalloped Potatoes

Craving something cozy and comforting? Cheesy scalloped potatoes have been my go-to dish for family gatherings and lazy Sundays alike. There’s something magical about thinly sliced potatoes baked in a creamy, cheesy sauce that just feels like a hug in a dish.
Ingredients
- 4 large russet potatoes, thinly sliced (about 1/8 inch thick)
- 2 cups heavy cream
- 1 1/2 cups shredded sharp cheddar cheese
- 1/2 cup grated Parmesan cheese
- 2 cloves garlic, minced
- 1 tbsp butter, for greasing
- A pinch of salt and pepper
- A sprinkle of paprika for that extra kick
Instructions
- Preheat your oven to 375°F (190°C) and grease a baking dish with the butter.
- Layer half of the potato slices in the dish, slightly overlapping them.
- Sprinkle half of the minced garlic, a pinch of salt, pepper, and a third of both cheeses over the potatoes.
- Repeat the layers with the remaining potatoes, garlic, salt, pepper, and another third of the cheeses.
- Pour the heavy cream evenly over the top, then sprinkle the remaining cheeses and a light dusting of paprika.
- Cover with foil and bake for 45 minutes. Tip: The foil helps the potatoes cook evenly without drying out.
- Remove the foil and bake for another 20-25 minutes, or until the top is golden and bubbly. Tip: Let it sit for 5 minutes before serving to allow the sauce to thicken.
- For an extra crispy top, broil for the last 2-3 minutes. Tip: Keep an eye on it to prevent burning.
These cheesy scalloped potatoes come out perfectly creamy with a slight bite from the potatoes and a golden, crispy top. Try serving them alongside a juicy roast or as the star of your vegetarian feast.
Herb Roasted Butternut Squash
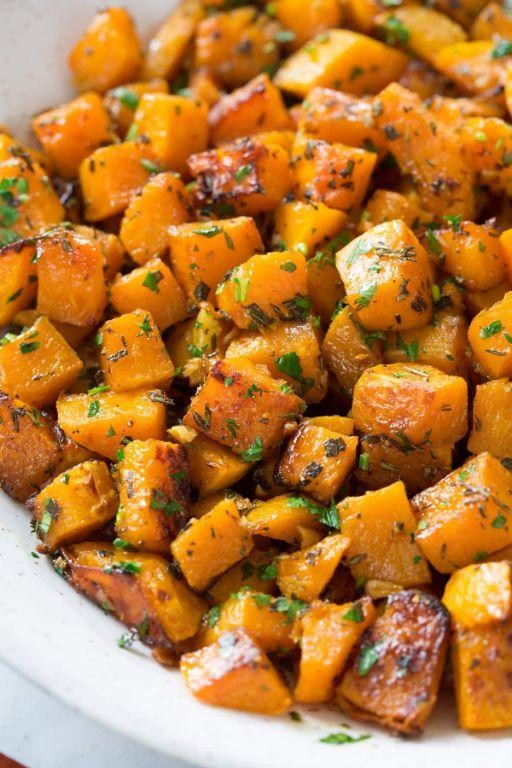
This morning, as I was sipping my coffee and flipping through my grandma’s old recipe book, I stumbled upon a gem that brought back so many memories—Herb Roasted Butternut Squash. It’s the perfect blend of sweet and savory, and honestly, it’s become my go-to side dish for any season.
Ingredients
- 1 medium butternut squash, peeled and cubed
- A couple of tablespoons of olive oil
- A sprinkle of salt and pepper
- A teaspoon of dried thyme
- A teaspoon of dried rosemary
- A pinch of garlic powder
Instructions
- Preheat your oven to 400°F. This ensures your squash gets perfectly roasted, not steamed.
- Toss the cubed butternut squash with olive oil, salt, pepper, thyme, rosemary, and garlic powder in a large bowl. Tip: Make sure every piece is evenly coated for maximum flavor.
- Spread the squash in a single layer on a baking sheet. Tip: Use parchment paper for easy cleanup and to prevent sticking.
- Roast in the preheated oven for 25-30 minutes, stirring halfway through, until the edges are caramelized and the squash is tender. Tip: Don’t overcrowd the pan, or the squash will steam instead of roast.
Last night, I served this over a bed of wild rice, and the combination was out of this world. The squash turns out so tender with a slight crisp on the edges, and the herbs give it this earthy flavor that’s just irresistible.
Cornbread Stuffing
Very few dishes bring back memories of family gatherings like a warm, buttery cornbread stuffing. I remember my grandma pulling hers out of the oven, the golden top slightly crispy, the aroma filling the kitchen. It’s a dish that feels like home, and today, I’m sharing my take on this classic.
Ingredients
- 4 cups of crumbled cornbread (homemade or store-bought, but homemade is always better)
- 1/2 cup of unsalted butter (because everything’s better with butter)
- 1 large onion, diced (for that sweet, savory base)
- 2 celery stalks, chopped (adds a nice crunch)
- 2 cloves of garlic, minced (can’t go wrong with garlic)
- 2 cups of chicken broth (homemade if you’ve got it)
- 2 large eggs, beaten (to bind everything together)
- 1 tbsp of fresh sage, chopped (for that earthy flavor)
- 1 tsp of fresh thyme leaves (a little goes a long way)
- Salt and pepper to taste (but be generous)
Instructions
- Preheat your oven to 350°F (175°C) and grease a 9×13 inch baking dish. This ensures your stuffing doesn’t stick and gets that perfect golden edge.
- In a large skillet over medium heat, melt the butter. Add the onion and celery, cooking until they’re soft and translucent, about 5 minutes. Tip: Don’t rush this step; the sweetness of the onions is key.
- Stir in the garlic, sage, and thyme, cooking for another minute until fragrant. This releases the oils in the herbs, maximizing flavor.
- In a large bowl, combine the crumbled cornbread with the onion mixture. Pour in the chicken broth and beaten eggs, mixing gently until everything is moistened. Tip: Overmixing can make the stuffing dense, so fold just until combined.
- Transfer the mixture to the prepared baking dish, spreading it out evenly. Bake for 30-35 minutes, or until the top is golden and the edges are slightly crispy. Tip: For an extra crispy top, broil for the last 2 minutes.
Delightfully moist with a crispy top, this cornbread stuffing is a crowd-pleaser. Serve it alongside your favorite roast or, for a twist, use it to stuff bell peppers for a hearty vegetarian option.
Maple Roasted Parsnips
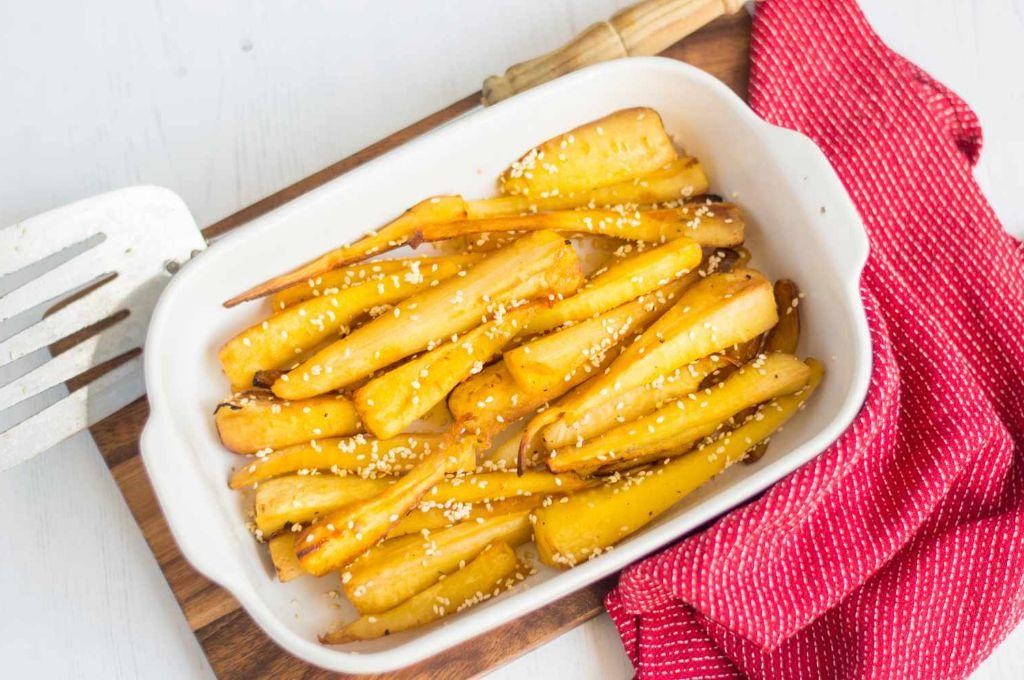
Venturing into the world of root vegetables, I stumbled upon the sweet, earthy charm of parsnips. It was a chilly autumn evening when I first tried maple roasting them, and now, it’s a staple in my kitchen during the cooler months. The caramelization brings out their natural sweetness, making them a hit even with the pickiest eaters at my table.
Ingredients
- 2 pounds of parsnips, peeled and cut into sticks
- A generous drizzle of pure maple syrup (about 1/4 cup)
- A couple of tablespoons of olive oil
- A pinch of salt
- A sprinkle of black pepper
- A dash of cinnamon (optional, but it adds a lovely warmth)
Instructions
- Preheat your oven to 400°F (200°C) to ensure it’s nice and hot for roasting.
- Toss the parsnip sticks with olive oil, maple syrup, salt, pepper, and cinnamon in a large bowl until they’re evenly coated. Tip: Make sure each piece is well-coated for maximum flavor.
- Spread them out on a baking sheet in a single layer. Crowding the pan will steam them instead of roasting, so use two sheets if necessary.
- Roast for about 25-30 minutes, flipping halfway through, until they’re golden and caramelized at the edges. Tip: Keep an eye on them after the 20-minute mark to prevent burning.
- Let them cool for a couple of minutes before serving to allow the flavors to meld together beautifully.
Delightfully crispy on the outside and tender on the inside, these maple roasted parsnips are a testament to how simple ingredients can transform into something extraordinary. Serve them alongside a roast chicken for a comforting meal, or toss them into a salad for a sweet and savory twist.
Baked Macaroni and Cheese
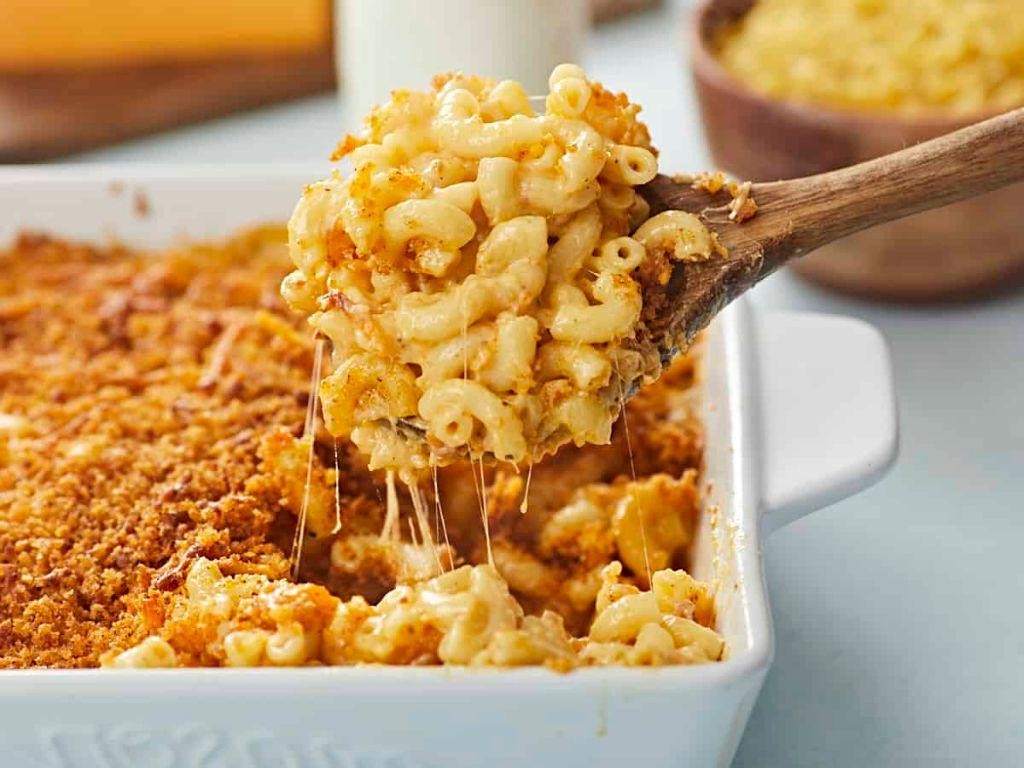
This weekend, I found myself craving the ultimate comfort food, and nothing hits the spot quite like a creamy, cheesy baked macaroni and cheese. It’s the kind of dish that brings back memories of family dinners and potlucks, where everyone always asks for the recipe.
Ingredients
- 8 ounces of elbow macaroni (about 2 cups)
- 2 cups of shredded sharp cheddar cheese
- 1 cup of shredded mozzarella cheese
- 2 cups of whole milk
- 1/4 cup of unsalted butter
- 1/4 cup of all-purpose flour
- 1/2 teaspoon of salt
- 1/4 teaspoon of black pepper
- A splash of hot sauce (trust me on this)
- A couple of breadcrumbs for that crispy top
Instructions
- Preheat your oven to 350°F (175°C) and grease a baking dish lightly.
- Boil the macaroni in salted water until just al dente, about 7 minutes, then drain and set aside.
- In a saucepan, melt the butter over medium heat, then whisk in the flour to create a roux. Cook for about 2 minutes until it’s golden and smells nutty.
- Slowly pour in the milk, whisking constantly to avoid lumps. Bring to a simmer and cook until the sauce thickens, about 5 minutes.
- Remove from heat and stir in the cheddar and mozzarella until melted and smooth. Add the salt, pepper, and hot sauce.
- Mix the cheese sauce with the drained macaroni, then pour into the prepared baking dish.
- Sprinkle breadcrumbs evenly over the top for a bit of crunch.
- Bake for 20-25 minutes, until bubbly and golden on top.
Just out of the oven, this mac and cheese is irresistibly creamy with a perfect crispy topping. Try serving it with a side of roasted veggies or enjoy it straight from the dish—no judgment here!
Garlic Butter Roasted Mushrooms
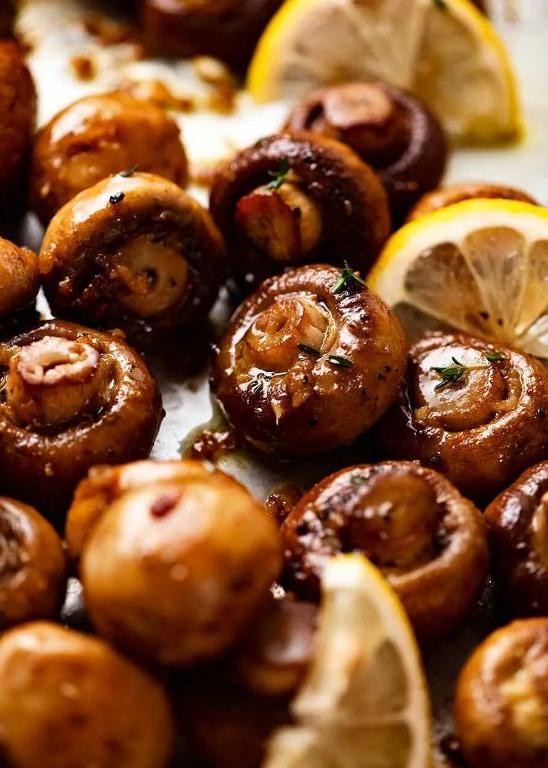
Deliciously simple and packed with flavor, these Garlic Butter Roasted Mushrooms are my go-to when I need a quick yet impressive side dish. I remember the first time I made them; the aroma filled my kitchen, and my family couldn’t wait to dig in. Now, it’s a staple in our home, especially during the cozy fall months.
Ingredients
- A couple of pounds of fresh mushrooms, cleaned and halved
- 4 tablespoons of unsalted butter, melted
- 4 cloves of garlic, minced
- A splash of olive oil
- 1 teaspoon of salt
- 1/2 teaspoon of black pepper
- A handful of fresh parsley, chopped
Instructions
- Preheat your oven to 400°F (200°C) and line a baking sheet with parchment paper for easy cleanup.
- In a large bowl, toss the halved mushrooms with melted butter, minced garlic, a splash of olive oil, salt, and black pepper until evenly coated. Tip: Make sure every mushroom gets a good coat for maximum flavor.
- Spread the mushrooms in a single layer on the prepared baking sheet. This ensures they roast evenly instead of steaming.
- Roast in the preheated oven for 20-25 minutes, stirring halfway through, until the mushrooms are golden and tender. Tip: Keep an eye on them after the 15-minute mark to prevent burning.
- Remove from the oven and sprinkle with chopped fresh parsley for a pop of color and freshness. Tip: The parsley adds a nice contrast to the rich garlic butter flavor.
Mouthwatering and tender, these mushrooms have a beautiful caramelized exterior with a juicy interior. Serve them over creamy polenta or alongside a juicy steak for a meal that feels gourmet but is surprisingly easy to pull off.
Spicy Roasted Cauliflower
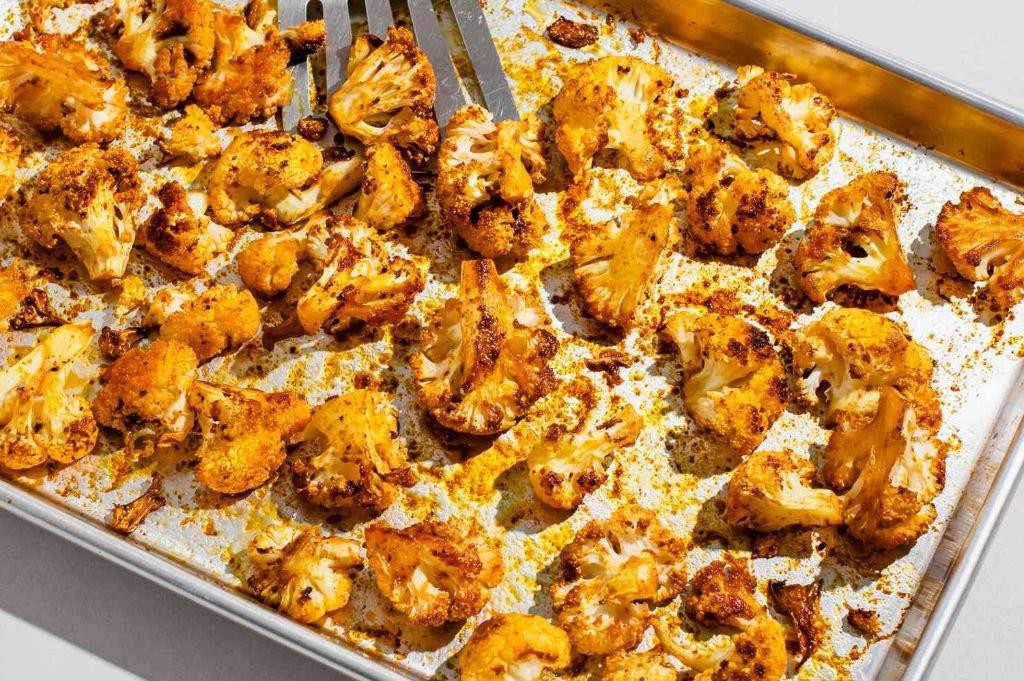
Craving something that’s both comforting and a bit adventurous? I recently stumbled upon this Spicy Roasted Cauliflower recipe during a lazy Sunday experiment, and it’s quickly become a weeknight hero in my kitchen. The way the spices cling to each floret, transforming the humble cauliflower into a fiery, crispy delight, is nothing short of magic.
Ingredients
- 1 large head of cauliflower, cut into florets
- A good glug of olive oil (about 3 tbsp)
- 2 tsp of smoked paprika
- 1 tsp of garlic powder
- A pinch of cayenne pepper (adjust based on your heat tolerance)
- Salt, just enough to season
Instructions
- Preheat your oven to 425°F. This high heat is key for getting those crispy edges we’re after.
- In a large bowl, toss the cauliflower florets with olive oil until they’re evenly coated. Tip: Don’t skimp on the oil; it helps the spices stick and ensures even roasting.
- Sprinkle the smoked paprika, garlic powder, cayenne, and salt over the cauliflower. Use your hands to mix everything together, making sure each piece is well-seasoned. Tip: Wearing gloves can save your hands from turning red if you’re heavy-handed with the cayenne.
- Spread the cauliflower out on a baking sheet in a single layer. Crowding the pan will steam them instead of roasting, so give them some space.
- Roast for 25-30 minutes, flipping halfway through, until the edges are crispy and the florets are tender. Tip: Keep an eye on them after the 20-minute mark to prevent burning, especially if your oven runs hot.
Just out of the oven, these spicy roasted cauliflower florets are irresistibly crispy with a smoky, fiery kick that’s balanced by the natural sweetness of the cauliflower. Try tossing them with a squeeze of lemon and a handful of fresh parsley for a bright finish, or pile them onto a grain bowl for a hearty meal.
Creamed Spinach
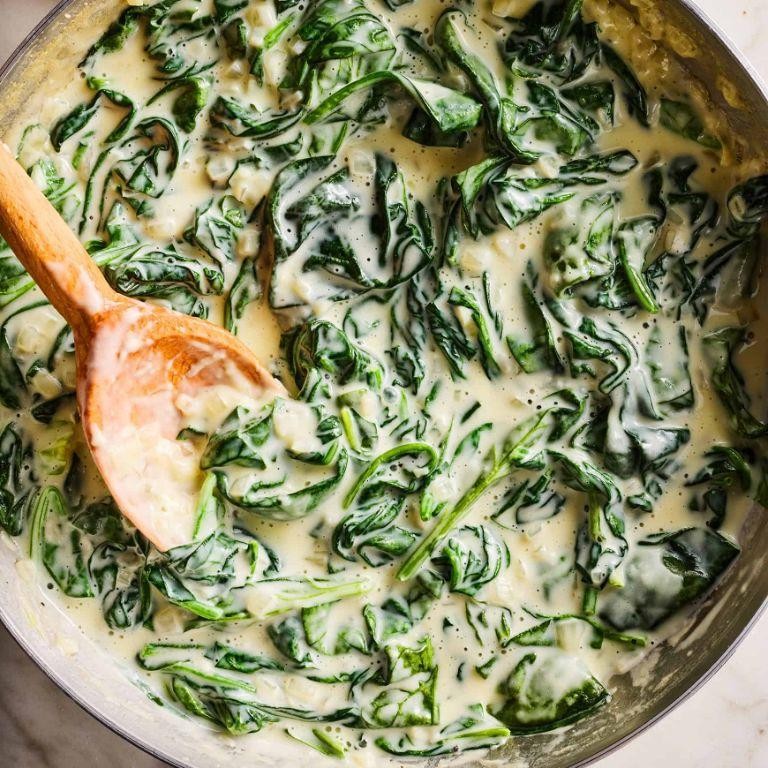
Unbelievably creamy and packed with flavor, this creamed spinach recipe is a game-changer for any meal. I remember the first time I tried making it at home, thinking it would be complicated, but it’s surprisingly simple and now it’s a staple in my kitchen.
Ingredients
- A couple of tablespoons of butter
- A splash of heavy cream
- Two cups of fresh spinach, roughly chopped
- Half a cup of grated Parmesan cheese
- A pinch of nutmeg
- Salt and pepper to season
Instructions
- Melt the butter in a large skillet over medium heat until it’s just beginning to bubble.
- Add the spinach to the skillet, stirring occasionally until it’s wilted down, about 3 minutes. Tip: Don’t overcrowd the skillet; work in batches if necessary.
- Pour in the heavy cream, stirring to combine, and let it simmer for about 2 minutes until it starts to thicken slightly.
- Sprinkle in the Parmesan cheese and a pinch of nutmeg, stirring until the cheese is melted and the mixture is creamy. Tip: Freshly grated Parmesan melts better than pre-shredded.
- Season with salt and pepper to your liking, then remove from heat. Tip: Taste as you go to adjust the seasoning perfectly.
This creamed spinach turns out luxuriously smooth with a rich, cheesy flavor that’s hard to resist. Try serving it alongside a juicy steak or as a decadent topping for baked potatoes for a twist on the classic.
Parmesan Roasted Asparagus
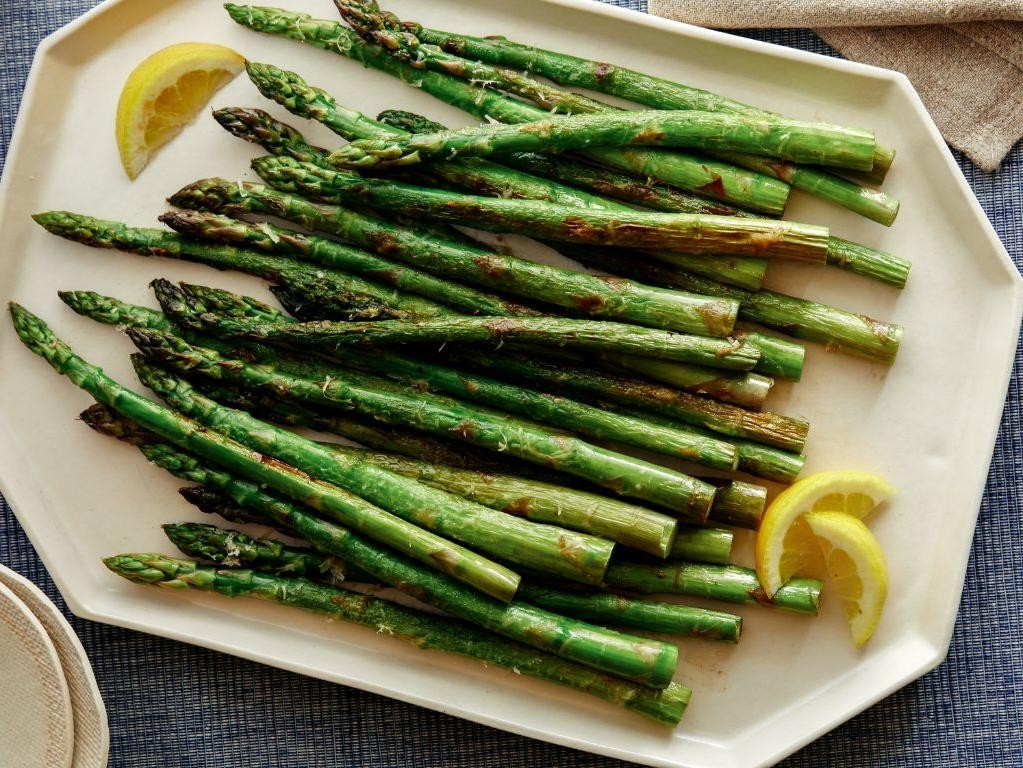
Goodness, there’s something about the simplicity of roasted asparagus that just feels like home to me. Maybe it’s the way the edges crisp up in the oven, or how a sprinkle of Parmesan transforms it into something utterly irresistible. I remember the first time I made this for a dinner party, and let’s just say, there were no leftovers.
Ingredients
- A bunch of asparagus, about 1 lb, ends trimmed
- A couple of tablespoons of olive oil
- A generous sprinkle of salt
- A few cracks of black pepper
- 1/4 cup of grated Parmesan cheese
- A squeeze of lemon juice (optional, but highly recommended)
Instructions
- Preheat your oven to 400°F. This is the perfect temp for getting those crispy edges without burning.
- Toss the asparagus with olive oil, salt, and pepper on a baking sheet. Make sure each spear is nicely coated for even roasting.
- Spread them out in a single layer. Crowding the pan leads to steaming, not roasting, and we want that crisp texture.
- Roast for about 12-15 minutes. You’ll know they’re ready when they’re tender and starting to brown at the tips.
- Sprinkle the Parmesan over the asparagus right after they come out of the oven. The residual heat will melt the cheese beautifully.
- Finish with a squeeze of lemon juice if you’re using it. It adds a bright contrast to the rich cheese.
Velvety with a slight crunch, this Parmesan roasted asparagus is a dream. I love serving it alongside a creamy pasta or as a fancy side to grilled chicken. The lemon zest? It’s a game-changer.
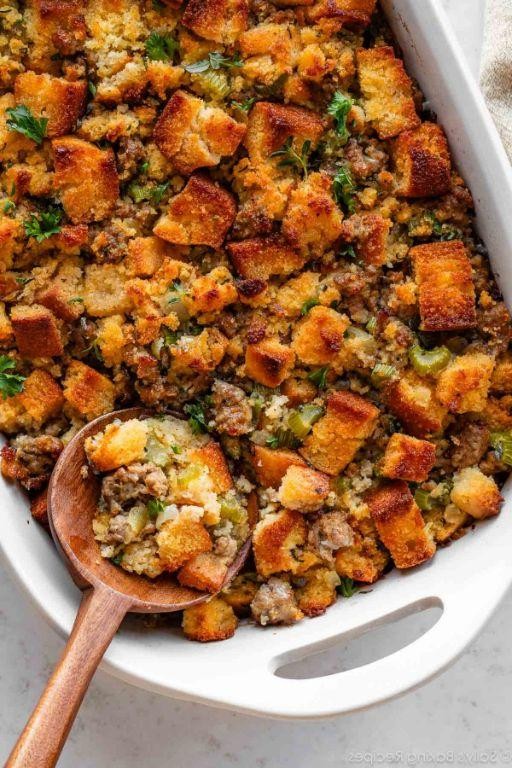
Apple and Sausage Stuffing

Nothing says comfort food like a hearty apple and sausage stuffing, especially when it’s packed with flavors that remind me of my grandma’s kitchen. I love making this dish during the holidays, but honestly, it’s so good that I find excuses to whip it up year-round.
Ingredients
- 1 lb of your favorite sausage (I go for a spicy one to add some kick)
- 3 cups of cubed day-old bread (trust me, the staleness makes it better)
- 2 apples, diced (I prefer Honeycrisp for their sweetness and crunch)
- 1 onion, finely chopped
- 2 celery stalks, diced
- A couple of tablespoons of butter (because everything’s better with butter)
- A splash of chicken broth (about 1 cup, but keep some extra just in case)
- A pinch of salt and pepper (to your liking, but don’t be shy)
- A teaspoon of dried sage (it’s not stuffing without it)
Instructions
- Preheat your oven to 350°F (175°C) and grease a baking dish with a bit of butter.
- In a large skillet over medium heat, cook the sausage until it’s nicely browned, breaking it up as it cooks. Tip: Don’t drain all the fat; it adds flavor!
- Add the butter, onion, and celery to the skillet, cooking until they’re soft, about 5 minutes.
- Toss in the diced apples and cook for another 2 minutes, just to soften them slightly. Tip: Leaving the skin on adds color and nutrients.
- Stir in the bread cubes, sage, salt, and pepper, then pour in the chicken broth. Mix well until everything is evenly moistened. Tip: If it seems dry, add a little more broth.
- Transfer the mixture to the prepared baking dish and cover with foil.
- Bake for 30 minutes, then remove the foil and bake for another 10 minutes to crisp up the top.
Let this stuffing cool for a few minutes before serving to let the flavors meld together beautifully. The combination of sweet apples, savory sausage, and aromatic sage creates a dish that’s both comforting and slightly sophisticated. Try serving it alongside roasted chicken or even as a standalone dish for a cozy dinner.
Roasted Root Vegetables
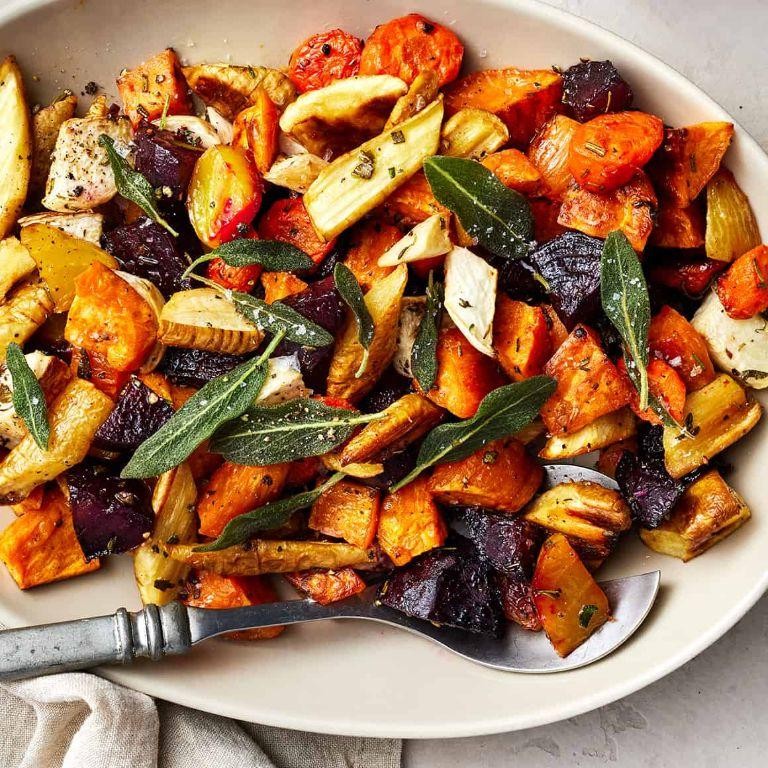
Mmm, there’s something so comforting about a tray of roasted root vegetables, isn’t there? I remember the first time I made this dish; it was a chilly autumn evening, and I was craving something hearty yet simple. This recipe is my go-to when I need a side that’s both nutritious and bursting with flavor.
Ingredients
- A couple of carrots, peeled and chopped into 1-inch pieces
- A couple of parsnips, peeled and chopped into 1-inch pieces
- One large sweet potato, peeled and chopped into 1-inch cubes
- A splash of olive oil (about 2 tbsp)
- A pinch of salt and pepper
- A sprinkle of dried rosemary (about 1 tsp)
Instructions
- Preheat your oven to 400°F (200°C). This ensures your veggies get that perfect roast.
- Toss all the chopped vegetables in a large bowl with the olive oil, salt, pepper, and rosemary. Tip: Make sure each piece is evenly coated for the best flavor.
- Spread the vegetables out in a single layer on a baking sheet. Tip: Don’t overcrowd the pan, or they’ll steam instead of roast.
- Roast in the preheated oven for about 25-30 minutes, stirring halfway through. Tip: They’re done when they’re tender and have golden edges.
Zesty and vibrant, these roasted root vegetables have a delightful caramelized sweetness with an herby kick. Serve them over a bed of quinoa for a wholesome meal, or alongside your favorite protein for a balanced dinner.
Balsamic Glazed Pearl Onions
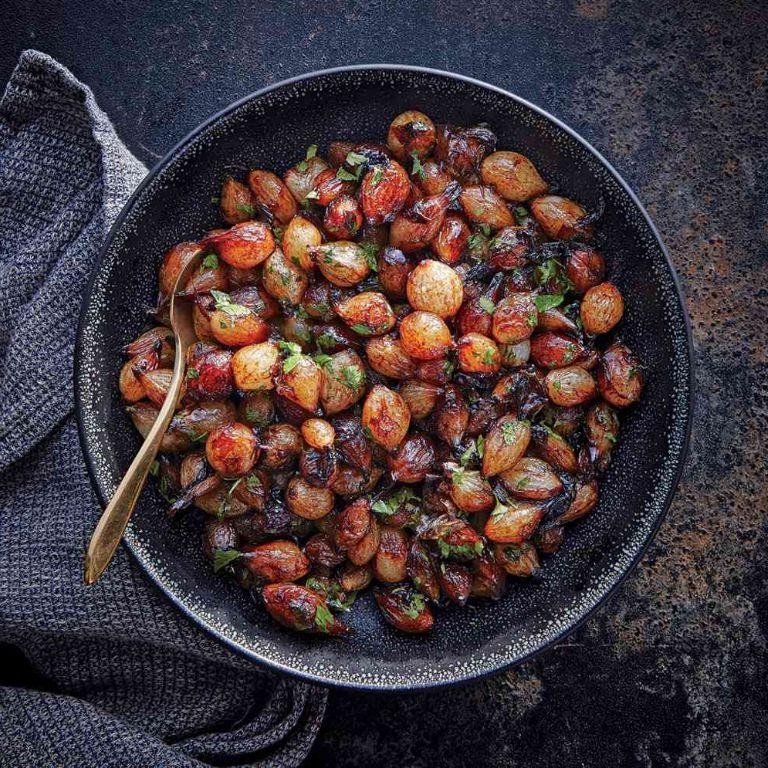
Every time I stumble upon a bag of pearl onions at the market, I can’t help but grab them, knowing they’ll transform into something magical with just a bit of love and balsamic. This recipe is a staple at my dinner parties, and today, I’m sharing my foolproof method to get those onions caramelized to perfection.
Ingredients
- 2 cups of pearl onions, peeled (trust me, peeling them is the hardest part)
- A generous splash of balsamic vinegar (about 1/4 cup)
- A couple of tablespoons of olive oil
- 1 tablespoon of honey (for that sweet balance)
- A pinch of salt and freshly ground black pepper
Instructions
- Heat a large skillet over medium heat and add the olive oil, letting it warm up for about a minute.
- Toss in the pearl onions, stirring them around to coat evenly with the oil. Let them cook undisturbed for 5 minutes to get a nice sear.
- Reduce the heat to low and add the balsamic vinegar and honey, stirring to combine. Tip: The vinegar will reduce quickly, so keep an eye on it to prevent burning.
- Season with salt and pepper, then cover the skillet. Let the onions simmer for 15 minutes, stirring occasionally, until they’re tender and the glaze has thickened. Tip: If the glaze thickens too much, a tablespoon of water can loosen it up.
- Remove the lid and cook for an additional 5 minutes to let the glaze reduce further and cling to the onions. Tip: For an extra layer of flavor, throw in a sprig of thyme or rosemary during the last few minutes of cooking.
Finally, these balsamic glazed pearl onions come out with a sticky-sweet exterior and a melt-in-your-mouth center. I love serving them over a creamy polenta or alongside a juicy steak for a contrast in textures that’s absolutely divine.
Wild Rice Pilaf
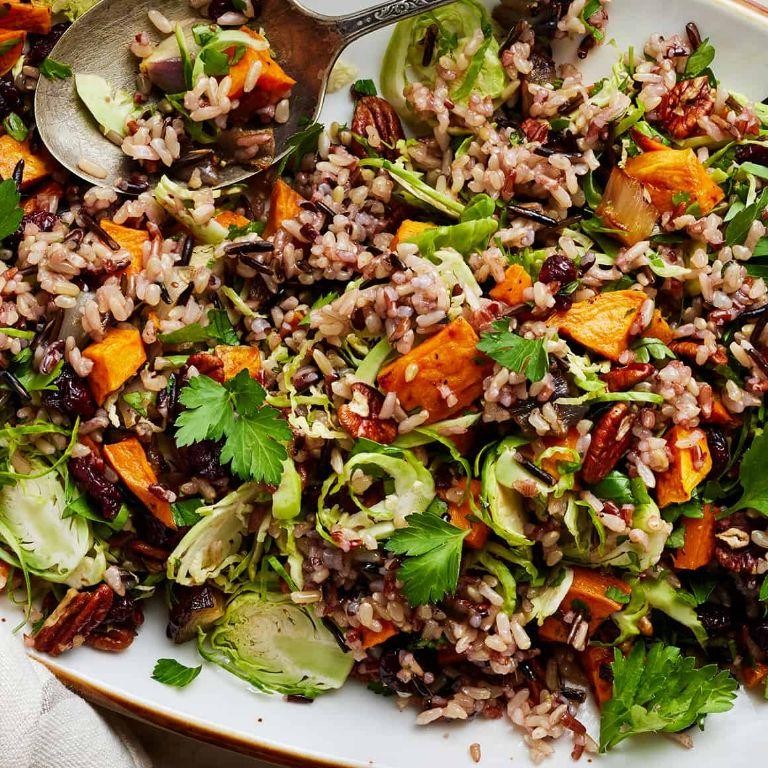
Zesty flavors and hearty textures make this Wild Rice Pilaf a standout dish that’s perfect for any season. I remember the first time I tried it at a friend’s potluck, and I’ve been tweaking my version ever since to get that perfect nutty crunch.
Ingredients
- 1 cup wild rice, because that’s the star of the show
- A couple of cups chicken broth, for that deep flavor
- A splash of olive oil, just enough to coat the pan
- Half an onion, diced, because what’s a pilaf without it?
- A clove of garlic, minced, for a little kick
- A handful of sliced almonds, for that crunch we love
- A sprinkle of parsley, fresh if you’ve got it
Instructions
- Rinse the wild rice under cold water until the water runs clear to remove any bitterness.
- Heat a splash of olive oil in a medium saucepan over medium heat. Tip: Swirl the oil to coat the bottom evenly.
- Add the diced onion and minced garlic, sautéing until they’re soft and fragrant, about 3 minutes.
- Stir in the rinsed wild rice, toasting it slightly with the onions and garlic for about 2 minutes. Tip: Toasting the rice enhances its nutty flavor.
- Pour in the chicken broth, bring to a boil, then reduce the heat to low. Cover and simmer for 45 minutes. Tip: Resist the urge to peek; keeping the lid on ensures even cooking.
- Once the rice is tender and has absorbed all the broth, remove from heat. Let it sit covered for 5 minutes to steam.
- Fluff the rice with a fork, then stir in the sliced almonds and a sprinkle of parsley.
Great texture and flavors come together in this pilaf, with the wild rice’s chewiness contrasting beautifully with the almonds’ crunch. Serve it alongside roasted chicken or as a hearty base for a veggie bowl to really let it shine.
Pumpkin Sage Risotto
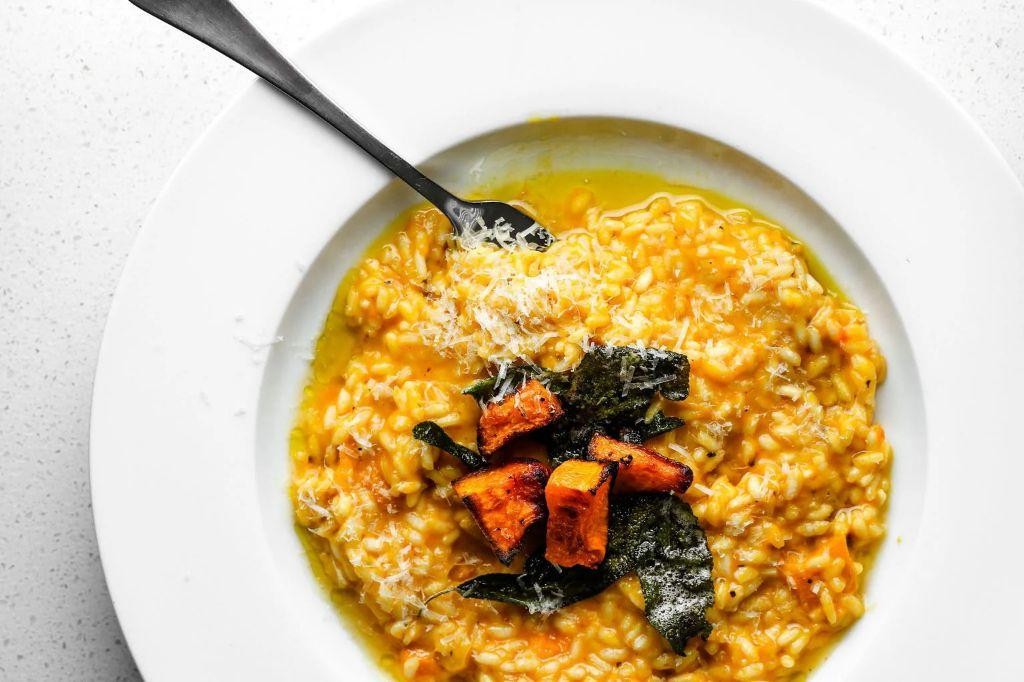
Craving something cozy yet sophisticated for dinner tonight? I recently whipped up this Pumpkin Sage Risotto on a chilly evening, and it was the perfect blend of creamy and savory, with a hint of sweetness from the pumpkin. It’s a dish that feels like a warm hug, and I love how the sage adds a little earthy note to it.
Ingredients
- 1 cup Arborio rice
- 4 cups chicken or vegetable broth, kept warm
- 1 cup pumpkin puree
- 1 small onion, finely chopped
- 2 cloves garlic, minced
- A couple of fresh sage leaves, chopped
- 1/2 cup dry white wine
- A splash of olive oil
- 2 tbsp butter
- 1/2 cup grated Parmesan cheese
- Salt and pepper to taste
Instructions
- Heat a splash of olive oil and 1 tbsp butter in a large pan over medium heat. Tip: Using a wide pan helps the rice cook evenly.
- Add the chopped onion and sauté until translucent, about 5 minutes. Then, stir in the minced garlic and chopped sage for another minute until fragrant.
- Pour in the Arborio rice, stirring to coat each grain with the oil and butter. Toast the rice for about 2 minutes until it starts to look slightly translucent around the edges.
- Add the white wine, stirring constantly until it’s fully absorbed. This deglazes the pan and adds depth to the risotto’s flavor.
- Begin adding the warm broth, one ladle at a time, stirring frequently. Wait until each addition is almost fully absorbed before adding the next. This process should take about 18-20 minutes.
- Once the rice is al dente and the broth is absorbed, stir in the pumpkin puree, remaining butter, and Parmesan cheese. Season with salt and pepper to taste. Tip: The risotto should be creamy, not stiff. If it’s too thick, add a little more broth.
- Remove from heat and let it sit for a couple of minutes. This allows the flavors to meld together beautifully.
Mmm, the final dish is luxuriously creamy with a velvety texture, and the pumpkin gives it a gorgeous orange hue. I love serving it with extra sage leaves fried in butter until crispy for a bit of texture contrast. It’s a showstopper that’s surprisingly simple to make!
Conclusion
We hope this roundup of 20 Delicious Christmas Sides Recipes brings festive joy to your table! Each dish is a celebration of flavor, perfect for sharing with loved ones. Don’t forget to try your favorites, leave a comment below, and share the love on Pinterest. Happy cooking and merry celebrations from our kitchen to yours!