Get ready to sweeten your holiday season with our roundup of 20 Delicious Christmas Dessert Recipes that are sure to amaze! Whether you’re crafting treats for a festive party or looking for that perfect bake to cozy up with, we’ve got something for every home cook. From timeless classics to innovative delights, these recipes will make your Christmas celebrations even more magical. Let’s dive in!
Classic Christmas Pudding
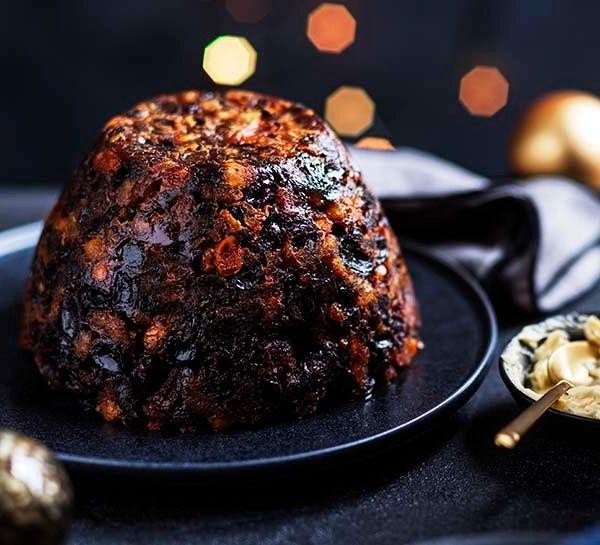
Christmas pudding isn’t just a dessert; it’s a festive explosion in your mouth that’s been waiting all year to make its grand entrance. Packed with tradition and a dash of holiday magic, this pudding is the edible equivalent of a cozy Christmas sweater.
Ingredients
- 1 cup all-purpose flour
- 1 cup breadcrumbs
- 1 cup suet
- 1 cup brown sugar
- 1 cup mixed dried fruits
- 2 eggs
- 1/2 cup milk
- 1 tsp baking powder
- 1/2 tsp cinnamon
- 1/4 tsp nutmeg
- 1/4 tsp allspice
Instructions
- Preheat your oven to 350°F (175°C) and grease a 2-quart pudding basin.
- In a large mixing bowl, combine 1 cup all-purpose flour, 1 cup breadcrumbs, 1 cup suet, and 1 cup brown sugar.
- Stir in 1 cup mixed dried fruits until evenly distributed.
- Beat 2 eggs with 1/2 cup milk in a separate bowl, then pour into the dry ingredients. Mix until just combined.
- Add 1 tsp baking powder, 1/2 tsp cinnamon, 1/4 tsp nutmeg, and 1/4 tsp allspice to the batter, stirring gently to incorporate.
- Pour the batter into the greased pudding basin, filling no more than two-thirds full to allow room for rising.
- Cover the basin with a greased piece of parchment paper and a layer of aluminum foil, securing with string to create a tight seal.
- Place the basin in a large pot and add enough boiling water to come halfway up the sides of the basin. Cover the pot and steam for 3 hours, checking occasionally to ensure the water doesn’t boil dry.
- After steaming, remove the basin from the pot and let the pudding cool for 10 minutes before unmolding onto a serving plate.
Here’s the grand finale: a pudding that’s rich, moist, and bursting with the warm spices of the season. Serve it flaming with a dollop of brandy butter for a show-stopping holiday dessert that’ll have everyone reaching for seconds.
Peppermint Bark Cheesecake
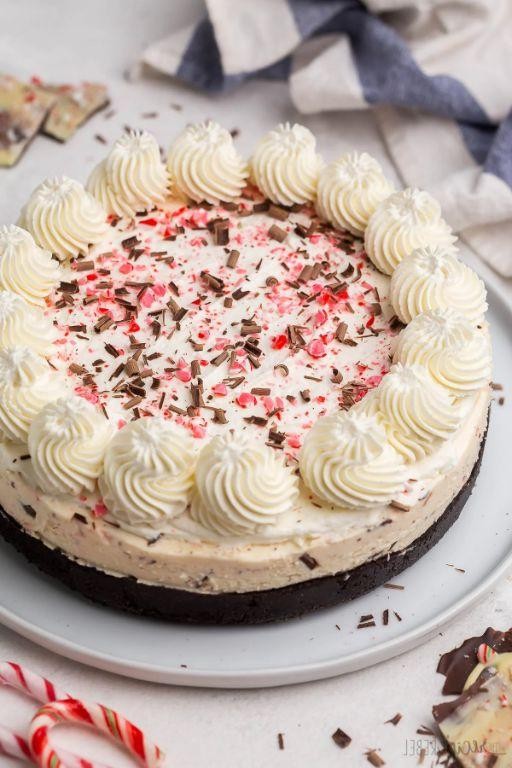
Zesty and zingy, this Peppermint Bark Cheesecake is the holiday hero you didn’t know you needed. It’s like a winter wonderland and a dessert dream had a delicious baby, and trust us, it’s love at first bite.
Ingredients
- 2 cups graham cracker crumbs
- 1/2 cup unsalted butter, melted
- 24 oz cream cheese, softened
- 1 cup granulated sugar
- 1 tsp vanilla extract
- 3 large eggs
- 1/2 cup sour cream
- 1 cup crushed peppermint bark
- 1/2 cup heavy cream
- 1/4 cup powdered sugar
- 1 tsp peppermint extract
Instructions
- Preheat your oven to 325°F (163°C) and grease a 9-inch springform pan.
- Mix 2 cups graham cracker crumbs with 1/2 cup melted unsalted butter until well combined. Press firmly into the bottom of the prepared pan. Tip: Use the bottom of a measuring cup to press the crust evenly.
- In a large bowl, beat 24 oz softened cream cheese with 1 cup granulated sugar until smooth. Tip: Ensure the cream cheese is at room temperature to avoid lumps.
- Add 1 tsp vanilla extract and 3 large eggs, one at a time, beating well after each addition.
- Stir in 1/2 cup sour cream until just combined, then fold in 1 cup crushed peppermint bark.
- Pour the filling over the crust and smooth the top. Bake for 45-50 minutes, or until the center is almost set but still slightly wobbly. Tip: Avoid overbaking to prevent cracks.
- Turn off the oven, crack the door open, and let the cheesecake cool inside for 1 hour to prevent sinking.
- Remove from the oven and cool completely on a wire rack, then refrigerate for at least 4 hours or overnight.
- Before serving, whip 1/2 cup heavy cream with 1/4 cup powdered sugar and 1 tsp peppermint extract until stiff peaks form. Spread over the cheesecake and garnish with additional crushed peppermint bark.
Gloriously creamy with a crunchy crust, this cheesecake is a minty, chocolatey masterpiece. Serve it chilled with a hot cocoa for the ultimate festive treat, or dare to be different and pair it with a shot of espresso for a grown-up twist.
Gingerbread House Cookies

Baking these Gingerbread House Cookies is like constructing your very own edible masterpiece—minus the hard hat and the fear of it collapsing under the weight of your candy decorations. Perfect for holiday bakers who love a dash of whimsy with their sweets, these cookies are the ultimate blend of festive fun and delicious flavor.
Ingredients
- 3 cups all-purpose flour
- 1 tsp baking soda
- 1/2 tsp salt
- 2 tsp ground ginger
- 2 tsp ground cinnamon
- 1/2 tsp ground cloves
- 3/4 cup unsalted butter, softened
- 3/4 cup packed brown sugar
- 1 large egg
- 1/2 cup molasses
- 1 tsp vanilla extract
Instructions
- Preheat your oven to 350°F (175°C) and line baking sheets with parchment paper.
- In a medium bowl, whisk together 3 cups all-purpose flour, 1 tsp baking soda, 1/2 tsp salt, 2 tsp ground ginger, 2 tsp ground cinnamon, and 1/2 tsp ground cloves.
- In a large bowl, cream together 3/4 cup unsalted butter and 3/4 cup packed brown sugar until light and fluffy.
- Beat in 1 large egg, then mix in 1/2 cup molasses and 1 tsp vanilla extract.
- Gradually blend in the dry ingredients until just combined. Tip: Overmixing can lead to tough cookies, so stop as soon as the flour disappears.
- Divide the dough in half, wrap each portion in plastic wrap, and chill for at least 1 hour. Tip: Chilling the dough makes it easier to roll and cut.
- On a lightly floured surface, roll out one portion of dough to 1/4-inch thickness.
- Cut out house-shaped cookies using a gingerbread house cookie cutter and transfer to the prepared baking sheets.
- Bake for 8-10 minutes, or until the edges are just starting to brown. Tip: For even baking, rotate the baking sheets halfway through.
- Let the cookies cool on the baking sheets for 5 minutes before transferring to wire racks to cool completely.
Crunchy on the outside with a chewy center, these Gingerbread House Cookies are spiced to perfection. Serve them as-is for a simple treat or go all out by decorating with royal icing and an assortment of candies for a show-stopping holiday display.
Eggnog Tiramisu

Fancy a twist on the classic tiramisu that’ll have your taste buds dancing the cha-cha? This Eggnog Tiramisu swaps out the usual coffee for rich, creamy eggnog, making it the perfect holiday dessert that’s as easy to make as it is to devour.
Ingredients
- 1 1/2 cups heavy cream
- 1/2 cup granulated sugar
- 8 oz mascarpone cheese
- 1/2 cup eggnog
- 1 tsp vanilla extract
- 24 ladyfingers
- 2 tbsp rum
- 1/4 tsp nutmeg
- 1/4 tsp cinnamon
Instructions
- In a large bowl, whip the heavy cream and granulated sugar together until stiff peaks form, about 3 minutes.
- Gently fold in the mascarpone cheese, eggnog, and vanilla extract until the mixture is smooth and well combined.
- Quickly dip each ladyfinger into the rum and layer half of them in the bottom of a 9×9 inch dish.
- Spread half of the mascarpone mixture over the ladyfingers, then sprinkle with half of the nutmeg and cinnamon.
- Repeat the layers with the remaining ladyfingers, mascarpone mixture, and spices.
- Cover and refrigerate for at least 4 hours, or overnight, to allow the flavors to meld and the dessert to set.
Every bite of this Eggnog Tiramisu is a creamy, dreamy delight, with the warm spices of nutmeg and cinnamon adding a festive kick. Serve it chilled with a dusting of cocoa powder or a drizzle of caramel for an extra indulgent treat.
Christmas Trifle
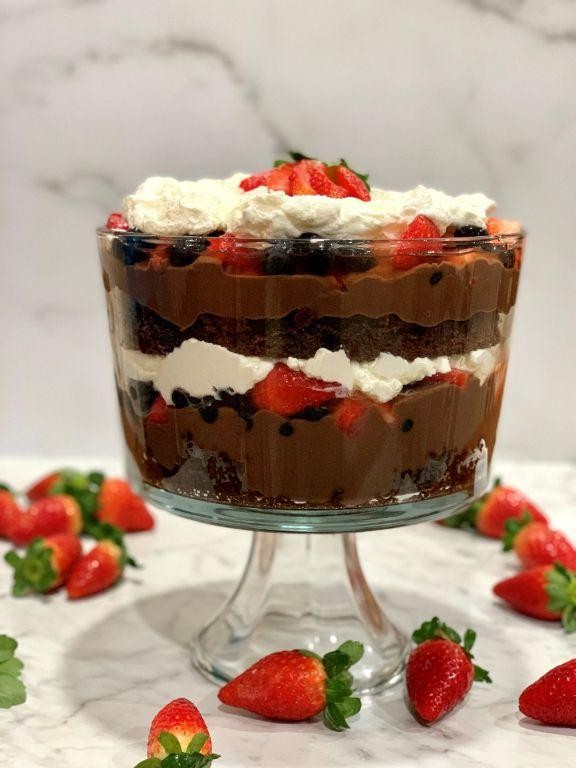
Trifle? More like triumph! This Christmas Trifle is the showstopper your holiday table has been dreaming of, layering boozy-soaked cake, velvety custard, and clouds of whipped cream into a dessert that’s as festive as it is delicious.
Ingredients
- 1 cup heavy cream
- 1/2 cup granulated sugar
- 1 tsp vanilla extract
- 2 cups custard
- 1/2 cup sherry
- 1 pound cake, cut into 1-inch cubes
- 1/2 cup raspberry jam
- 1/2 cup fresh raspberries
- 1/4 cup toasted almonds, sliced
Instructions
- In a large bowl, whip the heavy cream, 1/4 cup of sugar, and vanilla extract until stiff peaks form. Set aside.
- In a separate bowl, mix the custard with the remaining 1/4 cup of sugar until smooth.
- Drizzle the sherry over the pound cake cubes, ensuring they’re evenly moistened.
- Spread a layer of the sherry-soaked cake cubes at the bottom of a trifle dish.
- Dollop half of the raspberry jam over the cake layer, then spread gently.
- Pour half of the custard mixture over the jam, smoothing with a spatula.
- Repeat the layers with the remaining cake, jam, and custard.
- Top with the whipped cream, spreading it to the edges to seal in the layers.
- Garnish with fresh raspberries and toasted almonds.
- Chill in the refrigerator for at least 4 hours, or overnight, to allow the flavors to meld.
Outrageously indulgent, this trifle boasts a symphony of textures from the spongy cake to the creamy custard and crunchy almonds. Serve it in clear glasses to showcase those gorgeous layers, or go traditional with a big spoon and even bigger servings!
Snowball Cookies
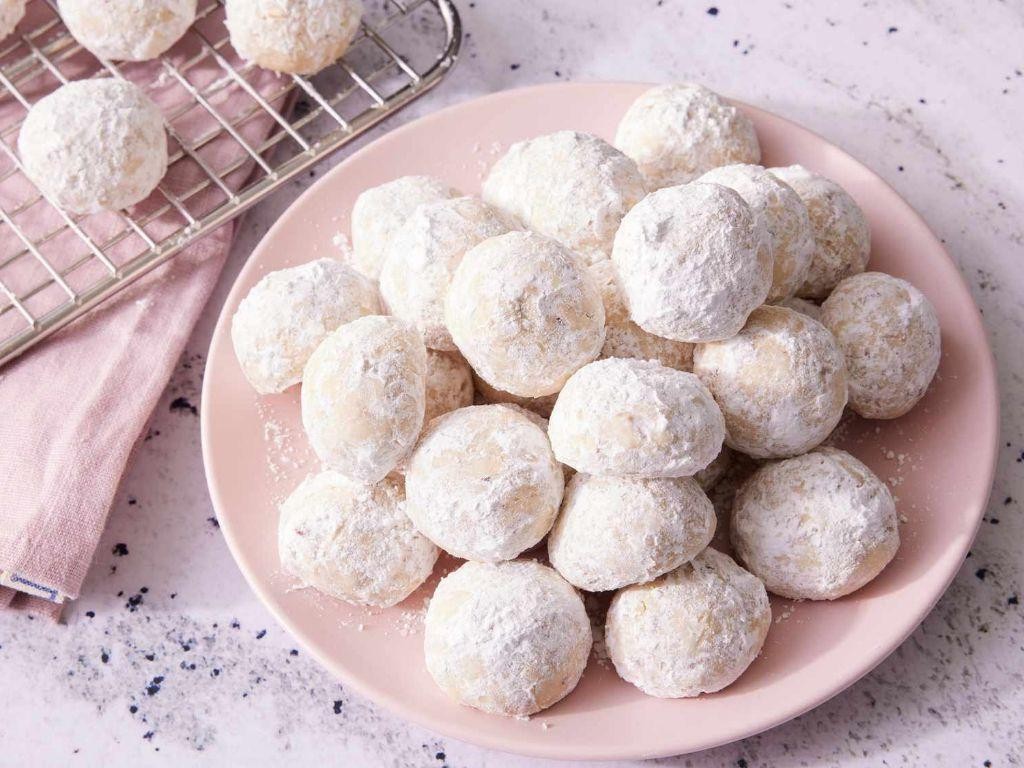
Delightfully deceptive in their simplicity, Snowball Cookies are the undercover agents of the cookie world—unassuming at first glance but packed with buttery, nutty goodness that’ll have you sneaking back for more. Perfect for holiday gifting or a cheeky midnight snack, these little white-dusted orbs are here to prove that good things do come in small packages.
Ingredients
- 1 cup unsalted butter, softened
- 1/2 cup powdered sugar
- 2 tsp vanilla extract
- 2 1/4 cups all-purpose flour
- 3/4 cup finely chopped walnuts
- 1/4 tsp salt
- Additional powdered sugar for rolling
Instructions
- Preheat your oven to 350°F (175°C) and line a baking sheet with parchment paper.
- In a large bowl, cream together the softened butter and 1/2 cup powdered sugar until light and fluffy. Tip: Ensure your butter is at room temperature to avoid a gritty texture.
- Mix in the vanilla extract until fully incorporated.
- Gradually add the flour, chopped walnuts, and salt to the butter mixture, stirring until a dough forms. Tip: If the dough feels too sticky, chill it for 30 minutes for easier handling.
- Roll the dough into 1-inch balls and place them 1 inch apart on the prepared baking sheet.
- Bake for 12-15 minutes, or until the bottoms are just lightly golden. Tip: Avoid overbaking to keep the cookies tender.
- Let the cookies cool on the baking sheet for 5 minutes, then roll them in additional powdered sugar while still warm.
- Allow the cookies to cool completely, then give them a second roll in powdered sugar for that classic snowball look.
Buttery and crumbly with a satisfying crunch from the walnuts, these Snowball Cookies are like a winter wonderland in your mouth. Serve them piled high on a vintage plate for a festive touch, or sneak a few into your pocket for a sweet surprise later—no judgment here.
Fruitcake
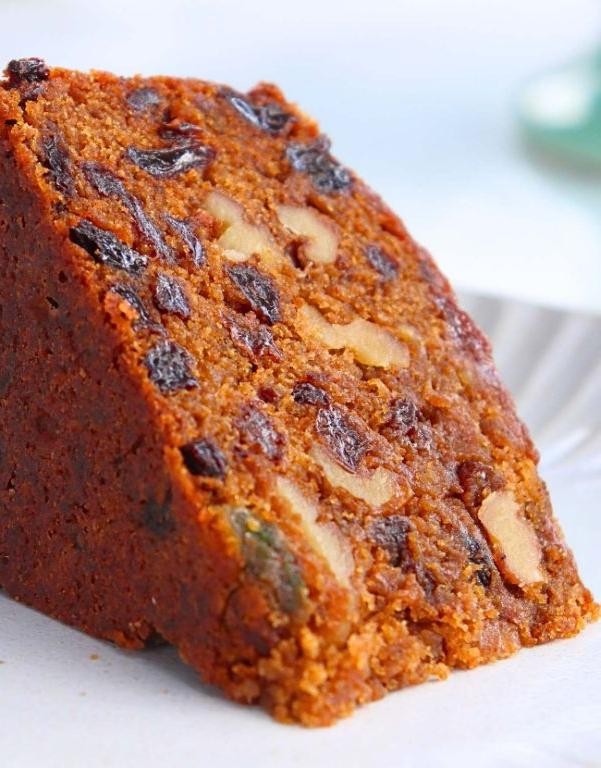
Zesty and packed with more fruits than a tropical rainforest, this fruitcake is the holiday heavyweight champion. It’s dense, it’s fruity, and it’s unapologetically bold—just like your aunt’s holiday sweater.
Ingredients
- 2 cups all-purpose flour
- 1 cup unsalted butter, softened
- 1 cup granulated sugar
- 4 large eggs
- 1 tsp vanilla extract
- 1/2 tsp baking powder
- 1/4 tsp salt
- 2 cups mixed dried fruits (cherries, raisins, apricots)
- 1 cup chopped nuts (walnuts or pecans)
- 1/2 cup brandy or rum
Instructions
- Preheat your oven to 325°F (163°C) and grease a 9×5 inch loaf pan.
- In a large bowl, cream together the butter and sugar until light and fluffy. Tip: Ensure the butter is at room temperature for easier mixing.
- Beat in the eggs one at a time, then stir in the vanilla extract.
- In a separate bowl, whisk together the flour, baking powder, and salt.
- Gradually blend the dry ingredients into the creamed mixture.
- Fold in the mixed dried fruits and chopped nuts. Tip: Soak the dried fruits in brandy overnight for extra moisture and flavor.
- Pour the batter into the prepared loaf pan and smooth the top with a spatula.
- Bake for 60-70 minutes, or until a toothpick inserted into the center comes out clean. Tip: Cover the top with foil if it starts to brown too quickly.
- Allow the cake to cool in the pan for 10 minutes, then transfer to a wire rack to cool completely.
Velvety and rich, this fruitcake is a symphony of textures—chewy fruits, crunchy nuts, and a moist crumb. Serve it with a dollop of whipped cream or a slice of sharp cheddar for an unexpected twist.
Yule Log Cake
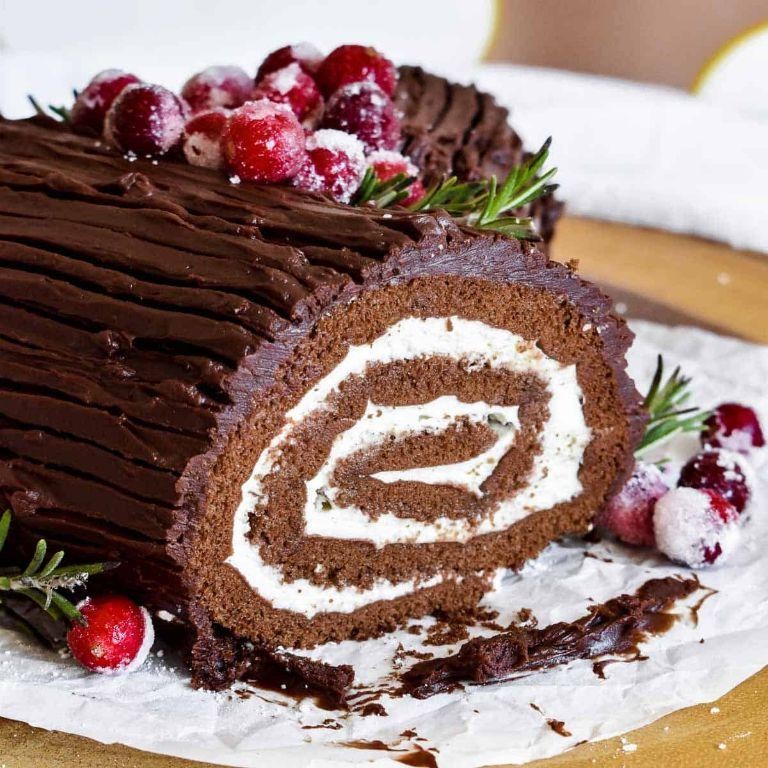
Yule log cake, or as we like to call it, the ‘roll model’ of holiday desserts, is here to spruce up your festive table with its chocolatey charm and whimsical appearance. This showstopper is not just a treat for the taste buds but also a conversation starter, making it the perfect centerpiece for your holiday gatherings.
Ingredients
- 4 large eggs
- 3/4 cup granulated sugar
- 2/3 cup all-purpose flour
- 1/4 cup cocoa powder
- 1 tsp baking powder
- 1/4 tsp salt
- 1 cup heavy cream
- 1/2 cup powdered sugar
- 1 tsp vanilla extract
- 1/2 cup chocolate chips
Instructions
- Preheat your oven to 350°F and line a 15×10-inch jelly roll pan with parchment paper, leaving an overhang on the sides.
- In a large bowl, beat the eggs and granulated sugar on high speed until thick and pale, about 5 minutes.
- Sift together the flour, cocoa powder, baking powder, and salt, then gently fold into the egg mixture until just combined.
- Spread the batter evenly into the prepared pan and bake for 12-15 minutes, or until the cake springs back when lightly touched.
- While the cake is still warm, dust it with powdered sugar and roll it up from the short end with the parchment paper inside. Let cool completely on a wire rack.
- For the filling, whip the heavy cream, powdered sugar, and vanilla extract until stiff peaks form. Unroll the cooled cake, spread the whipped cream evenly, then re-roll without the parchment.
- Melt the chocolate chips and spread over the rolled cake to mimic bark. Use a fork to create wood-like textures before the chocolate sets.
Every bite of this Yule log cake is a delightful mix of fluffy sponge and creamy filling, with the rich chocolate coating adding the perfect finish. Serve it on a platter surrounded by meringue mushrooms and powdered sugar ‘snow’ for an enchanting winter wonderland effect.
Cranberry White Chocolate Blondies
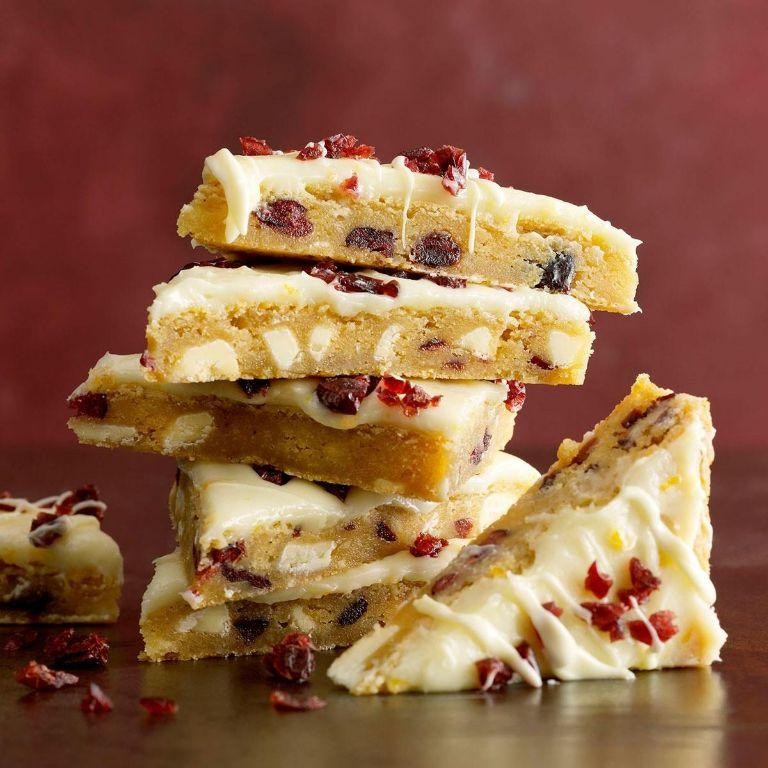
Get ready to meet your new obsession: these Cranberry White Chocolate Blondies are the perfect blend of tart and sweet, with a chewy center and crispy edges that’ll have you sneaking back for just one more bite. Trust us, resistance is futile.
Ingredients
- 1 cup unsalted butter, melted
- 1 1/2 cups light brown sugar, packed
- 2 large eggs
- 1 tbsp vanilla extract
- 2 cups all-purpose flour
- 1/2 tsp baking powder
- 1/4 tsp salt
- 1 cup dried cranberries
- 1 cup white chocolate chips
Instructions
- Preheat your oven to 350°F (175°C) and line a 9×13 inch baking pan with parchment paper, leaving an overhang on the sides for easy removal.
- In a large bowl, whisk together the melted butter and brown sugar until smooth. Tip: Ensure the butter is slightly cooled to avoid cooking the eggs.
- Add the eggs one at a time, whisking well after each addition, then stir in the vanilla extract.
- In a separate bowl, sift together the flour, baking powder, and salt. Gradually fold this into the wet ingredients until just combined. Tip: Overmixing can lead to tough blondies, so stop when you no longer see flour streaks.
- Gently fold in the dried cranberries and white chocolate chips until evenly distributed throughout the batter.
- Spread the batter evenly into the prepared pan and bake for 25-30 minutes, or until the edges are golden and a toothpick inserted into the center comes out with a few moist crumbs. Tip: For extra gooey blondies, err on the side of underbaking.
- Allow the blondies to cool in the pan for 10 minutes, then use the parchment overhang to lift them out onto a wire rack to cool completely.
Unbelievably delicious, these blondies strike the perfect balance between the tangy pop of cranberries and the creamy sweetness of white chocolate. Serve them warm with a scoop of vanilla ice cream for an indulgent twist, or enjoy them as is for a treat that’s sure to impress.
Peppermint Mocha Cupcakes
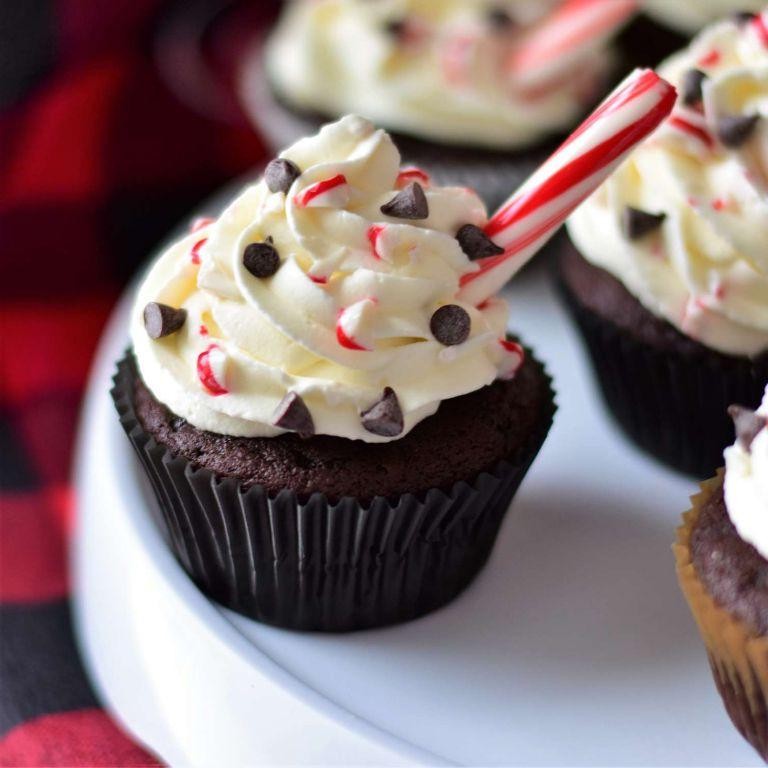
Venture into the world of holiday baking with these Peppermint Mocha Cupcakes, where the bold flavors of coffee and peppermint throw a party in your mouth. Perfect for those who like their desserts with a side of cheer and a dash of decadence.
Ingredients
- 1 1/2 cups all-purpose flour
- 1/2 cup unsweetened cocoa powder
- 1 tsp baking soda
- 1/2 tsp salt
- 1 cup granulated sugar
- 1/2 cup vegetable oil
- 2 large eggs
- 1 tsp vanilla extract
- 1/2 cup strong brewed coffee, cooled
- 1/2 cup buttermilk
- 1/2 cup crushed peppermint candies
- 1 cup unsalted butter, softened
- 3 cups powdered sugar
- 1 tbsp milk
- 1/2 tsp peppermint extract
Instructions
- Preheat your oven to 350°F and line a muffin tin with cupcake liners.
- In a large bowl, whisk together 1 1/2 cups all-purpose flour, 1/2 cup unsweetened cocoa powder, 1 tsp baking soda, and 1/2 tsp salt.
- In another bowl, beat 1 cup granulated sugar and 1/2 cup vegetable oil until smooth. Tip: Ensure the oil is at room temperature to avoid a lumpy mixture.
- Add 2 large eggs one at a time, then stir in 1 tsp vanilla extract.
- Alternately add the dry ingredients and 1/2 cup strong brewed coffee, cooled, and 1/2 cup buttermilk to the sugar mixture, starting and ending with the dry ingredients. Tip: Mix just until combined to keep the cupcakes light and fluffy.
- Fold in 1/2 cup crushed peppermint candies.
- Divide the batter evenly among the prepared muffin cups, filling each about 2/3 full.
- Bake for 18-20 minutes, or until a toothpick inserted into the center comes out clean. Tip: Rotate the pan halfway through baking for even cooking.
- Let the cupcakes cool in the pan for 5 minutes, then transfer to a wire rack to cool completely.
- For the frosting, beat 1 cup unsalted butter, softened, until creamy. Gradually add 3 cups powdered sugar, 1 tbsp milk, and 1/2 tsp peppermint extract, beating until light and fluffy.
- Pipe or spread the frosting onto the cooled cupcakes and sprinkle with additional crushed peppermint candies if desired.
Bite into these cupcakes to experience a delightful crunch from the peppermint candies, followed by the rich, smooth mocha flavor. Serve them at your next holiday gathering or enjoy as a festive treat with your morning coffee.
Christmas Star Bread
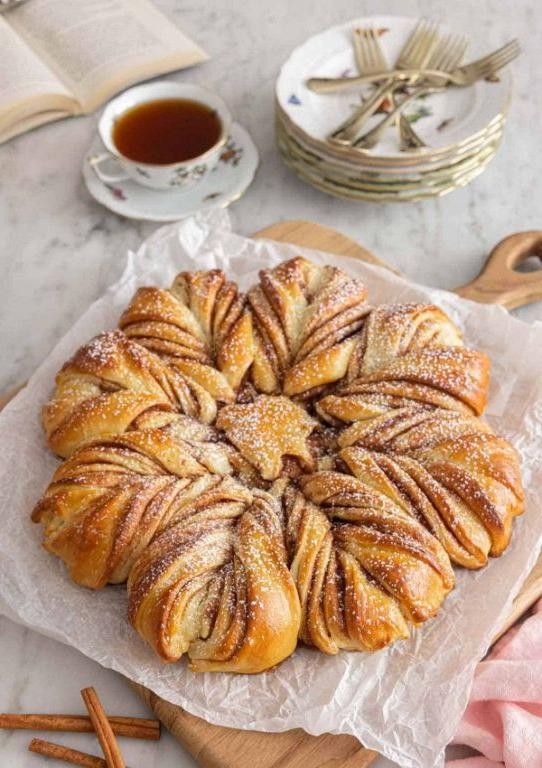
Every holiday season needs a showstopper, and this Christmas Star Bread is here to dazzle at your festive table. With its layers of sweet, buttery dough and a sprinkle of magic (aka sugar), it’s like unwrapping a present with every bite.
Ingredients
- 4 cups all-purpose flour
- 1/4 cup granulated sugar
- 1 tsp salt
- 1 packet active dry yeast
- 1 cup warm milk (110°F)
- 1/2 cup unsalted butter, melted
- 1 large egg
- 1/2 cup raspberry jam
- 1 tbsp powdered sugar for dusting
Instructions
- In a large bowl, whisk together 4 cups all-purpose flour, 1/4 cup granulated sugar, and 1 tsp salt.
- Dissolve 1 packet active dry yeast in 1 cup warm milk (110°F) and let sit for 5 minutes until frothy.
- Add the yeast mixture, 1/2 cup melted unsalted butter, and 1 large egg to the dry ingredients. Mix until a dough forms.
- Knead the dough on a floured surface for 8 minutes until smooth and elastic. Tip: If the dough sticks, add a little more flour, but don’t overdo it.
- Place the dough in a greased bowl, cover, and let rise in a warm place for 1 hour or until doubled in size.
- Punch down the dough and divide into 4 equal parts. Roll each into a 10-inch circle.
- Place the first circle on a parchment-lined baking sheet. Spread 2 tbsp raspberry jam evenly over the dough, leaving a 1-inch border.
- Repeat with the remaining circles and jam, stacking them. Tip: Use a pizza cutter to make clean cuts when shaping the star.
- Using a sharp knife, cut the stack into 16 equal strips from the center outward, leaving the center intact.
- Twist each pair of strips away from each other twice, then pinch the ends together to form points. Tip: For a glossy finish, brush the bread with an egg wash before baking.
- Bake at 350°F for 25 minutes or until golden brown. Let cool slightly, then dust with 1 tbsp powdered sugar.
Voilà! This Christmas Star Bread is a masterpiece of flaky layers and sweet jam, perfect for tearing apart and sharing. Serve it warm with a cup of cocoa for a cozy holiday treat that’s as fun to eat as it is to make.
Hot Chocolate Fudge
Now, who in their right mind can resist the siren call of hot chocolate fudge? This decadent delight is like a warm hug for your taste buds, perfect for those days when you need a little extra love (or sugar).
Ingredients
- 1 cup heavy cream
- 2 cups semi-sweet chocolate chips
- 1/4 cup unsalted butter
- 1 tsp vanilla extract
- 1/4 tsp salt
Instructions
- Line an 8×8 inch baking dish with parchment paper, leaving some overhang for easy removal later.
- In a medium saucepan, heat the heavy cream over medium heat until it begins to simmer, about 3-5 minutes. Tip: Keep an eye on it to prevent boiling over.
- Remove the saucepan from heat and immediately add the chocolate chips, butter, vanilla extract, and salt. Tip: The residual heat will melt everything smoothly, so no need to return to the stove.
- Stir the mixture until completely smooth and glossy, about 2-3 minutes. Tip: If you hit a few stubborn chocolate chips, a quick 10-second blast in the microwave can help.
- Pour the mixture into the prepared baking dish and smooth the top with a spatula.
- Refrigerate for at least 2 hours, or until the fudge is firm to the touch.
- Using the parchment overhang, lift the fudge out of the dish and cut into 1-inch squares.
So rich, so creamy, and oh-so-chocolatey, this hot chocolate fudge is a dream come true. Serve it slightly chilled for a firm bite, or let it sit out for a few minutes if you prefer a softer, melt-in-your-mouth experience.
Spiced Apple Cider Donuts
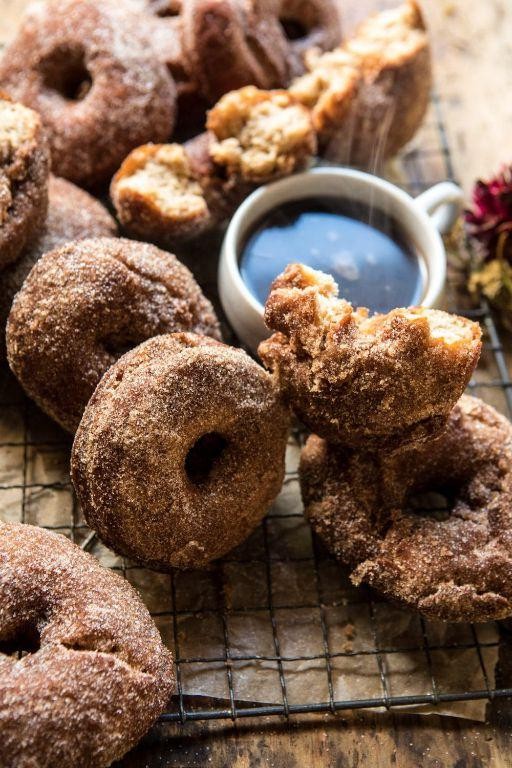
Who knew that donuts could get any better? Wait until you try these Spiced Apple Cider Donuts—they’re like autumn in your mouth, but let’s be real, they’re perfect any time of year. Packed with warm spices and a tender crumb, they’re about to become your new obsession.
Ingredients
- 2 cups all-purpose flour
- 1 1/2 tsp baking powder
- 1 1/2 tsp baking soda
- 1 tsp salt
- 2 tsp ground cinnamon
- 1/2 tsp ground nutmeg
- 1/4 tsp ground cloves
- 1/2 cup granulated sugar
- 1/2 cup light brown sugar
- 1/2 cup apple cider
- 1/2 cup buttermilk
- 6 tbsp unsalted butter, melted
- 1 large egg
- 1 tsp vanilla extract
Instructions
- Preheat your oven to 350°F and grease a donut pan with non-stick spray.
- In a large bowl, whisk together 2 cups all-purpose flour, 1 1/2 tsp baking powder, 1 1/2 tsp baking soda, 1 tsp salt, 2 tsp ground cinnamon, 1/2 tsp ground nutmeg, and 1/4 tsp ground cloves.
- In another bowl, mix 1/2 cup granulated sugar, 1/2 cup light brown sugar, 1/2 cup apple cider, 1/2 cup buttermilk, 6 tbsp melted unsalted butter, 1 large egg, and 1 tsp vanilla extract until smooth.
- Gently fold the wet ingredients into the dry ingredients until just combined—overmixing leads to tough donuts.
- Pipe or spoon the batter into the prepared donut pan, filling each mold about 3/4 full.
- Bake for 10-12 minutes, or until a toothpick inserted comes out clean. Let them cool in the pan for 5 minutes before transferring to a wire rack.
- For an extra treat, dip the warm donuts in melted butter and roll them in cinnamon sugar.
Best enjoyed fresh, these donuts boast a moist interior with a slightly crisp exterior, thanks to the apple cider reduction. Serve them with a hot cup of coffee or cider for the ultimate cozy experience.
Christmas Cranberry Pie
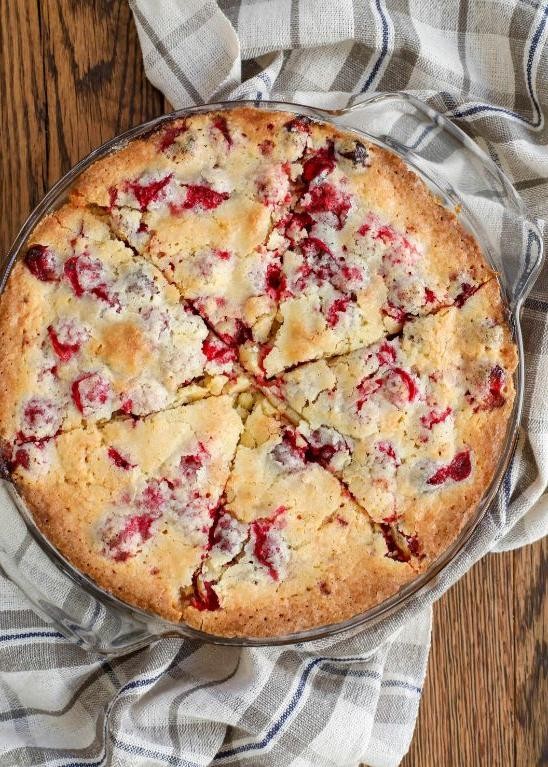
Mmm, nothing says ‘holiday cheer’ quite like the tart pop of cranberries nestled in a buttery, flaky crust—our Christmas Cranberry Pie is here to jingle your taste buds all the way to the North Pole and back!
Ingredients
- 2 cups all-purpose flour
- 1 cup unsalted butter, chilled and diced
- 1/4 cup ice water
- 1/2 cup granulated sugar
- 1/4 cup brown sugar
- 4 cups fresh cranberries
- 1 tbsp lemon zest
- 1 tsp vanilla extract
- 1/2 tsp ground cinnamon
- 1/4 tsp salt
Instructions
- Preheat your oven to 375°F (190°C) to ensure it’s ready for baking magic.
- In a large bowl, combine 2 cups all-purpose flour and 1/4 tsp salt. Tip: Keep your butter cold for a flakier crust.
- Add 1 cup chilled, diced unsalted butter to the flour mixture. Use a pastry cutter or your fingers to blend until the mixture resembles coarse crumbs.
- Gradually add 1/4 cup ice water, stirring until the dough comes together. Tip: Don’t overwork the dough to keep it tender.
- Divide the dough in half, shape into discs, wrap in plastic, and chill for 30 minutes.
- While the dough chills, mix 4 cups fresh cranberries, 1/2 cup granulated sugar, 1/4 cup brown sugar, 1 tbsp lemon zest, 1 tsp vanilla extract, and 1/2 tsp ground cinnamon in a bowl.
- Roll out one dough disc on a floured surface to fit a 9-inch pie plate. Transfer and trim the edges.
- Pour the cranberry mixture into the crust. Tip: Let the filling sit for 10 minutes to meld flavors.
- Roll out the second dough disc, place over the filling, seal the edges, and cut slits on top.
- Bake for 45-50 minutes, until the crust is golden and the filling bubbles.
This pie is a festive symphony of textures—crispy crust giving way to a juicy, tangy-sweet cranberry center. Serve it warm with a scoop of vanilla ice cream for a merry contrast, or enjoy a slice with your morning coffee as a cheeky start to the day.
Chocolate Peppermint Tart
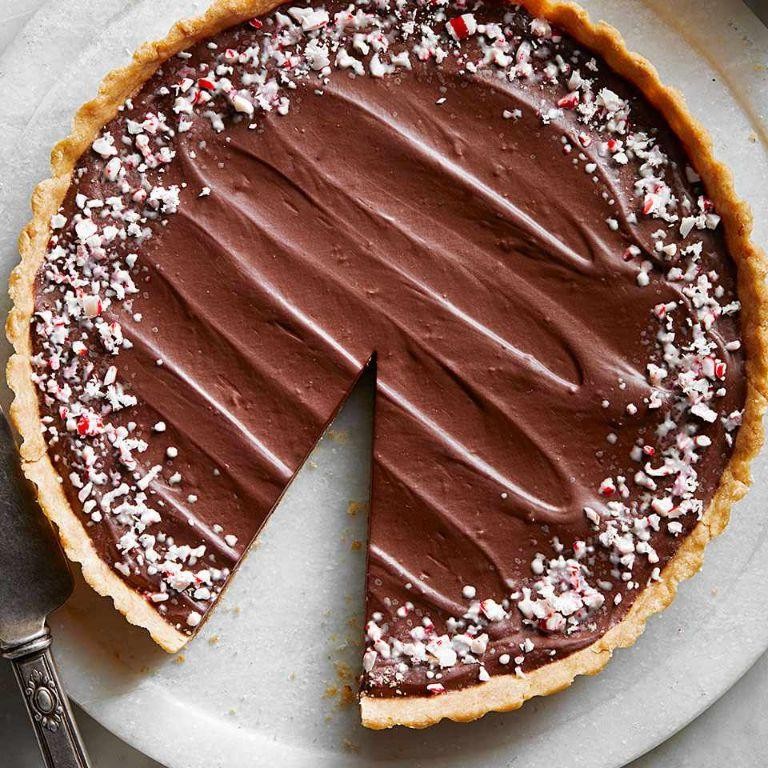
Get ready to dazzle your taste buds with a dessert that’s as fun to make as it is to devour! This Chocolate Peppermint Tart is the perfect blend of rich, creamy chocolate and refreshing peppermint, wrapped up in a crisp, buttery crust. It’s like a holiday party in your mouth, and everyone’s invited!
Ingredients
- 1 1/2 cups all-purpose flour
- 1/2 cup unsalted butter, chilled and cubed
- 1/4 cup granulated sugar
- 1/4 tsp salt
- 1 large egg yolk
- 2 tbsp ice water
- 1 1/2 cups heavy cream
- 12 oz semisweet chocolate, finely chopped
- 1/4 cup powdered sugar
- 1 tsp peppermint extract
- 1/2 cup crushed peppermint candies
Instructions
- Preheat your oven to 350°F (175°C). Lightly grease a 9-inch tart pan with a removable bottom.
- In a food processor, combine 1 1/2 cups all-purpose flour, 1/2 cup unsalted butter, 1/4 cup granulated sugar, and 1/4 tsp salt. Pulse until the mixture resembles coarse crumbs.
- Add 1 large egg yolk and 2 tbsp ice water. Pulse until the dough begins to come together.
- Press the dough evenly into the prepared tart pan. Chill for 15 minutes to prevent shrinking.
- Bake the crust for 15-20 minutes, or until golden brown. Let cool completely on a wire rack.
- In a saucepan, heat 1 1/2 cups heavy cream over medium heat until it just begins to simmer. Remove from heat.
- Add 12 oz semisweet chocolate to the hot cream. Let sit for 2 minutes, then stir until smooth.
- Stir in 1/4 cup powdered sugar and 1 tsp peppermint extract. Pour the filling into the cooled crust.
- Sprinkle 1/2 cup crushed peppermint candies over the top. Chill the tart for at least 4 hours, or until set.
Let this tart be the showstopper at your next gathering! The silky chocolate filling paired with the crunchy peppermint topping creates a texture contrast that’s simply irresistible. Serve it with a dollop of whipped cream or a sprinkle of extra crushed candies for an extra festive touch.
Vanilla Bean Noel Cookies

Kick off your holiday baking with these Vanilla Bean Noel Cookies, a festive treat that’s as fun to make as it is to devour. Perfect for cookie exchanges or just because, these little delights are like a winter wonderland in your mouth—minus the cold.
Ingredients
- 1 cup unsalted butter, softened
- 1 cup granulated sugar
- 1 large egg
- 2 tsp vanilla bean paste
- 2 1/2 cups all-purpose flour
- 1/2 tsp salt
- 1/2 cup powdered sugar, for rolling
Instructions
- Preheat your oven to 350°F (175°C) and line two baking sheets with parchment paper.
- In a large bowl, cream together 1 cup unsalted butter and 1 cup granulated sugar until light and fluffy, about 3 minutes. Tip: Ensure your butter is at room temperature for easier mixing.
- Beat in 1 large egg and 2 tsp vanilla bean paste until well combined.
- Gradually mix in 2 1/2 cups all-purpose flour and 1/2 tsp salt until the dough comes together. Tip: Don’t overmix to keep the cookies tender.
- Roll the dough into 1-inch balls, then roll each ball in 1/2 cup powdered sugar until fully coated. Tip: For extra sparkle, roll the cookies in powdered sugar again after baking.
- Place the balls on the prepared baking sheets, spacing them about 2 inches apart.
- Bake for 10-12 minutes, or until the edges are just set but the centers are still soft.
- Let the cookies cool on the baking sheets for 5 minutes before transferring to a wire rack to cool completely.
Absolutely divine, these cookies boast a melt-in-your-mouth texture with a rich vanilla flavor that’s anything but ordinary. Serve them stacked high on a vintage plate for a touch of nostalgia, or pack them in cute boxes as edible gifts that’ll have everyone asking for your secret.
Pumpkin Spice Latte Cake
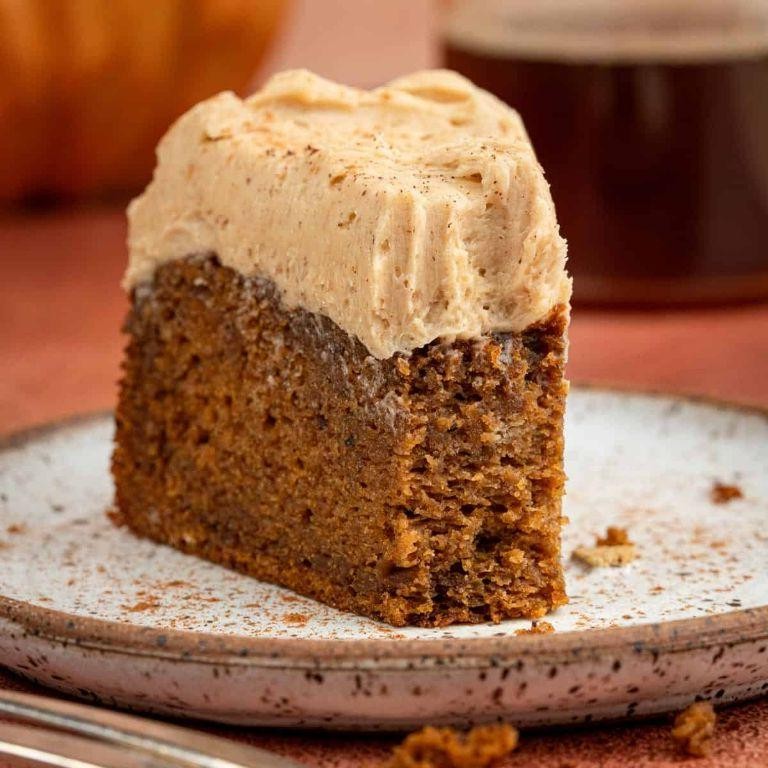
Let’s face it, pumpkin spice season isn’t just a season—it’s a lifestyle. And what better way to celebrate than by turning your favorite autumnal sip into a show-stopping cake that’s as Instagram-worthy as it is delicious?
Ingredients
- 2 cups all-purpose flour
- 1 1/2 cups granulated sugar
- 1 tsp baking soda
- 1/2 tsp baking powder
- 1/2 tsp salt
- 2 tsp pumpkin pie spice
- 1 cup pumpkin puree
- 1/2 cup vegetable oil
- 2 large eggs
- 1 tsp vanilla extract
- 1/2 cup strong brewed coffee, cooled
- 1/2 cup whole milk
- 1 tbsp white vinegar
Instructions
- Preheat your oven to 350°F (175°C) and grease a 9-inch round cake pan. Tip: For extra non-stick security, line the bottom with parchment paper.
- In a large bowl, whisk together 2 cups all-purpose flour, 1 1/2 cups granulated sugar, 1 tsp baking soda, 1/2 tsp baking powder, 1/2 tsp salt, and 2 tsp pumpkin pie spice until well combined.
- In another bowl, mix 1 cup pumpkin puree, 1/2 cup vegetable oil, 2 large eggs, and 1 tsp vanilla extract until smooth. Tip: Ensure all ingredients are at room temperature for a smoother batter.
- Combine the wet ingredients with the dry ingredients, then stir in 1/2 cup strong brewed coffee and 1/2 cup whole milk until just combined. Tip: Overmixing can lead to a dense cake, so mix until you no longer see flour streaks.
- Quickly stir in 1 tbsp white vinegar to activate the baking soda, then immediately pour the batter into the prepared pan.
- Bake for 30-35 minutes, or until a toothpick inserted into the center comes out clean. Let the cake cool in the pan for 10 minutes before transferring to a wire rack to cool completely.
Moist, fluffy, and packed with that signature pumpkin spice latte flavor, this cake is a dream come true for PSL lovers. Serve it with a dollop of whipped cream and a sprinkle of cinnamon for that coffeehouse flair right at home.
Christmas Coconut Macaroons
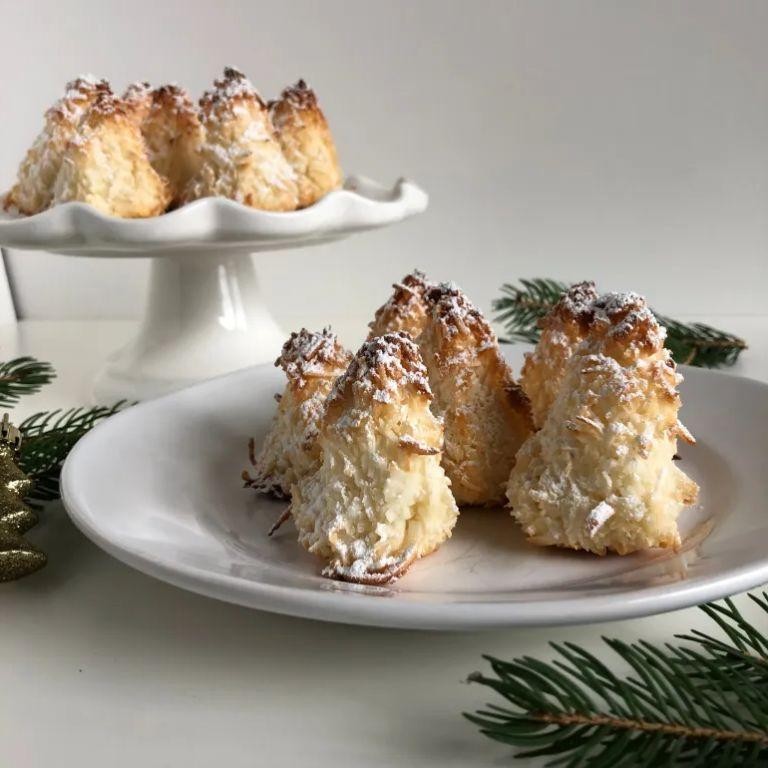
Who knew that these tiny, tropical-flavored snowballs could bring so much joy to your holiday table? Christmas Coconut Macaroons are the perfect blend of chewy, sweet, and slightly crispy, making them irresistible to anyone who dares to take a bite.
Ingredients
- 14 oz sweetened shredded coconut
- 14 oz sweetened condensed milk
- 1 tsp pure vanilla extract
- 2 large egg whites
- 1/4 tsp salt
Instructions
- Preheat your oven to 325°F and line a baking sheet with parchment paper.
- In a large bowl, combine the sweetened shredded coconut, sweetened condensed milk, and vanilla extract. Mix until fully incorporated.
- In a separate bowl, beat the egg whites and salt until stiff peaks form. This will give your macaroons their light, airy texture.
- Gently fold the beaten egg whites into the coconut mixture. Be careful not to overmix to keep the mixture fluffy.
- Using a cookie scoop or tablespoon, drop rounded mounds of the mixture onto the prepared baking sheet, spacing them about 1 inch apart.
- Bake for 20-25 minutes, or until the edges are golden brown and the tops are slightly firm to the touch.
- Allow the macaroons to cool on the baking sheet for 5 minutes before transferring them to a wire rack to cool completely.
How delightful are these little clouds of coconutty goodness? Their crispy exterior gives way to a moist, chewy center, making them a festive treat that’s as fun to eat as it is to make. Try drizzling them with dark chocolate for an extra decadent touch.
Maple Pecan Pie
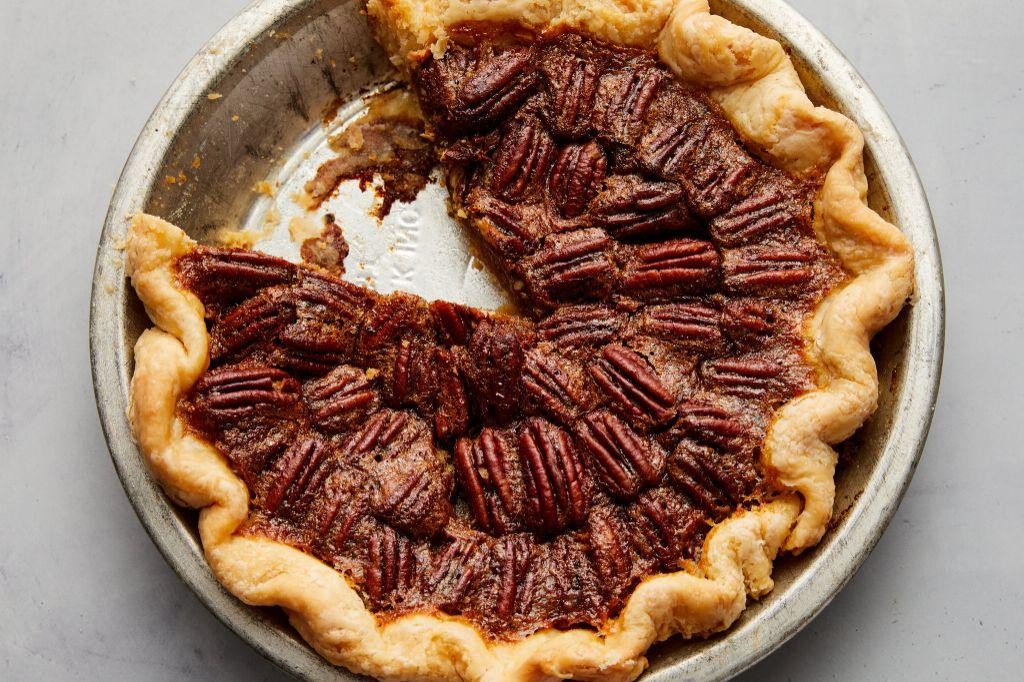
Ever had a pie so good it made you want to write home about it? Well, buckle up, buttercup, because this Maple Pecan Pie is about to become the star of your dessert table—no cap.
Ingredients
- 1 9-inch pie crust, unbaked
- 1 cup pure maple syrup
- 1 cup granulated sugar
- 1/2 cup unsalted butter, melted
- 3 large eggs
- 1 tsp vanilla extract
- 1/4 tsp salt
- 2 cups pecan halves
Instructions
- Preheat your oven to 350°F (175°C). This ensures your pie bakes evenly, avoiding any sad, undercooked spots.
- In a large bowl, whisk together the maple syrup, granulated sugar, melted butter, eggs, vanilla extract, and salt until smooth. Tip: Room temperature eggs blend more easily, preventing a lumpy filling.
- Stir in the pecan halves, making sure they’re evenly coated in the syrup mixture. This ensures every bite is packed with pecan goodness.
- Pour the filling into the unbaked pie crust, spreading the pecans evenly. A little patience here means a prettier pie.
- Bake for 50-60 minutes, or until the filling is set and the crust is golden brown. Tip: Cover the crust edges with foil halfway through to prevent over-browning.
- Remove the pie from the oven and let it cool completely on a wire rack. This step is crucial for the filling to set properly—no one likes a runny pie.
Decadently rich with a perfect balance of sweetness and nuttiness, this Maple Pecan Pie is a showstopper. Serve it warm with a scoop of vanilla ice cream for an extra indulgent treat, or enjoy it as is for a pure pecan experience.
White Christmas Rocky Road
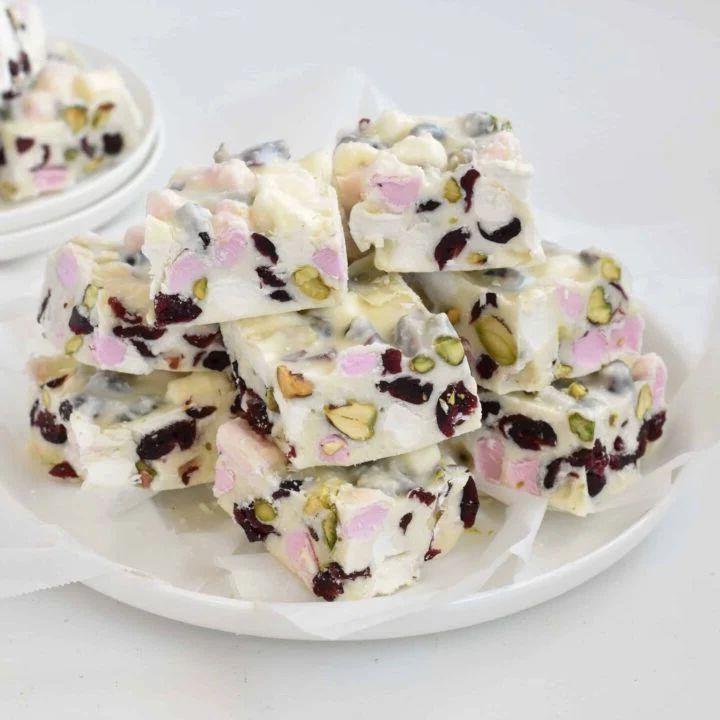
Snowflakes aren’t the only thing you’ll be catching this holiday season—prepare to catch some serious cravings with this ‘White Christmas Rocky Road’ that’s as easy to make as it is to devour. Perfect for those who believe the holidays are all about indulgence, this no-bake treat combines creamy, crunchy, and chewy in every bite.
Ingredients
- 3 cups white chocolate chips
- 1/4 cup unsalted butter
- 1/4 cup light corn syrup
- 1 tsp vanilla extract
- 2 cups mini marshmallows
- 1 cup roasted almonds
- 1/2 cup dried cranberries
- 1/2 cup shredded coconut
Instructions
- Line an 8×8 inch baking pan with parchment paper, leaving an overhang on the sides for easy removal.
- In a microwave-safe bowl, combine white chocolate chips, butter, and corn syrup. Microwave on high for 1 minute, then stir. If not fully melted, microwave in 15-second intervals, stirring between each, until smooth.
- Stir in vanilla extract until fully incorporated.
- Quickly fold in mini marshmallows, roasted almonds, dried cranberries, and shredded coconut until evenly distributed. Tip: Work fast to prevent the chocolate from setting.
- Pour the mixture into the prepared pan, using a spatula to press it into an even layer. Tip: Wet your fingers slightly to press down without sticking.
- Refrigerate for at least 2 hours, or until firm. Tip: For cleaner cuts, heat your knife under hot water before slicing.
- Once set, lift the rocky road out of the pan using the parchment overhang and cut into squares.
Go ahead, take a bite—this rocky road is a festive fiesta of textures, from the smooth melt of white chocolate to the satisfying crunch of almonds and the chewy pop of marshmallows. Serve it on a platter with other holiday treats or package it in cute boxes for edible gifts that’ll make you the star of the season.
Conclusion
We hope this roundup of 20 Delicious Christmas Dessert Recipes has inspired your holiday baking! Each recipe is a delightful way to sweeten your celebrations. Don’t forget to try them out, share your favorites in the comments, and pin this article on Pinterest to spread the joy. Happy baking and merry Christmas from our kitchen to yours!


