Outdoor cooking just got a whole lot more exciting with these 23 adventurous Boy Scouts recipes! Whether you’re a seasoned camper or just love the idea of whipping up delicious meals under the open sky, our roundup is packed with easy-to-follow, mouthwatering dishes that’ll fuel your next outdoor adventure. From hearty breakfasts to savory dinners, get ready to transform your campfire cooking game. Keep reading to discover your next favorite recipe!
Campfire Chili
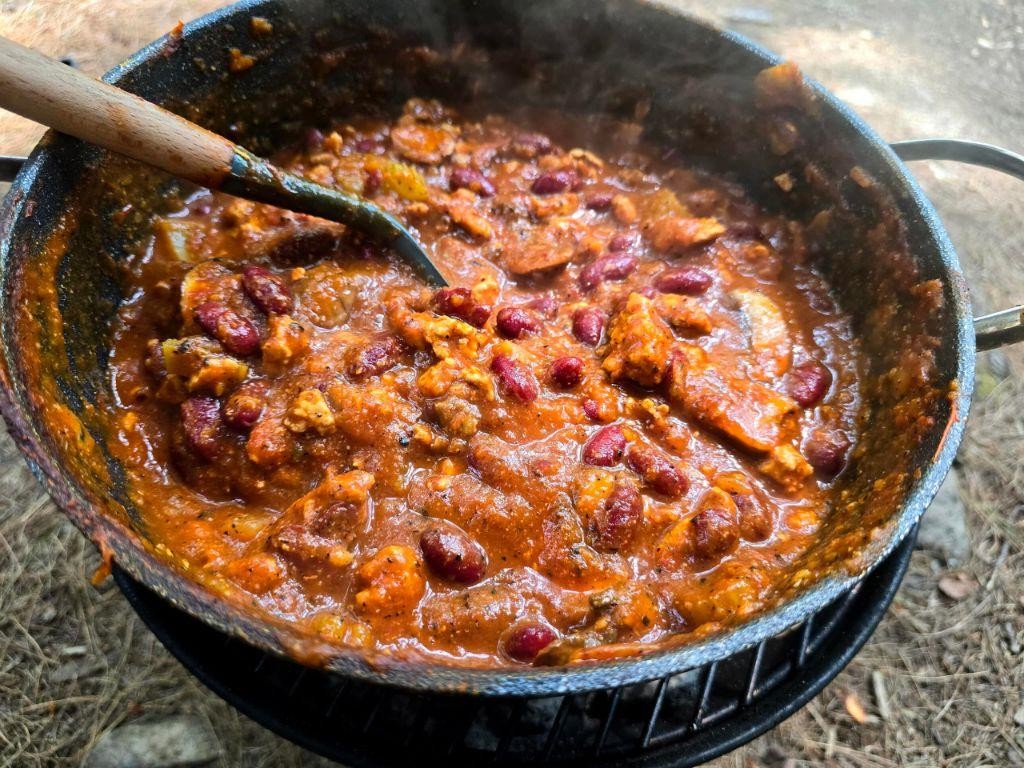
Evenings are getting cooler, and there’s nothing like a hearty bowl of chili to warm you up. This campfire chili is your go-to for a cozy night in or a gathering under the stars.
Ingredients
- 1 lb ground beef (or turkey for a lighter option)
- 1 onion, diced (yellow or white works best)
- 2 cloves garlic, minced (fresh is key for flavor)
- 1 can (15 oz) kidney beans, drained and rinsed (or black beans for variety)
- 1 can (15 oz) diced tomatoes (fire-roasted add a smoky depth)
- 2 tbsp chili powder (adjust for more heat)
- 1 tsp cumin (toasted and ground if possible)
- 1 cup beef broth (low sodium to control saltiness)
- 1 tbsp olive oil (or any neutral oil)
- Salt and pepper to taste (start with 1/2 tsp salt)
Instructions
- Heat olive oil in a large pot over medium heat until shimmering.
- Add diced onion and cook until translucent, about 5 minutes, stirring occasionally.
- Stir in minced garlic and cook for 1 minute until fragrant.
- Add ground beef, breaking it apart with a spoon, and cook until no longer pink, about 7 minutes.
- Sprinkle chili powder and cumin over the beef, stirring to coat evenly.
- Pour in diced tomatoes, kidney beans, and beef broth, stirring to combine.
- Bring the mixture to a simmer, then reduce heat to low and cover.
- Let the chili simmer for at least 30 minutes, stirring occasionally, to meld flavors.
- Season with salt and pepper, adjusting to your preference.
When ready, this chili boasts a rich, smoky flavor with just the right amount of heat. Serve it with a dollop of sour cream or over a baked potato for a twist.
Dutch Oven Stew
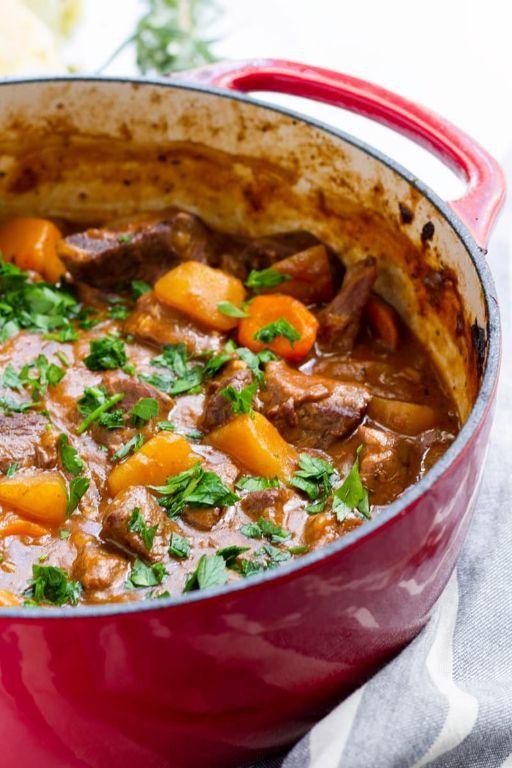
Ready to cozy up with a hearty meal that practically cooks itself? This Dutch oven stew is your ticket to a flavorful, no-fuss dinner that’ll have everyone asking for seconds.
Ingredients
- 2 tbsp olive oil (or any neutral oil)
- 1.5 lbs beef chuck, cut into 1-inch cubes
- 1 large onion, diced
- 3 carrots, sliced into 1/2-inch pieces
- 3 celery stalks, sliced into 1/2-inch pieces
- 4 garlic cloves, minced
- 4 cups beef broth (low sodium preferred)
- 1 tbsp tomato paste
- 1 tsp dried thyme (adjust to taste)
- 2 bay leaves
- Salt and pepper to taste
Instructions
- Heat olive oil in a Dutch oven over medium-high heat until shimmering, about 2 minutes.
- Add beef cubes in a single layer, working in batches if necessary, and sear until browned on all sides, about 3-4 minutes per batch. Tip: Don’t overcrowd the pot to ensure a good sear.
- Remove beef and set aside. In the same pot, add onion, carrots, and celery. Cook until softened, about 5 minutes.
- Stir in garlic and cook until fragrant, about 30 seconds.
- Return beef to the pot. Add beef broth, tomato paste, thyme, and bay leaves. Stir to combine.
- Bring to a boil, then reduce heat to low. Cover and simmer for 1.5 hours, stirring occasionally. Tip: The stew is ready when the beef is fork-tender.
- Season with salt and pepper to taste. Tip: Taste as you go to adjust seasoning perfectly.
Ladle this rich, savory stew into bowls and watch as the tender beef and veggies melt in your mouth. Serve it with crusty bread for dipping or over a bed of mashed potatoes for an extra comforting meal.
Foil Packet Potatoes

Foil packet potatoes are your new best friend for an easy, mess-free side dish that’s packed with flavor. You’ll love how simple they are to make, and the cleanup is a breeze!
Ingredients
- 4 medium potatoes, thinly sliced (Yukon Gold works great for creaminess)
- 2 tbsp olive oil (or any neutral oil)
- 1 tsp garlic powder (adjust to taste)
- 1 tsp onion powder
- 1/2 tsp paprika (for a smoky hint)
- Salt and pepper to taste
- 2 tbsp butter, cut into small pieces (for richness)
- Fresh parsley, chopped (optional, for garnish)
Instructions
- Preheat your grill or oven to 400°F. If using an oven, line a baking sheet with foil for easier cleanup.
- In a large bowl, toss the sliced potatoes with olive oil, garlic powder, onion powder, paprika, salt, and pepper until evenly coated.
- Divide the potato mixture evenly among 4 large pieces of foil, placing the potatoes in the center of each piece.
- Dot the potatoes with butter pieces, then fold the foil over the potatoes, sealing the edges tightly to create a packet.
- Place the foil packets on the grill or in the oven and cook for 25-30 minutes, or until the potatoes are tender when pierced with a fork.
- Carefully open the packets (watch for steam) and garnish with fresh parsley if desired.
Ready to serve, these foil packet potatoes come out perfectly tender with a hint of smokiness from the paprika. Try serving them alongside grilled meats or as part of a backyard BBQ spread for a dish that’s sure to impress.
Grilled Cheese Sandwiches

Oh, there’s nothing quite like the comfort of a perfectly grilled cheese sandwich. It’s crispy, gooey, and oh-so-satisfying. Let’s make one that’ll have you coming back for seconds.
Ingredients
- 2 slices of bread (white or whole wheat for better melting)
- 2 tbsp butter (softened for easy spreading)
- 1 cup shredded cheddar cheese (or a mix for more flavor)
- 1/4 tsp garlic powder (optional, for a little kick)
Instructions
- Heat a skillet over medium-low heat (about 300°F) to ensure the bread toasts slowly and the cheese melts perfectly.
- Butter one side of each bread slice. This will be the outer part of your sandwich, giving it that golden crisp.
- Place one slice, buttered side down, in the skillet. Sprinkle the cheese evenly over the bread, adding the garlic powder if using.
- Top with the second slice of bread, buttered side up. Press down gently with a spatula to help the sandwich stick together.
- Cook for 3-4 minutes until the bottom is golden brown. Flip carefully and cook the other side for another 3-4 minutes. Tip: Cover the skillet with a lid for the last minute to ensure the cheese melts thoroughly.
- Remove from the skillet and let it sit for a minute before cutting. This helps the cheese set slightly so it doesn’t ooze out too much.
Mmm, the result? A sandwich with a crispy, buttery exterior and a melt-in-your-mouth cheesy center. Try dipping it in tomato soup for the ultimate comfort food experience.
Hot Dogs on a Stick

Unbelievably easy and fun to make, these Hot Dogs on a Stick are the perfect grab-and-go treat for your next outdoor gathering or a quick snack at home. You’ll love the crispy exterior and the juicy, flavorful hot dog inside.
Ingredients
- 8 hot dogs (use your favorite brand for best flavor)
- 1 cup all-purpose flour (for a lighter batter, you can substitute with cake flour)
- 1 tsp baking powder (helps the batter puff up nicely)
- 1/2 tsp salt (adjust to taste)
- 1/2 cup milk (whole milk gives a richer batter)
- 1 egg (room temperature for easier mixing)
- 1 tbsp sugar (balances the savory flavors)
- Oil for frying (vegetable or canola oil works well, enough to fill 2 inches in your pot)
- 8 wooden skewers (soak in water for 30 minutes to prevent burning)
Instructions
- Insert a wooden skewer into each hot dog, pushing it about halfway through.
- In a mixing bowl, combine flour, baking powder, salt, and sugar. Whisk to blend.
- Add milk and egg to the dry ingredients. Stir until the batter is smooth with no lumps.
- Heat oil in a deep pot to 375°F. Use a thermometer for accuracy.
- Dip each skewered hot dog into the batter, coating evenly. Let excess drip off.
- Carefully lower the battered hot dogs into the hot oil. Fry 2-3 at a time to avoid crowding.
- Fry for 2-3 minutes, turning occasionally, until golden brown and crispy.
- Remove with tongs and drain on paper towels. Serve immediately for the best crunch.
Now you’ve got a batch of Hot Dogs on a Stick with a delightfully crispy coating and a tender, juicy center. Try serving them with a side of ketchup, mustard, or even a cheesy dip for an extra flavor kick.
Pancakes on a Stick

Very few things beat the fun of eating pancakes on a stick—it’s like the state fair came to your kitchen! Perfect for busy mornings or a playful snack, this recipe turns the classic pancake into a handheld delight.
Ingredients
- 1 cup all-purpose flour (for lighter pancakes, swap half with cake flour)
- 1 tbsp sugar (adjust to taste)
- 2 tsp baking powder (ensure it’s fresh for fluffier pancakes)
- 1/2 tsp salt
- 3/4 cup milk (whole milk works best, but any type will do)
- 1 large egg
- 2 tbsp melted butter (or any neutral oil)
- 1 tsp vanilla extract (optional, for extra flavor)
- Wooden skewers or popsicle sticks (soak in water for 30 minutes to prevent burning)
Instructions
- In a large bowl, whisk together the flour, sugar, baking powder, and salt until well combined.
- In another bowl, beat the milk, egg, melted butter, and vanilla extract until smooth.
- Pour the wet ingredients into the dry ingredients and stir until just combined; a few lumps are okay to avoid overmixing.
- Heat a non-stick skillet over medium heat (350°F) and lightly grease with butter or oil.
- Pour 1/4 cup of batter onto the skillet for each pancake, then immediately place a skewer into the batter before it sets.
- Cook for 2-3 minutes until bubbles form on the surface, then flip carefully and cook for another 1-2 minutes until golden brown.
- Repeat with the remaining batter, adjusting the heat as needed to prevent burning.
Unbelievably easy and fun, these pancakes on a stick are golden, fluffy, and just sweet enough. Drizzle with maple syrup or dip in chocolate sauce for an extra treat—either way, they’re sure to disappear fast!
Scout’s Banana Boats
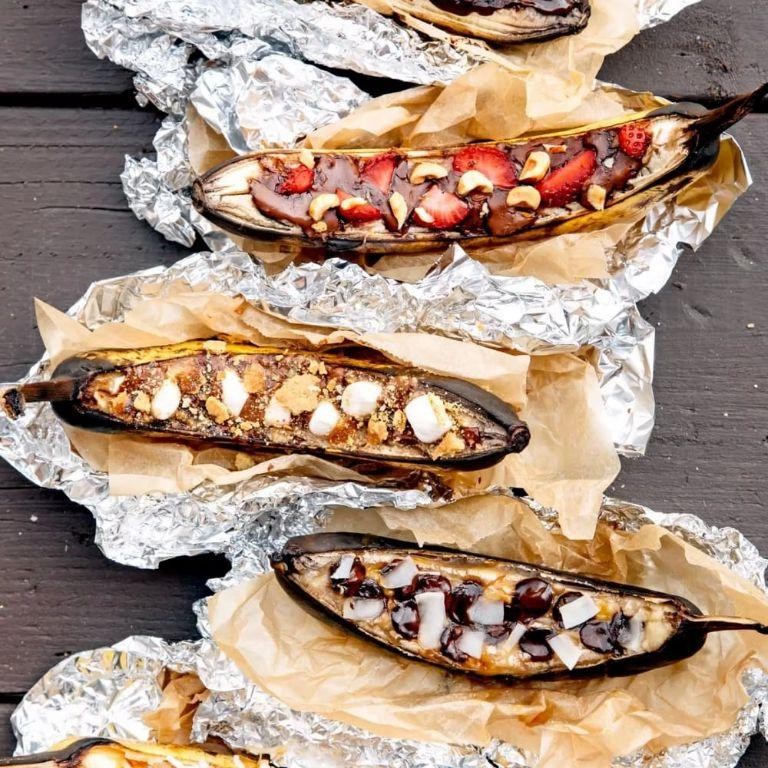
Remember those summer campfires where everything tasted better? Scout’s Banana Boats bring that magic to your kitchen. You’ll love how easy and fun these are to make, no campfire needed.
Ingredients
- 4 ripe bananas (firm but sweet)
- 1/2 cup chocolate chips (dark or milk, your choice)
- 1/4 cup mini marshmallows (or regular, chopped)
- 2 tbsp peanut butter (optional, for a nutty twist)
- Aluminum foil (enough to wrap each banana)
Instructions
- Preheat your oven to 350°F (175°C) or heat your grill to medium. This ensures even cooking.
- Leave the bananas in their peels. Make a lengthwise cut along the inner curve, deep enough to create a pocket but not through the other side. Tip: Use a spoon to gently widen the pocket.
- Stuff each banana with chocolate chips and mini marshmallows. Add peanut butter if using. Tip: Don’t overstuff; ingredients will melt and expand.
- Wrap each banana tightly in aluminum foil. Tip: Double wrapping prevents leaks.
- Place the wrapped bananas on a baking sheet or directly on the grill. Cook for 5-7 minutes, until the chocolate and marshmallows are melted. Tip: Check one at 5 minutes to avoid overcooking.
- Carefully unwrap the bananas. Serve warm, straight from the foil. Scoop out the melted goodness with a spoon.
Soft bananas cradle gooey chocolate and marshmallows, with peanut butter adding depth if you went for it. Try serving with a scoop of vanilla ice cream for an extra indulgent treat.
Trail Mix Granola Bars
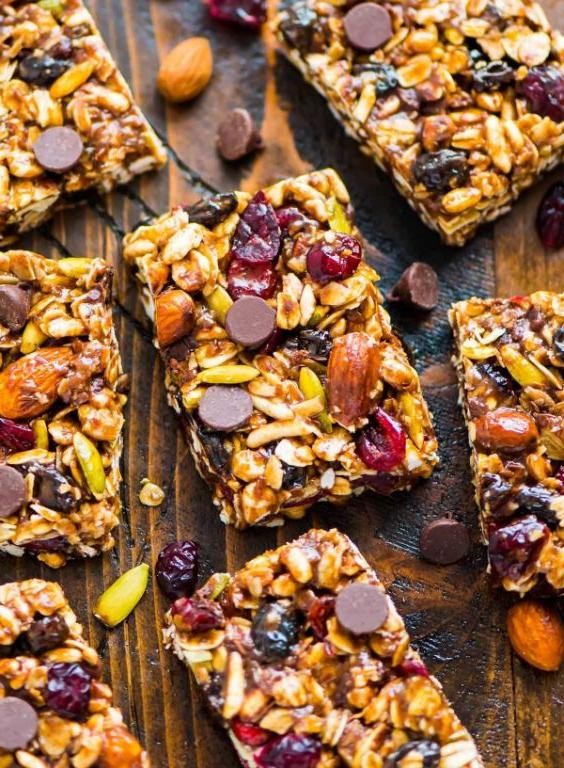
Did you know you can whip up a batch of trail mix granola bars that are perfect for on-the-go snacking? They’re packed with all your favorite nuts, seeds, and dried fruits, plus they’re super easy to make.
Ingredients
- 2 cups rolled oats (not instant)
- 1/2 cup honey (or maple syrup for a vegan option)
- 1/2 cup peanut butter (or any nut butter you prefer)
- 1/2 cup mixed nuts, chopped (almonds, walnuts, or your choice)
- 1/2 cup dried fruits (cranberries, raisins, or any mix you like)
- 1/4 cup chia seeds (or flaxseeds for a different texture)
- 1 tsp vanilla extract (adjust to taste)
- 1/2 tsp salt (to balance the sweetness)
Instructions
- Preheat your oven to 350°F (175°C) and line an 8×8 inch baking pan with parchment paper.
- In a large bowl, mix the rolled oats, chopped nuts, dried fruits, and chia seeds until well combined.
- In a small saucepan over low heat, warm the honey and peanut butter until smooth, stirring constantly to prevent burning.
- Remove from heat and stir in the vanilla extract and salt.
- Pour the wet mixture over the dry ingredients and mix until everything is evenly coated.
- Transfer the mixture to the prepared pan and press down firmly with a spatula or your hands to compact it.
- Bake for 20-25 minutes, or until the edges are golden brown.
- Let cool completely in the pan before cutting into bars.
Ready to enjoy? These granola bars are chewy, nutty, and just the right amount of sweet. Try drizzling them with melted chocolate for an extra indulgent treat!
Beef Jerky
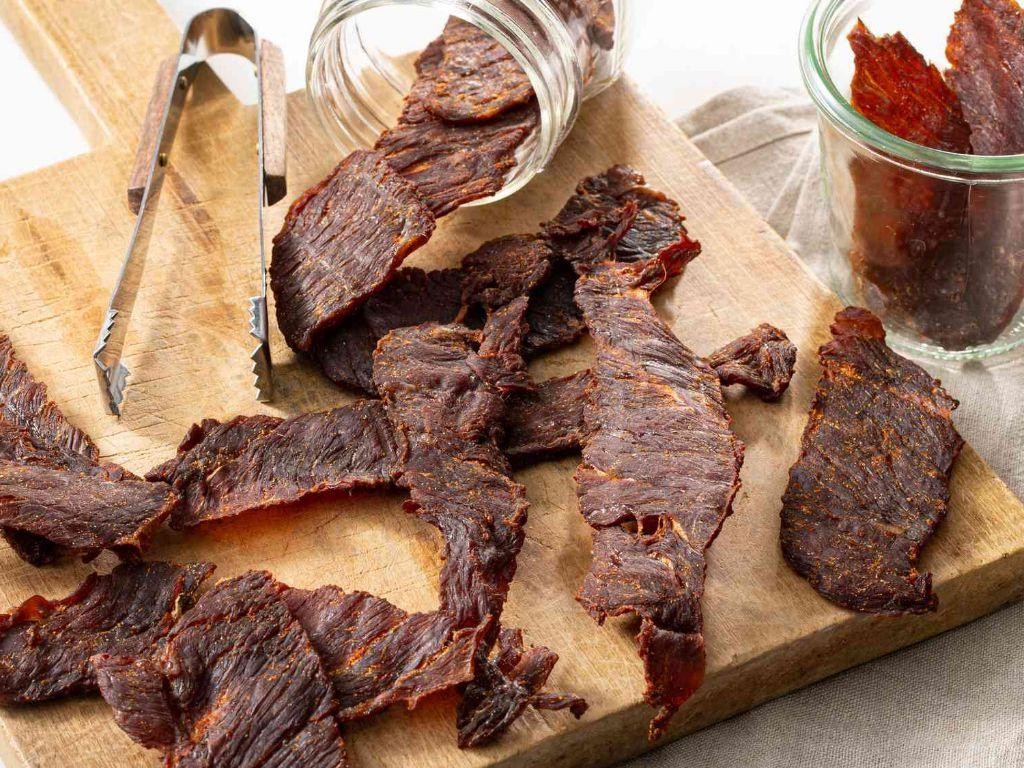
Oh, you’re in for a treat with this homemade beef jerky recipe! It’s perfect for snacking, road trips, or just when you’re craving something savory and chewy. Plus, making it yourself means you can tweak the flavors exactly how you like them.
Ingredients
- 2 lbs lean beef (like top round or flank steak, sliced against the grain into 1/4-inch strips)
- 1/2 cup soy sauce (low sodium works great if you’re watching salt)
- 1/4 cup Worcestershire sauce (adds a nice depth of flavor)
- 2 tbsp brown sugar (for a hint of sweetness)
- 1 tbsp smoked paprika (or regular paprika if that’s what you have)
- 1 tsp garlic powder (adjust to taste)
- 1 tsp onion powder (for extra savoriness)
- 1/2 tsp black pepper (freshly ground is best)
- 1/2 tsp liquid smoke (optional, but gives that authentic smoky flavor)
Instructions
- In a large bowl, mix together the soy sauce, Worcestershire sauce, brown sugar, smoked paprika, garlic powder, onion powder, black pepper, and liquid smoke until well combined.
- Add the beef strips to the marinade, ensuring each piece is well coated. Cover and refrigerate for at least 8 hours, or overnight for deeper flavor.
- Preheat your oven to 175°F (the lowest setting) and line baking sheets with aluminum foil for easy cleanup.
- Remove the beef from the marinade, letting excess drip off, and arrange the strips on the prepared baking sheets without overlapping.
- Bake in the preheated oven for 4-6 hours, flipping the strips halfway through, until the jerky is dry but still slightly pliable.
- Let the jerky cool completely on the baking sheets before transferring to an airtight container for storage.
Great job! Your homemade beef jerky should have a perfect balance of chewiness and flavor, with just the right amount of smoky sweetness. Try pairing it with some sharp cheddar cheese or tossing it into your favorite trail mix for an extra protein boost.
Campfire Popcorn
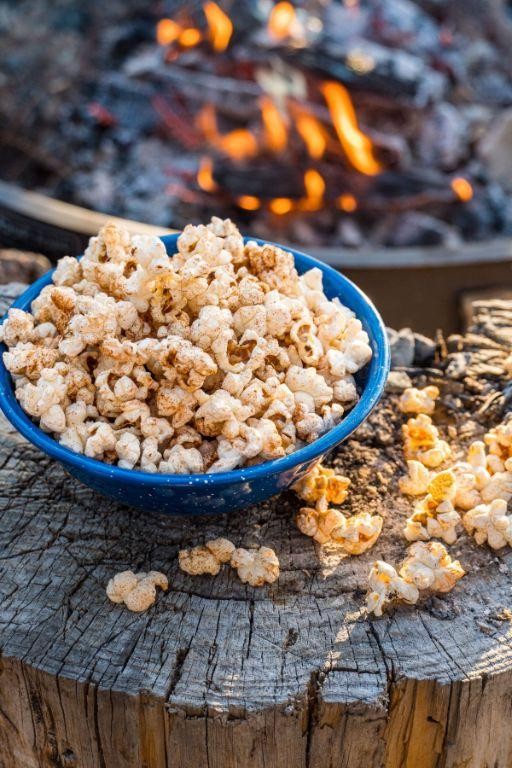
Guess what? There’s nothing quite like the smell of popcorn popping over a campfire to make you feel like you’re on an adventure, even if it’s just in your backyard.
Ingredients
- 1/2 cup popcorn kernels (look for the ‘mushroom’ variety for fewer hulls)
- 2 tbsp coconut oil (or any neutral oil that can handle high heat)
- 1/2 tsp salt (adjust to taste)
- 1 tbsp butter, melted (optional, for extra flavor)
Instructions
- Heat a large cast-iron skillet or Dutch oven over your campfire until it’s hot but not smoking, about 3 minutes.
- Add the coconut oil to the skillet, letting it melt completely before adding the popcorn kernels. Tip: If the oil starts to smoke, your skillet is too hot—move it to a cooler part of the fire.
- Pour in the popcorn kernels, spreading them into a single layer. Cover the skillet with a lid or aluminum foil, poking a few holes to let steam escape.
- Shake the skillet gently every 30 seconds to prevent burning and ensure even popping. Listen for the popping to slow to about 2 seconds between pops, which should take about 5 minutes.
- Remove the skillet from the heat immediately and carefully lift the lid away from you to avoid steam. Tip: Let it sit for a minute to catch any late poppers.
- Drizzle with melted butter if using, and sprinkle with salt. Toss gently to coat. Tip: For a fun twist, add a sprinkle of smoked paprika or nutritional yeast before tossing.
Crunchy, smoky, and irresistibly buttery, this campfire popcorn is a game-changer. Serve it straight from the skillet for that authentic outdoor vibe, or pack it into paper cones for easy sharing around the fire.
Walking Tacos

Oh, you’re going to love this twist on taco night—Walking Tacos are all the fun of your favorite Mexican dish, but portable and perfect for any gathering. Imagine all your taco favorites layered in a bag of crunchy chips for easy eating on the go.
Ingredients
- 1 lb ground beef (or turkey for a lighter option)
- 1 packet taco seasoning (or make your own with spices)
- 1/2 cup water
- 1 cup shredded lettuce
- 1 cup diced tomatoes
- 1/2 cup shredded cheddar cheese
- 1/4 cup sour cream
- 1/4 cup salsa (choose your heat level)
- 5 small bags of corn chips (like Fritos or Doritos)
Instructions
- Brown the ground beef in a skillet over medium heat, breaking it into small pieces as it cooks, about 5-7 minutes.
- Drain any excess fat from the skillet, then stir in the taco seasoning and water. Simmer for 5 minutes until the mixture thickens.
- While the meat simmers, carefully open the top of each chip bag, just enough to add your toppings without spilling.
- Spoon the taco meat evenly into each bag, about 1/4 cup per bag.
- Layer the lettuce, tomatoes, cheese, sour cream, and salsa on top of the meat in each bag.
- Give the bag a gentle shake to mix everything together, or eat it straight from the bag with a fork for less mess.
So, there you have it—a crunchy, savory, and slightly messy delight that’s as fun to eat as it is delicious. Try serving these at your next picnic or game day for a surefire hit.
Egg in a Hole

Got a hankering for something simple yet satisfying? Egg in a Hole is your go-to breakfast that’s as fun to make as it is to eat. Just bread, an egg, and a few pantry staples come together in this classic dish.
Ingredients
- 1 slice of bread (thick-cut works best)
- 1 large egg
- 1 tbsp butter (or any neutral oil)
- Salt and pepper (adjust to taste)
Instructions
- Heat a non-stick skillet over medium heat. Add the butter and let it melt until it’s just starting to bubble.
- While the butter melts, use a round cookie cutter or the rim of a glass to cut a hole in the center of the bread slice.
- Place the bread in the skillet and toast for about 1-2 minutes until golden brown. Flip it over.
- Crack the egg directly into the hole in the bread. Season with salt and pepper.
- Cook for about 2-3 minutes until the egg white starts to set but the yolk is still runny. For a firmer yolk, cover the skillet with a lid for the last minute.
- Carefully flip the bread and egg to cook the other side for another 1-2 minutes, depending on how runny you like your yolk.
- Remove from the skillet and serve immediately.
Buttery, crispy bread with a perfectly cooked egg in the middle makes this dish a breakfast winner. Try topping it with avocado slices or a sprinkle of cheese for an extra flavor boost.
Campfire Pizza
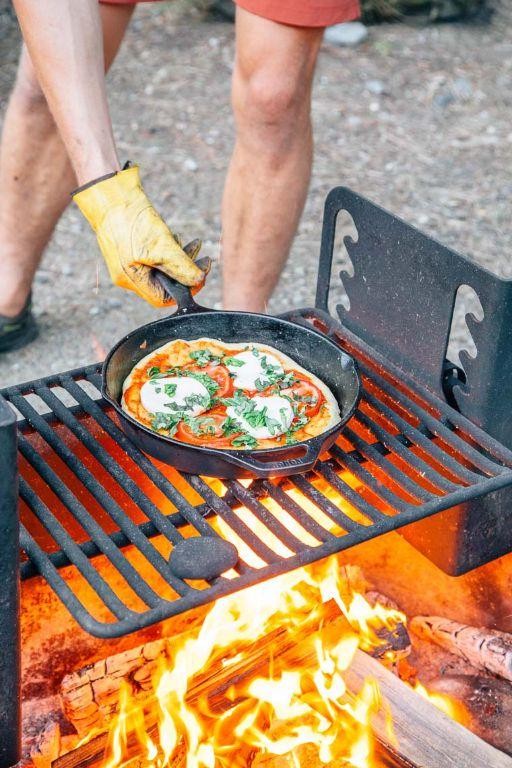
Let’s face it, nothing beats the charm of cooking under the stars, and this campfire pizza is your ticket to a memorable outdoor feast. It’s simple, fun, and downright delicious, making it perfect for your next adventure.
Ingredients
- 1 pre-made pizza dough (or homemade if you’re feeling ambitious)
- 1/2 cup pizza sauce (store-bought or homemade for extra flair)
- 1 1/2 cups shredded mozzarella cheese (more if you’re a cheese lover)
- Your favorite toppings (pepperoni, mushrooms, bell peppers—go wild!)
- 2 tbsp olive oil (or any neutral oil for greasing)
- Cornmeal or flour (for dusting, to prevent sticking)
Instructions
- Start by preparing your campfire. You’ll want a medium heat, with flames low enough to cook without burning. A grill grate over the fire works best.
- Lightly oil a cast iron skillet or pizza stone with olive oil to prevent sticking. Dust with cornmeal or flour for extra insurance.
- Roll out your pizza dough on a floured surface to your desired thickness. Thinner crusts cook faster, so keep that in mind.
- Carefully transfer the dough to your prepared skillet or stone. Spread pizza sauce evenly over the dough, leaving a small border for the crust.
- Sprinkle mozzarella cheese over the sauce, then add your chosen toppings. Less is more here—overloading can make the pizza soggy.
- Place the skillet or stone over the campfire. Cover with a lid or aluminum foil to trap heat and melt the cheese evenly.
- Cook for about 10-15 minutes, checking occasionally. The pizza is done when the crust is golden and the cheese is bubbly.
- Use a spatula to carefully remove the pizza from the skillet. Let it cool for a minute before slicing—patience is key to avoid burns.
Unbelievably crispy on the outside with a gooey, cheesy center, this campfire pizza is a game-changer. Serve it straight from the skillet for that rustic touch, or pair with a cold drink under the stars for the full experience.
BBQ Chicken Foil Packets
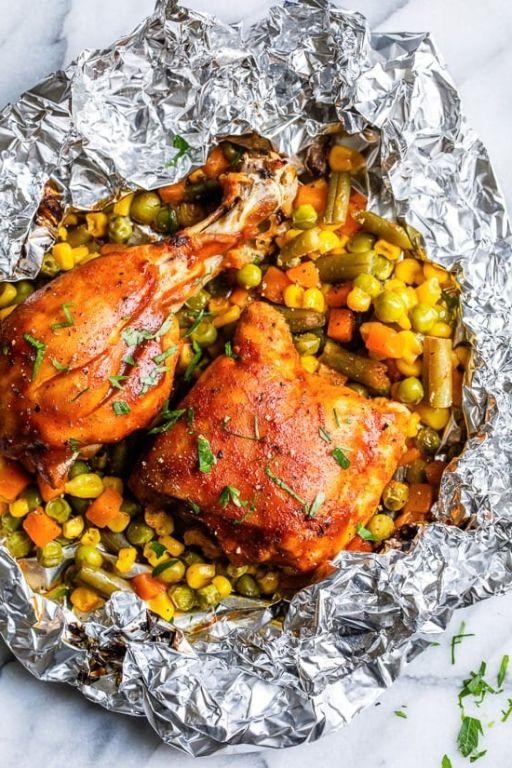
Feeling like a no-fuss dinner that’s big on flavor? BBQ chicken foil packets are your answer. They’re easy, mess-free, and packed with smoky sweetness.
Ingredients
- 1 lb boneless, skinless chicken breasts, cut into 1-inch pieces (thighs work too)
- 1 cup BBQ sauce, divided (homemade or store-bought)
- 1 red bell pepper, diced (any color works)
- 1 small red onion, diced
- 1 tbsp olive oil (or any neutral oil)
- 1 tsp garlic powder
- 1/2 tsp salt (adjust to taste)
- 1/2 tsp black pepper (adjust to taste)
- Fresh cilantro, chopped (optional for garnish)
Instructions
- Preheat your grill to medium-high heat, about 400°F.
- In a large bowl, toss the chicken pieces with olive oil, garlic powder, salt, and black pepper.
- Add half of the BBQ sauce to the bowl and mix until the chicken is evenly coated.
- Tear off four large sheets of heavy-duty aluminum foil, about 12×18 inches each.
- Divide the chicken, red bell pepper, and red onion evenly among the foil sheets.
- Drizzle the remaining BBQ sauce over each portion.
- Fold the foil over the ingredients and seal the edges tightly to form packets.
- Place the packets on the grill and cook for 15-20 minutes, flipping once halfway through.
- Carefully open a packet to check if the chicken is cooked through (no pink inside).
- Garnish with fresh cilantro if desired and serve directly from the foil for easy cleanup.
Vibrant and tender, these BBQ chicken foil packets are a hit with minimal effort. Try serving them over a bed of rice or with a side of cornbread for a complete meal.
One Pot Pasta

Ready to make dinner a breeze? This one pot pasta is your ticket to a delicious, no-fuss meal that’ll have everyone asking for seconds.
Ingredients
- 8 oz spaghetti (break in half if your pot is small)
- 2 cups water (or broth for extra flavor)
- 1 tbsp olive oil (or any neutral oil)
- 2 cloves garlic, minced (fresh is best)
- 1/2 tsp red pepper flakes (adjust to taste)
- 1 can (14.5 oz) diced tomatoes (undrained)
- 1 tsp salt (adjust to taste)
- 1/4 cup fresh basil, chopped (or 1 tsp dried)
- 1/4 cup grated Parmesan cheese (plus more for serving)
Instructions
- Heat olive oil in a large pot over medium heat.
- Add minced garlic and red pepper flakes. Cook for 1 minute, stirring constantly to avoid burning.
- Pour in water (or broth), diced tomatoes, and salt. Stir to combine.
- Add spaghetti to the pot, ensuring it’s fully submerged. If needed, press down gently with a spoon.
- Bring to a boil, then reduce heat to a simmer. Cover and cook for 10 minutes, stirring occasionally to prevent sticking.
- Remove from heat. Stir in fresh basil and Parmesan cheese.
- Let sit covered for 2 minutes to thicken the sauce.
One bite and you’ll love the al dente pasta coated in a rich, slightly spicy tomato sauce. Serve it with extra Parmesan and a side of crusty bread for dipping.
Campfire Cornbread
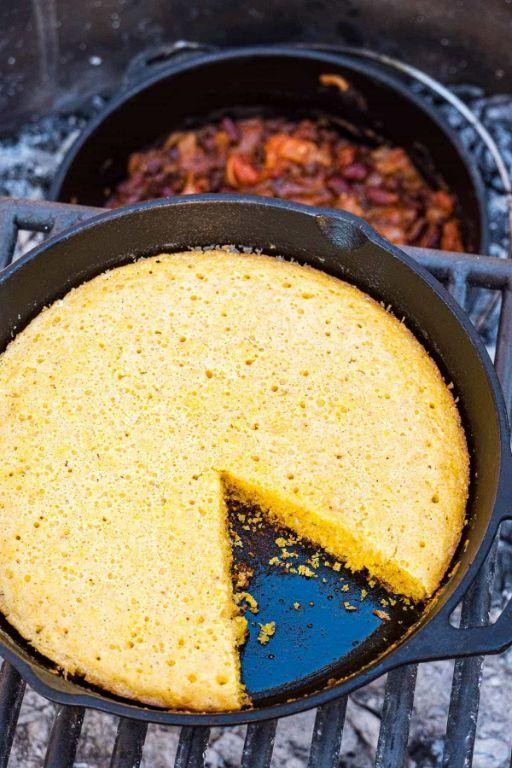
Did you know that nothing beats the comfort of warm, buttery cornbread, especially when it’s made over a campfire? This Campfire Cornbread recipe is your go-to for a quick, delicious side that pairs perfectly with any outdoor meal.
Ingredients
- 1 cup cornmeal (for that classic texture)
- 1 cup all-purpose flour (or gluten-free blend as a substitute)
- 1/4 cup sugar (adjust to taste)
- 1 tbsp baking powder (for the perfect rise)
- 1/2 tsp salt (enhances all the flavors)
- 1 cup milk (whole milk for richness, or any plant-based alternative)
- 1/4 cup melted butter (or any neutral oil)
- 1 large egg (binds everything together)
Instructions
- Preheat your campfire to medium heat, aiming for about 375°F. Use a cast-iron skillet for even cooking.
- In a large bowl, whisk together the cornmeal, flour, sugar, baking powder, and salt. Tip: Sifting the dry ingredients can prevent lumps.
- In another bowl, mix the milk, melted butter, and egg until well combined. Pour the wet ingredients into the dry ingredients, stirring just until mixed. Tip: Overmixing can lead to dense cornbread.
- Pour the batter into a greased cast-iron skillet. Cover with a lid or aluminum foil to trap the heat.
- Place the skillet over the campfire, cooking for about 20-25 minutes. Check for doneness by inserting a toothpick in the center; it should come out clean. Tip: Rotate the skillet occasionally for even browning.
Enjoy this Campfire Cornbread warm, with its crispy edges and soft, fluffy center. It’s fantastic with a drizzle of honey or a pat of butter melting on top. Perfect for your next outdoor adventure!
Smores Dip

This smores dip is the ultimate crowd-pleaser, perfect for those cozy nights in or when you’re craving something sweet and gooey. You’ll love how easy it is to whip up, and the best part? No campfire needed.
Ingredients
- 1 cup chocolate chips (milk or dark, depending on your preference)
- 1/2 cup heavy cream (for a richer dip, you can use half-and-half)
- 1 cup mini marshmallows (or large ones cut into smaller pieces)
- 1 tbsp unsalted butter (for greasing the dish)
- Graham crackers (for serving, as many as you like)
Instructions
- Preheat your oven to 350°F (175°C) and lightly grease a small oven-safe dish with the unsalted butter.
- In a small saucepan over low heat, warm the heavy cream until it’s just about to simmer, stirring occasionally to prevent scorching.
- Remove the saucepan from the heat and stir in the chocolate chips until the mixture is smooth and fully combined. Tip: If the chocolate isn’t melting completely, you can return the saucepan to low heat for a few more seconds.
- Pour the chocolate mixture into the greased dish and spread it evenly with a spatula.
- Top the chocolate layer evenly with the mini marshmallows, covering the entire surface.
- Bake in the preheated oven for about 5-7 minutes, or until the marshmallows are golden and puffy. Tip: Keep an eye on them to prevent burning.
- Remove the dish from the oven and let it cool for a couple of minutes before serving. Tip: The dip will be extremely hot, so caution is advised.
- Serve warm with graham crackers for dipping. Perfect for sharing, this smores dip is irresistibly creamy with a delightful contrast of textures from the crispy crackers and soft, toasted marshmallows.
Breakfast Burritos

Ready to kickstart your morning with something hearty and delicious? Breakfast burritos are your go-to, packed with all the good stuff to fuel your day. They’re customizable, easy to make, and oh-so-satisfying.
Ingredients
- 4 large eggs (farm-fresh for the best flavor)
- 1/2 cup shredded cheddar cheese (sharp for extra tang)
- 1/4 cup milk (whole milk makes them fluffier)
- 1 tbsp butter (or any neutral oil)
- 1/2 cup diced bell peppers (any color you like)
- 1/4 cup diced onions (red for a bit of sweetness)
- 1/2 cup cooked black beans (canned is fine, just rinse them)
- 4 large flour tortillas (warmed for easy rolling)
- Salt and pepper (adjust to taste)
- 1/2 avocado, sliced (for serving)
- Hot sauce (optional, for those who like it spicy)
Instructions
- In a bowl, whisk together the eggs, milk, salt, and pepper until well combined.
- Heat butter in a non-stick skillet over medium heat until melted.
- Add diced bell peppers and onions to the skillet. Cook for about 3 minutes, until they start to soften.
- Pour the egg mixture into the skillet. Stir occasionally until the eggs are fully cooked, about 5 minutes.
- Warm the tortillas in a dry skillet for about 30 seconds on each side or until pliable.
- Divide the egg mixture, black beans, and shredded cheese evenly among the tortillas.
- Fold the sides of the tortillas in, then roll them up tightly to enclose the filling.
- Serve the burritos with sliced avocado and hot sauce on the side.
Zesty and filling, these breakfast burritos have a perfect balance of creamy avocado, fluffy eggs, and hearty beans. Try wrapping them in parchment paper for an easy grab-and-go breakfast.
Veggie Skewers
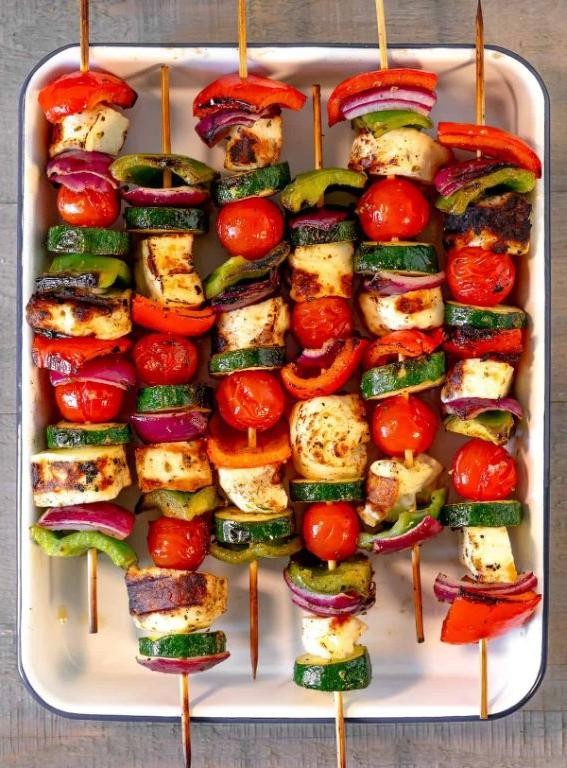
Oh, you’re going to love these veggie skewers! They’re perfect for those summer BBQs or even a quick weeknight dinner. Plus, they’re super customizable based on what veggies you have on hand.
Ingredients
- 2 cups bell peppers, cut into 1-inch pieces (mix colors for a vibrant look)
- 1 cup zucchini, sliced into 1-inch rounds
- 1 cup cherry tomatoes (they add a sweet pop)
- 1/4 cup olive oil (or any neutral oil)
- 2 tbsp balsamic vinegar (adjust to taste)
- 1 tsp garlic powder (fresh minced garlic works too)
- 1/2 tsp salt (adjust to taste)
- 1/4 tsp black pepper (freshly ground is best)
Instructions
- Preheat your grill to medium-high heat, about 400°F.
- Thread the bell peppers, zucchini, and cherry tomatoes onto skewers, alternating the veggies for color.
- In a small bowl, whisk together the olive oil, balsamic vinegar, garlic powder, salt, and pepper.
- Brush the skewers generously with the marinade on all sides.
- Place the skewers on the grill. Cook for 3-4 minutes per side, or until you see nice grill marks.
- Tip: Don’t overcrowd the skewers. Leave a little space between each piece for even cooking.
- Tip: If using wooden skewers, soak them in water for 30 minutes beforehand to prevent burning.
- Tip: Keep an eye on the tomatoes; they cook faster than the other veggies.
- Remove from the grill and let them rest for a couple of minutes before serving.
Grilled to perfection, these skewers have a smoky flavor with a slight tang from the balsamic. Serve them over a bed of quinoa or with a side of hummus for dipping.
Campfire Quesadillas

Ready to mix up your campfire cooking game? These campfire quesadillas are your go-to for a quick, cheesy meal under the stars. You’ll love how simple they are to make, with just a few ingredients and a bit of fire.
Ingredients
- 2 large flour tortillas – go for the burrito size for easy folding
- 1 cup shredded cheese (cheddar or a mix) – pre-shredded saves time
- 1/2 cup cooked chicken, diced – leftover rotisserie chicken works great
- 1/4 cup diced bell peppers – any color you like
- 1 tbsp butter – or any neutral oil for greasing
Instructions
- Heat a cast iron skillet over your campfire until it’s warm to the touch, about 2 minutes.
- Spread 1/2 tbsp butter on one side of each tortilla to prevent sticking and add flavor.
- Place one tortilla, buttered side down, in the skillet. Tip: Keep the fire at a medium heat to avoid burning.
- Sprinkle half the cheese evenly over the tortilla, then add the chicken and bell peppers. Top with the remaining cheese.
- Cover with the second tortilla, buttered side up. Press down gently with a spatula.
- Cook for 3-4 minutes until the bottom is golden brown and crispy. Tip: Peek underneath to check the color.
- Carefully flip the quesadilla using a spatula. Cook for another 3-4 minutes until the other side is golden and the cheese is melted.
- Remove from the skillet and let it cool for a minute before slicing. Tip: Use a pizza cutter for easy slicing.
Now you’ve got a quesadilla with a crispy exterior and a gooey, flavorful center. Next time, try serving it with a side of salsa or avocado for an extra kick.
Peanut Butter and Jelly Roll Ups

Ah, the classic peanut butter and jelly combo gets a fun twist with these roll-ups. Perfect for a quick snack or a lunchbox surprise, they’re as easy to make as they are delicious.
Ingredients
- 2 large flour tortillas (whole wheat for a healthier option)
- 1/2 cup creamy peanut butter (chunky if you prefer texture)
- 1/4 cup strawberry jelly (or any flavor you love)
- 1 tbsp honey (optional, for extra sweetness)
Instructions
- Lay a tortilla flat on a clean surface. Spread peanut butter evenly over the entire surface, leaving a small border around the edges to prevent spillage.
- Drizzle jelly over the peanut butter, using the back of a spoon to spread it evenly. Tip: Warm the jelly slightly if it’s too thick to spread easily.
- Drizzle honey over the jelly if using, for an added touch of sweetness.
- Starting from one end, tightly roll the tortilla into a log. Tip: Roll slowly to keep the fillings inside.
- Wrap the rolled tortilla in plastic wrap and refrigerate for 10 minutes to firm up. This makes slicing easier.
- Remove from the fridge, unwrap, and slice into 1-inch pieces with a sharp knife. Tip: Wipe the knife between cuts for cleaner slices.
Out of the fridge, these roll-ups are cool, slightly firm, and packed with the nostalgic flavors of peanut butter and jelly. Serve them on a platter for a party or pack them in a lunchbox for a sweet surprise.
Campfire Apple Crisp
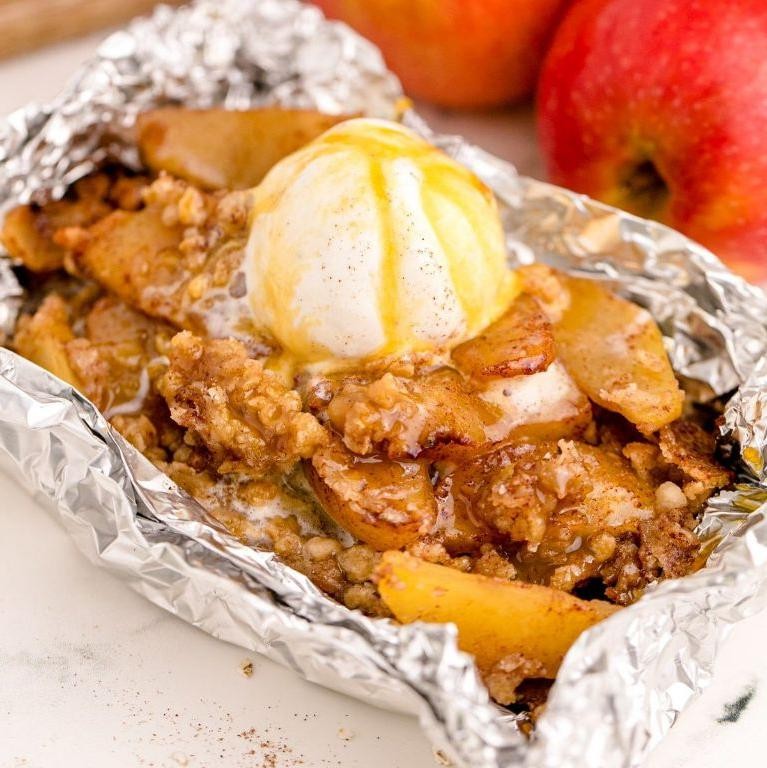
Backyard gatherings just got sweeter with this easy-to-make campfire apple crisp. You’ll love how the tender apples and crispy topping come together under the stars.
Ingredients
- 4 cups sliced apples (Granny Smith works well for a tart contrast)
- 1 cup rolled oats (for that perfect crunch)
- 1/2 cup brown sugar (pack it tight for sweetness)
- 1/4 cup butter, melted (or coconut oil for a dairy-free version)
- 1 tsp cinnamon (add more if you’re a cinnamon lover)
- 1/4 tsp salt (to balance the flavors)
Instructions
- Preheat your campfire to medium heat, or if using an oven, set it to 350°F.
- In a large bowl, mix the sliced apples with half of the cinnamon until evenly coated.
- Combine the rolled oats, brown sugar, remaining cinnamon, and salt in a separate bowl.
- Pour the melted butter over the oat mixture, stirring until the mixture is crumbly.
- Spread the apple slices evenly at the bottom of a cast iron skillet or baking dish.
- Sprinkle the oat mixture over the apples, covering them completely.
- Place the skillet over the campfire for 25-30 minutes, or bake for 30-35 minutes, until the topping is golden and the apples are bubbly.
- Let it cool for 5 minutes before serving to avoid burns.
Look at that golden topping and those soft, cinnamon-spiced apples! Serve it warm with a scoop of vanilla ice cream for an extra indulgent treat.
Hot Chocolate

Nothing beats a cozy cup of hot chocolate on a chilly day. You’ll love how simple it is to whip up this comforting classic at home.
Ingredients
- 2 cups whole milk (for creaminess, but any milk works)
- 2 tbsp unsweetened cocoa powder (sifted to avoid lumps)
- 2 tbsp granulated sugar (adjust to taste)
- 1/4 tsp vanilla extract (for depth of flavor)
- A pinch of salt (enhances the chocolate)
Instructions
- In a small saucepan, heat the milk over medium heat until it’s warm but not boiling, about 3-4 minutes. Stir occasionally to prevent a skin from forming.
- Whisk in the cocoa powder, sugar, and salt until fully dissolved. This ensures a smooth texture without any grittiness.
- Remove from heat and stir in the vanilla extract. It’s best added off the heat to preserve its flavor.
- Pour into mugs and serve immediately. For an extra touch, top with whipped cream or marshmallows.
Best enjoyed when it’s steaming hot, this hot chocolate is rich, velvety, and just sweet enough. Try dunking a cinnamon stick in for a spicy twist.
Conclusion
Venturing into the great outdoors just got tastier with these 23 Adventurous Boy Scouts Recipes! Whether you’re a seasoned camper or a backyard BBQ enthusiast, these dishes promise to spice up your outdoor cooking adventures. Don’t forget to try them out, drop a comment with your favorite, and share the delicious inspiration on Pinterest. Happy cooking!