Ever wondered how to add a pop of color to your meals while keeping them delicious and nutritious? Dive into our vibrant collection of 20 Delicious Blue Food Recipes for Every Occasion! From quick weeknight dinners to show-stopping seasonal favorites, these blue-hued dishes are sure to brighten your table and tantalize your taste buds. Keep scrolling to discover recipes that prove eating the rainbow has never been more fun!
Blueberry Pancakes
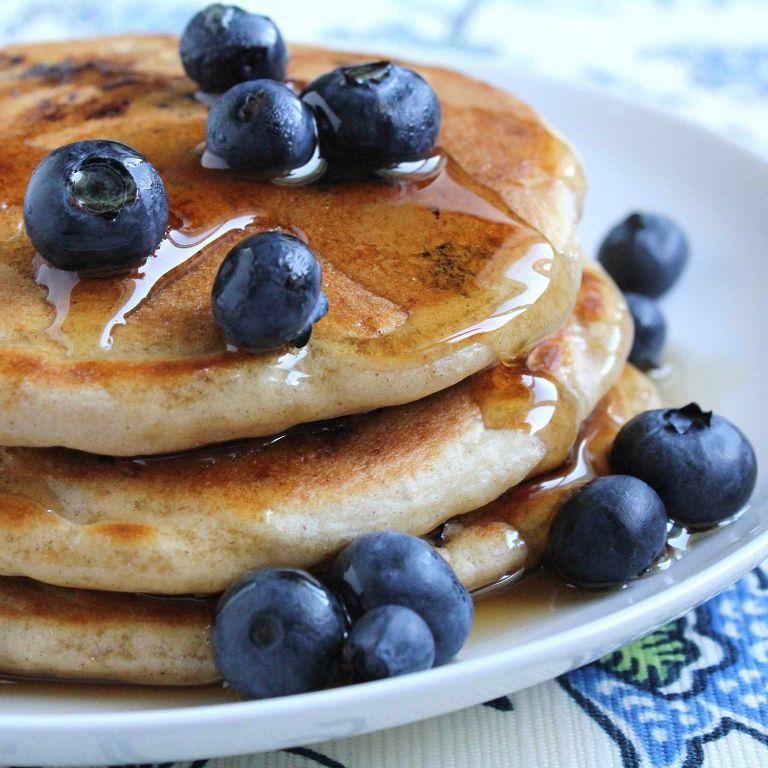
Waking up to the smell of blueberry pancakes is one of those simple pleasures that never gets old. I remember my grandma flipping them on Sunday mornings, the blueberries bursting into little pockets of sweetness. Now, I’ve made it a ritual to start my weekends the same way, and I’m sharing my go-to recipe with you.
Ingredients
- 1 cup all-purpose flour
- 2 tbsp granulated sugar
- 1 tsp baking powder
- 1/2 tsp baking soda
- 1/4 tsp salt
- 3/4 cup buttermilk
- 1 large egg
- 2 tbsp unsalted butter, melted
- 1/2 cup fresh blueberries
Instructions
- In a large bowl, whisk together 1 cup all-purpose flour, 2 tbsp granulated sugar, 1 tsp baking powder, 1/2 tsp baking soda, and 1/4 tsp salt.
- In another bowl, beat 1 large egg, then mix in 3/4 cup buttermilk and 2 tbsp melted unsalted butter.
- Pour the wet ingredients into the dry ingredients and stir until just combined. A few lumps are okay; overmixing leads to tough pancakes.
- Gently fold in 1/2 cup fresh blueberries to distribute evenly throughout the batter.
- Heat a non-stick skillet over medium heat and lightly grease with butter or cooking spray.
- Pour 1/4 cup of batter onto the skillet for each pancake. Cook until bubbles form on the surface and the edges look set, about 2-3 minutes.
- Flip the pancakes and cook for another 1-2 minutes until golden brown and cooked through.
- Serve warm with maple syrup and extra blueberries on top.
Rich in flavor and bursting with juicy blueberries, these pancakes are fluffy with just the right amount of sweetness. Try stacking them high with a dollop of whipped cream for an extra indulgent breakfast.
Blue Velvet Cupcakes
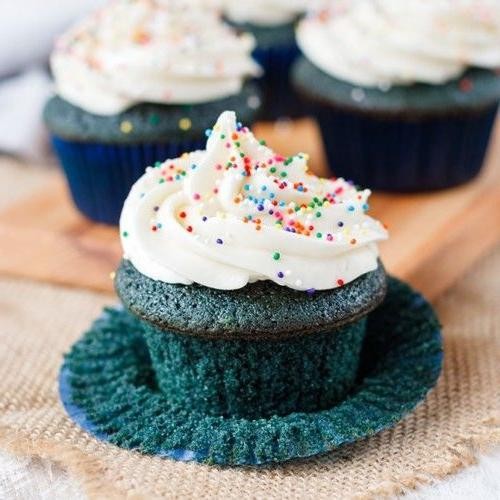
Craving something uniquely delightful to brighten up your dessert table? These Blue Velvet Cupcakes are not just a feast for the eyes but a tender, moist treat that’s surprisingly simple to make. I remember the first time I tried them at a friend’s party, and I’ve been hooked ever since, tweaking the recipe to perfection.
Ingredients
- 1 1/4 cups all-purpose flour
- 3/4 cup granulated sugar
- 1/2 tsp baking soda
- 1/2 tsp salt
- 1/2 cup vegetable oil
- 1/2 cup buttermilk, room temperature
- 1 large egg, room temperature
- 1 tbsp blue food coloring
- 1/2 tsp white vinegar
- 1/2 tsp vanilla extract
Instructions
- Preheat your oven to 350°F and line a muffin tin with cupcake liners.
- In a large bowl, whisk together the flour, sugar, baking soda, and salt until well combined.
- In another bowl, mix the vegetable oil, buttermilk, egg, blue food coloring, vinegar, and vanilla extract until smooth. Tip: Ensure all wet ingredients are at room temperature to avoid a lumpy batter.
- Gradually add the dry ingredients to the wet ingredients, stirring until just combined. Tip: Overmixing can lead to dense cupcakes, so mix until you no longer see flour streaks.
- Divide the batter evenly among the cupcake liners, filling each about 2/3 full. Tip: An ice cream scoop makes this step mess-free and ensures uniform cupcakes.
- Bake for 18-20 minutes, or until a toothpick inserted into the center comes out clean.
- Allow the cupcakes to cool in the pan for 5 minutes before transferring to a wire rack to cool completely.
Just out of the oven, these cupcakes boast a vibrant blue hue and a velvety texture that’s irresistibly soft. The subtle tang from the buttermilk pairs beautifully with a cream cheese frosting, or for a twist, try them with a citrus glaze to cut through the richness.
Blue Corn Tortillas
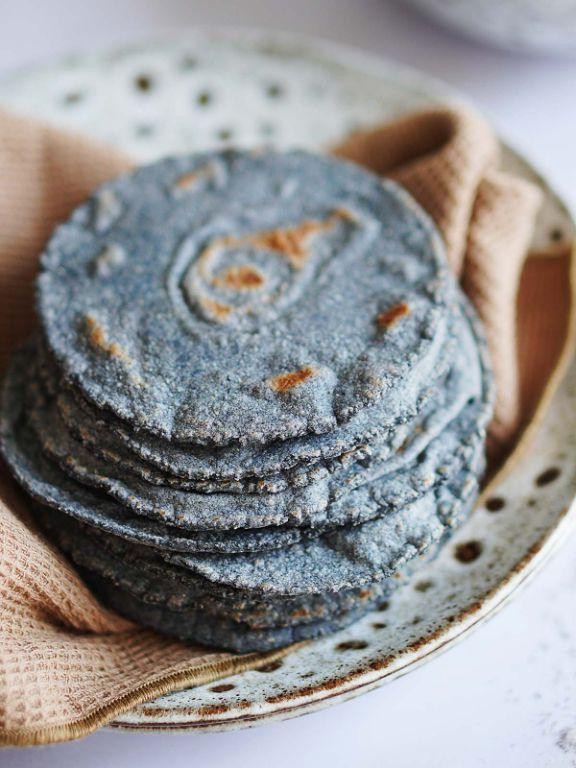
Many mornings, I find myself reaching for the same breakfast routine, but today, I decided to shake things up with something that reminds me of my trip to New Mexico—blue corn tortillas. There’s something about their earthy flavor and vibrant color that turns a simple meal into a special occasion.
Ingredients
- 2 cups blue corn masa harina
- 1 1/2 cups warm water
- 1/2 tsp salt
Instructions
- In a large mixing bowl, combine 2 cups blue corn masa harina and 1/2 tsp salt.
- Gradually add 1 1/2 cups warm water to the mixture, stirring until a dough forms. Tip: The dough should feel like Play-Doh; if it’s too dry, add a tablespoon of water at a time.
- Divide the dough into 12 equal pieces and roll each into a ball.
- Place a ball of dough between two pieces of parchment paper and press with a tortilla press to form a thin, even circle. Tip: If you don’t have a tortilla press, a heavy skillet works just as well.
- Heat a dry skillet over medium-high heat (about 375°F) and cook each tortilla for about 30 seconds on each side, or until lightly browned and puffy. Tip: Keep cooked tortillas wrapped in a clean kitchen towel to stay warm and pliable.
You’ll love the slightly nutty taste and tender texture of these blue corn tortillas. They’re perfect for tacos, or try them with a drizzle of honey for a sweet twist.
Blue Cheese Stuffed Burgers
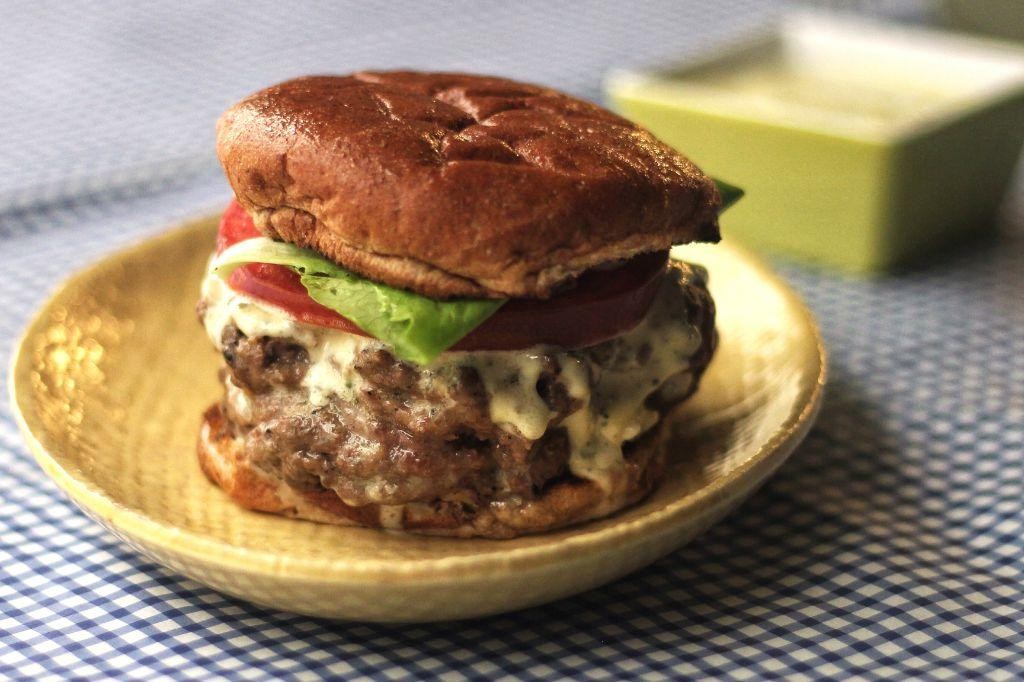
Absolutely nothing beats the joy of biting into a juicy burger, especially when it’s packed with a surprise inside. I remember the first time I tried making Blue Cheese Stuffed Burgers at home; the melty, tangy blue cheese oozing out with every bite was a game-changer. Now, it’s a staple in my summer BBQ menu, and trust me, it’s easier to make than you might think.
Ingredients
- 1.5 lbs ground beef (80/20 blend)
- 4 oz blue cheese, crumbled
- 1 tsp salt
- 1 tsp black pepper
- 1 tbsp olive oil
- 4 hamburger buns
Instructions
- Preheat your grill or skillet to medium-high heat (375°F).
- Divide the ground beef into 8 equal portions and shape each into a thin patty.
- Place 1 oz of blue cheese in the center of 4 patties, leaving a small border around the edges.
- Top each with another patty and press the edges firmly to seal the cheese inside. Tip: Make sure the edges are well-sealed to prevent the cheese from leaking out during cooking.
- Season both sides of each stuffed patty with salt and pepper.
- Brush the grill or skillet with olive oil to prevent sticking.
- Cook the burgers for 4-5 minutes on each side for medium-rare, or until they reach your desired level of doneness. Tip: Avoid pressing down on the burgers while cooking to keep them juicy.
- Toast the hamburger buns on the grill for 1-2 minutes until lightly golden. Tip: Toasting the buns adds a nice crunch and prevents them from getting soggy.
- Remove the burgers from the heat and let them rest for 2 minutes before serving.
The contrast between the crispy exterior and the molten blue cheese center is nothing short of magical. Serve these burgers with a side of sweet potato fries or a crisp salad to cut through the richness. And if you’re feeling adventurous, a drizzle of honey on top adds a delightful sweetness that pairs beautifully with the tangy cheese.
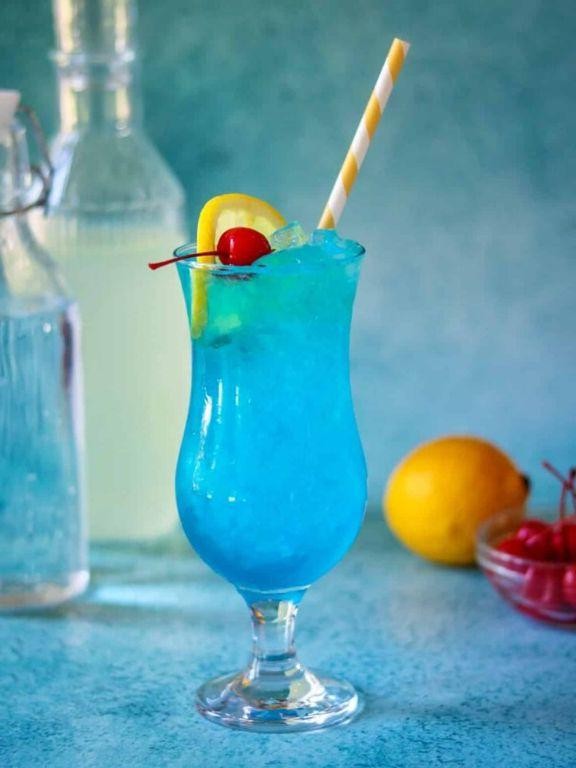
Blue Hawaiian Cocktail
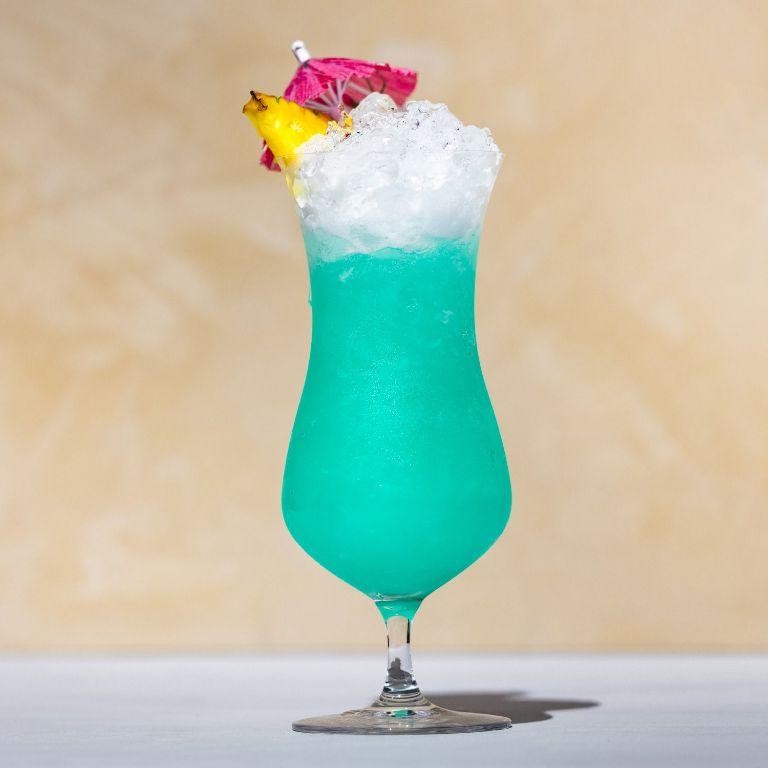
Picture this: you’re lounging on a sun-drenched beach, the sound of waves gently crashing in the background, and in your hand, a vibrant Blue Hawaiian Cocktail that transports you straight to the tropics. I first fell in love with this drink during a spontaneous weekend getaway to Hawaii, and ever since, it’s been my go-to for bringing a little island paradise into my everyday life.
Ingredients
- 1 cup ice
- 2 oz light rum
- 2 oz blue curaçao
- 2 oz cream of coconut
- 2 oz pineapple juice
- 1 cup crushed ice
- 1 pineapple slice (for garnish)
- 1 maraschino cherry (for garnish)
Instructions
- Fill a cocktail shaker with 1 cup of ice to chill it while you prepare the other ingredients.
- Add 2 oz of light rum, 2 oz of blue curaçao, 2 oz of cream of coconut, and 2 oz of pineapple juice to the shaker.
- Secure the lid on the shaker and shake vigorously for about 15 seconds, or until the outside of the shaker feels cold to the touch.
- Fill a hurricane glass with 1 cup of crushed ice to keep your cocktail chilled without diluting it too quickly.
- Strain the shaken mixture over the crushed ice in the hurricane glass, ensuring a smooth pour to maintain the vibrant blue color.
- Garnish with a pineapple slice and a maraschino cherry on the rim for that classic tropical flair.
Here’s the magic of the Blue Hawaiian: its creamy texture and sweet, citrusy flavor make it irresistibly refreshing. For an extra touch of paradise, serve it with a mini umbrella and watch as your guests’ faces light up with every sip.
Blueberry Lemonade
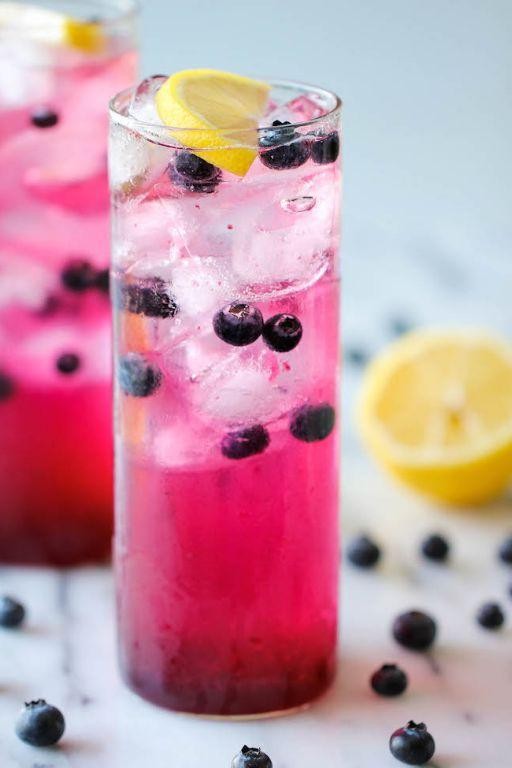
Every summer, I find myself craving something refreshing yet simple to make, and that’s how I stumbled upon this Blueberry Lemonade recipe. It’s a delightful twist on the classic lemonade, with blueberries adding a sweet depth that’s perfect for those hot afternoons. I remember the first time I made it; the vibrant color alone was enough to brighten my day.
Ingredients
- 1 cup fresh blueberries
- 1 cup granulated sugar
- 1 cup water (for syrup)
- 1 cup freshly squeezed lemon juice (about 4-6 lemons)
- 4 cups cold water (to dilute)
- Ice cubes (for serving)
- Fresh blueberries and lemon slices (for garnish)
Instructions
- In a small saucepan, combine 1 cup fresh blueberries, 1 cup granulated sugar, and 1 cup water. Bring to a boil over medium heat, stirring occasionally.
- Reduce heat to low and simmer for 10 minutes, until the blueberries have burst and the syrup has thickened slightly. Tip: Use a wooden spoon to gently press the blueberries against the side of the pan to release more flavor.
- Remove from heat and strain the syrup through a fine-mesh sieve into a pitcher, pressing on the solids to extract as much liquid as possible. Discard the solids.
- Add 1 cup freshly squeezed lemon juice and 4 cups cold water to the pitcher, stirring to combine. Tip: For a smoother lemonade, you can strain the lemon juice before adding it to the pitcher.
- Refrigerate the lemonade for at least 1 hour to chill thoroughly. Tip: The flavor deepens as it chills, so if you can wait, it’s even better the next day.
- Serve over ice cubes, garnished with fresh blueberries and lemon slices.
Great for gatherings or a quiet afternoon on the porch, this Blueberry Lemonade strikes the perfect balance between sweet and tart. The blueberries lend a subtle berry flavor that pairs beautifully with the sharpness of the lemon, creating a drink that’s as visually appealing as it is delicious. Try serving it in mason jars with striped paper straws for a rustic touch.
Blue Potato Salad
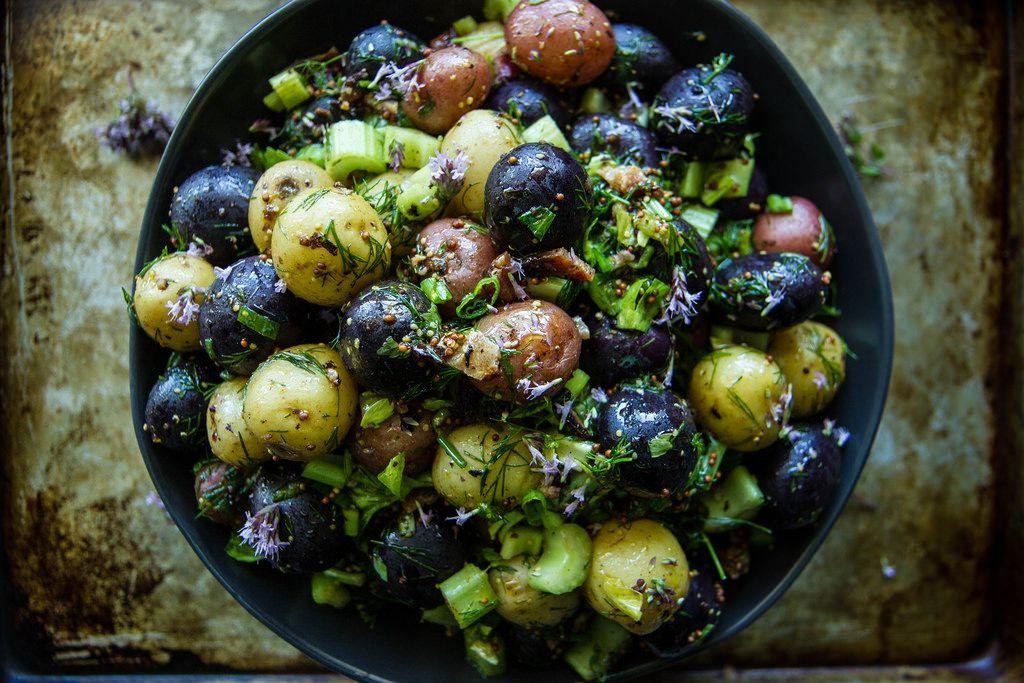
Remember those summer picnics where the potato salad was always the star? That’s exactly what I was thinking when I stumbled upon some gorgeous blue potatoes at the farmers’ market last weekend. Their vibrant hue not only adds a pop of color to the table but also packs a nutritional punch, making this dish a feast for the eyes and the body.
Ingredients
- 2 lbs blue potatoes, cubed
- 1/2 cup mayonnaise
- 2 tbsp Dijon mustard
- 1/4 cup red onion, finely diced
- 2 hard-boiled eggs, chopped
- 1 tbsp apple cider vinegar
- 1/2 tsp salt
- 1/4 tsp black pepper
- 1/4 cup fresh dill, chopped
Instructions
- Place the cubed blue potatoes in a large pot and cover with cold water by 1 inch. Bring to a boil over high heat.
- Once boiling, reduce heat to medium and simmer for 10-12 minutes, or until potatoes are fork-tender. Tip: Start checking at 10 minutes to avoid overcooking.
- Drain the potatoes and let them cool to room temperature, about 20 minutes. This prevents the mayonnaise from separating.
- In a large bowl, whisk together mayonnaise, Dijon mustard, apple cider vinegar, salt, and pepper until smooth.
- Add the cooled potatoes, red onion, hard-boiled eggs, and fresh dill to the bowl with the dressing. Gently fold everything together until well combined. Tip: Folding instead of stirring keeps the potatoes from breaking apart.
- Cover and refrigerate for at least 1 hour before serving to allow the flavors to meld. Tip: For best results, let it sit overnight.
Now, this blue potato salad isn’t just a side dish; it’s a conversation starter. The creamy texture paired with the tangy mustard and fresh dill makes it irresistibly delicious. Serve it on a bed of greens for an extra crunch or alongside grilled meats for a hearty meal.
Blue Algae Smoothie

Did you ever think you’d be sipping on something as vibrant and nutrient-packed as a Blue Algae Smoothie? I sure didn’t, until I stumbled upon spirulina at my local health food store and decided to give it a whirl. Now, it’s my go-to morning pick-me-up, and I’m excited to share how you can make this superfood smoothie at home.
Ingredients
- 1 cup almond milk
- 1 frozen banana
- 1 tbsp spirulina powder
- 1 tbsp honey
- 1/2 cup ice cubes
Instructions
- Pour 1 cup almond milk into a blender.
- Add 1 frozen banana to the blender for natural sweetness and creaminess.
- Measure 1 tbsp spirulina powder and add it to the blender for that vibrant blue color and superfood boost.
- Drizzle in 1 tbsp honey to sweeten the smoothie to your liking.
- Add 1/2 cup ice cubes to chill and thicken the smoothie.
- Blend on high for 30 seconds, or until the mixture is smooth and uniform in color. Tip: If the smoothie is too thick, add a splash more almond milk and blend again.
- Pour the smoothie into a glass and serve immediately. Tip: For an extra touch, garnish with a slice of banana or a sprinkle of spirulina powder on top.
- Enjoy your Blue Algae Smoothie right away for the best texture and flavor. Tip: This smoothie is best enjoyed fresh, but you can store it in the fridge for up to 2 hours if needed.
Kickstart your day with this Blue Algae Smoothie, and you’ll be amazed at how something so simple can taste so good and make you feel even better. The creamy texture from the banana pairs perfectly with the earthy tones of spirulina, making each sip a delightful experience. Try serving it in a clear glass to show off its stunning blue hue, or take it on the go in a mason jar for a healthy breakfast option.
Blueberry Muffins
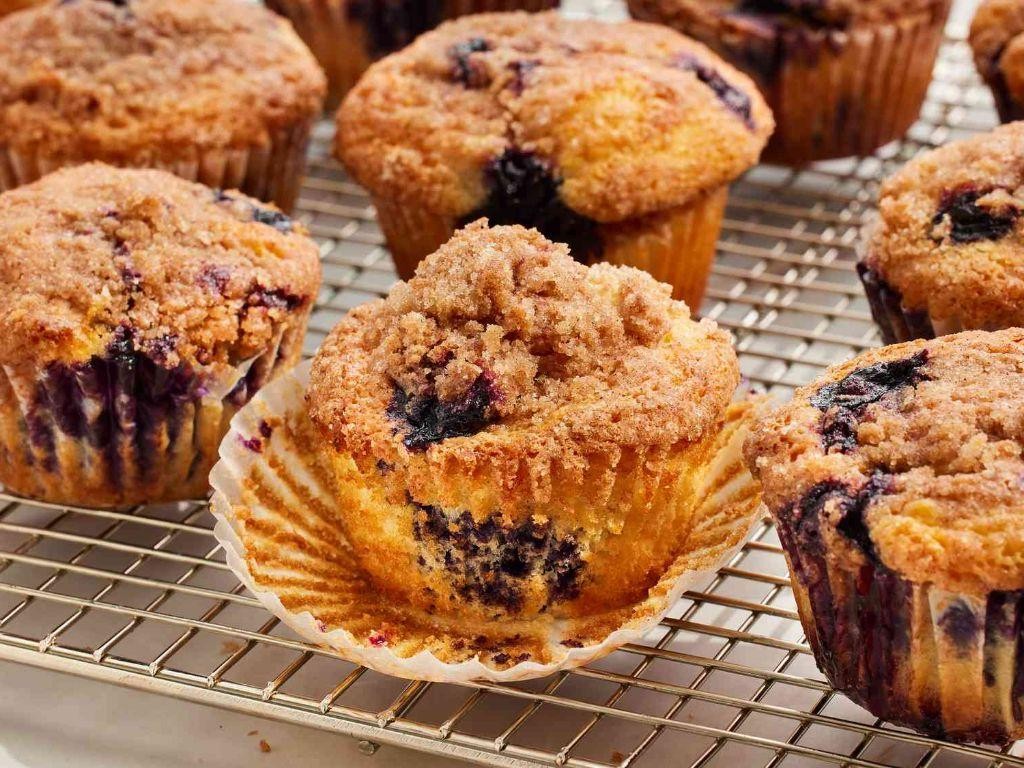
Yesterday, I found myself staring at a pint of blueberries that were just begging to be baked into something delicious. That’s when I decided to whip up a batch of my all-time favorite blueberry muffins. There’s something about the combination of juicy blueberries and tender muffin crumb that feels like a hug in food form.
Ingredients
- 2 cups all-purpose flour
- 1/2 cup granulated sugar
- 1/2 cup brown sugar
- 1 tbsp baking powder
- 1/2 tsp salt
- 1 cup milk
- 1/2 cup unsalted butter, melted
- 1 large egg
- 1 tsp vanilla extract
- 1 1/2 cups fresh blueberries
Instructions
- Preheat your oven to 375°F (190°C) and line a muffin tin with paper liners or grease it lightly.
- In a large bowl, whisk together 2 cups all-purpose flour, 1/2 cup granulated sugar, 1/2 cup brown sugar, 1 tbsp baking powder, and 1/2 tsp salt.
- In another bowl, mix 1 cup milk, 1/2 cup melted unsalted butter, 1 large egg, and 1 tsp vanilla extract until well combined.
- Pour the wet ingredients into the dry ingredients and stir until just combined. Tip: Overmixing can lead to tough muffins, so stop when you no longer see dry flour.
- Gently fold in 1 1/2 cups fresh blueberries. Tip: Tossing the blueberries in a little flour before adding them can help prevent them from sinking to the bottom.
- Divide the batter evenly among the muffin cups, filling each about 2/3 full. Tip: An ice cream scoop makes this step mess-free and ensures even sizes.
- Bake for 20-25 minutes, or until the muffins are golden and a toothpick inserted into the center comes out clean.
- Let the muffins cool in the pan for 5 minutes before transferring to a wire rack to cool completely.
Golden on the outside and bursting with blueberries inside, these muffins are perfect warm with a pat of butter or at room temperature with your morning coffee. For an extra special touch, try serving them with a dollop of whipped cream and a few fresh blueberries on top.
Blue Cheese and Pear Salad
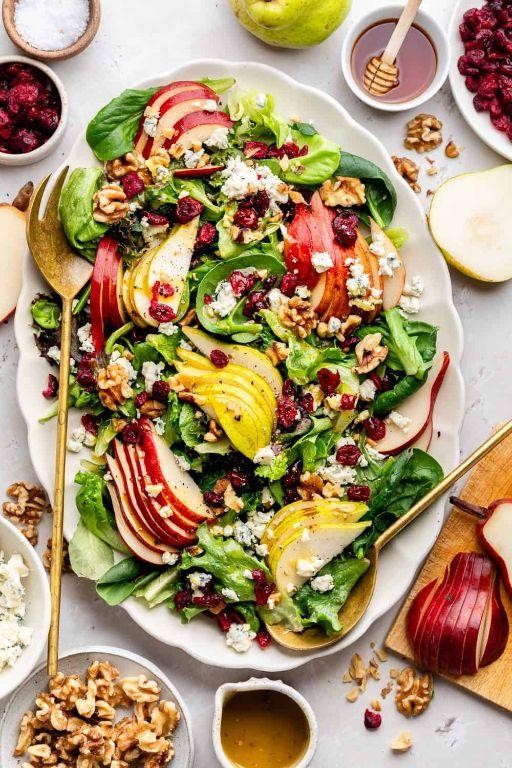
Every time I stumble upon a ripe pear at the market, I’m reminded of the first time I tried this Blue Cheese and Pear Salad at a friend’s dinner party. The combination of sweet, juicy pears with the bold, tangy blue cheese was a revelation, and I’ve been making it my way ever since, often adding a personal twist with a handful of walnuts for crunch.
Ingredients
- 2 cups mixed salad greens
- 1 ripe pear, thinly sliced
- 1/4 cup crumbled blue cheese
- 1/4 cup walnuts, roughly chopped
- 2 tbsp olive oil
- 1 tbsp balsamic vinegar
- 1 tsp honey
- 1/4 tsp salt
- 1/4 tsp black pepper
Instructions
- In a large bowl, combine the mixed salad greens and thinly sliced pear.
- Sprinkle the crumbled blue cheese and chopped walnuts over the salad greens and pear.
- In a small bowl, whisk together the olive oil, balsamic vinegar, honey, salt, and black pepper until well combined.
- Drizzle the dressing over the salad and gently toss to coat all ingredients evenly. Tip: For the best flavor, let the salad sit for 5 minutes before serving to allow the dressing to meld with the ingredients.
- Serve immediately. Tip: If you’re preparing this salad ahead of time, keep the dressing separate and add it just before serving to prevent the greens from wilting.
Now, this salad is a delightful contrast of textures and flavors—the crispness of the pear, the creaminess of the blue cheese, and the crunch of the walnuts all come together beautifully. Try serving it alongside a grilled chicken breast or as a starter to a fancy dinner to impress your guests.
Blue Raspberry Sorbet
Finally, a dessert that’s as fun to make as it is to eat! I stumbled upon this Blue Raspberry Sorbet recipe during a summer heatwave, and it’s been my go-to for instant refreshment ever since. The vibrant color and tangy sweetness are unbeatable, especially when you’ve been craving something cool and fruity.
Ingredients
- 2 cups granulated sugar
- 2 cups water
- 4 cups fresh raspberries
- 1 tbsp lemon juice
- 1 tsp blue food coloring
Instructions
- In a medium saucepan, combine 2 cups granulated sugar and 2 cups water. Heat over medium heat, stirring constantly, until the sugar is completely dissolved, about 5 minutes. Tip: Avoid boiling the syrup to prevent crystallization.
- Remove the saucepan from heat and let the syrup cool to room temperature, about 30 minutes.
- In a blender, puree 4 cups fresh raspberries with 1 tbsp lemon juice until smooth. Strain the mixture through a fine-mesh sieve to remove seeds, pressing with a spoon to extract as much liquid as possible.
- Stir the raspberry puree and 1 tsp blue food coloring into the cooled syrup until well combined. Tip: Adjust the amount of food coloring based on your desired shade of blue.
- Pour the mixture into an ice cream maker and churn according to the manufacturer’s instructions, usually about 20-25 minutes. Tip: For a softer sorbet, serve immediately. For a firmer texture, freeze for an additional 2 hours.
My favorite thing about this sorbet is its velvety texture and the way the raspberry’s natural tartness plays off the syrup’s sweetness. Serve it in hollowed-out lemons for an extra zesty presentation that’s sure to impress.
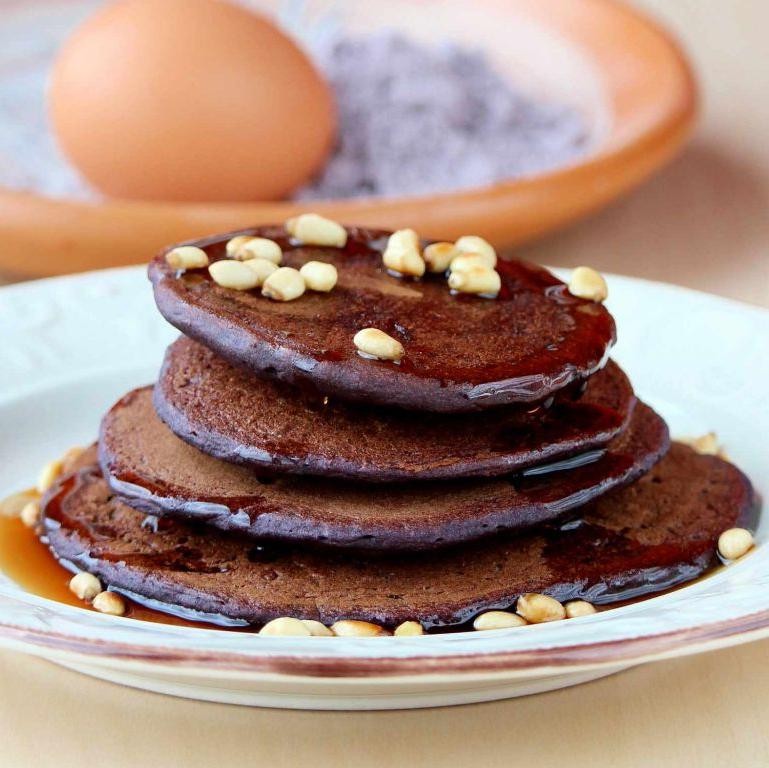
Blue Cornbread
Just when I thought cornbread couldn’t get any better, I stumbled upon the magic of blue cornmeal. It’s not just a visual stunner; its slightly nutty flavor adds a whole new dimension to the classic. Here’s how I make my blue cornbread, a recipe that’s become a staple in my kitchen for its simplicity and the cozy vibes it brings to any meal.
Ingredients
- 1 cup blue cornmeal
- 1 cup all-purpose flour
- 1/4 cup granulated sugar
- 1 tbsp baking powder
- 1/2 tsp salt
- 1 cup milk
- 1 large egg
- 1/4 cup unsalted butter, melted
Instructions
- Preheat your oven to 375°F (190°C) and grease an 8-inch square baking pan. Tip: For extra flavor, you can use a cast-iron skillet if you have one.
- In a large bowl, whisk together 1 cup blue cornmeal, 1 cup all-purpose flour, 1/4 cup granulated sugar, 1 tbsp baking powder, and 1/2 tsp salt.
- In another bowl, beat 1 large egg, then stir in 1 cup milk and 1/4 cup melted unsalted butter.
- Pour the wet ingredients into the dry ingredients and stir until just combined. Tip: Overmixing can lead to tough cornbread, so stop as soon as the flour disappears.
- Transfer the batter to the prepared pan and smooth the top with a spatula.
- Bake for 20-25 minutes, or until a toothpick inserted into the center comes out clean. Tip: The edges should be lightly golden and pulling away from the sides of the pan.
- Let the cornbread cool in the pan for 5 minutes before slicing.
Rich in color and flavor, this blue cornbread has a tender crumb and a subtly sweet, nutty taste that pairs wonderfully with chili or honey butter. For a festive twist, serve it alongside a bowl of posole or as the base for a unique Thanksgiving stuffing.
Blueberry Cheesecake
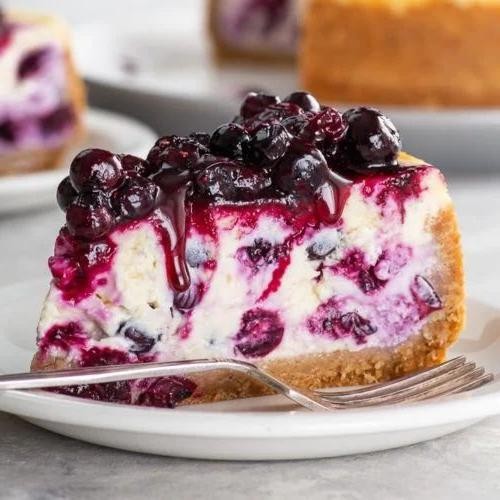
Perfectly creamy and irresistibly tangy, this Blueberry Cheesecake has been my go-to dessert for summer gatherings. I remember the first time I made it, the combination of fresh blueberries and smooth cream cheese won over even my pickiest relatives.
Ingredients
- 1 1/2 cups graham cracker crumbs
- 1/4 cup granulated sugar
- 1/2 cup unsalted butter, melted
- 24 oz cream cheese, softened
- 3/4 cup granulated sugar
- 3 large eggs
- 1 tsp vanilla extract
- 1 cup sour cream
- 2 cups fresh blueberries
- 1/4 cup blueberry jam
Instructions
- Preheat the oven to 325°F (163°C).
- In a medium bowl, mix 1 1/2 cups graham cracker crumbs, 1/4 cup granulated sugar, and 1/2 cup melted butter until combined. Tip: Press the mixture firmly into the bottom of a 9-inch springform pan to prevent crumbling.
- Bake the crust for 10 minutes, then let it cool. Tip: Cooling the crust before adding the filling helps maintain its texture.
- In a large bowl, beat 24 oz softened cream cheese and 3/4 cup granulated sugar until smooth.
- Add 3 eggs, one at a time, beating well after each addition.
- Stir in 1 tsp vanilla extract and 1 cup sour cream until just combined. Tip: Overmixing can introduce too much air, causing cracks.
- Pour the filling over the cooled crust.
- Bake for 45 minutes, or until the center is almost set.
- Let the cheesecake cool in the oven with the door slightly open for 1 hour to prevent sinking.
- Refrigerate for at least 4 hours, or overnight.
- Before serving, top with 2 cups fresh blueberries and drizzle with 1/4 cup blueberry jam.
Fresh out of the fridge, this cheesecake is wonderfully firm yet creamy, with the blueberries adding a burst of freshness. For an extra touch, serve each slice with a dollop of whipped cream and a sprinkle of lemon zest.
Blue Lagoon Mocktail
Last weekend, I found myself craving something refreshing yet visually stunning to beat the summer heat. That’s when I remembered the Blue Lagoon Mocktail, a drink that’s as beautiful as it is delicious, perfect for those who prefer their beverages without alcohol but still want that wow factor.
Ingredients
- 1 cup ice cubes
- 1/2 cup blue curaçao syrup
- 1/4 cup fresh lemon juice
- 1/4 cup simple syrup
- 1 cup club soda
- 1 lemon slice (for garnish)
- 1 maraschino cherry (for garnish)
Instructions
- Fill a tall glass to the brim with 1 cup of ice cubes to ensure your mocktail stays chilled without diluting too quickly.
- Pour 1/2 cup of blue curaçao syrup over the ice, watching as it settles to create that signature lagoon blue hue.
- Add 1/4 cup of fresh lemon juice for a tangy kick that balances the sweetness of the syrup.
- Drizzle in 1/4 cup of simple syrup, adjusting the amount based on your preference for sweetness.
- Top off the glass with 1 cup of club soda, gently stirring to combine all the ingredients without losing the effervescence.
- Garnish with a slice of lemon and a maraschino cherry on a skewer for that classic cocktail look.
Here’s how it turned out: the mocktail had a vibrant blue color that made it instantly Instagram-worthy, with a perfect balance of sweet and tart flavors. Serve it with a colorful straw to enhance the visual appeal and make every sip a delight.
Blueberry BBQ Sauce

Amazing how a simple twist can turn a classic into something extraordinary, right? That’s exactly what happened in my kitchen last summer when I decided to experiment with blueberries in my BBQ sauce. The result was a tangy, sweet, and slightly smoky sauce that’s become a staple in my household.
Ingredients
- 2 cups fresh blueberries
- 1 cup ketchup
- 1/2 cup apple cider vinegar
- 1/4 cup brown sugar
- 2 tbsp Worcestershire sauce
- 1 tbsp smoked paprika
- 1 tsp garlic powder
- 1 tsp onion powder
- 1/2 tsp salt
- 1/2 tsp black pepper
Instructions
- In a medium saucepan, combine all ingredients over medium heat.
- Bring the mixture to a simmer, stirring occasionally to prevent sticking.
- Reduce heat to low and let it simmer for 25 minutes, or until the blueberries have broken down and the sauce has thickened. Tip: For a smoother sauce, use an immersion blender after simmering.
- Remove from heat and let it cool slightly before using. Tip: The sauce will thicken further as it cools.
- Store in an airtight container in the refrigerator for up to a week. Tip: This sauce freezes well, so consider making a double batch for future use.
Great for more than just ribs, this Blueberry BBQ Sauce adds a fruity depth to grilled chicken, pork chops, or even as a unique dipping sauce for sweet potato fries. The balance of sweet and tangy, with a hint of smoke, makes it a versatile condiment that’s sure to impress.
Blue Cheese Dressing

Unbelievably creamy and packed with bold flavors, this Blue Cheese Dressing has been my go-to for elevating simple salads and wings to something extraordinary. I remember the first time I whipped it up for a game day party, and it was such a hit that I’ve been making it ever since, tweaking it to perfection.
Ingredients
- 1 cup mayonnaise
- 1/2 cup sour cream
- 1/2 cup buttermilk
- 4 oz blue cheese, crumbled
- 1 tbsp lemon juice
- 1 tsp Worcestershire sauce
- 1/2 tsp garlic powder
- 1/4 tsp salt
- 1/4 tsp black pepper
Instructions
- In a medium bowl, combine 1 cup mayonnaise, 1/2 cup sour cream, and 1/2 cup buttermilk. Whisk until smooth.
- Add 4 oz crumbled blue cheese, 1 tbsp lemon juice, 1 tsp Worcestershire sauce, 1/2 tsp garlic powder, 1/4 tsp salt, and 1/4 tsp black pepper to the bowl. Tip: For a chunkier texture, reserve some blue cheese to stir in at the end.
- Gently fold all ingredients together until well combined. Tip: Avoid overmixing to keep the dressing creamy with bits of blue cheese.
- Cover the bowl with plastic wrap and refrigerate for at least 1 hour before serving. Tip: This resting time allows the flavors to meld beautifully.
Blue Cheese Dressing is irresistibly creamy with a tangy kick and pockets of bold blue cheese. Try drizzling it over a wedge salad or using it as a dip for buffalo wings to take your meal to the next level.
Blueberry Scones

Zesty mornings call for something special, and nothing beats the comfort of freshly baked blueberry scones with a cup of coffee. I remember the first time I tried making these; the kitchen was a mess, but the aroma was absolutely worth it. Now, it’s a weekend ritual that never fails to bring a smile.
Ingredients
- 2 cups all-purpose flour
- 1/3 cup granulated sugar
- 1 tbsp baking powder
- 1/2 tsp salt
- 1/2 cup unsalted butter, cold and cubed
- 1/2 cup heavy cream
- 1 large egg
- 1 tsp vanilla extract
- 1 cup fresh blueberries
Instructions
- Preheat your oven to 400°F and line a baking sheet with parchment paper.
- In a large bowl, whisk together the flour, sugar, baking powder, and salt.
- Add the cold cubed butter to the dry ingredients. Use your fingers or a pastry cutter to work the butter into the flour until the mixture resembles coarse crumbs. Tip: Keep the butter cold for flakier scones.
- In a separate bowl, whisk together the heavy cream, egg, and vanilla extract.
- Gently fold the wet ingredients into the dry ingredients until just combined. Tip: Overmixing will make the scones tough.
- Carefully fold in the blueberries, trying not to crush them.
- Turn the dough out onto a lightly floured surface and shape it into a 1-inch thick circle.
- Cut the dough into 8 wedges and transfer them to the prepared baking sheet.
- Bake for 15-20 minutes, or until the scones are golden brown and a toothpick inserted into the center comes out clean. Tip: Rotate the baking sheet halfway through for even browning.
- Allow the scones to cool on the baking sheet for 5 minutes before transferring to a wire rack.
Absolutely delightful, these scones strike the perfect balance between tender and crumbly, with bursts of juicy blueberries in every bite. Serve them warm with a dollop of clotted cream or your favorite jam for an extra indulgent treat.
Blue Corn Pancakes
Mornings in my kitchen always start with the comforting sizzle of pancakes on the griddle, but today, I’m mixing things up with something a little different—Blue Corn Pancakes. There’s something about the earthy sweetness of blue cornmeal that turns an ordinary breakfast into a memorable feast, and I can’t wait to share this twist on a classic with you.
Ingredients
- 1 cup blue cornmeal
- 1 cup all-purpose flour
- 2 tbsp sugar
- 2 tsp baking powder
- 1/2 tsp salt
- 1 cup milk
- 1 large egg
- 2 tbsp melted butter
- 1/2 tsp vanilla extract
Instructions
- In a large bowl, whisk together 1 cup blue cornmeal, 1 cup all-purpose flour, 2 tbsp sugar, 2 tsp baking powder, and 1/2 tsp salt until well combined.
- In another bowl, beat 1 large egg, then mix in 1 cup milk, 2 tbsp melted butter, and 1/2 tsp vanilla extract.
- Pour the wet ingredients into the dry ingredients and stir until just combined. Let the batter sit for 5 minutes to thicken slightly—this ensures fluffy pancakes.
- Heat a non-stick skillet or griddle over medium heat (350°F) and lightly grease with butter or cooking spray.
- Pour 1/4 cup of batter onto the griddle for each pancake. Cook until bubbles form on the surface and the edges look set, about 2-3 minutes.
- Flip the pancakes and cook for another 1-2 minutes until golden brown and cooked through.
- Serve warm with your favorite toppings. For an extra touch, drizzle with honey or maple syrup and a sprinkle of fresh berries.
Delightfully rustic with a subtly sweet and nutty flavor, these Blue Corn Pancakes are a delightful departure from the ordinary. Their vibrant color and unique taste make them a standout dish for any breakfast or brunch table. Try stacking them high with a dollop of whipped cream and a scattering of edible flowers for a truly Instagram-worthy presentation.
Blueberry Pie
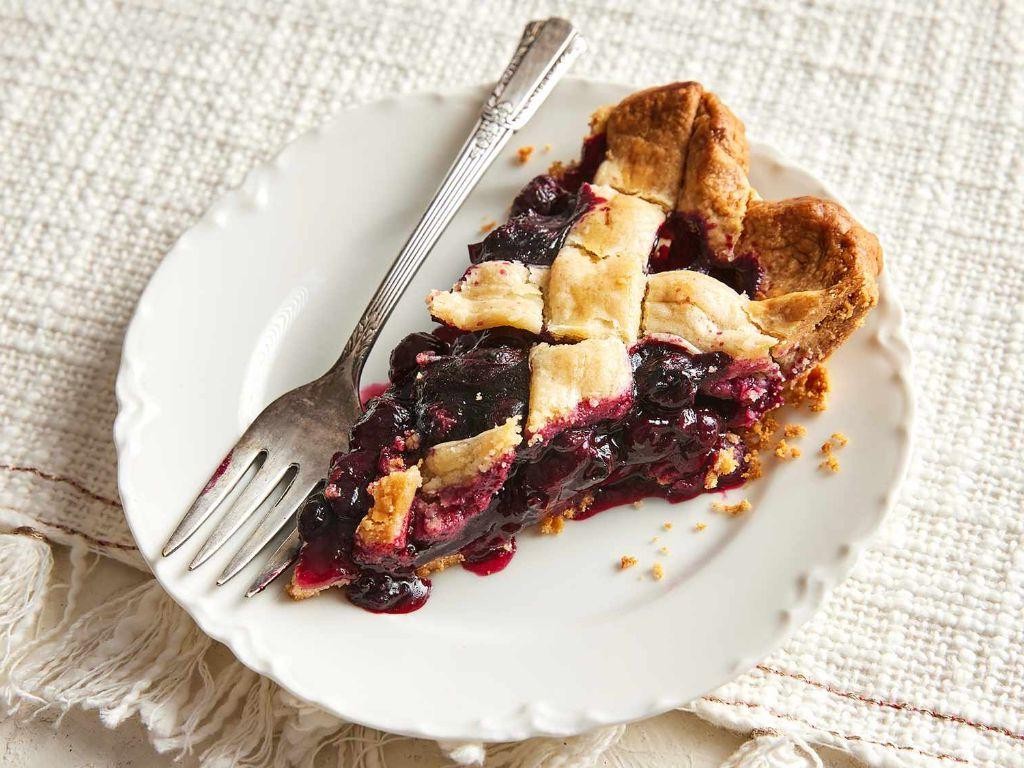
Zesty and vibrant, blueberry pie has always been my go-to dessert for summer gatherings. There’s something about the burst of blueberries encased in a flaky crust that screams celebration. I remember my grandmother dusting the top with sugar, a tradition I’ve proudly carried on.
Ingredients
- 2 cups fresh blueberries
- 1 cup granulated sugar
- 1/4 cup all-purpose flour
- 1/2 tsp ground cinnamon
- 1 tbsp lemon juice
- 2 pie crusts (9-inch)
- 1 tbsp unsalted butter
- 1 egg, beaten
Instructions
- Preheat your oven to 375°F (190°C).
- In a large bowl, mix 2 cups fresh blueberries, 1 cup granulated sugar, 1/4 cup all-purpose flour, 1/2 tsp ground cinnamon, and 1 tbsp lemon juice until well combined.
- Roll out one pie crust and place it into a 9-inch pie dish. Trim the edges, leaving a 1-inch overhang.
- Pour the blueberry mixture into the crust. Dot the top with 1 tbsp unsalted butter, cut into small pieces.
- Roll out the second pie crust and place it over the filling. Trim, seal, and crimp the edges. Cut slits in the top crust to allow steam to escape.
- Brush the top crust with 1 beaten egg for a golden finish.
- Bake for 45-50 minutes, or until the crust is golden and the filling is bubbly. If the edges brown too quickly, cover them with foil.
- Let the pie cool on a wire rack for at least 2 hours before serving to allow the filling to set.
Warm and inviting, this blueberry pie offers a perfect balance of sweetness and tartness, with a crust that’s irresistibly flaky. Serve it with a scoop of vanilla ice cream for a delightful contrast of temperatures and textures.
Blue Cheese and Walnut Pasta
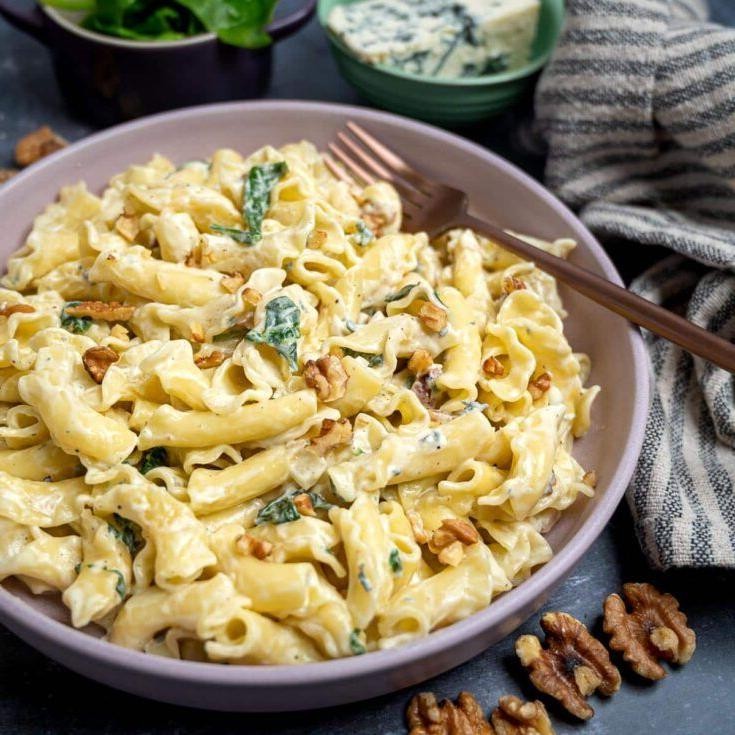
Kicking off the week with a dish that’s as bold in flavor as it is simple to make, this Blue Cheese and Walnut Pasta has become my go-to for those evenings when I crave something decadent yet effortless. It’s a recipe that reminds me of a cozy dinner I had in upstate New York, where the boldness of blue cheese perfectly complemented the earthy walnuts.
Ingredients
- 8 oz pasta
- 1/2 cup walnuts, chopped
- 1/2 cup heavy cream
- 4 oz blue cheese, crumbled
- 2 tbsp unsalted butter
- 1/4 tsp salt
- 1/4 tsp black pepper
Instructions
- Bring a large pot of salted water to a boil over high heat.
- Add 8 oz pasta to the boiling water and cook according to package instructions until al dente, about 8-10 minutes.
- While the pasta cooks, toast 1/2 cup chopped walnuts in a dry skillet over medium heat for 3-5 minutes, stirring frequently, until fragrant. Tip: Keep an eye on them to prevent burning.
- Drain the pasta, reserving 1/2 cup of the pasta water, and set aside.
- In the same pot, melt 2 tbsp unsalted butter over medium heat.
- Add 1/2 cup heavy cream, 4 oz crumbled blue cheese, 1/4 tsp salt, and 1/4 tsp black pepper to the pot. Stir continuously until the cheese melts and the sauce becomes smooth, about 3 minutes. Tip: If the sauce is too thick, gradually add the reserved pasta water until desired consistency is reached.
- Return the drained pasta to the pot with the sauce, adding the toasted walnuts. Toss everything together until the pasta is evenly coated.
- Serve immediately. Tip: For an extra touch, garnish with additional crumbled blue cheese and a sprinkle of chopped walnuts.
Bold and creamy, this pasta dish is a masterpiece of textures, from the smooth sauce to the crunchy walnuts. It’s perfect for a quiet night in or to impress guests at your next dinner party. Try serving it with a side of crisp green salad to balance the richness.
Conclusion
We hope this roundup of 20 delicious blue food recipes inspires your next culinary adventure! From vibrant smoothies to elegant desserts, there’s something for every occasion. Don’t forget to try your favorites, share your thoughts in the comments, and pin this article on Pinterest for easy access. Happy cooking!


