Prepare to dazzle your taste buds with our collection of 24 Delicious Bisquick Recipes: Dessert Delights! Whether you’re craving something sweet in a snap or looking to impress at your next gathering, these easy-to-make treats are sure to delight. From fluffy pancakes to decadent cobblers, we’ve got your dessert cravings covered. Dive in and discover your next favorite Bisquick creation!
Bisquick Strawberry Shortcake
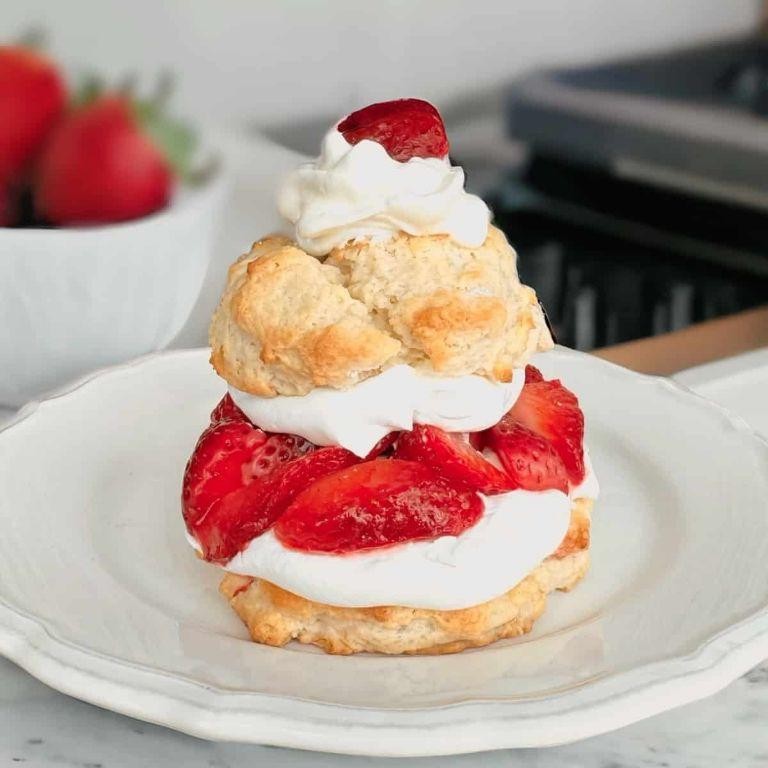
Howdy, dessert lovers! If you’re dreaming of a summer treat that’s as easy as pie (but, you know, not pie), this Bisquick Strawberry Shortcake is your golden ticket. It’s the kind of no-fuss, all-delight dish that’ll have you basking in compliments while secretly knowing you barely broke a sweat.
Ingredients
- 2 1/3 cups Bisquick mix
- 1/2 cup granulated sugar
- 1/2 cup unsalted butter, cold and cubed
- 2/3 cup whole milk
- 1 large pasture-raised egg, lightly beaten
- 1 quart fresh strawberries, hulled and sliced
- 1/4 cup granulated sugar (for strawberries)
- 1 cup heavy whipping cream
- 1 tbsp pure vanilla extract
- 2 tbsp confectioners’ sugar
Instructions
- Preheat your oven to 425°F (218°C) and line a baking sheet with parchment paper.
- In a large mixing bowl, combine 2 1/3 cups Bisquick mix and 1/2 cup granulated sugar.
- Add 1/2 cup cold, cubed unsalted butter to the dry ingredients. Use a pastry cutter or your fingers to work the butter into the mix until it resembles coarse crumbs.
- Make a well in the center of the mixture and pour in 2/3 cup whole milk and 1 lightly beaten large egg. Stir until just combined—don’t overmix!
- Drop the dough by spoonfuls onto the prepared baking sheet, forming 6 equal mounds. Bake for 10-12 minutes, or until golden brown.
- While the shortcakes bake, toss 1 quart of sliced strawberries with 1/4 cup granulated sugar in a bowl. Set aside to macerate.
- In a chilled bowl, whip 1 cup heavy whipping cream with 1 tbsp pure vanilla extract and 2 tbsp confectioners’ sugar until stiff peaks form.
- Once the shortcakes are cooled slightly, split them in half horizontally. Spoon a generous amount of macerated strawberries onto the bottom half, top with a dollop of whipped cream, and crown with the other half of the shortcake.
Delight in the contrast of the tender, buttery shortcake with the juicy, sweet strawberries and cloud-like whipped cream. For an extra indulgent twist, drizzle with a bit of melted dark chocolate or serve alongside a scoop of vanilla bean ice cream.
Bisquick Peach Cobbler
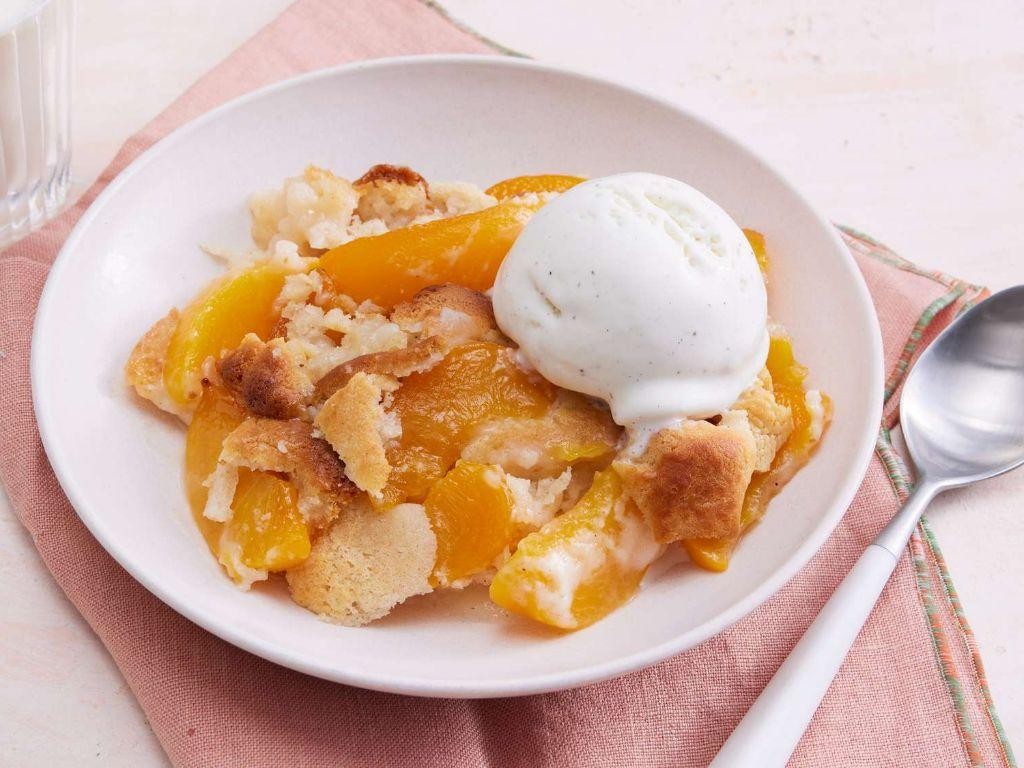
Picture this: a golden, bubbling masterpiece that’s equal parts comfort and chaos, just like your last family reunion. This Bisquick Peach Cobbler is the dessert equivalent of a warm hug from your favorite aunt—sweet, slightly messy, and utterly irresistible.
Ingredients
- 4 cups fresh peaches, peeled and sliced
- 1 cup granulated sugar
- 1 cup Bisquick mix
- 1 cup whole milk
- 1/2 cup unsalted butter, melted
- 1 tsp pure vanilla extract
- 1/2 tsp ground cinnamon
- 1/4 tsp freshly grated nutmeg
Instructions
- Preheat your oven to 375°F (190°C) and grease a 9×13-inch baking dish with a thin layer of clarified butter.
- In a medium bowl, toss the peeled and sliced peaches with 1/2 cup of granulated sugar, then set aside to macerate for 15 minutes.
- In a separate bowl, whisk together the Bisquick mix, remaining 1/2 cup sugar, whole milk, melted unsalted butter, pure vanilla extract, ground cinnamon, and freshly grated nutmeg until just combined.
- Pour the Bisquick mixture into the prepared baking dish, then evenly distribute the macerated peaches over the top.
- Bake for 45-50 minutes, or until the cobbler is golden brown and a toothpick inserted into the center comes out clean.
- Allow the cobbler to cool for at least 10 minutes before serving to let the flavors meld beautifully.
This cobbler emerges from the oven with a crisp, buttery crust that gives way to a luscious, peach-filled center. Serve it warm with a scoop of vanilla bean ice cream for a contrast of temperatures that’ll make your taste buds sing.
Bisquick Apple Crisp
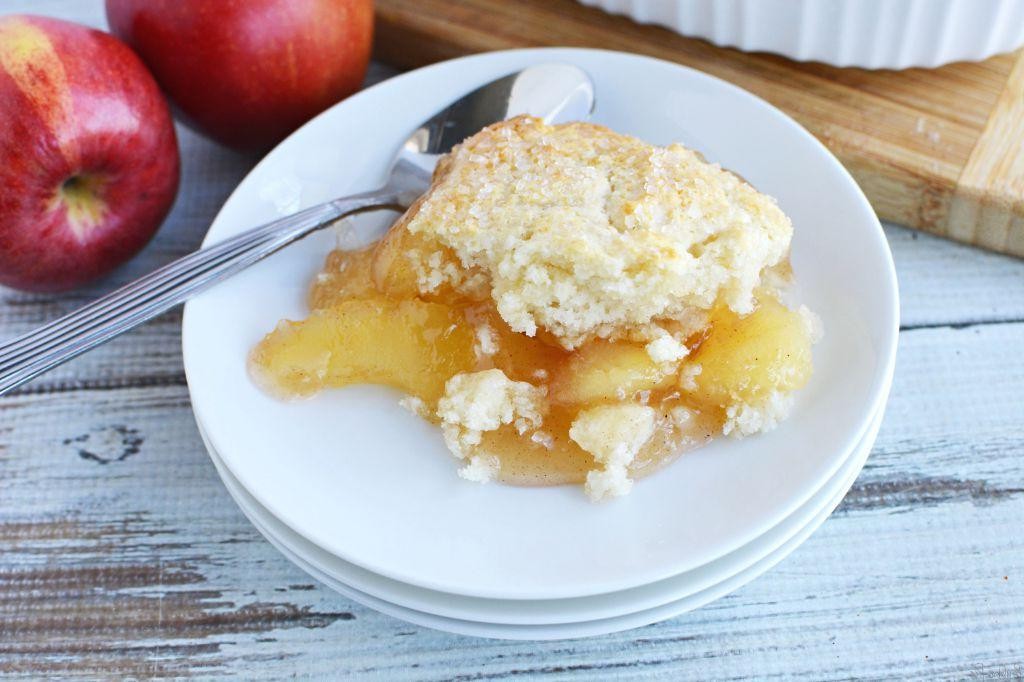
Picture this: a dessert that’s as easy as pie but twice as nice, where the humble apple gets a glamorous makeover with a Bisquick twist. This Bisquick Apple Crisp is your ticket to dessert heaven, no passport required.
Ingredients
- 4 cups Granny Smith apples, peeled and thinly sliced
- 1 cup granulated sugar
- 1 tsp ground cinnamon
- 1/2 tsp ground nutmeg
- 1 cup Bisquick mix
- 1/2 cup packed brown sugar
- 1/2 cup unsalted butter, chilled and cubed
- 1/2 cup rolled oats
Instructions
- Preheat your oven to 375°F (190°C) and lightly grease an 8-inch square baking dish.
- In a large bowl, toss the thinly sliced Granny Smith apples with granulated sugar, ground cinnamon, and ground nutmeg until evenly coated.
- Spread the apple mixture evenly in the prepared baking dish.
- In another bowl, combine the Bisquick mix, packed brown sugar, chilled cubed unsalted butter, and rolled oats. Use your fingers to mix until the mixture resembles coarse crumbs.
- Sprinkle the crumb mixture evenly over the apples in the baking dish.
- Bake in the preheated oven for 30-35 minutes, or until the topping is golden brown and the apples are bubbly.
- Let the crisp cool for 10 minutes before serving to allow the flavors to meld beautifully.
Rich with the warmth of cinnamon and nutmeg, this Bisquick Apple Crisp offers a delightful contrast between the tender apples and the crunchy, buttery topping. Serve it warm with a scoop of vanilla ice cream for an extra indulgent treat, or enjoy it as is for a cozy, comforting dessert any day of the week.
Bisquick Chocolate Chip Cookies
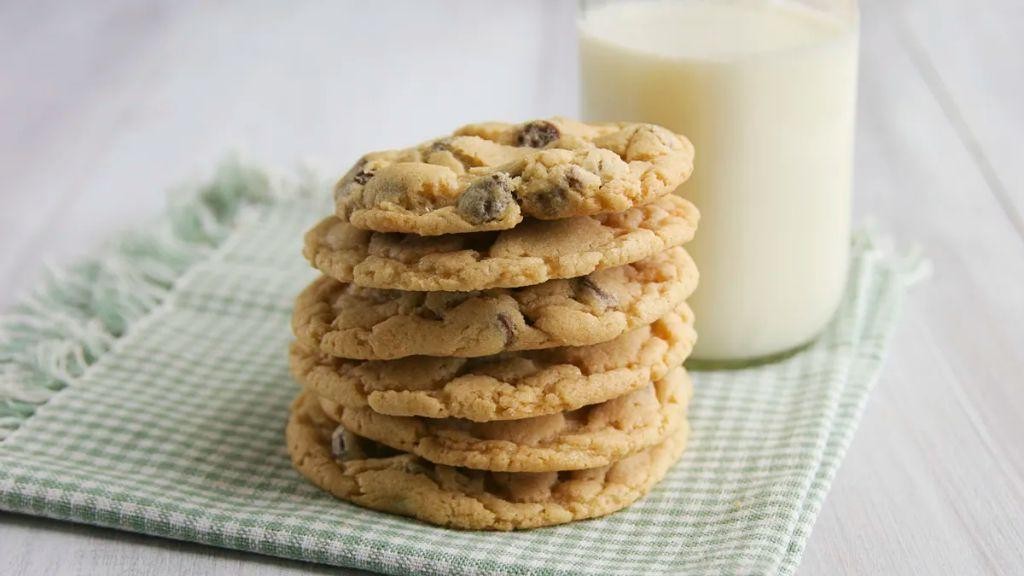
Baking up a storm in the kitchen just got a whole lot easier with these Bisquick Chocolate Chip Cookies. Who knew that a box of Bisquick could be the secret weapon to whipping up cookies that are as fluffy as a cloud and as addictive as your favorite Netflix series?
Ingredients
- 2 1/4 cups Bisquick baking mix
- 1/2 cup granulated sugar
- 1/2 cup packed brown sugar
- 1/2 cup unsalted butter, softened
- 1 large pasture-raised egg, lightly beaten
- 1 tsp pure vanilla extract
- 1 cup semi-sweet chocolate chips
Instructions
- Preheat your oven to 375°F (190°C) and line a baking sheet with parchment paper for an effortless cleanup.
- In a large mixing bowl, cream together the softened unsalted butter, granulated sugar, and brown sugar until the mixture is light and fluffy, about 3 minutes.
- Beat in the lightly beaten pasture-raised egg and pure vanilla extract until fully incorporated.
- Gradually fold in the Bisquick baking mix, ensuring not to overmix the dough to keep the cookies tender.
- Gently stir in the semi-sweet chocolate chips until evenly distributed throughout the dough.
- Using a tablespoon, drop rounded portions of dough onto the prepared baking sheet, spacing them about 2 inches apart to allow for spreading.
- Bake in the preheated oven for 10-12 minutes, or until the edges are golden but the centers are still soft.
- Allow the cookies to cool on the baking sheet for 5 minutes before transferring them to a wire rack to cool completely.
Zesty and zingy, these cookies strike the perfect balance between chewy and crisp, with chocolate chips that promise a melt-in-your-mouth experience. Serve them warm with a glass of cold milk for a classic combo, or crumble them over vanilla ice cream for an indulgent dessert twist.
Bisquick Blueberry Muffins

Delightfully simple yet irresistibly tasty, these Bisquick Blueberry Muffins are your ticket to breakfast bliss without the fuss. Perfect for those mornings when you’re craving something sweet but your pajamas are still calling your name.
Ingredients
- 2 cups Bisquick baking mix
- 2/3 cup whole milk
- 1/3 cup granulated sugar
- 1 pasture-raised egg, lightly beaten
- 1 cup fresh blueberries, rinsed and dried
- 1 tbsp unsalted butter, melted
- 1 tsp pure vanilla extract
Instructions
- Preheat your oven to 400°F (204°C) and line a muffin tin with paper liners or grease lightly with butter.
- In a large mixing bowl, combine the Bisquick baking mix, granulated sugar, lightly beaten egg, whole milk, melted unsalted butter, and pure vanilla extract. Stir until just combined; overmixing leads to tough muffins.
- Gently fold in the fresh blueberries, ensuring they’re evenly distributed without crushing them.
- Divide the batter evenly among the 12 muffin cups, filling each about 2/3 full to allow room for rising.
- Bake for 15-18 minutes, or until the muffins are golden brown and a toothpick inserted into the center comes out clean.
- Allow the muffins to cool in the tin for 5 minutes before transferring to a wire rack to cool completely.
Perfectly moist with a tender crumb, these muffins boast bursts of juicy blueberries in every bite. Serve them warm with a dollop of clotted cream for an indulgent twist or enjoy them as is for a quick, satisfying treat.
Bisquick Lemon Bars

Ah, the joy of biting into a tangy, sweet, and slightly buttery Bisquick lemon bar—it’s like summer decided to throw a party in your mouth, and everyone’s invited! These bars are the perfect blend of simplicity and sophistication, making them a hit for both lazy Sundays and fancy gatherings.
Ingredients
- 1 1/2 cups Bisquick mix
- 1/2 cup unsalted butter, chilled and cubed
- 1/4 cup granulated sugar
- 4 pasture-raised eggs, lightly beaten
- 1 1/2 cups granulated sugar
- 1/4 cup all-purpose flour
- 2 teaspoons lemon zest, finely grated
- 1/2 cup fresh lemon juice
- Powdered sugar, for dusting
Instructions
- Preheat your oven to 350°F (175°C) and grease an 8×8-inch baking pan with butter or line it with parchment paper for easy removal.
- In a medium bowl, combine 1 1/2 cups Bisquick mix, 1/2 cup chilled cubed butter, and 1/4 cup granulated sugar. Use a pastry cutter or your fingers to blend until the mixture resembles coarse crumbs.
- Press the crumb mixture firmly into the bottom of the prepared pan to form an even crust. Bake for 15 minutes, or until lightly golden. Tip: Chilling the crust for 10 minutes before baking can help prevent shrinkage.
- While the crust bakes, whisk together 4 lightly beaten eggs, 1 1/2 cups granulated sugar, 1/4 cup all-purpose flour, 2 teaspoons lemon zest, and 1/2 cup fresh lemon juice until smooth.
- Pour the lemon mixture over the hot crust as soon as it comes out of the oven. Return to the oven and bake for an additional 20-25 minutes, or until the filling is set and the edges are slightly browned.
- Cool completely in the pan on a wire rack, then refrigerate for at least 2 hours to firm up. Tip: For cleaner cuts, chill the bars overnight and use a sharp knife dipped in hot water.
- Dust with powdered sugar just before serving. Tip: For an extra zing, serve with a side of whipped cream infused with a hint of vanilla.
Out of the oven, these Bisquick lemon bars boast a velvety smooth filling atop a crumbly, buttery crust, striking the perfect balance between tart and sweet. Serve them chilled with a sprinkle of powdered sugar for a dessert that’s as visually appealing as it is delicious, or pair with a dollop of vanilla-infused whipped cream for an extra indulgent treat.
Bisquick Pumpkin Pie
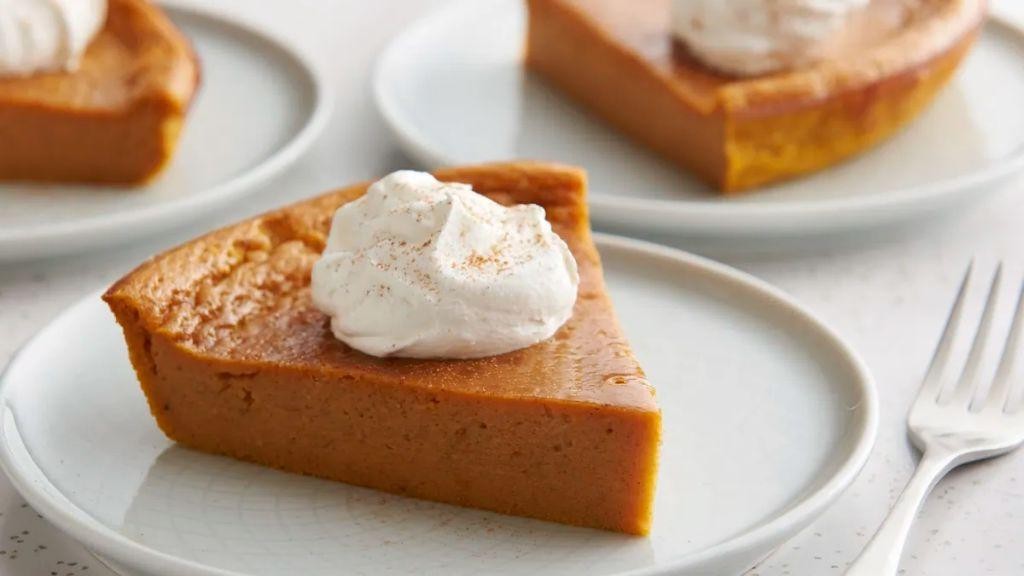
Now, who said pumpkin pie had to be a fussy affair? With our Bisquick Pumpkin Pie, you’re in for a treat that’s as easy as pie—literally. This no-fuss, all-flavor dessert is your ticket to Thanksgiving fame or just a cozy autumn night in.
Ingredients
- 1 1/2 cups pure pumpkin puree
- 3/4 cup granulated sugar
- 1/2 teaspoon ground cinnamon
- 1/4 teaspoon ground ginger
- 1/4 teaspoon ground nutmeg
- 1/2 teaspoon fine sea salt
- 2 pasture-raised eggs, lightly beaten
- 1 cup evaporated milk
- 1 cup Bisquick mix
- 1/2 cup unsalted butter, melted and slightly cooled
Instructions
- Preheat your oven to 350°F (175°C) and lightly grease a 9-inch pie plate.
- In a large mixing bowl, whisk together the pumpkin puree, granulated sugar, cinnamon, ginger, nutmeg, and sea salt until well combined.
- Add the lightly beaten eggs and evaporated milk to the pumpkin mixture, stirring until smooth.
- Gradually fold in the Bisquick mix, ensuring no lumps remain, then stir in the melted butter until the batter is uniform.
- Pour the batter into the prepared pie plate, smoothing the top with a spatula for an even bake.
- Bake for 45-50 minutes, or until the pie is set around the edges but slightly wobbly in the center—this is your cue it’s perfectly done.
- Allow the pie to cool on a wire rack for at least 2 hours before serving to let the flavors meld beautifully.
Brimming with warm spices and a velvety texture, this Bisquick Pumpkin Pie is a dream come true for pumpkin lovers. Serve it with a dollop of whipped cream or a scoop of vanilla ice cream for an extra indulgent twist.
Bisquick Cherry Clafoutis
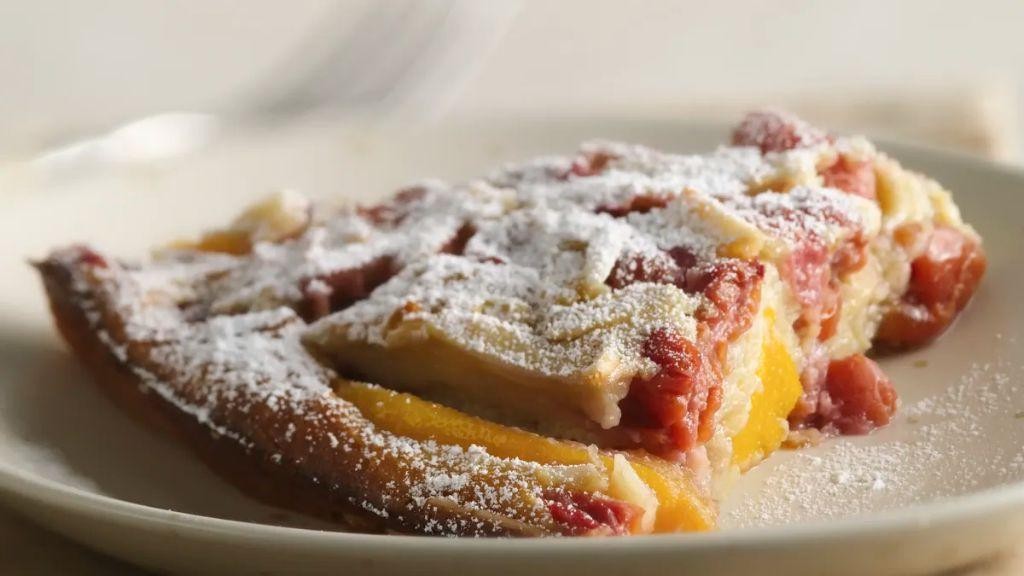
Just when you thought Bisquick couldn’t get any more versatile, along comes this Bisquick Cherry Clafoutis to prove you wrong. It’s like the pancake mix decided to put on a fancy French hat and absolutely slay at a dinner party.
Ingredients
- 1 cup Bisquick mix
- 1/2 cup granulated sugar
- 3 pasture-raised eggs, lightly beaten
- 1 cup whole milk
- 2 tbsp clarified butter, melted
- 1 tsp pure vanilla extract
- 1 1/2 cups fresh cherries, pitted
- 1 tbsp powdered sugar, for dusting
Instructions
- Preheat your oven to 350°F (175°C) and grease a 9-inch pie plate with a thin layer of clarified butter.
- In a large mixing bowl, whisk together the Bisquick mix and granulated sugar until well combined.
- Add the lightly beaten eggs, whole milk, melted clarified butter, and pure vanilla extract to the dry ingredients. Whisk until the batter is smooth and free of lumps.
- Arrange the pitted cherries evenly at the bottom of the greased pie plate.
- Pour the batter over the cherries, ensuring they are fully submerged.
- Bake in the preheated oven for 35-40 minutes, or until the clafoutis is golden brown and a toothpick inserted into the center comes out clean.
- Remove from the oven and let it cool for 10 minutes before dusting with powdered sugar.
- Serve warm, allowing the creamy texture and the burst of cherry flavors to take center stage.
How this dish manages to be both elegantly simple and decadently rich is a mystery we’re happy to indulge in. The cherries add a juicy pop against the custardy backdrop, making it a showstopper whether served at brunch or as a dessert.
Bisquick Banana Bread
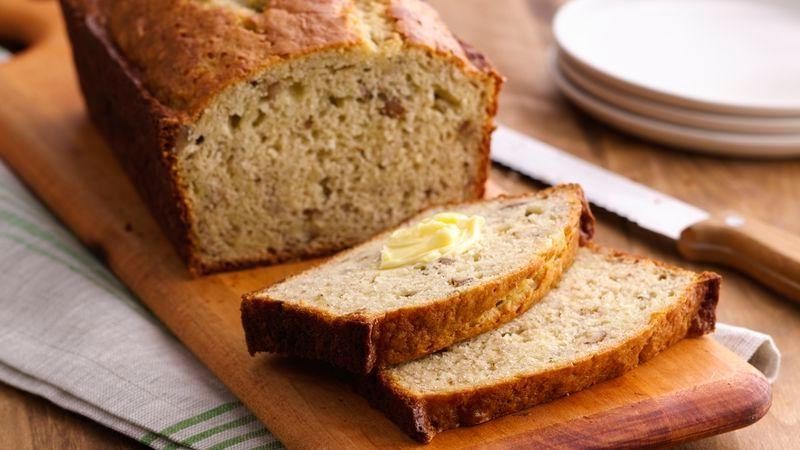
Absolutely no one can resist the comforting embrace of a warm slice of banana bread, especially when it’s made with the magical shortcut of Bisquick. This recipe is your ticket to banana bread bliss, combining the ease of a mix with the homemade heart we all crave.
Ingredients
- 2 cups Bisquick baking mix
- 1 cup granulated sugar
- 3 overripe bananas, mashed
- 2 pasture-raised eggs, lightly beaten
- 1/3 cup clarified butter, melted
- 1 tsp pure vanilla extract
- 1/2 tsp ground cinnamon
Instructions
- Preheat your oven to 350°F (175°C) and grease a 9×5 inch loaf pan with clarified butter.
- In a large mixing bowl, combine the Bisquick baking mix and granulated sugar, whisking to ensure no lumps remain.
- Add the mashed bananas, lightly beaten eggs, melted clarified butter, vanilla extract, and ground cinnamon to the dry ingredients. Mix until just combined; overmixing can lead to a tough bread.
- Pour the batter into the prepared loaf pan, smoothing the top with a spatula for an even bake.
- Bake for 55-60 minutes, or until a toothpick inserted into the center comes out clean. Tip: If the top browns too quickly, tent it with aluminum foil.
- Allow the banana bread to cool in the pan for 10 minutes, then transfer to a wire rack to cool completely. Tip: This patience-testing step ensures the bread sets perfectly.
So moist, so flavorful, and so easy, this Bisquick Banana Bread is a game-changer. Serve it toasted with a smear of butter or as the star of your next brunch spread—either way, it’s bound to disappear faster than you can say ‘more please.’
Bisquick Raspberry Tart
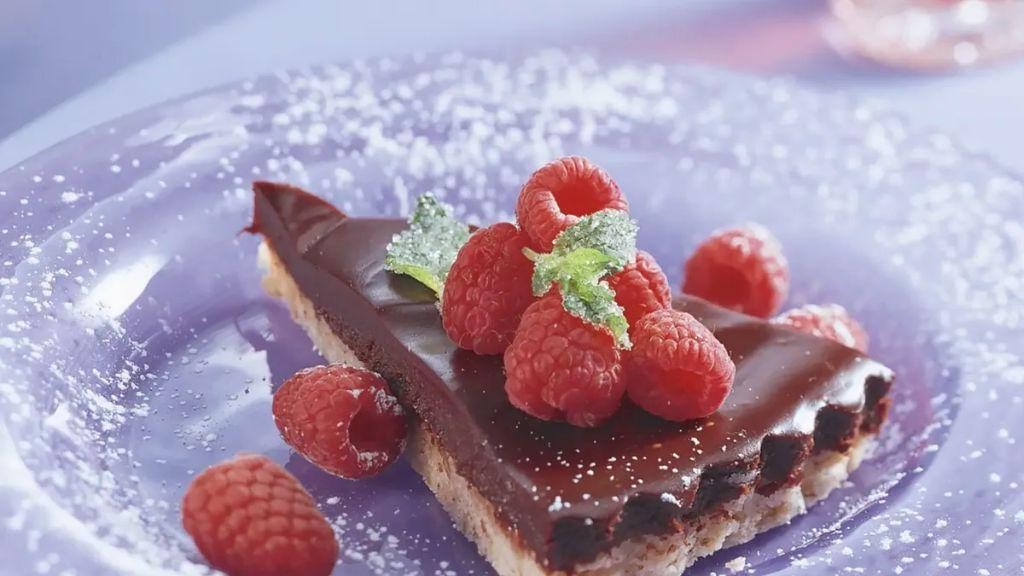
Delightfully simple yet irresistibly elegant, this Bisquick Raspberry Tart is the dessert that’ll have your guests thinking you slaved over it for hours. With a buttery, flaky crust and a luscious raspberry filling, it’s the perfect blend of sweet and tart—no fancy pastry skills required!
Ingredients
- 1 1/2 cups Bisquick baking mix
- 1/2 cup unsalted butter, chilled and cubed
- 3 tbsp ice water
- 2 cups fresh raspberries
- 1/2 cup granulated sugar
- 1 tbsp cornstarch
- 1 tsp pure vanilla extract
- 1 large pasture-raised egg, lightly beaten (for egg wash)
Instructions
- Preheat your oven to 375°F (190°C) and lightly grease a 9-inch tart pan.
- In a large bowl, combine the Bisquick baking mix and chilled, cubed butter. Use a pastry cutter or your fingers to blend until the mixture resembles coarse crumbs.
- Gradually add the ice water, one tablespoon at a time, stirring until the dough just comes together. Tip: Overworking the dough can make it tough, so stop as soon as it holds its shape.
- Press the dough evenly into the prepared tart pan, ensuring it covers the bottom and sides. Chill in the refrigerator for 15 minutes to prevent shrinkage during baking.
- In a separate bowl, gently toss the raspberries with granulated sugar, cornstarch, and vanilla extract until evenly coated.
- Remove the tart shell from the refrigerator and pour the raspberry mixture into it, spreading it out evenly.
- Brush the edges of the tart with the lightly beaten egg for a golden finish.
- Bake for 25-30 minutes, or until the crust is golden and the raspberry filling is bubbly. Tip: Place a baking sheet under the tart pan to catch any drips and make cleanup a breeze.
- Allow the tart to cool on a wire rack for at least 10 minutes before slicing. Tip: For clean slices, dip your knife in hot water and wipe it dry between cuts.
Golden and glistening, this tart boasts a crisp, buttery crust that shatters with each bite, giving way to a jammy, vibrant raspberry center. Serve it warm with a dollop of whipped cream or a scoop of vanilla ice cream for an extra indulgent treat.
Bisquick Pecan Pie
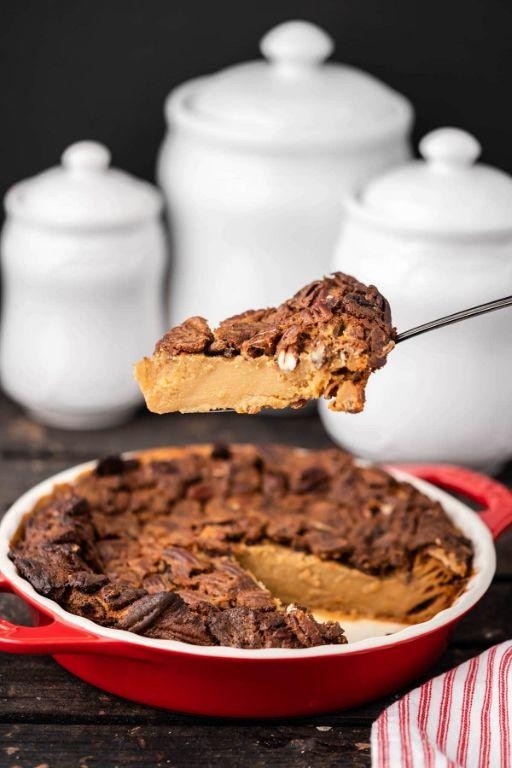
Zesty and utterly irresistible, this Bisquick Pecan Pie is the dessert hero you didn’t know you needed. Perfect for when you’re craving something sweet, nutty, and with just the right amount of sass, it’s a foolproof way to impress at any gathering—or to treat yourself, because why not?
Ingredients
- 1 cup Bisquick mix
- 1/2 cup granulated sugar
- 1/2 cup packed dark brown sugar
- 1/2 cup unsalted butter, melted and slightly cooled
- 3 pasture-raised eggs, lightly beaten
- 1 cup light corn syrup
- 1 tsp pure vanilla extract
- 1 1/2 cups pecan halves
Instructions
- Preheat your oven to 350°F (175°C) and lightly grease a 9-inch pie plate.
- In a large mixing bowl, whisk together the Bisquick mix, granulated sugar, and dark brown sugar until well combined.
- Add the melted butter, lightly beaten eggs, corn syrup, and vanilla extract to the dry ingredients. Stir until the mixture is smooth and homogenous.
- Fold in the pecan halves gently, ensuring they’re evenly distributed throughout the batter.
- Pour the mixture into the prepared pie plate, spreading it evenly with a spatula.
- Bake for 45-50 minutes, or until the pie is set and a toothpick inserted into the center comes out clean. Tip: Cover the edges with foil halfway through baking to prevent over-browning.
- Remove the pie from the oven and let it cool on a wire rack for at least 2 hours before serving. Tip: For easier slicing, chill the pie in the refrigerator for an additional hour.
Heavenly in every bite, this pie boasts a gooey, rich center with a crisp, buttery crust and crunchy pecans. Serve it warm with a scoop of vanilla ice cream for a decadent twist, or enjoy it as is for a pure pecan pleasure.
Bisquick Coconut Macaroons

Let’s be real, folks: if you’re not using Bisquick to whip up these coconut macaroons, you’re making life harder than it needs to be. These little clouds of joy are the perfect blend of chewy, sweet, and downright addictive, proving that sometimes, the best things in life come from a box.
Ingredients
- 2 cups Bisquick baking mix
- 1 1/2 cups granulated sugar
- 1/2 cup unsalted butter, melted and slightly cooled
- 2 large pasture-raised eggs, lightly beaten
- 1 tsp pure vanilla extract
- 14 oz sweetened shredded coconut
- 1/4 tsp fine sea salt
Instructions
- Preheat your oven to 350°F (175°C) and line a baking sheet with parchment paper.
- In a large mixing bowl, combine the Bisquick baking mix, granulated sugar, and fine sea salt, whisking to ensure no lumps remain.
- Add the melted butter, lightly beaten eggs, and pure vanilla extract to the dry ingredients, stirring until just combined.
- Gently fold in the sweetened shredded coconut until evenly distributed throughout the mixture.
- Using a tablespoon or a small cookie scoop, drop rounded portions of the dough onto the prepared baking sheet, spacing them about 2 inches apart.
- Bake for 12-15 minutes, or until the edges are golden brown and the tops are lightly toasted.
- Allow the macaroons to cool on the baking sheet for 5 minutes before transferring to a wire rack to cool completely.
Craving something that’s crispy on the outside, chewy on the inside, and packed with coconutty goodness? These macaroons are your answer. Serve them with a drizzle of dark chocolate or alongside a scoop of vanilla ice cream for an extra indulgent treat.
Bisquick Carrot Cake
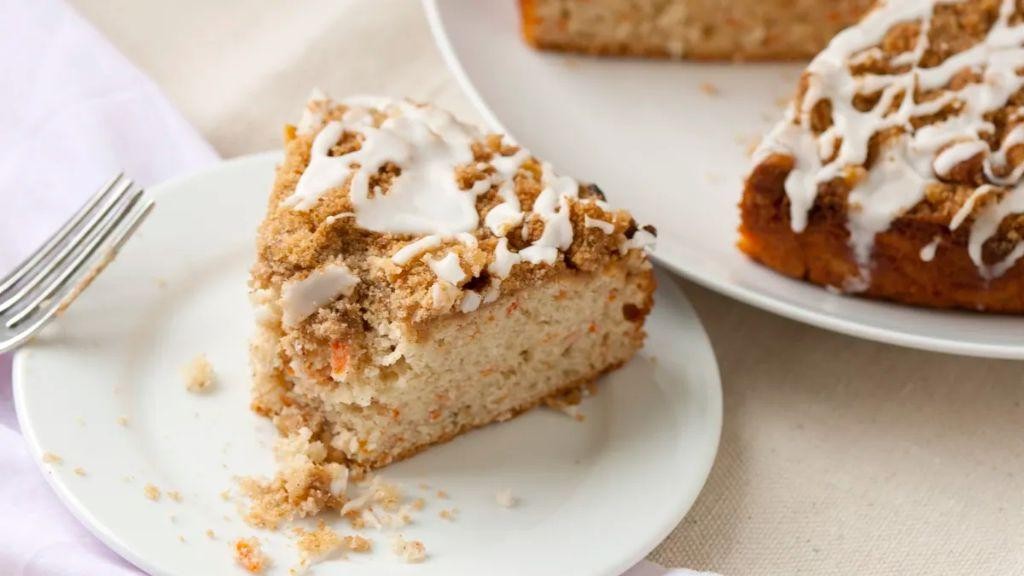
Buckle up, buttercups, because we’re about to dive into a Bisquick Carrot Cake that’s so easy, it’ll make your grandma’s recipe look like a PhD thesis. This isn’t just any carrot cake—it’s a fluffy, spiced masterpiece that’ll have you questioning why you ever bothered with the from-scratch stress.
Ingredients
- 2 cups Bisquick mix
- 1 cup granulated sugar
- 1 tsp ground cinnamon
- 1/2 tsp ground nutmeg
- 1/4 tsp ground cloves
- 3 pasture-raised eggs, lightly beaten
- 1/2 cup whole milk
- 1/4 cup clarified butter, melted
- 2 cups finely grated carrots
- 1/2 cup chopped walnuts
- 1 tsp pure vanilla extract
Instructions
- Preheat your oven to 350°F (175°C) and grease a 9-inch round cake pan with clarified butter, ensuring an even coat to prevent sticking.
- In a large mixing bowl, whisk together the Bisquick mix, granulated sugar, cinnamon, nutmeg, and cloves until well combined.
- Add the lightly beaten eggs, whole milk, and melted clarified butter to the dry ingredients, stirring until just incorporated—overmixing leads to a tough cake.
- Fold in the finely grated carrots, chopped walnuts, and pure vanilla extract with a spatula, distributing evenly without deflating the batter.
- Pour the batter into the prepared cake pan, smoothing the top with the spatula for an even bake.
- Bake for 35-40 minutes, or until a toothpick inserted into the center comes out clean and the edges pull away slightly from the pan.
- Allow the cake to cool in the pan for 10 minutes, then transfer to a wire rack to cool completely, ensuring it doesn’t steam and become soggy.
Every bite of this Bisquick Carrot Cake is a moist, spiced symphony, with the walnuts adding a delightful crunch. Serve it with a dollop of cream cheese frosting for a classic touch, or get wild and pair it with a scoop of vanilla bean ice cream for a dessert that’s anything but ordinary.
Bisquick Almond Biscotti
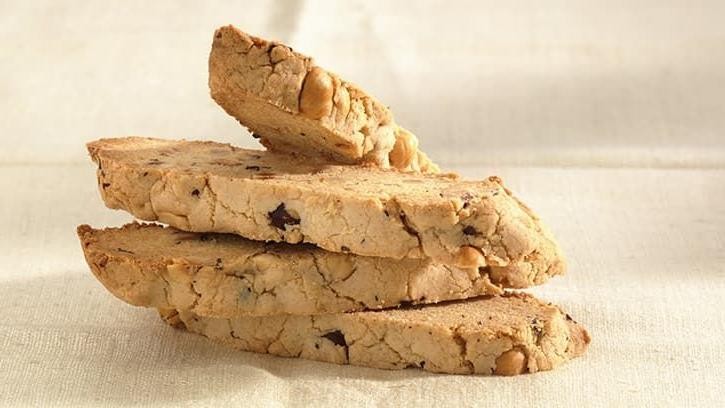
Unbelievably, there’s a way to make your coffee breaks even more delightful with these Bisquick Almond Biscotti. Crisp, nutty, and just the right amount of sweet, they’re the dunkable dream you didn’t know you needed.
Ingredients
- 2 cups Bisquick baking mix
- 3/4 cup granulated sugar
- 1/2 cup sliced almonds, toasted
- 2 large pasture-raised eggs, lightly beaten
- 1 tsp pure almond extract
- 1/4 cup unsalted butter, melted and slightly cooled
Instructions
- Preheat your oven to 350°F (175°C) and line a baking sheet with parchment paper.
- In a large mixing bowl, combine the Bisquick baking mix and granulated sugar.
- Add the toasted sliced almonds to the dry ingredients, ensuring they’re evenly distributed.
- In a separate bowl, whisk together the lightly beaten eggs, pure almond extract, and melted butter until well combined.
- Gradually incorporate the wet ingredients into the dry mixture, stirring until a cohesive dough forms.
- Divide the dough in half and shape each portion into a log approximately 12 inches long on the prepared baking sheet.
- Bake for 25 minutes, or until the logs are golden and firm to the touch.
- Remove from the oven and let cool for 10 minutes. Reduce the oven temperature to 325°F (165°C).
- Using a serrated knife, slice the logs diagonally into 1/2-inch thick pieces.
- Arrange the slices cut-side down on the baking sheet and bake for an additional 10 minutes per side, or until crisp and lightly golden.
Just imagine the crunch of these biscotti giving way to a tender interior, with the almond flavor shining through in every bite. Perfect for pairing with your afternoon espresso or as a sophisticated snack with a glass of dessert wine.
Bisquick Chocolate Lava Cake
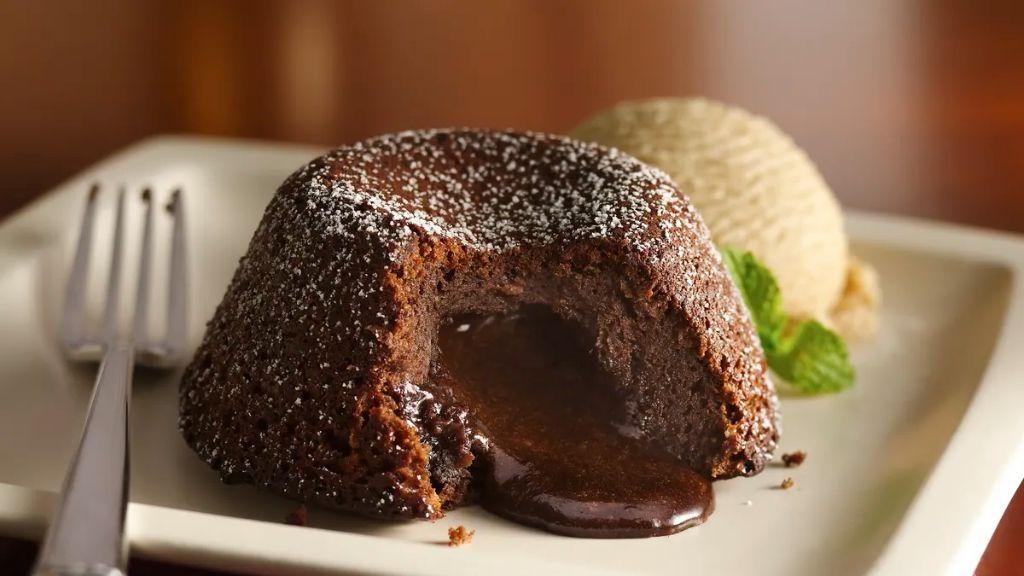
Oh, the joy of stumbling upon a dessert that’s as fun to make as it is to devour! Our Bisquick Chocolate Lava Cake is the hero of last-minute cravings, turning your kitchen into a chocolate paradise with minimal fuss.
Ingredients
- 1 cup Bisquick mix
- 1/2 cup granulated sugar
- 1/4 cup unsweetened cocoa powder, Dutch-processed
- 1/2 cup whole milk
- 1 large pasture-raised egg, lightly beaten
- 2 tbsp unsalted butter, melted and slightly cooled
- 1 tsp pure vanilla extract
- 1/2 cup semi-sweet chocolate chips
- Powdered sugar, for dusting
Instructions
- Preheat your oven to 350°F (175°C) and generously grease four 6-ounce ramekins with butter.
- In a medium bowl, whisk together the Bisquick mix, granulated sugar, and cocoa powder until no lumps remain.
- Add the milk, beaten egg, melted butter, and vanilla extract to the dry ingredients. Stir until just combined; overmixing leads to tough cakes.
- Divide half of the batter evenly among the prepared ramekins. Sprinkle 2 tablespoons of chocolate chips into each, then cover with the remaining batter.
- Bake for 15-18 minutes, or until the edges are set but the center is slightly jiggly—this is your lava cue.
- Let the cakes rest for 2 minutes, then invert onto plates. Dust with powdered sugar and serve immediately.
Craving meets satisfaction with every spoonful of this molten masterpiece. The contrast of the warm, gooey center against the tender cake exterior is nothing short of magical. For an extra indulgent twist, pair with a scoop of vanilla bean ice cream and watch the magic multiply.
Bisquick Cinnamon Rolls
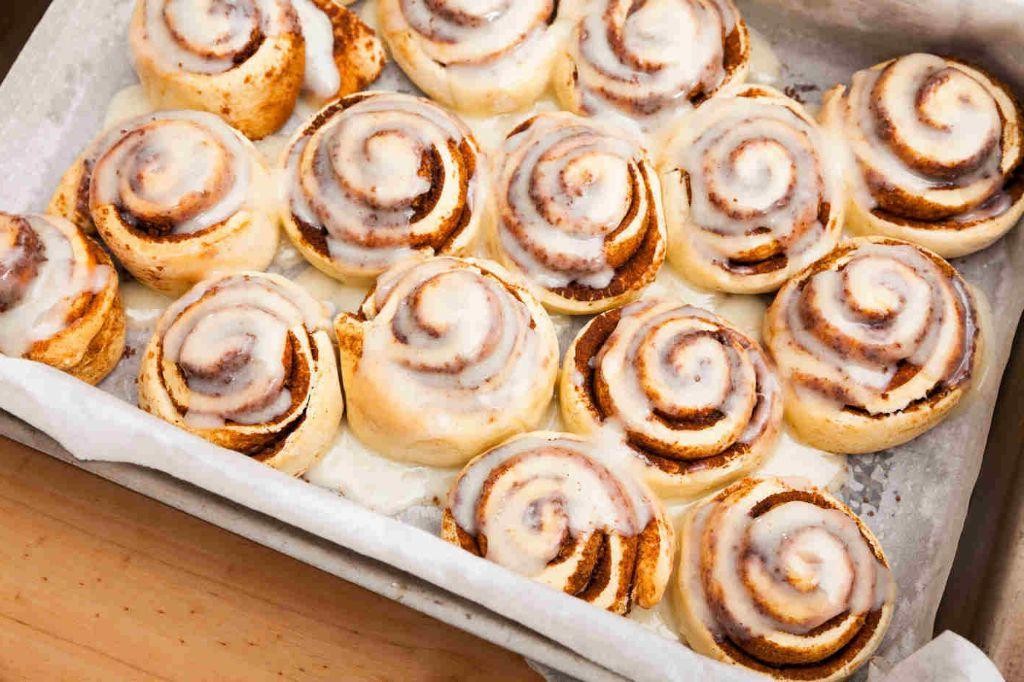
Just when you thought your mornings couldn’t get any cozier, along comes this Bisquick Cinnamon Rolls recipe to prove you wrong. Imagine fluffy, buttery swirls of joy, each bite a perfect harmony of sweet cinnamon and creamy glaze—because let’s face it, we all deserve a little indulgence before the day really starts.
Ingredients
- 2 cups Bisquick baking mix
- 2/3 cup whole milk
- 2 tbsp granulated sugar
- 2 tbsp unsalted butter, melted
- 1/4 cup packed brown sugar
- 1 tsp ground cinnamon
- 1/2 cup powdered sugar
- 1 tbsp whole milk (for glaze)
- 1/2 tsp pure vanilla extract
Instructions
- Preheat your oven to 425°F (218°C) and lightly grease a 9-inch round baking pan.
- In a large mixing bowl, combine the Bisquick baking mix, whole milk, and granulated sugar until a soft dough forms.
- Turn the dough onto a surface dusted with additional Bisquick and knead gently 5 times.
- Roll the dough into a 12×9-inch rectangle using a rolling pin.
- Brush the melted butter evenly over the dough, leaving a 1/2-inch border.
- Sprinkle the brown sugar and cinnamon over the buttered dough.
- Starting from the long side, roll the dough tightly into a log and pinch the seam to seal.
- Cut the log into 12 equal slices using a sharp knife or dental floss for cleaner cuts.
- Arrange the slices, cut side up, in the prepared baking pan.
- Bake for 12-15 minutes, or until golden brown.
- While the rolls bake, whisk together powdered sugar, whole milk, and vanilla extract until smooth to create the glaze.
- Drizzle the glaze over the warm rolls immediately after removing them from the oven.
Oh, the sheer bliss of pulling apart these warm, gooey cinnamon rolls, each layer more tempting than the last. Serve them with a side of sarcasm for anyone who dares to ask if you’re sharing, or better yet, pair with a strong cup of coffee to combat the inevitable sugar rush.
Bisquick Red Velvet Cake
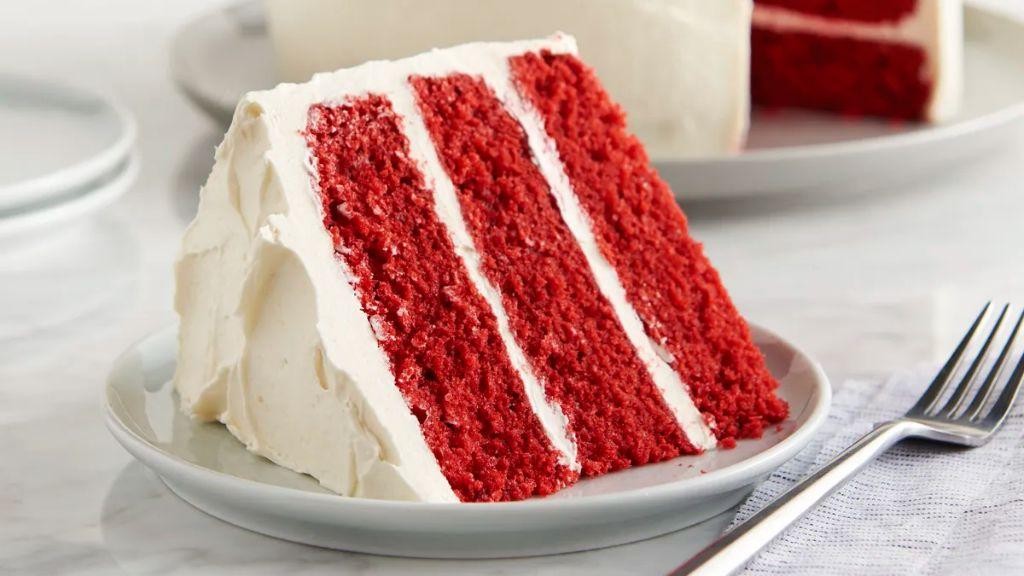
Who knew that a box of Bisquick could be the secret weapon in your dessert arsenal? This Bisquick Red Velvet Cake is here to prove that sometimes, the best things in life come with a little help from our pantry pals. Get ready to dazzle your taste buds with this effortlessly elegant, vibrantly velvety creation that’s as fun to make as it is to devour.
Ingredients
- 2 cups Bisquick mix
- 1 cup granulated sugar
- 3 pasture-raised eggs, lightly beaten
- 1 cup buttermilk
- 1/4 cup clarified butter, melted
- 1 tbsp red food coloring
- 1 tsp pure vanilla extract
- 1/2 tsp baking soda
- 1 tbsp white vinegar
Instructions
- Preheat your oven to 350°F (175°C) and grease a 9-inch round cake pan with clarified butter, ensuring an even coat for easy release.
- In a large mixing bowl, whisk together the Bisquick mix and granulated sugar until well combined.
- Add the lightly beaten pasture-raised eggs, buttermilk, melted clarified butter, red food coloring, and pure vanilla extract to the dry ingredients. Mix until the batter is smooth and uniformly red.
- In a small bowl, combine the baking soda and white vinegar, then quickly fold into the batter to activate the leavening agents, ensuring a light and fluffy texture.
- Pour the batter into the prepared cake pan, smoothing the top with a spatula for an even bake.
- Bake for 25-30 minutes, or until a toothpick inserted into the center comes out clean. Avoid opening the oven door frequently to maintain a consistent temperature.
- Allow the cake to cool in the pan for 10 minutes before transferring to a wire rack to cool completely, preventing it from becoming soggy.
Just when you thought red velvet couldn’t get any more indulgent, this cake comes along with its moist crumb and subtle tang, thanks to the buttermilk. Serve it with a dollop of whipped cream or a scoop of vanilla ice cream for a dessert that’s as visually stunning as it is delicious.
Bisquick Key Lime Pie

Now, who said dessert can’t be both zesty and a breeze to whip up? Our Bisquick Key Lime Pie is here to prove the naysayers wrong, blending the tangy punch of key limes with the foolproof magic of Bisquick for a dessert that’s as fun to make as it is to devour.
Ingredients
- 1 1/2 cups graham cracker crumbs
- 1/3 cup granulated sugar
- 6 tbsp unsalted butter, melted
- 3 pasture-raised eggs, lightly beaten
- 1 can (14 oz) sweetened condensed milk
- 1/2 cup key lime juice, freshly squeezed
- 1 tbsp key lime zest
- 1 cup Bisquick mix
Instructions
- Preheat your oven to 350°F (175°C) to ensure it’s perfectly heated for baking.
- In a medium bowl, combine graham cracker crumbs, granulated sugar, and melted butter until the mixture resembles wet sand.
- Press the crumb mixture firmly into the bottom and up the sides of a 9-inch pie plate, creating an even crust. Tip: Use the bottom of a measuring cup to press the crumbs for a compact, even layer.
- Bake the crust for 10 minutes, then remove from oven and let cool slightly. This step ensures your crust is sturdy and ready to hold the filling.
- In a large bowl, whisk together the lightly beaten eggs, sweetened condensed milk, key lime juice, and zest until smooth and fully incorporated.
- Gently fold in the Bisquick mix until just combined, being careful not to overmix. Tip: Overmixing can lead to a tough pie, so stop as soon as the last streak of Bisquick disappears.
- Pour the filling into the pre-baked crust, smoothing the top with a spatula for an even finish.
- Bake for 15-20 minutes, or until the edges are set but the center still has a slight jiggle. Tip: The pie will continue to set as it cools, so resist the urge to overbake.
- Allow the pie to cool to room temperature, then refrigerate for at least 4 hours, or overnight, to fully set.
This Bisquick Key Lime Pie is a symphony of textures, from the crisp, buttery crust to the creamy, tangy filling that dances on the palate. Serve it chilled with a dollop of whipped cream and a sprinkle of lime zest for an extra pop of color and flavor that’ll have everyone coming back for seconds.
Bisquick Peanut Butter Cookies
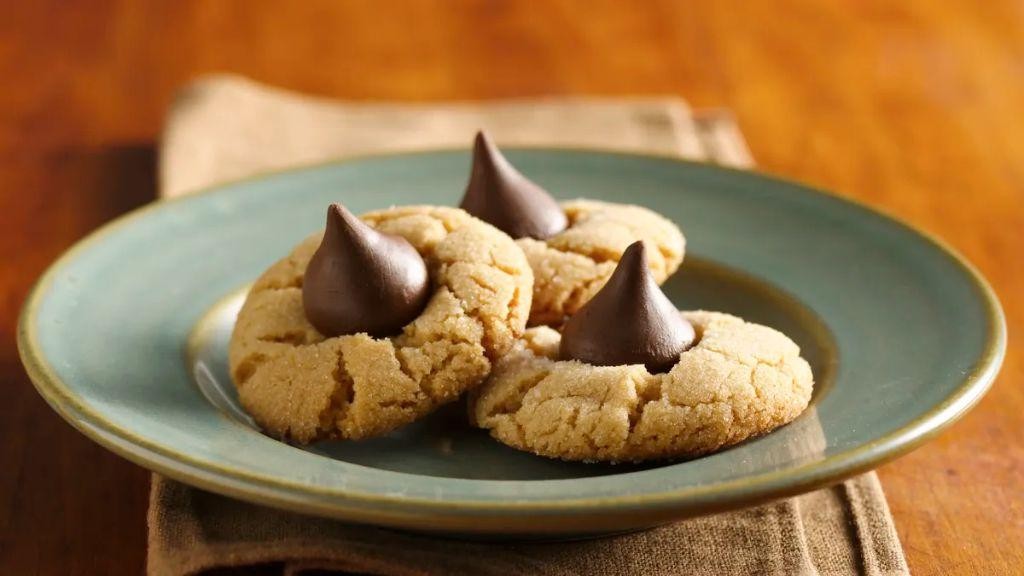
Folks, if you’ve ever found yourself in a cookie crisis (we’ve all been there), fear not! These Bisquick Peanut Butter Cookies are here to save your day with their irresistibly nutty charm and effortless elegance. Perfect for when you’re short on time but big on cravings, they’re the superhero of the snack world.
Ingredients
- 1 cup creamy peanut butter
- 1 cup granulated sugar
- 1 large pasture-raised egg, lightly beaten
- 1 teaspoon pure vanilla extract
- 2 cups Bisquick baking mix
Instructions
- Preheat your oven to 375°F (190°C) and line a baking sheet with parchment paper for an easy cleanup.
- In a large mixing bowl, combine the creamy peanut butter and granulated sugar until the mixture is smooth and well incorporated.
- Add the lightly beaten pasture-raised egg and pure vanilla extract to the peanut butter mixture, stirring until just combined to avoid overmixing.
- Gradually fold in the Bisquick baking mix, ensuring the dough comes together without overworking it—this keeps your cookies tender.
- Using a tablespoon, scoop the dough and roll it into 1-inch balls, placing them 2 inches apart on the prepared baking sheet.
- Flatten each ball with a fork, creating a classic crisscross pattern that also ensures even baking.
- Bake for 10-12 minutes, or until the edges are just golden but the centers are still soft—they’ll firm up as they cool.
- Allow the cookies to cool on the baking sheet for 5 minutes before transferring them to a wire rack to cool completely.
Marvel at the magic of these cookies—crispy edges giving way to a chewy center, with a rich peanut butter flavor that’s downright addictive. Serve them stacked high with a glass of cold milk for dunking, or crumble over vanilla ice cream for a decadent dessert twist.
Bisquick Blackberry Buckle
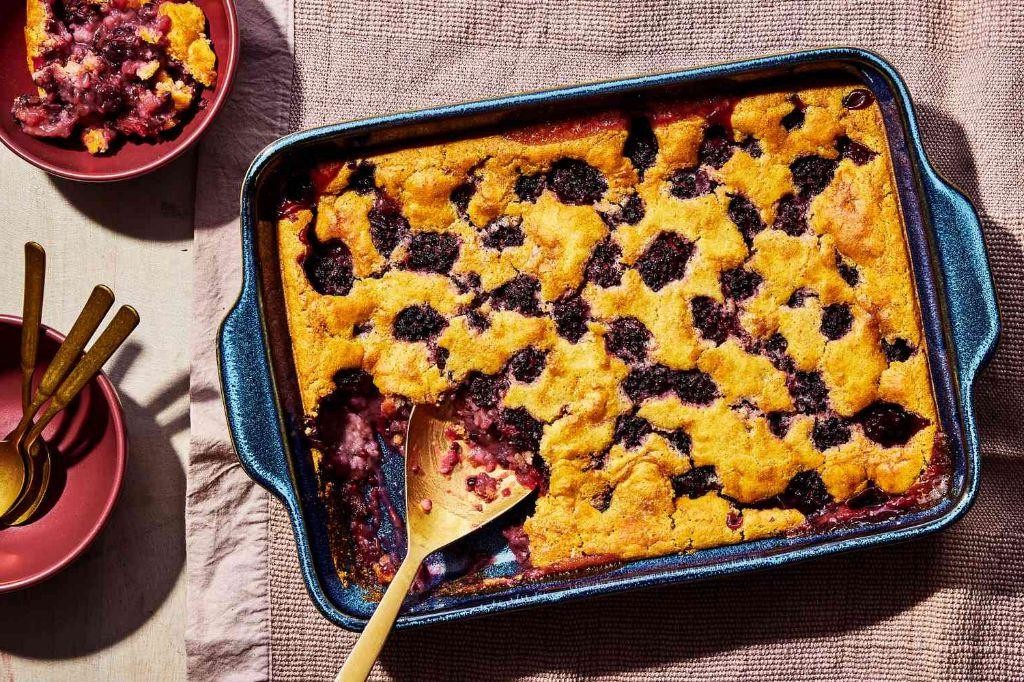
Now, let’s dive into a dessert that’s as fun to say as it is to eat—Bisquick Blackberry Buckle. This whimsically named treat is a cross between a cake and a cobbler, bursting with juicy blackberries and topped with a buttery, crumbly streusel that’ll have you coming back for seconds (or thirds, no judgment here).
Ingredients
- 2 cups Bisquick baking mix
- 1 cup granulated sugar
- 1 cup whole milk
- 1 pasture-raised egg, lightly beaten
- 2 cups fresh blackberries
- 1/2 cup unsalted butter, melted
- 1/2 cup packed brown sugar
- 1/2 tsp ground cinnamon
Instructions
- Preheat your oven to 375°F (190°C) and grease a 9-inch square baking dish with clarified butter.
- In a large mixing bowl, combine the Bisquick baking mix and granulated sugar. Whisk to aerate and remove any lumps.
- Add the whole milk and lightly beaten pasture-raised egg to the dry ingredients. Stir until just combined—overmixing leads to a tough buckle.
- Gently fold in the fresh blackberries, being careful not to break them, to maintain those juicy bursts of flavor.
- Pour the batter into the prepared baking dish, spreading it evenly with a spatula.
- In a small bowl, mix the melted unsalted butter, packed brown sugar, and ground cinnamon until crumbly. Sprinkle this streusel evenly over the batter.
- Bake for 45-50 minutes, or until the top is golden brown and a toothpick inserted into the center comes out clean.
- Allow the buckle to cool for at least 15 minutes before serving to let the flavors meld beautifully.
Velvety soft with pockets of tart blackberries and a crunchy, cinnamon-kissed topping, this Bisquick Blackberry Buckle is a dream. Serve it warm with a scoop of vanilla bean ice cream for an irresistible contrast of temperatures and textures.
Bisquick Gingerbread Cookies

Venture into the cozy embrace of holiday baking with these Bisquick Gingerbread Cookies, where simplicity meets spice in a dance of flavors so delightful, even Santa might skip the milk for these. Perfect for those who believe in magic (and shortcuts), these cookies are your ticket to festive fame without the fuss.
Ingredients
- 2 1/4 cups Bisquick baking mix
- 1/3 cup molasses, unsulphured
- 1/4 cup granulated sugar
- 1/4 cup unsalted butter, softened
- 1 large pasture-raised egg, lightly beaten
- 1 tsp ground ginger
- 1 tsp ground cinnamon
- 1/4 tsp ground cloves
- 1/4 tsp ground nutmeg
Instructions
- Preheat your oven to 375°F (190°C) and line a baking sheet with parchment paper for an easy cleanup.
- In a large mixing bowl, combine the Bisquick baking mix, granulated sugar, and all spices, whisking to ensure an even distribution of flavors.
- Add the softened unsalted butter, molasses, and lightly beaten pasture-raised egg to the dry ingredients, mixing until a cohesive dough forms. Tip: If the dough feels too sticky, a light dusting of Bisquick on your hands will make handling a breeze.
- Roll the dough into 1-inch balls and place them 2 inches apart on the prepared baking sheet, gently flattening each with the back of a spoon. Tip: For uniform cookies, use a small ice cream scoop.
- Bake for 8-10 minutes, or until the edges are just starting to brown but the centers remain soft. Tip: They’ll firm up as they cool, so resist the urge to overbake for that perfect chew.
- Allow the cookies to cool on the baking sheet for 5 minutes before transferring to a wire rack to cool completely.
Wrapped in warmth and spice, these Bisquick Gingerbread Cookies boast a tender chew with a crisp edge, a testament to the joy of holiday baking. Serve them stacked high on a vintage plate or tied with a ribbon for a heartfelt homemade gift that’s sure to spread cheer.
Bisquick Vanilla Cupcakes
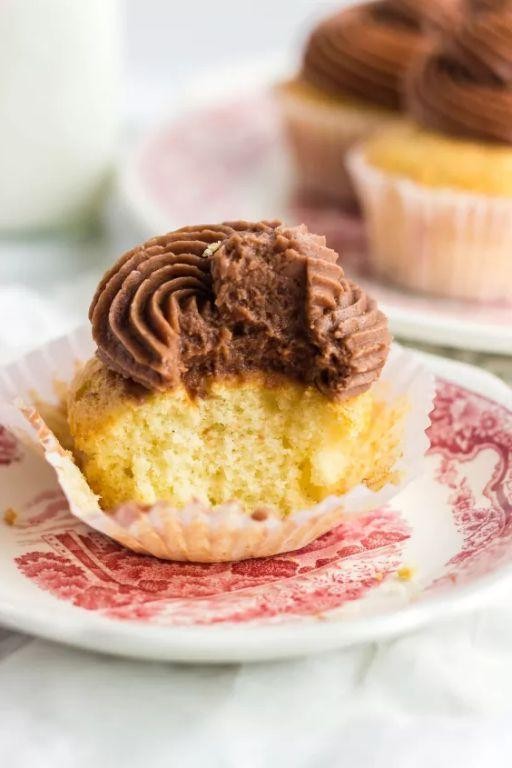
Let’s be real, who has the time to measure out a gazillion ingredients when a craving for vanilla cupcakes hits? Not us, and definitely not you. That’s where our Bisquick Vanilla Cupcakes swoop in to save the day—fluffy, fragrant, and foolproof, with a dash of humor to boot.
Ingredients
- 2 cups Bisquick baking mix
- 1 cup granulated sugar
- 2 pasture-raised eggs, lightly beaten
- 1 cup whole milk
- 1/4 cup clarified butter, melted
- 2 tsp pure vanilla extract
Instructions
- Preheat your oven to 350°F (175°C) and line a muffin tin with cupcake liners. This ensures easy removal and adds a pop of color.
- In a large mixing bowl, whisk together the Bisquick baking mix and granulated sugar to eliminate any lumps. A smooth base equals a uniform texture.
- Add the lightly beaten eggs, whole milk, melted clarified butter, and pure vanilla extract to the dry ingredients. Mix until just combined; overmixing leads to tough cupcakes.
- Divide the batter evenly among the prepared cupcake liners, filling each about two-thirds full. This prevents overflow and promotes even baking.
- Bake for 18-20 minutes, or until a toothpick inserted into the center comes out clean. The tops should be golden and spring back when lightly touched.
- Allow the cupcakes to cool in the tin for 5 minutes before transferring to a wire rack to cool completely. Patience here prevents crumbling.
These cupcakes are the epitome of vanilla dreams—moist, tender, and just sweet enough. Serve them with a dollop of whipped cream and a sprinkle of edible glitter for that extra pizzazz, because why not?
Bisquick Maple Glazed Donuts
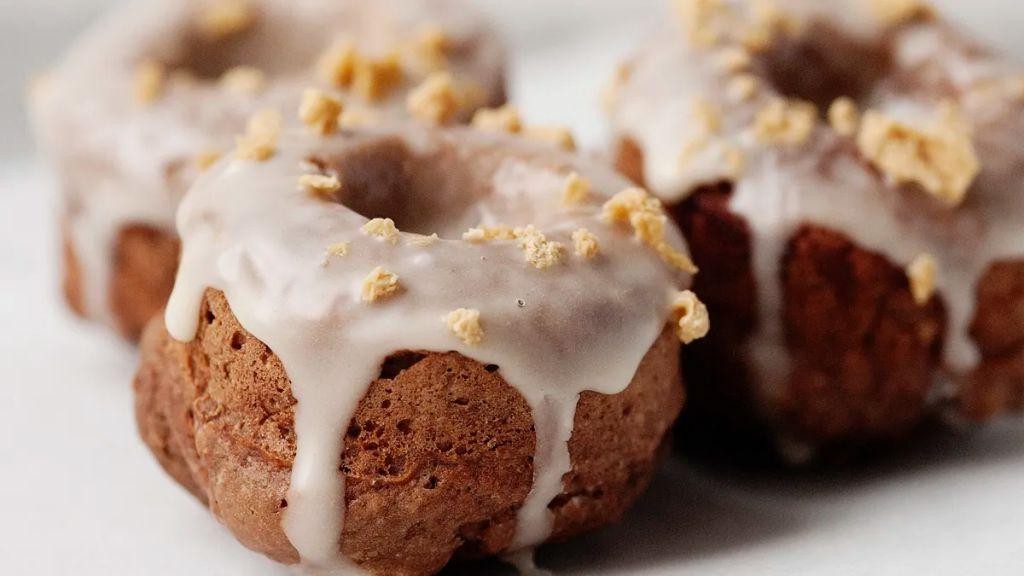
Feeling like your morning coffee deserves a sidekick that’s as sweet and sassy as your favorite sitcom character? Look no further than these Bisquick Maple Glazed Donuts, a fluffy, maple-kissed dream that’s here to make your taste buds do a happy dance.
Ingredients
- 2 cups Bisquick baking mix
- 1/2 cup granulated sugar
- 1/3 cup whole milk
- 2 pasture-raised eggs, lightly beaten
- 2 tbsp unsalted butter, melted
- 1 tsp pure vanilla extract
- 1/2 cup pure maple syrup
- 1 cup powdered sugar
- 1 tbsp clarified butter
Instructions
- Preheat your oven to 375°F and grease a donut pan with clarified butter, ensuring each cavity is lightly coated to prevent sticking.
- In a large mixing bowl, whisk together the Bisquick baking mix and granulated sugar until well combined.
- Add the whole milk, lightly beaten pasture-raised eggs, melted unsalted butter, and pure vanilla extract to the dry ingredients. Stir until just combined; overmixing can lead to tough donuts.
- Transfer the batter to a piping bag or a zip-top bag with a corner snipped off, and pipe evenly into the prepared donut pan, filling each cavity about 3/4 full.
- Bake for 10-12 minutes, or until the donuts are golden and spring back when lightly touched. A toothpick inserted should come out clean.
- While the donuts bake, prepare the glaze by whisking together pure maple syrup and powdered sugar in a small bowl until smooth.
- Once the donuts are slightly cooled but still warm, dip each into the maple glaze, allowing excess to drip off before placing on a wire rack to set.
Who knew happiness could be baked in under 30 minutes? These donuts boast a tender crumb, a crackly maple glaze, and are best served with a side of unabashed joy. Try stacking them high on a vintage plate for a photo op that’ll break the internet—or just your fast.
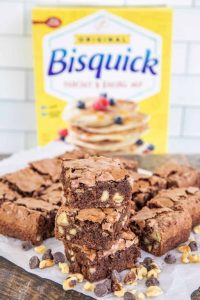
Bisquick Chocolate Brownies

Alright, buckle up, buttercups, because we’re about to dive into the world of Bisquick Chocolate Brownies—a dessert so easy, it practically makes itself, and so delicious, it’ll disappear faster than your resolve to eat just one.
Ingredients
- 1 cup Bisquick mix
- 1 cup granulated sugar
- 1/2 cup unsweetened cocoa powder, sifted
- 1/2 cup clarified butter, melted
- 2 pasture-raised eggs, lightly beaten
- 1 tsp pure vanilla extract
- 1/2 cup semisweet chocolate chips
Instructions
- Preheat your oven to 350°F (175°C) and grease an 8-inch square baking pan with clarified butter.
- In a large mixing bowl, whisk together the Bisquick mix, granulated sugar, and sifted cocoa powder until well combined.
- Add the melted clarified butter, lightly beaten eggs, and pure vanilla extract to the dry ingredients. Stir until the batter is smooth and no dry spots remain.
- Fold in the semisweet chocolate chips evenly throughout the batter.
- Pour the batter into the prepared baking pan, using a spatula to spread it evenly.
- Bake for 25-30 minutes, or until a toothpick inserted into the center comes out with a few moist crumbs attached.
- Allow the brownies to cool in the pan for at least 10 minutes before slicing into squares.
Every bite of these brownies is a perfect balance of fudgy and cakey, with a rich chocolate flavor that’s elevated by the melty chocolate chips. Serve them warm with a scoop of vanilla ice cream for an indulgent twist, or enjoy them as is for a simple yet satisfying treat.
Conclusion
Baking up a storm has never been easier with these 24 Delicious Bisquick Recipes Dessert Delights! Whether you’re craving something sweet or looking to impress, this roundup has a treat for every occasion. We’d love to hear which recipes you try—drop a comment with your favorites and don’t forget to share the love on Pinterest. Happy baking!