Dive into the rich, tangy world of balsamic vinegar with our roundup of 18 Delicious Balsamic Vinegar Recipes for Every Occasion! Whether you’re whipping up a quick weeknight dinner, celebrating with seasonal favorites, or craving some comfort food, balsamic vinegar adds that perfect punch of flavor. Get ready to transform your meals from ordinary to extraordinary—let’s explore these mouthwatering recipes together!
Balsamic Glazed Chicken
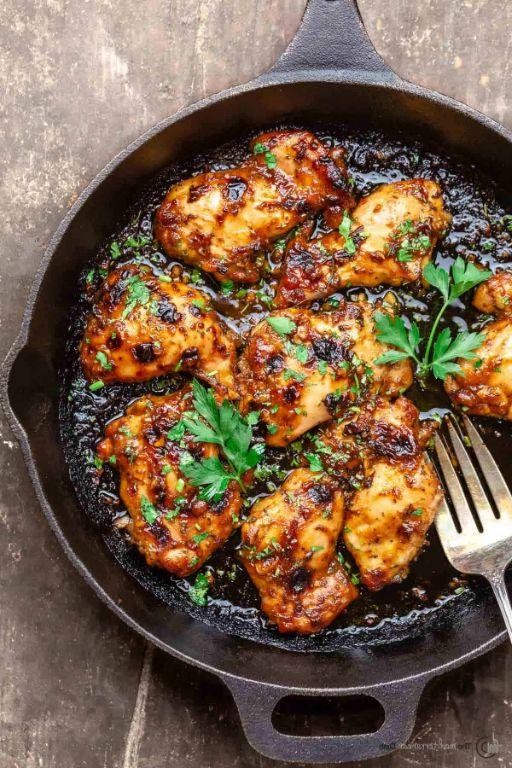
Just when you think chicken dishes can’t get any more flavorful, along comes Balsamic Glazed Chicken to prove you wrong. This dish combines the tangy sweetness of balsamic vinegar with the savory depth of garlic and herbs, creating a meal that’s both simple to make and impressive to serve.
Ingredients
- 4 boneless, skinless chicken breasts (I find that organic chicken tends to have better flavor and texture.)
- 1/2 cup balsamic vinegar (Aged balsamic vinegar adds a richer taste, but any good quality vinegar will work.)
- 2 tbsp honey (For a deeper flavor, try using dark honey.)
- 2 cloves garlic, minced (Freshly minced garlic makes all the difference here.)
- 1 tbsp extra virgin olive oil (My go-to for its fruity notes.)
- 1 tsp dried thyme (Or fresh thyme if you have it—about 1 tbsp.)
- Salt and freshly ground black pepper (To season, but we’ll specify amounts in the steps.)
Instructions
- Preheat your oven to 375°F (190°C). This ensures even cooking and a perfect glaze.
- Season the chicken breasts with 1/2 tsp salt and 1/4 tsp black pepper on both sides. Even seasoning is key to a flavorful dish.
- Heat the olive oil in a large oven-safe skillet over medium-high heat. A hot skillet gives the chicken a nice sear.
- Add the chicken breasts and cook for 3-4 minutes on each side, until golden brown. Don’t overcrowd the pan to ensure each piece sears properly.
- Remove the chicken from the skillet and set aside on a plate. Keep the skillet on the heat.
- In the same skillet, add the minced garlic and sauté for about 30 seconds, until fragrant. This builds layers of flavor.
- Stir in the balsamic vinegar, honey, and thyme. Bring to a simmer and cook for 2-3 minutes, until the mixture slightly thickens. The glaze should coat the back of a spoon.
- Return the chicken to the skillet, turning to coat in the glaze. Spoon extra glaze over the top for maximum flavor.
- Transfer the skillet to the preheated oven and bake for 10-12 minutes, until the chicken reaches an internal temperature of 165°F (74°C).
- Let the chicken rest for 5 minutes before serving. This allows the juices to redistribute.
Perfectly glazed and juicy, this Balsamic Glazed Chicken boasts a sticky-sweet exterior with a tender, flavorful interior. Serve it over a bed of creamy polenta or alongside roasted vegetables for a complete meal that’s sure to impress.
Strawberry Balsamic Salad
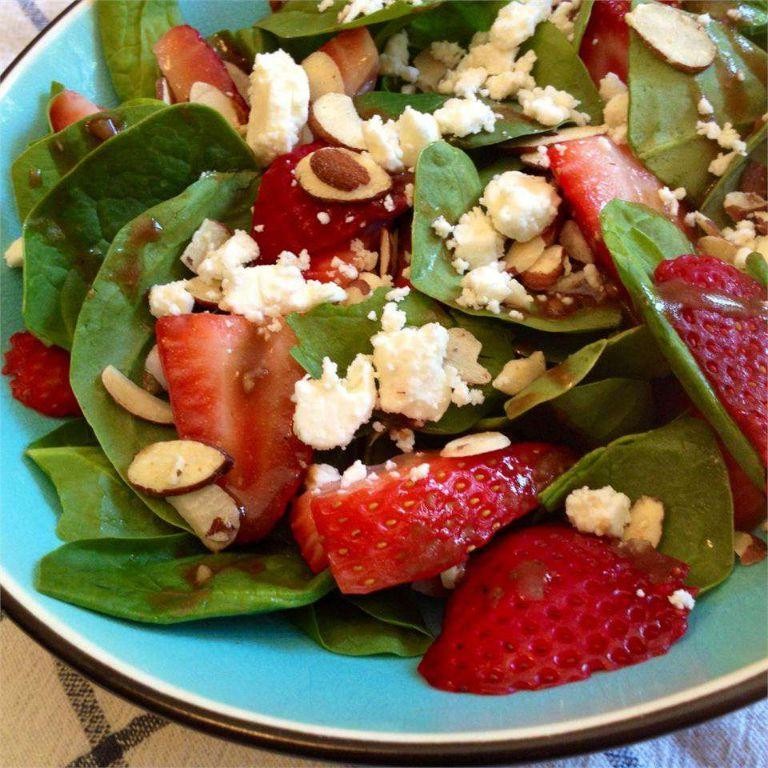
Let’s dive into creating a refreshing Strawberry Balsamic Salad that’s perfect for any season. This dish combines the sweetness of strawberries with the tangy depth of balsamic vinegar, creating a harmonious blend of flavors.
Ingredients
- 2 cups fresh strawberries, hulled and sliced (I find that slightly underripe strawberries add a nice crunch)
- 1/4 cup extra virgin olive oil (my go-to for its fruity notes)
- 2 tbsp balsamic vinegar (aged is preferable for a smoother taste)
- 1 tbsp honey (local honey adds a lovely floral touch)
- 1/4 tsp salt (I like using sea salt for its mineral quality)
- 1/4 tsp freshly ground black pepper
- 4 cups mixed greens (baby spinach and arugula are my favorites for this)
- 1/4 cup crumbled feta cheese (optional, but it adds a creamy contrast)
- 1/4 cup sliced almonds, toasted (for that irresistible crunch)
Instructions
- In a small bowl, whisk together the extra virgin olive oil, balsamic vinegar, honey, salt, and black pepper until well combined. Tip: Let the dressing sit for 10 minutes to allow the flavors to meld.
- Place the mixed greens in a large salad bowl. Tip: If the greens are wet, pat them dry with a paper towel to help the dressing adhere better.
- Add the sliced strawberries and crumbled feta cheese (if using) to the greens.
- Drizzle the dressing over the salad and toss gently to coat all the ingredients evenly. Tip: Use your hands to toss the salad for more control and to prevent bruising the greens.
- Sprinkle the toasted sliced almonds on top just before serving to maintain their crunch.
Unbelievably simple yet bursting with flavors, this Strawberry Balsamic Salad offers a delightful contrast between the juicy strawberries and the crisp greens. Serve it alongside grilled chicken or fish for a complete meal, or enjoy it as is for a light and satisfying lunch.
Balsamic Roasted Vegetables
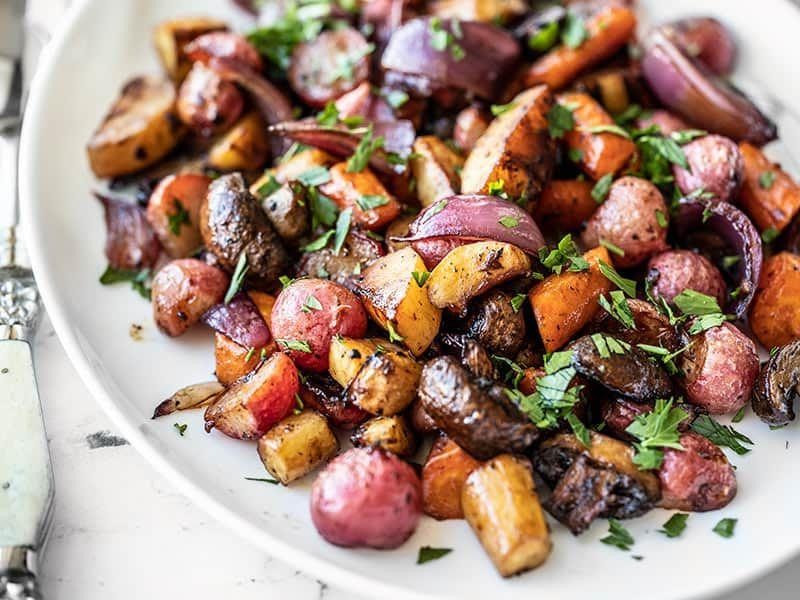
Here’s a simple yet flavorful way to bring out the natural sweetness in your veggies with a tangy balsamic twist. Perfect for a weeknight side or meal prep, this dish is as versatile as it is delicious.
Ingredients
- 2 cups of mixed vegetables (I love using bell peppers, zucchini, and red onion for a colorful mix)
- 2 tablespoons extra virgin olive oil (my go-to for its fruity flavor)
- 1 tablespoon balsamic vinegar (a good quality one makes all the difference)
- 1 teaspoon dried thyme (fresh is great, but dried works beautifully here)
- 1/2 teaspoon salt (I prefer sea salt for its subtle crunch)
- 1/4 teaspoon black pepper (freshly ground for the best flavor)
Instructions
- Preheat your oven to 400°F (200°C) to ensure it’s hot enough for roasting.
- Chop the mixed vegetables into even, bite-sized pieces for uniform cooking.
- In a large bowl, toss the vegetables with extra virgin olive oil, balsamic vinegar, dried thyme, salt, and black pepper until evenly coated. Tip: Letting the veggies sit for 5 minutes after tossing helps them absorb the flavors better.
- Spread the vegetables in a single layer on a baking sheet. Tip: Use parchment paper for easy cleanup and to prevent sticking.
- Roast in the preheated oven for 25-30 minutes, stirring halfway through, until the vegetables are tender and caramelized. Tip: Keep an eye on them after 20 minutes to avoid over-charring.
Caramelized edges and a tender interior make these balsamic roasted vegetables a textural delight. Serve them over a bed of quinoa for a hearty meal, or alongside grilled chicken for a balanced dinner.
Balsamic Beef Stew

Now, let’s dive into making a comforting Balsamic Beef Stew that’s perfect for any season. This dish combines tender beef with a rich, tangy balsamic glaze, creating a depth of flavor that’s both sophisticated and homey.
Ingredients
- 2 lbs beef chuck, cut into 1-inch pieces (I find chuck offers the perfect balance of flavor and tenderness.)
- 2 tbsp extra virgin olive oil (My go-to for its fruity notes.)
- 1 large onion, diced (Yellow onions work best for their sweetness.)
- 3 cloves garlic, minced (Freshly minced garlic makes all the difference.)
- 2 cups beef broth (Homemade or low-sodium store-bought.)
- 1/2 cup balsamic vinegar (Aged balsamic adds a lovely complexity.)
- 2 tbsp tomato paste (I prefer the concentrated flavor it brings.)
- 1 tsp dried thyme (Or fresh if you have it, about 1 tbsp.)
- 2 large carrots, sliced into 1/2-inch pieces (Adds a sweet crunch.)
- 2 large potatoes, diced into 1-inch pieces (Yukon Golds are my favorite for stews.)
- Salt and pepper to taste (Season as you go for layered flavor.)
Instructions
- Heat the olive oil in a large Dutch oven over medium-high heat until shimmering, about 2 minutes.
- Season the beef pieces generously with salt and pepper. Add to the pot in a single layer, working in batches if necessary to avoid overcrowding. Brown on all sides, about 3 minutes per batch. Tip: Don’t rush the browning; it’s key for flavor.
- Remove the beef and set aside. In the same pot, add the onion and cook until softened, about 5 minutes. Stir in the garlic and cook for another minute until fragrant.
- Return the beef to the pot. Add the beef broth, balsamic vinegar, tomato paste, and thyme. Stir to combine, scraping up any browned bits from the bottom of the pot.
- Bring the mixture to a simmer, then reduce the heat to low. Cover and cook for 1.5 hours, stirring occasionally. Tip: The low and slow cooking ensures the beef becomes fork-tender.
- Add the carrots and potatoes. Cover and continue to cook for another 30 minutes, or until the vegetables are tender. Tip: Test a potato piece; it should pierce easily with a fork.
- Season the stew with additional salt and pepper if needed before serving.
Velvety chunks of beef and tender vegetables swim in a glossy, balsamic-kissed broth that’s both rich and bright. Serve this stew over a bed of creamy polenta or with crusty bread to soak up every last drop.
Caprese Salad with Balsamic Reduction

Caprese salad is a timeless Italian classic that’s as simple to make as it is delicious. Crafting this dish with a balsamic reduction adds a sweet and tangy depth that elevates the fresh flavors of the ingredients.
Ingredients
- 2 large ripe tomatoes (I like to use heirloom for their color and sweetness)
- 8 oz fresh mozzarella cheese (look for the kind packed in water for the best texture)
- 1/4 cup fresh basil leaves (the bigger, the better for tearing)
- 1/2 cup balsamic vinegar (a good quality one makes all the difference)
- 1 tbsp honey (this is my secret for a perfectly balanced reduction)
- 2 tbsp extra virgin olive oil (my go-to for its fruity notes)
- Salt and freshly ground black pepper (to season)
Instructions
- Begin by reducing the balsamic vinegar. In a small saucepan over medium heat, combine the balsamic vinegar and honey. Stir occasionally until the mixture has thickened enough to coat the back of a spoon, about 10 minutes. Tip: Keep an eye on it to prevent burning.
- While the reduction cools, slice the tomatoes and mozzarella into 1/4-inch thick slices. Arrange them on a plate, alternating between tomato and mozzarella.
- Tear the basil leaves by hand and scatter them over the arranged tomato and mozzarella slices. Tip: Tearing the basil prevents bruising and releases more aroma.
- Drizzle the olive oil over the salad, then season lightly with salt and pepper.
- Once the balsamic reduction has cooled slightly, drizzle it over the salad. Tip: A little goes a long way, so start with a small amount and add more if needed.
Your Caprese salad with balsamic reduction is now ready to enjoy. The creamy mozzarella and juicy tomatoes pair beautifully with the sweet and tangy reduction, while the fresh basil adds a pop of color and flavor. Try serving it with a slice of crusty bread to soak up all the delicious juices.
Balsamic Pork Tenderloin
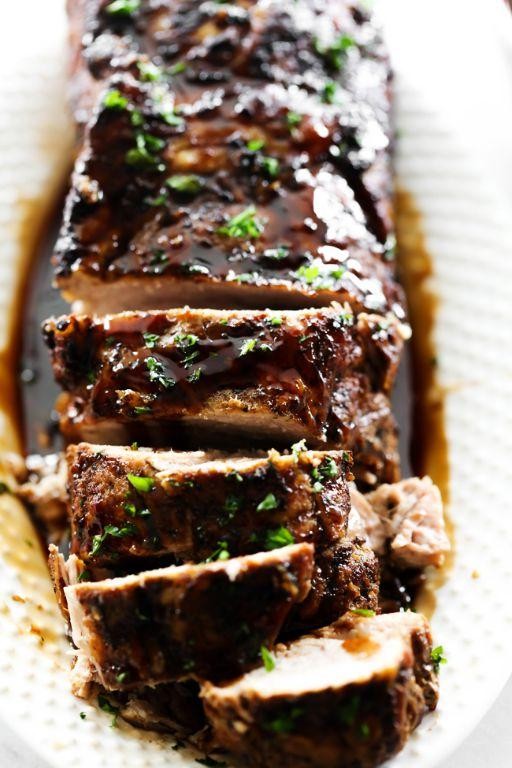
This balsamic pork tenderloin is a dish that marries simplicity with elegance, perfect for both weeknight dinners and special occasions. The key to its rich flavor lies in the marinade, which infuses the pork with a tangy sweetness that’s irresistibly delicious.
Ingredients
- 1 1/2 lbs pork tenderloin (look for one with a nice pink hue and minimal silver skin)
- 1/4 cup balsamic vinegar (I swear by aged balsamic for its depth of flavor)
- 2 tbsp extra virgin olive oil (my go-to for its fruity notes)
- 2 cloves garlic, minced (freshly minced garlic makes all the difference)
- 1 tbsp honey (for a touch of sweetness that balances the vinegar)
- 1 tsp Dijon mustard (adds a slight tang and helps emulsify the marinade)
- 1/2 tsp salt (I prefer sea salt for its clean taste)
- 1/4 tsp black pepper (freshly ground for the best aroma)
Instructions
- In a small bowl, whisk together the balsamic vinegar, olive oil, minced garlic, honey, Dijon mustard, salt, and black pepper until well combined.
- Place the pork tenderloin in a large resealable plastic bag and pour the marinade over it. Seal the bag, removing as much air as possible, and massage the marinade into the pork. Marinate in the refrigerator for at least 2 hours, or overnight for deeper flavor.
- Preheat your oven to 375°F (190°C) and lightly grease a baking dish. Remove the pork from the marinade, letting excess drip off, and place it in the prepared dish. Reserve the marinade.
- Heat the reserved marinade in a small saucepan over medium heat. Bring to a simmer and cook for 5 minutes, stirring occasionally, until slightly thickened. This will be your glaze.
- Roast the pork in the preheated oven for 25-30 minutes, or until a meat thermometer inserted into the thickest part reads 145°F (63°C). Baste the pork with the glaze halfway through cooking.
- Let the pork rest for 5 minutes before slicing. This allows the juices to redistribute, ensuring a moist and tender result.
The balsamic pork tenderloin comes out perfectly juicy with a caramelized exterior that’s packed with flavor. Serve it sliced over a bed of creamy polenta or alongside roasted vegetables for a complete meal that’s sure to impress.
Balsamic Mushroom Pasta
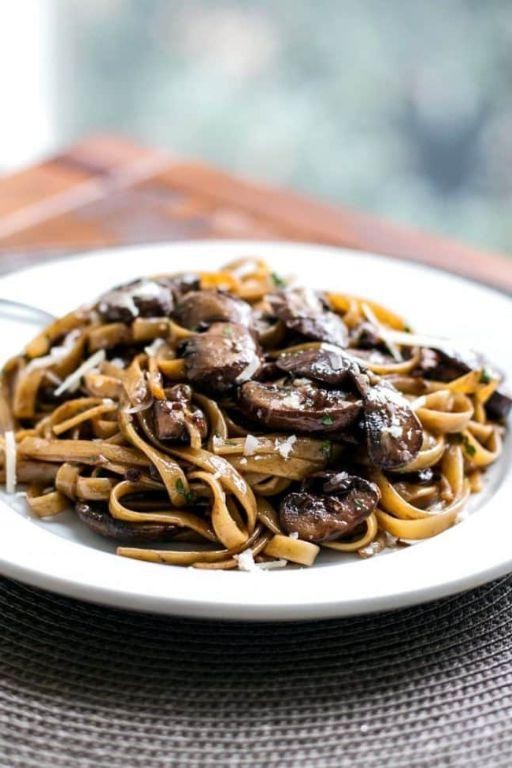
Sometimes, the simplest dishes bring the most comfort, and this Balsamic Mushroom Pasta is no exception. Let me guide you through creating this savory, tangy delight that’s perfect for any weeknight dinner.
Ingredients
- 8 oz pasta (I love using fusilli for its ability to hold onto the sauce, but any shape works)
- 2 tbsp extra virgin olive oil (my go-to for its fruity notes)
- 1 lb cremini mushrooms, sliced (they have a deeper flavor than white mushrooms)
- 3 garlic cloves, minced (fresh is always best)
- 1/4 cup balsamic vinegar (opt for a good quality one for a richer taste)
- 1/2 cup vegetable broth (homemade or store-bought, both work)
- Salt and freshly ground black pepper (to season layers of flavor)
- 1/4 cup grated Parmesan cheese (plus more for serving)
- Fresh basil leaves, for garnish (adds a pop of color and freshness)
Instructions
- Bring a large pot of salted water to a boil over high heat. Add the pasta and cook according to package instructions until al dente, about 8-10 minutes. Reserve 1/2 cup of pasta water, then drain.
- While the pasta cooks, heat olive oil in a large skillet over medium heat. Add the mushrooms and cook, stirring occasionally, until they release their moisture and start to brown, about 5-7 minutes.
- Add the minced garlic to the skillet and cook for 1 minute until fragrant, being careful not to burn it.
- Pour in the balsamic vinegar and vegetable broth, stirring to combine. Let the mixture simmer for 3-4 minutes until slightly reduced.
- Add the cooked pasta to the skillet along with the reserved pasta water. Toss everything together until the pasta is well coated and the sauce has thickened, about 2 minutes.
- Season with salt and pepper to taste, then stir in the Parmesan cheese until melted.
- Garnish with fresh basil leaves and serve immediately, with extra Parmesan on the side.
This dish boasts a beautiful balance of earthy mushrooms and tangy balsamic, with a silky sauce that clings to every noodle. Try serving it with a side of crusty bread to soak up any remaining sauce, or top with a fried egg for an extra layer of richness.
Grilled Peach and Balsamic Pizza
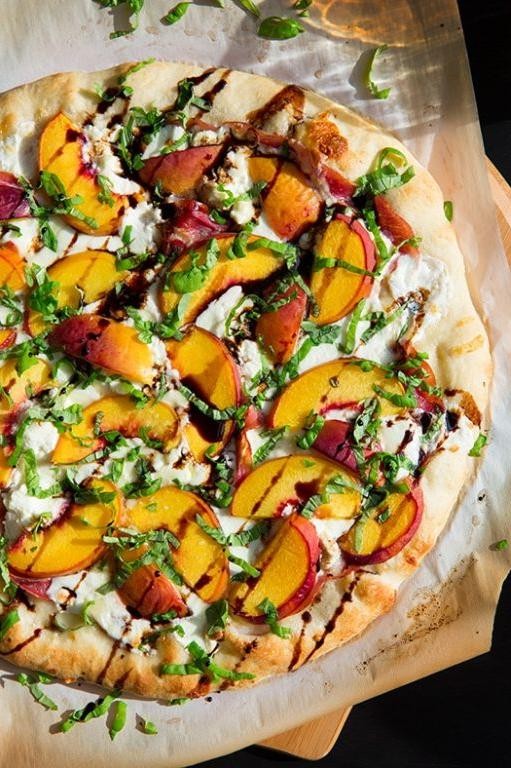
Out of all the summer recipes, this Grilled Peach and Balsamic Pizza stands out for its perfect balance of sweet and savory flavors. Let’s walk through how to create this delightful dish, step by step, ensuring even beginners can achieve delicious results.
Ingredients
- 1 pre-made pizza dough (I find that letting it rest at room temp for 30 minutes makes it easier to stretch)
- 2 ripe peaches, sliced (look for ones that are slightly firm to the touch)
- 1 cup fresh arugula (the peppery taste complements the sweetness of the peaches)
- 1/2 cup balsamic glaze (homemade or store-bought, but I prefer the thicker consistency of store-bought for easier drizzling)
- 1 cup shredded mozzarella cheese (for that perfect melt)
- 2 tbsp extra virgin olive oil (my go-to for brushing the dough)
- 1/4 tsp salt (just a pinch to enhance all the flavors)
Instructions
- Preheat your grill to medium-high heat, about 400°F, ensuring the grates are clean to prevent sticking.
- On a lightly floured surface, stretch the pizza dough into a 12-inch circle. Brush both sides with extra virgin olive oil to prevent sticking and add flavor.
- Grill the dough for 2-3 minutes on each side, or until you see nice grill marks and the dough is firm enough to flip.
- Remove the dough from the grill and quickly top with shredded mozzarella cheese, followed by the sliced peaches.
- Return the pizza to the grill, close the lid, and cook for another 3-4 minutes, or until the cheese is fully melted and bubbly.
- Carefully remove the pizza from the grill and let it cool for a minute before topping with fresh arugula.
- Drizzle the balsamic glaze over the top and sprinkle with a pinch of salt to bring all the flavors together.
You’ll love the contrast between the crispy crust, creamy cheese, and juicy peaches, with the arugula adding a fresh crunch. Try serving it with a chilled glass of rosé for the ultimate summer dining experience.
Balsamic Brussels Sprouts
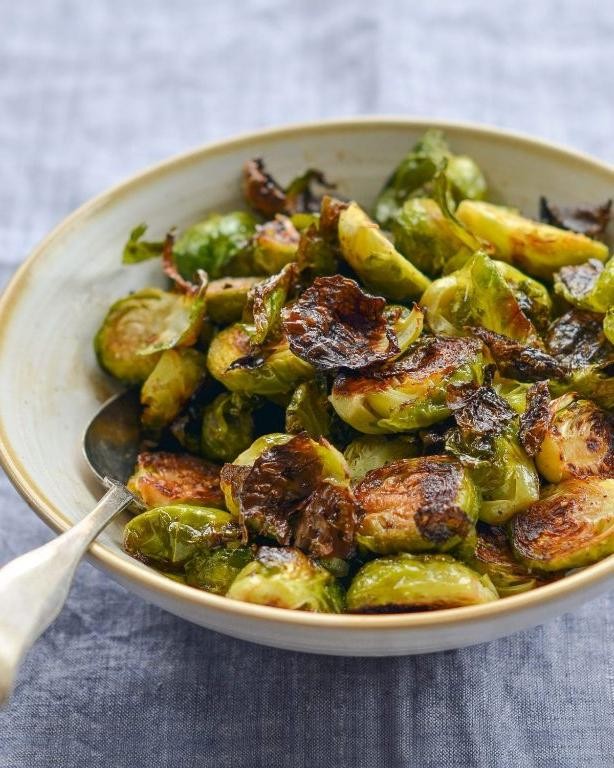
Brussels sprouts might not have been your favorite as a kid, but this balsamic version will change your mind with its perfect balance of sweet and tangy flavors.
Ingredients
- 1 lb Brussels sprouts, halved (look for bright green, firm sprouts)
- 2 tbsp extra virgin olive oil (my go-to for its fruity notes)
- 2 tbsp balsamic vinegar (a good quality one makes all the difference)
- 1 tbsp honey (for that sweet contrast)
- 1/2 tsp salt (I like sea salt for its texture)
- 1/4 tsp black pepper (freshly ground, please)
Instructions
- Preheat your oven to 400°F (200°C) to ensure it’s hot enough for roasting.
- In a large bowl, toss the halved Brussels sprouts with extra virgin olive oil, ensuring each piece is lightly coated.
- Spread the sprouts in a single layer on a baking sheet, cut side down, for maximum caramelization.
- Roast in the preheated oven for 20 minutes, then flip them over for even browning.
- While the sprouts are roasting, whisk together balsamic vinegar and honey in a small bowl.
- After flipping the sprouts, drizzle the balsamic-honey mixture over them and return to the oven for another 10 minutes.
- Sprinkle with salt and black pepper right after taking them out of the oven, tossing gently to distribute the seasoning.
The result? Tender Brussels sprouts with crispy edges, glazed in a sticky, sweet, and tangy sauce. Try serving them over a bed of creamy polenta for a comforting meal.
Balsamic Fig Jam
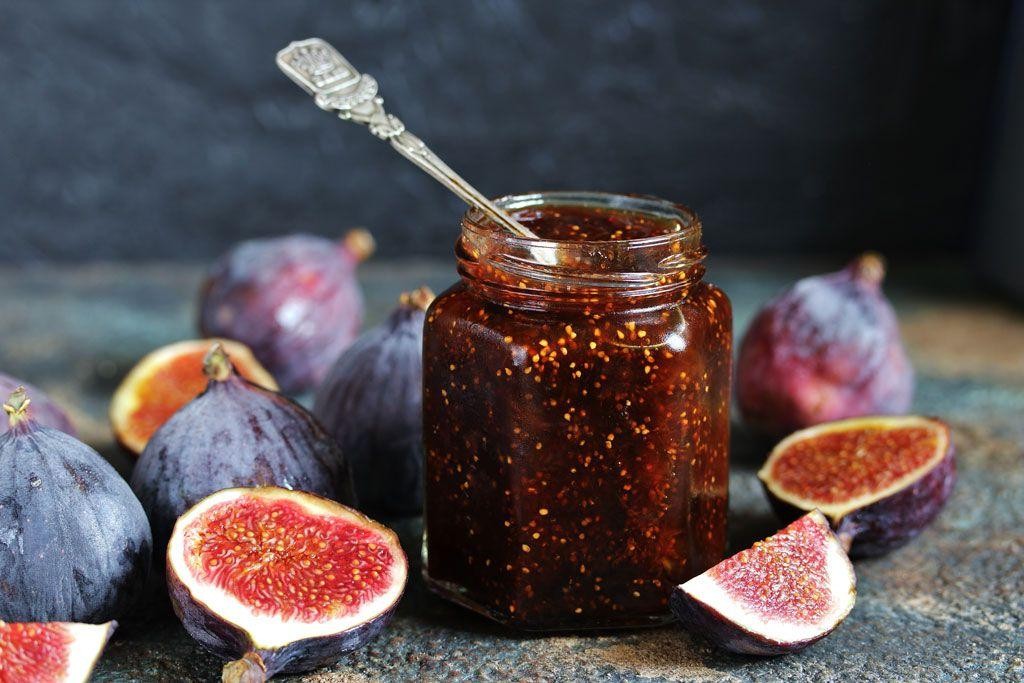
Let’s dive into making a delightful Balsamic Fig Jam that’s as versatile as it is delicious. This recipe is perfect for beginners, guiding you through each step to ensure a perfect batch every time.
Ingredients
- 2 cups fresh figs, stems removed and chopped (I love using Black Mission figs for their sweetness)
- 1/2 cup granulated sugar (adjust based on the sweetness of your figs)
- 1/4 cup balsamic vinegar (a good quality one makes all the difference)
- 1 tbsp lemon juice (freshly squeezed for the best flavor)
- 1/2 tsp vanilla extract (my secret ingredient for depth)
Instructions
- In a medium saucepan, combine the chopped figs, sugar, balsamic vinegar, and lemon juice over medium heat.
- Stir the mixture gently until the sugar dissolves completely, about 5 minutes. Tip: Keep the heat medium to avoid burning the sugar.
- Once the sugar has dissolved, reduce the heat to low and let the mixture simmer for 20 minutes, stirring occasionally. Tip: The jam should thicken slightly but still be somewhat liquid.
- Remove the saucepan from the heat and stir in the vanilla extract. Let the jam cool for 5 minutes. Tip: The vanilla adds a wonderful aroma, so don’t skip this step.
- Transfer the jam to a clean jar and let it cool to room temperature before sealing. The jam will continue to thicken as it cools.
Velvety smooth with a perfect balance of sweet and tangy, this Balsamic Fig Jam is a dream on toast, paired with cheese, or even as a glaze for meats. Its rich flavor and versatile nature make it a must-try for any home cook.
Balsamic Garlic Roasted Potatoes

First, let’s dive into making these irresistible Balsamic Garlic Roasted Potatoes, a dish that perfectly balances the tangy sweetness of balsamic with the robust flavor of garlic, all hugging tender, crispy potatoes.
Ingredients
- 2 pounds of baby potatoes, halved (their small size ensures quick, even cooking)
- 3 tablespoons extra virgin olive oil (my go-to for its fruity notes)
- 4 garlic cloves, minced (fresh is best for that punchy flavor)
- 2 tablespoons balsamic vinegar (opt for a quality brand for depth of flavor)
- 1 teaspoon salt (I find sea salt elevates the dish)
- 1/2 teaspoon black pepper (freshly ground adds a nice kick)
- 1 tablespoon fresh rosemary, chopped (dried works, but fresh is magical)
Instructions
- Preheat your oven to 400°F (200°C) to ensure it’s hot enough for roasting.
- In a large bowl, toss the halved baby potatoes with extra virgin olive oil, ensuring each piece is lightly coated for crispiness.
- Add the minced garlic, balsamic vinegar, salt, black pepper, and chopped rosemary to the bowl. Mix well to evenly distribute the flavors.
- Spread the potatoes in a single layer on a baking sheet. This avoids steaming and promotes even roasting.
- Roast in the preheated oven for 35-40 minutes, stirring halfway through, until the potatoes are golden and crispy on the outside.
- Tip: For extra crispiness, let the potatoes sit in the oven for an additional 5 minutes after turning it off.
- Tip: Always taste a potato piece before serving to adjust seasoning if necessary.
- Tip: If the potatoes are browning too quickly, loosely cover them with foil.
Now, these Balsamic Garlic Roasted Potatoes boast a delightful contrast of textures—crispy on the outside, fluffy on the inside, with a flavor profile that’s both rich and bright. Serve them alongside a creamy dip or as a standout side at your next dinner party.
Balsamic Onion Tart
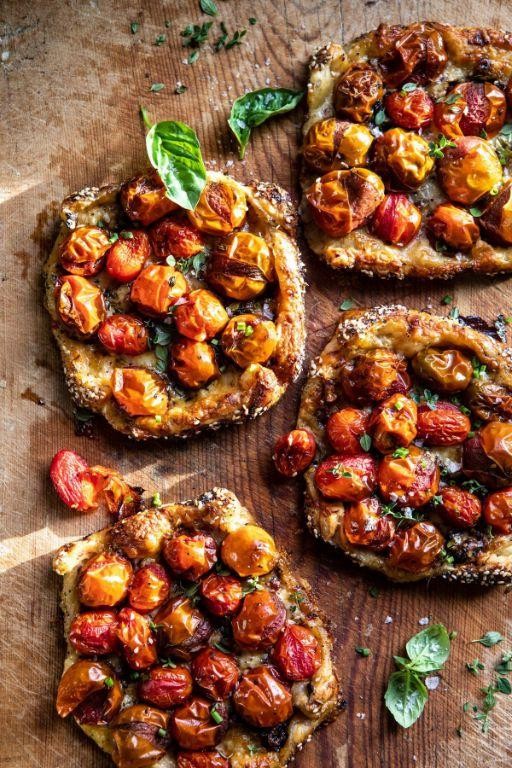
Savor the simplicity and elegance of this Balsamic Onion Tart, a dish that perfectly balances the sweetness of caramelized onions with the tangy depth of balsamic vinegar. Follow these steps to create a tart that’s as delightful to look at as it is to eat.
Ingredients
- 1 1/4 cups all-purpose flour (I always sift mine for a lighter crust)
- 1/2 cup unsalted butter, chilled and diced (cold butter is key for flakiness)
- 1/4 cup ice water (just enough to bring the dough together)
- 2 large yellow onions, thinly sliced (sweet varieties work best here)
- 2 tbsp extra virgin olive oil (my go-to for its fruity notes)
- 2 tbsp balsamic vinegar (a good quality one makes all the difference)
- 1 tsp sugar (to help caramelize the onions)
- 1/2 tsp salt (I prefer sea salt for its texture)
- 1/4 tsp freshly ground black pepper (freshly ground adds a brighter flavor)
- 1/2 cup grated Gruyère cheese (for a nutty, melty topping)
Instructions
- In a large bowl, combine the flour and diced butter. Use your fingers to rub the butter into the flour until the mixture resembles coarse crumbs.
- Gradually add ice water, 1 tablespoon at a time, mixing until the dough just comes together. Tip: Overworking the dough will make it tough.
- Form the dough into a disk, wrap in plastic, and refrigerate for at least 30 minutes. This rest period ensures a tender crust.
- Preheat your oven to 375°F (190°C). Roll out the chilled dough on a floured surface to fit a 9-inch tart pan. Trim the edges.
- In a skillet over medium heat, warm the olive oil. Add the onions, sugar, salt, and pepper. Cook, stirring occasionally, until the onions are golden and caramelized, about 20 minutes.
- Stir in the balsamic vinegar and cook for another 2 minutes, allowing the vinegar to reduce slightly. Tip: This step deepens the flavor.
- Spread the onion mixture evenly over the tart crust. Sprinkle with Gruyère cheese.
- Bake for 25-30 minutes, or until the crust is golden and the cheese is bubbly. Tip: Let the tart cool for 5 minutes before slicing for cleaner cuts.
Now, admire your Balsamic Onion Tart with its buttery crust, sweet and tangy onion filling, and golden cheese topping. It’s perfect served warm with a side of arugula salad for a contrast in textures.
Balsamic BBQ Sauce
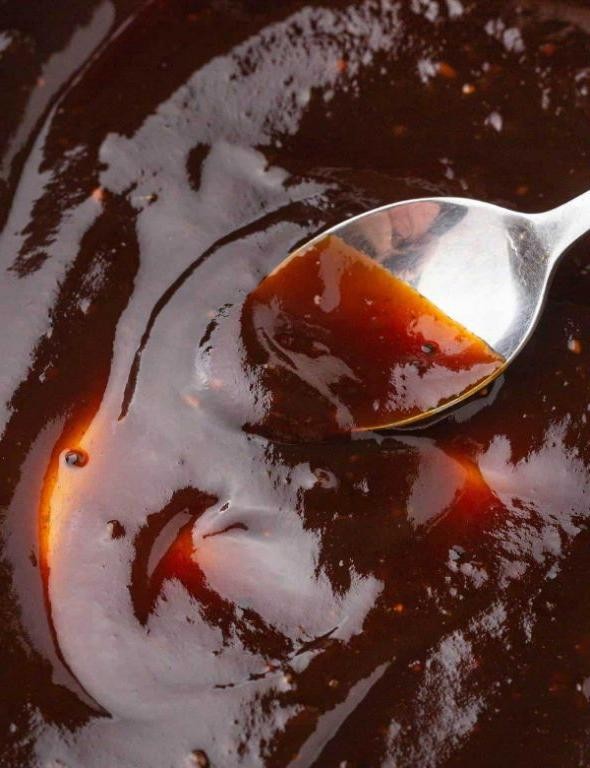
Mastering the art of homemade BBQ sauce can elevate your grilling game to new heights, and this Balsamic BBQ Sauce is no exception. Let’s walk through the process together, ensuring you end up with a sauce that’s both rich in flavor and perfectly balanced.
Ingredients
- 1 cup ketchup (I find that organic ketchup gives a smoother base)
- 1/2 cup balsamic vinegar (aged balsamic adds a deeper flavor)
- 1/4 cup brown sugar (packed tightly for that molasses kick)
- 2 tbsp honey (local honey brings a nice floral note)
- 1 tbsp Worcestershire sauce (this is my secret umami booster)
- 1 tsp garlic powder (for that essential savory depth)
- 1/2 tsp smoked paprika (it’s all about the smokiness)
- 1/4 tsp cayenne pepper (just a hint of heat)
- 1/4 cup water (to adjust consistency as needed)
Instructions
- In a medium saucepan, combine the ketchup, balsamic vinegar, brown sugar, honey, Worcestershire sauce, garlic powder, smoked paprika, and cayenne pepper. Stir to mix well.
- Place the saucepan over medium heat and bring the mixture to a gentle simmer, stirring occasionally to prevent sticking.
- Once simmering, reduce the heat to low and let the sauce cook for 15 minutes, stirring every 5 minutes. This slow cooking melds the flavors beautifully.
- After 15 minutes, check the sauce’s consistency. If it’s too thick, stir in water, 1 tablespoon at a time, until you reach your desired thickness.
- Remove the saucepan from the heat and let the sauce cool for at least 10 minutes before using. This resting period allows the flavors to further develop.
Perfect for slathering on ribs or brushing onto grilled vegetables, this Balsamic BBQ Sauce boasts a glossy finish and a complex flavor profile that’s tangy, sweet, and smoky all at once. Try it as a dipping sauce for sweet potato fries to really let the balsamic shine.
Balsamic Honey Glazed Salmon
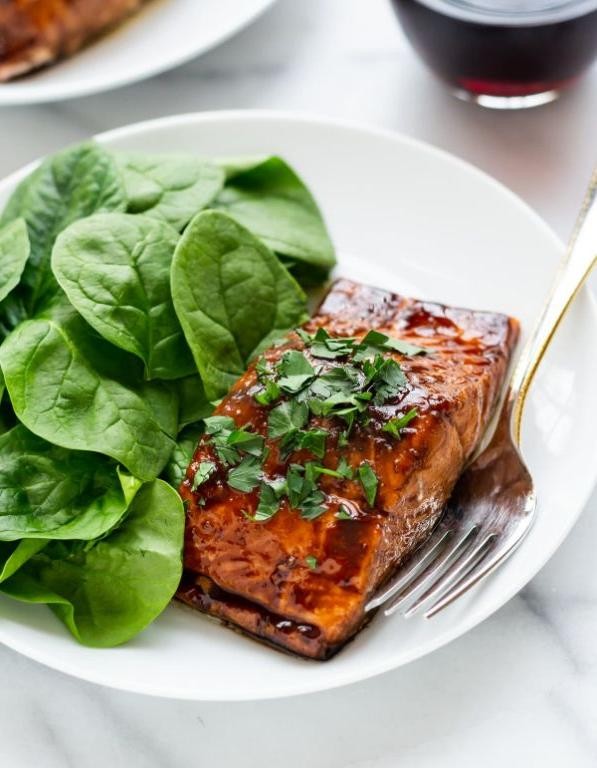
Preparing a delicious Balsamic Honey Glazed Salmon is simpler than you might think, and it’s a perfect way to impress at any dinner table. Let’s walk through the process together, ensuring you end up with a perfectly glazed, flavorful dish.
Ingredients
- 4 salmon fillets (about 6 oz each, skin-on for extra flavor)
- 1/4 cup balsamic vinegar (I love using aged balsamic for its depth of flavor)
- 2 tbsp honey (local honey adds a lovely floral note)
- 1 tbsp extra virgin olive oil (my go-to for its fruity undertones)
- 1 tsp minced garlic (freshly minced makes all the difference)
- 1/2 tsp salt (I prefer sea salt for its clean taste)
- 1/4 tsp black pepper (freshly ground for the best aroma)
Instructions
- Preheat your oven to 400°F (200°C) to ensure it’s ready for baking.
- In a small saucepan over medium heat, combine balsamic vinegar, honey, olive oil, minced garlic, salt, and black pepper. Stir constantly until the mixture thickens slightly, about 5 minutes. Tip: Keep an eye on the glaze to prevent burning.
- Place the salmon fillets skin-side down on a baking sheet lined with parchment paper. Tip: Leaving space between the fillets ensures even cooking.
- Brush each fillet generously with the balsamic honey glaze, reserving some for later.
- Bake in the preheated oven for 12-15 minutes, or until the salmon flakes easily with a fork. Tip: The glaze should be sticky and caramelized, not burnt.
- Remove from the oven and drizzle with the remaining glaze before serving.
The salmon comes out with a beautifully sticky glaze, the perfect balance of sweet and tangy. Serve it over a bed of quinoa or with roasted vegetables for a complete meal that’s as nutritious as it is delicious.
Balsamic Tomato Soup

Perfect for those chilly evenings or when you’re craving something comforting yet sophisticated, this Balsamic Tomato Soup combines the tangy depth of balsamic vinegar with the sweet acidity of ripe tomatoes. Let’s walk through the process together, ensuring you end up with a soup that’s both flavorful and velvety.
Ingredients
- 2 tbsp extra virgin olive oil (my go-to for its fruity notes)
- 1 medium onion, finely chopped (yellow onions work best for sweetness)
- 2 cloves garlic, minced (fresh is key here for that punchy flavor)
- 28 oz canned whole tomatoes (I prefer San Marzano for their superior taste)
- 2 cups vegetable broth (homemade or low-sodium store-bought)
- 2 tbsp balsamic vinegar (a good quality one makes all the difference)
- 1 tsp sugar (to balance the acidity, adjust to your liking)
- Salt and freshly ground black pepper (to taste, but don’t be shy)
- 1/2 cup heavy cream (for that luxurious finish)
- Fresh basil leaves, for garnish (adds a lovely freshness)
Instructions
- Heat the olive oil in a large pot over medium heat until shimmering.
- Add the chopped onion and cook, stirring occasionally, until translucent, about 5 minutes.
- Stir in the minced garlic and cook for another minute until fragrant. Tip: Don’t let the garlic brown or it’ll turn bitter.
- Pour in the canned tomatoes with their juice, breaking them up with a spoon as they cook.
- Add the vegetable broth, balsamic vinegar, and sugar, then bring the mixture to a simmer.
- Reduce the heat to low and let the soup simmer for 20 minutes, stirring occasionally. Tip: This slow simmer helps meld the flavors together beautifully.
- Use an immersion blender to puree the soup until smooth. Alternatively, carefully transfer to a blender in batches. Tip: Be cautious with hot liquids in a blender to avoid spills.
- Stir in the heavy cream and season with salt and pepper to taste. Heat through for another 2 minutes.
- Ladle the soup into bowls and garnish with fresh basil leaves before serving.
Just like that, you’ve got a bowl of Balsamic Tomato Soup that’s rich, creamy, and bursting with layers of flavor. Serve it with a crusty piece of bread for dipping, or for an extra touch, drizzle with a bit more balsamic vinegar right before serving to elevate the dish.
Balsamic Grilled Cheese Sandwich
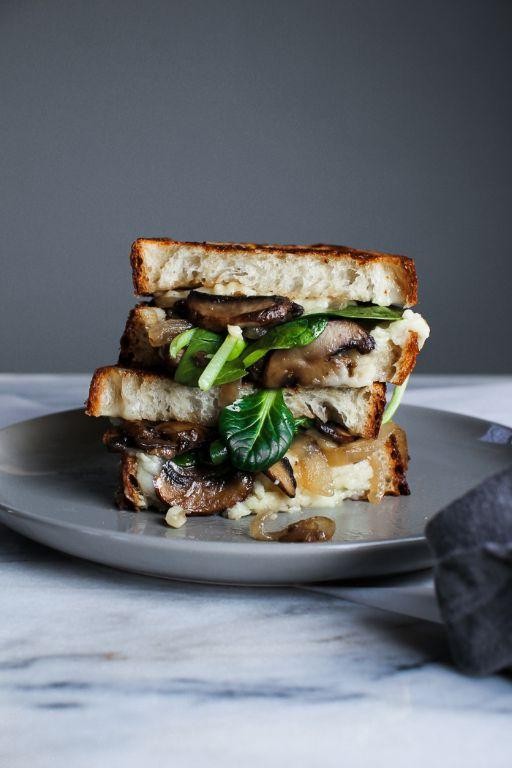
Ready to elevate your grilled cheese game? This Balsamic Grilled Cheese Sandwich combines the classic comfort of melted cheese with the tangy sweetness of balsamic glaze, creating a gourmet twist that’s surprisingly simple to make.
Ingredients
- 2 slices of sourdough bread (I find its tanginess pairs perfectly with the balsamic)
- 1 tbsp extra virgin olive oil (my go-to for its fruity notes)
- 1/2 cup shredded mozzarella cheese (for that perfect melt)
- 1/4 cup shredded sharp cheddar cheese (adds a nice depth of flavor)
- 2 tbsp balsamic glaze (homemade or store-bought, both work great)
- 1 tbsp butter, softened (room temp spreads easier)
Instructions
- Preheat a non-stick skillet over medium heat (about 350°F) for even cooking.
- Brush one side of each bread slice with extra virgin olive oil; this will be the outer crust.
- On the non-oiled side of one slice, evenly spread the softened butter.
- Layer the mozzarella and cheddar cheeses on top of the buttered slice.
- Drizzle the balsamic glaze over the cheese, ensuring it’s evenly distributed.
- Top with the second bread slice, oiled side facing out.
- Place the sandwich in the skillet, pressing down gently with a spatula. Cook for 3-4 minutes until the bottom is golden brown and the cheese begins to melt.
- Flip the sandwich carefully and cook for another 3-4 minutes until the other side is equally golden and the cheese is fully melted.
- Remove from heat and let it sit for a minute before cutting; this allows the cheese to set slightly for a cleaner cut.
The sandwich boasts a crispy exterior with a gooey, flavorful center, where the balsamic glaze cuts through the richness of the cheeses. Serve it with a side of tomato soup for dipping, or enjoy it as is for a satisfying meal any time of the day.
Balsamic Chocolate Cake
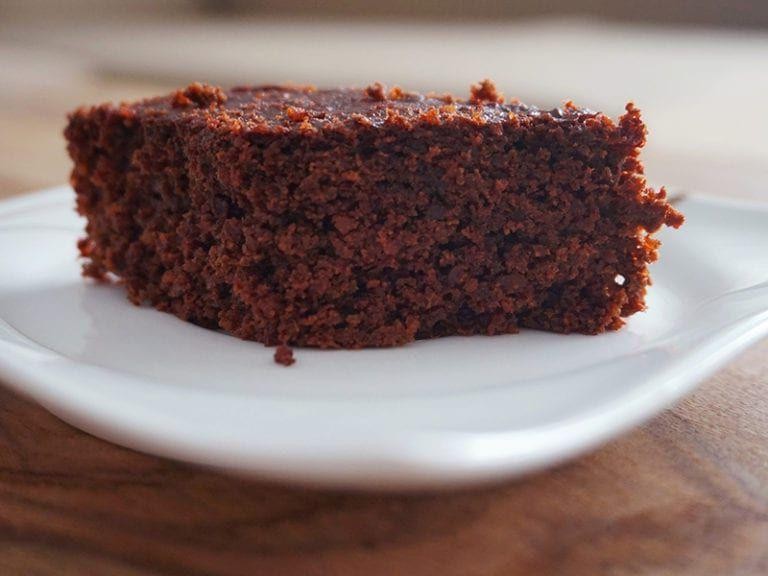
Zesty and rich, this Balsamic Chocolate Cake combines the deep flavors of cocoa with a tangy balsamic twist, creating a dessert that’s both sophisticated and surprisingly simple to make. Follow these steps to bring this unique cake to your table.
Ingredients
- 1 3/4 cups all-purpose flour (I always sift mine for a lighter texture)
- 3/4 cup unsweetened cocoa powder (the darker, the better for this recipe)
- 2 cups granulated sugar (I find this amount perfectly balances the balsamic’s acidity)
- 1 1/2 tsp baking soda (freshness matters, so check the date)
- 1/2 tsp salt (a pinch more if you’re using unsalted butter)
- 2 large eggs (room temperature eggs blend more smoothly)
- 1 cup whole milk (for richness, though 2% works in a pinch)
- 1/2 cup vegetable oil (I use canola for its neutral flavor)
- 2 tsp vanilla extract (pure extract makes a difference)
- 1 tbsp balsamic vinegar (aged balsamic adds a wonderful depth)
- 1 cup boiling water (helps bloom the cocoa’s flavor)
Instructions
- Preheat your oven to 350°F (175°C) and grease a 9-inch round cake pan. Tip: Line the bottom with parchment paper for easy removal.
- In a large bowl, whisk together the flour, cocoa powder, sugar, baking soda, and salt until well combined.
- Add the eggs, milk, oil, and vanilla extract to the dry ingredients. Mix on medium speed until just combined. Tip: Overmixing can lead to a dense cake.
- Gently stir in the balsamic vinegar, then carefully add the boiling water. The batter will be thin; this is normal.
- Pour the batter into the prepared pan and bake for 30-35 minutes, or until a toothpick inserted into the center comes out clean. Tip: Avoid opening the oven door too early to prevent sinking.
- Let the cake cool in the pan for 10 minutes, then transfer to a wire rack to cool completely.
Sumptuously moist with a subtle tang, this cake pairs wonderfully with a dollop of whipped cream or a scoop of vanilla ice cream. For an extra touch, drizzle with a balsamic reduction before serving.
Balsamic Watermelon Feta Salad
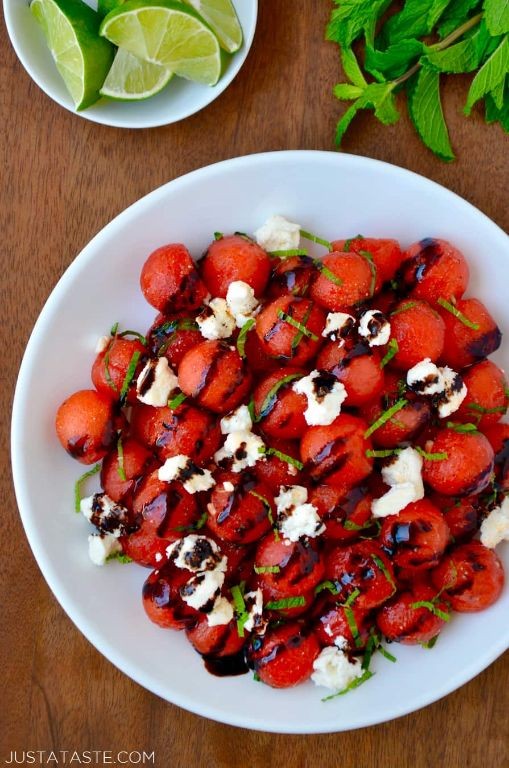
Great for those sweltering summer days, this Balsamic Watermelon Feta Salad combines sweet, salty, and tangy flavors in a refreshing dish that’s as easy to make as it is delicious.
Ingredients
- 4 cups cubed watermelon (about 1-inch cubes, seedless is best for ease)
- 1 cup crumbled feta cheese (I love the creamy texture of Bulgarian feta here)
- 1/4 cup fresh mint leaves, thinly sliced (plus a few whole leaves for garnish)
- 2 tbsp extra virgin olive oil (my go-to for its fruity notes)
- 1 tbsp balsamic glaze (look for a thick, syrupy consistency)
- 1/2 tsp flaky sea salt (Maldon salt adds a nice crunch)
- 1/4 tsp freshly ground black pepper
Instructions
- In a large mixing bowl, gently toss the watermelon cubes with the extra virgin olive oil until lightly coated.
- Sprinkle the flaky sea salt and freshly ground black pepper over the watermelon, tossing again to distribute evenly.
- Add the crumbled feta cheese and sliced mint leaves to the bowl, folding them in carefully to avoid breaking the watermelon cubes.
- Drizzle the balsamic glaze over the salad just before serving to maintain its vibrant color and prevent the watermelon from becoming soggy.
- Garnish with a few whole mint leaves for a pop of color and freshness.
Bright and juicy, the watermelon pairs beautifully with the creamy feta and aromatic mint, while the balsamic glaze adds a sweet and tangy depth. Serve this salad chilled on a hot day for a burst of freshness, or alongside grilled meats for a delightful contrast.
Conclusion
We hope this roundup of 18 balsamic vinegar recipes inspires your next culinary adventure! From savory to sweet, there’s something for every occasion. Don’t forget to try your favorites, share your thoughts in the comments, and pin this article to your Pinterest board for easy access. Happy cooking!


