Looking to spice up your mealtime with some bold flavors and easy-to-make dishes? Our ’22 Adventurous Backpack Battles Recipes Ultimate’ roundup is your ticket to transforming ordinary ingredients into extraordinary meals. Perfect for home cooks craving a dash of adventure in their kitchen, these recipes promise to delight your taste buds and inspire your culinary creativity. Dive in and discover your next favorite dish!
Trail Mix Energy Bars
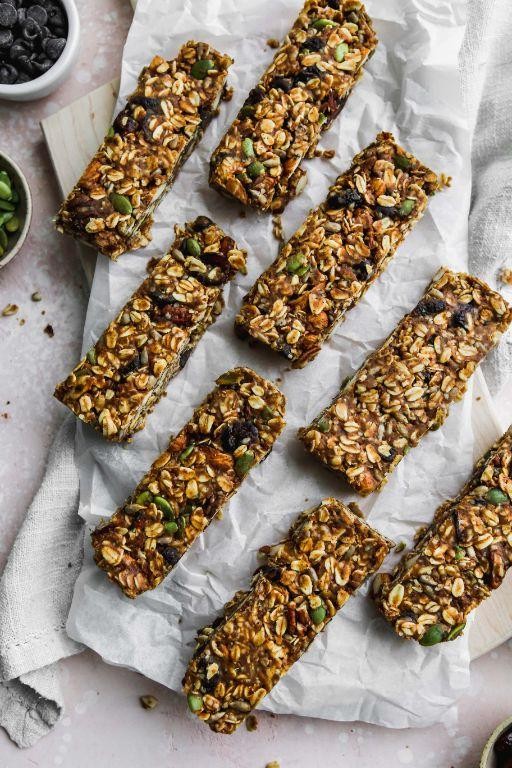
Elevate your snack game with these homemade Trail Mix Energy Bars, a perfect blend of nutty, sweet, and chewy textures that promise to fuel your day with natural energy. Crafted with wholesome ingredients, these bars are as nutritious as they are delicious, offering a convenient pick-me-up for busy mornings or afternoon slumps.
Ingredients
- 1 cup rolled oats
- 1/2 cup almond butter
- 1/3 cup honey
- 1/4 cup chia seeds
- 1/2 cup dried cranberries
- 1/2 cup roasted almonds, chopped
- 1/4 cup dark chocolate chips
- 1 tsp vanilla extract
- 1/2 tsp sea salt
Instructions
- Preheat your oven to 350°F and line an 8×8 inch baking pan with parchment paper, leaving an overhang on the sides for easy removal.
- In a large bowl, combine 1 cup rolled oats, 1/2 cup almond butter, 1/3 cup honey, 1/4 cup chia seeds, 1/2 cup dried cranberries, 1/2 cup chopped roasted almonds, 1/4 cup dark chocolate chips, 1 tsp vanilla extract, and 1/2 tsp sea salt. Mix until all ingredients are evenly distributed.
- Press the mixture firmly into the prepared pan, using the back of a spoon or your hands to ensure it’s compact and even.
- Bake for 15 minutes, or until the edges are lightly golden. Tip: For chewier bars, reduce baking time by 2 minutes.
- Allow the bars to cool completely in the pan on a wire rack before lifting them out using the parchment overhang. Tip: Chilling the bars in the refrigerator for 30 minutes makes them easier to cut.
- Cut into 12 even bars or squares. Tip: Use a sharp knife and wipe it clean between cuts for neat edges.
Rich in flavor and satisfyingly dense, these Trail Mix Energy Bars boast a delightful contrast between the crunchy almonds and chewy cranberries. Serve them alongside a cup of coffee for a mid-morning boost or pack them in your gym bag for a post-workout treat.
Dehydrated Vegetable Soup

Savory and satisfying, this Dehydrated Vegetable Soup transforms humble ingredients into a symphony of flavors, perfect for those seeking both convenience and culinary delight. Its preparation is a testament to the beauty of simplicity, offering a nourishing bowl that warms the soul.
Ingredients
- 1 cup dehydrated mixed vegetables
- 4 cups water
- 1 tbsp olive oil
- 1 tsp salt
- 1/2 tsp black pepper
- 1 clove garlic, minced
Instructions
- In a large pot, heat 1 tbsp olive oil over medium heat until shimmering, about 1 minute.
- Add 1 clove minced garlic to the pot, sautéing until fragrant, approximately 30 seconds, to unlock its aromatic potential.
- Pour in 4 cups water, bringing the mixture to a gentle boil over high heat.
- Stir in 1 cup dehydrated mixed vegetables, reducing the heat to medium-low to simmer uncovered for 15 minutes, allowing the vegetables to fully rehydrate.
- Season the soup with 1 tsp salt and 1/2 tsp black pepper, stirring well to combine and taste, adjusting the seasoning if necessary for a perfectly balanced flavor.
- Remove the pot from heat and let the soup stand for 5 minutes, enabling the flavors to meld beautifully.
With its vibrant medley of vegetables and rich, garlicky broth, this soup boasts a comforting texture and depth of flavor that delights the palate. Serve it with a crusty loaf of bread for a heartier meal or enjoy it as is for a light, nutritious lunch.
Peanut Butter Oatmeal Packets
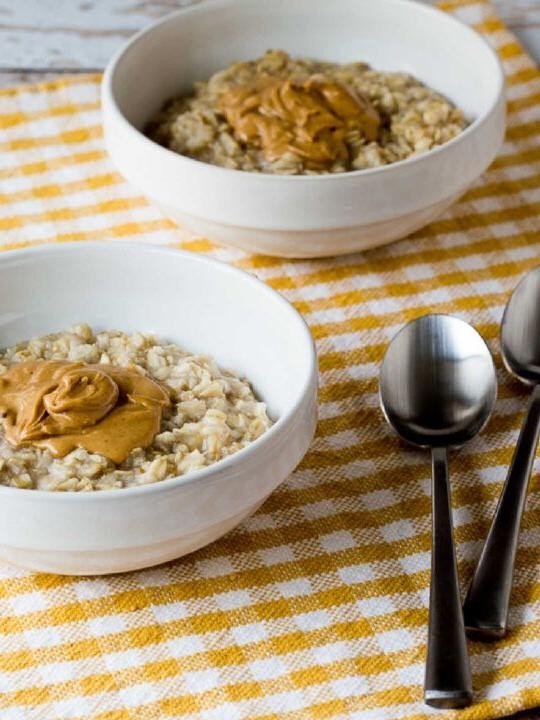
Unveiling a breakfast that marries convenience with indulgence, our Peanut Butter Oatmeal Packets are a testament to the art of quick yet gourmet mornings. Each bite promises a creamy, nutty embrace, perfectly balanced with the wholesome chew of oats.
Ingredients
- 1 cup rolled oats
- 2 tbsp peanut butter
- 1 tbsp honey
- 1/2 cup milk
- 1/4 tsp salt
Instructions
- In a medium bowl, combine 1 cup rolled oats and 1/4 tsp salt.
- Add 2 tbsp peanut butter and 1 tbsp honey to the bowl, stirring until the mixture is evenly coated.
- Gradually pour in 1/2 cup milk, stirring continuously to achieve a smooth consistency.
- Transfer the mixture to a small saucepan and cook over medium heat for 5 minutes, stirring constantly to prevent sticking.
- Once the oatmeal reaches your desired thickness, remove from heat. Tip: For a creamier texture, add an extra splash of milk.
- Let the oatmeal sit for 2 minutes before serving to allow it to thicken slightly. Tip: Covering the saucepan during this time helps retain heat.
- Serve warm, garnished with a drizzle of honey or a sprinkle of crushed peanuts for added texture. Tip: For a vegan version, substitute honey with maple syrup and use almond milk.
Zesty mornings call for this Peanut Butter Oatmeal, where the velvety richness of peanut butter meets the earthy tones of oats. Enjoy it as is, or elevate it with fresh banana slices for a fruity contrast.
Instant Coffee Pancakes

Amidst the hustle of morning routines, these Instant Coffee Pancakes emerge as a swift yet sophisticated solution, blending the rich aroma of coffee with the comforting warmth of pancakes. Perfect for those who cherish both efficiency and indulgence, this recipe promises a delightful start to any day.
Ingredients
- 1 cup all-purpose flour
- 2 tbsp granulated sugar
- 1 tsp baking powder
- 1/2 tsp salt
- 1 tbsp instant coffee granules
- 1 cup milk
- 1 large egg
- 2 tbsp unsalted butter, melted
- 1 tsp vanilla extract
Instructions
- In a large bowl, whisk together 1 cup all-purpose flour, 2 tbsp granulated sugar, 1 tsp baking powder, and 1/2 tsp salt until well combined.
- Dissolve 1 tbsp instant coffee granules in 1 cup milk, stirring until no granules remain.
- Add the coffee-infused milk, 1 large egg, 2 tbsp melted unsalted butter, and 1 tsp vanilla extract to the dry ingredients, mixing just until the batter comes together—avoid overmixing to ensure fluffy pancakes.
- Heat a non-stick skillet over medium heat (350°F) and lightly grease with butter or cooking spray.
- Pour 1/4 cup of batter onto the skillet for each pancake, cooking until bubbles form on the surface and the edges look set, about 2-3 minutes.
- Flip the pancakes and cook for an additional 1-2 minutes, or until golden brown and cooked through.
- Transfer to a plate and repeat with the remaining batter, adjusting the heat as necessary to prevent burning.
Out of the skillet, these pancakes boast a tender interior with a subtle coffee kick, perfectly balanced by the sweetness of the batter. Serve them stacked high with a drizzle of maple syrup and a dusting of powdered sugar for an extra touch of elegance, or pair with fresh berries for a refreshing contrast.
Spicy Tuna Wraps

Zesty and vibrant, Spicy Tuna Wraps offer a refreshing twist on lunchtime favorites, combining the bold flavors of sushi-grade tuna with the crisp texture of fresh vegetables, all wrapped in a soft, pliable tortilla.
Ingredients
- 1 cup sushi-grade tuna, finely diced
- 1 tbsp mayonnaise
- 1 tsp sriracha sauce
- 1/2 cup cucumber, julienned
- 1/4 cup carrots, julienned
- 2 large flour tortillas
- 1 tbsp sesame oil
- 1/2 avocado, sliced
- 1 tbsp soy sauce
- 1 tsp sesame seeds
Instructions
- In a medium bowl, combine the diced tuna, mayonnaise, and sriracha sauce until evenly mixed.
- Heat a large skillet over medium heat and lightly brush each tortilla with sesame oil.
- Warm the tortillas in the skillet for 30 seconds on each side until they are pliable and slightly toasted.
- Lay the warmed tortillas flat and evenly distribute the tuna mixture down the center of each.
- Top the tuna with julienned cucumber, carrots, and avocado slices.
- Drizzle soy sauce over the fillings and sprinkle with sesame seeds.
- Fold the sides of the tortillas inward, then roll tightly from the bottom to enclose the fillings.
- Cut each wrap in half diagonally and serve immediately.
Notably, these wraps boast a perfect balance of creamy, spicy, and crunchy elements, making them an ideal choice for a light yet satisfying meal. For an extra touch of elegance, serve them on a platter garnished with extra sesame seeds and a side of pickled ginger.
Beef Jerky and Cheese Roll-Ups

Lusciously simple yet undeniably sophisticated, Beef Jerky and Cheese Roll-Ups offer a delightful interplay of textures and flavors, perfect for elevating your appetizer game or as a protein-packed snack.
Ingredients
- 1 cup thinly sliced beef jerky
- 8 oz cream cheese, softened
- 1/4 cup finely chopped green onions
- 1 tbsp Worcestershire sauce
- 1/2 tsp garlic powder
- 1/4 tsp black pepper
- 10 large flour tortillas
Instructions
- In a medium bowl, combine the softened cream cheese, green onions, Worcestershire sauce, garlic powder, and black pepper until smooth.
- Lay out the flour tortillas on a clean, flat surface. Spread an even layer of the cream cheese mixture over each tortilla, leaving a small border around the edges.
- Evenly distribute the thinly sliced beef jerky over the cream cheese layer on each tortilla.
- Starting at one end, tightly roll up each tortilla, ensuring the filling is compact and the edges are sealed.
- Wrap each rolled tortilla in plastic wrap and refrigerate for at least 1 hour to firm up, making them easier to slice.
- Using a sharp knife, slice each roll-up into 1-inch pieces, discarding the ends for a cleaner presentation.
- Arrange the slices on a serving platter, and serve chilled or at room temperature.
Rich in savory depth with a satisfying chew from the jerky contrasted by the creamy, tangy filling, these roll-ups are a crowd-pleaser. For an extra touch of elegance, garnish with a sprinkle of smoked paprika or serve alongside a bold, spicy mustard for dipping.
Campfire Quesadillas

Beneath the starlit sky, these Campfire Quesadillas bring a touch of gourmet to the great outdoors, blending the rustic charm of open-flame cooking with the sophisticated flavors of melted cheese and charred tortillas.
Ingredients
- 4 large flour tortillas
- 2 cups shredded Monterey Jack cheese
- 1 cup cooked chicken, shredded
- 1/2 cup black beans, rinsed and drained
- 1/4 cup chopped cilantro
- 1 tbsp olive oil
- 1/2 tsp ground cumin
- 1/4 tsp smoked paprika
Instructions
- Heat a cast-iron skillet over medium-high heat on a campfire grate for 5 minutes.
- Brush one side of each tortilla with olive oil using a pastry brush.
- Place one tortilla, oiled side down, in the skillet. Sprinkle 1/2 cup of Monterey Jack cheese evenly over the tortilla.
- Layer 1/4 cup of shredded chicken, 2 tablespoons of black beans, and 1 tablespoon of chopped cilantro over the cheese.
- Sprinkle 1/8 teaspoon of ground cumin and a pinch of smoked paprika over the filling.
- Top with another 1/2 cup of Monterey Jack cheese and cover with a second tortilla, oiled side up.
- Cook for 3 minutes, or until the bottom tortilla is golden brown and crispy. Carefully flip the quesadilla using a spatula.
- Cook for an additional 3 minutes on the other side, or until the cheese is fully melted and the tortilla is crispy.
- Remove from the skillet and let rest for 1 minute before slicing into wedges.
- Repeat the process with the remaining tortillas and ingredients.
Creating a perfect balance of textures, these quesadillas feature a crispy exterior with a gooey, flavorful center. Serve them with a side of fresh salsa or avocado slices for an added layer of freshness and color.
Freeze-Dried Fruit Salad

Offering a refreshing twist on a classic, this Freeze-Dried Fruit Salad combines vibrant colors and textures for a dish that’s as delightful to the eye as it is to the palate. Perfect for those seeking a quick yet sophisticated option, it’s a testament to how simplicity can yield extraordinary results.
Ingredients
- 2 cups freeze-dried strawberries
- 1 cup freeze-dried mango chunks
- 1 cup freeze-dried banana slices
- 1/2 cup freeze-dried blueberries
- 1 tbsp honey
- 1 tbsp fresh lemon juice
Instructions
- In a large mixing bowl, combine 2 cups freeze-dried strawberries, 1 cup freeze-dried mango chunks, 1 cup freeze-dried banana slices, and 1/2 cup freeze-dried blueberries.
- Drizzle 1 tbsp honey and 1 tbsp fresh lemon juice over the fruit mixture.
- Gently toss the ingredients until the fruit is evenly coated with the honey and lemon juice. Tip: For a more intense flavor, let the salad sit for 5 minutes before serving to allow the fruit to slightly rehydrate.
- Serve immediately or chill in the refrigerator for up to 30 minutes for a cooler salad. Tip: If you prefer a crunchier texture, serve right after tossing.
- For an elegant presentation, garnish with a few fresh mint leaves before serving. Tip: This salad pairs beautifully with a dollop of Greek yogurt for added creaminess.
A symphony of sweet and tangy flavors, this Freeze-Dried Fruit Salad offers a delightful crunch with every bite. Its vibrant hues make it a stunning centerpiece for brunch tables, while the ease of preparation ensures it’s a go-to for last-minute gatherings.
Granola with Powdered Milk
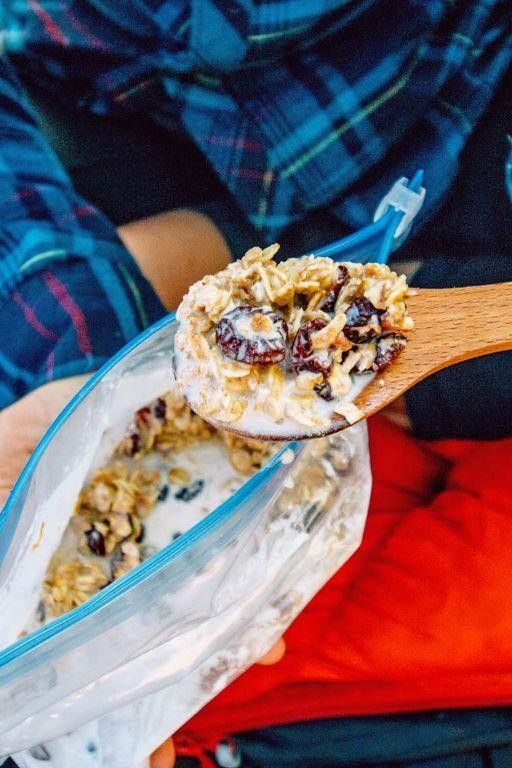
Zesty mornings call for a breakfast that’s both nourishing and effortlessly chic, and this Granola with Powdered Milk recipe is just the ticket. Combining the rustic crunch of homemade granola with the creamy subtlety of powdered milk, it’s a dish that promises to elevate your morning routine with minimal fuss.
Ingredients
- 2 cups rolled oats
- 1/2 cup powdered milk
- 1/4 cup honey
- 2 tbsp coconut oil
- 1/2 tsp vanilla extract
- 1/4 tsp salt
Instructions
- Preheat your oven to 300°F and line a baking sheet with parchment paper.
- In a large bowl, combine 2 cups rolled oats, 1/2 cup powdered milk, and 1/4 tsp salt.
- In a small saucepan over low heat, melt 2 tbsp coconut oil with 1/4 cup honey and 1/2 tsp vanilla extract, stirring until fully combined.
- Pour the liquid mixture over the dry ingredients and stir until the oats are evenly coated.
- Spread the mixture onto the prepared baking sheet in an even layer.
- Bake for 20 minutes, then stir the granola to ensure even browning and bake for an additional 10 minutes.
- Remove from the oven and let cool completely on the baking sheet to crisp up.
The granola emerges from the oven with a golden hue, offering a delightful contrast between the crunchy clusters and the soft, milky undertones. Serve it over yogurt for a parfait-like experience or enjoy it straight from the jar as a midday snack.
Chocolate Hazelnut Spread Sandwiches
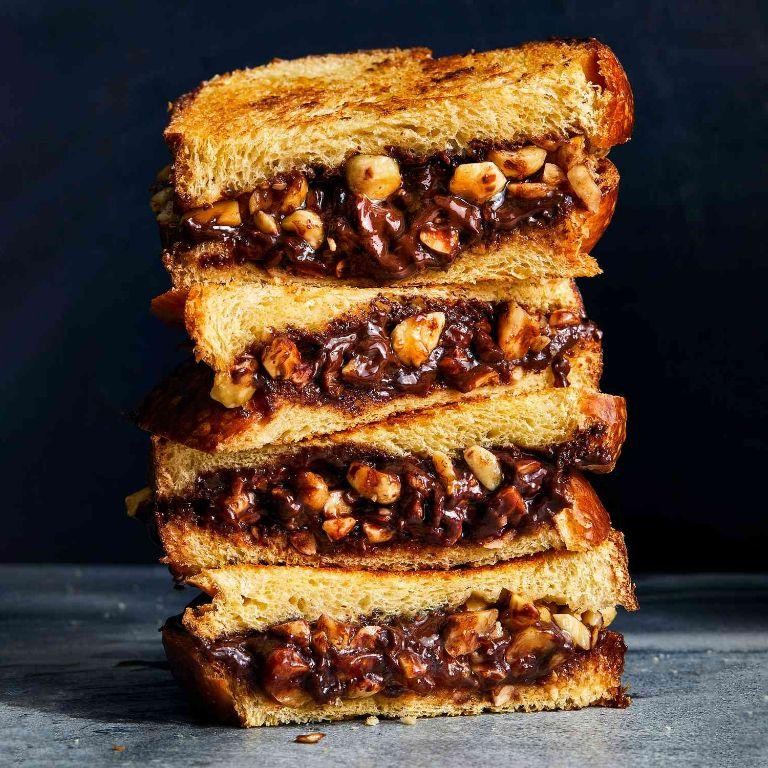
Kickstart your morning with a decadent twist on the classic sandwich, where rich chocolate hazelnut spread meets the comforting embrace of freshly toasted bread. This recipe elevates the humble sandwich into a luxurious treat, perfect for those moments when only something sweet will do.
Ingredients
- 4 slices whole grain bread
- 1/2 cup chocolate hazelnut spread
- 2 tbsp unsalted butter, softened
Instructions
- Preheat a non-stick skillet over medium heat (350°F) for even toasting.
- Spread 1/4 cup of chocolate hazelnut spread evenly on one side of each of two bread slices. Tip: For a smoother spread, warm it slightly before applying.
- Butter one side of the remaining two bread slices with 1 tbsp of unsalted butter each, ensuring coverage to the edges for a golden finish.
- Place one buttered bread slice, butter side down, onto the skillet. Top with a chocolate hazelnut spread-covered slice, spread side up.
- Cook for 2-3 minutes until the bottom is golden brown and crispy. Tip: Press lightly with a spatula to ensure even browning.
- Flip the sandwich carefully and cook the other side for another 2-3 minutes. Tip: Adjust heat if browning too quickly to prevent burning.
- Remove from skillet and repeat the process with the remaining slices to make a second sandwich.
- Let the sandwiches cool for 1 minute before slicing diagonally for an elegant presentation.
Best enjoyed warm, the sandwiches boast a crispy exterior with a gooey, molten center that oozes with every bite. Serve alongside a cold glass of milk or a hot cup of coffee for a delightful contrast in temperatures and flavors.
Rice and Beans Instant Pot
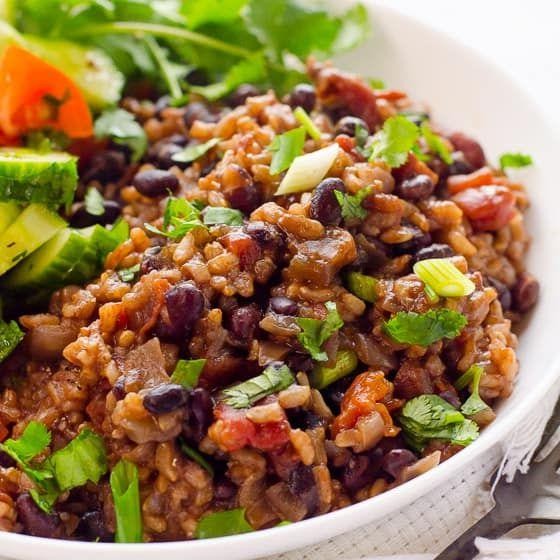
Vibrant and hearty, this Rice and Beans Instant Pot recipe transforms simple pantry staples into a comforting dish with minimal effort. Perfect for busy weeknights, it promises a satisfying meal that’s both nutritious and flavorful.
Ingredients
- 1 cup long-grain white rice
- 1 can (15 oz) black beans, drained and rinsed
- 1 tbsp olive oil
- 1 small onion, diced
- 2 cloves garlic, minced
- 1 tsp ground cumin
- 1/2 tsp salt
- 1/4 tsp black pepper
- 1 3/4 cups vegetable broth
- 1 bay leaf
Instructions
- Set the Instant Pot to ‘Sauté’ mode and heat the olive oil for 2 minutes.
- Add the diced onion and minced garlic, sautéing for 3 minutes until translucent.
- Stir in the ground cumin, salt, and black pepper, cooking for 1 minute to release the spices’ aromas.
- Add the rice, black beans, vegetable broth, and bay leaf to the pot, stirring to combine.
- Secure the lid, set the valve to ‘Sealing’, and cook on ‘Manual’ high pressure for 5 minutes.
- Once cooking is complete, allow a natural pressure release for 10 minutes, then quick release any remaining pressure.
- Remove the bay leaf and fluff the rice with a fork before serving.
Best enjoyed fresh, this dish boasts a fluffy texture with perfectly tender beans, infused with the warmth of cumin and garlic. For a vibrant twist, top with fresh cilantro, a squeeze of lime, or diced avocado.
Couscous with Sun-Dried Tomatoes
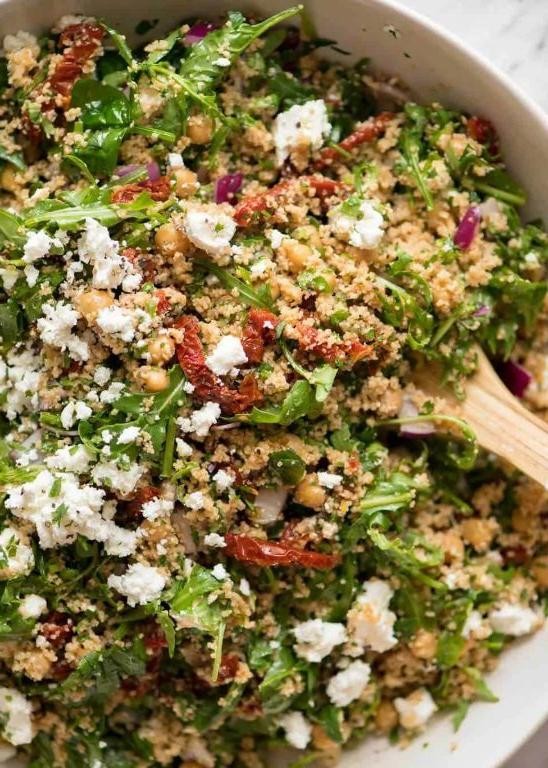
Brighten your table with this vibrant Couscous with Sun-Dried Tomatoes, a dish that marries the light, fluffy texture of couscous with the intense, tangy sweetness of sun-dried tomatoes. Perfect for a quick weeknight dinner or as a sophisticated side, this recipe promises a delightful interplay of flavors and textures.
Ingredients
- 1 cup couscous
- 1 1/4 cups boiling water
- 1/2 cup sun-dried tomatoes, chopped
- 2 tbsp olive oil
- 1/4 tsp salt
- 1/4 tsp black pepper
- 2 tbsp fresh parsley, chopped
Instructions
- Place 1 cup couscous in a large bowl.
- Pour 1 1/4 cups boiling water over the couscous, cover the bowl with a plate, and let it sit for 5 minutes until the water is fully absorbed. Tip: Fluff the couscous with a fork after soaking to separate the grains.
- While the couscous is soaking, heat 2 tbsp olive oil in a small pan over medium heat.
- Add 1/2 cup chopped sun-dried tomatoes to the pan and sauté for 2 minutes until they become fragrant. Tip: If using oil-packed sun-dried tomatoes, reduce the added olive oil to avoid excess grease.
- Uncover the couscous and add the sautéed sun-dried tomatoes, 1/4 tsp salt, and 1/4 tsp black pepper. Mix well to combine.
- Garnish with 2 tbsp chopped fresh parsley before serving. Tip: For an extra burst of flavor, add a squeeze of lemon juice or a sprinkle of feta cheese.
Now, this Couscous with Sun-Dried Tomatoes offers a delightful contrast between the tender grains and the chewy tomatoes, with a flavor profile that’s both rich and refreshing. Serve it alongside grilled chicken or fish for a complete meal, or enjoy it as a standalone dish for a light yet satisfying lunch.
Pasta with Pesto Sauce Packets
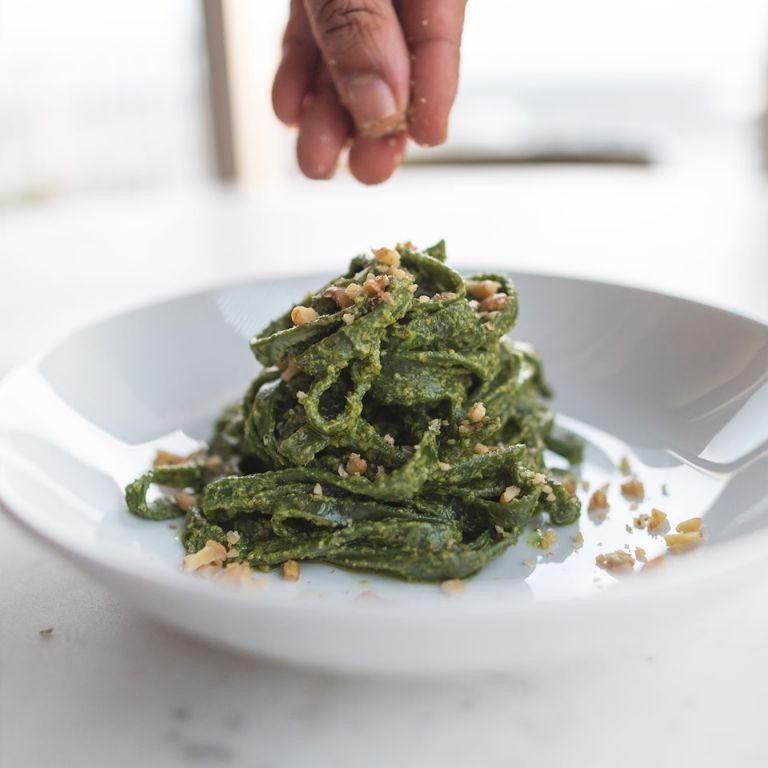
Gracefully blending the convenience of pre-made pesto with the timeless appeal of pasta, this dish offers a quick yet sophisticated meal solution for any night of the week.
Ingredients
- 12 oz dried pasta
- 1/2 cup pesto sauce packets
- 1/4 cup grated Parmesan cheese
- 2 tbsp olive oil
- 1/4 tsp salt
- 1/4 tsp black pepper
Instructions
- Bring a large pot of salted water to a boil over high heat.
- Add 12 oz dried pasta to the boiling water and cook for 8-10 minutes, or until al dente, stirring occasionally to prevent sticking.
- While the pasta cooks, open 1/2 cup pesto sauce packets and place the pesto in a large serving bowl.
- Drain the pasta, reserving 1/4 cup of the pasta water, then immediately add the hot pasta to the bowl with the pesto.
- Toss the pasta with the pesto, adding the reserved pasta water a little at a time to create a silky sauce that coats the pasta evenly.
- Drizzle 2 tbsp olive oil over the pasta and sprinkle with 1/4 tsp salt and 1/4 tsp black pepper, tossing again to combine.
- Finish by sprinkling 1/4 cup grated Parmesan cheese over the top of the pasta before serving.
Combining the vibrant flavors of basil and garlic from the pesto with the creamy texture of Parmesan, this pasta dish is a testament to simplicity and elegance. Serve it with a crisp white wine and a side of roasted vegetables for a complete meal that delights the senses.
Hardtack with Honey

This timeless pairing marries the rustic simplicity of hardtack with the golden sweetness of honey, creating a snack that’s both humble and heavenly. The contrast between the crisp, durable cracker and the smooth, aromatic drizzle is a testament to the beauty of minimalist ingredients.
Ingredients
- 2 cups all-purpose flour
- 1/2 cup water
- 1 tbsp salt
- 1/4 cup honey
Instructions
- Preheat your oven to 375°F (190°C) to ensure it’s ready for baking.
- In a large mixing bowl, combine 2 cups all-purpose flour and 1 tbsp salt, whisking them together to distribute the salt evenly.
- Gradually add 1/2 cup water to the dry ingredients, stirring continuously until a stiff dough forms. Tip: If the dough feels too dry, add water one teaspoon at a time until it comes together.
- Roll the dough out on a lightly floured surface to a 1/4-inch thickness, then cut into 3-inch squares. Tip: Use a ruler for precision, ensuring even baking.
- Place the squares on an ungreased baking sheet and prick each piece several times with a fork to prevent puffing.
- Bake in the preheated oven for 30 minutes, then flip each piece and bake for an additional 30 minutes until golden and hard. Tip: For extra crispness, leave the hardtack in the turned-off oven as it cools.
- Once cooled, drizzle 1/4 cup honey over the hardtack, allowing it to seep into the cracks for a perfect balance of textures.
Nowhere does simplicity shine brighter than in this dish, where each bite offers a satisfying crunch followed by the gentle caress of honey. Serve alongside a sharp cheese or enjoy as a sturdy companion to your morning tea.
Smoked Salmon and Cream Cheese Bagels
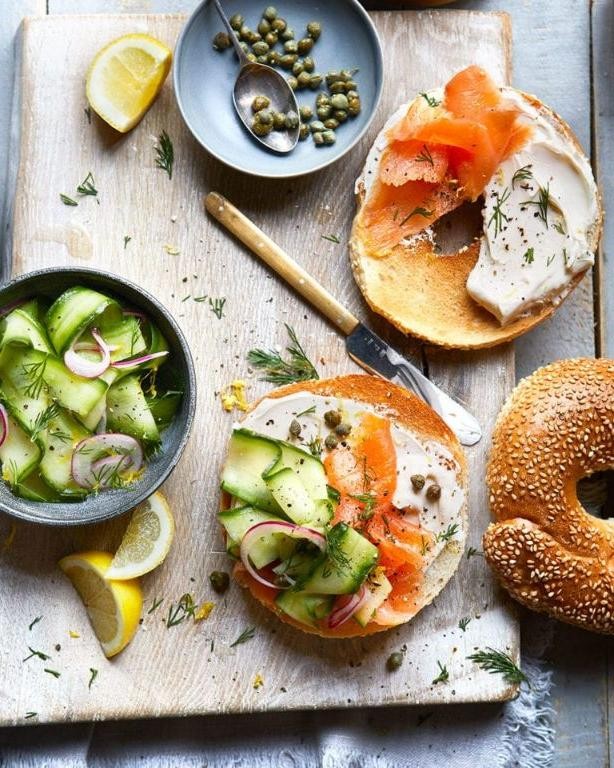
Luxuriously layered with velvety cream cheese and rich smoked salmon, this bagel recipe transforms a simple breakfast into a gourmet experience. Perfect for a leisurely weekend brunch or a sophisticated morning meeting, it’s a dish that promises to delight with every bite.
Ingredients
- 4 bagels, sliced in half
- 8 oz cream cheese, softened
- 8 oz smoked salmon, thinly sliced
- 1 tbsp capers, drained
- 1/2 red onion, thinly sliced
- 1 tbsp fresh dill, chopped
- 1 tbsp lemon juice
Instructions
- Preheat your oven to 350°F and place the bagel halves on a baking sheet, cut side up. Toast in the oven for 5-7 minutes until lightly golden and crisp.
- While the bagels are toasting, mix the softened cream cheese with lemon juice in a small bowl until smooth and spreadable.
- Once the bagels are toasted, evenly spread the cream cheese mixture on each half.
- Layer the smoked salmon slices over the cream cheese, covering the surface evenly.
- Garnish each bagel half with thinly sliced red onion, capers, and a sprinkle of fresh dill.
- Serve immediately for the best texture and flavor, pairing with a crisp white wine or freshly squeezed orange juice for an elevated brunch experience.
Unveiling a harmonious blend of textures, from the crunch of the toasted bagel to the silky salmon, this dish is a testament to simple ingredients creating extraordinary flavors. Consider serving on a wooden board for a rustic, inviting presentation that’s as Instagram-worthy as it is delicious.
Vegetable Stir-Fry with Noodles
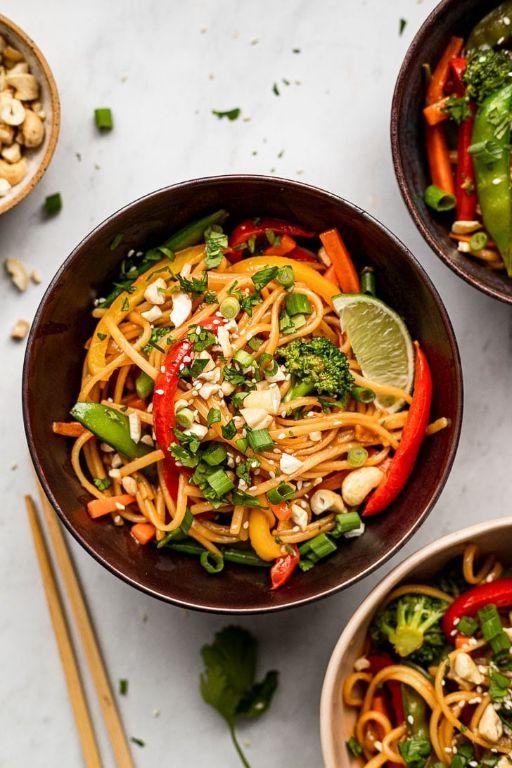
Mastering the art of a quick yet sophisticated meal, this Vegetable Stir-Fry with Noodles combines crisp, vibrant vegetables with silky noodles, all enveloped in a savory sauce that promises to delight the palate.
Ingredients
- 8 oz rice noodles
- 2 tbsp vegetable oil
- 1 cup broccoli florets
- 1 red bell pepper, sliced
- 1 carrot, julienned
- 2 cloves garlic, minced
- 1 tbsp soy sauce
- 1 tbsp oyster sauce
- 1 tsp sesame oil
- 1/2 cup snap peas
- 2 green onions, sliced
Instructions
- Soak the rice noodles in hot water for 8 minutes, then drain and set aside. Tip: Ensure the noodles are al dente to prevent them from becoming mushy during stir-frying.
- Heat the vegetable oil in a large wok or skillet over medium-high heat until shimmering.
- Add the broccoli, red bell pepper, and carrot to the wok. Stir-fry for 3 minutes until the vegetables are crisp-tender.
- Add the minced garlic and stir-fry for 30 seconds until fragrant. Tip: Garlic burns quickly, so keep the stir-fry moving.
- Incorporate the drained noodles, soy sauce, oyster sauce, and sesame oil into the wok. Toss everything together for 2 minutes until well combined and heated through.
- Add the snap peas and green onions, stir-frying for an additional minute. Tip: Adding the snap peas last preserves their crunch and bright color.
How the dish comes together is a testament to the harmony of textures and flavors—the noodles offer a soft contrast to the crisp vegetables, while the sauce lends a depth that’s both rich and nuanced. Serve it garnished with extra green onions or a sprinkle of sesame seeds for an elegant touch.
Chicken and Dumplings Foil Pack
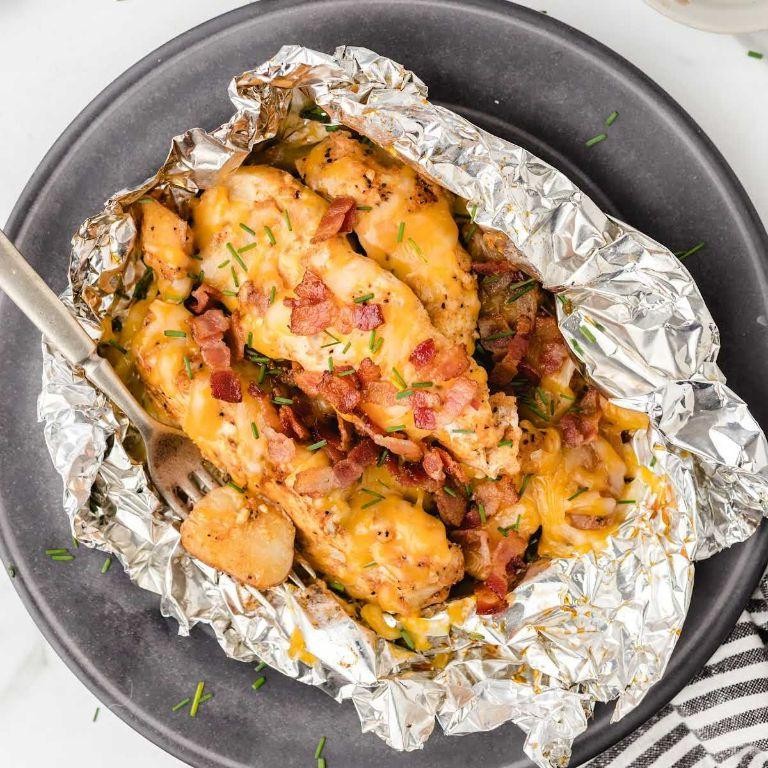
Kickstarting a cozy evening with a dish that marries comfort and convenience, the Chicken and Dumplings Foil Pack is a testament to the magic of simple ingredients coming together under a foil tent. Juicy chicken, tender dumplings, and a savory broth steam to perfection, offering a fuss-free meal that doesn’t skimp on flavor.
Ingredients
- 1 lb boneless, skinless chicken breasts, cubed
- 1 cup all-purpose flour
- 2 tsp baking powder
- 1/2 tsp salt
- 1/2 cup milk
- 2 tbsp unsalted butter, melted
- 1 cup chicken broth
- 1/2 cup heavy cream
- 1 tsp dried thyme
- 1/2 tsp black pepper
- 1 cup frozen mixed vegetables
Instructions
- Preheat your oven to 375°F and prepare 4 large sheets of aluminum foil, each about 12 inches long.
- In a bowl, whisk together 1 cup all-purpose flour, 2 tsp baking powder, and 1/2 tsp salt. Tip: Sifting the dry ingredients ensures lighter dumplings.
- Stir in 1/2 cup milk and 2 tbsp melted butter until just combined. Overmixing can lead to tough dumplings.
- Divide the cubed chicken evenly among the foil sheets, placing it in the center of each.
- Top the chicken with 1/4 cup of the flour mixture per pack, then pour 1/4 cup chicken broth and 2 tbsp heavy cream over each.
- Sprinkle each pack with 1/4 tsp dried thyme, 1/8 tsp black pepper, and 1/4 cup frozen mixed vegetables.
- Fold the foil over the ingredients, sealing the edges tightly to create a packet. Tip: Leaving a little space inside the packet allows the ingredients to steam properly.
- Place the foil packs on a baking sheet and bake for 25 minutes, or until the chicken is cooked through and the dumplings are fluffy. Tip: Carefully open one pack to check for doneness to avoid steam burns.
- Let the packs sit for 5 minutes before serving to allow the flavors to meld.
This dish yields tender chicken and pillowy dumplings enveloped in a creamy, herb-infused broth. For a rustic presentation, serve the foil packs directly on the table, letting each person unveil their own steamy parcel of comfort.
Sweet Potato and Black Bean Tacos
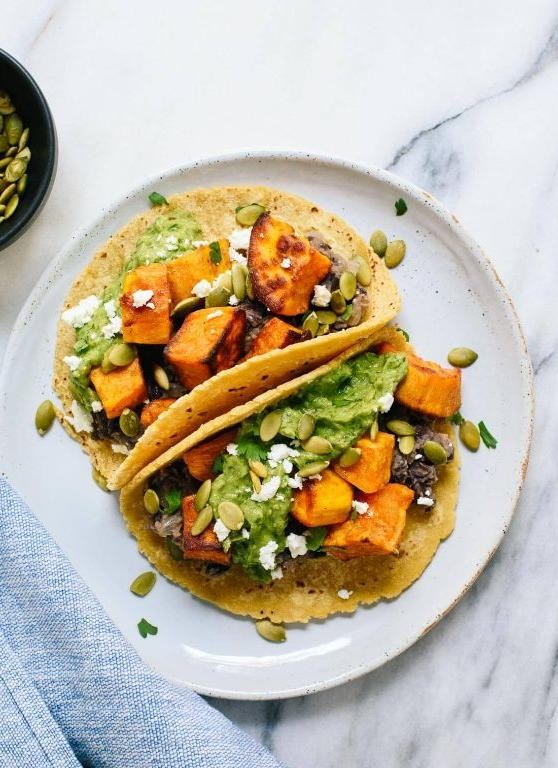
Flavorful and vibrant, these Sweet Potato and Black Bean Tacos are a delightful fusion of sweet and savory, wrapped in a warm tortilla for a meal that’s as nutritious as it is delicious. Perfect for a cozy dinner or a festive gathering, they promise a burst of color and flavor in every bite.
Ingredients
– 2 cups diced sweet potatoes
– 1 tbsp olive oil
– 1 tsp ground cumin
– 1 tsp smoked paprika
– 1/2 tsp salt
– 1 can (15 oz) black beans, rinsed and drained
– 8 small corn tortillas
– 1 avocado, sliced
– 1/4 cup chopped cilantro
– 1 lime, cut into wedges
Instructions
1. Preheat your oven to 400°F and line a baking sheet with parchment paper.
2. In a large bowl, toss the diced sweet potatoes with olive oil, cumin, smoked paprika, and salt until evenly coated.
3. Spread the sweet potatoes in a single layer on the prepared baking sheet and roast for 25 minutes, or until tender and slightly caramelized, stirring halfway through for even cooking.
4. While the sweet potatoes roast, warm the black beans in a small saucepan over medium heat for 5 minutes, stirring occasionally.
5. Heat the corn tortillas in a dry skillet over medium heat for 30 seconds on each side, or until soft and pliable.
6. To assemble the tacos, divide the roasted sweet potatoes and warm black beans among the tortillas.
7. Top each taco with avocado slices, chopped cilantro, and a squeeze of lime juice.
Delightfully textured with the softness of sweet potatoes, the creaminess of avocado, and the slight chew of black beans, these tacos are a feast for the senses. Serve them with extra lime wedges on the side for an added zing, or pair with a crisp salad for a complete meal.
Pumpkin Spice Oatmeal

Savory mornings call for a comforting bowl of Pumpkin Spice Oatmeal, a dish that marries the warmth of autumn spices with the creamy texture of steel-cut oats, creating a breakfast that’s both nourishing and indulgent.
Ingredients
- 1 cup steel-cut oats
- 2 cups water
- 1 cup milk
- 1/2 cup pumpkin puree
- 2 tbsp maple syrup
- 1 tsp vanilla extract
- 1/2 tsp cinnamon
- 1/4 tsp nutmeg
- 1/4 tsp ginger
- 1/8 tsp cloves
- Pinch of salt
Instructions
- In a medium saucepan, bring 2 cups of water to a boil over high heat.
- Stir in 1 cup of steel-cut oats and reduce the heat to low, allowing the mixture to simmer uncovered for 25 minutes, stirring occasionally to prevent sticking.
- After 25 minutes, add 1 cup of milk, 1/2 cup of pumpkin puree, 2 tbsp of maple syrup, 1 tsp of vanilla extract, 1/2 tsp of cinnamon, 1/4 tsp of nutmeg, 1/4 tsp of ginger, 1/8 tsp of cloves, and a pinch of salt to the saucepan. Stir well to combine.
- Continue to cook the oatmeal on low heat for an additional 10 minutes, stirring frequently, until the mixture thickens to your desired consistency.
- Remove the saucepan from the heat and let the oatmeal sit for 5 minutes to allow the flavors to meld together.
Yielded with a velvety texture and a harmonious blend of spices, this Pumpkin Spice Oatmeal is a testament to the beauty of simple ingredients transformed. Serve it topped with a dollop of whipped cream and a sprinkle of cinnamon for an extra touch of elegance.
Apple Cinnamon Rice Cakes

Revered for their simplicity and versatility, rice cakes serve as the perfect canvas for a myriad of flavors, and this apple cinnamon rendition is no exception. Combining the warmth of cinnamon with the sweet tartness of apples, this dish is a delightful nod to the comforting flavors of fall.
Ingredients
- 1 cup short-grain white rice
- 2 cups water
- 1 medium apple, finely diced
- 1 tbsp ground cinnamon
- 2 tbsp honey
- 1 tbsp unsalted butter
- 1/4 tsp salt
Instructions
- Rinse the short-grain white rice under cold water until the water runs clear to remove excess starch.
- In a medium saucepan, combine the rinsed rice, water, and salt. Bring to a boil over high heat.
- Once boiling, reduce the heat to low, cover, and simmer for 18 minutes. Avoid lifting the lid to ensure even cooking.
- While the rice cooks, melt the unsalted butter in a skillet over medium heat. Add the finely diced apple and sauté for 5 minutes until slightly softened.
- Stir in the ground cinnamon and honey to the apples, cooking for an additional 2 minutes to blend the flavors.
- Fluff the cooked rice with a fork, then gently fold in the apple cinnamon mixture until evenly distributed.
- Press the mixture into a greased 8-inch square pan, using the back of a spoon to compact it evenly.
- Allow the rice cakes to cool for at least 30 minutes before cutting into squares. This resting period helps them hold their shape.
Perfectly balanced between sweet and spicy, these apple cinnamon rice cakes offer a chewy texture with bursts of soft apple. Serve them warm with a drizzle of honey for an extra touch of sweetness or alongside a scoop of vanilla ice cream for a decadent dessert.
Banana Bread Energy Bites
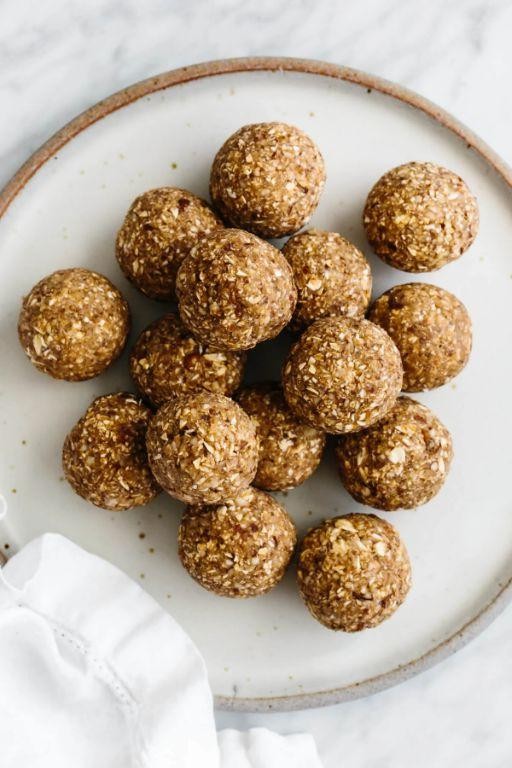
Kickstart your day with these Banana Bread Energy Bites, a delightful fusion of wholesome ingredients and comforting flavors, perfectly sized for on-the-go nourishment. Crafted with ripe bananas and a hint of cinnamon, these bites are a testament to simplicity meeting elegance.
Ingredients
- 1 cup rolled oats
- 2 ripe bananas, mashed
- 1/4 cup almond butter
- 2 tbsp honey
- 1/2 tsp cinnamon
- 1/4 cup mini chocolate chips
- 1/4 cup chopped walnuts
Instructions
- In a large mixing bowl, combine 1 cup rolled oats, 2 mashed ripe bananas, 1/4 cup almond butter, 2 tbsp honey, and 1/2 tsp cinnamon until well mixed.
- Gently fold in 1/4 cup mini chocolate chips and 1/4 cup chopped walnuts to distribute evenly throughout the mixture.
- Using a tablespoon, scoop the mixture and roll into 1-inch balls. For uniform size, a small cookie scoop can be used.
- Place the balls on a parchment-lined baking sheet and refrigerate for at least 30 minutes to firm up. This step ensures they hold their shape.
- Once set, transfer the energy bites to an airtight container. Store in the refrigerator for up to 1 week for optimal freshness.
Moist and chewy with a satisfying crunch from the walnuts, these Banana Bread Energy Bites are a harmonious blend of textures. Enjoy them as a quick breakfast or a post-workout snack, or serve them alongside a dollop of Greek yogurt for an extra protein boost.
Maple Syrup and Walnut Oatmeal
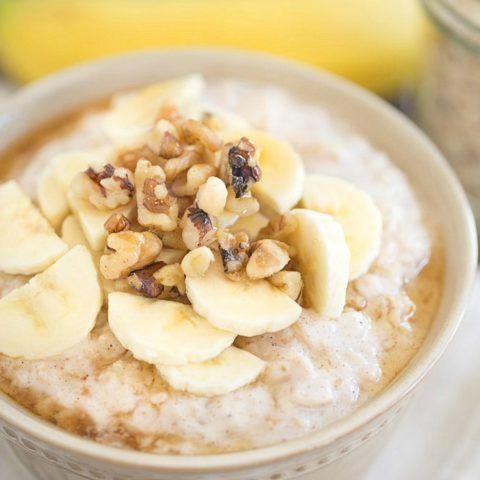
Savory mornings call for a breakfast that balances simplicity with indulgence, and this Maple Syrup and Walnut Oatmeal does just that. Its comforting warmth and rich flavors make it a perfect start to any day, offering a delightful contrast between the creamy oats and the crunchy walnuts, all sweetened with the natural elegance of maple syrup.
Ingredients
- 1 cup rolled oats
- 2 cups water
- 1/4 tsp salt
- 2 tbsp maple syrup
- 1/4 cup walnuts, chopped
- 1/2 tsp vanilla extract
Instructions
- In a medium saucepan, bring 2 cups of water to a boil over high heat.
- Add 1 cup of rolled oats and 1/4 tsp of salt to the boiling water, then reduce the heat to medium-low.
- Simmer the oats, stirring occasionally, for about 5 minutes or until they have absorbed most of the water and reached your desired consistency. Tip: For creamier oatmeal, stir more frequently.
- Remove the saucepan from the heat and stir in 2 tbsp of maple syrup and 1/2 tsp of vanilla extract.
- Divide the oatmeal into bowls and top each serving with 1/4 cup of chopped walnuts. Tip: Toasting the walnuts beforehand enhances their flavor and adds a delightful crunch.
- Drizzle additional maple syrup on top if desired, and serve immediately. Tip: A pinch of cinnamon can add a warm, spicy note to the dish.
Lusciously creamy with a hint of vanilla and the earthy crunch of walnuts, this oatmeal is a testament to the beauty of simple ingredients coming together. Serve it in your favorite bowl with a side of fresh fruit for a breakfast that feels both nourishing and decadent.
Conclusion
Outdoor enthusiasts and home cooks alike will find our ’22 Adventurous Backpack Battles Recipes Ultimate’ roundup a treasure trove of inspiration for meals that are as easy to make as they are delicious. Whether you’re planning your next adventure or just looking to spice up your meal routine, these recipes promise to deliver. Don’t forget to try them out, share your favorites in the comments, and pin this article for your next culinary quest!