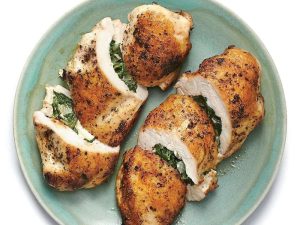
Ever dreamed of whisking your taste buds away to the land down under without leaving your kitchen? Australia’s deserts are not just about stunning landscapes but also home to some uniquely delicious treats that are sure to add an exciting twist to your dessert repertoire. From the iconic Pavlova to the lesser-known but equally tempting Lamingtons, we’ve rounded up 18 mouthwatering recipes that promise to bring a slice of Australian sweetness to your table. Ready to explore?
Pavlova with Fresh Kiwi and Cream
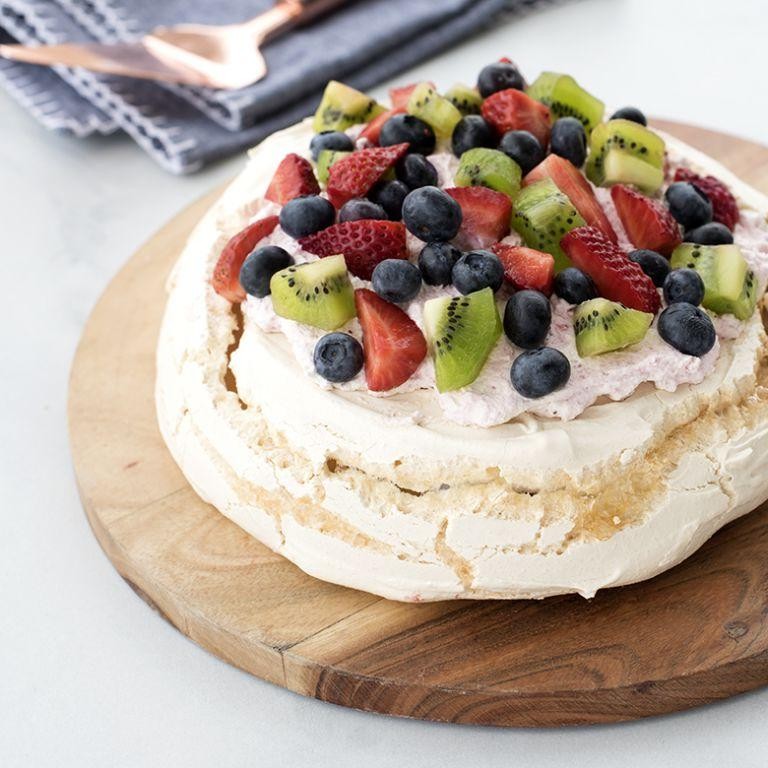
Make this Pavlova with Fresh Kiwi and Cream for a dessert that’s as stunning as it is delicious. Meringue, cream, and kiwi come together in a symphony of textures and flavors.
Ingredients
- 4 large egg whites (room temperature eggs whip up better)
- 1 cup granulated sugar (I find this amount perfectly sweet)
- 1 tsp white vinegar (helps stabilize the meringue)
- 1 tsp vanilla extract (pure vanilla makes all the difference)
- 1 cup heavy cream (chilled for best whipping results)
- 2 kiwis, peeled and sliced (ripe but firm)
Instructions
- Preheat oven to 250°F. Line a baking sheet with parchment paper.
- In a clean bowl, beat egg whites on high speed until soft peaks form, about 3 minutes.
- Gradually add sugar, 1 tbsp at a time, beating until stiff, glossy peaks form, about 5 minutes.
- Gently fold in vinegar and vanilla extract with a spatula.
- Spread meringue into a 8-inch circle on prepared sheet. Make a slight indentation in the center.
- Bake for 1 hour 30 minutes. Turn off oven; leave meringue inside to cool completely, about 1 hour.
- Whip heavy cream until stiff peaks form, about 2 minutes.
- Spread whipped cream over cooled meringue. Top with kiwi slices.
Delight in the crisp shell giving way to a marshmallow-like interior, topped with creamy and tangy kiwi. Serve immediately for the best texture contrast.
Lamington Squares with Raspberry Jam
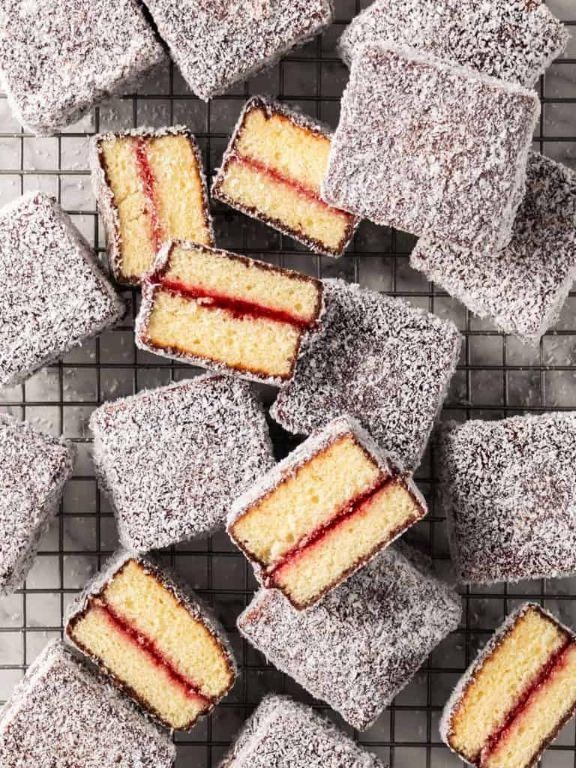
Aussie-inspired Lamington Squares with Raspberry Jam bring a delightful twist to your dessert table. Perfect for afternoon tea or a sweet snack, these squares are irresistibly soft and jam-packed with flavor.
Ingredients
- 2 cups all-purpose flour (I always sift mine for extra lightness)
- 1 cup sugar (granulated works best here)
- 3 eggs, room temperature (they blend smoother when not cold)
- 1/2 cup unsalted butter, melted (I find unsalted gives better control over sweetness)
- 1/2 cup raspberry jam (go for seedless if you prefer a smoother texture)
- 2 cups desiccated coconut (for that classic Lamington coating)
- 1 cup milk (whole milk adds richness)
- 1 tsp vanilla extract (pure extract makes all the difference)
Instructions
- Preheat your oven to 350°F (175°C). Grease a 9×9 inch baking pan.
- In a large bowl, whisk together flour and sugar. Tip: Sifting the flour prevents lumps.
- Add eggs, melted butter, and vanilla extract to the dry ingredients. Mix until just combined.
- Gradually pour in milk, stirring continuously to form a smooth batter.
- Pour the batter into the prepared pan. Bake for 25 minutes or until a toothpick comes out clean.
- Let the cake cool completely in the pan. Tip: Cooling ensures the jam spreads evenly without soaking in.
- Cut the cooled cake into squares. Spread a thin layer of raspberry jam on top of each square.
- Roll each jam-covered square in desiccated coconut until fully coated. Tip: Use a fork to handle the squares for less mess.
Rich in texture and flavor, these Lamington Squares offer a perfect balance of sweetness and tartness. Serve them on a vintage plate for a charming, rustic look.
Anzac Biscuits with a Twist of Lemon
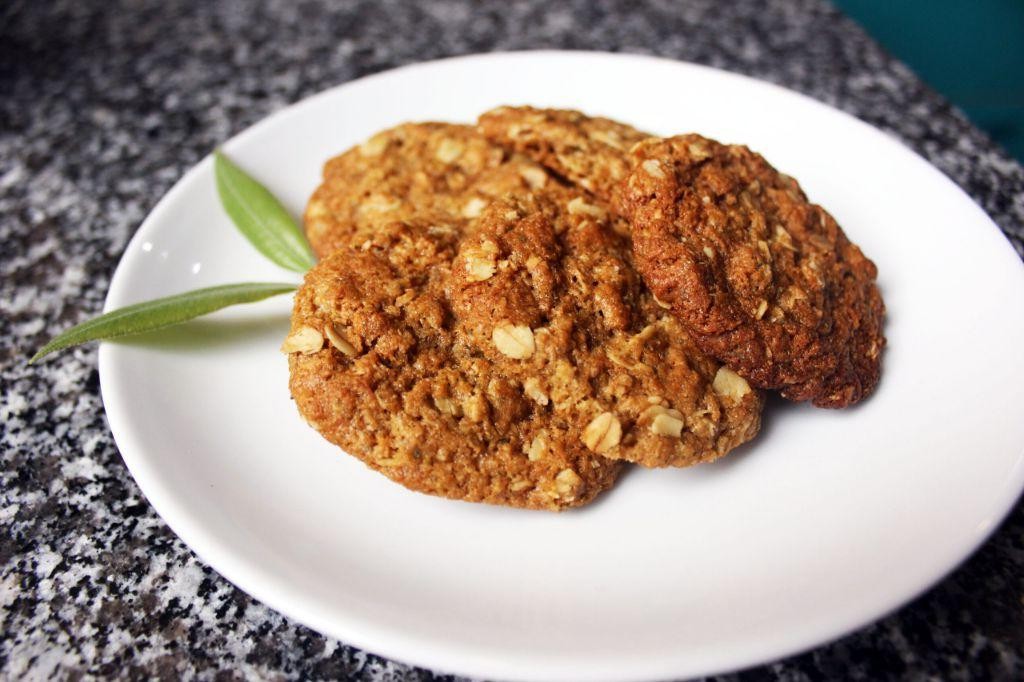
Unearth the perfect blend of crunch and zest with these Anzac Biscuits, reimagined with a bright lemon twist for a modern take on the classic.
Ingredients
- 1 cup rolled oats – for that essential chewiness.
- 1 cup all-purpose flour – I always sift mine to avoid lumps.
- 1 cup desiccated coconut – adds a lovely texture and tropical hint.
- 3/4 cup brown sugar – packed tight for that deep molasses flavor.
- 1/2 cup butter – unsalted and melted, because control over salt is key.
- 2 tbsp golden syrup – my secret for that iconic Anzac stickiness.
- 1 tsp baking soda – to give them a slight lift.
- Zest of 1 lemon – freshly grated, none of that bottled stuff.
- 2 tbsp boiling water – just enough to dissolve the baking soda.
Instructions
- Preheat your oven to 350°F (175°C) and line a baking tray with parchment paper.
- In a large bowl, mix the oats, flour, coconut, and brown sugar until well combined.
- Add the melted butter and golden syrup to the dry ingredients, stirring until the mixture is evenly moistened.
- Dissolve the baking soda in the boiling water, then quickly stir it into the mixture along with the lemon zest. Tip: Work fast here to keep the baking soda active.
- Roll tablespoon-sized portions of the mixture into balls, place them on the prepared tray, and flatten slightly. Tip: Space them 2 inches apart; they’ll spread as they bake.
- Bake for 12-15 minutes or until golden brown. Tip: Let them cool on the tray for 5 minutes before transferring to a wire rack; they firm up as they cool.
Anzac biscuits with a twist of lemon offer a delightful contrast between the traditional hearty oat texture and the fresh, citrusy zing. Serve them alongside a cup of tea or crumbled over vanilla ice cream for an unexpected dessert.
Golden Syrup Dumplings with Ice Cream
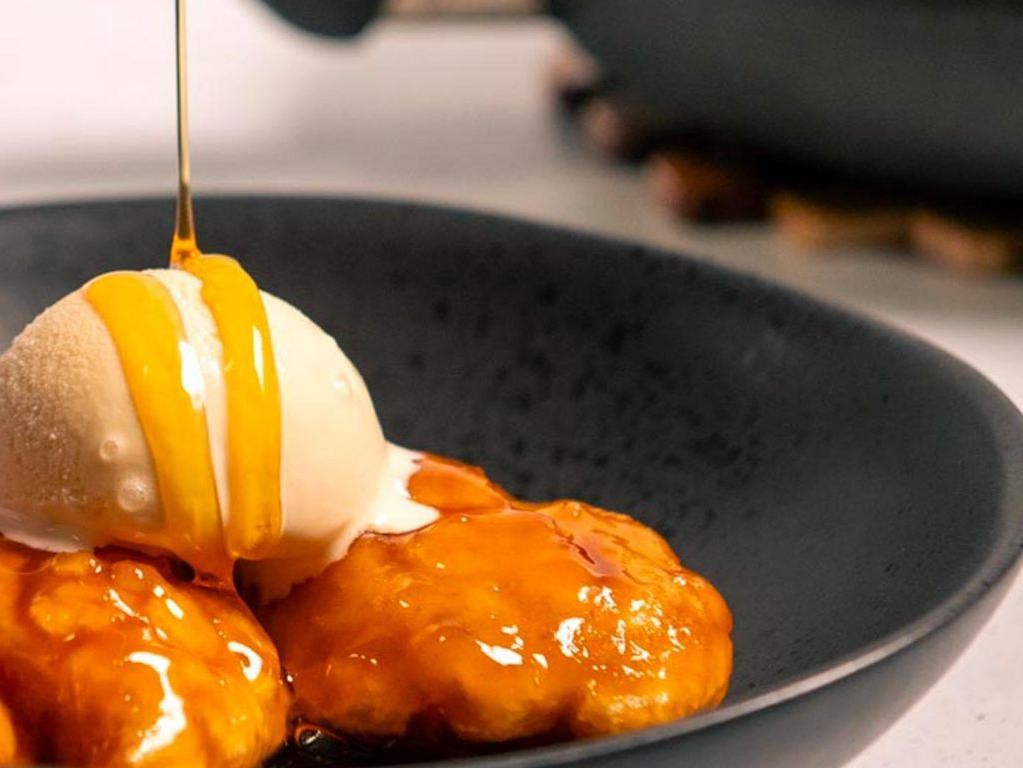
Zesty and comforting, these golden syrup dumplings with ice cream are a sweet escape. Perfect for when you crave something indulgent yet simple.
Ingredients
- 1 cup all-purpose flour (I swear by King Arthur for consistency)
- 2 tbsp unsalted butter, chilled (European-style butter adds richness)
- 1/4 cup milk (whole milk makes them extra tender)
- 1 tsp baking powder (aluminum-free for no bitter aftertaste)
- 1/2 cup golden syrup (Lyle’s has the best depth of flavor)
- 1 cup water
- Vanilla ice cream, for serving (Häagen-Dazs vanilla bean is my pick)
Instructions
- Preheat your oven to 350°F. A properly heated oven ensures even cooking.
- In a bowl, mix flour and baking powder. Sifting prevents lumps for smoother dumplings.
- Cut in butter until mixture resembles coarse crumbs. Cold butter is key for flakiness.
- Stir in milk just until combined. Overmixing leads to tough dumplings.
- Shape dough into 8 small balls. Wet hands prevent sticking.
- In a saucepan, combine golden syrup and water. Bring to a boil over medium heat.
- Gently place dumplings into boiling syrup. Reduce heat to low, cover, simmer for 15 minutes.
- Remove lid, bake in oven for 10 minutes until tops are golden. This step adds a delightful crust.
- Serve warm with a scoop of vanilla ice cream. The contrast of hot and cold is magical.
Yieldingly soft inside with a sticky-sweet glaze, these dumplings are a textural dream. Try drizzling extra syrup for a glossy finish.
Sticky Date Pudding with Butterscotch Sauce
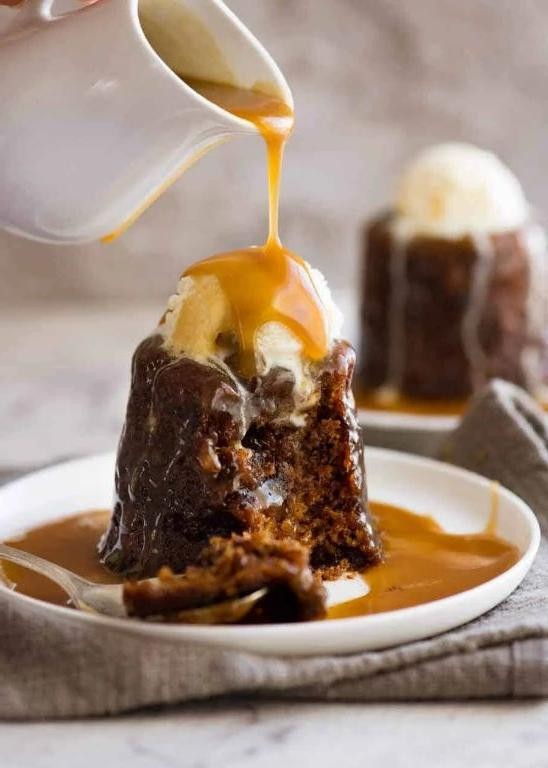
Warm up your oven for this classic dessert that’s a hug in a bowl. Sticky Date Pudding with Butterscotch Sauce is your go-to for comfort and indulgence.
Ingredients
- 1 cup pitted dates, chopped (Medjool dates are my favorite for their natural sweetness)
- 1 tsp baking soda
- 1 cup boiling water
- 1/4 cup unsalted butter, softened (I always use unsalted to control the sweetness)
- 3/4 cup granulated sugar
- 2 large eggs, room temperature (they blend better when not cold)
- 1 tsp vanilla extract
- 1 cup all-purpose flour
- 1 tsp baking powder
- 1/2 cup heavy cream (for the sauce, go for the full-fat version for richness)
- 1/2 cup brown sugar, packed
- 2 tbsp unsalted butter
- 1 tsp vanilla extract
Instructions
- Preheat your oven to 350°F (175°C). Grease an 8-inch square baking dish.
- In a bowl, combine chopped dates and baking soda. Pour boiling water over them and let sit for 10 minutes. This softens the dates beautifully.
- In another bowl, cream together 1/4 cup butter and granulated sugar until light and fluffy. Tip: Scrape the bowl sides to ensure even mixing.
- Beat in eggs one at a time, then stir in 1 tsp vanilla extract.
- Sift flour and baking powder together, then fold into the wet ingredients. Tip: Don’t overmix to keep the pudding tender.
- Stir in the date mixture until just combined. Pour into the prepared dish.
- Bake for 35-40 minutes, or until a toothpick comes out clean. Tip: The top should be springy to the touch.
- For the sauce, heat heavy cream, brown sugar, and 2 tbsp butter in a saucepan over medium heat. Stir until sugar dissolves and sauce thickens, about 5 minutes. Remove from heat and stir in 1 tsp vanilla extract.
- Serve warm pudding drizzled with butterscotch sauce. Now, enjoy the moist, date-packed pudding with its rich, velvety sauce. Perfect with a scoop of vanilla ice cream for contrast.
Not just a dessert, this pudding is a celebration of textures and flavors. The sticky sweetness of dates pairs magically with the deep, buttery sauce. Try it with a dollop of whipped cream for an extra treat.
Chocolate Ripple Cake with Whipped Cream

Very few desserts are as effortlessly elegant as this Chocolate Ripple Cake with Whipped Cream. It’s a no-bake wonder that combines rich chocolate and airy whipped cream for a decadent treat.
Ingredients
- 2 cups heavy cream (chilled for best whipping results)
- 1/4 cup powdered sugar (I like mine not too sweet, adjust to your preference)
- 1 tsp vanilla extract (pure vanilla makes a difference)
- 1 package chocolate ripple cookies (about 24 cookies, the crispier, the better)
Instructions
- In a large bowl, whip the heavy cream on medium-high speed until soft peaks form, about 3 minutes.
- Add the powdered sugar and vanilla extract to the whipped cream. Continue whipping until stiff peaks form, about 2 more minutes. Tip: Chill your bowl and beaters beforehand for quicker whipping.
- Spread a small amount of whipped cream on the base of your serving plate to anchor the first layer of cookies.
- Place a layer of chocolate ripple cookies side by side on the whipped cream base.
- Cover the cookie layer with a generous layer of whipped cream, about 1/2 inch thick.
- Repeat the layers, ending with a final layer of whipped cream on top. Tip: For a neater appearance, smooth the sides with a spatula.
- Refrigerate the cake for at least 4 hours, or overnight. Tip: The longer it chills, the softer the cookies become, blending beautifully with the cream.
Delightfully creamy with a hint of crunch from the cookies, this cake is a textural dream. Serve chilled with a dusting of cocoa powder or fresh berries for a pop of color.
Vanilla Slice with Passionfruit Icing
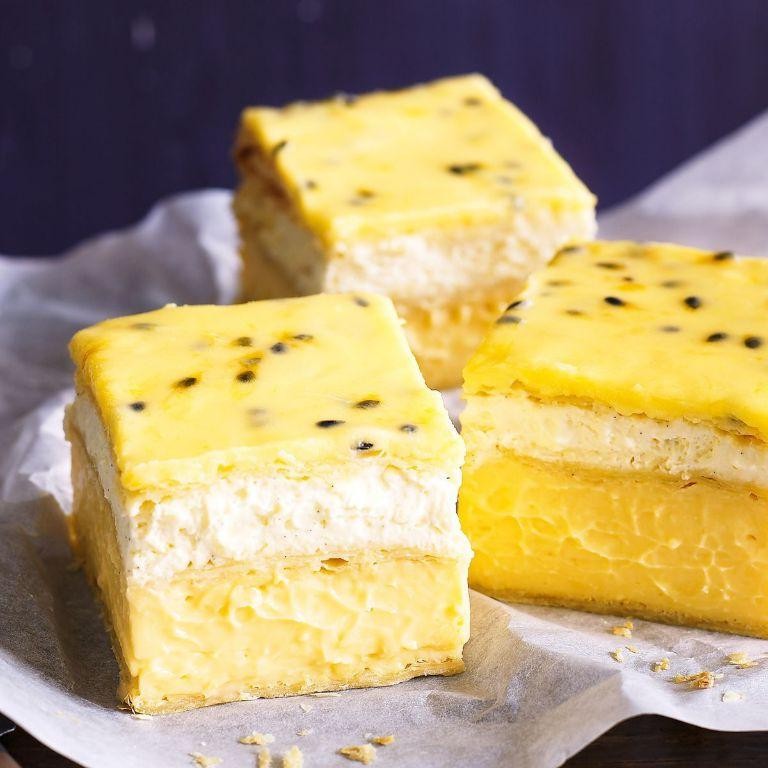
Kickstart your dessert game with this Vanilla Slice topped with a tangy Passionfruit Icing. It’s a foolproof recipe that balances sweetness with a tropical twist.
Ingredients
- 2 cups all-purpose flour (I swear by King Arthur for consistent results)
- 1 cup unsalted butter, chilled and cubed (European-style butter makes a difference)
- 1/2 cup cold water (ice-cold ensures a flaky crust)
- 1 1/2 cups whole milk (for richness, don’t skimp)
- 3/4 cup granulated sugar (I like to use organic for a cleaner taste)
- 1/4 cup cornstarch (this is your thickening hero)
- 4 egg yolks (room temp blends smoother)
- 2 tsp vanilla extract (real deal, not imitation)
- 1/2 cup passionfruit pulp (fresh or frozen, but strain the seeds if you prefer)
- 1 cup powdered sugar (sifted to avoid lumps)
Instructions
- Preheat oven to 375°F. This ensures even baking from the get-go.
- In a large bowl, mix flour and butter until crumbs form. Cold butter is key for flakiness.
- Gradually add water, stirring until dough comes together. Don’t overwork it.
- Roll dough to 1/4-inch thickness on a floured surface. Even thickness means even baking.
- Cut into rectangles and bake for 15-20 minutes until golden. Watch closely after 15 minutes.
- For the custard, heat milk in a saucepan until just simmering. Scalding milk prevents a grainy texture.
- Whisk sugar, cornstarch, and yolks in a bowl. Tempering avoids scrambled eggs.
- Slowly pour hot milk into yolk mixture, whisking constantly. This step is all about patience.
- Return to saucepan and cook on medium until thick, about 5 minutes. Stir non-stop to avoid lumps.
- Off heat, stir in vanilla. Let cool slightly before layering on baked crust.
- For the icing, mix passionfruit pulp and powdered sugar until smooth. Adjust thickness with a bit more sugar or pulp.
- Spread icing over cooled custard layer. Chill for at least 2 hours before slicing.
Ultimate satisfaction comes from the contrast of crisp pastry, creamy custard, and zesty icing. Serve chilled with a sprinkle of crushed pistachios for extra crunch.
Caramel Slice with Sea Salt
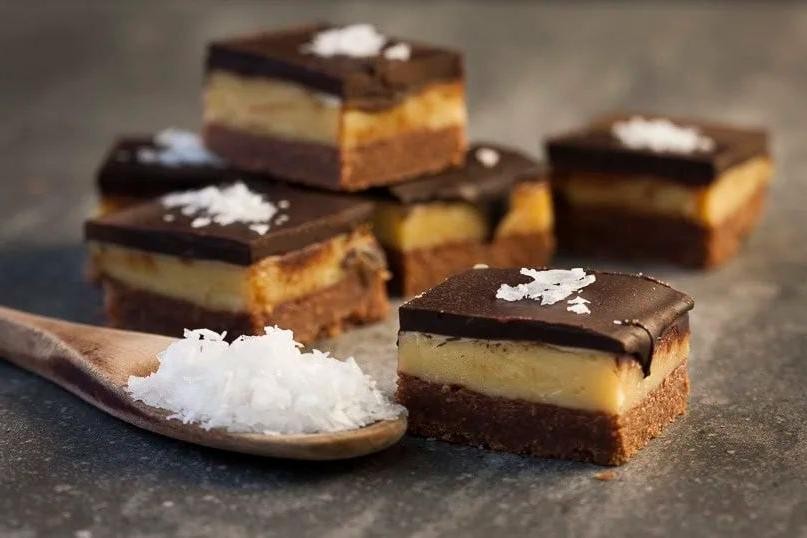
Nothing beats the combination of sweet and salty, especially when it comes to this caramel slice with sea salt. It’s a simple yet indulgent treat that’s perfect for any occasion.
Ingredients
- 1 cup all-purpose flour (I like to sift mine for a lighter base)
- 1/2 cup unsalted butter, melted (go for the good stuff, it makes a difference)
- 1/4 cup granulated sugar (this is just enough to sweeten the base without overpowering the caramel)
- 1 can (14 oz) sweetened condensed milk (the star of the show, don’t skimp)
- 2 tbsp unsalted butter (extra for that rich caramel flavor)
- 2 tbsp golden syrup (this adds a beautiful color and depth)
- 1 tsp vanilla extract (pure is my preference for the best flavor)
- 1/2 tsp sea salt (flaky sea salt is ideal for that perfect finish)
- 1 cup dark chocolate chips (I find 70% cocoa strikes the right balance)
Instructions
- Preheat your oven to 350°F (175°C). Line an 8-inch square baking pan with parchment paper, leaving some overhang for easy removal.
- In a bowl, mix 1 cup all-purpose flour, 1/2 cup melted unsalted butter, and 1/4 cup granulated sugar until combined. Press firmly into the prepared pan. Bake for 15 minutes or until lightly golden. Tip: Use the back of a spoon to smooth the base for an even layer.
- While the base bakes, combine 1 can sweetened condensed milk, 2 tbsp unsalted butter, and 2 tbsp golden syrup in a saucepan over medium heat. Stir constantly for 5-7 minutes until thickened and golden. Tip: Keep the heat medium to avoid burning the caramel.
- Remove the base from the oven and pour the caramel over, spreading evenly. Sprinkle with 1/2 tsp sea salt. Return to the oven for 10 minutes. Tip: The caramel will bubble but should not brown too much.
- Let the slice cool slightly, then melt 1 cup dark chocolate chips over a double boiler or in the microwave in 30-second bursts. Spread over the caramel layer. Chill in the fridge for at least 2 hours until set.
Lusciously rich with a perfect balance of sweet and salty, this caramel slice is a crowd-pleaser. Serve it chilled for a firmer texture or slightly warmed for a gooier experience. Either way, it’s irresistible.
Banana Bread with Walnuts and Honey
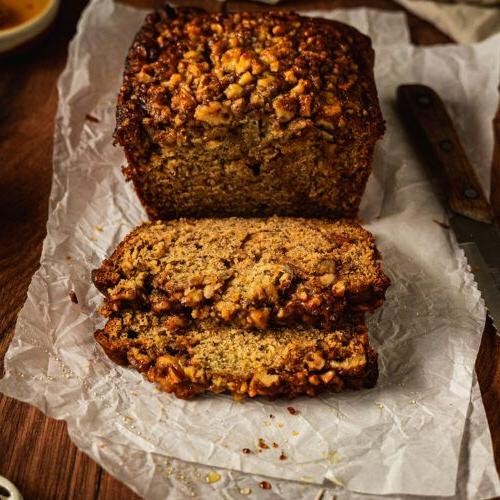
Banana bread never gets old, especially when it’s packed with crunchy walnuts and sweetened naturally with honey. This version is straightforward, moist, and just sweet enough.
Ingredients
– 3 ripe bananas (the spottier, the better for sweetness)
– 1/3 cup melted butter (I use unsalted for control)
– 1/2 cup honey (local if you can find it)
– 1 egg (room temp blends easier)
– 1 tsp vanilla extract (pure makes a difference)
– 1 tsp baking soda (fresh for best rise)
– Pinch of salt (balances the sweetness)
– 1 1/2 cups all-purpose flour (sifted to avoid lumps)
– 1/2 cup chopped walnuts (toasted for extra crunch)
Instructions
1. Preheat your oven to 350°F (175°C). Grease a 9×5 inch loaf pan.
2. In a large bowl, mash the bananas with a fork until smooth.
3. Stir the melted butter into the mashed bananas.
4. Mix in the honey, egg, and vanilla extract.
5. Sprinkle the baking soda and salt over the mixture and stir in.
6. Add the flour last, mixing just until incorporated. Tip: Overmixing leads to tough bread.
7. Fold in the chopped walnuts. Tip: Reserve a few for topping if you like extra crunch.
8. Pour the batter into the prepared loaf pan. Tip: Smooth the top for an even bake.
9. Bake for 50-60 minutes, or until a toothpick comes out clean.
10. Let cool in the pan for 10 minutes, then transfer to a wire rack.
Enjoy this banana bread warm with a dab of butter or as is. The honey gives it a subtle floral note, while the walnuts add a satisfying crunch. Perfect for breakfast or an afternoon snack.
Apple and Rhubarb Crumble
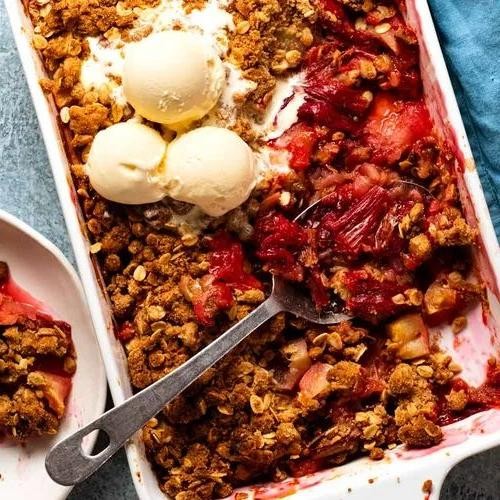
Craving a dessert that balances sweet and tart? This apple and rhubarb crumble is your answer.
Ingredients
- 2 cups diced rhubarb (fresh is best, but frozen works in a pinch)
- 3 cups peeled, diced apples (I love Honeycrisp for their sweetness and firmness)
- 1 cup granulated sugar (adjust based on your fruit’s tartness)
- 1 tsp cinnamon (a must for that warm spice kick)
- 1 cup all-purpose flour (I always sift mine for a lighter crumble)
- 1/2 cup rolled oats (for that perfect crunch)
- 1/2 cup cold unsalted butter, cubed (keep it cold for the best texture)
- 1/2 cup brown sugar (for a deeper flavor)
Instructions
- Preheat your oven to 375°F. Grease a 9-inch baking dish lightly.
- In a large bowl, mix rhubarb, apples, granulated sugar, and cinnamon until well combined. Pour into the baking dish.
- In another bowl, combine flour, oats, and brown sugar. Add cold butter cubes. Use your fingers to rub the butter into the dry ingredients until the mixture resembles coarse crumbs.
- Sprinkle the crumble mixture evenly over the fruit in the baking dish.
- Bake for 35-40 minutes, or until the topping is golden and the fruit is bubbling at the edges.
- Let it cool for 10 minutes before serving. This rest time helps the juices thicken slightly.
Golden and bubbling straight from the oven, this crumble offers a delightful contrast between the soft, tangy fruit and the crisp, buttery topping. Serve it warm with a scoop of vanilla ice cream for an extra indulgent treat.
Peach Melba with Vanilla Bean Ice Cream
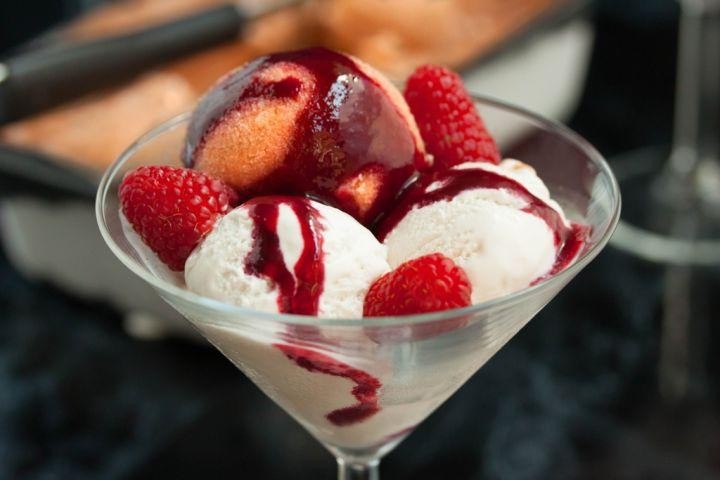
Nothing beats the classic combination of ripe peaches and raspberry sauce over creamy vanilla bean ice cream. Perfect for summer evenings.
Ingredients
- 2 ripe peaches, peeled and halved (I find yellow peaches sweeter)
- 1 cup raspberries (fresh or frozen, but fresh gives a brighter flavor)
- 1/4 cup granulated sugar (adjust if your peaches are very sweet)
- 1 tbsp lemon juice (freshly squeezed makes a difference)
- 1 pint vanilla bean ice cream (splurge on the good stuff)
- 1/2 tsp vanilla extract (pure, not imitation)
- 1/4 cup water (filtered if you’re picky like me)
Instructions
- In a small saucepan, combine raspberries, sugar, lemon juice, and water over medium heat.
- Bring to a simmer, stirring occasionally, until sugar dissolves and raspberries break down, about 5 minutes.
- Remove from heat and strain through a fine-mesh sieve to remove seeds. Cool sauce to room temperature.
- Preheat grill to medium-high (about 375°F). Lightly oil grill grates.
- Place peach halves cut side down on grill. Cook until slightly charred and softened, about 3 minutes per side.
- Remove peaches from grill and let cool slightly.
- Scoop vanilla bean ice cream into serving bowls. Top with grilled peach halves.
- Drizzle cooled raspberry sauce over peaches and ice cream.
- Garnish with a few whole raspberries or a mint leaf if desired.
Warm peaches and cool ice cream create a delightful contrast. The raspberry sauce adds a tangy sweetness that ties everything together. Try serving it with a sprinkle of crushed pistachios for extra crunch.
Chocolate Self-Saucing Pudding
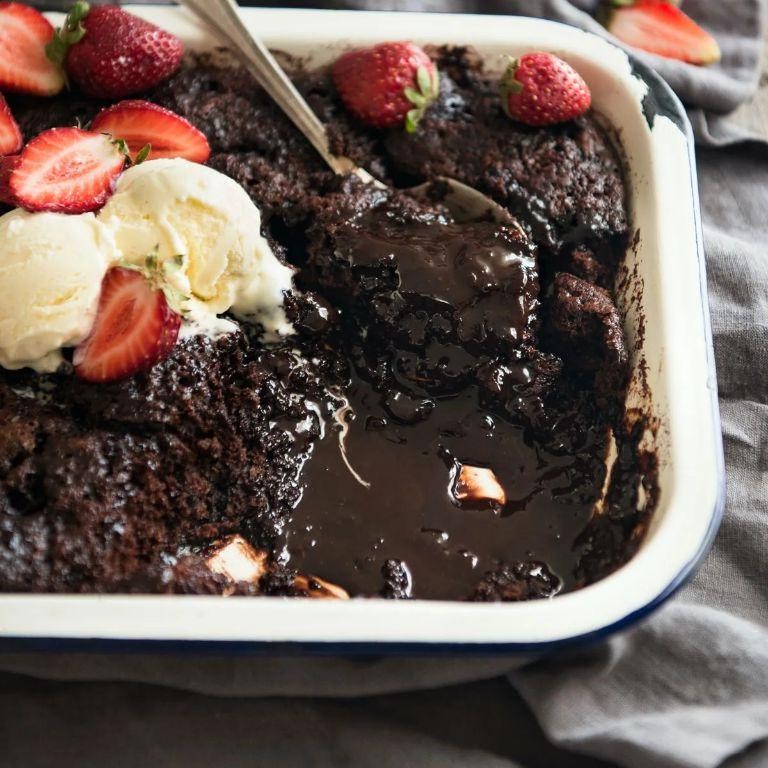
Outrageously indulgent and effortlessly simple, this chocolate self-saucing pudding is a dream for any chocolate lover. Perfect for those last-minute dessert cravings, it magically creates its own sauce while baking.
Ingredients
- 1 cup all-purpose flour (I always sift mine for a lighter texture)
- 2 tsp baking powder (aluminum-free gives a cleaner taste)
- 1/2 cup granulated sugar (I like to use organic cane sugar for a slight caramel note)
- 2 tbsp unsweetened cocoa powder (Dutch-processed for a deeper flavor)
- 1/2 cup milk (whole milk makes it richer)
- 2 tbsp melted butter (salted butter adds a nice contrast)
- 1 tsp vanilla extract (pure extract, not imitation)
- 1/2 cup brown sugar (pack it tight for accurate measurement)
- 1/4 cup unsweetened cocoa powder (yes, more cocoa!)
- 1 1/4 cups boiling water (freshly boiled works best)
Instructions
- Preheat your oven to 350°F. Grease a 9-inch baking dish lightly.
- In a medium bowl, whisk together the flour, baking powder, granulated sugar, and 2 tbsp cocoa powder.
- Stir in the milk, melted butter, and vanilla extract until just combined. Tip: Don’t overmix to keep the pudding tender.
- Spread the batter evenly in the prepared baking dish.
- Sprinkle the brown sugar and remaining 1/4 cup cocoa powder evenly over the batter.
- Carefully pour the boiling water over the back of a spoon onto the pudding mixture. Tip: This prevents disrupting the layers.
- Bake for 30 minutes, or until the top is firm but the sauce is bubbling underneath. Tip: A toothpick inserted should come out with moist crumbs.
Unbelievably, the pudding separates into a moist cake with a rich, gooey sauce beneath. Serve warm with a scoop of vanilla ice cream for a classic combo, or try it with fresh berries for a fruity twist.
Lemon Myrtle Cheesecake with Berry Coulis
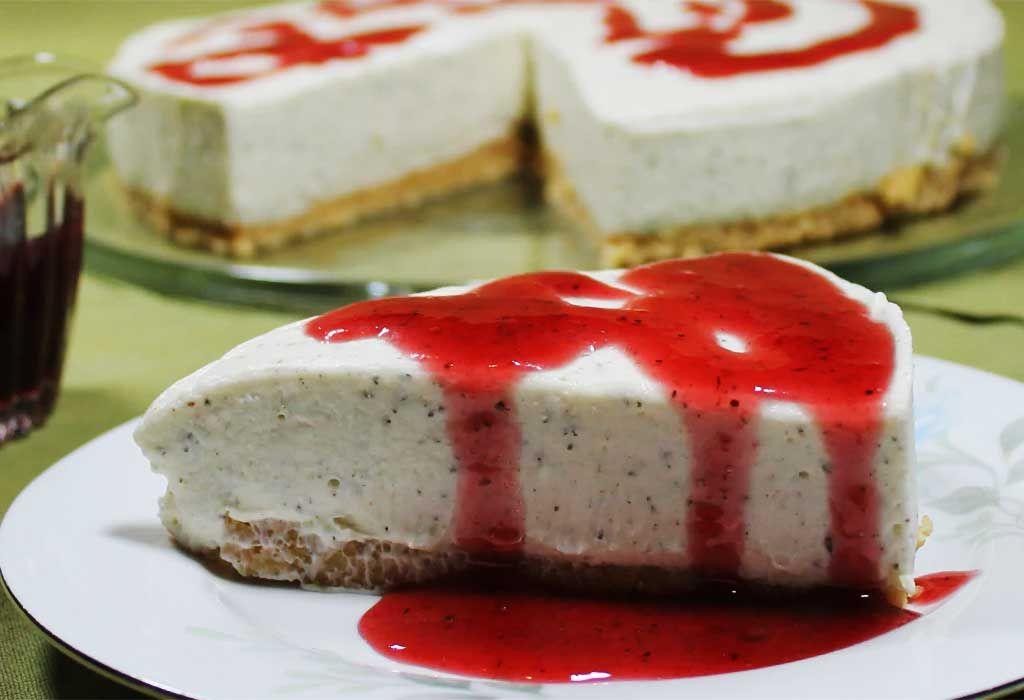
Dessert lovers, rejoice! This Lemon Myrtle Cheesecake with Berry Coulis combines tangy and sweet flavors for a refreshing finish. Perfect for summer gatherings or a cozy night in.
Ingredients
- 2 cups graham cracker crumbs (I always use honey-flavored for extra sweetness)
- 1/2 cup unsalted butter, melted (go for European-style butter if you can)
- 24 oz cream cheese, room temperature (this is key for a smooth texture)
- 1 cup granulated sugar
- 1 tbsp Lemon Myrtle powder (find it at specialty stores for that unique flavor)
- 3 large eggs, room temperature (they blend better when not cold)
- 1 cup mixed berries (frozen works, but fresh is best in season)
- 1/4 cup water
- 2 tbsp sugar (for the coulis, adjust based on berry sweetness)
Instructions
- Preheat oven to 325°F. Line a 9-inch springform pan with parchment paper.
- Mix graham cracker crumbs and melted butter. Press firmly into the pan base. Chill for 10 minutes.
- Beat cream cheese until smooth. Gradually add sugar and Lemon Myrtle powder.
- Add eggs one at a time, beating just until blended. Overmixing introduces air, causing cracks.
- Pour filling over crust. Smooth top with a spatula. Bake for 45 minutes until edges are set but center jiggles slightly.
- Turn off oven. Leave cheesecake inside with door ajar for 1 hour to prevent sinking.
- For the coulis, simmer berries, water, and sugar for 10 minutes. Strain for a smooth sauce.
- Cool cheesecake completely before adding coulis. Refrigerate for at least 4 hours.
Outstandingly creamy with a zesty kick, this cheesecake pairs wonderfully with the berry coulis. Try serving it with a sprinkle of Lemon Myrtle on top for an extra flavor boost.
Coconut and Lime Panna Cotta
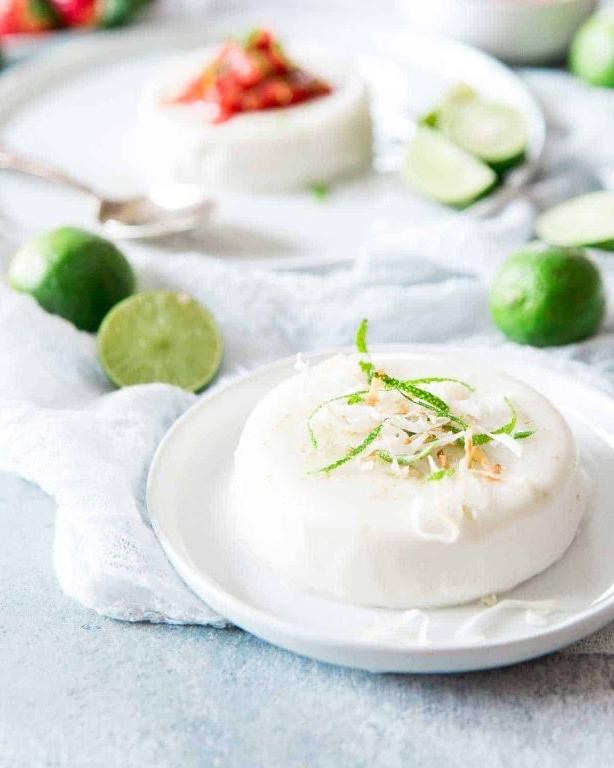
Summer calls for a dessert that’s both refreshing and indulgent. Coconut and Lime Panna Cotta hits the spot with its creamy texture and zesty finish.
Ingredients
- 2 cups heavy cream (go for organic if you can, it makes a difference)
- 1 cup coconut milk (full-fat for that rich flavor)
- 1/2 cup sugar (I like to use cane sugar for a slight caramel note)
- 2 tsp gelatin (powdered, it’s easier to work with)
- Zest of 2 limes (freshly grated, avoid the bitter white part)
- 1/4 cup lime juice (squeeze it yourself for the brightest flavor)
- 1 tsp vanilla extract (pure, not imitation)
Instructions
- In a medium saucepan, combine heavy cream, coconut milk, and sugar. Heat over medium heat until sugar dissolves, about 5 minutes. Do not boil.
- Sprinkle gelatin over 1/4 cup cold water in a small bowl. Let sit for 5 minutes to bloom.
- Remove cream mixture from heat. Stir in bloomed gelatin until fully dissolved.
- Add lime zest, lime juice, and vanilla extract to the mixture. Stir well.
- Strain the mixture through a fine-mesh sieve into a jug to remove zest and any lumps.
- Pour the mixture into 4 ramekins or glasses. Refrigerate for at least 4 hours, until set.
- Tip: For a smoother texture, stir the mixture occasionally as it cools before pouring into ramekins.
- Tip: Run a knife around the edge of the panna cotta before unmolding for a clean release.
- Tip: Serve with a sprinkle of toasted coconut or fresh berries for added texture and flavor.
Delightfully creamy with a perfect balance of sweet and tart, this panna cotta is a crowd-pleaser. Try layering it with a mango puree for a tropical twist.
Finger Lime and White Chocolate Mousse
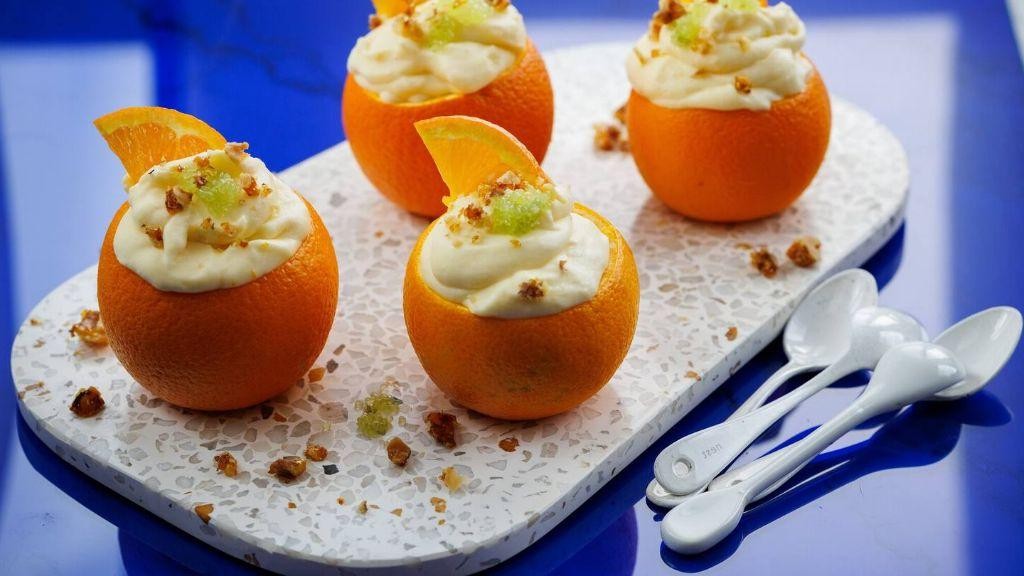
Yield to the unexpected pairing of finger lime and white chocolate in this mousse. It’s a refreshing twist on a classic dessert.
Ingredients
- 1 cup heavy cream (chilled, for best whip)
- 1/2 cup white chocolate chips (I love Ghirardelli for their meltability)
- 2 tbsp finger lime caviar (the citrus bursts are key)
- 2 large eggs (room temp, they blend smoother)
- 1/4 cup sugar (granulated, for that perfect sweetness)
- 1 tsp vanilla extract (pure, not imitation)
Instructions
- Melt white chocolate chips in a double boiler over simmering water, stirring until smooth. Tip: Ensure no water gets into the chocolate to avoid seizing.
- Separate eggs, placing yolks in a large bowl. Whisk yolks with sugar until pale and thick, about 3 minutes.
- Gently fold melted chocolate into yolk mixture. Add vanilla extract, mix well.
- In another bowl, whip heavy cream to stiff peaks. Tip: Chill your bowl and whisk for faster whipping.
- Fold whipped cream into chocolate mixture in two additions, keeping the mixture light and airy.
- Gently stir in finger lime caviar last, to preserve the citrus bursts. Tip: Don’t overmix to keep the texture varied.
- Divide mousse into serving glasses, chill for at least 2 hours before serving.
Kick back and enjoy the contrast of creamy mousse with the pop of finger lime. Serve with a sprinkle of lime zest for an extra zing.
Macadamia Nut Tart with Caramel Drizzle
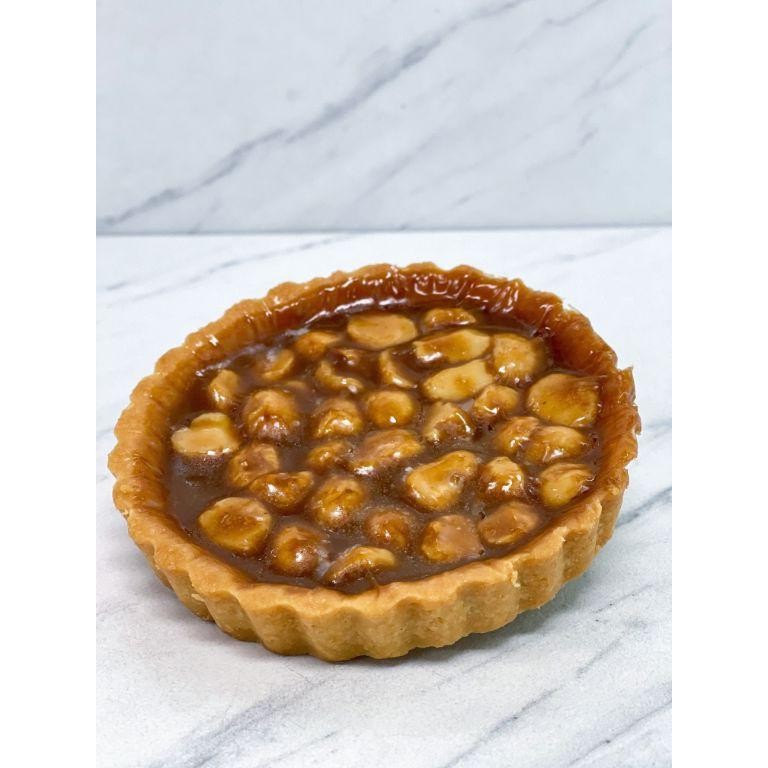
Let’s dive straight into making this decadent Macadamia Nut Tart with Caramel Drizzle. It’s a rich, buttery dessert that’s surprisingly simple to whip up.
Ingredients
- 1 1/2 cups all-purpose flour (I swear by King Arthur for consistent results)
- 1/2 cup unsalted butter, chilled and cubed (European-style butter adds extra richness)
- 1/4 cup granulated sugar
- 1 large egg yolk (room temp blends smoother)
- 1 cup macadamia nuts, roughly chopped (toasting them first brings out their flavor)
- 1/2 cup heavy cream
- 1/2 cup brown sugar, packed (dark brown sugar gives a deeper caramel taste)
- 2 tbsp unsalted butter
- 1 tsp vanilla extract (pure vanilla makes all the difference)
Instructions
- Preheat your oven to 350°F. This ensures even baking.
- In a food processor, combine flour, cubed butter, and granulated sugar. Pulse until mixture resembles coarse crumbs.
- Add egg yolk. Pulse until dough comes together. Tip: If dough is too dry, add ice water, 1 tbsp at a time.
- Press dough into a 9-inch tart pan. Chill for 20 minutes. This prevents shrinking.
- Bake crust for 15 minutes until lightly golden. Let cool slightly.
- Spread macadamia nuts evenly over the crust.
- In a saucepan, heat heavy cream, brown sugar, and butter over medium heat. Stir until sugar dissolves and mixture thickens, about 5 minutes.
- Remove from heat. Stir in vanilla. Pour over nuts.
- Bake for 20 minutes until caramel is bubbly. Tip: Place a baking sheet underneath to catch any drips.
- Cool completely before slicing. Tip: A warm knife cuts cleaner.
Zesty and rich, this tart pairs perfectly with a scoop of vanilla ice cream. The crunchy nuts and gooey caramel create a delightful contrast. Try serving it with a drizzle of dark chocolate for an extra indulgent twist.
Passionfruit and Mango Trifle
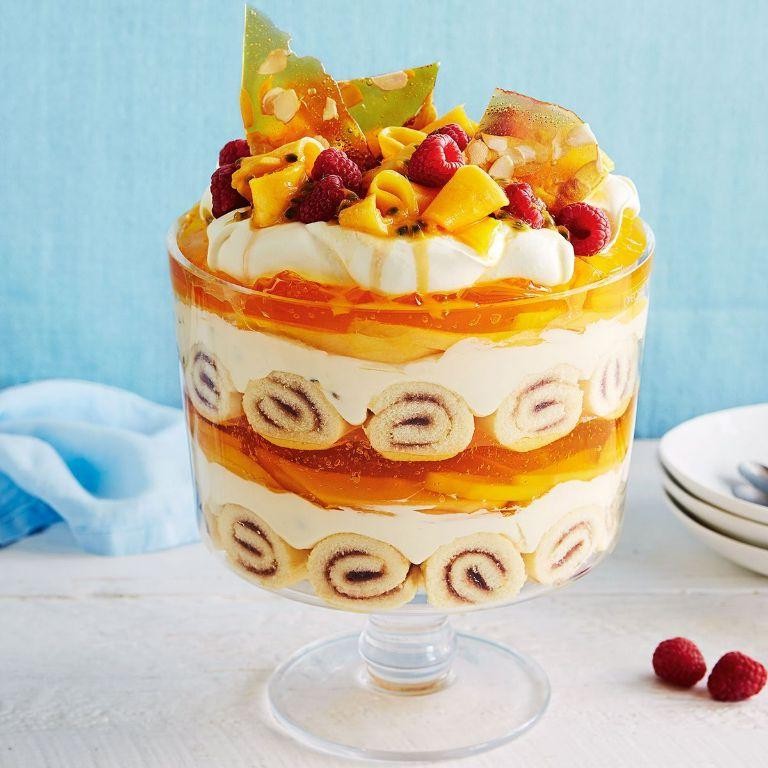
Ready to dive into a tropical dessert that’s as vibrant in flavor as it is in color? This Passionfruit and Mango Trifle layers creamy, fruity goodness for a show-stopping treat.
Ingredients
- 2 cups heavy cream (chilled for best whipping results)
- 1/4 cup powdered sugar (I find this amount perfectly sweetens the cream without overpowering the fruit)
- 1 tsp vanilla extract (pure vanilla makes a noticeable difference)
- 1 lb store-bought pound cake, cubed (homemade works too, but I’m all for shortcuts)
- 1 cup passionfruit pulp (strained to remove seeds if you prefer a smoother texture)
- 2 ripe mangoes, diced (about 2 cups, go for the sweetest you can find)
- 1/2 cup mango puree (blend some of the diced mango for this)
Instructions
- In a large bowl, whip the heavy cream, powdered sugar, and vanilla extract until stiff peaks form. Tip: Chill your bowl and beaters beforehand for quicker whipping.
- Layer half of the pound cake cubes at the bottom of a trifle dish or large glass bowl.
- Drizzle half of the passionfruit pulp over the cake, followed by half of the diced mango.
- Spread half of the whipped cream over the mango layer, smoothing it gently with a spatula.
- Repeat the layers with the remaining pound cake, passionfruit pulp, diced mango, and whipped cream.
- Drizzle the mango puree over the top layer of whipped cream. Tip: Use a spoon to create decorative swirls for a professional touch.
- Chill the trifle in the refrigerator for at least 2 hours before serving. Tip: This resting time allows the flavors to meld beautifully.
Mouthwatering layers of creamy, fruity bliss await in every spoonful. Serve chilled, perhaps with a sprinkle of toasted coconut for added texture.
Damper with Golden Syrup and Butter
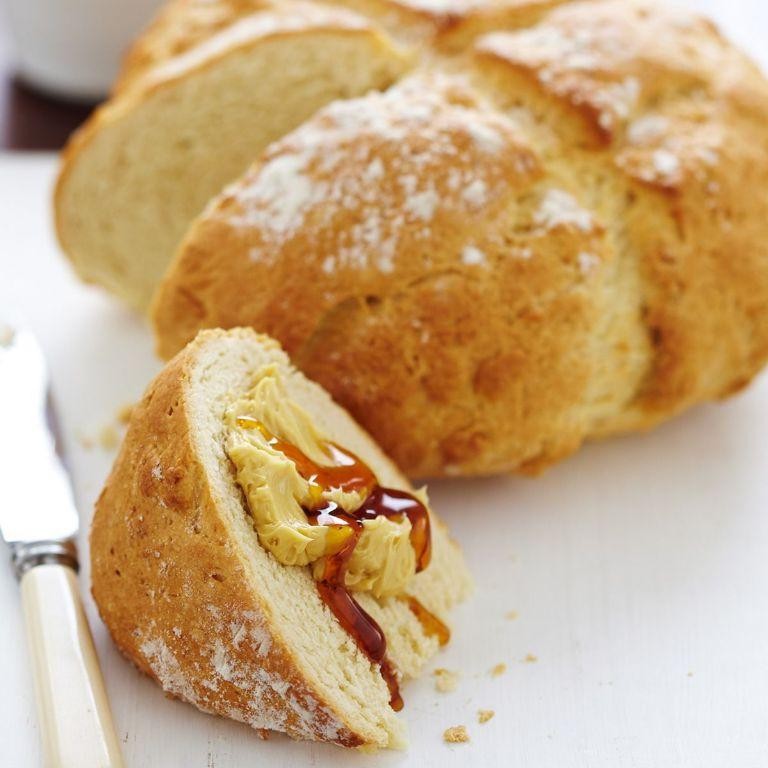
Zesty and comforting, this Damper with Golden Syrup and Butter is a no-fuss treat that’s perfect for any time of the day. Its simplicity is its charm, offering a quick bread that’s deliciously soft inside with a golden crust.
Ingredients
- 3 cups all-purpose flour (I like to sift mine for extra fluffiness)
- 1 tbsp baking powder (freshness is key here)
- 1 tsp salt (I prefer sea salt for its subtle crunch)
- 1 1/4 cups milk (whole milk makes it richer)
- 1/4 cup golden syrup (the star of the show, go for the good stuff)
- 2 tbsp unsalted butter, melted (I always use European-style for its creaminess)
Instructions
- Preheat your oven to 425°F (220°C). A hot oven ensures a good rise.
- In a large bowl, whisk together the flour, baking powder, and salt. This distributes the baking powder evenly.
- Make a well in the center and pour in the milk and golden syrup. Mix until just combined; overmixing leads to toughness.
- Turn the dough onto a floured surface and knead lightly for about 30 seconds. It should be sticky but manageable.
- Shape into a round loaf about 8 inches in diameter. Place on a baking tray lined with parchment paper.
- Brush the top with melted butter. This gives it that irresistible golden sheen.
- Bake for 25 minutes or until the top is golden and sounds hollow when tapped. Don’t open the oven too early.
- Let it cool for 5 minutes before slicing. It’s tempting, but patience prevents crumbling.
Light and slightly sweet, this damper is best served warm with an extra drizzle of golden syrup. The contrast between the crispy exterior and soft interior is simply divine. Try it with a dollop of clotted cream for an indulgent twist.
Conclusion
Now that you’ve explored these 18 delicious Australian desert recipes, it’s clear there’s a world of unique flavors waiting to be discovered in your kitchen. Whether you’re craving something sweet, savory, or a bit of both, these recipes offer something for every taste. We’d love to hear which ones become your favorites—don’t forget to leave a comment and share your baking adventures with us on Pinterest!