Welcome to a cheesy paradise where Asiago takes center stage! Whether you’re whipping up a quick weeknight dinner, indulging in seasonal favorites, or craving some comfort food magic, we’ve got you covered. Dive into our roundup of 18 Delicious Asiago Cheese Recipes that promise to elevate every meal. Ready to transform your cooking game? Let’s get started!
Asiago Cheese and Spinach Stuffed Chicken
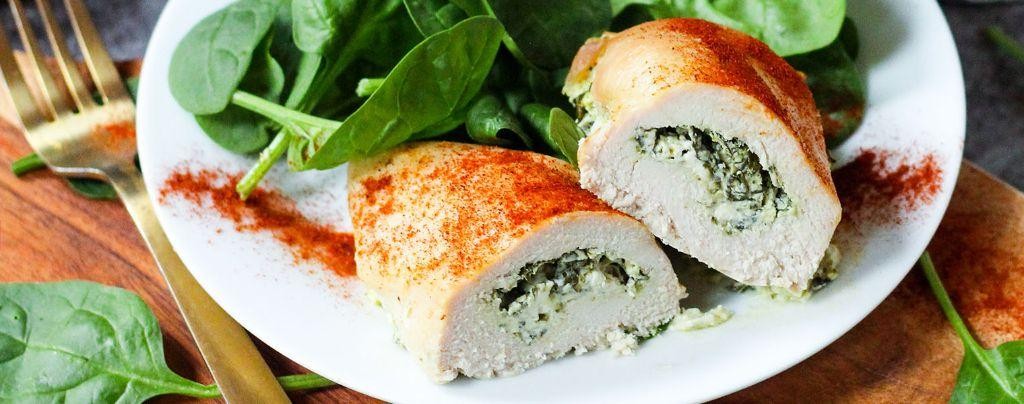
Unbelievably delicious and surprisingly simple to whip up, this Asiago Cheese and Spinach Stuffed Chicken is the kind of dish that’ll have your dinner guests thinking you’ve been hiding a chef’s hat somewhere. It’s cheesy, it’s juicy, and it’s packed with flavors that dance together like they’ve been best friends forever.
Ingredients
- 4 boneless, skinless chicken breasts (because nobody wants to deal with bones on a weeknight)
- 1 cup fresh spinach, roughly chopped (the greener, the meaner, in flavor that is)
- 1/2 cup grated Asiago cheese (the sharper, the better—this is no time for shy cheeses)
- 2 tbsp extra virgin olive oil (my kitchen’s liquid gold)
- 1 tsp garlic powder (because garlic makes everything better)
- Salt and pepper to taste (but let’s be honest, you’ll probably add more)
Instructions
- Preheat your oven to 375°F (because good things come to those who preheat).
- In a bowl, mix the spinach, Asiago cheese, and garlic powder until they’re best friends.
- Carefully slice a pocket into each chicken breast (think of it as giving them a little purse for their cheesy spinach goodies).
- Stuff each chicken breast with the spinach and cheese mixture, then secure with toothpicks (because nobody likes a cheesy escape artist).
- Heat the olive oil in an oven-safe skillet over medium-high heat (this is where the magic starts).
- Sear the chicken for 3-4 minutes on each side until golden brown (this isn’t just for looks—it’s for flavor).
- Transfer the skillet to the oven and bake for 20-25 minutes, or until the chicken is cooked through (no pink, please).
- Let the chicken rest for 5 minutes before serving (patience is a virtue, especially when it comes to juicy chicken).
Ready to dive in? The chicken is so tender it practically melts in your mouth, with the Asiago and spinach filling adding a creamy, savory punch that’s downright addictive. Serve it atop a bed of wild rice or with a side of roasted veggies for a meal that’s as beautiful as it is delicious.
Creamy Asiago Cheese Pasta
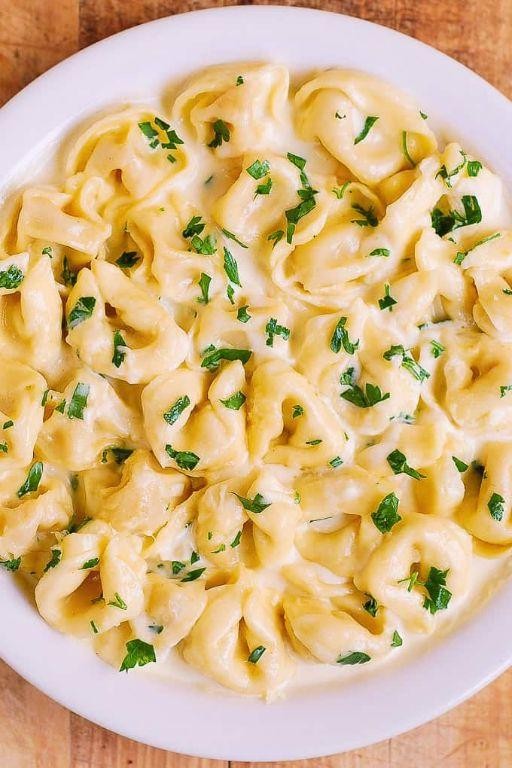
Today’s the day we ditch the dinner dilemma with a dish that’s as easy to love as it is to make—Creamy Asiago Cheese Pasta. Trust me, your fork will be doing a happy dance in no time.
Ingredients
- 8 oz pasta (I’m a sucker for fettuccine here, but penne works in a pinch)
- 2 cups heavy cream (go for the good stuff—it’s the backbone of our sauce)
- 1 1/2 cups grated Asiago cheese (freshly grated melts like a dream)
- 2 tbsp unsalted butter (because everything’s better with butter)
- 2 cloves garlic, minced (fresh is best, but we won’t tell if you use pre-minced)
- 1/2 tsp salt (just enough to make the flavors pop)
- 1/4 tsp black pepper (freshly ground if you’re feeling fancy)
Instructions
- Bring a large pot of salted water to a rolling boil over high heat. Tip: Salt it like the sea for perfectly seasoned pasta.
- Add the pasta and cook according to package instructions until al dente, about 8-10 minutes. Tip: Stir occasionally to prevent sticking.
- While the pasta cooks, melt butter in a large skillet over medium heat. Add garlic and sauté until fragrant, about 30 seconds—don’t let it burn!
- Pour in the heavy cream, stirring constantly, and bring to a gentle simmer. Let it cook for 2 minutes to slightly thicken.
- Reduce heat to low and gradually stir in the Asiago cheese until melted and smooth. Tip: Add the cheese in batches to avoid clumping.
- Drain the pasta, reserving 1/2 cup of pasta water. Toss the pasta with the sauce, adding pasta water as needed to reach your desired consistency.
- Season with salt and pepper, give it one final toss, and serve immediately. Revel in the creamy, cheesy goodness that’s rich in flavor and even richer in comfort. Perfect with a side of garlic bread for the ultimate carb-loaded feast.
Asiago Cheese and Garlic Bread
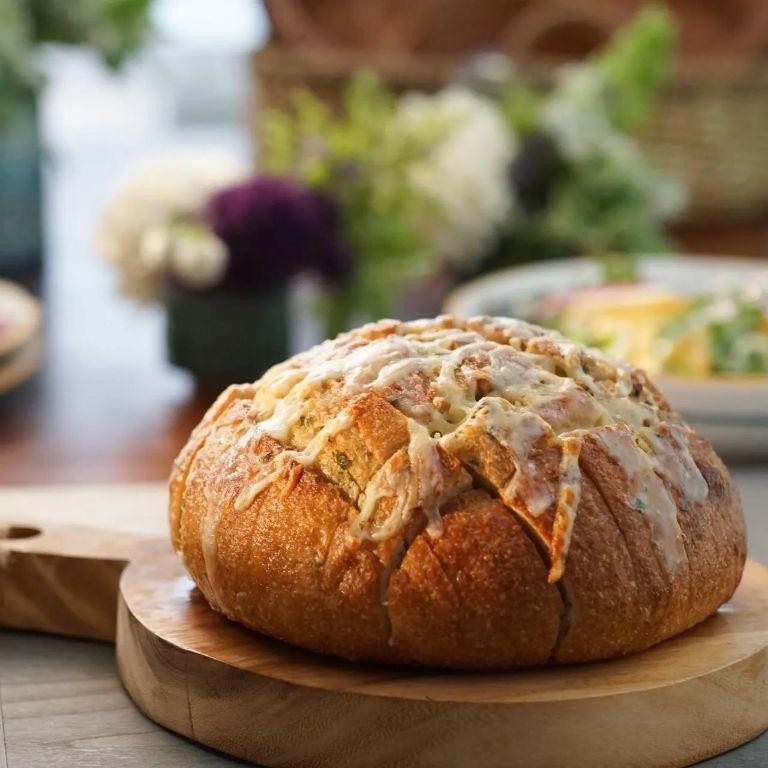
Now, let’s talk about a little slice of heaven that’s about to make your taste buds do a happy dance. Asiago Cheese and Garlic Bread is the hero we all need in our lives, combining the bold flavors of garlic and the creamy, nutty goodness of Asiago cheese into one irresistible loaf. Perfect for those ‘I need carbs now’ moments or impressing your in-laws without breaking a sweat.
Ingredients
- 1 loaf of French bread (because size matters, and so does crunch)
- 1/2 cup unsalted butter, softened (trust me, your arms will thank you for not using it cold)
- 4 cloves garlic, minced (the more, the merrier, but your breath might disagree)
- 1 cup grated Asiago cheese (freshly grated is the secret handshake to flavor town)
- 1 tbsp chopped fresh parsley (for that pop of color and a hint of freshness)
- 1/2 tsp salt (because even heroes need balance)
Instructions
- Preheat your oven to 375°F (190°C) – no guessing games here, precision is key.
- Slice the French bread in half lengthwise, like you’re performing surgery on your future happiness.
- In a bowl, mix the softened butter, minced garlic, and salt until it’s smoother than your last pickup line.
- Spread the garlic butter mixture evenly over the cut sides of the bread. Don’t be shy; this is where the magic happens.
- Sprinkle the grated Asiago cheese over the buttered bread, covering every inch like it’s the last snowfall of the season.
- Place the bread on a baking sheet and bake for 10-12 minutes, or until the cheese is bubbly and golden brown. Watch closely – cheese has a tendency to go from golden to ‘oh no’ real quick.
- Remove from the oven and sprinkle with chopped parsley for that Instagram-worthy finish.
Ready to dive in? The first bite offers a crunch that gives way to a molten center of cheesy, garlicky bliss. Serve it alongside a hearty pasta dish or, let’s be real, just tear into it straight from the oven. No judgment here.
Roasted Asparagus with Asiago Cheese
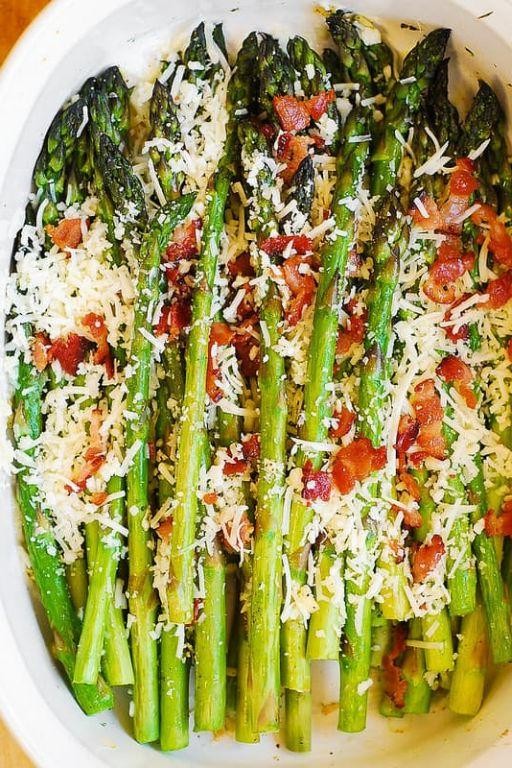
Oh, the joys of spring! When asparagus starts popping up at the market, I know it’s time to whip out my favorite roasting pan and get cheesy with it. This Roasted Asparagus with Asiago Cheese is a simple yet show-stopping side that’ll have your taste buds doing a happy dance.
Ingredients
- 1 bunch of asparagus (about 1 lb) – look for spears that are bright green and firm, no floppy business here!
- 2 tbsp extra virgin olive oil – my kitchen MVP for roasting
- 1/2 tsp kosher salt – because table salt is just too basic
- 1/4 tsp freshly ground black pepper – freshly ground is key, folks
- 1/2 cup grated Asiago cheese – the sharper, the better in my book
Instructions
- Preheat your oven to 400°F (204°C) – no guessing, use an oven thermometer if you’re unsure.
- Trim the tough ends off the asparagus – about 1 inch from the bottom, they snap off easily at the natural breaking point.
- Toss the asparagus with olive oil, salt, and pepper on a baking sheet – get your hands in there for an even coat.
- Roast for 12-15 minutes until tender but still crisp – set a timer, overcooked asparagus is a sad sight.
- Sprinkle the grated Asiago cheese over the hot asparagus – the residual heat will melt it into gooey perfection.
- Broil for 1-2 minutes until the cheese is golden and bubbly – watch it like a hawk to avoid a cheese catastrophe.
Velvety asparagus meets nutty, melted Asiago in this dish that’s as easy on the eyes as it is on the palate. Serve it alongside a juicy steak or atop a bed of creamy polenta for a meal that’s anything but ordinary.
Asiago Cheese and Mushroom Risotto
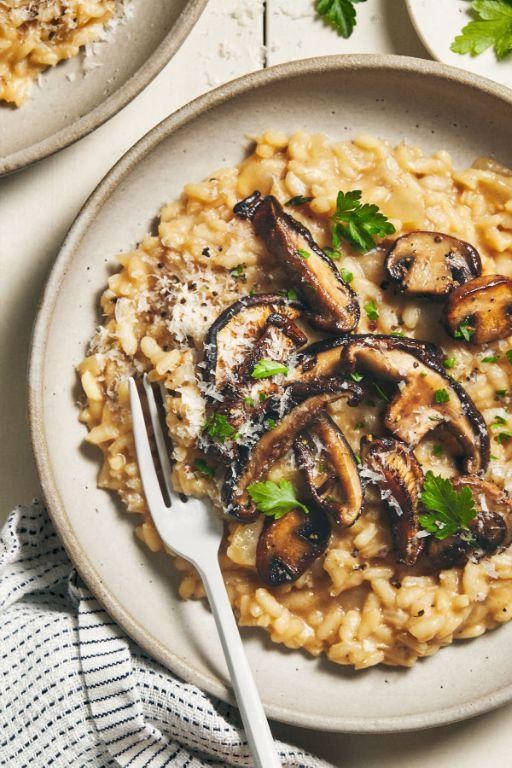
Dive into the creamy, dreamy world of ‘Asiago Cheese and Mushroom Risotto’, where every spoonful is a hug for your taste buds. This dish is like that one friend who’s always extra—extra cheesy, extra flavorful, and extra comforting.
Ingredients
- 1 cup Arborio rice (because regular rice just doesn’t cut it for risotto)
- 4 cups chicken broth (homemade if you’re fancy, store-bought if you’re human)
- 1 cup grated Asiago cheese (the star of the show, folks)
- 8 oz mushrooms, sliced (any type, but cremini are my ride or die)
- 2 tbsp extra virgin olive oil (my kitchen’s liquid gold)
- 1 small onion, finely chopped (no one likes a chunky onion in their risotto)
- 2 cloves garlic, minced (because garlic is life)
- 1/2 cup dry white wine (for the risotto and the chef)
- Salt and pepper to taste (but let’s be honest, you’ll taste and adjust anyway)
Instructions
- Heat the chicken broth in a saucepan over low heat. Keep it warm, like a cozy blanket for your risotto.
- In a large pan, heat the olive oil over medium heat. Add the onions and garlic, sautéing until they’re softer than your favorite pillow, about 3 minutes.
- Add the mushrooms and cook until they’re golden and have released their juices, about 5 minutes. Tip: Don’t crowd the mushrooms, or they’ll steam instead of sauté.
- Stir in the Arborio rice, toasting it for 2 minutes until it’s slightly translucent. This step is like giving the rice a quick tan.
- Pour in the white wine, stirring until it’s absorbed. This is the risotto’s way of saying, “I’m ready for more.”
- Begin adding the warm broth, one ladle at a time, stirring constantly. Wait until each ladle is absorbed before adding the next. This is where the magic happens, and your arm gets a workout.
- After about 18 minutes, the rice should be al dente. Stir in the Asiago cheese until it’s melted and the risotto is creamy. Tip: If the risotto is too thick, loosen it with a bit more broth.
- Season with salt and pepper to taste. Remember, the cheese is salty, so go easy at first.
Out of this world, right? This risotto is creamy with a slight bite, packed with umami from the mushrooms and a punch of flavor from the Asiago. Serve it in a bowl with a sprinkle of extra cheese on top, because why not?
Asiago Cheese and Prosciutto Pizza
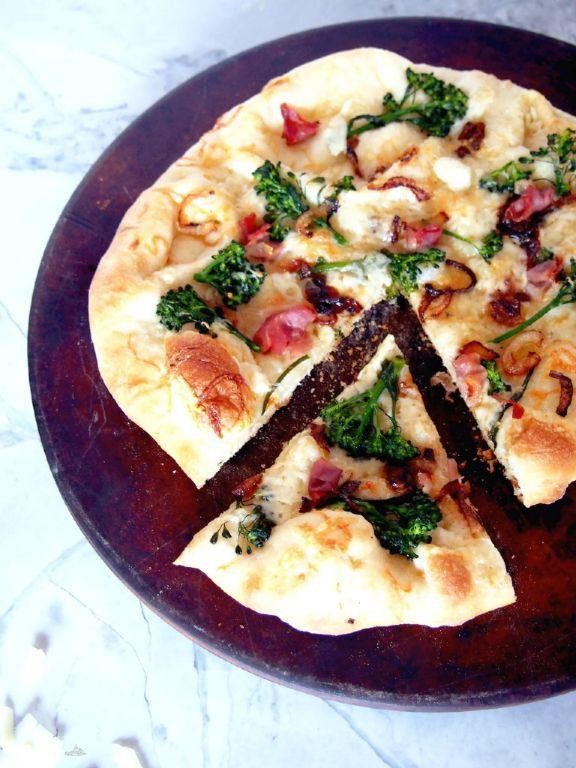
Dare to dream about a pizza that combines the salty, savory goodness of prosciutto with the nutty, creamy allure of Asiago cheese? Well, pinch yourself, because this Asiago Cheese and Prosciutto Pizza is about to make those dreams a delicious reality.
Ingredients
- 1 lb pizza dough (I like to let mine sit out for 30 minutes to make stretching easier)
- 1/2 cup tomato sauce (homemade or your favorite jarred variety)
- 2 cups shredded Asiago cheese (because more cheese is always the answer)
- 4 oz thinly sliced prosciutto (tear it into rustic pieces for that artisanal look)
- 2 tbsp extra virgin olive oil (my kitchen MVP)
- 1 tsp red pepper flakes (for a little kick, optional but highly recommended)
- 1/4 cup fresh basil leaves (torn, not chopped, for maximum flavor)
Instructions
- Preheat your oven to 475°F (245°C) with a pizza stone or inverted baking sheet inside to get it piping hot.
- On a floured surface, stretch the dough into a 12-inch circle. Don’t stress about perfection—rustic is charming!
- Brush the dough with olive oil, then spread the tomato sauce evenly, leaving a small border for the crust.
- Sprinkle the shredded Asiago cheese over the sauce, ensuring every bite is cheesy goodness.
- Arrange the prosciutto pieces on top, then sprinkle with red pepper flakes if using.
- Transfer the pizza to the preheated stone or sheet and bake for 12-14 minutes, until the crust is golden and the cheese is bubbly.
- Remove from the oven and immediately scatter the torn basil leaves over the top for a fresh, aromatic finish.
How does this pizza stack up? The crust is crispy yet chewy, the Asiago brings a deep, nutty flavor that pairs perfectly with the salty prosciutto, and the fresh basil adds a pop of color and freshness. Serve it with a side of drama—this pizza is a showstopper.
Asiago Cheese and Artichoke Dip
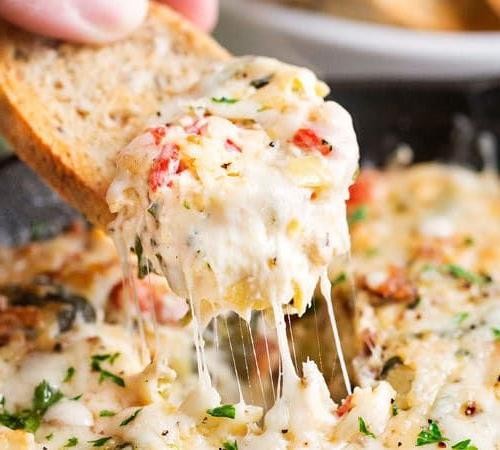
Absolutely nothing brings a party to life like a bubbling, cheesy dip that’s got more personality than your uncle’s karaoke performance. This Asiago Cheese and Artichoke Dip is your next crowd-pleaser, blending creamy, tangy, and downright addictive flavors in one dish.
Ingredients
- 1 cup shredded Asiago cheese (because pre-shredded bags are a time-saver, but freshly grated tastes like a dream)
- 1 cup mayonnaise (the real deal, none of that ‘light’ stuff—we’re here for flavor)
- 1 cup sour cream (full-fat for that luxe texture)
- 1 can (14 oz) artichoke hearts, drained and chopped (squeeze out the water like you’re wringing out drama)
- 1 clove garlic, minced (fresh is best, but we won’t tell if you use the jarred kind)
- 1/2 tsp red pepper flakes (for a kick that says ‘hello’)
Instructions
- Preheat your oven to 350°F because we’re about to turn up the heat in the best way possible.
- In a large bowl, mix the mayonnaise, sour cream, and minced garlic until they’re best friends. Tip: A whisk works wonders here for a smoother blend.
- Fold in the chopped artichoke hearts and red pepper flakes gently—think of it as inviting them to the party without overwhelming the vibe.
- Stir in the shredded Asiago cheese until the mixture is uniformly cheesy. Tip: Reserve a handful of cheese for the top because everything’s better with a cheesy crust.
- Transfer the mixture to a baking dish and sprinkle the reserved cheese on top. Tip: A shallow dish ensures every scoop gets that golden top.
- Bake for 20-25 minutes, or until the dip is bubbly and the top is golden brown. Watch for the edges to start dancing—that’s your cue it’s ready.
Creamy with a punch of tanginess and just enough heat to keep things interesting, this dip is a texture dream. Serve it with crusty bread or a rainbow of veggies for a color pop that’ll make your spread Instagram-worthy.
Asiago Cheese and Bacon Quiche
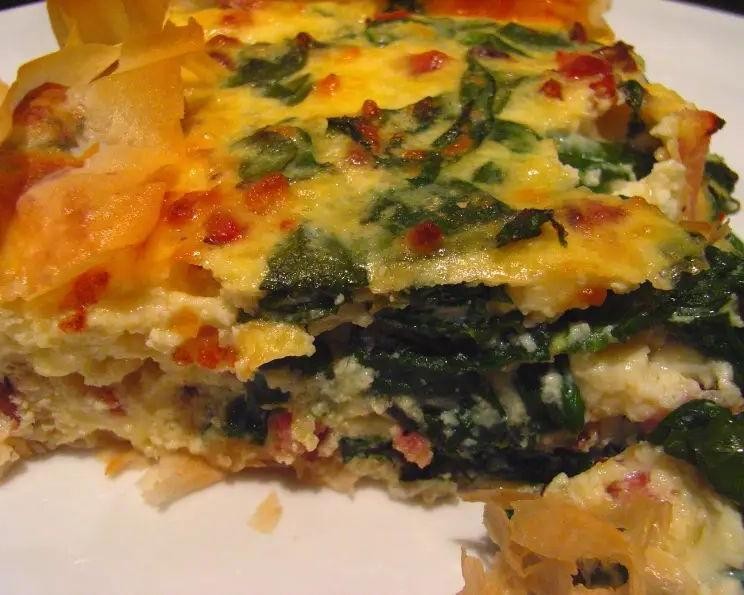
Get ready to dive fork-first into a dish that’s as indulgent as a lazy Sunday morning—Asiago Cheese and Bacon Quiche. This isn’t just breakfast; it’s a hug in pie form, with a crispy crust that whispers sweet nothings to your taste buds.
Ingredients
- 1 pie crust (store-bought or homemade, because we’re not here to judge)
- 6 large eggs (room temp, they mix better and won’t shock your dairy)
- 1 cup heavy cream (the richer, the better—this is no time for austerity)
- 1 cup grated Asiago cheese (because sharp is always in fashion)
- 6 strips bacon, cooked and crumbled (crispy is key, floppy bacon need not apply)
- 1/2 tsp salt (just enough to make the flavors pop)
- 1/4 tsp black pepper (freshly ground, unless you’re into disappointment)
Instructions
- Preheat your oven to 375°F (no peeking until it’s fully heated—patience is a virtue).
- Roll out your pie crust and fit it into a 9-inch pie dish. Crimp the edges for that extra flair (or don’t, it’s your quiche).
- In a large bowl, whisk together the eggs and heavy cream until smooth. Tip: A fork works, but a whisk is your best friend here.
- Stir in the Asiago cheese, crumbled bacon, salt, and pepper. Mix well but gently—overworking is the enemy of fluffiness.
- Pour the mixture into the pie crust. Tip: Leave a little space at the top to prevent a quiche volcano in your oven.
- Bake for 35-40 minutes, or until the center is set and the top is golden brown. Tip: The jiggle test is your ally—a slight wobble means it’s perfect.
- Let the quiche cool for 10 minutes before slicing. This is the hardest part, but trust me, it’s worth the wait.
Velvety smooth with pockets of smoky bacon and the sharp tang of Asiago, this quiche is a masterpiece of textures and flavors. Serve it warm with a side of sass or cold straight from the fridge—no judgment here.
Asiago Cheese and Sun-Dried Tomato Scones
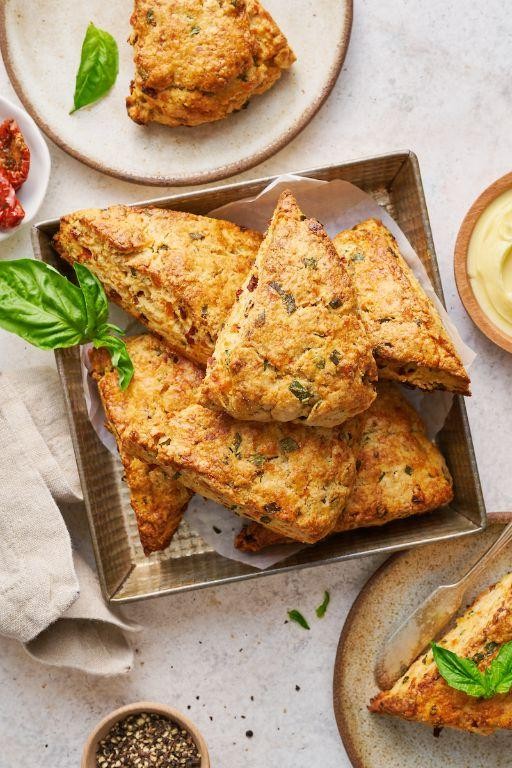
Ever had one of those mornings where only a scone will do, but you’re tired of the same old, same old? Enter these Asiago Cheese and Sun-Dried Tomato Scones—your taste buds’ new best friends, ready to jazz up your breakfast game with a savory twist.
Ingredients
- 2 cups all-purpose flour (because greatness starts with a solid foundation)
- 1 tbsp baking powder (the unsung hero of fluffiness)
- 1/2 tsp salt (just enough to make the flavors pop)
- 1/2 cup unsalted butter, cold and cubed (trust me, cold is key here)
- 1/2 cup heavy cream (for that luxurious texture we all crave)
- 1 large egg (room temp, please—it’s a team player)
- 1/2 cup grated Asiago cheese (the sharper, the better, in my opinion)
- 1/4 cup chopped sun-dried tomatoes (packed in oil, because we’re fancy like that)
Instructions
- Preheat your oven to 400°F (because precision is the name of the game) and line a baking sheet with parchment paper.
- In a large bowl, whisk together the flour, baking powder, and salt. This isn’t just mixing; it’s the first step to scone stardom.
- Add the cold, cubed butter to the dry ingredients. Use your fingers or a pastry cutter to work the butter into the flour until it resembles coarse crumbs. Tip: The colder the butter, the flakier the scone.
- In a small bowl, whisk together the heavy cream and egg. Make a well in the center of your dry ingredients and pour in the wet mix. Stir until just combined—overmixing is the enemy of tenderness.
- Gently fold in the Asiago cheese and sun-dried tomatoes. The dough will be sticky, but that’s exactly what we want.
- Turn the dough out onto a floured surface and pat into a 1-inch thick circle. Cut into 8 wedges and transfer to the prepared baking sheet.
- Bake for 15-18 minutes, or until golden brown. Tip: Keep an eye on them after 15 minutes—oven temperaments vary.
- Let cool on the baking sheet for 5 minutes before transferring to a wire rack. Tip: Resist the urge to dive in immediately; they’re worth the wait.
Unbelievably tender with pockets of cheesy goodness and bursts of sun-dried tomato, these scones are a revelation. Serve them warm with a smear of butter or alongside a hearty soup for a match made in heaven.
Asiago Cheese and Herb Focaccia
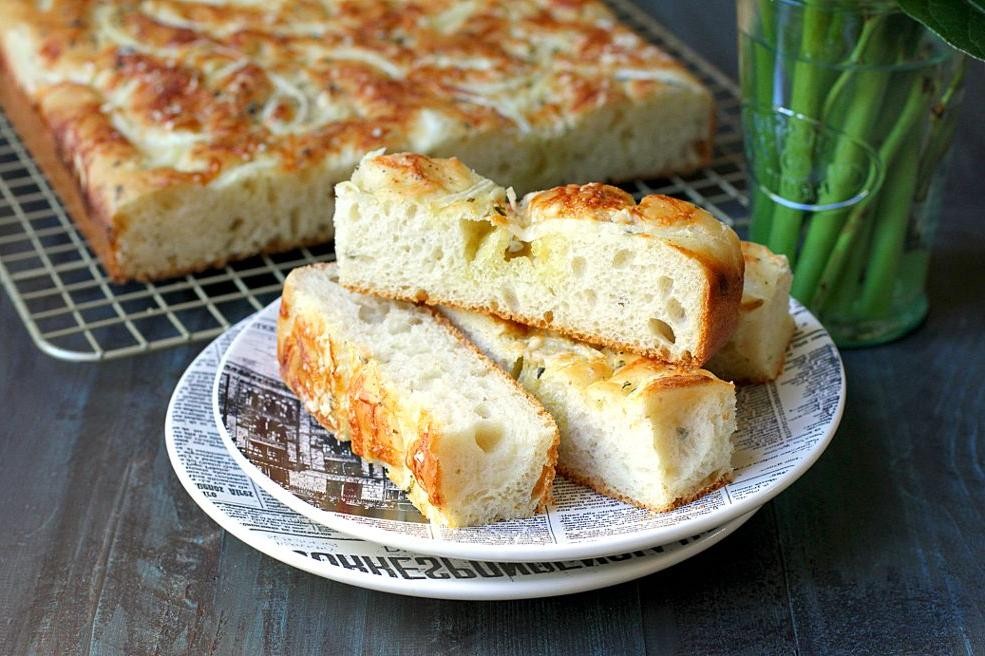
Craving something cheesy, herby, and downright irresistible? Let me introduce you to a focaccia that’s about to become your new best friend—Asiago Cheese and Herb Focaccia. It’s fluffy, flavorful, and packed with enough cheesy goodness to make you forget all about that sad desk salad.
Ingredients
- 3 cups all-purpose flour (because we’re not messing around with bread flour today)
- 1 cup warm water (think baby bath temp, not hot tub)
- 1 tbsp sugar (just a smidge to wake up the yeast)
- 2 tsp active dry yeast (the magic maker)
- 1 tsp salt (because flavor is key)
- 1/4 cup extra virgin olive oil (my kitchen MVP)
- 1 cup grated Asiago cheese (the more, the merrier, I say)
- 2 tbsp mixed herbs (rosemary and thyme are my dynamic duo)
Instructions
- In a large bowl, whisk together warm water and sugar until the sugar dissolves. Sprinkle yeast on top and let it sit for 5 minutes until frothy. (Tip: If it doesn’t froth, your yeast might be older than your last relationship.)
- Add flour, salt, and 2 tbsp olive oil to the yeast mixture. Stir until a shaggy dough forms.
- Knead the dough on a floured surface for 5 minutes until smooth and elastic. (Tip: If the dough sticks to your hands like bad decisions, add a bit more flour.)
- Place dough in a greased bowl, cover with a damp towel, and let rise in a warm spot for 1 hour or until doubled in size.
- Preheat your oven to 375°F (because patience is a virtue, but preheating is a must).
- Punch down the dough and press it into a greased 9×13 inch baking pan. Drizzle with remaining olive oil and sprinkle Asiago cheese and herbs on top.
- Bake for 20-25 minutes until golden brown and cheesy. (Tip: If your kitchen doesn’t smell like an Italian bistro, you’re doing it wrong.)
You’ll love the crispy edges and soft, chewy center of this focaccia. Serve it warm with a drizzle of olive oil or use it as the ultimate sandwich bread—because why settle for boring?
Asiago Cheese and Caramelized Onion Tart

Every now and then, a dish comes along that’s so decadently delicious, it’s like a hug for your taste buds—enter the Asiago Cheese and Caramelized Onion Tart. It’s the kind of recipe that makes you want to do a little happy dance in the kitchen, and trust me, no one will judge you if you do.
Ingredients
- 1 1/4 cups all-purpose flour (because greatness starts with a solid foundation)
- 1/2 cup unsalted butter, chilled and diced (cold butter equals flaky crust, and that’s a fact)
- 1/4 cup ice water (just enough to bring the dough together without a pool party)
- 2 large yellow onions, thinly sliced (the thinner, the sweeter they caramelize)
- 2 tbsp extra virgin olive oil (my go-to for that golden, glossy goodness)
- 1 cup grated Asiago cheese (because life’s too short for skimpy cheese portions)
- 2 large eggs, room temperature (they mix better when they’re not chilly)
- 1/2 cup heavy cream (for that lush, velvety filling)
- 1 tsp salt (to make all the flavors pop)
- 1/2 tsp black pepper (a little kick never hurt anybody)
Instructions
- Preheat your oven to 375°F (190°C) because we’re about to get baking.
- In a large bowl, mix the flour and salt. Add the chilled butter and use your fingers to rub it into the flour until it resembles coarse crumbs. Tip: Keep those fingers light and quick to avoid melting the butter.
- Gradually add ice water, a tablespoon at a time, mixing until the dough just comes together. Wrap it in plastic and chill for 30 minutes. Patience is key here—trust me, it’s worth the wait.
- While the dough chills, heat olive oil in a skillet over medium heat. Add the onions and cook, stirring occasionally, until they’re golden and caramelized, about 25 minutes. Tip: Low and slow wins the race for perfectly caramelized onions.
- Roll out the dough on a floured surface to fit a 9-inch tart pan. Press it into the pan and trim the edges. Prick the bottom with a fork and bake for 15 minutes until lightly golden.
- In a bowl, whisk together eggs, heavy cream, salt, and pepper. Stir in the caramelized onions and half the Asiago cheese. Pour the mixture into the pre-baked crust and sprinkle the remaining cheese on top.
- Bake for 25-30 minutes until the filling is set and the top is bubbly and golden. Tip: Let it cool for a few minutes before slicing to avoid a tart-tastrophe.
How does this tart stack up? Imagine a buttery, flaky crust giving way to a rich, creamy filling with sweet onions and nutty Asiago cheese. Serve it warm with a side of arugula salad for a meal that’s as balanced as it is indulgent.
Asiago Cheese and Potato Gratin
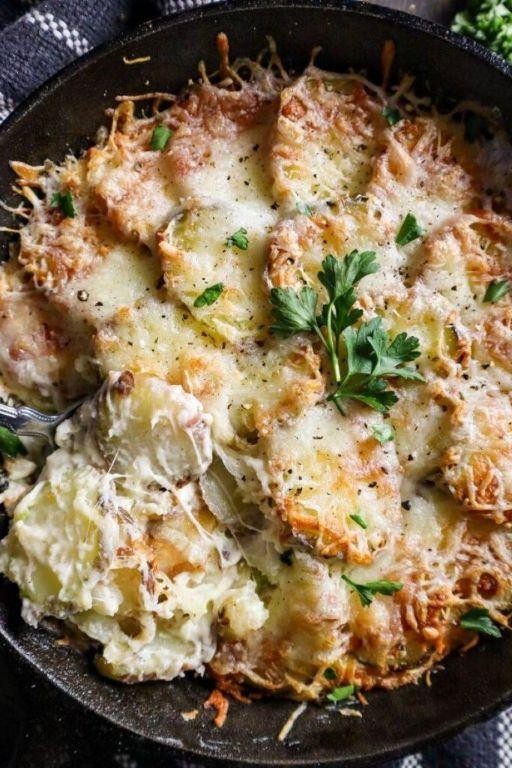
Just when you thought potatoes couldn’t get any more addictive, along comes this Asiago Cheese and Potato Gratin to prove you wrong. It’s the ultimate comfort food with a fancy twist, perfect for when you’re feeling a little extra (or just really hungry).
Ingredients
- 2 lbs Yukon Gold potatoes, thinly sliced (because they’re the perfect balance of starchy and creamy)
- 1 1/2 cups heavy cream (go big or go home, right?)
- 1 cup grated Asiago cheese (the sharper, the better in my book)
- 2 cloves garlic, minced (fresh is best, no cheating with the jarred stuff)
- 1 tbsp unsalted butter (for greasing the dish, because we’re not savages)
- 1/2 tsp salt (to make everything pop)
- 1/4 tsp black pepper (for a little kick)
Instructions
- Preheat your oven to 375°F (190°C) and grease a 9×13 inch baking dish with the butter. Pro tip: Use your hands to spread the butter for an even coat and a little arm workout.
- In a large bowl, toss the sliced potatoes with the heavy cream, minced garlic, salt, and pepper until each slice is lovingly coated.
- Layer the potato slices in the prepared baking dish, overlapping slightly for that picture-perfect gratin look. Pour any remaining cream mixture over the top.
- Sprinkle the grated Asiago cheese evenly over the potatoes. Don’t hold back—this is where the magic happens.
- Cover the dish with aluminum foil and bake for 45 minutes. Then, remove the foil and bake for an additional 15-20 minutes, or until the top is golden and bubbly, and the potatoes are tender when pierced with a fork.
Unbelievable how something so simple can taste so decadent, right? The Asiago Cheese and Potato Gratin comes out creamy, cheesy, and with just the right amount of bite from the garlic. Serve it as the star of your dinner table or sneak a midnight snack straight from the fridge—no judgment here.
Asiago Cheese and Pear Salad
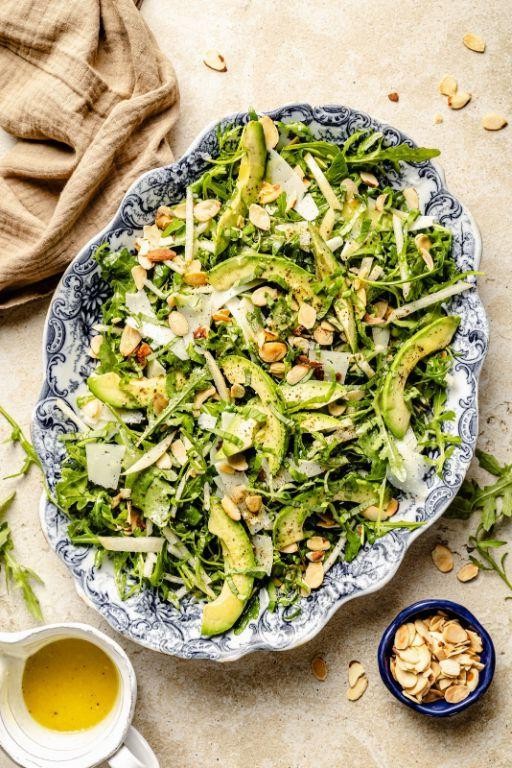
Unbelievably, this Asiago Cheese and Pear Salad is the culinary equivalent of a standing ovation—simple, yet utterly show-stopping. It’s the kind of dish that makes you want to write home about, or at least brag a little on social media.
Ingredients
- 2 cups arugula (because life’s too short for boring greens)
- 1 ripe pear, thinly sliced (go for Bartlett for sweetness or Bosc for a firmer bite)
- 1/2 cup shaved Asiago cheese (the sharper, the better—no wallflowers here)
- 1/4 cup walnuts, toasted (because everything’s better with a little crunch)
- 2 tbsp extra virgin olive oil (my kitchen MVP)
- 1 tbsp balsamic vinegar (the good stuff, please)
- Salt and freshly ground black pepper (to make everything pop)
Instructions
- In a large bowl, toss the arugula with olive oil until each leaf is lightly coated—this is your salad’s foundation, so don’t skimp.
- Arrange the pear slices on top of the arugula like you’re setting up dominoes for the world’s most delicious chain reaction.
- Sprinkle the shaved Asiago cheese over the pears, aiming for even coverage—think of it as snowfall on a winter morning.
- Scatter the toasted walnuts across the salad for that essential crunch factor.
- Drizzle balsamic vinegar over the top with a steady hand—this isn’t the time for reckless pouring.
- Season with salt and freshly ground black pepper to taste, because seasoning is the secret handshake of great cooking.
Ready to dive in? This salad is a masterclass in contrasts—creamy Asiago meets crisp pear, all tied together with the peppery punch of arugula. Serve it as a sophisticated starter or pair it with a crusty baguette for a lunch that feels downright luxurious.
Asiago Cheese and Walnut Stuffed Mushrooms
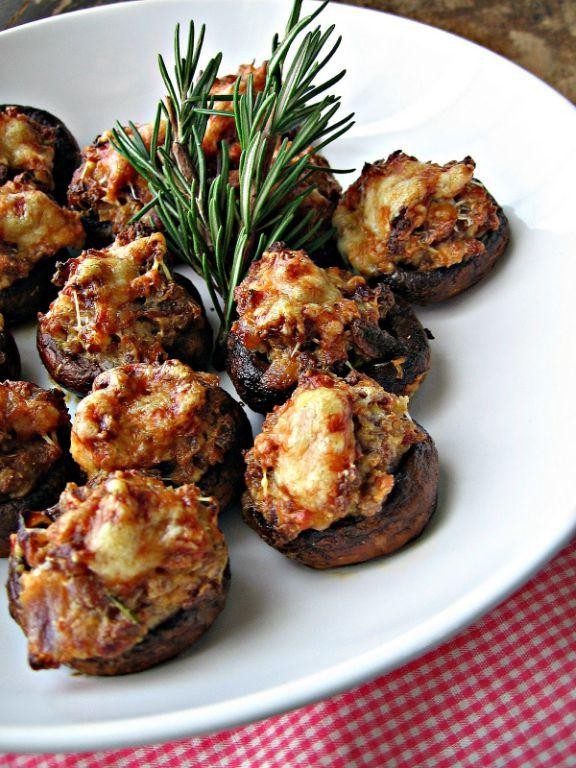
Unbelievably, these Asiago Cheese and Walnut Stuffed Mushrooms are the little bites of joy your next gathering desperately needs. They’re like the party guests who show up fashionably late but leave everyone talking.
Ingredients
- 24 large white mushrooms (because size matters when you’re stuffing them)
- 1 cup finely chopped walnuts (toast them for a nuttier vibe)
- 1 cup grated Asiago cheese (the sharper, the better—no wallflowers here)
- 2 tbsp extra virgin olive oil (my kitchen MVP)
- 2 cloves garlic, minced (because garlic is life)
- 1/4 tsp salt (just a pinch to make everything pop)
- 1/4 tsp black pepper (freshly ground, please—we’re not savages)
Instructions
- Preheat your oven to 375°F (because patience is a virtue, but preheating is a must).
- Clean the mushrooms with a damp paper towel, then gently remove the stems (save them for another dish or compost—waste not, want not).
- In a skillet over medium heat, warm the olive oil and sauté the garlic until fragrant, about 30 seconds (your kitchen should smell amazing right now).
- Add the chopped walnuts to the skillet and toast for 2 minutes, stirring constantly (this is where the magic starts).
- Remove from heat and stir in the Asiago cheese, salt, and pepper (the mixture should look like a party in a bowl).
- Stuff each mushroom cap with the walnut and cheese mixture, packing it in like you’re preparing for a long winter (but really, just until they’re heaping).
- Arrange the stuffed mushrooms on a baking sheet and bake for 20 minutes, or until the cheese is bubbly and golden (the waiting is the hardest part).
Serve these bad boys warm and watch them disappear faster than your resolve to eat just one. The combination of crunchy walnuts and melty Asiago cheese is a textural dream, and the earthy mushrooms bring it all home. Try serving them on a rustic wooden board for that Instagram-worthy touch.
Asiago Cheese and Chicken Alfredo
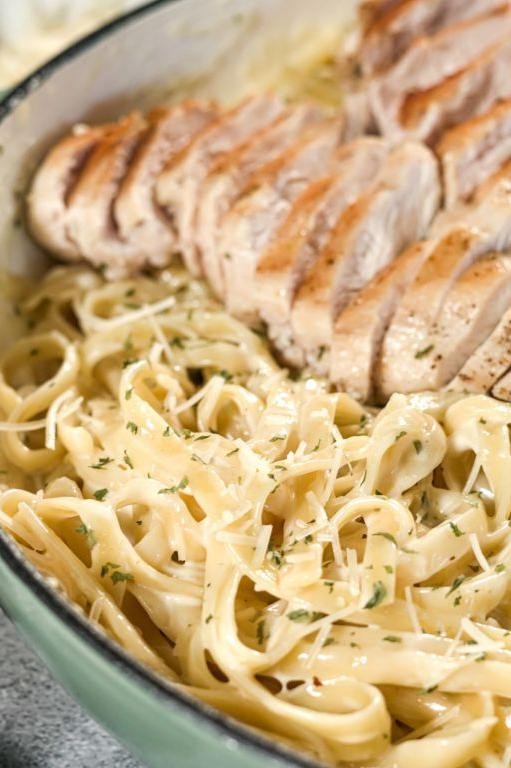
Buckle up, buttercups, because we’re about to dive fork-first into a creamy, dreamy bowl of Asiago Cheese and Chicken Alfredo that’ll make your taste buds do a happy dance. This dish is the culinary equivalent of a warm hug, with a cheesy twist that’s downright irresistible.
Ingredients
- 2 boneless, skinless chicken breasts (because nobody wants to fuss with bones when there’s cheese to be eaten)
- 1 tbsp extra virgin olive oil (my kitchen MVP for adding that golden touch)
- 2 cloves garlic, minced (the more, the merrier, I say)
- 1 cup heavy cream (go big or go home, right?)
- 1 cup grated Asiago cheese (freshly grated beats pre-packaged any day)
- 8 oz fettuccine pasta (the classic choice for Alfredo, but hey, live dangerously if you want)
- Salt and pepper to taste (but let’s be honest, you’ll taste and adjust anyway)
Instructions
- Bring a large pot of salted water to a boil over high heat. Pro tip: Salt it like the sea for pasta that’s flavorful from the get-go.
- Add the fettuccine and cook according to package instructions until al dente, about 8-10 minutes. Drain and set aside, but save a cup of pasta water—it’s liquid gold for adjusting sauce consistency later.
- While the pasta cooks, heat olive oil in a large skillet over medium-high heat. Add the chicken breasts and cook until golden brown and no longer pink inside, about 6-7 minutes per side. Remove and let rest before slicing into strips.
- In the same skillet, lower the heat to medium and sauté the garlic until fragrant, about 30 seconds. Don’t let it brown, or it’ll turn bitter—nobody wants that.
- Pour in the heavy cream, stirring constantly, and let it simmer for 2 minutes to thicken slightly. This is where the magic starts.
- Gradually whisk in the Asiago cheese until smooth and creamy. If the sauce is too thick, loosen it with a splash of the reserved pasta water.
- Add the cooked pasta and chicken strips to the skillet, tossing everything together until well coated. Season with salt and pepper, but remember, Asiago is salty, so taste first!
Zesty, creamy, and utterly comforting, this Asiago Cheese and Chicken Alfredo is a masterpiece of textures and flavors. Serve it with a side of garlic bread for the ultimate carb-loaded indulgence, or keep it light with a crisp green salad. Either way, you’re in for a treat.
Asiago Cheese and Broccoli Soup
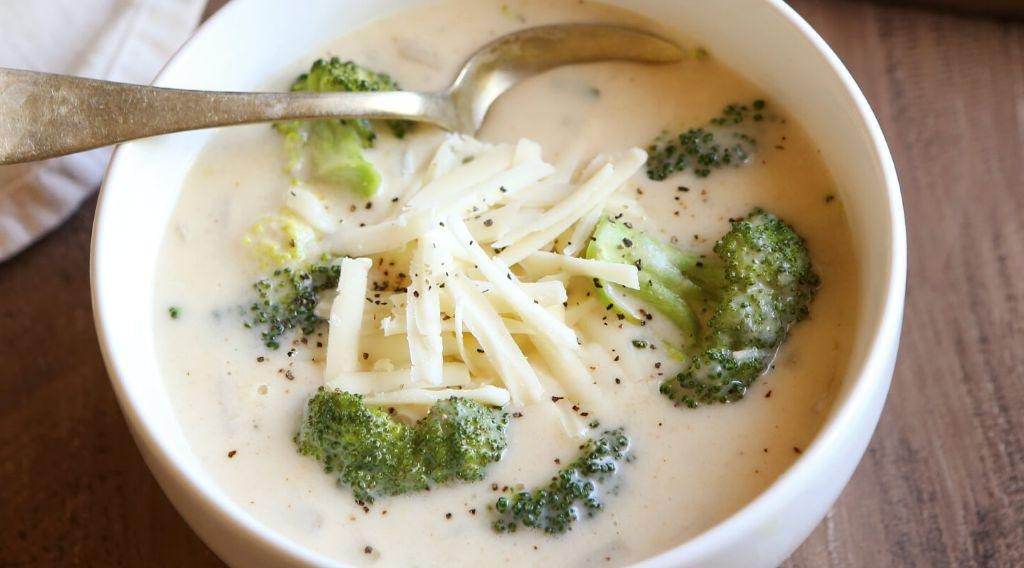
Let’s face it, folks, nothing says ‘I love you’ like a bowl of creamy, dreamy Asiago Cheese and Broccoli Soup. Especially when it’s pretending to be healthy because, hello, broccoli!
Ingredients
- 2 tablespoons of unsalted butter (because salted is just showing off)
- 1 medium onion, diced (no one likes a chunky onion in their soup)
- 2 cloves of garlic, minced (fresh only, please, we’re not savages)
- 3 cups of broccoli florets (the tiny trees that could)
- 3 cups of chicken broth (homemade if you’re fancy, boxed if you’re human)
- 1 cup of heavy cream (go big or go home)
- 1.5 cups of grated Asiago cheese (the star of the show)
- Salt and pepper to taste (but let’s be honest, you’ll taste and adjust anyway)
Instructions
- Melt the butter in a large pot over medium heat. Watch it sizzle like your dreams.
- Add the diced onion and minced garlic to the pot. Sauté until they’re softer than your heart after watching a puppy video, about 5 minutes.
- Toss in the broccoli florets and chicken broth. Bring to a boil, then reduce heat to simmer. Let it cook until the broccoli is tender, about 10 minutes. Tip: Don’t overcook the broccoli unless you enjoy the color of sadness.
- Using an immersion blender, puree the soup until smooth. If you don’t have one, a regular blender works but be careful, hot soup is sneaky.
- Stir in the heavy cream and grated Asiago cheese until the cheese is melted and the soup is creamy. Tip: Keep the heat low to avoid curdling the cream.
- Season with salt and pepper. Taste it. Adjust. Taste it again. Repeat until perfect.
Oh, the joy of dipping crusty bread into this velvety, cheesy goodness! The soup is rich, with a slight tang from the Asiago, and the broccoli adds just enough green to make you feel virtuous. Serve it in a bread bowl for maximum carb-on-carb action.
Asiago Cheese and Sausage Stuffed Shells
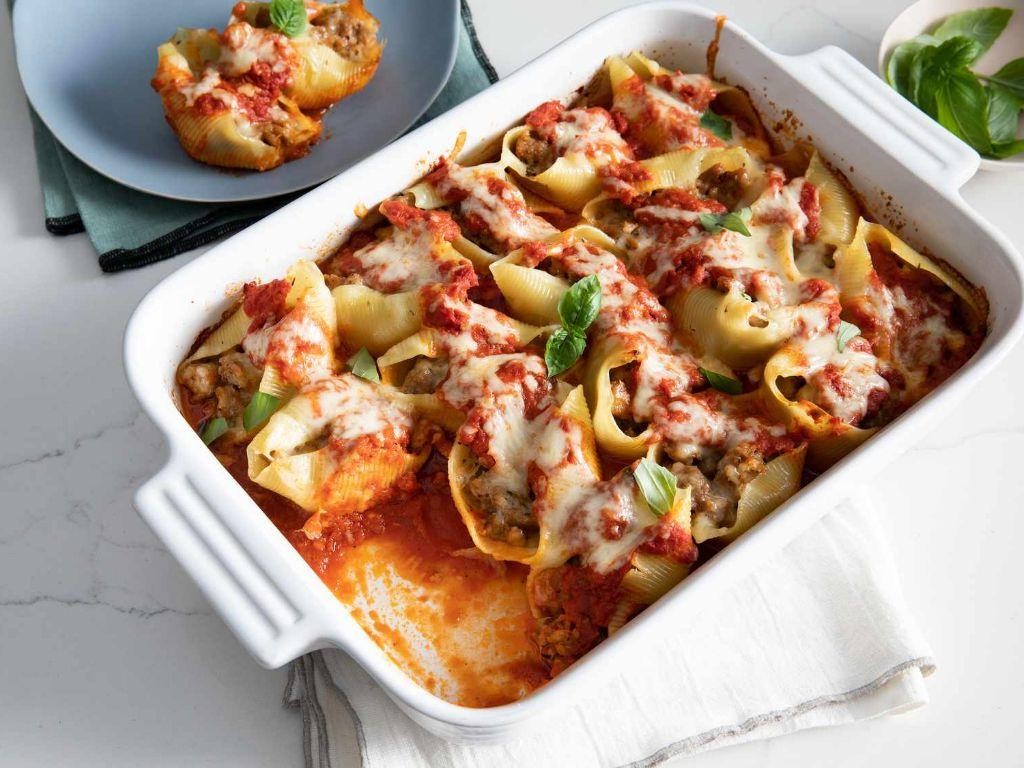
Ready to dive into a dish that’s as fun to make as it is to eat? These Asiago Cheese and Sausage Stuffed Shells are the culinary equivalent of a cozy blanket on a chilly evening—comforting, cheesy, and utterly irresistible.
Ingredients
- 1 box (12 oz) jumbo pasta shells (because bigger is always better, right?)
- 1 lb Italian sausage (go for the spicy kind if you’re feeling adventurous)
- 2 cups ricotta cheese (full-fat for maximum creaminess)
- 1 cup grated Asiago cheese (plus extra for sprinkling, because cheese)
- 1 large egg (room temp, it blends smoother)
- 2 cloves garlic, minced (fresh is best, no cheating with the jarred stuff)
- 1/4 cup fresh parsley, chopped (for that pop of color and freshness)
- 1 jar (24 oz) marinara sauce (homemade if you’re a superstar, store-bought if you’re human)
- 1/2 tsp salt (just enough to make the flavors sing)
- 1/4 tsp black pepper (freshly ground, please)
Instructions
- Preheat your oven to 375°F (because patience is a virtue, especially when cheese is involved).
- Boil the jumbo shells according to package instructions until al dente, then drain and set aside to cool slightly (tip: drizzle a little olive oil to prevent sticking).
- In a skillet over medium heat, cook the Italian sausage until browned and crumbly, about 5-7 minutes (tip: drain excess fat unless you’re into that).
- In a bowl, mix ricotta, Asiago, egg, garlic, parsley, salt, and pepper until well combined (tip: use a fork for a lighter texture).
- Stuff each shell with the cheese mixture, then place in a baking dish (tip: a spoon works, but a piping bag is your secret weapon).
- Pour marinara sauce over the stuffed shells, sprinkle with extra Asiago, and bake for 25 minutes until bubbly and golden (tip: broil for the last 2 minutes for extra crispiness).
Every bite of these stuffed shells is a creamy, cheesy, sausage-packed delight. Serve them with a side of garlic bread to sop up any leftover sauce, or go rogue and add a sprinkle of red pepper flakes for a little heat.
Asiago Cheese and Roasted Red Pepper Panini
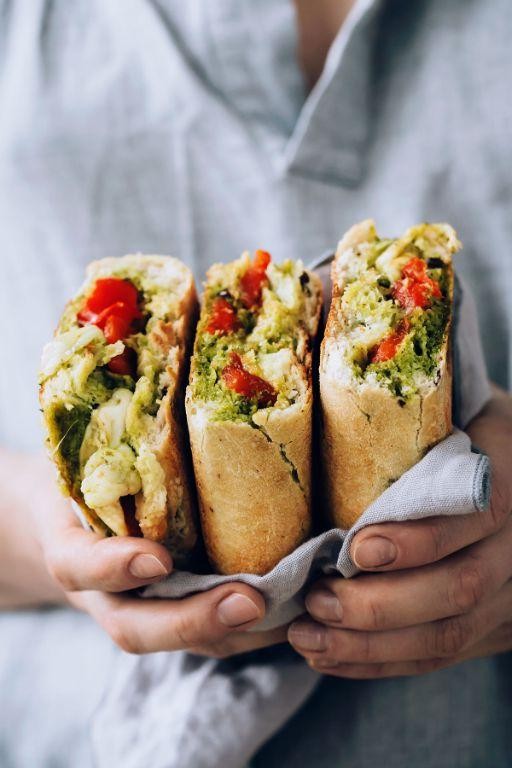
Zesty and zingy, this Asiago Cheese and Roasted Red Pepper Panini is the sandwich of your dreams, combining creamy, nutty cheese with sweet, smoky peppers in a crispy, buttery embrace. It’s the kind of meal that makes you forget about your diet, at least until tomorrow.
Ingredients
- 2 slices of sourdough bread (because life’s too short for mediocre bread)
- 1/2 cup shredded Asiago cheese (the more, the merrier, I say)
- 1/4 cup roasted red peppers, sliced (jarred is fine, but roasting your own is a game-changer)
- 1 tbsp mayonnaise (trust me, it’s the secret to golden perfection)
- 1 tbsp unsalted butter, softened (real butter only, please)
Instructions
- Preheat your panini press to 375°F. No press? A skillet and a heavy pan will do the trick.
- Spread mayonnaise on one side of each bread slice. This isn’t just for flavor—it creates an unbeatable crust.
- Layer Asiago cheese and roasted red peppers on the mayonnaise side of one bread slice, then top with the second slice, mayonnaise side out.
- Butter the outside of both bread slices lightly but thoroughly. This is where the magic happens.
- Place the sandwich in the panini press and cook for 3-4 minutes, until the bread is golden and the cheese is melty. Press down gently for maximum crispiness.
- Tip: Let the sandwich sit for a minute before cutting. This prevents the cheese from making a break for it.
Unbelievably crispy on the outside, oozing with cheesy goodness on the inside, this panini is a textural masterpiece. Serve it with a side of pickles or a crisp salad for a meal that’s anything but ordinary.
Conclusion
We hope this roundup of 18 delicious Asiago cheese recipes inspires your next kitchen adventure! Whether you’re cooking for a special occasion or just spicing up weeknight dinners, there’s something here for everyone. Don’t forget to share your favorites in the comments and pin this article on Pinterest to keep these tasty ideas handy. Happy cooking!


