Busy weeknights or lazy weekends, we’ve all been there—craving something delicious yet healthy that fits our dairy-free keto lifestyle. Fear not! Our roundup of 19 Delicious Dairy-Free Keto Recipes is here to save the day, offering a mix of quick dinners, hearty meals, and sweet treats that’ll keep you on track without sacrificing flavor. Dive in and discover your next favorite dish!
Avocado and Egg Breakfast Bowl
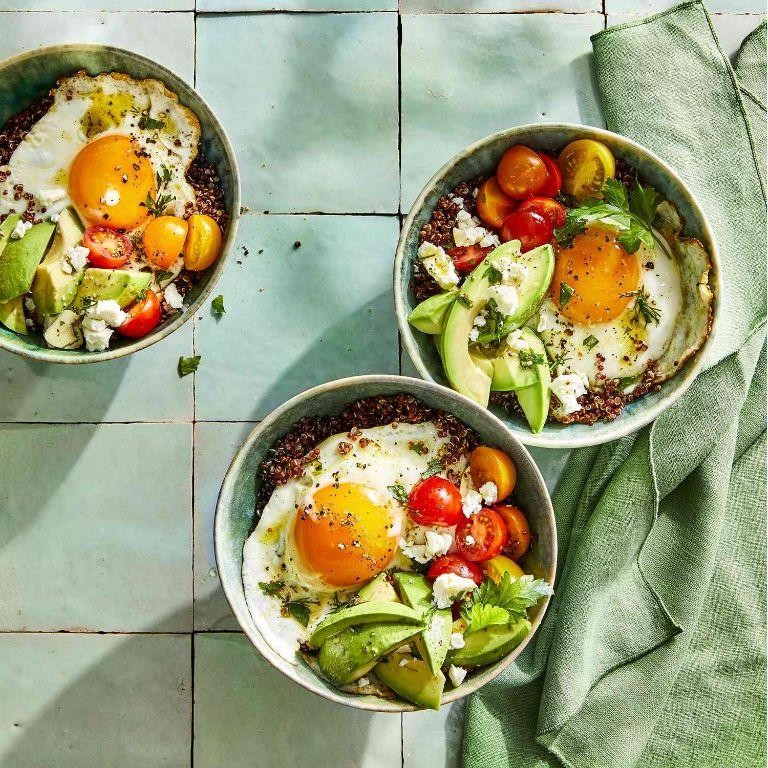
Oh, mornings—the time when our stomachs growl louder than our alarms, and the only thing standing between us and a grumpy day is a breakfast that’s both easy and epic. Enter the Avocado and Egg Breakfast Bowl, your new best friend that’s as nutritious as it is Instagram-worthy, proving that good things do come in bowls.
Ingredients
- For the base:
- 1 ripe avocado, sliced
- 2 large eggs
- For the toppings:
- 1/4 cup cherry tomatoes, halved
- 1 tbsp olive oil
- Salt and pepper, to taste
- 1 tbsp chopped fresh cilantro
- 1/4 tsp red pepper flakes
Instructions
- Heat a non-stick skillet over medium heat and add 1 tbsp olive oil, swirling to coat the pan.
- Crack 2 large eggs into the skillet, being careful not to break the yolks. Cook for 3 minutes for sunny-side-up eggs, or until the whites are set but the yolks are still runny. Tip: Covering the skillet can help the tops of the eggs cook faster without flipping.
- While the eggs cook, slice 1 ripe avocado in half, remove the pit, and scoop the flesh into a bowl. Mash lightly with a fork if you prefer a creamier texture.
- Halve 1/4 cup cherry tomatoes and sprinkle them over the avocado.
- Once the eggs are done, gently place them on top of the avocado and tomatoes.
- Season with salt and pepper to taste, then sprinkle with 1 tbsp chopped fresh cilantro and 1/4 tsp red pepper flakes for a kick. Tip: A squeeze of lime juice can add a refreshing zing if you’re feeling fancy.
This bowl is a symphony of textures—creamy avocado, juicy tomatoes, and that glorious runny yolk tying it all together. Serve it with a side of toast for scooping, or go rogue and eat it straight from the bowl while pretending you’re at a fancy café.
Coconut Flour Pancakes
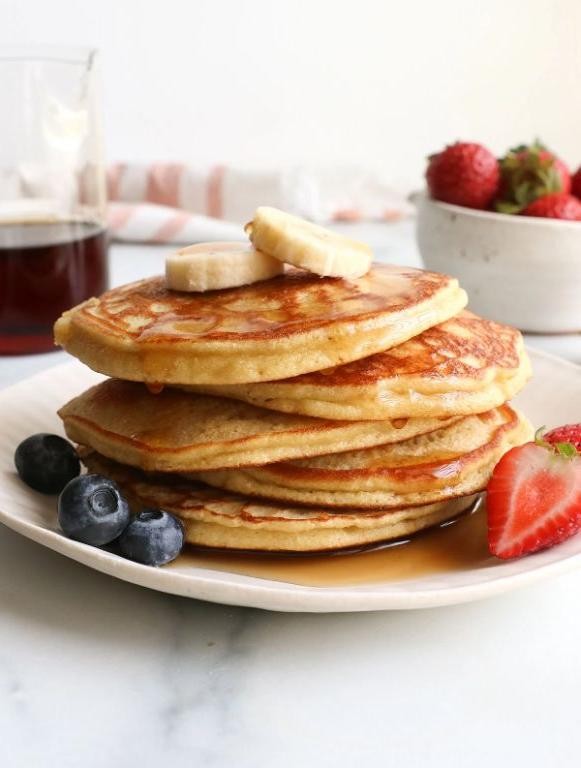
Let’s face it, mornings can be tough, but these Coconut Flour Pancakes are here to flip your frown upside down. Light, fluffy, and packed with a tropical twist, they’re the perfect excuse to hit the snooze button one more time—because breakfast is about to get a whole lot more exciting.
Ingredients
- For the batter:
- 1/2 cup coconut flour
- 1/4 tsp baking soda
- 1/4 tsp salt
- 4 large eggs
- 1/2 cup coconut milk
- 2 tbsp honey
- 1 tsp vanilla extract
- For cooking:
- 2 tbsp coconut oil
Instructions
- In a large bowl, whisk together coconut flour, baking soda, and salt until well combined.
- In another bowl, beat the eggs, then mix in coconut milk, honey, and vanilla extract until smooth.
- Gradually add the wet ingredients to the dry ingredients, stirring until the batter is smooth. Let it sit for 5 minutes to thicken—patience is key here!
- Heat a large skillet over medium heat and add 1 tbsp coconut oil, swirling to coat the pan.
- Pour 1/4 cup of batter for each pancake onto the skillet. Cook for 2-3 minutes until bubbles form on the surface, then flip and cook for another 1-2 minutes until golden brown.
- Repeat with the remaining batter, adding more coconut oil to the skillet as needed.
These pancakes are a dreamy combo of slightly sweet and nutty, with a texture that’s somehow both airy and satisfying. Try stacking them high with a drizzle of maple syrup and a handful of fresh berries for a breakfast that’s as Instagram-worthy as it is delicious.
Zucchini Noodles with Avocado Pesto
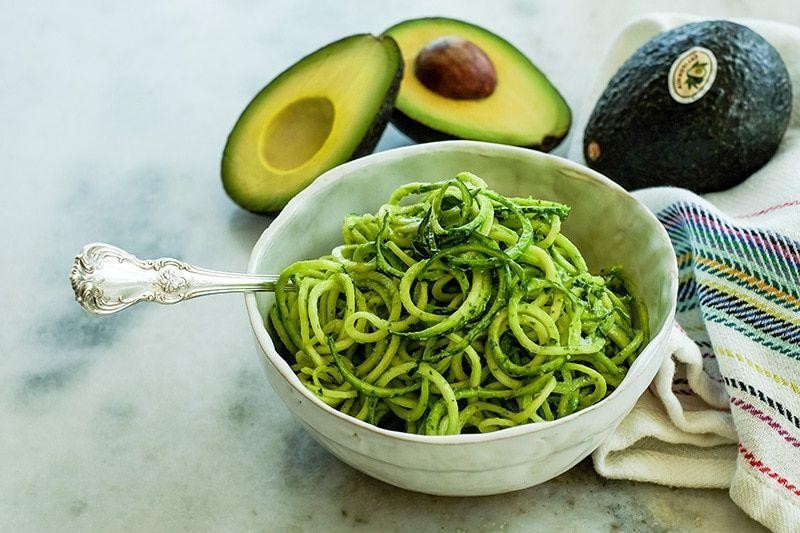
Howdy, food lovers! If you’re tired of the same old pasta but still crave something twirl-worthy, let’s spiral into the world of zucchini noodles with a creamy avocado pesto that’ll make your taste buds do a happy dance.
Ingredients
- For the zucchini noodles:
- 4 medium zucchinis, spiralized
- 1 tbsp olive oil
- 1/2 tsp salt
- For the avocado pesto:
- 2 ripe avocados, pitted and peeled
- 1/2 cup fresh basil leaves
- 2 cloves garlic
- 1/4 cup pine nuts
- 2 tbsp lemon juice
- 1/4 cup olive oil
- 1/2 tsp salt
- 1/4 tsp black pepper
Instructions
- In a large bowl, toss the spiralized zucchini with 1 tbsp olive oil and 1/2 tsp salt until evenly coated. Let it sit for 10 minutes to soften slightly.
- While the zucchini rests, combine the avocados, basil, garlic, pine nuts, lemon juice, 1/4 cup olive oil, salt, and pepper in a food processor. Blend until smooth, scraping down the sides as needed.
- Heat a large skillet over medium heat. Add the zucchini noodles and sauté for 2-3 minutes, just until they’re warm but still crisp. Tip: Don’t overcook, or they’ll turn mushy!
- Remove the skillet from heat and gently fold in the avocado pesto until the noodles are well coated. Tip: For extra creaminess, add a splash of water if the pesto is too thick.
- Serve immediately, garnished with extra basil leaves and pine nuts if desired. Tip: For a protein boost, top with grilled chicken or shrimp.
Just like that, you’ve got a dish that’s as vibrant in color as it is in flavor—creamy, zesty, and with just the right amount of crunch. Perfect for a quick dinner or to impress at your next potluck, these zucchini noodles are a game-changer.
Cauliflower Rice Stir Fry
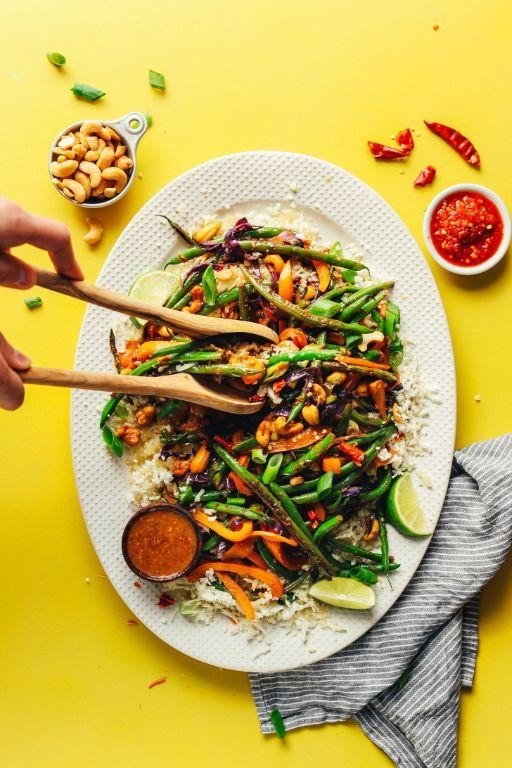
So, you’ve decided to ditch the carbs but not the flavor, huh? Well, buckle up, because this Cauliflower Rice Stir Fry is about to take your taste buds on a wild ride without the guilt trip!
Ingredients
- For the stir fry:
- 1 large head of cauliflower, riced (about 4 cups)
- 2 tbsp olive oil
- 1 cup diced carrots
- 1 cup diced bell peppers
- 1/2 cup chopped green onions
- 2 cloves garlic, minced
- For the sauce:
- 3 tbsp soy sauce
- 1 tbsp sesame oil
- 1 tsp ginger, grated
- 1/2 tsp red pepper flakes
Instructions
- Heat olive oil in a large skillet over medium-high heat (about 350°F).
- Add diced carrots and bell peppers to the skillet. Stir-fry for 5 minutes until they start to soften.
- Toss in the minced garlic and chopped green onions. Stir-fry for another 2 minutes until fragrant.
- Add the riced cauliflower to the skillet. Stir-fry for 5-7 minutes until the cauliflower is tender but still has a bit of crunch.
- While the veggies are cooking, whisk together soy sauce, sesame oil, grated ginger, and red pepper flakes in a small bowl.
- Pour the sauce over the cauliflower mixture. Stir well to combine and cook for an additional 2 minutes.
- Remove from heat and let it sit for a minute to allow the flavors to meld together beautifully.
Every bite of this stir fry is a crunchy, savory delight with just the right kick of heat. Serve it up in a bowl for a quick lunch or plate it alongside some grilled chicken for a dinner that’ll have everyone asking for seconds.
Almond Flour Bread
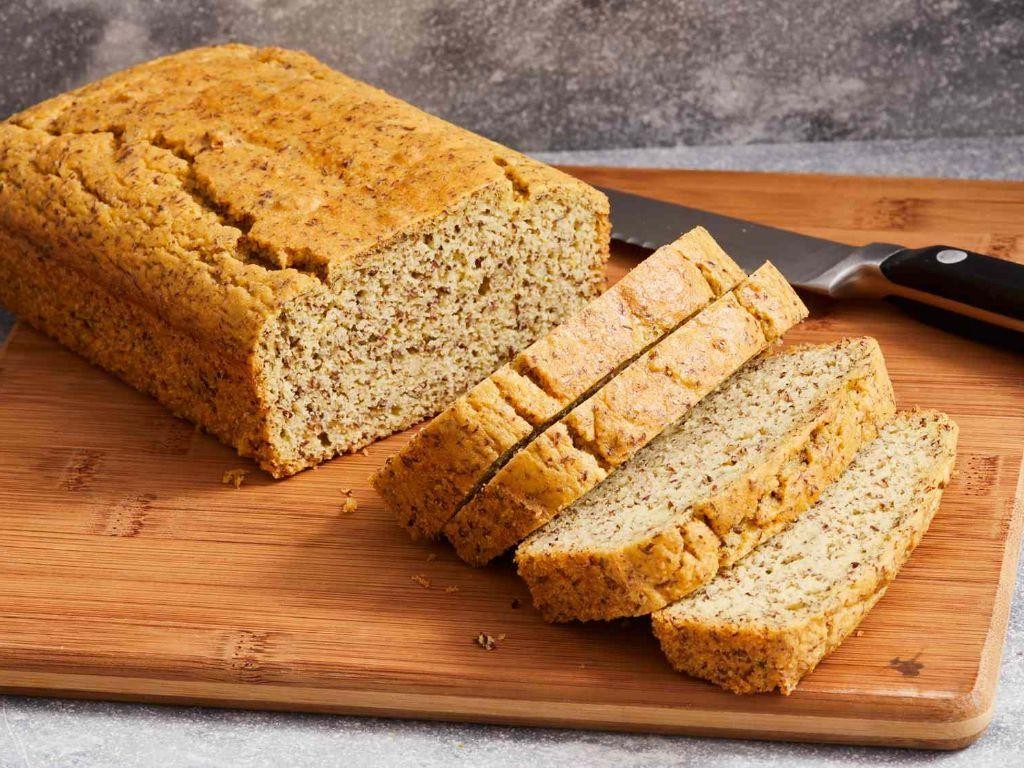
Every now and then, we stumble upon a recipe that makes us question why we ever bothered with the complicated stuff. This almond flour bread is that recipe—simple, satisfying, and sneakily gluten-free, it’s the little loaf that could.
Ingredients
- For the bread:
- 2 cups almond flour
- 1/4 cup coconut flour
- 1 tsp baking soda
- 1/2 tsp salt
- 5 large eggs
- 1/4 cup melted coconut oil
- 1 tbsp honey
- 1 tbsp apple cider vinegar
Instructions
- Preheat your oven to 350°F (175°C) and grease a 9×5 inch loaf pan with coconut oil.
- In a large bowl, whisk together the almond flour, coconut flour, baking soda, and salt until well combined.
- In another bowl, beat the eggs, then mix in the melted coconut oil, honey, and apple cider vinegar.
- Pour the wet ingredients into the dry ingredients and stir until just combined. Tip: Don’t overmix to keep the bread light and fluffy.
- Transfer the batter to the prepared loaf pan and smooth the top with a spatula.
- Bake for 40-45 minutes, or until the top is golden brown and a toothpick inserted into the center comes out clean. Tip: Cover with foil if the top browns too quickly.
- Let the bread cool in the pan for 10 minutes, then transfer to a wire rack to cool completely. Tip: This bread slices best when completely cooled.
Great for toasting, slathering with avocado, or just enjoying as is, this almond flour bread is a versatile star. Its moist crumb and slightly nutty flavor make it a hit for breakfast or anytime you need a quick, wholesome bite.
Chocolate Avocado Mousse
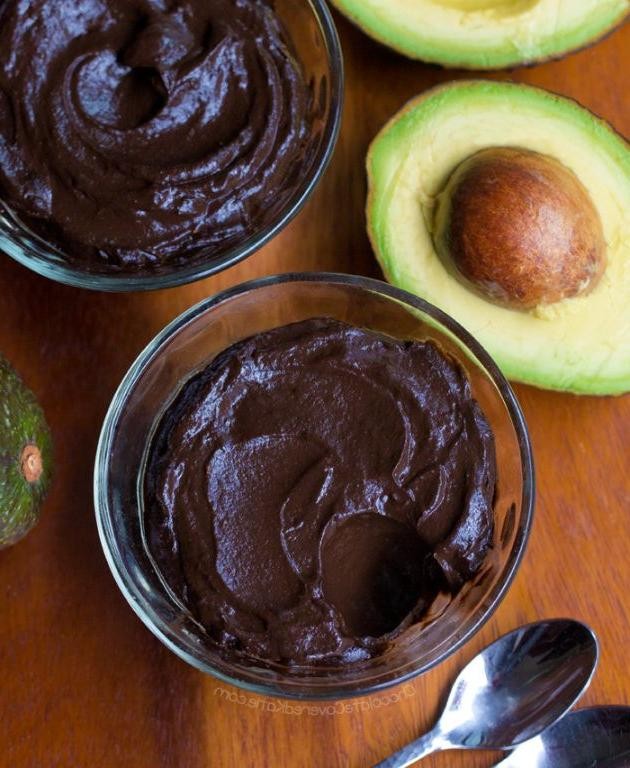
Now, let’s talk about a dessert that’s as sneaky as it is delicious—Chocolate Avocado Mousse. This velvety, rich treat will have your taste buds dancing and your guests none the wiser about its secret, healthy ingredient. Perfect for when you want to indulge without the guilt, or just really love avocados and chocolate (who doesn’t?).
Ingredients
- For the mousse:
- 2 ripe avocados, peeled and pitted
- 1/2 cup unsweetened cocoa powder
- 1/4 cup honey
- 1/4 cup almond milk
- 1 tsp vanilla extract
- Pinch of salt
- For topping (optional):
- Whipped cream
- Chocolate shavings
Instructions
- In a food processor, combine the avocados, cocoa powder, honey, almond milk, vanilla extract, and salt. Blend until smooth, scraping down the sides as needed. Tip: For an extra silky texture, blend for a full 2 minutes.
- Taste the mousse and adjust sweetness by adding more honey if desired. Tip: The ripeness of your avocados can affect sweetness, so adjust accordingly.
- Divide the mousse into serving dishes and refrigerate for at least 1 hour to set. Tip: Chilling overnight enhances the flavors even more.
- Before serving, top with whipped cream and chocolate shavings if using.
Great news—this mousse is so rich and creamy, no one will believe it’s avocado-based. Serve it in fancy glasses for a touch of elegance, or straight from the bowl for those ‘I need chocolate now’ moments. Either way, it’s a win.
Keto Green Smoothie
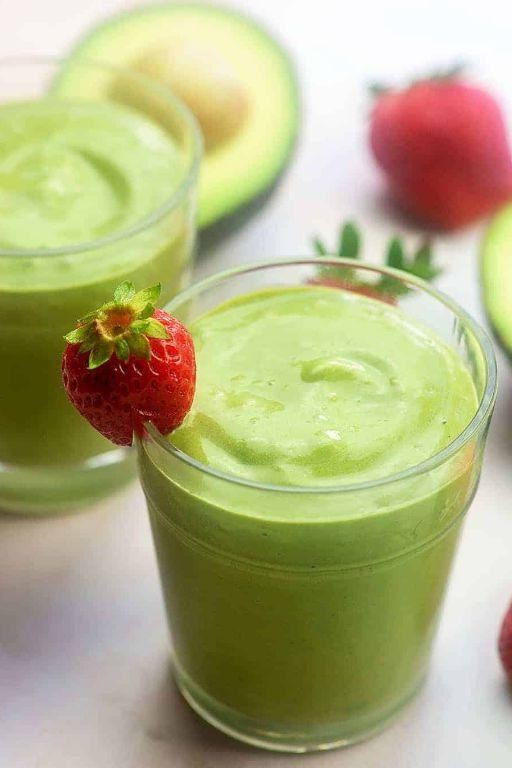
Mornings can be tough, but this Keto Green Smoothie is like a high-five for your taste buds and a hug for your health goals. Packed with greens and just the right amount of sweetness, it’s the ultimate ‘I woke up like this’ breakfast.
Ingredients
- For the base: 1 cup unsweetened almond milk, 1/2 avocado, 1 cup fresh spinach
- For sweetness and flavor: 1 tbsp almond butter, 1/2 tsp vanilla extract, 1/4 tsp cinnamon
- For the keto kick: 1 tbsp MCT oil, 1 scoop vanilla keto protein powder
- For the chill factor: 1/2 cup ice cubes
Instructions
- Add the unsweetened almond milk, avocado, and fresh spinach to your blender. This trio is the foundation of your smoothie, so make sure they’re in first.
- Drop in the almond butter, vanilla extract, and cinnamon. These are your flavor powerhouses, turning the blend from ‘meh’ to ‘more, please!’
- Sprinkle in the MCT oil and vanilla keto protein powder. They’re the secret agents of ketosis, working undercover to keep you fueled.
- Toss in the ice cubes last to keep everything cool and refreshing. No one likes a lukewarm smoothie, after all.
- Blend on high for 45 seconds, or until the mixture is as smooth as your morning playlist. If it’s too thick, add a splash more almond milk; too thin, a few more ice cubes.
- Pour into your favorite glass, take a moment to admire that vibrant green hue, and dive in. Tip: A sprinkle of cinnamon on top adds a nice visual and flavor pop.
Absolutely creamy with a hint of nutty sweetness, this smoothie is like dessert for breakfast—minus the guilt. Serve it with a side of sunshine or your morning podcast for the ultimate start to the day.
Spicy Tuna Lettuce Wraps
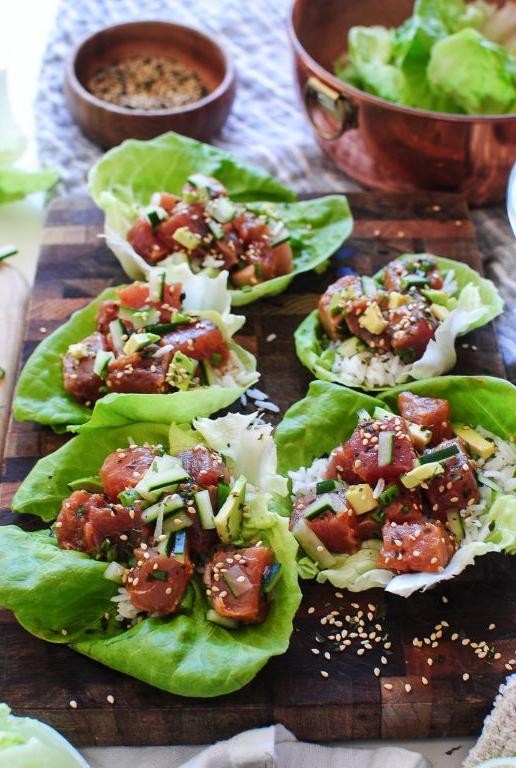
Kick your lunch game up a notch with these Spicy Tuna Lettuce Wraps that are as fun to make as they are to eat—no fancy skills required, just a love for bold flavors and a slight tolerance for heat (or a big one, we don’t judge).
Ingredients
- For the tuna mixture:
- 1 can (5 oz) tuna in water, drained
- 1/4 cup mayonnaise
- 1 tbsp sriracha sauce
- 1/2 tsp garlic powder
- 1/4 tsp salt
- For assembling:
- 4 large lettuce leaves (butter or romaine work great)
- 1/4 cup shredded carrots
- 1/4 cup thinly sliced cucumber
- 1 tbsp sesame seeds
Instructions
- In a medium bowl, mix the drained tuna, mayonnaise, sriracha, garlic powder, and salt until well combined. Tip: For extra creaminess, let the mixture sit in the fridge for 10 minutes before assembling.
- Lay out the lettuce leaves on a clean surface. Tip: Pat them dry with a paper towel to prevent sogginess.
- Divide the tuna mixture evenly among the lettuce leaves, spreading it down the center of each.
- Top each with shredded carrots, sliced cucumber, and a sprinkle of sesame seeds. Tip: For a crunchier texture, add the veggies right before serving.
- Gently fold the sides of the lettuce leaves over the filling, tucking in any escapees, and serve immediately.
Light, crunchy, and packing a punch, these wraps are your ticket to a no-fuss, flavor-packed meal. Try serving them with a side of extra sriracha for those who like to live on the edge.
Pumpkin Spice Fat Bombs

Ready to dive into the cozy, spice-filled world of Pumpkin Spice Fat Bombs? These little nuggets of joy are your ticket to a flavor-packed snack that’s as fun to make as it is to eat, blending the warmth of pumpkin spice with the creamy goodness of fat bombs. Perfect for those who love their treats with a side of humor and a dash of bold flavors!
Ingredients
- For the fat bombs:
- 1/2 cup pumpkin puree
- 1/2 cup coconut oil, melted
- 1/4 cup almond butter
- 2 tbsp powdered erythritol
- 1 tsp pumpkin pie spice
- 1/2 tsp vanilla extract
- A pinch of salt
Instructions
- In a medium bowl, combine the pumpkin puree, melted coconut oil, and almond butter. Stir until the mixture is smooth and well incorporated.
- Add the powdered erythritol, pumpkin pie spice, vanilla extract, and a pinch of salt to the bowl. Mix thoroughly to ensure all the flavors are evenly distributed.
- Pour the mixture into silicone molds or a lined mini muffin tin. For an extra smooth finish, tap the molds gently on the counter to remove any air bubbles.
- Freeze the fat bombs for at least 2 hours, or until they are completely solid. This is the perfect time to practice your patience or plan your next snack attack.
- Once frozen, pop the fat bombs out of the molds. If they’re being stubborn, a quick run of warm water on the back of the mold should do the trick.
These Pumpkin Spice Fat Bombs are a creamy, dreamy delight with a texture that’s irresistibly smooth and a flavor that screams autumn in every bite. Serve them as a post-workout snack, a midday pick-me-up, or sneak them into your movie night for a guilt-free treat that’s sure to impress.
Beef and Broccoli Stir Fry
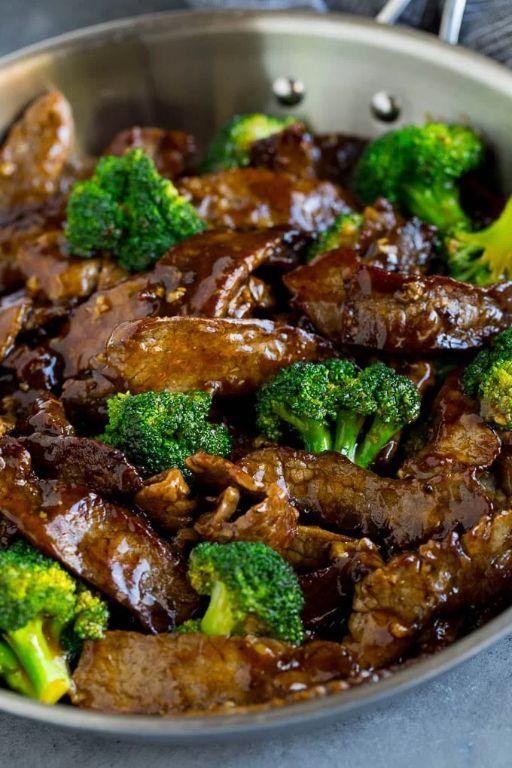
Howdy, food lovers! If you’re craving a dish that’s quicker to make than deciding what to watch on Netflix tonight, our Beef and Broccoli Stir Fry is your golden ticket. Packed with flavor and ready in a flash, it’s the superhero of weeknight dinners.
Ingredients
- For the marinade:
- 1 lb flank steak, thinly sliced against the grain
- 2 tbsp soy sauce
- 1 tbsp cornstarch
- 1 tbsp water
- For the sauce:
- 1/2 cup beef broth
- 1/4 cup soy sauce
- 2 tbsp brown sugar
- 1 tbsp sesame oil
- 2 garlic cloves, minced
- 1 tsp ginger, grated
- For the stir fry:
- 2 cups broccoli florets
- 2 tbsp vegetable oil
Instructions
- In a bowl, combine the flank steak with soy sauce, cornstarch, and water. Let it marinate for 15 minutes. Tip: Slicing the steak against the grain ensures it’s tender.
- Whisk together beef broth, soy sauce, brown sugar, sesame oil, garlic, and ginger in a separate bowl for the sauce. Set aside.
- Heat 1 tbsp of vegetable oil in a large skillet over medium-high heat. Add the marinated beef and cook until browned, about 2-3 minutes per side. Remove and set aside.
- In the same skillet, add the remaining tbsp of oil and the broccoli. Stir fry for 3-4 minutes until bright green and slightly tender. Tip: Don’t overcook the broccoli to keep that crunch!
- Return the beef to the skillet, pour the sauce over, and stir everything together. Cook for another 2 minutes until the sauce thickens. Tip: If the sauce is too thick, add a splash of beef broth to loosen it up.
Kick back and savor the symphony of tender beef and crisp broccoli, all coated in a glossy, savory-sweet sauce. Serve it over a bed of fluffy rice or noodles for a meal that’ll have everyone asking for seconds.
Coconut Yogurt Parfait
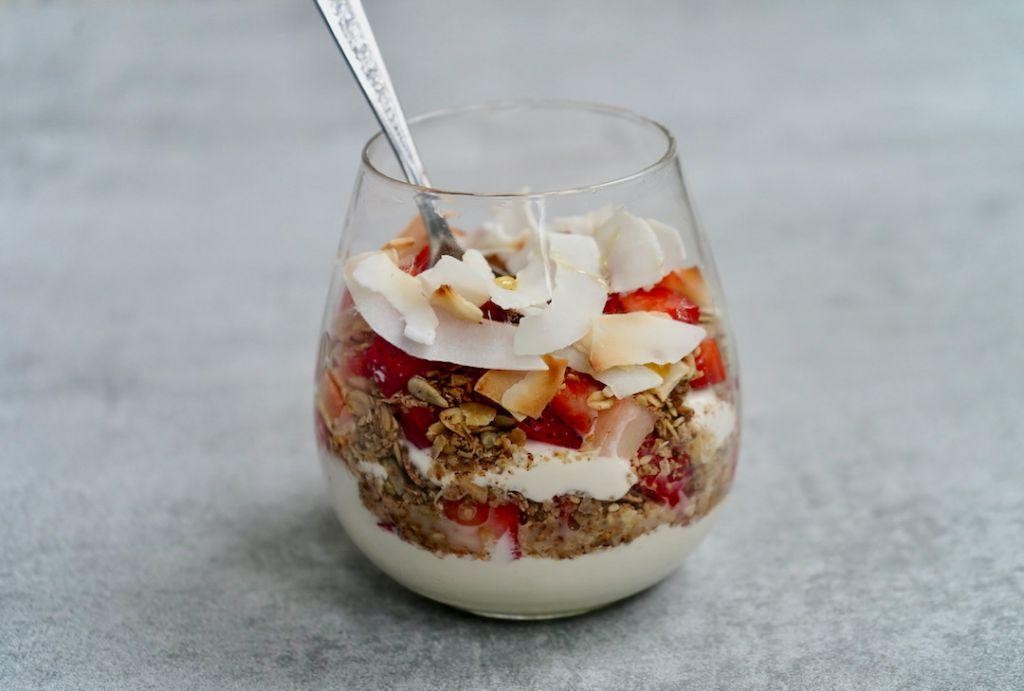
Craving something creamy, dreamy, and a tad bit tropical to kickstart your morning? Look no further than this Coconut Yogurt Parfait, a layered masterpiece that’s as fun to make as it is to devour. Perfect for those who like their breakfasts with a side of sunshine and a sprinkle of humor.
Ingredients
- For the parfait:
- 1 cup coconut yogurt
- 1/2 cup granola
- 1/4 cup shredded coconut
- 1/2 cup mixed berries (strawberries, blueberries, raspberries)
- 1 tbsp honey
Instructions
- In a clear glass or bowl, start by spreading a 1/4 cup of coconut yogurt at the bottom for a creamy base.
- Sprinkle 2 tbsp of granola over the yogurt for that essential crunch factor.
- Add a layer of mixed berries (about 2 tbsp) to introduce a burst of color and tanginess.
- Repeat the layers until the glass is nearly full, ending with a dollop of coconut yogurt on top.
- Drizzle 1 tbsp of honey over the final layer for a sweet finish that ties all the flavors together.
- Garnish with shredded coconut for a tropical twist and a photo-worthy presentation.
This parfait is a textural symphony—creamy yogurt, crunchy granola, and juicy berries dancing in harmony. Try serving it in a coconut shell for an extra dose of island vibes, or better yet, enjoy it straight from the jar for those ‘too lazy to wash a dish’ mornings.
Keto Sushi Rolls
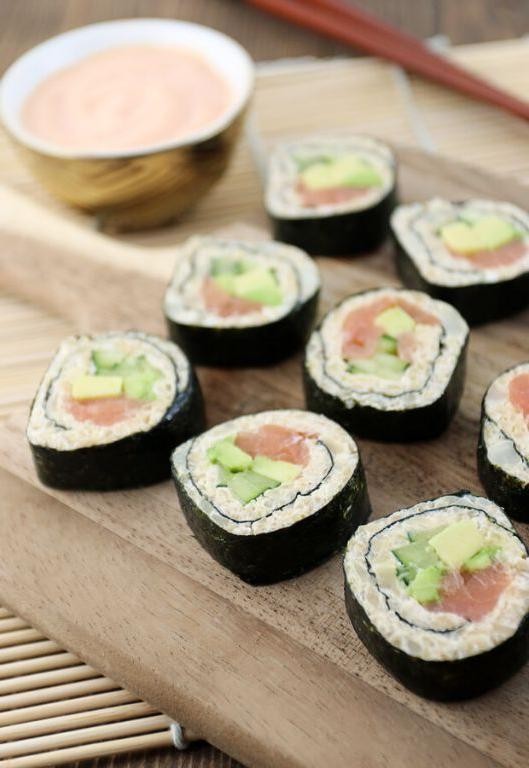
Zesty and zippy, these Keto Sushi Rolls are here to shake up your low-carb life without missing a beat—or a bite! Perfect for when you’re craving that sushi roll vibe but your diet says ‘not today, rice.’
Ingredients
- For the rice substitute:
- 1 cup riced cauliflower
- 1 tbsp cream cheese, softened
- 1/2 tsp rice vinegar
- 1/4 tsp salt
- For the filling:
- 2 oz smoked salmon
- 1/4 avocado, sliced
- 1/4 cucumber, julienned
- For wrapping:
- 2 nori sheets
Instructions
- Microwave the riced cauliflower for 2 minutes on high, then let it cool for 5 minutes to remove excess moisture.
- In a bowl, mix the cooled cauliflower with cream cheese, rice vinegar, and salt until it resembles sticky rice.
- Lay a nori sheet on a bamboo mat, spread half the cauliflower mixture evenly, leaving a 1-inch border at the top.
- Arrange half the salmon, avocado, and cucumber in a line at the bottom edge of the nori sheet.
- Roll tightly from the bottom, using the mat to press and shape the roll. Seal the edge with a bit of water.
- Repeat with the second nori sheet and remaining ingredients.
- Slice each roll into 6 pieces with a sharp, wet knife for clean cuts.
Great for grab-and-go lunches or impressing your keto friends, these rolls pack a punch of flavor with a satisfying crunch. Serve with a side of soy sauce or wasabi for that authentic sushi experience—minus the carbs!
Baked Salmon with Asparagus
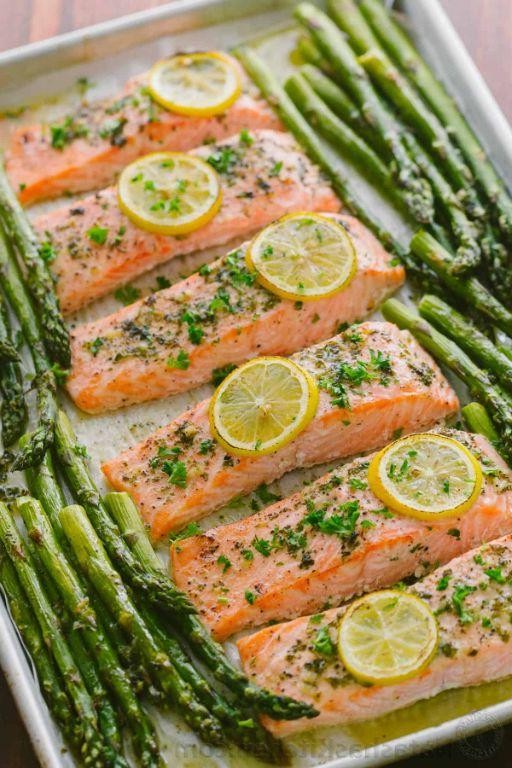
Howdy, food lovers! If you’re looking to impress at your next dinner party or just treat yourself to something fancy yet foolproof, this baked salmon with asparagus is your golden ticket. It’s like a hug for your taste buds, with minimal fuss and maximum flavor.
Ingredients
- For the salmon:
- 1 lb salmon fillet
- 2 tbsp olive oil
- 1 tsp salt
- 1/2 tsp black pepper
- 1 lemon, sliced
- For the asparagus:
- 1 bunch asparagus, trimmed
- 1 tbsp olive oil
- 1/2 tsp salt
- 1/4 tsp black pepper
Instructions
- Preheat your oven to 400°F (200°C) and line a baking sheet with parchment paper for easy cleanup.
- Place the salmon fillet on the prepared baking sheet. Drizzle with 2 tbsp olive oil and season with 1 tsp salt and 1/2 tsp black pepper. Top with lemon slices.
- In a separate bowl, toss the asparagus with 1 tbsp olive oil, 1/2 tsp salt, and 1/4 tsp black pepper until evenly coated.
- Arrange the asparagus around the salmon on the baking sheet.
- Bake in the preheated oven for 12-15 minutes, or until the salmon flakes easily with a fork and the asparagus is tender-crisp.
- Let the salmon rest for 2 minutes before serving to allow the juices to redistribute.
Boom! You’ve just made a dish that’s as pleasing to the eye as it is to the palate. The salmon is melt-in-your-mouth tender, while the asparagus adds a satisfying crunch. Serve it over a bed of quinoa or with a side of garlic mashed potatoes for a meal that’ll have everyone asking for seconds.
Chia Seed Pudding
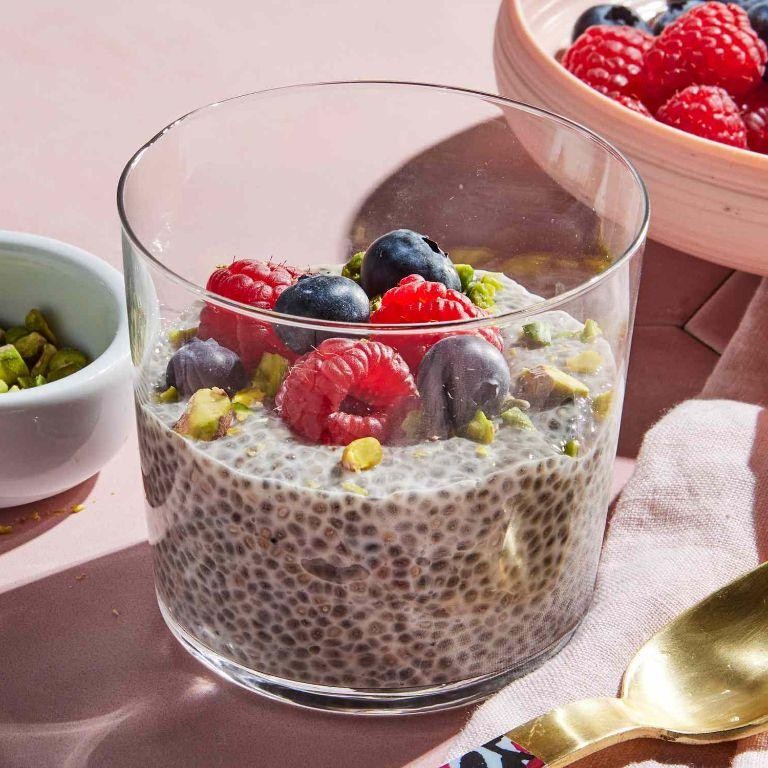
Dive into the world of overnight magic with this chia seed pudding that’s so easy, it practically makes itself while you dream of breakfast. Perfect for those who can’t decide between dessert and a healthy start, this dish is your morning win-win.
Ingredients
- For the pudding:
- 1/4 cup chia seeds
- 1 cup almond milk (or any milk of choice)
- 1 tbsp maple syrup
- 1/2 tsp vanilla extract
- For topping (optional):
- Fresh berries
- 1 tbsp almond butter
- A sprinkle of granola
Instructions
- In a medium bowl, whisk together chia seeds, almond milk, maple syrup, and vanilla extract until well combined. Tip: Make sure there are no clumps of chia seeds for a smooth texture.
- Cover the bowl with plastic wrap and refrigerate for at least 4 hours, or overnight. Tip: The longer it sits, the thicker and creamier it gets.
- Once set, give the pudding a good stir to break up any clumps that may have formed. Tip: If it’s too thick, add a splash of almond milk to loosen it up.
- Serve the pudding in a bowl or jar, and top with fresh berries, a dollop of almond butter, and a sprinkle of granola for crunch.
Velvety smooth with a slight chew, this chia seed pudding is like eating clouds that decided to get nutritious. Layer it in a parfait glass for an Instagram-worthy breakfast or keep it simple in a mason jar for an on-the-go snack that’s anything but basic.
Stuffed Bell Peppers
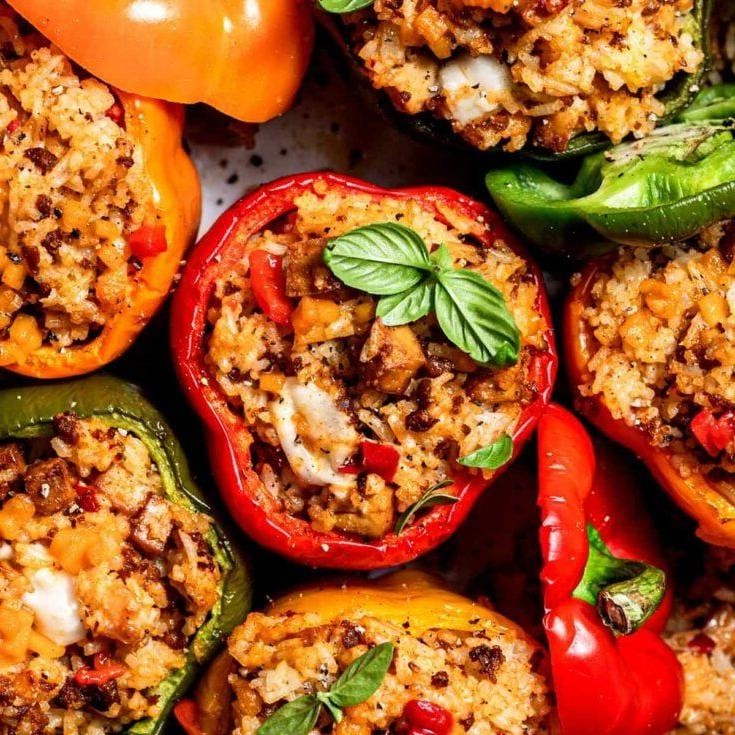
Ever find yourself staring at a bell pepper and thinking, ‘You could be so much more than just a salad accessory’? Well, buckle up, because we’re about to transform these colorful caps into the main event with a stuffing that’s as bold and vibrant as their hues.
Ingredients
- For the peppers:
- 4 large bell peppers, any color
- 1 tbsp olive oil
- For the filling:
- 1 lb ground beef
- 1 cup cooked rice
- 1/2 cup diced onion
- 1/2 cup diced tomatoes
- 1 tsp garlic powder
- 1 tsp salt
- 1/2 tsp black pepper
- 1 cup shredded cheese
Instructions
- Preheat your oven to 375°F (190°C) and lightly grease a baking dish with olive oil.
- Slice the tops off the bell peppers and remove the seeds and membranes. Tip: Keep the tops for a cute presentation!
- In a skillet over medium heat, cook the ground beef until browned, about 5-7 minutes. Drain any excess fat.
- Add the diced onion, tomatoes, garlic powder, salt, and black pepper to the skillet. Cook for another 3 minutes until the onions are translucent.
- Stir in the cooked rice and half of the shredded cheese into the beef mixture. Tip: This is a great way to use leftover rice!
- Stuff each bell pepper with the beef and rice mixture, then place them in the prepared baking dish.
- Sprinkle the remaining cheese on top of each stuffed pepper. Tip: For extra golden cheese, broil for the last 2 minutes of baking.
- Bake for 25-30 minutes, or until the peppers are tender and the cheese is bubbly.
Yum! These stuffed bell peppers are a symphony of textures, from the tender pepper to the hearty, cheesy filling. Serve them atop a bed of greens for a pop of color or alongside a crusty piece of bread to sop up any delicious juices.
Keto Chocolate Chip Cookies
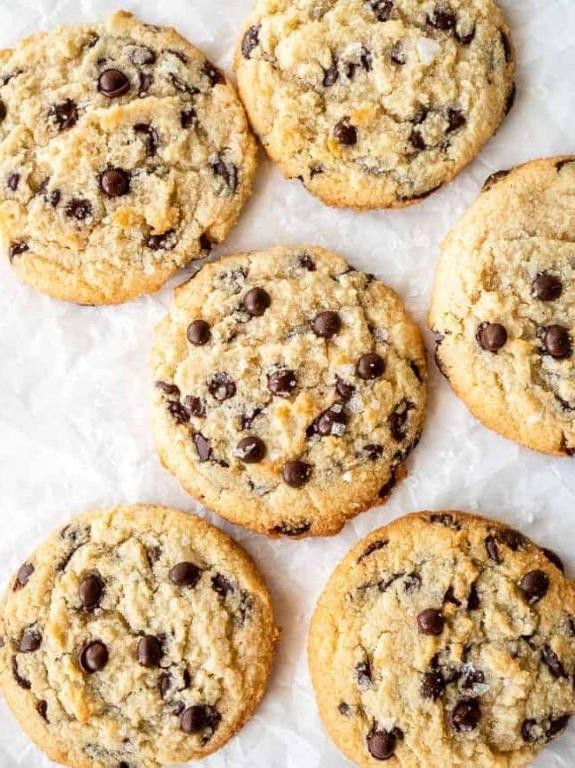
Delightfully decadent yet surprisingly simple, these Keto Chocolate Chip Cookies are about to become your new best friend. Perfect for when you’re craving something sweet but want to keep it low-carb, these little morsels of joy are here to save the day—no guilt attached!
Ingredients
- For the dough:
- 2 cups almond flour
- 1/2 cup butter, softened
- 1/3 cup erythritol
- 1 large egg
- 1 tsp vanilla extract
- 1/2 tsp baking soda
- 1/4 tsp salt
- For the chocolate chips:
- 1/2 cup sugar-free chocolate chips
Instructions
- Preheat your oven to 350°F (175°C) and line a baking sheet with parchment paper.
- In a large bowl, cream together the softened butter and erythritol until light and fluffy. Tip: Ensure your butter is at room temperature for easier mixing.
- Beat in the egg and vanilla extract until well combined.
- In a separate bowl, whisk together the almond flour, baking soda, and salt.
- Gradually add the dry ingredients to the wet ingredients, mixing until a dough forms. Tip: Don’t overmix to keep the cookies tender.
- Fold in the sugar-free chocolate chips evenly throughout the dough.
- Using a tablespoon, scoop the dough and roll into balls. Place them on the prepared baking sheet, spacing them about 2 inches apart.
- Flatten each ball slightly with the back of a spoon or your fingers. Tip: For uniform cookies, use a cookie scoop.
- Bake for 10-12 minutes, or until the edges are golden but the centers are still soft.
- Allow the cookies to cool on the baking sheet for 5 minutes before transferring to a wire rack to cool completely.
Velvety on the inside with a satisfying crunch on the outside, these cookies are a dream come true for keto dieters. Serve them with a glass of almond milk for the ultimate low-carb treat, or crumble them over keto ice cream for an extra indulgent dessert.
Shrimp and Cauliflower Grits
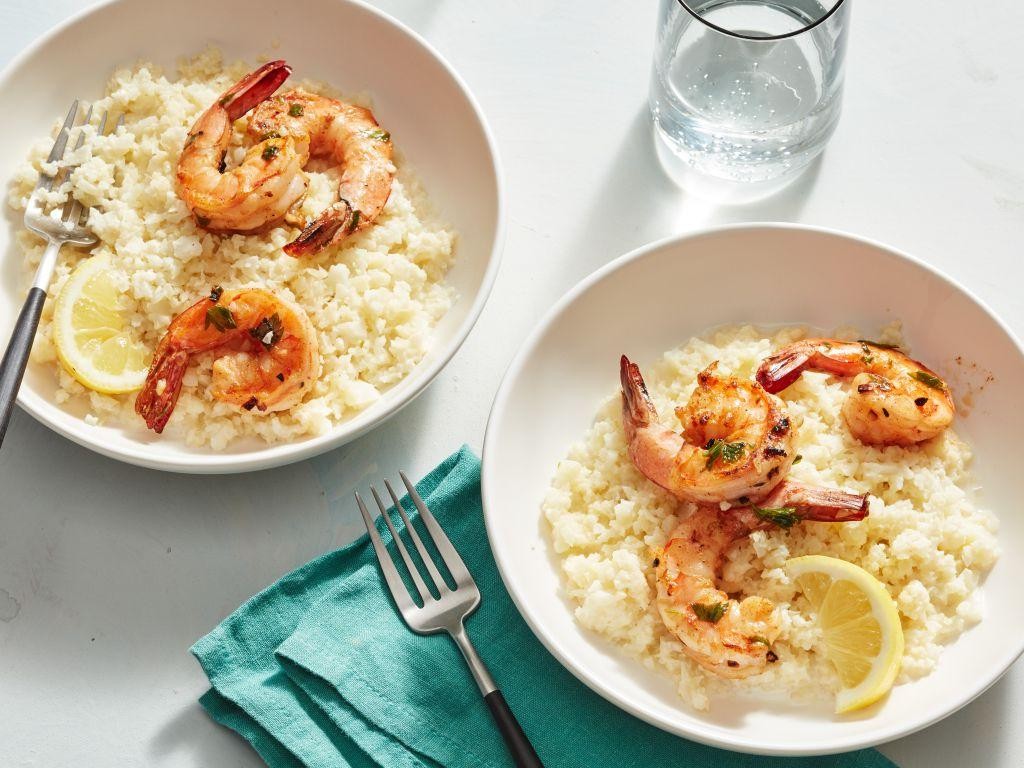
Ever had one of those days where you’re craving something decadently Southern but also kinda want to keep it light? Enter Shrimp and Cauliflower Grits, the dish that’s here to satisfy your soul without weighing you down like a food coma in July.
Ingredients
- For the grits:
- 1 head of cauliflower, riced (about 4 cups)
- 2 cups chicken broth
- 1/2 cup heavy cream
- 1/2 cup shredded cheddar cheese
- 1 tbsp butter
- Salt and pepper to taste
- For the shrimp:
- 1 lb shrimp, peeled and deveined
- 2 tbsp olive oil
- 2 cloves garlic, minced
- 1/2 tsp smoked paprika
- 1/4 tsp cayenne pepper
- Salt and pepper to taste
Instructions
- In a large skillet over medium heat, bring the chicken broth to a simmer.
- Add the riced cauliflower to the skillet, cover, and let it steam for 5 minutes until tender. Tip: Don’t peek! Keeping the lid on ensures even cooking.
- Stir in the heavy cream, cheddar cheese, and butter until the mixture is creamy and the cheese has melted. Season with salt and pepper to taste. Set aside and keep warm.
- In another skillet, heat the olive oil over medium-high heat. Add the shrimp in a single layer and cook for 2 minutes per side until pink and opaque.
- Add the minced garlic, smoked paprika, and cayenne pepper to the shrimp, stirring for about 30 seconds until fragrant. Tip: Garlic burns quickly, so keep the party moving!
- Season the shrimp with salt and pepper to taste.
- Serve the creamy cauliflower grits topped with the spicy shrimp. Tip: Garnish with chopped green onions for a pop of color and freshness.
Rich, creamy, and with just the right kick, this dish is a textural dream—silky grits meet plump, juicy shrimp. Try serving it with a side of crispy bacon for an extra layer of indulgence that’ll have everyone at the table fighting for seconds.
Lemon Garlic Chicken Thighs
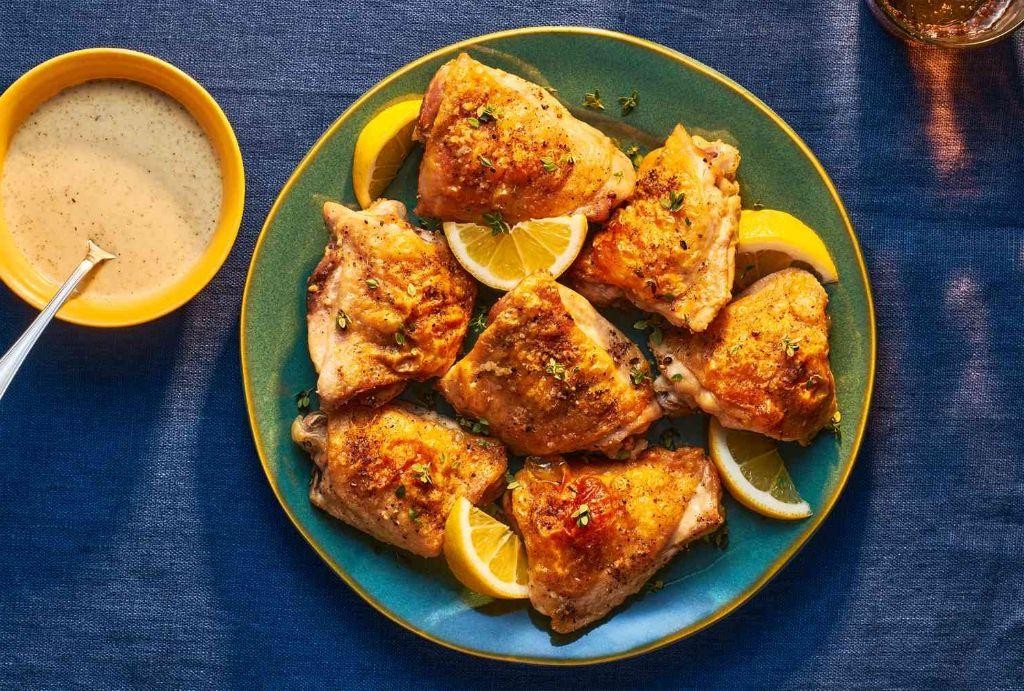
Mmm, get ready to pucker up and savor the zesty, garlicky goodness of these Lemon Garlic Chicken Thighs that are about to become your weeknight hero. Perfectly golden, juicy, and packed with flavors that dance on your palate, this dish is a no-fuss, high-reward kind of deal that’ll have you coming back for seconds (and maybe thirds).
Ingredients
- For the marinade:
- 6 bone-in, skin-on chicken thighs
- 3 tbsp olive oil
- 4 cloves garlic, minced
- Zest and juice of 1 large lemon
- 1 tsp salt
- 1/2 tsp black pepper
- 1 tsp dried oregano
- For cooking:
- 1 tbsp olive oil
Instructions
- In a large bowl, whisk together 3 tbsp olive oil, minced garlic, lemon zest, lemon juice, salt, black pepper, and dried oregano to create the marinade.
- Add the chicken thighs to the bowl, ensuring each piece is thoroughly coated in the marinade. Cover and refrigerate for at least 30 minutes, or up to 4 hours for deeper flavor.
- Heat 1 tbsp olive oil in a large skillet over medium-high heat. Once hot, add the chicken thighs skin-side down. Cook for 5-7 minutes until the skin is golden brown and crispy.
- Flip the chicken thighs and reduce the heat to medium. Cook for an additional 8-10 minutes, or until the internal temperature reaches 165°F.
- Remove from heat and let rest for 5 minutes before serving. This allows the juices to redistribute, ensuring every bite is succulent.
Ready to dig in? These Lemon Garlic Chicken Thighs boast a crispy skin that gives way to tender, flavorful meat beneath, with a bright lemon punch and a garlicky backbone that’s downright addictive. Serve them over a bed of fluffy rice or alongside roasted veggies to soak up all that delicious pan sauce.
Keto Avocado Ice Cream
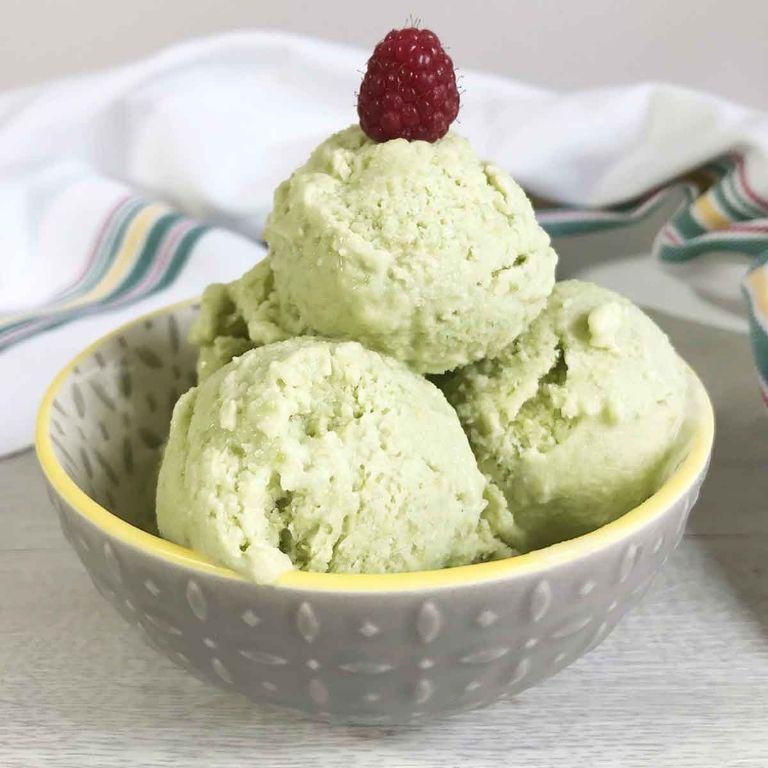
Perfectly creamy and surprisingly simple, this Keto Avocado Ice Cream is your ticket to guilt-free indulgence. Who knew avocados could moonlight as dessert royalty?
Ingredients
- For the base:
- 2 ripe avocados, peeled and pitted
- 1 cup heavy cream
- 1/2 cup unsweetened almond milk
- 1/3 cup powdered erythritol
- 1 tsp vanilla extract
- Pinch of salt
- For the mix-in:
- 1/4 cup sugar-free dark chocolate chips
Instructions
- In a blender, combine the avocados, heavy cream, almond milk, erythritol, vanilla extract, and salt. Blend until smooth, about 1 minute.
- Pour the mixture into an ice cream maker and churn according to the manufacturer’s instructions, usually about 20 minutes.
- While the ice cream is churning, roughly chop the sugar-free dark chocolate chips for a chunkier texture, or leave them whole for smoother bites.
- In the last 5 minutes of churning, add the chocolate chips to the ice cream maker to incorporate them evenly.
- Transfer the ice cream to a freezer-safe container and freeze for at least 2 hours to firm up.
Creamy, dreamy, and packed with healthy fats, this ice cream is a game-changer for keto dessert lovers. Serve it in halved avocado shells for a fun, Instagram-worthy presentation that’ll have everyone talking.
Conclusion
Vibrant and varied, this collection of 19 dairy-free keto recipes offers a treasure trove of healthy, delicious options for every home cook. Whether you’re keto-curious or fully committed, these dishes promise to delight. We’d love to hear which recipes become your favorites—drop us a comment below! And if you found this roundup helpful, why not share the love? Pin it on Pinterest for others to discover. Happy cooking!


