Kickstart your culinary adventure with our roundup of 24 Delicious Silkie Chickens Recipes for Gourmet Meals! Whether you’re craving something cozy for a weeknight dinner or planning a lavish weekend feast, these recipes promise to transform the humble Silkie chicken into extraordinary dishes. Dive in to discover flavors that will tantalize your taste buds and inspire your next kitchen masterpiece. Let’s get cooking!
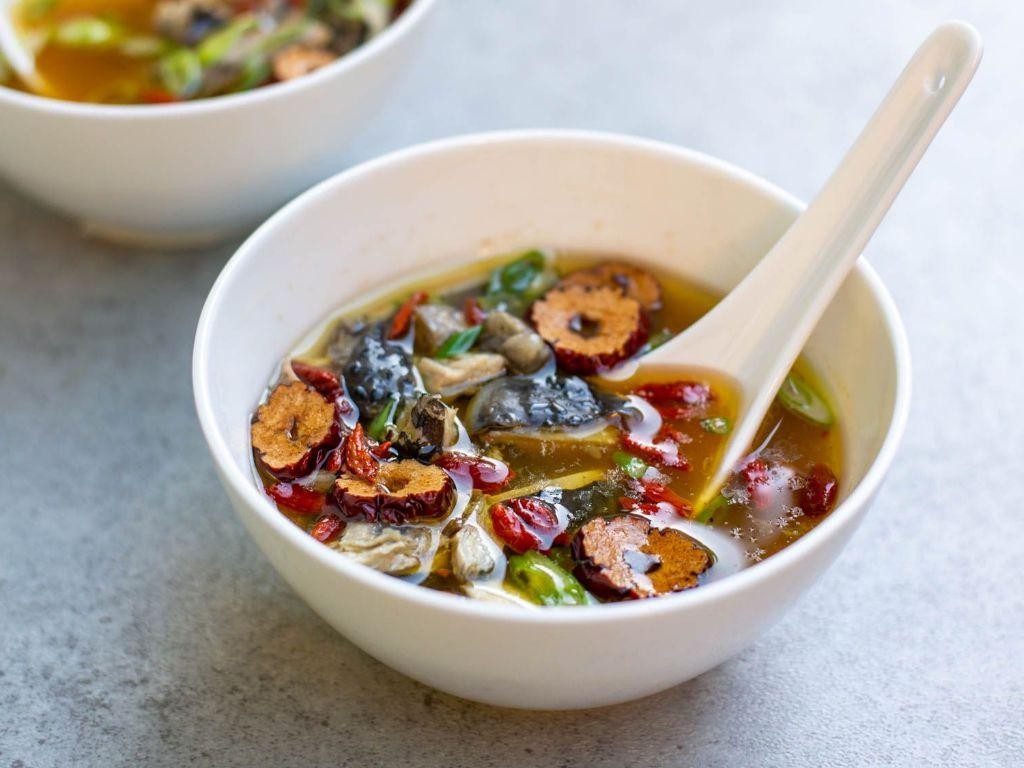
Silkie Chicken Soup with Herbs

Nestled in the quiet of the kitchen, there’s something deeply comforting about preparing a bowl of Silkie Chicken Soup with Herbs. It’s a dish that whispers of home, of gentle flavors mingling in harmony, and of the slow, thoughtful process of cooking that feels almost meditative.
Ingredients
- 1 whole Silkie chicken, about 3 lbs
- A couple of carrots, roughly chopped
- A handful of celery stalks, sliced
- 1 medium onion, diced
- A splash of olive oil
- 4 cups of chicken broth
- A few sprigs of fresh thyme
- A couple of bay leaves
- Salt and freshly ground black pepper, just enough to season
Instructions
- Heat a splash of olive oil in a large pot over medium heat until it shimmers.
- Add the diced onion, chopped carrots, and sliced celery, stirring occasionally until they soften, about 5 minutes.
- Place the whole Silkie chicken into the pot, nestling it among the vegetables.
- Pour in the chicken broth until the chicken is nearly submerged, then add the thyme sprigs and bay leaves.
- Bring the soup to a gentle boil, then reduce the heat to low, covering the pot with a lid.
- Let the soup simmer for about 1.5 hours, or until the chicken is tender and cooked through.
- Carefully remove the chicken from the pot and shred the meat, discarding the bones.
- Return the shredded chicken to the pot, season with salt and pepper, and simmer for another 10 minutes to meld the flavors.
Ladling this soup into bowls, the broth is rich and aromatic, the chicken impossibly tender. Serve it with a slice of crusty bread for dipping, or over a bed of steamed rice for a more substantial meal.
Braised Silkie Chicken with Mushrooms
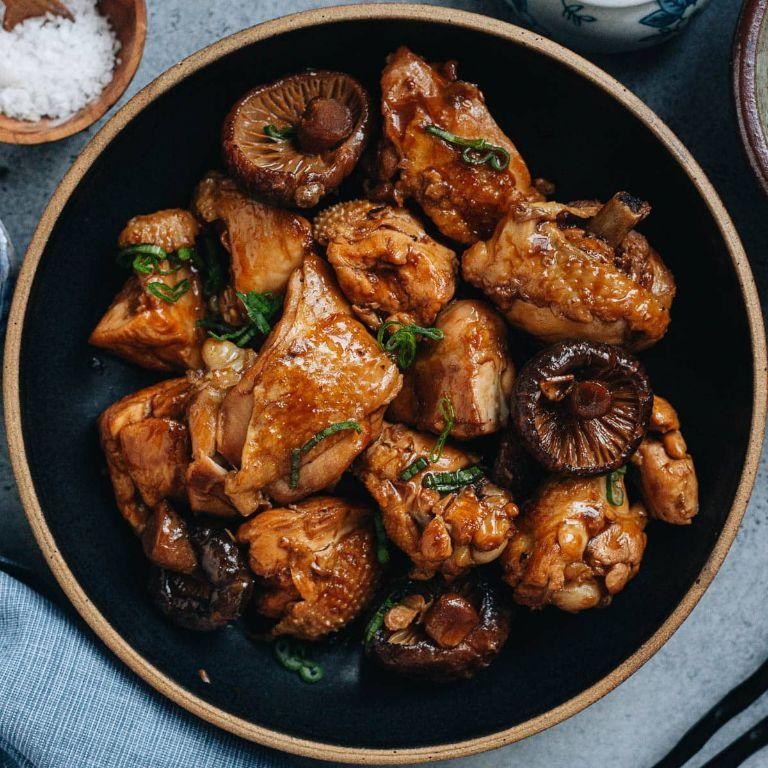
Just imagine the tender embrace of silkie chicken, its delicate flesh braised to perfection, mingling with earthy mushrooms in a dish that feels like a quiet evening at home. This recipe is a gentle nod to comfort, a slow dance of flavors that invites you to savor each bite.
Ingredients
- 1 whole silkie chicken, about 3 pounds
- A couple of cups of mixed mushrooms, like shiitake and cremini, sliced
- 2 tablespoons of olive oil
- A splash of soy sauce
- 1 cup of chicken broth
- A pinch of salt
- A few sprigs of fresh thyme
Instructions
- Heat the olive oil in a large Dutch oven over medium heat until it shimmers, about 2 minutes.
- Add the chicken, browning it on all sides for a golden crust, roughly 5 minutes per side.
- Toss in the mushrooms, letting them soak up the chicken’s flavors and soften for about 3 minutes.
- Pour in the soy sauce and chicken broth, then sprinkle the salt and lay the thyme sprigs on top.
- Cover and reduce the heat to low, letting everything braise together for 45 minutes, until the chicken is fork-tender.
- Remove the thyme sprigs before serving, and let the dish rest for 5 minutes to allow the flavors to settle.
Now, the silkie chicken should be so tender it nearly falls off the bone, with mushrooms that have absorbed all the rich, umami goodness. Serve it over a bed of steamed jasmine rice or with a side of crusty bread to soak up the savory broth.
Silkie Chicken Stew with Root Vegetables
Remembering the warmth of my grandmother’s kitchen, I find myself drawn to the comforting embrace of a simmering pot, where tender Silkie chicken and earthy root vegetables meld into a stew that feels like a hug in a bowl.
Ingredients
- 1 whole Silkie chicken, about 3 lbs, cut into pieces
- A couple of carrots, chopped into 1-inch pieces
- 2 medium parsnips, diced
- 1 large onion, roughly chopped
- A splash of olive oil
- 4 cups of chicken stock
- A handful of fresh thyme sprigs
- Salt, just enough to season
- A pinch of freshly ground black pepper
Instructions
- Heat a splash of olive oil in a large pot over medium heat until it shimmers.
- Add the chicken pieces, skin side down, and cook until golden brown, about 5 minutes per side. Tip: Don’t crowd the pot; cook in batches if necessary.
- Remove the chicken and set aside. In the same pot, add the onion, carrots, and parsnips. Cook until the onions are translucent, about 5 minutes.
- Return the chicken to the pot. Pour in the chicken stock until the chicken is just covered. Tip: The stock should be at a gentle simmer, not a rolling boil.
- Add the thyme sprigs, salt, and a pinch of black pepper. Cover and simmer on low heat for 45 minutes. Tip: The stew is ready when the chicken falls off the bone easily.
- Remove the thyme sprigs before serving.
Every spoonful of this stew offers a tender bite of chicken, sweetened by the root vegetables and deepened by the rich broth. Serve it with a crusty loaf to soak up every last drop, or over a bed of creamy polenta for a heartier meal.
Grilled Silkie Chicken with Lemon and Thyme
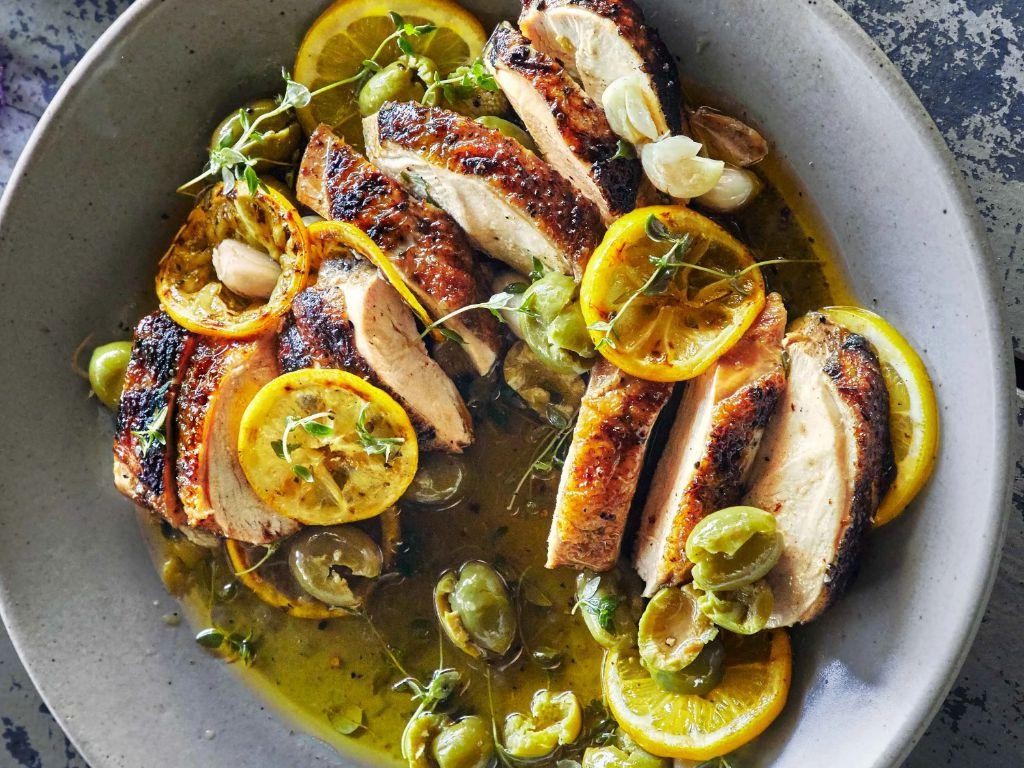
Under the soft glow of the evening light, there’s something deeply comforting about preparing a meal that feels both nourishing and intimate. This grilled Silkie chicken, with its delicate flavors of lemon and thyme, is just that—a simple yet profound dish that invites you to slow down and savor the process.
Ingredients
- 1 whole Silkie chicken, about 3 to 4 pounds
- A couple of fresh thyme sprigs
- 1 lemon, thinly sliced
- A splash of olive oil
- 2 cloves of garlic, minced
- 1 teaspoon of salt
- A pinch of freshly ground black pepper
Instructions
- Preheat your grill to a medium heat, around 350°F, ensuring one side is slightly cooler for indirect cooking.
- While the grill heats, gently rub the chicken all over with olive oil, then season inside and out with salt, pepper, and minced garlic.
- Carefully slide your fingers under the skin of the chicken to create pockets, then tuck lemon slices and thyme sprigs underneath for flavor that permeates the meat.
- Place the chicken on the cooler side of the grill, breast side up, and cover. Let it cook undisturbed for about 45 minutes.
- After 45 minutes, check the internal temperature at the thickest part of the thigh; it should read 165°F. If not, give it a bit more time.
- Once done, let the chicken rest for 10 minutes before carving to keep all those precious juices locked in.
Resting the chicken not only ensures juiciness but also allows the flavors to meld beautifully. The meat, tender and infused with citrus and herbs, pairs wonderfully with a crisp salad or roasted vegetables for a meal that feels both rustic and refined.
Silkie Chicken Curry with Coconut Milk

Today, as the light fades softly outside, I find myself drawn to the warmth and comfort of cooking something that feels like a hug in a bowl. Silkie chicken curry with coconut milk is that dish for me, a gentle blend of flavors that soothes the soul as much as it delights the palate.
Ingredients
- a couple of pounds of Silkie chicken, cut into pieces
- a splash of vegetable oil
- one large onion, finely chopped
- three cloves of garlic, minced
- a thumb-sized piece of ginger, grated
- two tablespoons of curry powder
- a can of coconut milk
- a cup of chicken broth
- a handful of fresh cilantro, chopped
- salt, just a pinch
Instructions
- Heat a splash of vegetable oil in a large pot over medium heat until it shimmers.
- Add the finely chopped onion, cooking until it turns translucent, about 5 minutes.
- Stir in the minced garlic and grated ginger, cooking for another minute until fragrant.
- Sprinkle the curry powder over the onions, garlic, and ginger, stirring well to coat everything evenly.
- Add the Silkie chicken pieces to the pot, browning them lightly on all sides, about 5 minutes total.
- Pour in the coconut milk and chicken broth, bringing the mixture to a gentle simmer.
- Reduce the heat to low, cover the pot, and let it cook for about 45 minutes, until the chicken is tender and cooked through.
- Season with a pinch of salt and sprinkle with chopped cilantro before serving.
Mmm, the curry is creamy with a hint of spice, the chicken so tender it falls apart at the touch of a fork. Serve it over a bed of steamed jasmine rice or with warm naan bread to soak up every last bit of that delicious sauce.
Roasted Silkie Chicken with Garlic and Rosemary
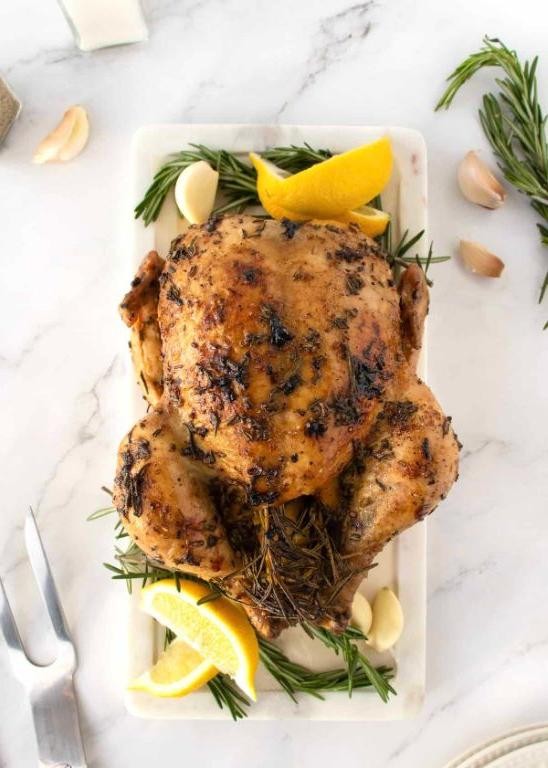
Just as the first light of dawn gently touches the earth, there’s something profoundly comforting about the aroma of roasted chicken filling the kitchen. This dish, with its tender Silkie chicken, fragrant garlic, and earthy rosemary, is a humble yet elegant celebration of simple ingredients coming together.
Ingredients
- 1 whole Silkie chicken, about 3 to 4 pounds
- A couple of tablespoons of olive oil
- 4 cloves of garlic, minced
- A few sprigs of fresh rosemary
- A splash of white wine (about 1/4 cup)
- Salt and freshly ground black pepper, just enough to season
Instructions
- Preheat your oven to 375°F (190°C) to ensure it’s perfectly heated for roasting.
- Pat the Silkie chicken dry with paper towels; this helps the skin get beautifully crispy.
- Rub the chicken all over with olive oil, then season generously with salt and pepper, both inside and out.
- Stuff the cavity with minced garlic and rosemary sprigs, letting their flavors infuse the meat as it cooks.
- Place the chicken in a roasting pan and pour the white wine around it, not over, to keep the skin crisp.
- Roast for about 1 hour and 15 minutes, or until the internal temperature reaches 165°F (74°C) at the thickest part of the thigh.
- Let the chicken rest for 10 minutes before carving; this keeps the juices from running out.
For the skin to achieve that golden crispness, make sure the chicken is dry before oiling. The white wine adds a subtle acidity that balances the richness of the chicken. Resting the chicken is crucial for juicy, tender meat.
Finally, the texture of the Silkie chicken is uniquely tender, almost velvety, with the garlic and rosemary lending a aromatic depth. Serve it atop a bed of creamy polenta or alongside roasted vegetables for a meal that feels both rustic and refined.
Silkie Chicken Pot Pie with Flaky Crust
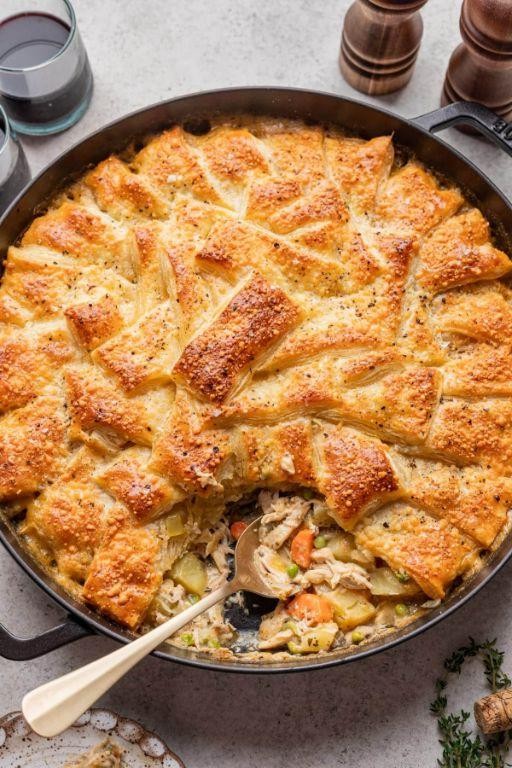
Lazy afternoons call for comfort food that warms the soul and fills the kitchen with inviting aromas. Today, we’re embracing the cozy charm of a homemade pot pie, with a twist that’s as tender as it is flavorful.
Ingredients
- 2 cups of shredded Silkie chicken, because its unique texture makes every bite special
- A splash of olive oil, just enough to coat the bottom of your pan
- A couple of carrots, diced into little coins for sweetness and color
- A handful of peas, frozen or fresh, for that pop of green
- 1 cup of diced potatoes, because what’s a pot pie without them?
- A generous sprinkle of salt and pepper, to bring all the flavors together
- 2 cups of chicken broth, for a rich and savory filling
- 1 cup of heavy cream, to add a touch of luxury
- 2 cups of all-purpose flour, for the flakiest crust you’ve ever made
- A stick of cold butter, cubed, because cold butter is the secret to flakiness
- A dash of cold water, just until the dough comes together
Instructions
- Preheat your oven to 375°F (190°C), letting it warm up while you prepare the filling.
- In a large pan, heat a splash of olive oil over medium heat, then add the shredded Silkie chicken, browning it slightly for depth of flavor.
- Add the diced carrots and potatoes, cooking until they start to soften, about 5 minutes. Tip: Don’t rush this step; letting the veggies cook slowly builds flavor.
- Stir in the peas, a generous sprinkle of salt, and pepper, then pour in the chicken broth and heavy cream. Simmer for 10 minutes, until the mixture thickens slightly.
- While the filling simmers, mix the flour and cubed cold butter in a bowl, using your fingers to blend until it resembles coarse crumbs. Tip: Keep everything cold for the flakiest crust.
- Add a dash of cold water, just enough for the dough to come together, then roll it out on a floured surface to fit your pie dish.
- Pour the filling into the dish, cover with the rolled-out dough, and crimp the edges to seal. Cut a few slits on top for steam to escape.
- Bake for 35-40 minutes, until the crust is golden and the filling bubbles. Tip: Place a baking sheet underneath to catch any drips.
Delight in the contrast of the flaky, buttery crust against the creamy, savory filling. Serve it straight from the oven, with a side of crisp greens for a meal that feels like a hug.
Stuffed Silkie Chicken with Wild Rice and Cranberries
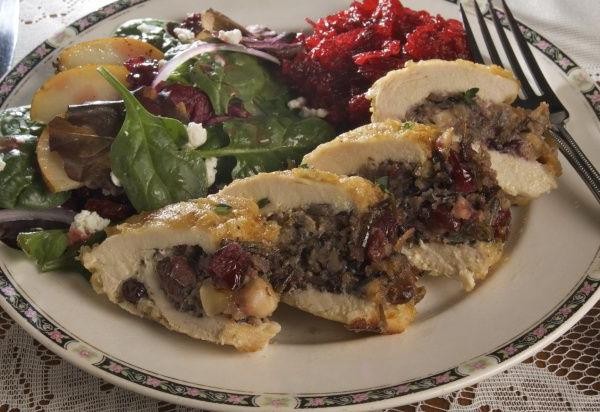
Beneath the golden hue of the evening light, there’s something profoundly comforting about preparing a dish that feels like a hug in every bite. This stuffed Silkie chicken, with its tender meat and hearty wild rice filling, speckled with tart cranberries, is just that—a meal to savor slowly, with gratitude.
Ingredients
- 1 whole Silkie chicken, about 3 to 4 pounds
- A cup of wild rice, rinsed
- A couple of cups of chicken broth
- A handful of dried cranberries
- A splash of olive oil
- A teaspoon of salt
- A pinch of black pepper
- A sprig of fresh thyme
Instructions
- Preheat your oven to 375°F, letting it warm up while you prepare the chicken, ensuring even cooking.
- In a medium pot, combine the wild rice and chicken broth, bringing to a boil before reducing to a simmer for about 45 minutes, or until the rice is tender and has absorbed most of the liquid.
- While the rice cooks, gently rub the Silkie chicken with olive oil, then season inside and out with salt and pepper, massaging the spices in for even flavor.
- Once the rice is done, stir in the dried cranberries and fresh thyme, letting the residual heat soften the cranberries slightly.
- Carefully stuff the chicken with the wild rice mixture, packing it loosely to allow for expansion, then truss the legs with kitchen twine to keep everything snug.
- Place the chicken in a roasting pan and roast in the preheated oven for about 1 hour and 15 minutes, or until the internal temperature reaches 165°F at the thickest part of the thigh.
- Let the chicken rest for 10 minutes before carving, allowing the juices to redistribute for the most succulent bite.
Perfectly roasted, the chicken’s skin crisps to a delicate crunch, giving way to the moist, flavorful meat beneath. The wild rice and cranberries meld into a sweet and savory stuffing, offering a delightful contrast in textures. Serve it atop a bed of roasted autumn vegetables for a plate that celebrates the season’s bounty.
Silkie Chicken Noodle Soup with Homemade Pasta

Wandering through the kitchen on a quiet afternoon, the thought of crafting something both comforting and nourishing led me to this Silkie Chicken Noodle Soup with Homemade Pasta. It’s a dish that feels like a warm embrace, with its tender chicken and silky noodles swimming in a golden broth.
Ingredients
- a whole Silkie chicken, about 3 lbs
- a couple of carrots, chopped
- a stalk of celery, diced
- a small onion, finely chopped
- a splash of olive oil
- 8 cups of water
- a pinch of salt
- 2 cups of all-purpose flour
- 3 eggs
- a drizzle of olive oil for the pasta
Instructions
- In a large pot, heat a splash of olive oil over medium heat. Add the chopped onion, carrots, and celery, sautéing until they’re just soft, about 5 minutes.
- Add the whole Silkie chicken to the pot, followed by 8 cups of water and a pinch of salt. Bring to a boil, then reduce to a simmer, covering the pot. Let it cook for about 1.5 hours, or until the chicken is tender and falls off the bone.
- While the soup simmers, make the pasta. On a clean surface, mound the flour and make a well in the center. Crack the eggs into the well, then gradually mix the flour into the eggs until a dough forms.
- Knead the dough for about 10 minutes until it’s smooth and elastic. Let it rest under a damp cloth for 30 minutes.
- Roll out the dough thinly on a floured surface, then cut into noodles of your desired width.
- Bring a pot of salted water to a boil and cook the noodles for about 3 minutes, or until they float to the surface. Drain and drizzle with a bit of olive oil to prevent sticking.
- Once the chicken is cooked, remove it from the pot, shred the meat, and return it to the broth. Add the cooked noodles to the soup just before serving.
The soup is a harmony of textures, from the melt-in-your-mouth chicken to the al dente bite of the homemade pasta. Serve it with a sprinkle of fresh herbs on top for a pop of color and flavor, or alongside a crusty loaf of bread for dipping into the rich, savory broth.
Silkie Chicken and Dumplings Comfort Food
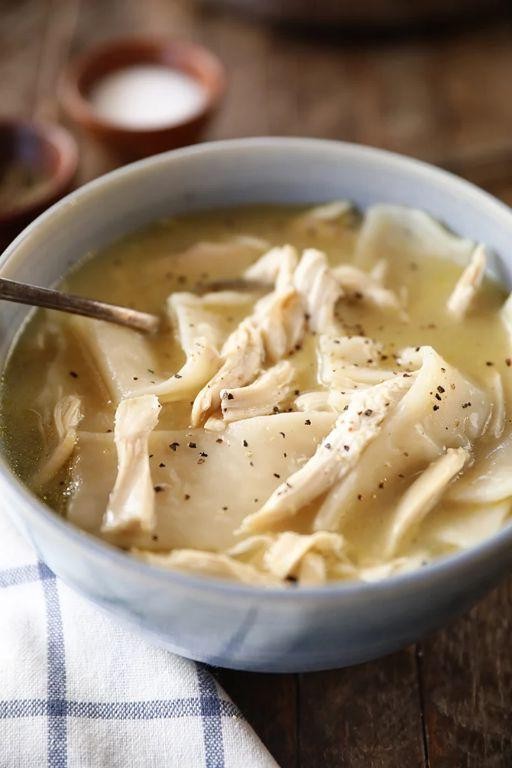
Kindness in cooking comes in many forms, but few dishes wrap you in warmth quite like a bowl of Silkie Chicken and Dumplings. It’s a recipe that whispers of home, with tender bites of chicken and fluffy dumplings swimming in a rich, comforting broth.
Ingredients
- a couple of pounds of Silkie chicken, cut into pieces
- a splash of olive oil
- a couple of carrots, diced
- a stalk of celery, chopped
- a small onion, finely chopped
- a couple of cloves of garlic, minced
- 4 cups of chicken broth
- a cup of all-purpose flour
- 2 tsp of baking powder
- a pinch of salt
- a half cup of milk
- a tbsp of butter, melted
Instructions
- Heat a splash of olive oil in a large pot over medium heat. Add the chicken pieces and brown them on all sides, about 5 minutes per side. Tip: Don’t rush the browning; it builds flavor.
- Throw in the carrots, celery, onion, and garlic. Cook until the veggies soften, about 5 minutes, stirring occasionally.
- Pour in the chicken broth, bring to a boil, then reduce heat to simmer. Cover and let it cook for about 20 minutes. Tip: Simmering gently ensures the chicken stays tender.
- While the soup simmers, mix the flour, baking powder, and salt in a bowl. Stir in the milk and melted butter to form a dough.
- Drop tablespoon-sized dollops of dough into the simmering soup. Cover and cook for 10 minutes without peeking. Tip: Keeping the lid on traps steam, making the dumplings light and fluffy.
- After 10 minutes, check a dumpling to ensure it’s cooked through. If done, remove from heat.
Perfect for a quiet evening, this dish offers a silky broth with clouds of dumplings and tender chicken. Try serving it with a sprinkle of fresh herbs for a pop of color and freshness.
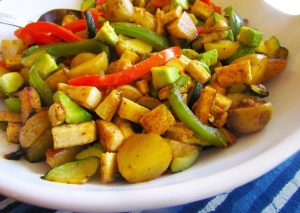
Silkie Chicken Stir-Fry with Vegetables
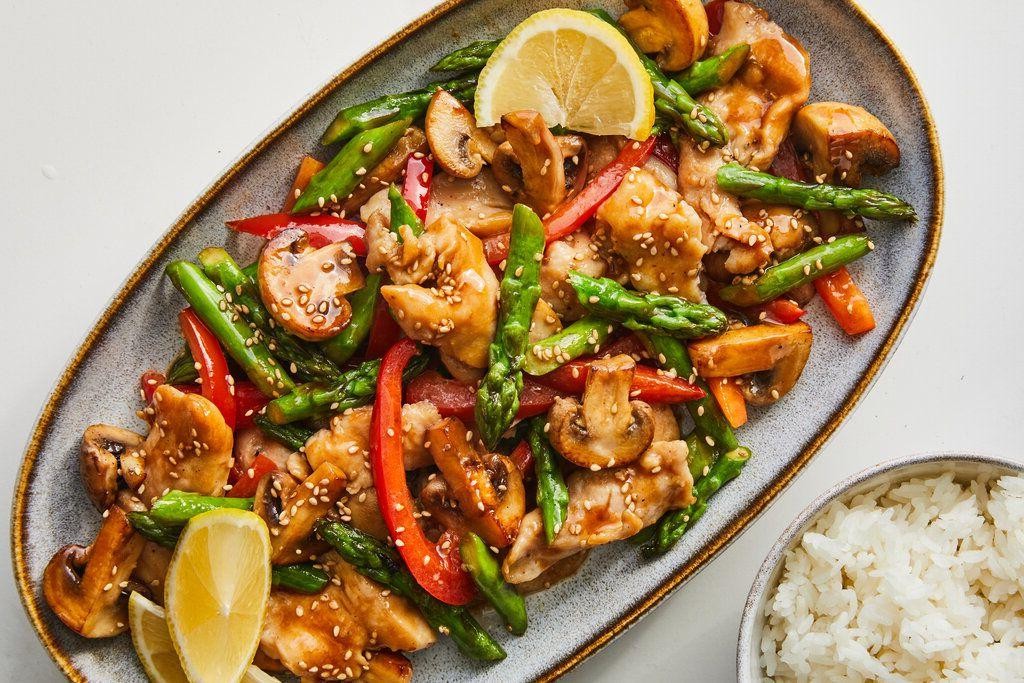
Reflecting on the quiet moments of the morning, there’s something deeply comforting about preparing a dish that’s both nourishing and vibrant. Silkie chicken stir-fry with vegetables is one such meal, blending the tender uniqueness of silkie chicken with the crisp freshness of seasonal veggies.
Ingredients
- 1 lb silkie chicken, cut into bite-sized pieces
- 2 cups of mixed vegetables (think bell peppers, snap peas, and carrots), sliced
- 2 tbsp olive oil
- a splash of soy sauce
- a couple of garlic cloves, minced
- 1 tsp ginger, grated
- a pinch of salt
- a dash of black pepper
Instructions
- Heat the olive oil in a large skillet over medium-high heat until it shimmers slightly, about 2 minutes.
- Add the silkie chicken pieces to the skillet, seasoning them with a pinch of salt and a dash of black pepper. Cook until they’re golden brown on all sides, roughly 5 minutes. Tip: Don’t overcrowd the pan to ensure each piece gets a nice sear.
- Toss in the minced garlic and grated ginger, stirring quickly to avoid burning, about 30 seconds. The aroma will tell you when it’s just right.
- Add the sliced vegetables to the skillet, stirring them gently to mix with the chicken and aromatics. Cook for about 4 minutes, until they’re just tender but still crisp. Tip: Keep the heat high to maintain a slight crunch in the veggies.
- Finish with a splash of soy sauce, tossing everything together for another minute to coat evenly. Tip: The soy sauce adds depth, but be mindful of the saltiness depending on your preference.
Just like that, you’ve got a stir-fry that’s as pleasing to the palate as it is to the eye. The silkie chicken offers a subtly gamey flavor that pairs beautifully with the sweetness of the vegetables, all brought together by the umami of soy sauce. Serve it over a bed of steamed rice or enjoy it as is for a lighter meal.
Silkie Chicken Tacos with Avocado Salsa

Under the soft glow of the kitchen light, there’s something deeply comforting about preparing a meal that feels both nourishing and indulgent. Silkie chicken tacos with avocado salsa are just that—a tender, flavorful embrace in every bite, perfect for those evenings when you crave something a little different.
Ingredients
- 2 cups of shredded Silkie chicken (about 1 small chicken)
- A splash of olive oil
- A couple of cloves of garlic, minced
- 1 teaspoon of ground cumin
- 1/2 teaspoon of smoked paprika
- Salt, just a pinch
- 1 ripe avocado, diced
- A handful of cherry tomatoes, quartered
- A small bunch of cilantro, chopped
- 1 lime, juiced
- 4 small corn tortillas
Instructions
- Heat a splash of olive oil in a pan over medium heat (about 350°F).
- Add the minced garlic and sauté until fragrant, about 30 seconds—be careful not to burn it.
- Toss in the shredded Silkie chicken, cumin, smoked paprika, and a pinch of salt. Stir well to coat the chicken evenly with the spices. Cook for about 5 minutes, until the chicken is heated through and slightly crispy at the edges.
- While the chicken cooks, mix the diced avocado, quartered cherry tomatoes, chopped cilantro, and lime juice in a bowl to make the salsa. Gently fold to combine without mashing the avocado too much.
- Warm the corn tortillas in a dry pan over medium heat for about 30 seconds on each side, or until they’re soft and pliable.
- Assemble the tacos by dividing the spiced chicken among the tortillas, then topping each with a generous spoonful of avocado salsa.
With the first bite, the tenderness of the Silkie chicken contrasts beautifully with the creamy, bright salsa, creating a harmony of textures and flavors. Serve these tacos with an extra wedge of lime on the side for those who love an extra zing, or alongside a crisp, cold beer to round out the meal.
Silkie Chicken Salad with Grapes and Walnuts
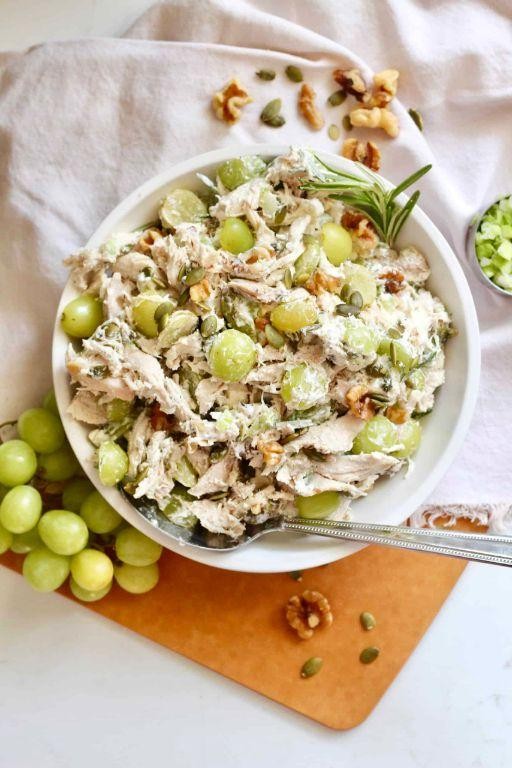
Zenith moments in the kitchen often come from the simplest dishes, like this Silkie Chicken Salad with Grapes and Walnuts. It’s a gentle reminder of how textures and flavors can dance together quietly, creating something unexpectedly delightful.
Ingredients
- 2 cups of shredded Silkie chicken, tender and cooled
- a handful of red grapes, halved for little bursts of sweetness
- a generous sprinkle of walnuts, roughly chopped for crunch
- a couple of tablespoons of mayonnaise, to bind it all together
- a splash of lemon juice, for a hint of brightness
- a pinch of salt, to elevate the flavors
- a dash of black pepper, for a slight kick
Instructions
- In a large mixing bowl, combine the shredded Silkie chicken and halved grapes gently, ensuring not to crush the grapes.
- Add the roughly chopped walnuts to the bowl, scattering them evenly throughout the mixture.
- Spoon in the mayonnaise, starting with one tablespoon and adding more as needed to coat the ingredients lightly but thoroughly.
- Squeeze the lemon juice over the mixture, aiming for a fresh, tangy lift without overpowering the dish.
- Season with a pinch of salt and a dash of black pepper, then fold everything together until well combined.
- Let the salad chill in the refrigerator for at least 30 minutes before serving, allowing the flavors to meld beautifully.
How the salad transforms after chilling is magical—the chicken becomes even more tender, the grapes slightly sweeter, and the walnuts retain their crunch. Serve it atop a bed of crisp lettuce or between slices of artisan bread for a sandwich that sings with every bite.
Silkie Chicken Kebabs with Yogurt Marinade

Lately, I’ve found myself drawn to the quiet comfort of preparing meals that remind me of home, and these Silkie Chicken Kebabs with Yogurt Marinade are no exception. There’s something about the tender meat and the creamy marinade that feels like a gentle hug on a busy day.
Ingredients
- 1.5 lbs of Silkie chicken, cut into 1-inch cubes
- A generous cup of plain yogurt
- A couple of garlic cloves, minced
- A splash of lemon juice
- 2 tbsp of olive oil
- A pinch of salt and a dash of black pepper
- A handful of fresh cilantro, chopped
- 1 tsp of ground cumin
- 1 tsp of paprika
Instructions
- In a large bowl, whisk together the yogurt, minced garlic, lemon juice, olive oil, salt, black pepper, cumin, and paprika until well combined.
- Add the chicken cubes to the marinade, ensuring each piece is thoroughly coated. Cover and refrigerate for at least 4 hours, or overnight for deeper flavor.
- Preheat your grill to medium-high heat, about 375°F, ensuring the grates are clean and lightly oiled to prevent sticking.
- Thread the marinated chicken onto skewers, leaving a little space between each piece for even cooking.
- Grill the kebabs for about 5-7 minutes on each side, or until the chicken is golden brown and reaches an internal temperature of 165°F.
- Garnish with chopped cilantro before serving.
As you take your first bite, the chicken’s tenderness and the marinade’s tangy, spiced notes will transport you. Try serving these kebabs over a bed of fluffy couscous or with a side of grilled vegetables for a complete meal that’s as nourishing as it is delightful.
Silkie Chicken Pasta with Creamy Alfredo Sauce
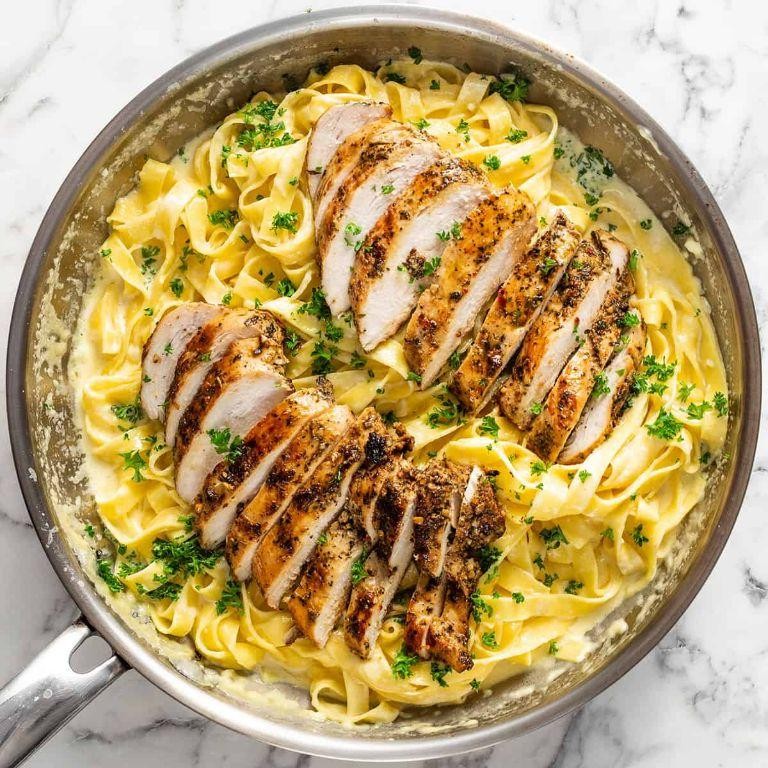
On a quiet evening like this, when the kitchen feels like a sanctuary, there’s something deeply comforting about preparing a dish that’s both nourishing and indulgent. Silkie chicken pasta with creamy Alfredo sauce is just that—a tender embrace in every bite, where the richness of the sauce meets the subtle, gamey notes of the chicken.
Ingredients
- 2 cups of fettuccine pasta
- 1 Silkie chicken breast, boneless and skinless
- A splash of olive oil
- 2 cloves of garlic, minced
- A couple of tablespoons of butter
- 1 cup of heavy cream
- A handful of grated Parmesan cheese
- A pinch of salt and freshly ground black pepper
- A sprinkle of chopped parsley for garnish
Instructions
- Bring a large pot of salted water to a boil and cook the fettuccine according to package instructions until al dente, about 8-10 minutes. Tip: Reserve a cup of pasta water before draining; it’s gold for adjusting sauce consistency.
- While the pasta cooks, heat a splash of olive oil in a skillet over medium heat. Season the Silkie chicken breast with salt and pepper, then cook for about 6-7 minutes on each side, or until the internal temperature reaches 165°F. Let it rest before slicing. Tip: Resting the chicken ensures juicy, tender slices.
- In the same skillet, melt a couple of tablespoons of butter over low heat. Add minced garlic and sauté until fragrant, about 30 seconds.
- Pour in the heavy cream, stirring gently, and let it simmer for 2 minutes to thicken slightly. Tip: Keep the heat low to prevent the cream from separating.
- Stir in the grated Parmesan cheese until the sauce is smooth and creamy. If the sauce is too thick, loosen it with a bit of the reserved pasta water.
- Add the cooked pasta to the skillet, tossing to coat evenly with the Alfredo sauce.
- Slice the rested Silkie chicken and arrange it over the pasta. Garnish with chopped parsley and an extra sprinkle of Parmesan.
Lusciously creamy with a velvety texture, this dish is a testament to the magic of simple ingredients coming together. Serve it with a side of roasted vegetables or a crisp salad to cut through the richness, making each forkful a delightful contrast.
Silkie Chicken and Corn Chowder
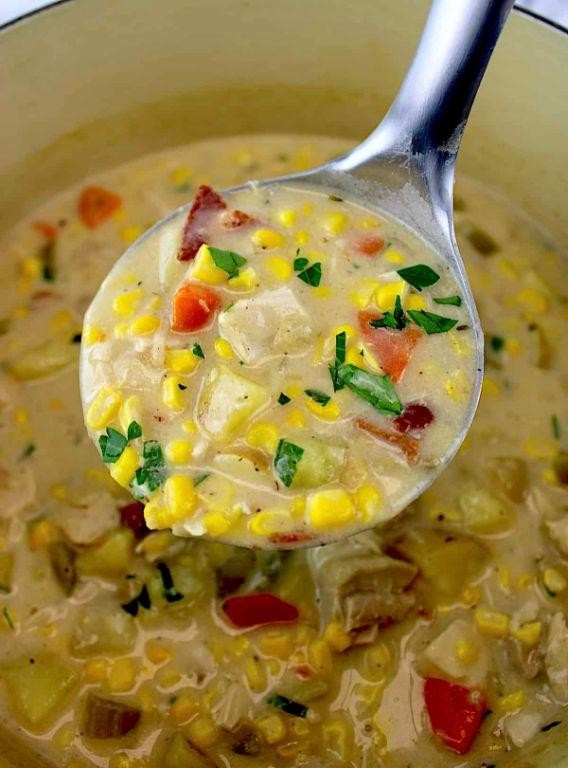
Zephyrs of early morning light filter through the kitchen window as I ponder the comforting embrace of a bowl of Silkie Chicken and Corn Chowder, a dish that whispers of home and heart with every spoonful.
Ingredients
- a couple of tablespoons of olive oil
- 1 cup of diced onions
- 2 cloves of garlic, minced
- 1 pound of Silkie chicken, cut into bite-sized pieces
- 4 cups of chicken broth
- 2 cups of corn kernels
- 1 cup of heavy cream
- a splash of white wine
- salt and pepper, just enough to season
Instructions
- Heat the olive oil in a large pot over medium heat until it shimmers, about 2 minutes.
- Add the diced onions and minced garlic, sautéing until they turn translucent, roughly 5 minutes.
- Tip: Stir occasionally to prevent burning and to evenly cook the onions and garlic.
- Introduce the Silkie chicken pieces to the pot, browning them on all sides, which should take about 7 minutes.
- Pour in the chicken broth and bring the mixture to a gentle boil, then reduce the heat to simmer for 20 minutes.
- Tip: Skimming off any foam that rises to the top will give your chowder a clearer broth.
- Add the corn kernels and heavy cream, stirring well to combine, and let it simmer for another 10 minutes.
- Finish with a splash of white wine, then season with salt and pepper to your liking.
- Tip: Letting the chowder sit for 5 minutes off the heat before serving allows the flavors to meld beautifully.
Perfectly creamy with a hint of sweetness from the corn, this chowder cradles the tender Silkie chicken in every bite. Serve it with a crusty bread for dipping, or garnish with fresh herbs to add a pop of color and freshness.
Silkie Chicken Fricassee with White Wine

Just like the quiet moments before dawn, this Silkie Chicken Fricassee with White Wine is a gentle reminder of the beauty in simplicity, a dish that whispers comfort with every bite.
Ingredients
- 1 whole Silkie chicken, cut into pieces
- A couple of tablespoons of olive oil
- A splash of white wine (about 1/2 cup)
- 1 cup of chicken broth
- A handful of mushrooms, sliced
- 2 cloves of garlic, minced
- A pinch of salt and freshly ground black pepper
- A sprinkle of fresh thyme leaves
Instructions
- Heat the olive oil in a large skillet over medium heat until it shimmers, about 2 minutes.
- Add the chicken pieces to the skillet, skin side down, and cook until golden brown, about 5 minutes per side. Tip: Don’t overcrowd the pan to ensure each piece gets perfectly crispy.
- Remove the chicken from the skillet and set aside on a plate.
- In the same skillet, add the mushrooms and garlic, sautéing until the mushrooms are soft and the garlic is fragrant, about 3 minutes.
- Pour in the white wine, scraping up any browned bits from the bottom of the pan, and let it reduce by half, about 2 minutes.
- Add the chicken broth, salt, pepper, and thyme, stirring to combine.
- Return the chicken to the skillet, cover, and simmer on low heat for 25 minutes, or until the chicken is cooked through. Tip: The liquid should be at a gentle simmer, not a boil, to keep the chicken tender.
- Check the seasoning and adjust if necessary before serving. Tip: Letting the dish rest for 5 minutes off the heat allows the flavors to meld beautifully.
Silky and rich, the chicken falls off the bone, mingling with the aromatic broth and earthy mushrooms. Serve it over a bed of creamy polenta or with crusty bread to soak up every last drop of the sauce.
Silkie Chicken Burgers with Special Sauce
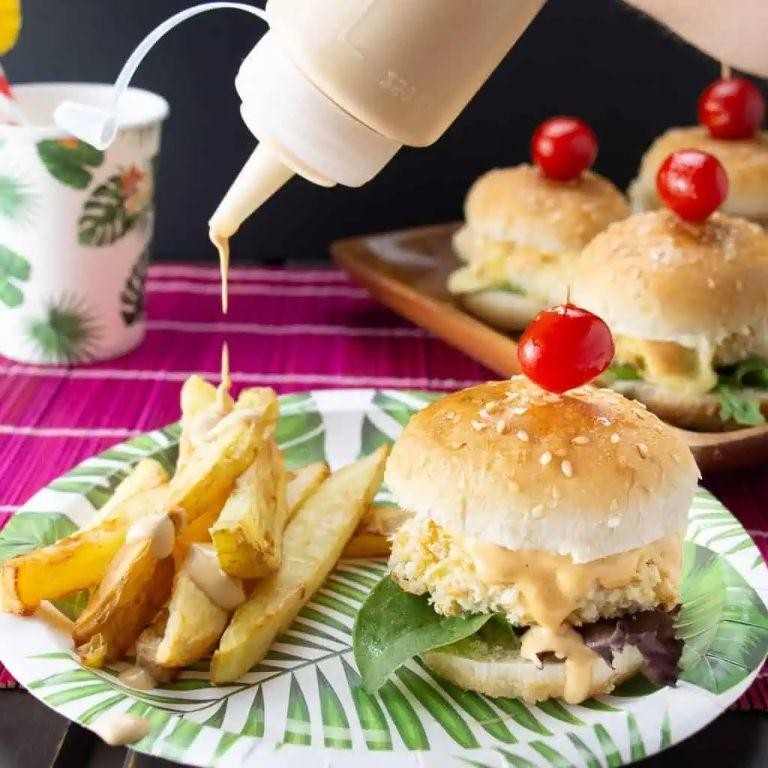
Yesterday, I found myself craving something uniquely comforting yet intriguingly different, leading me to experiment with Silkie Chicken Burgers paired with a special sauce that’s become my new obsession.
Ingredients
- 1 pound of ground Silkie chicken, because its rich, gamey flavor is unmatched
- A couple of tablespoons of mayonnaise, for that creamy base
- A splash of Sriracha, to add just the right amount of heat
- Half a cup of panko breadcrumbs, to keep the burgers juicy yet firm
- One egg, lightly beaten, as our binding agent
- A pinch of salt and a dash of black pepper, because seasoning is key
- Two tablespoons of olive oil, for frying to golden perfection
- A handful of arugula, for a peppery crunch
- Four brioche buns, because they’re buttery and soft
Instructions
- In a large bowl, gently mix the ground Silkie chicken with panko breadcrumbs, the beaten egg, salt, and black pepper until just combined. Tip: Overmixing can make the burgers tough.
- Shape the mixture into four equal patties, each about 1 inch thick. Tip: Making a slight indentation in the center of each patty prevents bulging during cooking.
- Heat olive oil in a skillet over medium heat (350°F) and cook the patties for about 5 minutes on each side, or until they’re golden brown and reach an internal temperature of 165°F. Tip: Resist the urge to press down on the patties; it squeezes out the juices.
- While the patties cook, whisk together mayonnaise and Sriracha in a small bowl to create the special sauce.
- Toast the brioche buns lightly, just until they’re golden around the edges.
- Assemble the burgers by spreading the special sauce on the bottom bun, adding the patty, and topping with a handful of arugula before crowning with the top bun.
Zesty and rich, these Silkie Chicken Burgers offer a delightful contrast between the creamy, spicy sauce and the tender, flavorful meat. Serve them with sweet potato fries for a meal that’s as visually appealing as it is delicious.
Silkie Chicken and Spinach Stuffed Shells
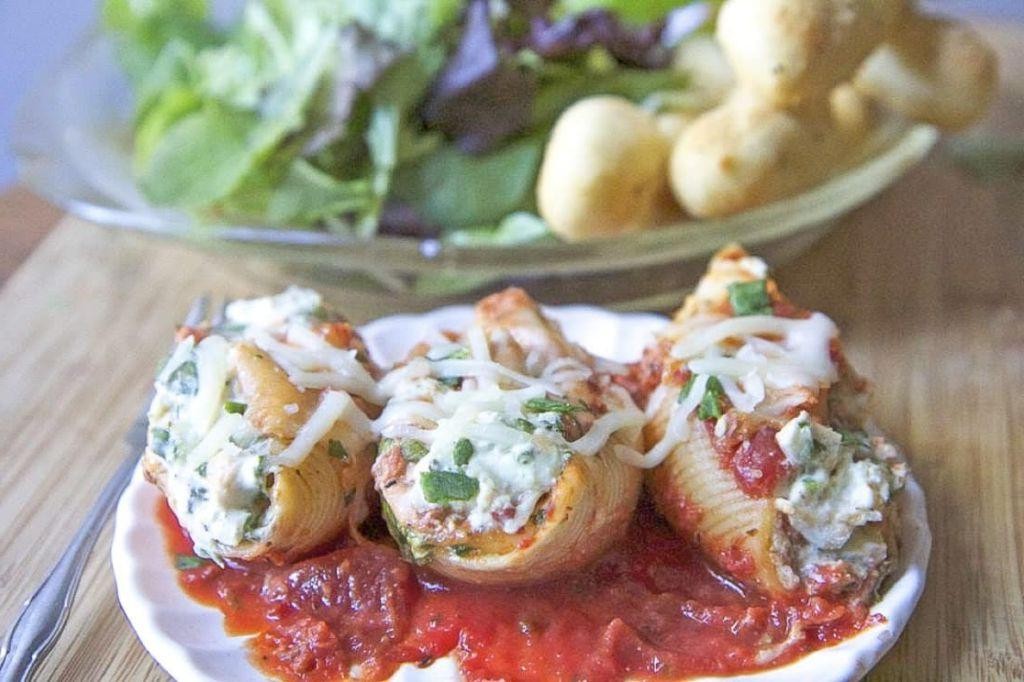
Venturing into the kitchen on a quiet evening, the thought of combining the delicate flavors of Silkie chicken with the earthy tones of spinach in stuffed shells feels like a comforting embrace. It’s a dish that whispers of home, of slow-cooked love, and the kind of meal that gathers people around the table without a word.
Ingredients
- a dozen jumbo pasta shells
- a couple of cups of shredded Silkie chicken
- a handful of fresh spinach, roughly chopped
- a splash of olive oil
- a cup of ricotta cheese
- half a cup of grated Parmesan
- a pinch of salt and freshly ground black pepper
- a dash of garlic powder
- a jar of your favorite marinara sauce
- a sprinkle of mozzarella cheese for topping
Instructions
- Preheat your oven to 375°F, letting it warm up while you prepare the filling.
- Boil the jumbo pasta shells in salted water for about 9 minutes, until they’re just al dente, then drain and set aside to cool slightly.
- In a skillet, heat a splash of olive oil over medium heat and sauté the spinach until it’s wilted, about 2 minutes.
- In a bowl, mix the shredded Silkie chicken, sautéed spinach, ricotta, Parmesan, a pinch of salt, pepper, and a dash of garlic powder until well combined.
- Carefully stuff each pasta shell with the chicken and spinach mixture, placing them seam side up in a baking dish.
- Pour the marinara sauce over the stuffed shells, covering them evenly, then sprinkle mozzarella cheese on top.
- Bake in the preheated oven for 25 minutes, or until the cheese is bubbly and golden.
- Let the dish sit for 5 minutes before serving to allow the flavors to meld together beautifully.
Each bite of these stuffed shells offers a tender contrast between the creamy filling and the al dente pasta, with the Silkie chicken adding a subtle richness. Serve them alongside a crisp green salad or a glass of white wine for a meal that feels both indulgent and comforting.
Silkie Chicken Fried Rice with Egg
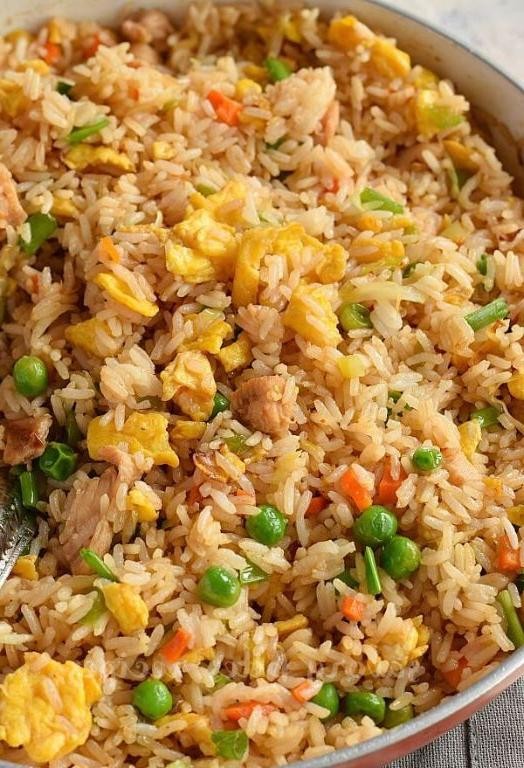
Kindly imagine the quiet hum of the kitchen at dawn, the gentle sizzle of ingredients meeting the pan, and the comforting aroma of Silkie Chicken Fried Rice with Egg filling the air. This dish, a tender embrace of flavors and textures, is a humble yet profound reminder of the joys of simple, home-cooked meals.
Ingredients
- 2 cups of cooked jasmine rice, preferably day-old
- 1 Silkie chicken breast, diced into bite-sized pieces
- A splash of sesame oil
- A couple of eggs, lightly beaten
- 1 tbsp of soy sauce
- A handful of green onions, chopped
- A pinch of salt
- A drizzle of vegetable oil
Instructions
- Heat a drizzle of vegetable oil in a large pan over medium heat until shimmering, about 2 minutes.
- Add the diced Silkie chicken breast, seasoning with a pinch of salt, and cook until no longer pink, roughly 5 minutes. Tip: Don’t overcrowd the pan to ensure even cooking.
- Push the chicken to one side of the pan, pour the beaten eggs into the other side, and scramble until just set, about 1 minute.
- Mix the chicken and eggs together, then add the day-old jasmine rice, breaking up any clumps with the back of your spoon.
- Drizzle in the soy sauce and a splash of sesame oil, stirring constantly to coat every grain of rice evenly. Tip: The sesame oil adds depth, so adjust according to your preference.
- Finally, toss in the chopped green onions, cooking for another minute until they’re just wilted. Tip: Green onions add a fresh crunch, so don’t skip them!
Gently savor the silky texture of the chicken against the fluffy rice, each bite a perfect harmony of savory and slightly sweet. Serve it in a warmed bowl, perhaps with a side of pickled vegetables for a contrasting tang, and let the simplicity of this dish speak for itself.
Silkie Chicken Casserole with Cheese Topping
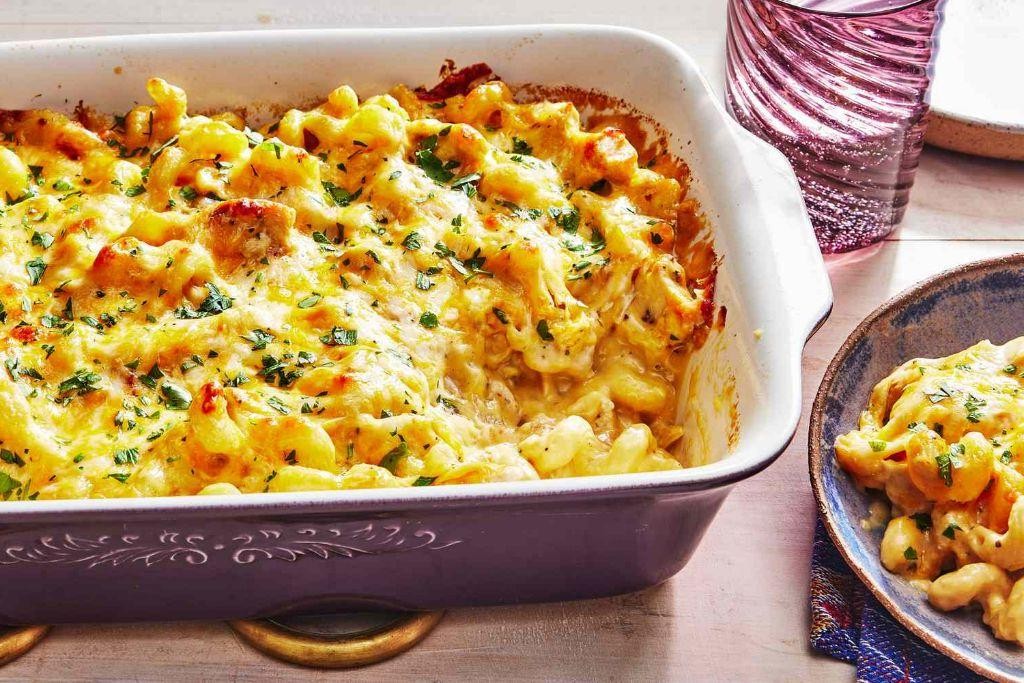
Now, as the evening light fades, there’s something deeply comforting about the thought of a Silkie Chicken Casserole with Cheese Topping. It’s a dish that whispers of home, of quiet moments, and the simple joy of a meal made with care.
Ingredients
- 2 cups of shredded Silkie chicken, because its unique texture makes all the difference
- A splash of olive oil, just enough to coat the pan
- A couple of garlic cloves, minced, for that gentle kick
- 1 cup of heavy cream, to bring everything together
- A handful of grated cheddar cheese, because what’s a casserole without cheese?
- Salt and pepper, to lightly season
Instructions
- Preheat your oven to 375°F, letting it warm up while you prepare the casserole.
- Heat a splash of olive oil in a pan over medium heat, then add the minced garlic, stirring until it’s just fragrant—about 30 seconds.
- Add the shredded Silkie chicken to the pan, stirring gently to combine with the garlic. Cook for about 2 minutes, just to warm through.
- Pour in the heavy cream, stirring to coat the chicken evenly. Let it simmer for a couple of minutes until the mixture slightly thickens.
- Transfer the chicken and cream mixture to a baking dish, spreading it out evenly.
- Sprinkle the grated cheddar cheese over the top, covering the chicken mixture completely.
- Bake in the preheated oven for 20 minutes, or until the cheese is bubbly and golden brown.
- Let the casserole sit for 5 minutes before serving, allowing the flavors to meld together beautifully.
Unbelievably tender, the Silkie chicken melts into the creamy sauce, while the cheese topping adds a delightful crunch. Serve it with a side of crusty bread to soak up every last bit of the sauce, or over a bed of steamed greens for a lighter touch.
Silkie Chicken and Sweet Potato Hash
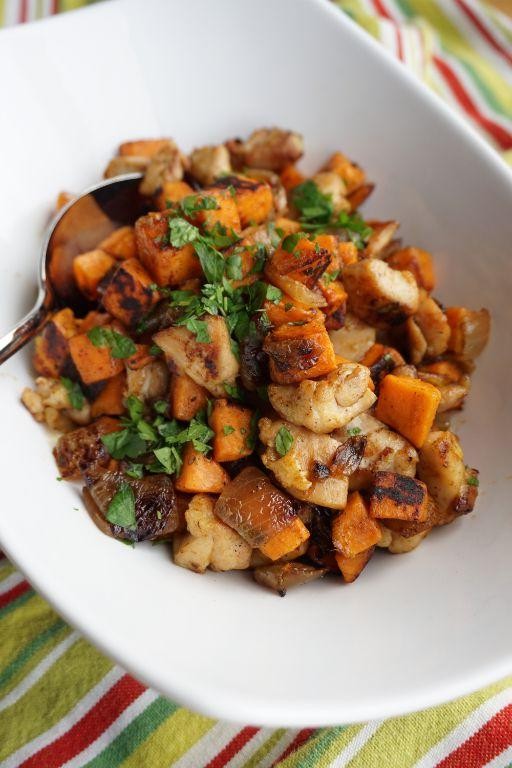
Gently, the morning light filters through the kitchen window, casting a warm glow on the counter where today’s comfort begins. This dish, a humble yet hearty hash, marries the tender, almost mystical Silkie chicken with the earthy sweetness of potatoes, a simple melody of flavors that sings of home.
Ingredients
- 2 cups of diced sweet potatoes, about the size of a couple of dice each
- 1 lb of Silkie chicken thighs, cut into bite-sized pieces
- A splash of olive oil, just enough to coat the pan
- 1 small onion, finely chopped, as if you’re sharing secrets with the pan
- A pinch of salt and a whisper of black pepper, to start the conversation
- 1/2 tsp of smoked paprika, for a hint of mystery
- 2 cloves of garlic, minced, because what’s a dish without garlic?
- A handful of fresh parsley, chopped, for a bright finish
Instructions
- Heat a large skillet over medium heat, then add that splash of olive oil, letting it warm until it shimmers like a quiet pond at dawn.
- Toss in the sweet potatoes, spreading them out in a single layer. Let them cook undisturbed for about 5 minutes, until they start to caramelize on one side—patience here rewards you with sweetness.
- Add the onion, stirring occasionally, until it turns translucent, about 3 minutes. This is when the kitchen starts to smell like promises.
- Push the veggies to one side of the skillet, then add the Silkie chicken pieces. Sprinkle them with salt, pepper, and smoked paprika. Cook until the chicken is no longer pink, about 5 minutes, stirring occasionally.
- Stir in the minced garlic, cooking for just 30 seconds until fragrant—garlic burns fast, so keep an eye on it.
- Combine everything in the skillet, letting the flavors marry for a couple of minutes. Taste and adjust the seasoning if needed, but remember, the Silkie chicken brings its own subtle depth.
- Finish by sprinkling the chopped parsley over the top, for a pop of color and freshness.
Finally, the hash is ready, a tapestry of textures from the creamy sweet potatoes to the succulent Silkie chicken. Serve it straight from the skillet for a rustic touch, or alongside a softly poached egg for breakfast that feels like a hug.
Silkie Chicken Meatballs in Tomato Sauce
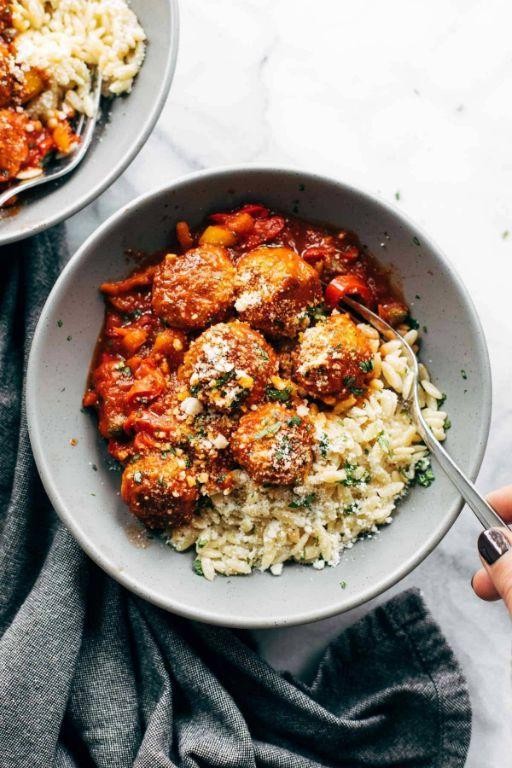
Now, as the light fades softly outside, let’s gather around the idea of something comforting yet slightly unexpected—Silkie Chicken Meatballs in Tomato Sauce. It’s a dish that whispers of home but carries the intrigue of its unique main ingredient.
Ingredients
- 1 pound of Silkie chicken ground meat, because its rich flavor is unmatched
- A couple of cloves of garlic, minced, for that punch of aroma
- A splash of olive oil, to bring everything together smoothly
- 1 cup of breadcrumbs, for just the right amount of tenderness
- 1 egg, to bind our little meatballs with love
- A pinch of salt and pepper, because seasoning is key
- 2 cups of tomato sauce, homemade or your favorite store-bought, for that cozy embrace
- A handful of fresh basil leaves, for a burst of freshness at the end
Instructions
- Preheat your oven to 375°F, letting it warm up while you prepare the meatballs.
- In a large bowl, mix the Silkie chicken ground meat with minced garlic, breadcrumbs, egg, salt, and pepper until just combined. Tip: Overmixing can make the meatballs tough.
- Shape the mixture into small, even meatballs, about 1 inch in diameter. Tip: Wetting your hands slightly prevents the mixture from sticking.
- Heat a splash of olive oil in a large oven-safe skillet over medium heat. Brown the meatballs on all sides, about 2 minutes per side. They don’t need to be cooked through here.
- Pour the tomato sauce over the meatballs, gently stirring to coat. Bring to a simmer, then transfer the skillet to the oven.
- Bake for 15-20 minutes, until the meatballs are cooked through and the sauce is bubbly. Tip: The internal temperature should reach 165°F for safety.
- Garnish with fresh basil leaves before serving.
Zesty and tender, these meatballs carry the Silkie chicken’s distinct richness, balanced by the tomato sauce’s acidity. Serve them over a bed of creamy polenta or alongside crusty bread to soak up every last drop of sauce.
Silkie Chicken and Asparagus Risotto
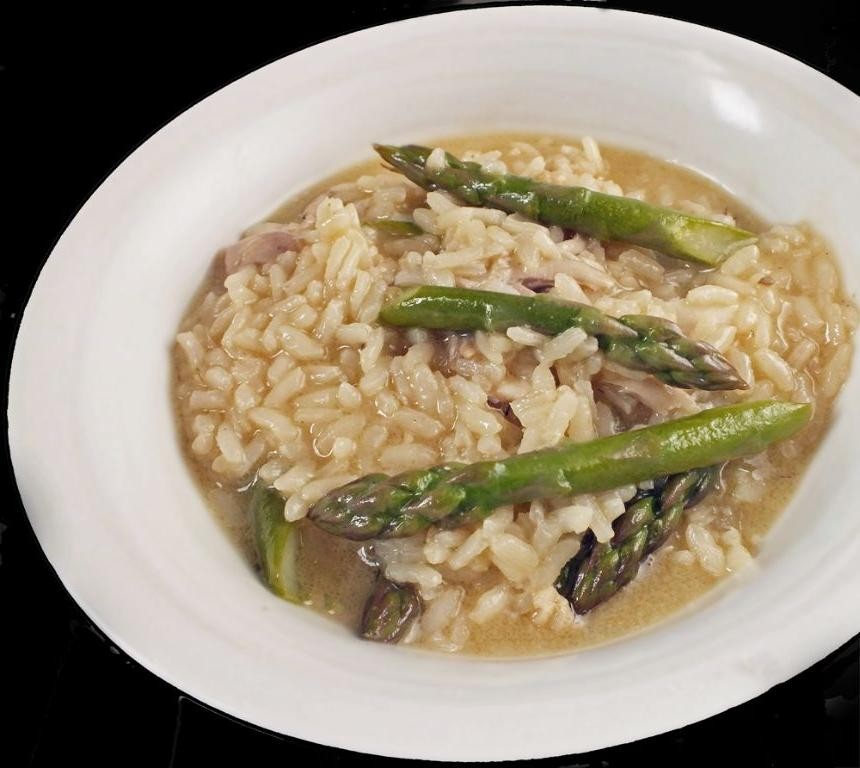
Evening light filters through the kitchen window as I stir the pot, the creamy risotto beginning to take shape, a comforting blend of silkie chicken and fresh asparagus that feels like a hug in a bowl.
Ingredients
- 1 cup Arborio rice
- 2 cups chicken stock, kept warm
- 1 silkie chicken breast, diced
- a handful of asparagus, trimmed and cut into 1-inch pieces
- a splash of white wine
- a couple of tablespoons of butter
- 1 small onion, finely chopped
- a sprinkle of Parmesan cheese
- a drizzle of olive oil
- salt and pepper, just enough to season
Instructions
- Heat a drizzle of olive oil in a large pan over medium heat, then add the diced silkie chicken, seasoning lightly with salt and pepper. Cook until just golden, about 5 minutes, then set aside.
- In the same pan, melt a tablespoon of butter and sauté the chopped onion until translucent, about 3 minutes, stirring occasionally to prevent burning.
- Add the Arborio rice to the pan, stirring to coat each grain in butter, and toast for 2 minutes until slightly translucent at the edges.
- Pour in a splash of white wine, stirring continuously until the liquid is fully absorbed, about 1 minute.
- Begin adding the warm chicken stock one ladle at a time, stirring frequently and allowing each addition to be absorbed before adding the next. This process should take about 18 minutes.
- Halfway through adding the stock, stir in the asparagus pieces, allowing them to cook and become tender with the rice.
- Once the rice is creamy and al dente, stir in the cooked silkie chicken, remaining butter, and a sprinkle of Parmesan cheese. Adjust seasoning with salt and pepper if needed.
- Remove from heat and let sit for 2 minutes to thicken slightly before serving.
Unassuming yet elegant, this risotto boasts a velvety texture with pops of crisp asparagus and tender chicken. Serve it in shallow bowls, perhaps with a extra grating of Parmesan on top for those who love a cheesy finish.
Conclusion
Silkie chicken recipes offer a unique twist to your culinary adventures, blending gourmet flavors with home-cooked comfort. From savory stews to elegant entrees, our roundup has something to delight every palate. We invite you to explore these dishes, share your favorites in the comments, and spread the joy of cooking by pinning this article on Pinterest. Happy cooking!