Fall in love with sage all over again with our roundup of 21 Delicious Sage Recipes for Every Season! Whether you’re whipping up a quick weeknight dinner, craving seasonal favorites, or in need of some comfort food, sage’s earthy flavor is the perfect companion. From hearty winter stews to light summer salads, these recipes will inspire you to sprinkle, chop, and savor sage in ways you’ve never imagined. Keep reading to discover your next favorite dish!
Sage and Brown Butter Pasta
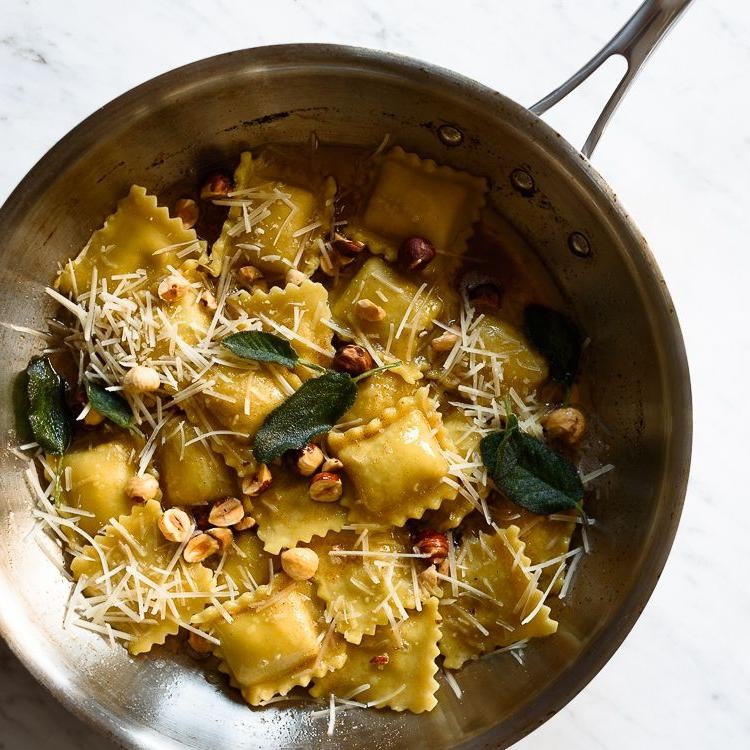
Yearning for a dish that combines simplicity with elegance? Sage and Brown Butter Pasta is your answer, a dish that transforms basic ingredients into a luxurious meal with minimal effort. Let’s dive into the methodical process of creating this comforting yet sophisticated dish.
Ingredients
- 8 oz of dried pasta (such as fettuccine or spaghetti)
- 1/2 cup of unsalted butter, cut into pieces
- 20 fresh sage leaves, roughly torn
- 1/2 cup of freshly grated Parmesan cheese, plus extra for serving
- 1/4 tsp of freshly ground black pepper
- 1/2 tsp of fine sea salt
Instructions
- Bring a large pot of salted water to a rolling boil over high heat.
- Add the pasta and cook according to package instructions until al dente, about 8-10 minutes.
- While the pasta cooks, melt the butter in a large skillet over medium heat, swirling occasionally, until it turns a golden brown and emits a nutty aroma, about 3-4 minutes.
- Add the torn sage leaves to the browned butter and cook for 1 minute, until crisp but not burnt.
- Reserve 1/2 cup of pasta water, then drain the pasta and add it directly to the skillet with the sage and brown butter.
- Toss the pasta with the brown butter and sage, adding the reserved pasta water a little at a time to create a silky sauce that coats the pasta.
- Remove the skillet from heat and stir in the grated Parmesan cheese, black pepper, and sea salt until the cheese is melted and the pasta is evenly coated.
- Serve immediately, garnished with extra Parmesan cheese and a few additional sage leaves for a beautiful presentation.
The Sage and Brown Butter Pasta boasts a velvety texture with a rich, nutty flavor from the browned butter, perfectly balanced by the earthy sage and sharp Parmesan. For an extra touch of luxury, top with a poached egg or serve alongside a crisp green salad.
Roasted Chicken with Sage and Lemon
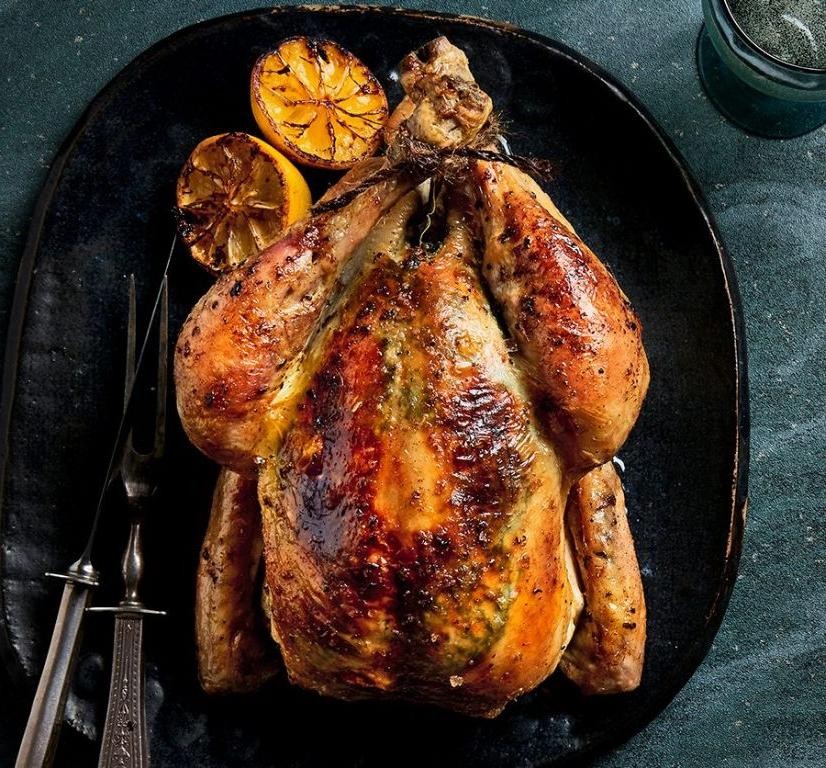
When the craving for a comforting yet elegant meal strikes, roasted chicken with sage and lemon stands out as a timeless choice. This dish combines the earthy aroma of sage with the bright zest of lemon, creating a harmonious flavor profile that’s both simple and sophisticated.
Ingredients
- 1 whole chicken (about 4 lbs), patted dry with paper towels
- 2 tbsp rich extra virgin olive oil
- 1 tbsp finely chopped fresh sage leaves
- 1 large lemon, thinly sliced
- 1 tsp kosher salt
- 1/2 tsp finely ground black pepper
- 1/2 cup low-sodium chicken broth
Instructions
- Preheat your oven to 375°F (190°C) to ensure it’s ready for roasting.
- Rub the chicken all over with olive oil, ensuring every part is lightly coated for a golden skin.
- Sprinkle the inside and outside of the chicken with salt, pepper, and chopped sage, massaging the seasonings into the skin.
- Place the lemon slices inside the chicken cavity and tie the legs together with kitchen twine for even cooking.
- Transfer the chicken to a roasting pan and pour the chicken broth around it to keep the meat moist during cooking.
- Roast in the preheated oven for about 1 hour and 30 minutes, or until the internal temperature reaches 165°F (74°C) when measured at the thickest part of the thigh.
- Let the chicken rest for 10 minutes before carving to allow the juices to redistribute.
Zesty and aromatic, this roasted chicken boasts a crispy skin and tender, juicy meat. Serve it atop a bed of roasted vegetables or alongside a fresh salad for a complete meal that delights the senses.
Butternut Squash and Sage Risotto

Even the most novice cooks can master this comforting Butternut Squash and Sage Risotto with a bit of patience and attention to detail. Let’s break down the process into manageable steps to ensure a creamy, flavorful outcome every time.
Ingredients
- 1 cup Arborio rice, known for its starchy quality that creates a creamy texture
- 4 cups homemade chicken stock, kept warm on the stove
- 1 cup butternut squash, peeled and diced into 1/2-inch cubes
- 2 tbsp unsalted butter, divided
- 1 tbsp rich extra virgin olive oil
- 1/4 cup finely grated Parmesan cheese, plus extra for serving
- 1/4 cup dry white wine, such as Pinot Grigio
- 1 tbsp fresh sage leaves, thinly sliced
- 1 small yellow onion, finely diced
- 1/2 tsp kosher salt
- 1/4 tsp finely ground black pepper
Instructions
- In a large, heavy-bottomed pot, heat 1 tbsp of butter and the olive oil over medium heat until the butter is melted.
- Add the diced onion and a pinch of salt, sautéing until translucent, about 5 minutes.
- Stir in the Arborio rice, toasting it for 2 minutes until the edges become slightly translucent.
- Pour in the white wine, stirring constantly until the liquid is fully absorbed.
- Begin adding the warm chicken stock, one ladle at a time, stirring frequently and allowing each addition to be absorbed before adding the next. Tip: Maintain a gentle simmer throughout to prevent the rice from cooking too quickly.
- After about 15 minutes, when half the stock has been incorporated, add the diced butternut squash.
- Continue adding stock until the rice is al dente and the squash is tender, about 10 more minutes. Tip: The risotto should be creamy, not soupy; adjust the final amount of stock as needed.
- Remove from heat and stir in the remaining 1 tbsp of butter, Parmesan cheese, sage, salt, and pepper. Tip: Let the risotto rest for 2 minutes before serving to allow flavors to meld.
Lusciously creamy with a hint of earthy sage and sweet butternut squash, this risotto is a celebration of textures and flavors. Serve it in shallow bowls with a sprinkle of extra Parmesan and a few sage leaves for a beautiful, restaurant-worthy presentation.
Sage Infused Olive Oil
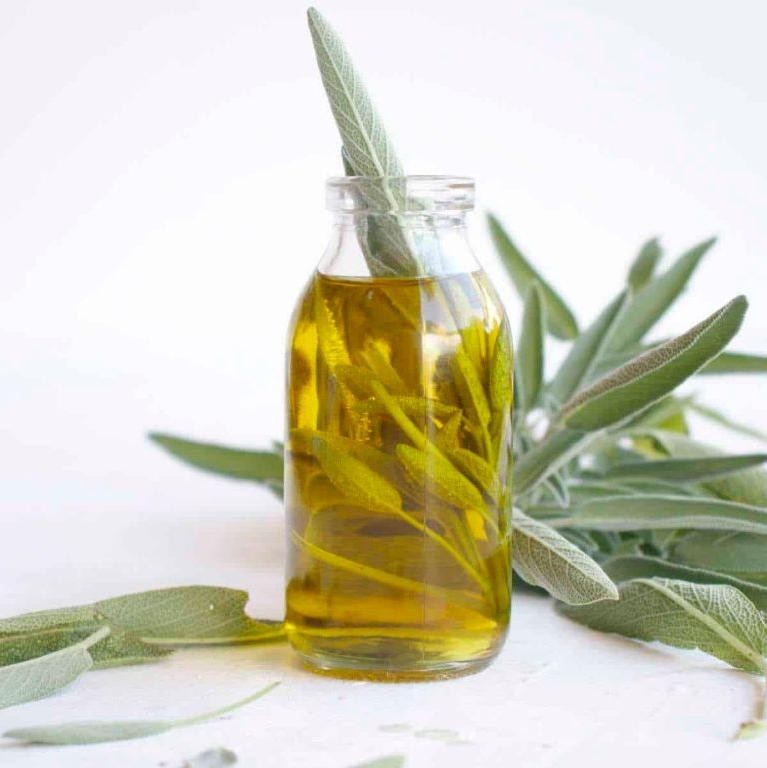
Foraging for a simple yet elegant way to elevate your dishes? Sage infused olive oil is a versatile condiment that adds a herbaceous depth to any meal, and today, we’ll walk through how to make it from scratch.
Ingredients
- 2 cups rich extra virgin olive oil
- 1/2 cup fresh sage leaves, thoroughly washed and patted dry
Instructions
- In a small saucepan, combine 2 cups of rich extra virgin olive oil and 1/2 cup of fresh sage leaves.
- Heat the mixture over low heat, ensuring the oil does not exceed 180°F to preserve the delicate flavors of the sage.
- Let the sage leaves steep in the warm oil for 20 minutes, stirring occasionally to release their aromatic oils.
- After steeping, remove the saucepan from the heat and allow the oil to cool to room temperature, about 1 hour.
- Once cooled, strain the oil through a fine-mesh sieve into a clean, dry bottle, pressing gently on the sage leaves to extract all the flavorful oil.
- Discard the sage leaves or repurpose them for another recipe.
- Seal the bottle tightly and store the sage infused olive oil in a cool, dark place for up to 1 month.
Gently drizzle this fragrant oil over roasted vegetables, pasta, or grilled meats to impart a subtle, earthy flavor. The oil’s smooth texture and aromatic profile make it a standout addition to your culinary repertoire, perfect for those who appreciate the finer details in cooking.
Pumpkin Sage Soup

As the leaves begin to turn and the air carries a crispness, there’s no better way to welcome the season than with a bowl of warm, comforting Pumpkin Sage Soup. This dish combines the earthy sweetness of pumpkin with the aromatic warmth of sage, creating a symphony of flavors that’s both nourishing and indulgent.
Ingredients
- 2 tablespoons rich extra virgin olive oil
- 1 medium yellow onion, finely chopped
- 2 cloves garlic, minced
- 4 cups fresh pumpkin puree
- 4 cups vegetable broth
- 1 teaspoon finely ground black pepper
- 1/2 teaspoon sea salt
- 1 tablespoon fresh sage, finely chopped
- 1/2 cup heavy cream
Instructions
- Heat the extra virgin olive oil in a large pot over medium heat until shimmering.
- Add the finely chopped yellow onion and sauté until translucent, about 5 minutes, stirring occasionally to prevent burning.
- Stir in the minced garlic and cook for an additional 1 minute, until fragrant.
- Pour in the fresh pumpkin puree and vegetable broth, stirring to combine. Tip: For a smoother soup, blend the pumpkin puree before adding it to the pot.
- Season with finely ground black pepper and sea salt, then bring the mixture to a gentle boil.
- Reduce the heat to low, cover, and simmer for 20 minutes to allow the flavors to meld.
- Stir in the finely chopped fresh sage and heavy cream, then cook for an additional 5 minutes. Tip: Adding the cream off the heat can prevent curdling.
- Remove from heat and let the soup sit for 5 minutes before serving. Tip: For an extra touch of elegance, garnish with a drizzle of cream and a sage leaf.
Hearty and velvety, this Pumpkin Sage Soup boasts a creamy texture that’s perfectly balanced by the subtle sharpness of sage. Serve it with a side of crusty bread for dipping, or elevate it as a starter for your next dinner party by pairing it with a crisp white wine.
Sage and Apple Stuffed Pork Chops

Preparing a meal that combines the savory depth of pork with the sweet and aromatic flavors of sage and apple can transform an ordinary dinner into a memorable feast. Let’s dive into creating these Sage and Apple Stuffed Pork Chops, a dish that perfectly balances flavors and textures.
Ingredients
- 4 bone-in pork chops, 1-inch thick
- 1 cup finely diced sweet apples
- 2 tbsp fresh sage, finely chopped
- 1/4 cup breadcrumbs
- 1/4 cup chicken stock
- 2 tbsp unsalted butter, melted
- 1/2 tsp salt
- 1/4 tsp freshly ground black pepper
Instructions
- Preheat your oven to 375°F (190°C) to ensure it’s ready for baking the pork chops.
- In a mixing bowl, combine the finely diced sweet apples, fresh sage, breadcrumbs, chicken stock, melted unsalted butter, salt, and freshly ground black pepper to create the stuffing mixture.
- Carefully cut a pocket into the side of each pork chop, ensuring not to cut all the way through.
- Stuff each pork chop generously with the apple and sage mixture, securing the opening with toothpicks if necessary.
- Heat a large oven-proof skillet over medium-high heat and sear the pork chops for 3 minutes on each side until golden brown.
- Transfer the skillet to the preheated oven and bake for 20 minutes, or until the internal temperature of the pork reaches 145°F (63°C).
- Let the pork chops rest for 5 minutes before serving to allow the juices to redistribute.
Delight in the juicy tenderness of the pork, enhanced by the sweet and herby stuffing. Serve these chops alongside a crisp green salad or roasted vegetables for a complete meal that’s sure to impress.
Garlic Sage Mashed Potatoes

Zesty and aromatic, this Garlic Sage Mashed Potatoes recipe transforms the humble potato into a creamy, flavorful side dish that’s perfect for any meal. Follow these steps to create a dish that’s both comforting and elegantly simple.
Ingredients
- 2 lbs Yukon Gold potatoes, peeled and quartered
- 4 cloves garlic, minced
- 1/4 cup unsalted butter, softened
- 1/2 cup heavy cream, warmed
- 1 tbsp fresh sage, finely chopped
- 1 tsp salt
- 1/2 tsp freshly ground black pepper
Instructions
- Place the peeled and quartered Yukon Gold potatoes in a large pot and cover with cold water by 1 inch. Bring to a boil over high heat.
- Once boiling, reduce the heat to medium and simmer the potatoes for 15-20 minutes, or until they are fork-tender.
- While the potatoes cook, melt the unsalted butter in a small saucepan over low heat. Add the minced garlic and sauté for 1-2 minutes, until fragrant but not browned.
- Drain the potatoes well and return them to the pot. Mash the potatoes with a potato masher until smooth.
- Stir in the warmed heavy cream, sautéed garlic butter, finely chopped fresh sage, salt, and freshly ground black pepper until fully combined and creamy.
- For extra fluffiness, whip the mashed potatoes with a hand mixer on low speed for 30 seconds. Tip: Avoid overmixing to prevent the potatoes from becoming gluey.
- Taste and adjust seasoning if necessary, then serve warm. Tip: For a richer flavor, let the mashed potatoes sit covered for 5 minutes before serving to allow the flavors to meld.
These Garlic Sage Mashed Potatoes boast a velvety texture with a harmonious blend of earthy sage and pungent garlic. Serve them alongside roasted meats or as a base for a savory mushroom gravy to elevate your meal.
Sage and Onion Stuffing

Here’s how to create a comforting Sage and Onion Stuffing that’s perfect for any gathering. This classic dish combines simple ingredients for a flavorful side that complements any meal.
Ingredients
- 1/2 cup unsalted butter, melted to a golden hue
- 1 large yellow onion, diced into fine, uniform pieces
- 2 cups fresh breadcrumbs, made from day-old artisan bread
- 1 tbsp fresh sage leaves, finely chopped to release their aromatic oils
- 1/2 tsp kosher salt, for a clean, balanced seasoning
- 1/4 tsp freshly ground black pepper, for a subtle heat
- 1 cup chicken stock, warm and rich in flavor
Instructions
- Preheat your oven to 350°F (175°C) to ensure it’s ready for baking.
- In a large skillet over medium heat, melt the unsalted butter until it’s golden and fragrant, about 2 minutes.
- Add the finely diced yellow onion to the skillet, sautéing until translucent and soft, approximately 5 minutes. Tip: Stir occasionally to prevent browning.
- Remove the skillet from heat and stir in the fresh breadcrumbs, ensuring they’re evenly coated with the butter and onion mixture.
- Fold in the finely chopped fresh sage leaves, kosher salt, and freshly ground black pepper, distributing the herbs and seasonings throughout the mixture.
- Gradually pour in the warm chicken stock, mixing until the breadcrumbs are moistened but not soggy. Tip: The consistency should hold together when pressed.
- Transfer the mixture to a greased baking dish, spreading it evenly. Tip: For a crispier top, lightly press down with the back of a spoon.
- Bake in the preheated oven for 25-30 minutes, or until the top is golden brown and the edges are slightly crispy.
Serve this Sage and Onion Stuffing warm, where its crispy top gives way to a moist, flavorful interior. It pairs beautifully with roasted meats or can be enjoyed as a hearty vegetarian option when served alongside a crisp green salad.
Sage Butter Roasted Turkey
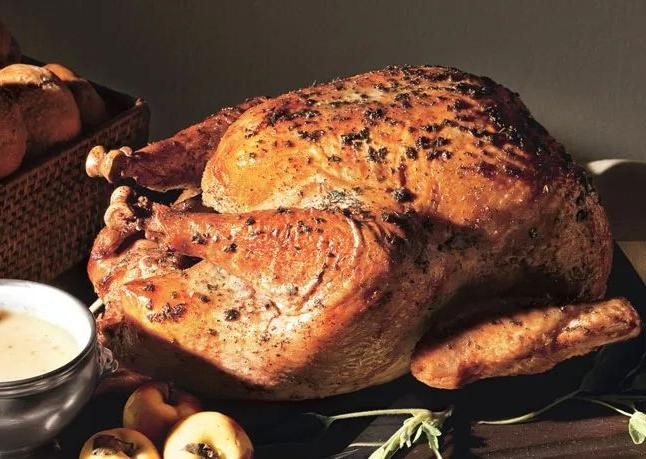
Cooking a Sage Butter Roasted Turkey is a rewarding endeavor that fills your kitchen with aromatic herbs and the promise of a succulent centerpiece. Carefully following each step ensures a perfectly golden bird with moist, flavorful meat every time.
Ingredients
- 1 whole turkey (12-14 lbs), thawed if frozen
- 1 cup unsalted butter, softened to room temperature
- 1/4 cup fresh sage leaves, finely chopped
- 2 tsp kosher salt, finely ground
- 1 tsp freshly ground black pepper, coarsely cracked
- 2 cups low-sodium chicken stock, rich and flavorful
Instructions
- Preheat your oven to 325°F (163°C) and position the rack in the lower third of the oven to ensure even cooking.
- In a small bowl, mix the softened butter with finely chopped sage, kosher salt, and coarsely cracked black pepper until well combined.
- Gently loosen the skin of the turkey over the breast and thighs with your fingers, being careful not to tear it.
- Spread half of the sage butter mixture under the skin directly onto the meat, and rub the remaining butter over the outside of the turkey for a golden crust.
- Place the turkey on a rack in a roasting pan, breast side up, and pour the chicken stock into the bottom of the pan to keep the meat moist.
- Roast the turkey in the preheated oven, basting every 45 minutes with pan juices, until a meat thermometer inserted into the thickest part of the thigh reads 165°F (74°C), about 3 to 3 1/2 hours.
- Once done, remove the turkey from the oven and let it rest for 30 minutes before carving to allow the juices to redistribute.
Perfectly roasted, this turkey boasts a crispy, herb-infused skin with tender, juicy meat that falls right off the bone. Serve it sliced on a platter garnished with fresh sage leaves for an elegant presentation or alongside your favorite sides for a comforting family meal.
Sage and Honey Glazed Carrots
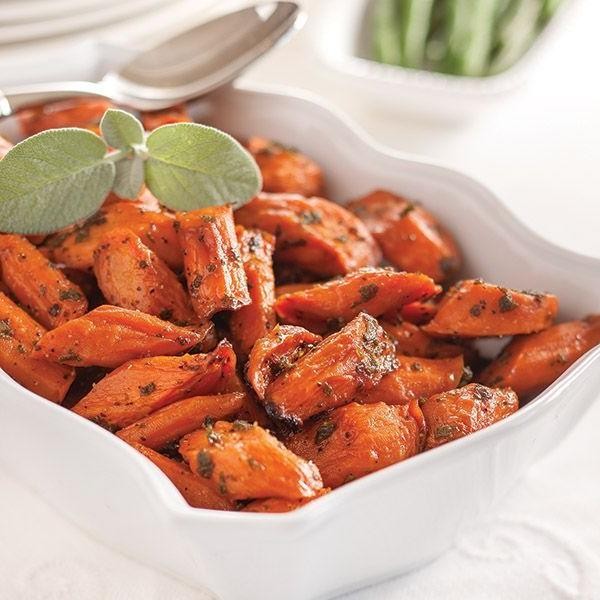
Begin by preheating your oven to 400°F to ensure it’s perfectly heated for roasting the carrots to tender, caramelized perfection.
Ingredients
- 1 pound fresh, crisp carrots, peeled and sliced into even sticks
- 2 tablespoons rich, golden honey
- 1 tablespoon finely chopped fresh sage
- 2 tablespoons unsalted butter, melted
- 1/2 teaspoon coarse sea salt
- 1/4 teaspoon freshly ground black pepper
Instructions
- In a large mixing bowl, combine the sliced carrots, honey, chopped sage, melted butter, sea salt, and black pepper. Toss until the carrots are evenly coated.
- Spread the carrots in a single layer on a parchment-lined baking sheet, ensuring they’re not overcrowded to allow for even roasting.
- Roast in the preheated oven for 20 minutes, then stir the carrots to promote even caramelization.
- Continue roasting for another 10-15 minutes, or until the carrots are fork-tender and the edges are slightly crispy and golden brown.
- Remove from the oven and let them rest for 2 minutes before serving to allow the flavors to meld together beautifully.
Yield: These sage and honey glazed carrots emerge from the oven with a delightful contrast of textures—tender yet slightly crisp edges—and a flavor profile that balances the earthy sage with the sweetness of honey. For an elegant presentation, garnish with a sprinkle of fresh sage leaves or drizzle with a touch more honey before serving.
Sage Tea for Digestion

After a heavy meal, finding relief can be as simple as brewing a cup of sage tea, known for its digestive benefits. This herbal remedy is not only effective but also easy to prepare with just a few ingredients.
Ingredients
- 1 cup of fresh, aromatic sage leaves
- 2 cups of filtered, cold water
- 1 teaspoon of raw, golden honey (optional)
- 1 slice of organic lemon (optional)
Instructions
- Gently rinse the fresh sage leaves under cold, running water to remove any dirt or impurities.
- In a small saucepan, bring the filtered water to a rolling boil over high heat, which should take about 3-5 minutes.
- Once boiling, reduce the heat to low and add the sage leaves, allowing them to steep for 5 minutes to release their essential oils and flavors.
- After steeping, remove the saucepan from the heat and strain the tea into a cup, discarding the sage leaves.
- If desired, stir in the raw honey until fully dissolved for a touch of sweetness and an extra soothing effect.
- For an added zing, place the slice of organic lemon on the rim of the cup or squeeze it directly into the tea.
The resulting sage tea offers a warm, earthy flavor with a hint of bitterness, balanced by the sweetness of honey and the brightness of lemon. Enjoy it slowly to aid digestion or serve it chilled over ice for a refreshing twist on this herbal classic.
Sage and Cheddar Biscuits

These sage and cheddar biscuits are a delightful twist on the classic, offering a savory bite that’s perfect for any meal. Today, we’ll walk through the process of making them from scratch, ensuring you end up with fluffy, flavorful biscuits every time.
Ingredients
- 2 cups all-purpose flour, sifted for lightness
- 1 tbsp baking powder, for the perfect rise
- 1/2 tsp salt, to enhance flavors
- 1/2 cup unsalted butter, cold and cubed
- 1 cup sharp cheddar cheese, freshly grated
- 2 tbsp fresh sage, finely chopped
- 3/4 cup whole milk, for richness
Instructions
- Preheat your oven to 425°F (220°C) to ensure it’s hot enough for baking.
- In a large bowl, whisk together the sifted flour, baking powder, and salt until well combined.
- Add the cold, cubed butter to the flour mixture. Use your fingertips to rub the butter into the flour until the mixture resembles coarse crumbs. Tip: Keeping the butter cold ensures flaky biscuits.
- Stir in the freshly grated cheddar cheese and finely chopped sage until evenly distributed throughout the mixture.
- Gradually add the whole milk, stirring just until the dough comes together. Tip: Overmixing can lead to tough biscuits, so mix until just combined.
- Turn the dough out onto a lightly floured surface and gently pat it into a 1-inch thick rectangle.
- Use a floured biscuit cutter to cut out biscuits, pressing straight down without twisting to ensure even rising.
- Place the biscuits on a baking sheet lined with parchment paper, leaving a little space between each for expansion.
- Bake in the preheated oven for 12-15 minutes, or until the biscuits are golden brown on top. Tip: For extra color, brush the tops with a little milk before baking.
You’ll love the tender, flaky texture of these biscuits, with the sharp cheddar and aromatic sage coming through in every bite. Serve them warm with a dollop of honey butter for a sweet and savory treat.
Fried Sage Leaves

Now, let’s dive into the crispy, aromatic world of Fried Sage Leaves, a simple yet elegant dish that brings a burst of flavor to any meal. Perfect for beginners, this recipe will guide you through each step to achieve golden, crispy leaves with a delicate, herbaceous taste.
Ingredients
- 1 cup fresh sage leaves, large and unblemished
- 1/2 cup rich extra virgin olive oil
- 1/4 tsp finely ground sea salt
Instructions
- Heat the rich extra virgin olive oil in a small skillet over medium heat until it reaches 350°F, using a candy thermometer to check the temperature accurately.
- Gently pat the fresh sage leaves dry with a paper towel to remove any moisture, ensuring they fry evenly without splattering.
- Carefully add a few sage leaves at a time to the hot oil, frying for about 10-15 seconds or until they turn a vibrant green and slightly crispy. Avoid overcrowding the skillet to maintain the oil’s temperature.
- Use a slotted spoon to transfer the fried sage leaves to a plate lined with paper towels, allowing them to drain and crisp up further.
- Sprinkle the finely ground sea salt over the warm sage leaves, enhancing their natural flavor.
Zesty and crisp, these Fried Sage Leaves offer a delightful contrast in texture and a punch of herbal flavor. Serve them as a garnish over creamy soups, alongside roasted meats, or simply enjoy them as a standalone snack for a gourmet touch.
Sage and Walnut Pesto
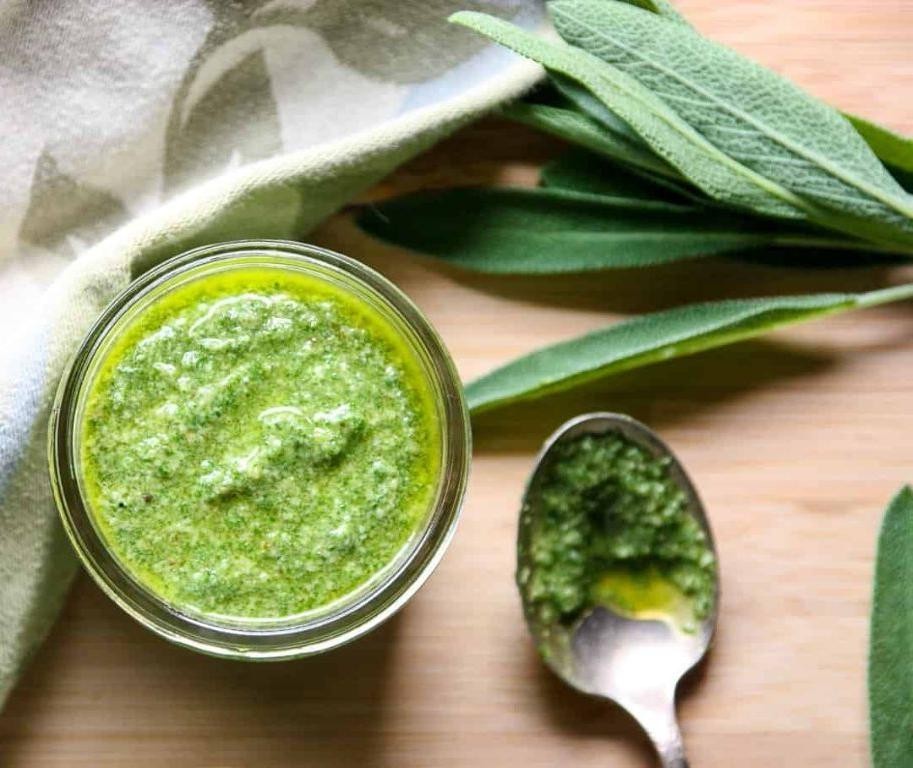
Venturing into the world of homemade pesto can transform your meals with minimal effort. Today, we’re focusing on a Sage and Walnut Pesto, a rustic twist on the classic that’s both aromatic and deeply flavorful.
Ingredients
- 2 cups fresh sage leaves, tightly packed
- 1/2 cup toasted walnuts, roughly chopped
- 1/2 cup rich extra virgin olive oil
- 1/4 cup freshly grated Parmesan cheese
- 2 cloves garlic, minced
- 1/2 tsp fine sea salt
- 1/4 tsp freshly ground black pepper
Instructions
- In a food processor, combine the fresh sage leaves and toasted walnuts. Pulse 5-6 times until coarsely chopped.
- Add the minced garlic, Parmesan cheese, sea salt, and black pepper to the food processor. Pulse another 3-4 times to blend the ingredients.
- With the food processor running on low, slowly drizzle in the extra virgin olive oil until the mixture is smooth but still slightly textured. Tip: Scrape down the sides of the bowl once or twice to ensure even blending.
- Taste the pesto and adjust the seasoning with more salt or pepper if needed. Tip: For a brighter flavor, add a squeeze of lemon juice.
- Transfer the pesto to a jar or bowl. Tip: To preserve its vibrant color, cover the surface with a thin layer of olive oil before storing in the refrigerator.
Perfectly balanced, this Sage and Walnut Pesto boasts a nutty depth with the earthy aroma of sage. Spread it on crusty bread, toss it with pasta, or dollop it over roasted vegetables for an instant flavor upgrade.
Sage Infused Vodka

Now, let’s embark on a flavorful journey to create Sage Infused Vodka, a sophisticated spirit that’s as enjoyable to make as it is to sip. This recipe is perfect for those who appreciate the herbal nuances in their cocktails and are eager to experiment with homemade infusions.
Ingredients
- 1 cup high-quality vodka
- 1/4 cup fresh sage leaves, gently bruised to release oils
- 1 tbsp pure maple syrup, for a subtle sweetness
- 1 strip lemon zest, about 2 inches long, to add a citrusy brightness
Instructions
- In a clean, 16-ounce glass jar, combine the high-quality vodka and gently bruised fresh sage leaves.
- Seal the jar tightly and store it in a cool, dark place for 24 hours to allow the sage to infuse into the vodka.
- After 24 hours, open the jar and add the pure maple syrup and the strip of lemon zest to the mixture.
- Reseal the jar and let the mixture sit for an additional 24 hours to meld the flavors together.
- Strain the infused vodka through a fine-mesh sieve into a clean bottle, discarding the sage leaves and lemon zest.
- Store the Sage Infused Vodka in the refrigerator to preserve its freshness and flavor.
Just imagine the aromatic blend of sage and citrus with a hint of sweetness, creating a vodka that’s both refreshing and complex. Serve it chilled over ice or as the base for a herbal cocktail that will impress your guests.
Sage and Mushroom Quiche

Venturing into the world of savory pies, this Sage and Mushroom Quiche combines earthy flavors with a creamy, custard-like filling, encased in a flaky, buttery crust. Perfect for brunch or a light dinner, it’s a dish that promises to delight with every bite.
Ingredients
- 1 9-inch pie crust, chilled and ready to bake
- 1 tbsp unsalted butter, melted
- 1 cup cremini mushrooms, thinly sliced
- 1 tbsp fresh sage, finely chopped
- 3 large farm-fresh eggs
- 1 cup heavy cream
- 1/2 tsp kosher salt
- 1/4 tsp freshly ground black pepper
- 1/2 cup Gruyère cheese, grated
Instructions
- Preheat your oven to 375°F (190°C). Place the pie crust in a 9-inch pie dish and brush the inside with melted butter to prevent sogginess.
- In a skillet over medium heat, sauté the mushrooms until they’re golden and have released their moisture, about 5 minutes. Stir in the sage during the last minute of cooking.
- In a mixing bowl, whisk together the eggs, heavy cream, salt, and pepper until smooth. Tip: Ensure the mixture is homogenous for a uniform texture in the quiche.
- Spread the sautéed mushrooms evenly over the bottom of the pie crust, then sprinkle the grated Gruyère cheese on top.
- Pour the egg mixture over the mushrooms and cheese, filling the pie crust. Tip: Do this slowly to allow the mixture to seep into the gaps.
- Bake in the preheated oven for 35-40 minutes, or until the quiche is set and the top is lightly golden. Tip: Check for doneness by inserting a knife near the center; it should come out clean.
- Let the quiche cool for 10 minutes before slicing. This resting period helps the filling set further.
Enjoy the quiche warm, where the creamy filling contrasts beautifully with the crisp crust and the earthy mushrooms and sage shine through. For an extra touch, serve with a side of arugula salad dressed lightly with lemon vinaigrette.
Sage Roasted Potatoes

Let’s dive into creating a dish that’s as comforting as it is flavorful, perfect for any season. Sage roasted potatoes are a simple yet elegant side that pairs wonderfully with a variety of mains, offering a crispy exterior and a tender, fluffy interior.
Ingredients
- 2 pounds of russet potatoes, scrubbed and cut into 1-inch cubes
- 3 tablespoons of rich extra virgin olive oil
- 1 tablespoon of freshly chopped sage leaves
- 1 teaspoon of coarse sea salt
- 1/2 teaspoon of finely ground black pepper
- 2 cloves of garlic, minced
Instructions
- Preheat your oven to 400°F (204°C) to ensure it’s hot enough to crisp the potatoes.
- In a large mixing bowl, toss the potato cubes with olive oil, ensuring each piece is evenly coated for uniform cooking.
- Add the chopped sage, sea salt, black pepper, and minced garlic to the bowl, mixing thoroughly to distribute the flavors.
- Spread the potatoes in a single layer on a baking sheet, giving them space to roast rather than steam.
- Roast in the preheated oven for 45 minutes, flipping the potatoes halfway through to achieve an even golden brown color.
- Test for doneness by piercing a potato cube with a fork; it should slide in easily without resistance.
Once roasted, these potatoes boast a delightful contrast between their crispy edges and soft centers, with the sage and garlic infusing each bite with aromatic warmth. Serve them alongside a dollop of sour cream or as a hearty base for a breakfast hash to elevate your meal.
Sage and Pear Salad
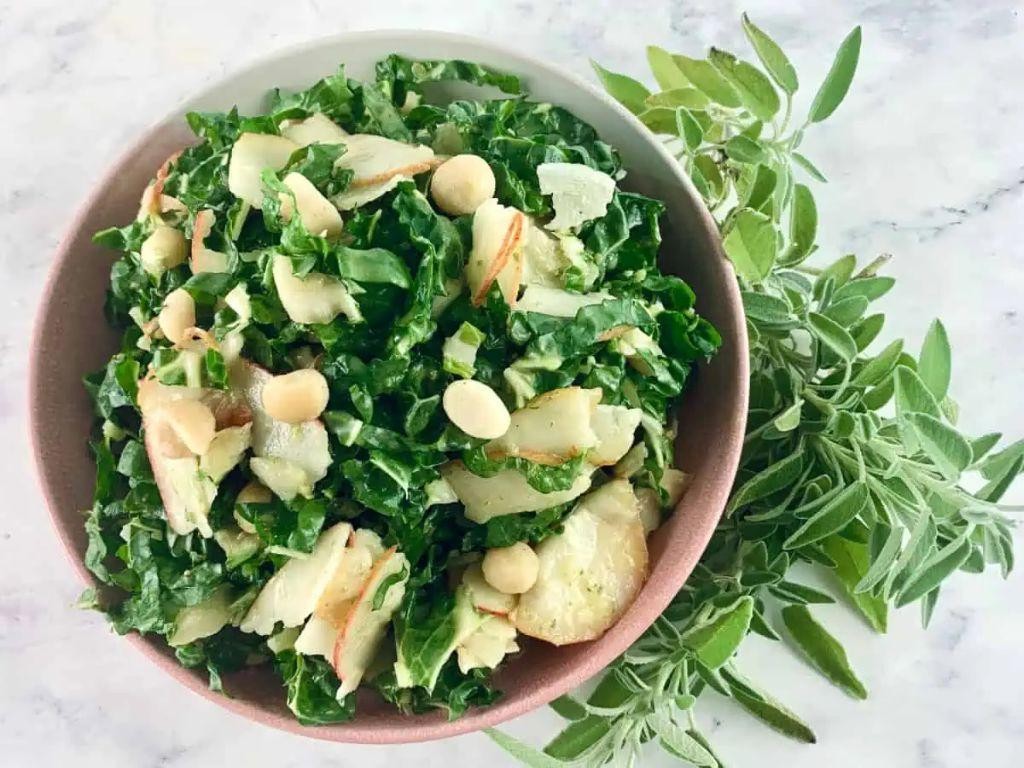
On a crisp autumn day, nothing complements the season quite like a Sage and Pear Salad. This dish combines the earthy aroma of fresh sage with the sweet, juicy crunch of ripe pears, creating a harmonious blend of flavors and textures that’s both refreshing and satisfying.
Ingredients
- 2 cups fresh baby spinach, thoroughly washed and dried
- 1 ripe pear, thinly sliced
- 1 tbsp fresh sage leaves, finely chopped
- 1/4 cup crumbled goat cheese
- 1/4 cup toasted walnuts, roughly chopped
- 2 tbsp rich extra virgin olive oil
- 1 tbsp balsamic vinegar
- 1 tsp honey
- 1/4 tsp finely ground black pepper
- 1/8 tsp sea salt
Instructions
- In a large salad bowl, gently toss the fresh baby spinach and thinly sliced pear together until evenly distributed.
- Sprinkle the finely chopped fresh sage leaves over the spinach and pear mixture, ensuring an even spread.
- Scatter the crumbled goat cheese and toasted walnuts over the top of the salad for a creamy and crunchy contrast.
- In a small bowl, whisk together the rich extra virgin olive oil, balsamic vinegar, honey, finely ground black pepper, and sea salt until the dressing is emulsified.
- Drizzle the dressing over the salad just before serving, tossing lightly to coat all ingredients without crushing the delicate pear slices.
- Serve immediately to enjoy the crisp texture of the spinach and the juicy sweetness of the pear at their best.
Great for a light lunch or as a sophisticated side, this Sage and Pear Salad offers a delightful interplay of textures—from the crisp spinach to the creamy goat cheese. For an extra touch of elegance, serve it on a chilled plate to keep the ingredients fresh and vibrant.
Sage and Bacon Wrapped Dates

Ready to elevate your appetizer game with a dish that’s as easy to make as it is impressive? Sage and Bacon Wrapped Dates combine sweet, savory, and herbal notes in a bite-sized package that’s perfect for any gathering.
Ingredients
- 12 plump Medjool dates, pitted
- 6 slices of thick-cut bacon, cut in half
- 24 fresh sage leaves
- 1/4 cup of rich, dark brown sugar
- 1 tbsp of smooth Dijon mustard
- 1/2 tsp of finely ground black pepper
Instructions
- Preheat your oven to 375°F (190°C) and line a baking sheet with parchment paper for easy cleanup.
- Carefully open each pitted date and insert a fresh sage leaf inside, ensuring it’s fully enclosed.
- Wrap each date with a half slice of bacon, securing it with a toothpick if necessary to keep the bacon in place.
- In a small bowl, whisk together the dark brown sugar, Dijon mustard, and black pepper until smooth.
- Brush each bacon-wrapped date generously with the brown sugar mixture, coating all sides.
- Arrange the dates on the prepared baking sheet, ensuring they’re not touching to allow for even cooking.
- Bake for 20-25 minutes, or until the bacon is crispy and the sugar mixture has caramelized.
- Let the dates cool for 5 minutes before serving to allow the flavors to meld and to avoid burning your mouth.
Unwrap the toothpicks and serve these golden-brown delights warm. The crispy bacon gives way to a sweet, chewy date with a burst of herbal sage, making each bite a perfect balance of flavors and textures. Try skewering them on a decorative pick for a festive presentation at your next party.
Sage and Thyme Roasted Nuts
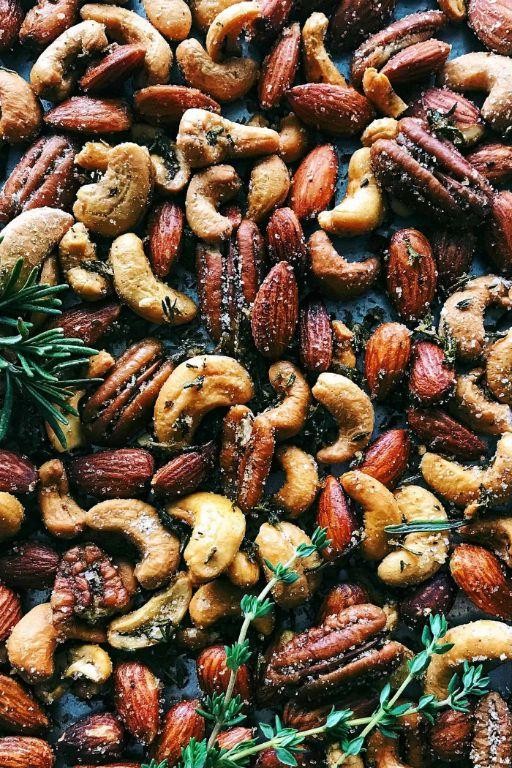
Just imagine the aromatic blend of sage and thyme filling your kitchen as you prepare these irresistibly crunchy roasted nuts. Perfect for snacking or as a gourmet addition to your cheese board, this recipe is as simple as it is delicious.
Ingredients
- 2 cups of raw mixed nuts (almonds, cashews, and walnuts)
- 1 tablespoon of finely chopped fresh sage
- 1 tablespoon of finely chopped fresh thyme
- 2 tablespoons of rich extra virgin olive oil
- 1 teaspoon of coarse sea salt
- 1/2 teaspoon of freshly ground black pepper
Instructions
- Preheat your oven to 350°F (175°C) and line a baking sheet with parchment paper for easy cleanup.
- In a large mixing bowl, combine the raw mixed nuts, finely chopped fresh sage, and thyme, ensuring the herbs are evenly distributed among the nuts.
- Drizzle the extra virgin olive oil over the nut mixture and toss gently to coat every nut evenly.
- Sprinkle the coarse sea salt and freshly ground black pepper over the nuts, tossing again to ensure a uniform seasoning.
- Spread the nut mixture in a single layer on the prepared baking sheet, avoiding overcrowding to ensure even roasting.
- Roast in the preheated oven for 15 minutes, then stir the nuts to promote even browning and prevent burning.
- Continue roasting for another 10 minutes, or until the nuts are golden brown and fragrant, keeping a close eye to avoid over-roasting.
- Remove from the oven and let the nuts cool completely on the baking sheet; they will crisp up as they cool.
Golden and aromatic, these Sage and Thyme Roasted Nuts offer a perfect balance of earthy herbs and savory crunch. Serve them alongside a sharp cheddar or as a standalone snack to impress your guests with minimal effort.
Sage and Lemon Zest Cookies

These sage and lemon zest cookies are a delightful twist on the classic shortbread, offering a fragrant and citrusy flavor that’s perfect for any time of the day. To ensure success, follow each step carefully, and don’t hesitate to reach out if you have any questions.
Ingredients
– 1 cup unsalted butter, softened to room temperature
– 1/2 cup granulated sugar, fine and sparkling
– 2 tbsp fresh sage leaves, finely chopped
– 1 tbsp lemon zest, freshly grated from organic lemons
– 2 cups all-purpose flour, sifted for lightness
– 1/4 tsp sea salt, finely ground
Instructions
1. Preheat your oven to 350°F (175°C) and line a baking sheet with parchment paper for easy cleanup.
2. In a large mixing bowl, cream together the softened butter and granulated sugar until the mixture is light and fluffy, about 3 minutes. Tip: Ensure your butter is at room temperature to achieve the perfect consistency.
3. Gently fold in the finely chopped sage and freshly grated lemon zest until evenly distributed throughout the mixture.
4. Gradually add the sifted all-purpose flour and finely ground sea salt to the butter mixture, mixing until just combined. Tip: Overmixing can lead to tough cookies, so stop as soon as the flour is incorporated.
5. Roll the dough into 1-inch balls and place them on the prepared baking sheet, spacing them about 2 inches apart. Tip: For uniform cookies, use a small ice cream scoop.
6. Flatten each ball slightly with the back of a spoon or your fingers to about 1/2-inch thickness.
7. Bake in the preheated oven for 12-15 minutes, or until the edges are just beginning to turn golden. The cookies will firm up as they cool.
8. Allow the cookies to cool on the baking sheet for 5 minutes before transferring them to a wire rack to cool completely.
Now that your sage and lemon zest cookies are ready, enjoy their crisp edges and tender centers, a perfect balance of herbal and citrus notes. Serve them alongside a cup of Earl Grey tea for an afternoon treat that’s sure to impress.
Conclusion
Now that you’ve explored these 21 delicious sage recipes, there’s a flavor for every season to spice up your meals! We hope this roundup inspires your next kitchen adventure. Don’t forget to leave a comment with your favorite recipe and share the love by pinning this article on Pinterest. Happy cooking!


