Just when you thought kasha was just a simple side dish, we’re here to surprise you with 18 delicious ways to turn this nutritious grain into the star of your meals! Whether you’re craving comfort food, looking for quick dinner solutions, or eager to explore new flavors, these recipes will inspire you to give kasha the spotlight it deserves. Ready to transform your kitchen routine? Let’s dive into these mouthwatering ideas!
Savory Mushroom and Kasha Pilaf
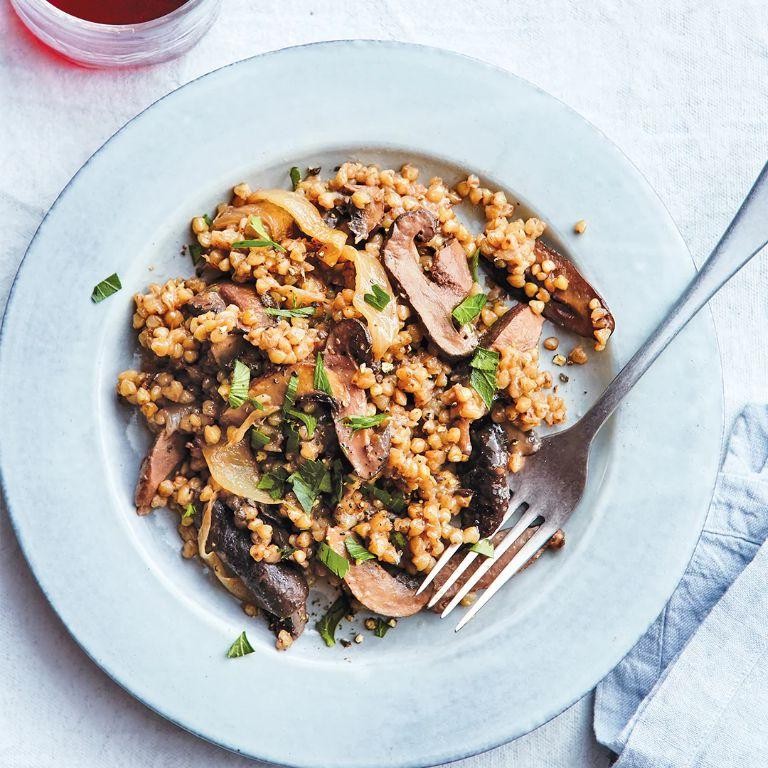
Ready to elevate your dinner game with a dish that’s as hearty as it is hilarious? Our Savory Mushroom and Kasha Pilaf is here to turn your ordinary meal into an extraordinary adventure, proving that comfort food can indeed have a gourmet twist.
Ingredients
- 1 cup kasha (because who doesn’t love a good crunch?)
- 2 cups vegetable broth (homemade if you’re fancy, store-bought if you’re sane)
- 1 tbsp extra virgin olive oil (my liquid gold)
- 1 large onion, diced (the tearjerker)
- 2 cloves garlic, minced (vampires, beware!)
- 8 oz mushrooms, sliced (the more, the merrier)
- 1 tsp thyme (for that earthy whisper)
- Salt and pepper (the dynamic duo)
Instructions
- Heat the olive oil in a large skillet over medium heat until it shimmers like a mirage in the desert.
- Add the diced onion and sauté until it’s as golden as a sunset, about 5 minutes. Tip: Stir occasionally to prevent any onion drama.
- Toss in the garlic and mushrooms, cooking until the mushrooms have shrunk down and look as if they’ve had a spa day, about 7 minutes. Tip: Don’t overcrowd the pan; mushrooms need their personal space.
- Stir in the kasha, thyme, salt, and pepper, toasting everything for 2 minutes until the kitchen smells like a forest after the rain.
- Pour in the vegetable broth, bring to a boil, then reduce the heat to low, cover, and let it simmer for 15 minutes. Tip: No peeking! Let the kasha absorb all that brothy goodness in peace.
- Remove from heat, let it sit covered for 5 minutes, then fluff with a fork as if you’re styling its hair for a photoshoot.
And just like that, you’ve got a pilaf that’s as fluffy as a cloud and as savory as a secret. Serve it with a sprinkle of fresh herbs or alongside a protein that’s begging for some attention. Either way, it’s a dish that promises to be the life of the party.
Sweet Cinnamon Apple Kasha Breakfast Bowl
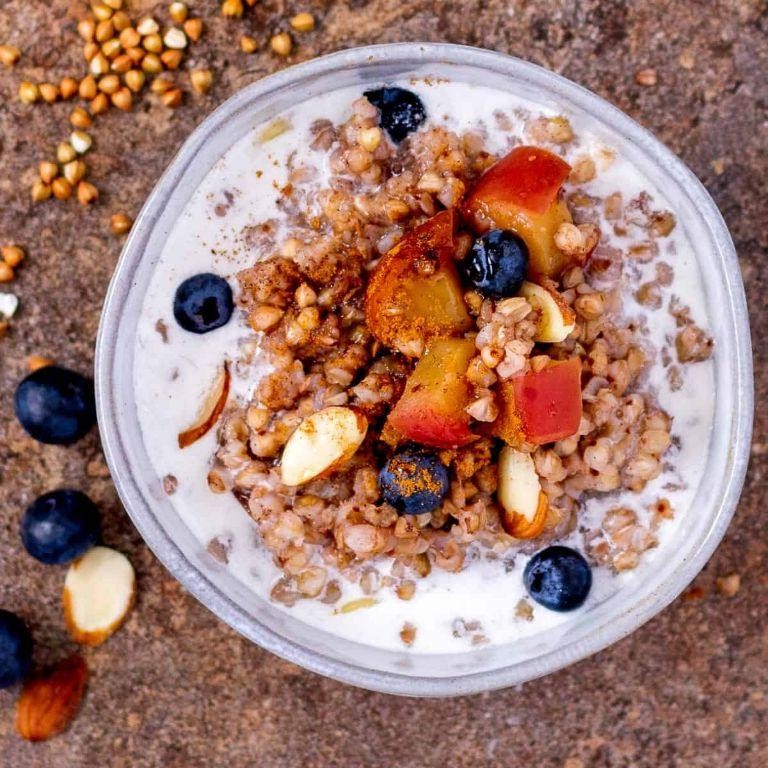
Just when you thought your morning routine couldn’t get any cozier, here comes a breakfast bowl that’s like a hug in a dish. Sweet, cinnamon-y, and packed with the goodness of apples and kasha, it’s the perfect way to start your day with a smile (and maybe a little dance).
Ingredients
- 1 cup kasha (toasted buckwheat groats) – because who doesn’t love a nutty, earthy base?
- 2 cups water – for boiling, not for swimming, though that’s fun too.
- 1 large apple, diced (I’m team Honeycrisp, but use your favorite) – because texture matters.
- 1 tbsp cinnamon – for that warm, spicy kick that says ‘good morning’.
- 2 tbsp honey – because life’s too short for unsweetened breakfasts.
- 1/2 cup almond milk – or whatever milk makes your heart sing.
- A pinch of salt – to make all the flavors pop like confetti.
Instructions
- Rinse the kasha under cold water to remove any dust or debris. Trust me, it’s worth the extra 10 seconds.
- In a medium saucepan, bring the water to a boil over high heat. Watch it like a hawk, because boiling water has a sneaky way of escaping.
- Add the rinsed kasha to the boiling water, reduce the heat to low, cover, and simmer for 10 minutes. Set a timer unless you’re a time wizard.
- While the kasha is cooking, toss the diced apple with cinnamon in a bowl. This is where the magic starts.
- Once the kasha is cooked (it should be tender but still have a bit of chew), fluff it with a fork and stir in the honey and almond milk. This is your bowl’s creamy dreamy moment.
- Fold in the cinnamon apples and let the mixture sit for 2 minutes to let the flavors get to know each other. Patience is a virtue, especially at breakfast.
- Serve warm, topped with an extra drizzle of honey if you’re feeling fancy. Because why not?
Lusciously creamy with a delightful crunch from the apples, this bowl is a texture lover’s dream. The cinnamon and honey play together like old friends, making each bite a sweet, spicy symphony. Try serving it with a sprinkle of toasted nuts for an extra layer of yum.
Kasha and Beef Stuffed Peppers
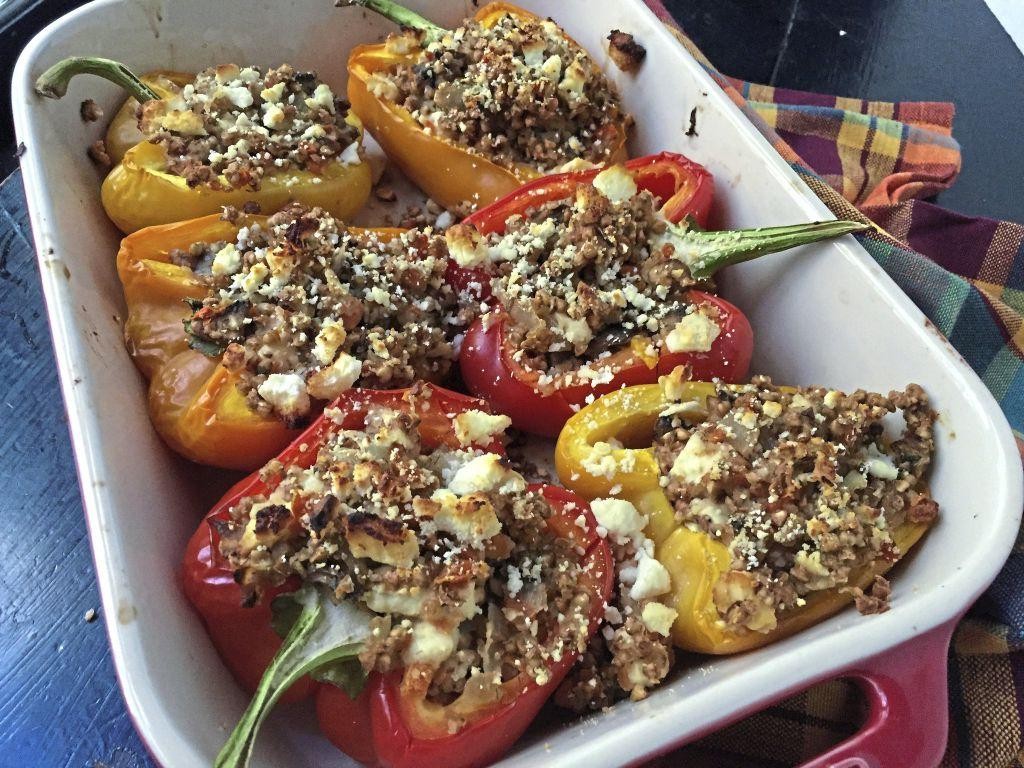
Dive into a dish that’s as hearty as it is colorful, where kasha and beef come together in a symphony of flavors, all snugly packed into vibrant bell peppers. It’s the kind of meal that makes you forget you’re eating something good for you—because it’s just that delicious.
Ingredients
- 4 large bell peppers (any color, but I’m partial to red for their sweetness)
- 1 lb ground beef (85/15 is my jam for the perfect fat ratio)
- 1 cup kasha (toasted buckwheat groats, because we’re fancy like that)
- 2 cups beef broth (homemade if you’ve got it, but no judgment here)
- 1 onion, diced (yellow for sweetness, white for sharpness—your call)
- 2 cloves garlic, minced (more if you’re fighting off vampires)
- 1 tbsp extra virgin olive oil (the good stuff, because why not?)
- 1 tsp salt (plus more to taste, but we’re not vague here)
- 1/2 tsp black pepper (freshly ground, because pre-ground is sad)
- 1/2 cup grated Parmesan cheese (for that cheesy goodness on top)
Instructions
- Preheat your oven to 375°F (because we’re baking, not sunbathing).
- Cut the tops off the bell peppers and remove the seeds and membranes. Stand them up in a baking dish just snug enough so they don’t tip over like drunken sailors.
- Heat the olive oil in a large skillet over medium heat. Add the onion and garlic, sautéing until they’re softer than your favorite pillow, about 5 minutes.
- Add the ground beef to the skillet, breaking it up with a spoon until it’s browned and no longer pink, about 7 minutes. Drain any excess fat unless you’re into that.
- Stir in the kasha, beef broth, salt, and pepper. Bring to a boil, then reduce the heat to low, cover, and simmer until the kasha is tender and the liquid is absorbed, about 15 minutes. Tip: Don’t peek! Let the kasha do its thing.
- Remove the skillet from the heat and let it sit covered for 5 minutes. Then, fluff the mixture with a fork like you’re styling its hair for a photoshoot.
- Spoon the kasha and beef mixture into the bell peppers, packing it in like you’re stuffing a suitcase for a two-week vacation.
- Sprinkle the tops with Parmesan cheese, because cheese makes everything better.
- Bake in the preheated oven until the peppers are tender and the cheese is golden and bubbly, about 25-30 minutes. Tip: If the cheese isn’t as golden as you’d like, broil for the last 2 minutes, but watch it like a hawk.
- Let the peppers cool for 5 minutes before serving—unless you enjoy molten lava mouth.
Yield to the temptation of these stuffed peppers, where the tender sweetness of the bell pepper meets the earthy, nutty kasha and savory beef in every bite. Serve them with a side of crusty bread to sop up any escaped juices, because waste not, want not.
Garlic Butter Kasha with Roasted Vegetables
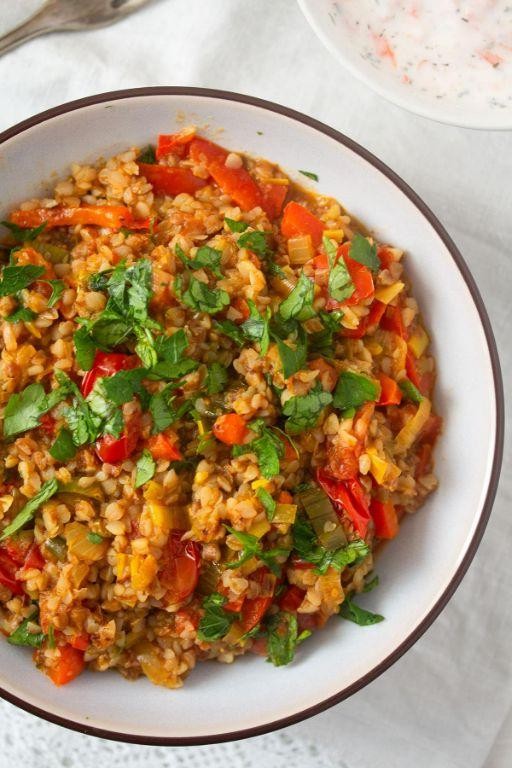
Just when you thought your weeknight dinners couldn’t get any more exciting, along comes this Garlic Butter Kasha with Roasted Vegetables to shake things up. It’s like a cozy hug for your taste buds, with a side of ‘where have you been all my life?’
Ingredients
- 1 cup kasha (because who doesn’t love a good crunch?)
- 2 cups vegetable broth (the unsung hero of flavor town)
- 3 tbsp unsalted butter (go big or go home)
- 4 cloves garlic, minced (the more, the merrier, I always say)
- 2 cups mixed vegetables (I’m team bell peppers and zucchini, but you do you)
- 1 tbsp olive oil (extra virgin, because we’re fancy like that)
- Salt and pepper (the dynamic duo of seasoning)
Instructions
- Preheat your oven to 400°F because we’re about to get roasting.
- Toss those mixed vegetables with olive oil, salt, and pepper on a baking sheet. Spread them out like they’re sunbathing.
- Roast for 20 minutes or until they’re just the right amount of charred. Flip halfway through because even vegetables deserve a tan on both sides.
- While the veggies are doing their thing, melt butter in a saucepan over medium heat. Add garlic and sauté until it’s golden and fragrant—about 2 minutes. Tip: Don’t walk away; garlic burns faster than a rumor in a small town.
- Stir in the kasha, toasting it for a minute until it’s nicely coated in that garlic butter goodness.
- Pour in the vegetable broth, bring to a boil, then reduce to a simmer. Cover and cook for 15 minutes. Tip: Resist the urge to peek; let the steam work its magic.
- Once the kasha is fluffy and the liquid is absorbed, fluff it with a fork. Tip: This is your moment to channel your inner chef and make it rain with that fork action.
- Fold in the roasted vegetables, giving everything a gentle mix to avoid a veggie avalanche.
Kasha never had it so good—this dish is a textural dream with the perfect balance of nutty, buttery, and roasted flavors. Serve it up in a hollowed-out pumpkin for that extra ‘wow’ factor at your next dinner party.
Kasha Varnishkes with Caramelized Onions
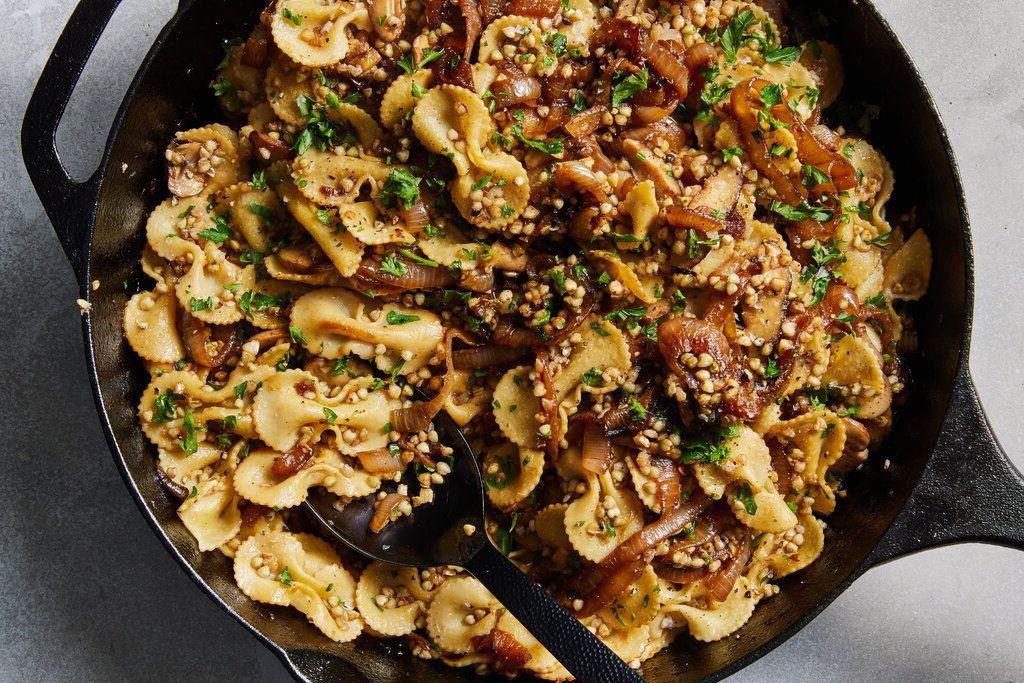
So, you’ve decided to dive into the world of comfort food with a twist, huh? Kasha Varnishkes with Caramelized Onions is like that cozy sweater you forgot you had—unexpectedly delightful and oh-so-comforting. Let’s get cooking!
Ingredients
- 1 cup kasha (toasted buckwheat groats)—because raw just won’t do.
- 2 cups chicken or vegetable broth (homemade if you’re fancy, boxed if you’re human).
- 1 large onion, thinly sliced (the more caramelized, the better).
- 2 tbsp unsalted butter (because everything’s better with butter).
- 1 tbsp olive oil (extra virgin, because we’re not savages).
- 8 oz bowtie pasta (aka farfalle, because we’re fancy like that).
- Salt and pepper (to make your taste buds dance).
Instructions
- Heat a large skillet over medium heat and add 1 tbsp olive oil and 1 tbsp butter. Watch it melt like your worries on a Friday night.
- Add the thinly sliced onions to the skillet. Cook, stirring occasionally, for about 20 minutes until they’re golden brown and sweet enough to write home about. Tip: Lower the heat if they’re browning too fast—patience is key!
- Meanwhile, bring a pot of salted water to a boil and cook the bowtie pasta according to package instructions until al dente. Drain and set aside. Tip: Save a cup of pasta water—it’s liquid gold for adjusting sauce consistency later.
- In a separate pot, bring 2 cups of broth to a boil. Stir in the kasha, reduce heat to low, cover, and simmer for 10-15 minutes until the liquid is absorbed. Tip: Don’t peek! Let the kasha do its thing undisturbed.
- Combine the cooked kasha, pasta, and caramelized onions in a large bowl. Add the remaining 1 tbsp butter, salt, and pepper to taste. Mix gently but thoroughly. If it’s a bit dry, splash in some of that reserved pasta water.
This dish is a textural dream—chewy kasha, tender pasta, and those melt-in-your-mouth onions. Serve it up with a side of roasted veggies or keep it classic with a dollop of sour cream. Trust me, your taste buds will thank you.
Spicy Kasha and Black Bean Tacos

Yo, buckle up, taco lovers! We’re about to embark on a flavor-packed journey with these Spicy Kasha and Black Bean Tacos that’ll make your taste buds dance the cha-cha.
Ingredients
- 1 cup kasha (toasted buckwheat groats) – because who doesn’t love a nutty, earthy base?
- 2 cups water – the universal solvent, now taco-bound.
- 1 tbsp olive oil (extra virgin, because we’re fancy like that).
- 1 can black beans (15 oz, drained and rinsed) – the heart and soul of our taco.
- 1 tsp cumin – for that smoky whisper.
- 1 tsp chili powder – dial up the heat, why don’t ya?
- 1/2 tsp salt – the flavor enhancer.
- 4 corn tortillas – the trusty vessel for our masterpiece.
- 1 avocado, sliced – because creaminess is next to godliness.
- 1/4 cup cilantro, chopped – for that fresh, herby kick.
- 1 lime, cut into wedges – a squeeze of sunshine.
Instructions
- In a medium saucepan, bring 2 cups of water to a boil over high heat. Tip: A watched pot never boils, but seriously, keep an eye on it.
- Stir in 1 cup of kasha, reduce heat to low, cover, and simmer for 10 minutes until water is absorbed. Tip: This is your moment to practice patience.
- While the kasha cooks, heat 1 tbsp olive oil in a skillet over medium heat. Add the black beans, cumin, chili powder, and salt. Cook for 5 minutes, stirring occasionally. Tip: Smell that? That’s the smell of victory.
- Warm the corn tortillas in a dry skillet over medium heat for about 30 seconds on each side. Tip: No one likes a cold taco shell.
- Assemble the tacos: Divide the kasha and black bean mixture among the tortillas. Top with avocado slices, chopped cilantro, and a squeeze of lime.
These tacos are a textural dream – creamy avocado meets hearty kasha and beans, all hugged by a warm tortilla. Serve them with an extra lime wedge on the side for those who dare to go extra zesty.
Kasha with Honey Glazed Carrots and Parsnips
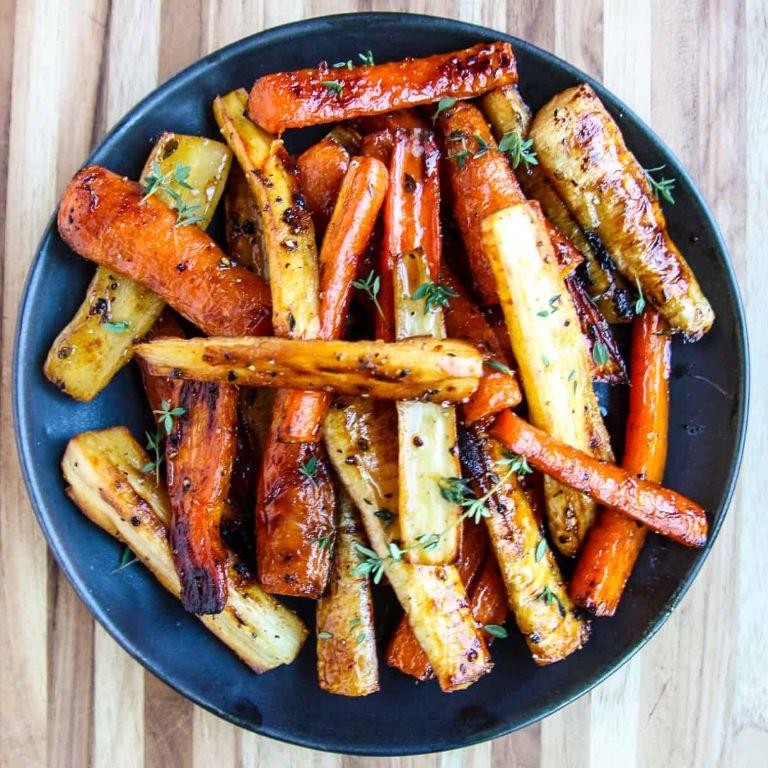
Wow, have we got a cozy, comforting dish for you that’s about to make your taste buds do a happy dance! Kasha with honey glazed carrots and parsnips is like a warm hug on a plate, perfect for those days when you need a little extra love from your food.
Ingredients
- 1 cup kasha (because, let’s be honest, it’s the star of the show)
- 2 cups water (for boiling, not for swimming)
- 2 large carrots, peeled and sliced into coins (the more, the merrier)
- 2 large parsnips, peeled and sliced into coins (their sweetness is a game-changer)
- 2 tbsp honey (the good stuff, please)
- 2 tbsp extra virgin olive oil (my kitchen MVP)
- Salt to taste (but let’s not go overboard)
Instructions
- Preheat your oven to 375°F because we’re about to get those veggies perfectly caramelized.
- Toss the carrot and parsnip coins with olive oil and honey on a baking sheet. Spread them out like they’re sunbathing.
- Roast for 25 minutes, flipping halfway through, until they’re golden and irresistible. Tip: Keep an eye on them to avoid any veggie casualties.
- While the veggies are roasting, bring 2 cups of water to a boil in a medium saucepan. Tip: A pinch of salt in the water makes the kasha pop.
- Stir in the kasha, reduce the heat to low, cover, and let it simmer for 10 minutes. Tip: No peeking! Let the steam work its magic.
- Fluff the kasha with a fork and gently mix in the roasted veggies. Serve warm and watch as the compliments roll in.
Kasha with honey glazed carrots and parsnips is a symphony of textures and flavors—earthy, sweet, and utterly satisfying. Try serving it with a dollop of Greek yogurt for a creamy contrast that’ll make your heart sing.
Creamy Kasha and Chicken Casserole
Picture this: a dish so comforting, it’s like a hug from your grandma, if your grandma was a world-class chef who also told the best jokes. That’s what you’re getting with this creamy kasha and chicken casserole—a dish that’s as hearty as it is hilarious.
Ingredients
- 1 cup kasha (because life’s too short for bland grains)
- 2 cups chicken broth (homemade if you’re fancy, store-bought if you’re human)
- 1 lb chicken breast, diced (free-range if you’re feeling extra)
- 1 cup heavy cream (the secret to its luxurious texture)
- 1 tbsp extra virgin olive oil (my kitchen MVP)
- 1 onion, finely chopped (the unsung hero of flavor)
- 2 cloves garlic, minced (because vampires aren’t welcome here)
- 1 tsp salt (to make everything pop)
- 1/2 tsp black pepper (for a little kick)
- 1/2 cup grated Parmesan cheese (because cheese makes everything better)
Instructions
- Preheat your oven to 375°F (because patience is a virtue, especially in baking).
- Heat the olive oil in a large skillet over medium heat. Add the onion and garlic, sautéing until they’re just shy of golden, about 3 minutes (tip: stirring occasionally prevents them from getting too tan).
- Add the diced chicken to the skillet, cooking until it’s no longer pink, about 5 minutes (tip: don’t overcrowd the pan, or you’ll steam the chicken instead of browning it).
- Stir in the kasha, chicken broth, heavy cream, salt, and pepper. Bring the mixture to a simmer, then reduce the heat to low and cover, cooking for 10 minutes (tip: this is when the magic happens, so resist the urge to peek).
- Remove from heat, stir in the Parmesan cheese, then transfer everything to a greased casserole dish.
- Bake uncovered for 20 minutes, or until the top is lightly golden and the edges are bubbly.
When it comes out of the oven, you’ll be greeted with a casserole that’s creamy, dreamy, and packed with flavor. Serve it with a side of roasted veggies for a meal that’s as balanced as your life probably isn’t.
Kasha Salad with Fresh Herbs and Lemon Dressing
Let’s face it, salads can be a snooze-fest, but not this one! Our Kasha Salad with Fresh Herbs and Lemon Dressing is here to shake up your salad game with its nutty goodness and zesty kick. Perfect for those who think ‘healthy’ and ‘boring’ are synonyms—prepare to be delightfully wrong.
Ingredients
- 1 cup kasha (toasted buckwheat groats)—because raw just doesn’t cut it for that nutty depth.
- 2 cups water—filtered if you’re fancy, tap if you’re human.
- 1/4 cup extra virgin olive oil—my liquid gold for dressings.
- 2 tbsp fresh lemon juice—bottled is a crime here, folks.
- 1/2 cup chopped fresh parsley—flat-leaf for the win, but curly won’t sue you.
- 1/4 cup chopped fresh dill—because it’s the herb that keeps on giving.
- 1/2 tsp salt—sea salt, because we’re not savages.
- 1/4 tsp black pepper—freshly ground, unless you enjoy disappointment.
Instructions
- Rinse the kasha under cold water until the water runs clear—no one likes a starchy surprise.
- In a medium saucepan, bring 2 cups of water to a boil. Add the rinsed kasha, reduce heat to low, cover, and simmer for 15 minutes—or until all the water is absorbed. Tip: Resist the urge to peek; let the steam work its magic.
- While the kasha cooks, whisk together the olive oil, lemon juice, salt, and pepper in a large bowl. Tip: Taste as you go; dressing should make you pucker slightly, in a good way.
- Fluff the cooked kasha with a fork and let it cool to room temperature—about 10 minutes. Tip: Spread it on a baking sheet to cool faster if you’re impatient like me.
- Add the cooled kasha, parsley, and dill to the bowl with the dressing. Toss everything together until well combined.
Ready to serve? This salad is a textural dream—chewy kasha, crisp herbs, and a dressing that packs a punch. Try it as a bed for grilled chicken or just dive in with a fork; no judgments here.
Maple Walnut Kasha Muffins

Ready to bake your way into breakfast bliss? These Maple Walnut Kasha Muffins are here to turn your morning routine from meh to magnificent with their nutty crunch and sweet maple kiss.
Ingredients
- 1 cup kasha (toasted buckwheat groats) – because who doesn’t love a little toastiness in their life?
- 1/2 cup pure maple syrup – the real deal, none of that pancake syrup imposter stuff.
- 1/2 cup chopped walnuts – for that irresistible crunch and a nod to your inner squirrel.
- 1 cup all-purpose flour – the trusty backbone of many a muffin.
- 1 tsp baking powder – the little lift that could.
- 1/2 tsp baking soda – because we’re not monsters; we want these to rise.
- 1/4 tsp salt – just a pinch to balance the sweetness.
- 1 large egg, room temperature – it’s all about that easy mix, folks.
- 1/2 cup milk – dairy or plant-based, we don’t judge.
- 1/4 cup melted butter – because butter makes everything better.
- 1 tsp vanilla extract – the secret whisper of flavor.
Instructions
- Preheat your oven to 375°F (190°C) and line a muffin tin with paper liners or grease it. Nobody likes a sticky situation.
- In a large bowl, whisk together the kasha, flour, baking powder, baking soda, and salt. This is where the magic starts.
- In another bowl, beat the egg, then mix in the maple syrup, milk, melted butter, and vanilla extract. Pro tip: Make sure your melted butter isn’t too hot, or you’ll scramble the egg. Yikes!
- Pour the wet ingredients into the dry ingredients and stir until just combined. Overmixing is the enemy of fluffy muffins.
- Gently fold in the chopped walnuts. They’re the star of the show, after all.
- Divide the batter evenly among the muffin cups, filling each about 3/4 full. They need room to grow into their full muffin potential.
- Bake for 18-20 minutes, or until a toothpick inserted into the center comes out clean. Keep an eye on them; ovens can be sneaky.
- Let the muffins cool in the tin for 5 minutes, then transfer to a wire rack. Patience is a virtue, especially when muffins are involved.
Golden and glorious, these muffins boast a tender crumb with a delightful crunch from the walnuts and kasha. Serve them warm with a drizzle of maple syrup for extra decadence, or enjoy them as is for a perfectly portable breakfast or snack.
Kasha and Lentil Soup with Kale
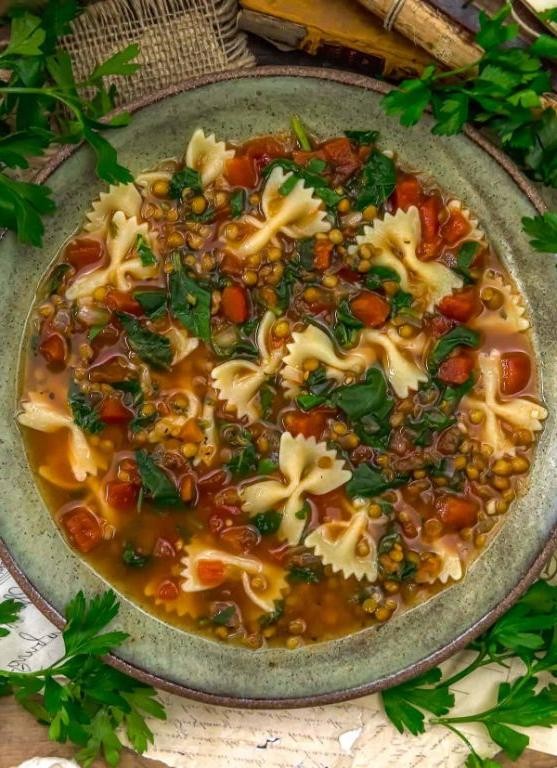
Picture this: a bowl so hearty it could double as a hug, packed with the kind of ingredients that make your taste buds do a happy dance. That’s what you’re in for with this kasha and lentil soup with kale—a dish that’s as nourishing as it is delicious.
Ingredients
- 1 cup kasha (toasted buckwheat groats) – because who doesn’t love a nutty flavor?
- 1 cup green lentils – the tiny but mighty protein powerhouse.
- 4 cups vegetable broth – my kitchen MVP for adding depth without the fuss.
- 2 tbsp extra virgin olive oil – my go-to for that rich, fruity base.
- 1 large onion, diced – the unsung hero of flavor town.
- 2 cloves garlic, minced – because everything’s better with garlic.
- 1 bunch kale, stems removed and leaves chopped – for that pop of green and a slight crunch.
- 1 tsp cumin – a little spice to keep things interesting.
- Salt and pepper – to make all those flavors sing in harmony.
Instructions
- Heat the olive oil in a large pot over medium heat until it shimmers like a mirage in the desert.
- Add the diced onion and cook until it’s as soft and translucent as a morning fog, about 5 minutes.
- Toss in the minced garlic and cumin, stirring for about 30 seconds until the aroma makes your kitchen smell like a gourmet restaurant.
- Pour in the vegetable broth and bring the mixture to a boil, then reduce the heat to a simmer. This is where the magic starts.
- Add the lentils and kasha, stirring gently to combine. Let them simmer for 20 minutes, or until the lentils are tender but not mushy. Tip: Keep an eye on the pot to prevent any sticking.
- Stir in the chopped kale and cook for another 5 minutes, just until the kale wilts into the soup like it’s meant to be there. Tip: For extra flavor, add a pinch of salt and pepper now.
- Give the soup a taste and adjust the seasoning if needed. Tip: If the soup is too thick, add a splash of water or more broth to reach your desired consistency.
Yum! This soup is a texture lover’s dream, with the kasha adding a delightful chewiness against the soft lentils and tender kale. Serve it with a slice of crusty bread for dipping, or top with a dollop of yogurt for a creamy contrast. Either way, it’s a bowl full of comfort that’s sure to impress.
Cheesy Kasha Stuffed Mushrooms

Prepare to have your taste buds do a happy dance with these Cheesy Kasha Stuffed Mushrooms, a dish that’s as fun to make as it is to devour. Perfect for when you’re craving something cheesy, earthy, and utterly irresistible.
Ingredients
- 12 large white mushrooms (the bigger, the better for stuffing!)
- 1 cup kasha (toasted buckwheat groats, because we’re fancy like that)
- 1/2 cup shredded sharp cheddar cheese (go for the good stuff, it melts like a dream)
- 1/4 cup grated Parmesan cheese (the salty, nutty kick we all crave)
- 2 tbsp extra virgin olive oil (my kitchen MVP)
- 1 small onion, finely diced (because every great dish starts with onion)
- 2 cloves garlic, minced (double it if you’re a garlic fiend like me)
- 1/2 tsp salt (just enough to make the flavors pop)
- 1/4 tsp black pepper (freshly ground, please)
- 1/4 cup fresh parsley, chopped (for that fresh, herby finish)
Instructions
- Preheat your oven to 375°F (190°C) and line a baking sheet with parchment paper. No sticking, no fuss.
- Clean the mushrooms with a damp paper towel and gently remove the stems. Save those stems! We’re chopping them up for the filling.
- Heat the olive oil in a skillet over medium heat. Add the onion and chopped mushroom stems, sautéing until they’re soft and golden, about 5 minutes. Tip: Don’t rush this step; caramelized equals flavor.
- Stir in the garlic, kasha, salt, and pepper, cooking for another 2 minutes until everything is well acquainted.
- Remove the skillet from heat and let the mixture cool slightly before stirring in the cheddar, Parmesan, and parsley. Tip: Letting it cool prevents the cheese from turning into a gooey mess too soon.
- Generously stuff each mushroom cap with the kasha mixture, pressing down lightly to pack it in. Tip: Overstuffing is encouraged here.
- Bake for 20-25 minutes, until the mushrooms are tender and the cheese is bubbly and golden.
Dig into these beauties while they’re hot, and marvel at the crispy, cheesy top giving way to the tender mushroom beneath. Serve them as a party appetizer or a decadent side dish—either way, they’re bound to steal the show.
Kasha with Sautéed Greens and Poached Eggs
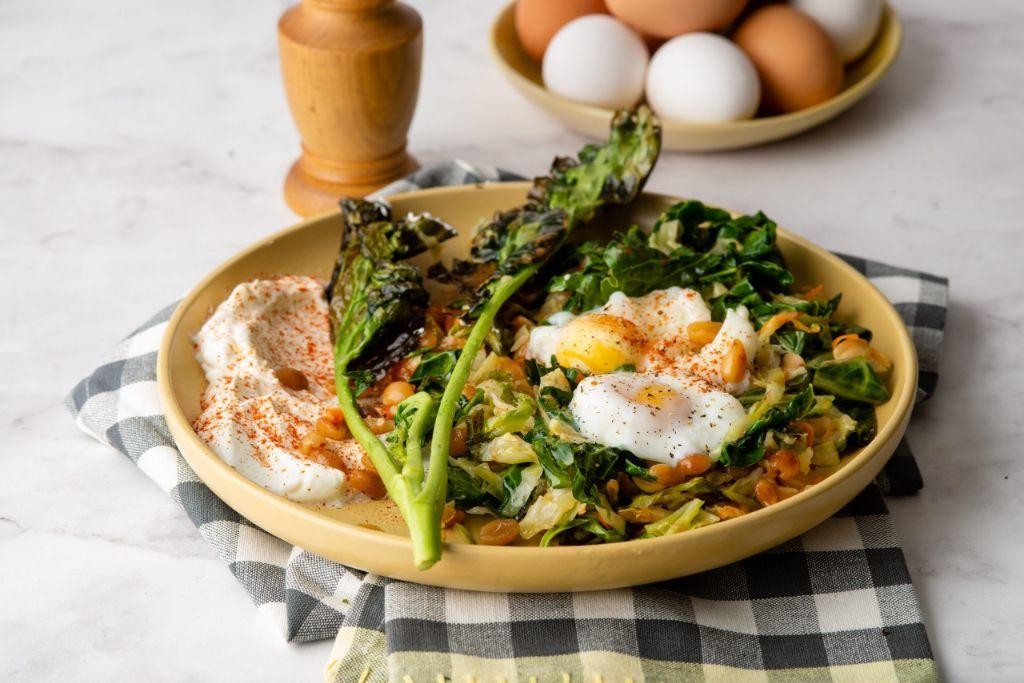
Let’s face it, breakfast can be a snooze-fest, but not with this dish that’s here to shake up your morning routine like a caffeine IV drip.
Ingredients
- 1 cup kasha (because who doesn’t love a good crunch?)
- 2 cups water (the unsung hero of every recipe)
- 2 tbsp extra virgin olive oil (my kitchen MVP)
- 2 cups mixed greens (the more, the merrier)
- 2 cloves garlic, minced (for that punch of flavor)
- 4 eggs (room temp, because they play nicer when poached)
- Salt and pepper (the dynamic duo)
Instructions
- Bring 2 cups of water to a boil in a medium saucepan, then stir in the kasha. Reduce heat to low, cover, and simmer for 10 minutes until the water is absorbed. Tip: Don’t peek! Let the kasha do its thing.
- While the kasha cooks, heat olive oil in a large skillet over medium heat. Add the garlic and sauté for 30 seconds until fragrant. Tip: Garlic burns faster than your last diet, so keep an eye on it.
- Add the mixed greens to the skillet and sauté for 2-3 minutes until just wilted. Season with salt and pepper. Tip: Greens should be vibrant, not sad and soggy.
- Fill a large saucepan with water and bring to a gentle simmer. Crack each egg into a small cup, then gently slide into the water. Poach for 3-4 minutes for runny yolks. Tip: A splash of vinegar in the water helps the eggs keep their shape.
- Divide the kasha between two bowls, top with sautéed greens, and crown each with two poached eggs. Season with additional salt and pepper if desired.
And there you have it—a dish that’s a textural dream with the creamy yolks, crunchy kasha, and tender greens. Serve it with a side of hot sauce for those who like to live dangerously.
Kasha and Smoked Salmon Canapés

Kasha and smoked salmon canapés are the little black dress of appetizers—timeless, elegant, and always in style. Perfect for when you want to impress without the stress, these bite-sized beauties are a breeze to whip up, leaving you more time to enjoy the party (or sneak a few extras for yourself).
Ingredients
- 1 cup kasha (toasted buckwheat groats)—because raw just doesn’t cut it for that nutty flavor we’re after.
- 2 cups water—filtered if you’re fancy, tap if you’re practical.
- 1/2 tsp salt—the unsung hero of flavor town.
- 8 oz smoked salmon, thinly sliced—go for the good stuff; your taste buds will thank you.
- 1/2 cup crème fraîche—sour cream’s more sophisticated cousin.
- 1 tbsp fresh dill, chopped—because dried dill is a crime against canapés.
- 1 tbsp capers, drained—for that briny pop of joy.
- 1 baguette, sliced into 1/2 inch rounds—the sturdy foundation our toppings deserve.
- 1 tbsp olive oil—extra virgin, because we’re not savages.
Instructions
- Preheat your oven to 350°F—because we’re toasting, not roasting.
- Toss the baguette slices with olive oil and bake for 10 minutes, or until golden and crisp. Tip: Keep an eye on them; they go from golden to gone in a flash.
- While the bread toasts, bring water to a boil in a medium saucepan. Stir in kasha and salt, reduce heat to low, cover, and simmer for 15 minutes. Tip: No peeking! Let the steam work its magic.
- Fluff the kasha with a fork and let it cool slightly. Meanwhile, mix crème fraîche and dill in a small bowl. Tip: Taste as you go—adjusting the dill to your liking is encouraged.
- Spread a thin layer of the dill crème fraîche on each toasted baguette round.
- Top with a spoonful of kasha, a slice of smoked salmon, and a few capers. The order matters here—kasha first keeps everything else in place.
- Arrange your canapés on a platter and watch them disappear. Tip: For an extra touch of elegance, garnish with a tiny sprig of dill on each.
Oozing with creamy, smoky, and briny flavors, these canapés are a textural dream—crispy, creamy, and slightly chewy all at once. Serve them at your next gathering and prepare for the compliments to roll in, or keep them all to yourself; we won’t judge.
Chocolate Kasha Energy Bars
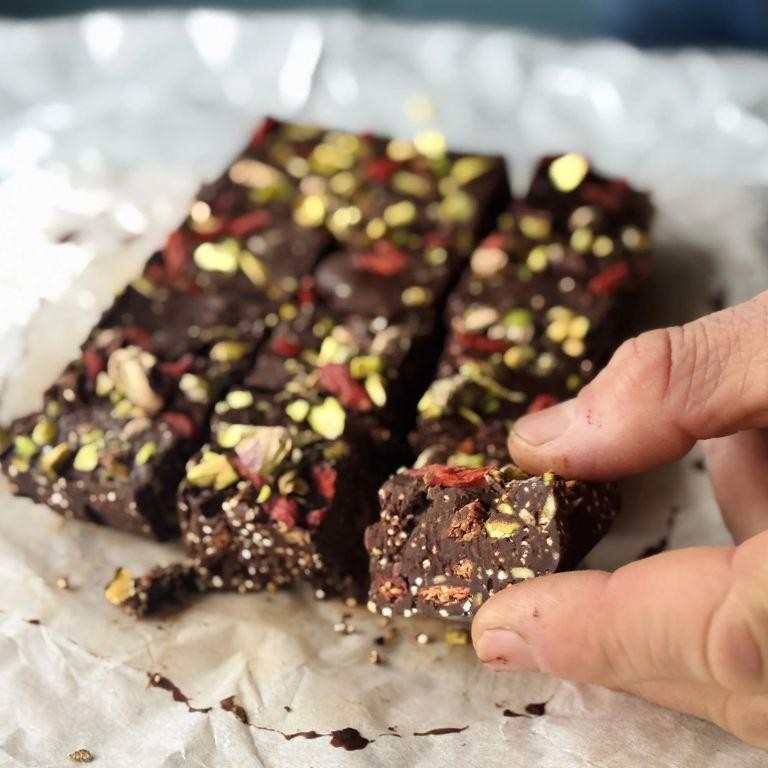
Very few things in life are as reliably delightful as biting into a chocolatey, crunchy energy bar that’s secretly good for you. These Chocolate Kasha Energy Bars are your new best friend for those ‘I need a snack, stat’ moments, packing a punch of flavor and energy without the guilt.
Ingredients
- 1 cup kasha (toasted buckwheat groats) – because who doesn’t love a nutty crunch?
- 1/2 cup almond butter – smooth or crunchy, your call, but I’m team crunchy for the extra texture.
- 1/3 cup honey – the glue that holds our dreams together, literally.
- 1/4 cup cocoa powder – the darker, the better, in my opinion.
- 1 tsp vanilla extract – a splash of liquid gold.
- 1/2 cup dark chocolate chips – because more chocolate is always the answer.
- A pinch of salt – to make all the flavors pop.
Instructions
- Preheat your oven to 350°F and line an 8×8 inch baking pan with parchment paper, leaving some overhang for easy removal.
- In a large bowl, mix the kasha, almond butter, honey, cocoa powder, vanilla extract, and salt until well combined. Tip: If the mixture feels too dry, a splash of warm water can help bring it together.
- Fold in the dark chocolate chips, saving a handful to sprinkle on top for that Instagram-worthy finish.
- Press the mixture firmly into the prepared pan, using the back of a spoon or your hands to compact it evenly. Tip: Wetting your hands slightly prevents the mixture from sticking.
- Sprinkle the reserved chocolate chips on top and press them lightly into the surface.
- Bake for 15 minutes, then let cool completely in the pan before slicing into bars. Tip: For cleaner cuts, chill the bars in the fridge for 30 minutes before slicing.
Absolutely irresistible, these bars strike the perfect balance between chewy and crunchy, with a deep chocolate flavor that’s not too sweet. Serve them alongside your morning coffee for a breakfast that feels like dessert, or pack them for a hike – they’re sturdy enough to survive your backpack.
Kasha with Roasted Butternut Squash and Sage
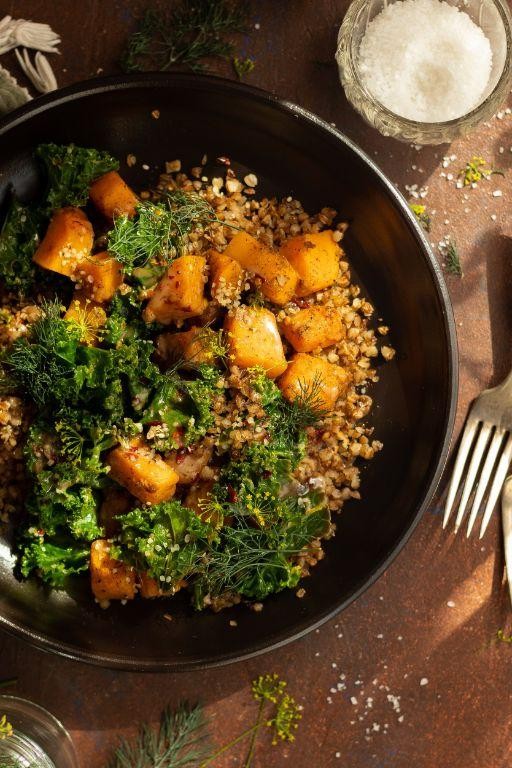
Now, let’s dive into a dish that’s as comforting as your favorite sweater but with a flavor profile that’s anything but basic. Kasha with Roasted Butternut Squash and Sage is the autumnal hug your taste buds didn’t know they needed.
Ingredients
- 1 cup kasha (because who doesn’t love a good crunch?)
- 2 cups butternut squash, cubed (the smaller, the crispier, my friends)
- 2 tbsp extra virgin olive oil (my kitchen MVP)
- 1 tbsp fresh sage, chopped (trust me, fresh makes all the difference)
- 1/2 tsp salt (because seasoning is key)
- 1/4 tsp black pepper (for that little kick)
- 2 cups vegetable broth (homemade if you’re fancy, store-bought if you’re human)
Instructions
- Preheat your oven to 400°F because we’re about to get that squash perfectly roasted.
- Toss the butternut squash cubes with 1 tbsp olive oil, salt, and pepper on a baking sheet. Spread them out like they’re sunbathing for even roasting.
- Roast for 25 minutes or until the edges are caramelized and the squash is tender. Tip: Give them a stir halfway through to prevent any squash drama.
- While the squash is doing its thing, heat the remaining 1 tbsp olive oil in a saucepan over medium heat. Add the kasha and toast for 3 minutes, stirring constantly, until it smells nutty and delicious.
- Pour in the vegetable broth, bring to a boil, then reduce the heat to low. Cover and simmer for 10 minutes. Tip: No peeking! Let the kasha absorb all that brothy goodness.
- Once the kasha is fluffy and the liquid is absorbed, stir in the roasted butternut squash and chopped sage. Tip: The sage adds a fragrant punch, so don’t skip it unless you’re rebelling against flavor.
- Serve warm and watch as this dish becomes the star of your table. The kasha’s earthy tones paired with the sweet, caramelized squash and aromatic sage is a trio that sings in harmony. Perfect for a cozy night in or to impress at your next potluck.
Kasha and Turkey Meatballs in Tomato Sauce
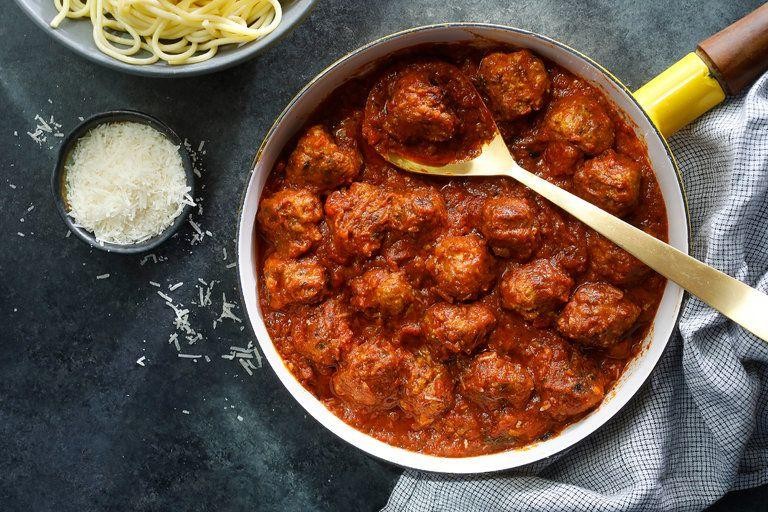
Y’all, if you’re looking for a dish that’s cozy enough for a weeknight but fancy enough to impress your in-laws, look no further. This kasha and turkey meatballs in tomato sauce is the culinary equivalent of a warm hug—comforting, satisfying, and slightly unexpected.
Ingredients
- 1 cup kasha (because who doesn’t love a good crunch?)
- 1 lb ground turkey (the leaner, the meaner, I say)
- 1 egg, room temp (trust me, it mixes better)
- 1/2 cup breadcrumbs (Panko for the win)
- 2 cloves garlic, minced (more if you’re feeling brave)
- 1/4 cup grated Parmesan (the real deal, none of that shakey stuff)
- 1 tbsp extra virgin olive oil (my kitchen staple)
- 24 oz tomato sauce (homemade or jarred, no judgment here)
- 1 tsp dried oregano (because fresh is great, but dried has its moments)
- Salt and pepper to taste (but really, don’t skimp on the salt)
Instructions
- Preheat your oven to 375°F because we’re baking these bad boys to perfection.
- In a large bowl, mix the ground turkey, egg, breadcrumbs, minced garlic, Parmesan, salt, and pepper like you mean it. Tip: Wet your hands to prevent the mixture from sticking.
- Shape the mixture into meatballs, about 1.5 inches in diameter. This should give you about 20 meatballs—enough to share or not.
- Heat the olive oil in a large skillet over medium heat. Brown the meatballs on all sides, about 2 minutes per side. They don’t need to be cooked through, just nicely colored.
- Transfer the meatballs to a baking dish, pour the tomato sauce over them, and sprinkle with oregano. Cover with foil and bake for 20 minutes. Tip: The foil keeps the moisture in, making the meatballs extra tender.
- While the meatballs are baking, cook the kasha according to package instructions. Tip: Toasting the kasha in a dry skillet before adding water brings out its nutty flavor.
- Remove the foil and bake for another 10 minutes, or until the meatballs are cooked through and the sauce is bubbly.
What you’ve got here is a dish where the kasha adds a delightful chewiness against the tender meatballs, all swathed in a rich, herby tomato sauce. Serve it over the kasha for a wholesome meal, or get creative and stuff it into a sub roll for a meatball sandwich that’ll make you the hero of lunchtime.
Kasha Pudding with Mixed Berries and Cream
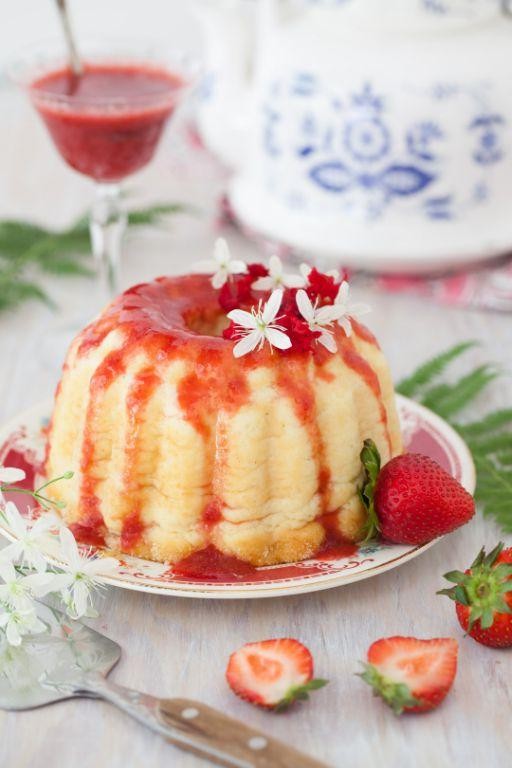
Ready to dive into a bowl of comfort that’s as whimsical as its name? Kasha Pudding with Mixed Berries and Cream is the quirky cousin of your breakfast favorites, blending earthy grains with the sweet-tart pop of berries and the luxurious kiss of cream.
Ingredients
- 1 cup kasha (toasted buckwheat groats) – because raw just doesn’t cut it for that nutty depth.
- 2 cups whole milk – skim is for the birds when we’re indulging.
- 1/4 cup honey – the good stuff, none of that fake syrup business.
- 1 tsp vanilla extract – pure, because imitation is the sincerest form of flattery we don’t need.
- 1 cup mixed berries (fresh or frozen) – because life’s too short to choose just one.
- 1/2 cup heavy cream – whipped to soft peaks, because stiff peaks are overrated.
- A pinch of salt – to make everything else taste better, obviously.
Instructions
- In a medium saucepan, combine kasha and milk. Bring to a gentle boil over medium heat, stirring occasionally to prevent the milk from scorching.
- Reduce heat to low, cover, and simmer for 15 minutes. The kasha should be tender but still have a bit of chew. Tip: Stir once halfway through to ensure even cooking.
- Remove from heat and stir in honey, vanilla extract, and a pinch of salt. Let it sit covered for 5 minutes to meld the flavors. Tip: This is the perfect time to whip your cream to soft peaks.
- Fold in half of the mixed berries into the kasha mixture, reserving the rest for topping.
- Divide the pudding among bowls. Top with a dollop of whipped cream and the remaining berries. Tip: For an extra touch of elegance, drizzle a little honey over the top before serving.
Mmm, the result? A delightful contrast of creamy, chewy, and juicy with every spoonful. Serve it in your fanciest bowls to impress or straight from the pot for maximum comfort—no judgment here.
Conclusion
Now that you’ve explored these 18 delicious kasha recipes, it’s clear how versatile and nutritious this ingredient can be in your kitchen. Whether you’re craving something sweet or savory, there’s a dish here for every taste. We’d love to hear which recipes you try and adore—drop us a comment below! Don’t forget to share your favorites on Pinterest so others can enjoy these wholesome meals too. Happy cooking!