Ever wondered what fueled the fierce Vikings on their legendary voyages? Dive into the past with our collection of 22 Ancient Viking Recipes Historical, where we bring the robust and rustic flavors of the Norse to your modern kitchen. Perfect for home cooks looking to spice up their meal prep with a touch of history, these recipes promise adventure on a plate. Ready to cook like a Viking? Let’s embark on this culinary journey together!
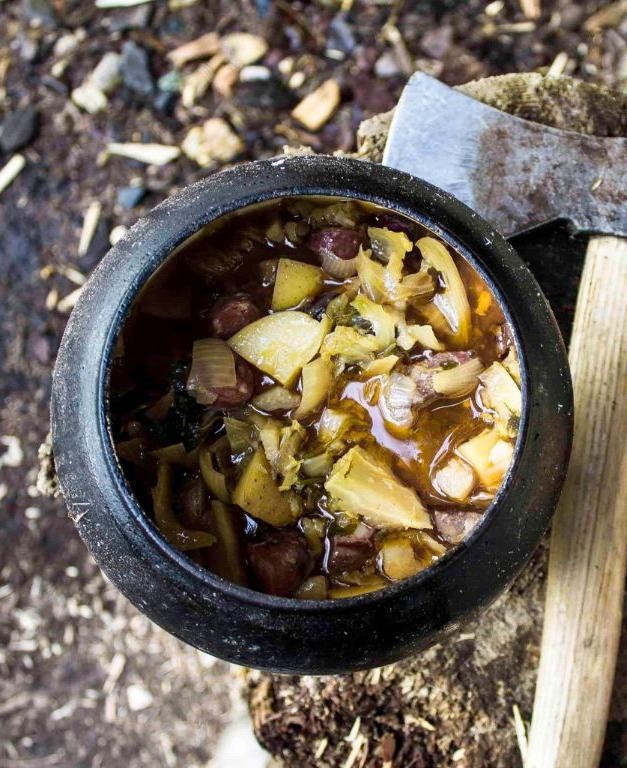
Viking Lamb Stew with Root Vegetables
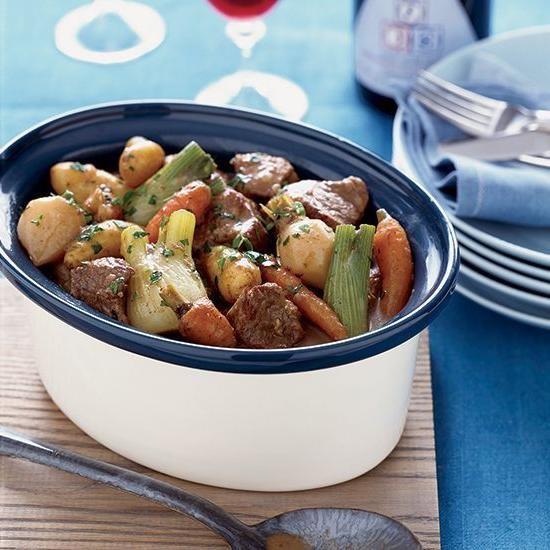
Lamb stews are hearty, but this Viking-inspired version with root vegetables brings a bold twist to the classic. Perfect for chilly evenings, it’s a one-pot wonder that demands attention.
Ingredients
- 2 lbs lamb shoulder, cut into 1-inch cubes (I find shoulder offers the best flavor and tenderness)
- 2 tbsp extra virgin olive oil (my go-to for richness)
- 4 cups beef stock (homemade if you have it, but store-bought works fine)
- 2 large carrots, peeled and chopped into 1-inch pieces (they sweeten as they cook)
- 1 large parsnip, peeled and chopped into 1-inch pieces (adds a nice earthy note)
- 1 large turnip, peeled and chopped into 1-inch pieces (for a slight bitterness that balances the stew)
- 1 large onion, diced (yellow onions are my preference for their sweetness)
- 2 cloves garlic, minced (fresh is best, no substitutes)
- 1 tsp salt (adjust based on your stock’s saltiness)
- 1/2 tsp black pepper (freshly ground packs more punch)
- 1 tbsp fresh thyme leaves (dried works in a pinch, but fresh is brighter)
Instructions
- Heat olive oil in a large pot over medium-high heat until shimmering.
- Add lamb cubes in a single layer, working in batches to avoid overcrowding. Brown on all sides, about 3 minutes per batch. Tip: Don’t rush the browning; it builds flavor.
- Remove lamb and set aside. In the same pot, add onion and garlic. Cook until soft, about 5 minutes.
- Return lamb to the pot. Add carrots, parsnip, turnip, salt, pepper, and thyme. Stir to combine.
- Pour in beef stock, ensuring it covers the ingredients. Bring to a boil.
- Reduce heat to low, cover, and simmer for 1.5 hours. Tip: Check occasionally to ensure it’s not boiling; a gentle simmer is key.
- After 1.5 hours, uncover and simmer for another 30 minutes to thicken the stew. Tip: The lamb should be fork-tender; if not, give it more time.
Perfectly tender lamb mingles with sweet and earthy vegetables in a rich broth. Serve with crusty bread to soak up every last drop, or over a bed of mashed potatoes for extra comfort.
Traditional Viking Flatbread
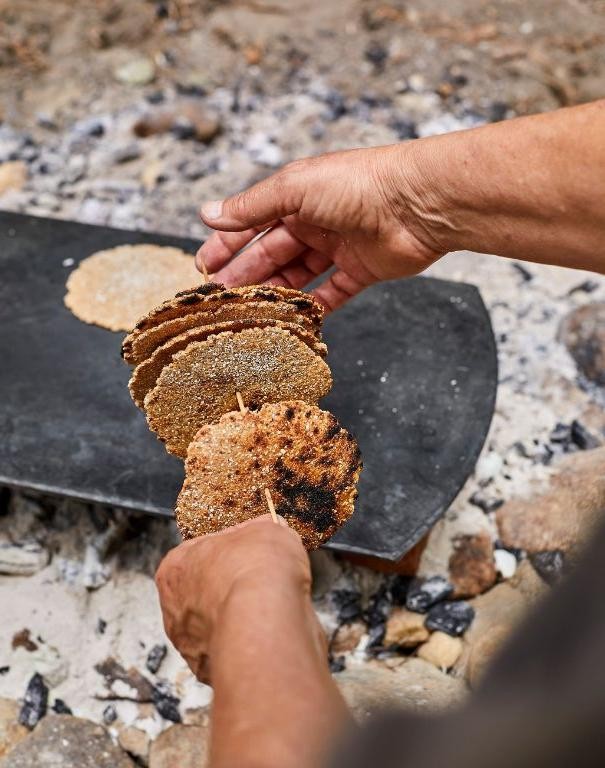
Mixing tradition with simplicity, this Viking flatbread brings a piece of history to your table. It’s sturdy, versatile, and surprisingly easy to make with just a few ingredients.
Ingredients
- 2 cups whole wheat flour – I love the nutty flavor it adds, but all-purpose works in a pinch.
- 1 cup water – Lukewarm is best for easier mixing.
- 1 tbsp extra virgin olive oil – My go-to for a slight richness.
- 1/2 tsp salt – Just enough to enhance the flavors.
Instructions
- In a large bowl, combine the whole wheat flour and salt. Whisk them together to ensure even distribution.
- Add the lukewarm water and extra virgin olive oil to the dry ingredients. Mix until a sticky dough forms. Tip: If the dough feels too dry, add water a tablespoon at a time.
- Knead the dough on a lightly floured surface for about 5 minutes, until smooth and elastic. Tip: Don’t over-knead, or the flatbread will be tough.
- Divide the dough into 4 equal pieces. Roll each piece into a ball, then flatten into a disc about 1/4 inch thick. Tip: For even thickness, use a rolling pin and rotate the dough frequently.
- Heat a dry skillet over medium-high heat (about 375°F). Cook each flatbread for 2-3 minutes per side, until golden brown spots appear.
Fresh off the skillet, this flatbread has a delightful chew with a crisp exterior. Serve it warm with butter or as a base for your favorite toppings.
Honey Glazed Viking Pork Ribs
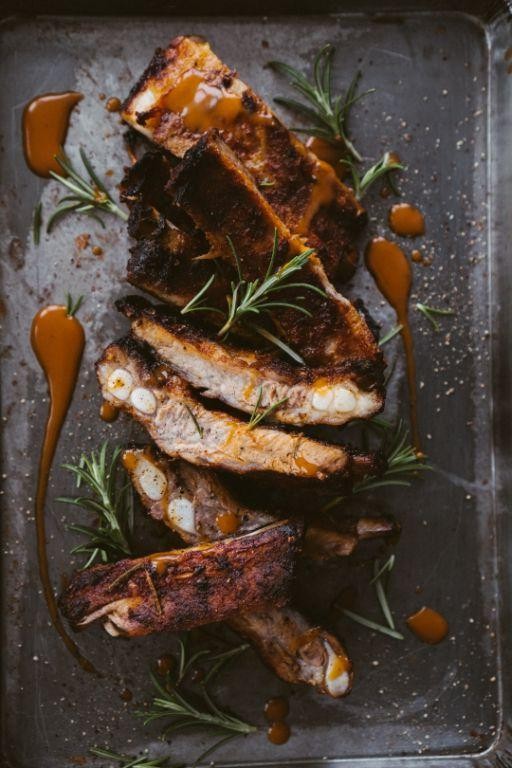
You won’t believe how these Honey Glazed Viking Pork Ribs transform your dinner into a feast. Yet, the recipe is straightforward, promising juicy, fall-off-the-bone ribs every time.
Ingredients
- 2 lbs pork ribs (St. Louis style works best for me)
- 1/2 cup honey (local, raw honey adds a depth of flavor)
- 1/4 cup soy sauce (I swear by low-sodium for better control)
- 2 tbsp apple cider vinegar (adds a nice tang)
- 1 tbsp garlic powder (because fresh is great, but powder sticks better)
- 1 tsp smoked paprika (for that Viking smokiness)
- 1/2 tsp black pepper (freshly ground, always)
Instructions
- Preheat your oven to 300°F. Low and slow is the key here.
- In a bowl, whisk together honey, soy sauce, apple cider vinegar, garlic powder, smoked paprika, and black pepper. Tip: Warm the honey slightly if it’s too thick to mix.
- Place ribs on a baking sheet lined with foil for easy cleanup. Brush both sides generously with the glaze. Tip: Use a silicone brush for even coating.
- Cover tightly with foil and bake for 2 hours. This steams the ribs, making them tender.
- Remove foil, increase oven temperature to 400°F, and bake for another 15 minutes to caramelize the glaze. Tip: Keep an eye on them to prevent burning.
- Let rest for 10 minutes before slicing. This keeps the juices in.
Very tender ribs with a sticky, sweet glaze that has a hint of smokiness. Serve them atop a pile of creamy mashed potatoes for the ultimate comfort dish.
Viking Age Fish Pie with Herbs
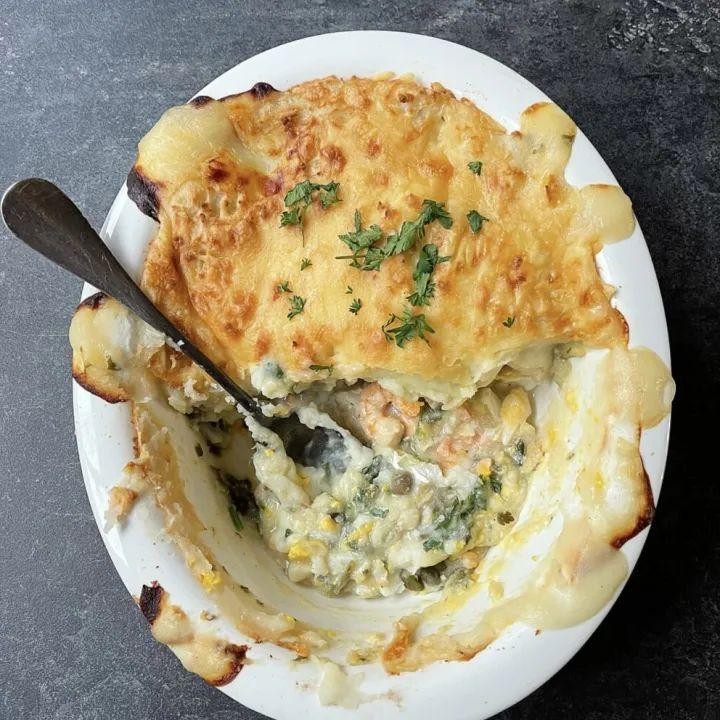
Dive into the heart of Viking cuisine with this robust fish pie, packed with herbs and history. Perfect for a hearty dinner that transports you back in time.
Ingredients
- 2 cups all-purpose flour (I like to sift mine for a lighter crust)
- 1/2 cup unsalted butter, chilled and diced (keep it cold for flakiness)
- 1/4 cup ice water (just enough to bring the dough together)
- 1 lb white fish fillets, cut into chunks (cod works wonderfully)
- 1/2 cup heavy cream (for richness)
- 2 tbsp fresh dill, chopped (the star herb here)
- 1 tbsp fresh thyme leaves (adds a subtle earthiness)
- 1 tsp salt (I prefer sea salt for its clean taste)
- 1/2 tsp black pepper (freshly ground packs more punch)
Instructions
- Preheat your oven to 375°F. A properly heated oven ensures even cooking.
- In a large bowl, mix flour and butter until crumbly. Tip: Use your fingertips for a lighter touch.
- Gradually add ice water, stirring until dough forms. Don’t overwork it.
- Roll out dough on a floured surface to fit your pie dish. Chill for 15 minutes to prevent shrinkage.
- Layer fish chunks in the crust. Sprinkle dill, thyme, salt, and pepper evenly.
- Pour heavy cream over the fish. It should just cover the fish without overflowing.
- Cover with remaining dough, sealing edges. Cut slits on top for steam to escape.
- Bake for 35-40 minutes until golden brown. Tip: Place a baking sheet underneath to catch drips.
- Let rest for 10 minutes before slicing. This helps the filling set.
Golden and aromatic, this pie offers a flaky crust with tender, herb-infused fish inside. Serve with a side of pickled vegetables for an authentic Viking feast.
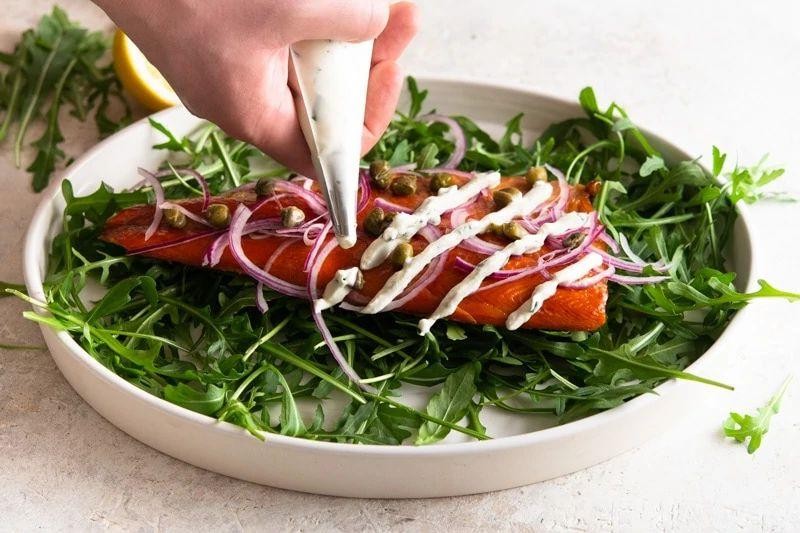
Smoked Viking Salmon with Dill
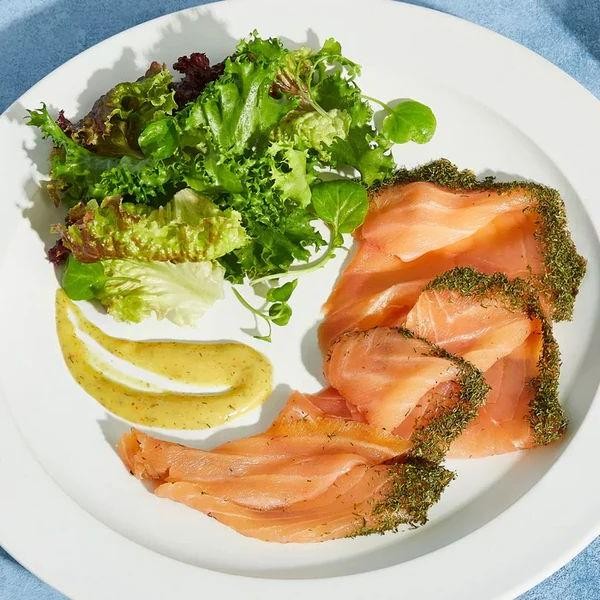
Perfect for a summer evening, this Smoked Viking Salmon with Dill brings a Nordic twist to your table. Its rich flavor and simple preparation make it a standout dish.
Ingredients
- 1 lb Viking salmon fillet (skin-on for extra flavor)
- 2 tbsp coarse sea salt (I love the texture it gives)
- 1 tbsp brown sugar (for a subtle sweetness)
- 1 tsp freshly ground black pepper (freshly ground makes all the difference)
- 1 large bunch of fresh dill (the star of the show)
- 1 cup applewood chips (for that authentic smoky flavor)
Instructions
- Rinse the salmon fillet under cold water and pat dry with paper towels.
- In a small bowl, mix the sea salt, brown sugar, and black pepper.
- Rub the mixture evenly over the salmon fillet, including the skin side.
- Place the salmon on a wire rack over a baking sheet and refrigerate uncovered for 12 hours. Tip: This dry brine step is crucial for flavor and texture.
- Soak the applewood chips in water for at least 30 minutes before smoking.
- Preheat your smoker to 225°F. Tip: Maintaining a consistent temperature is key to perfect smoking.
- Place the salmon in the smoker, skin side down, and arrange the dill on top.
- Smoke the salmon for about 1.5 hours, or until it reaches an internal temperature of 145°F. Tip: Use a meat thermometer to ensure accuracy.
- Remove the salmon from the smoker and let it rest for 10 minutes before serving.
Rich in flavor with a perfectly smoky and slightly sweet profile, this salmon pairs beautifully with a crisp salad or on top of a bagel with cream cheese. The dill adds a fresh, herby note that elevates the dish.
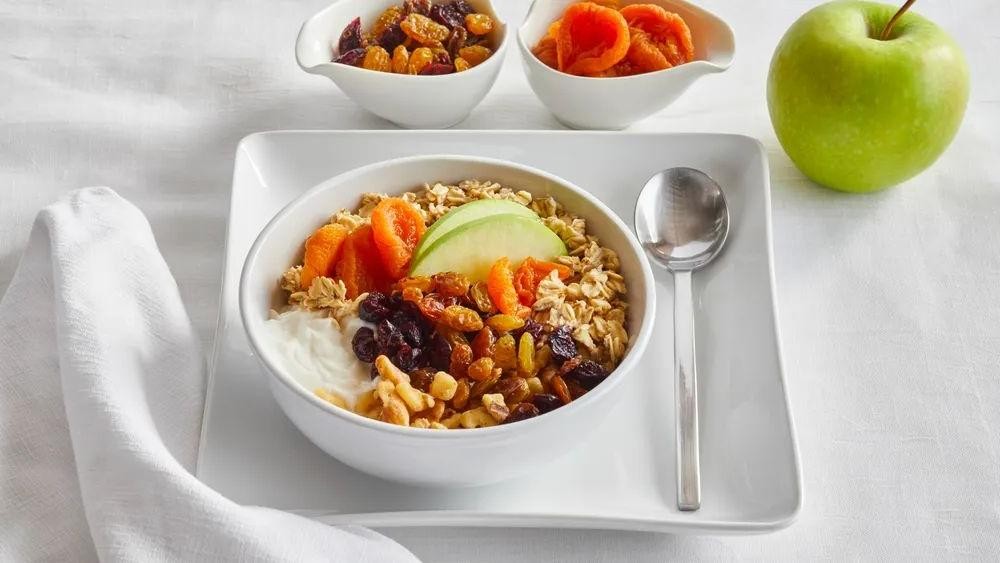
Viking Barley Porridge with Nuts
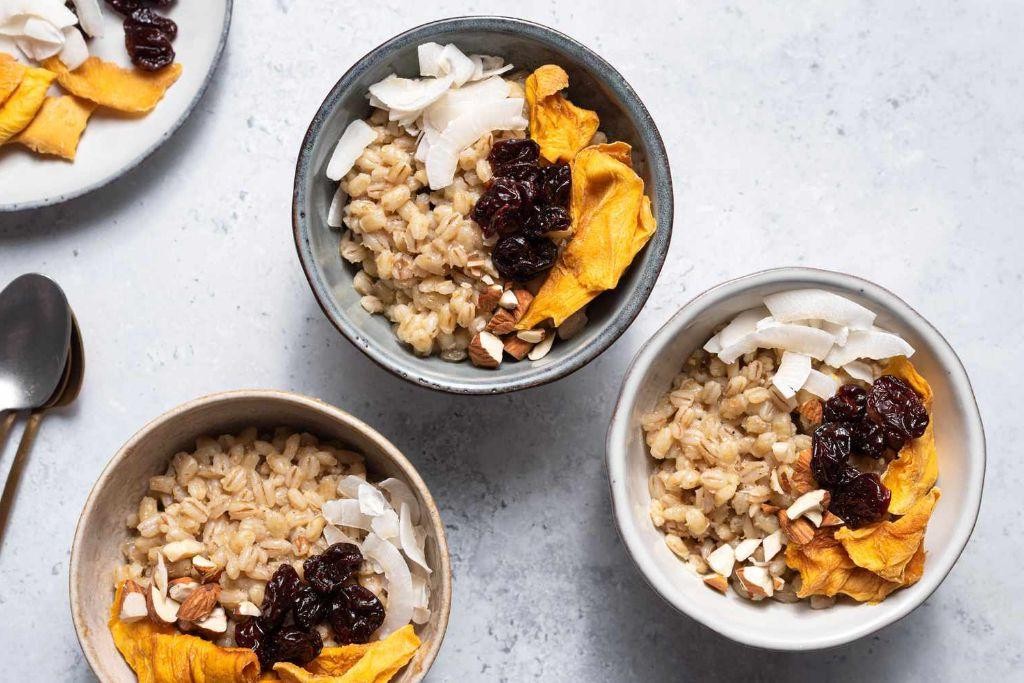
This hearty Viking Barley Porridge with Nuts is a rustic, comforting dish that’s surprisingly simple to make. Try it for a wholesome breakfast or a satisfying snack.
Ingredients
- 1 cup pearl barley (rinsed well to remove any dust)
- 3 cups water (filtered tastes best in my opinion)
- 1/2 tsp salt (I like sea salt for its subtle crunch)
- 1/4 cup mixed nuts (almonds and walnuts are my favorites for their texture)
- 1 tbsp honey (local honey adds a lovely floral note)
- 1/2 tsp cinnamon (a must for that warm spice kick)
Instructions
- In a medium saucepan, combine the rinsed pearl barley and water. Bring to a boil over high heat.
- Once boiling, reduce the heat to low and cover the saucepan. Simmer for 45 minutes, stirring occasionally to prevent sticking.
- After 45 minutes, check the barley for tenderness. It should be soft but still slightly chewy. If needed, cook for an additional 5-10 minutes.
- While the barley cooks, roughly chop the mixed nuts. Toast them in a dry skillet over medium heat for 2-3 minutes until fragrant. Set aside.
- Once the barley is cooked, remove from heat. Stir in the salt, honey, and cinnamon until well combined.
- Serve the porridge warm, topped with the toasted nuts. For extra richness, a drizzle of cream or a pat of butter works wonders.
Expect a creamy yet textured porridge with a nutty sweetness from the honey and a spicy warmth from the cinnamon. Perfect for chilly mornings or as a unique dessert option.
Roasted Viking Venison with Juniper Berries

Unleash the bold flavors of the wilderness with this Roasted Viking Venison dish, enhanced by the aromatic punch of juniper berries. Perfect for those who appreciate a meal with a story and a robust taste.
Ingredients
- 2 lbs venison roast (wild-caught if possible, for that authentic touch)
- 1 tbsp juniper berries (lightly crushed to release their piney essence)
- 2 tbsp extra virgin olive oil (my go-to for its fruity notes)
- 1 tsp sea salt (coarse, for that perfect crunch)
- 1/2 tsp black pepper (freshly ground, because pre-ground just doesn’t cut it)
- 2 cloves garlic (minced, for a sharp kick)
- 1 cup red wine (a bold Cabernet works wonders here)
Instructions
- Preheat your oven to 375°F (190°C) to ensure a perfectly roasted exterior.
- Rub the venison roast with olive oil, then season evenly with salt, pepper, and minced garlic.
- Press the crushed juniper berries onto the surface of the roast for an even distribution of flavor.
- Place the roast on a rack in a roasting pan, then pour the red wine into the bottom of the pan to keep the meat moist.
- Roast for 25 minutes per pound for medium-rare, or until the internal temperature reaches 135°F (57°C). Tip: Use a meat thermometer for accuracy.
- Let the roast rest for 10 minutes before slicing to allow the juices to redistribute. Tip: Cover loosely with foil to keep warm.
- Slice against the grain for the most tender bites. Tip: A sharp knife is your best friend here.
Venison roasted this way is succulent with a slightly gamey depth, balanced by the juniper’s sharpness. Serve atop a bed of wild rice or with roasted root vegetables to complement its earthy tones.
Viking Cabbage and Apple Soup
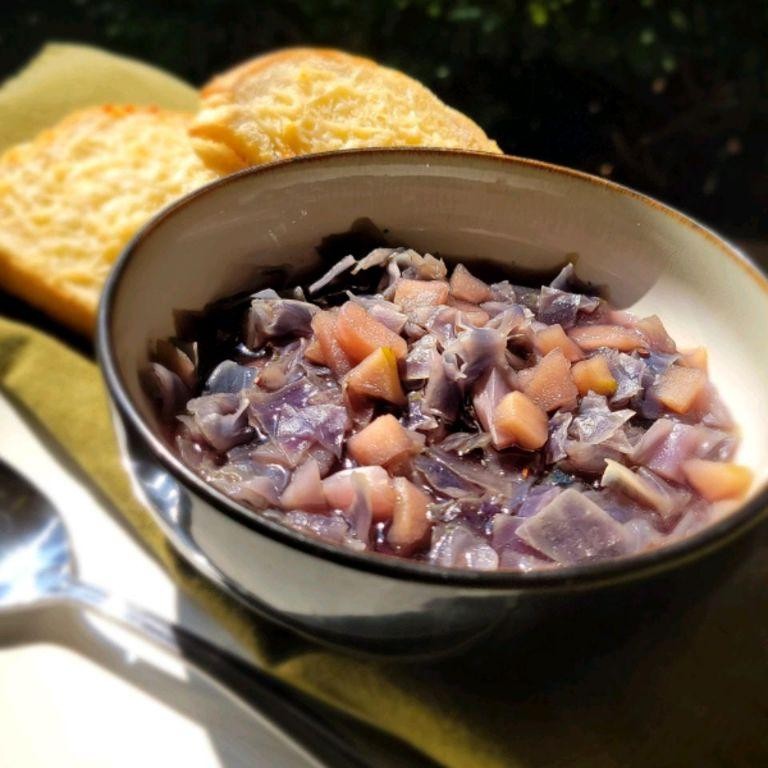
This Viking Cabbage and Apple Soup brings a hearty, ancient flavor to your modern table. Try it for a cozy, nutrient-packed meal.
Ingredients
- 1 tbsp extra virgin olive oil (my go-to for its fruity notes)
- 1 large onion, diced (yellow works best for sweetness)
- 2 cloves garlic, minced (freshly minced packs more punch)
- 1 medium cabbage, shredded (about 6 cups for the perfect crunch)
- 2 apples, cored and diced (I prefer Honeycrisp for balance)
- 4 cups vegetable broth (homemade elevates the flavor)
- 1 tsp caraway seeds (a must for that Viking authenticity)
- Salt and pepper (to your liking, but don’t skimp)
Instructions
- Heat olive oil in a large pot over medium heat until shimmering.
- Add onion and garlic, sauté until translucent, about 5 minutes.
- Stir in cabbage and apples, cook until slightly softened, 5 more minutes.
- Pour in vegetable broth, bring to a boil, then reduce to a simmer.
- Add caraway seeds, salt, and pepper, stir well.
- Simmer uncovered for 20 minutes, stirring occasionally, until cabbage is tender.
- Adjust seasoning if needed, then remove from heat.
Just ladle this soup into bowls for a rustic presentation. The apples add a subtle sweetness, contrasting the earthy cabbage. Serve with a slice of dark rye bread to complete the Viking experience.
Ancient Viking Mead Recipe
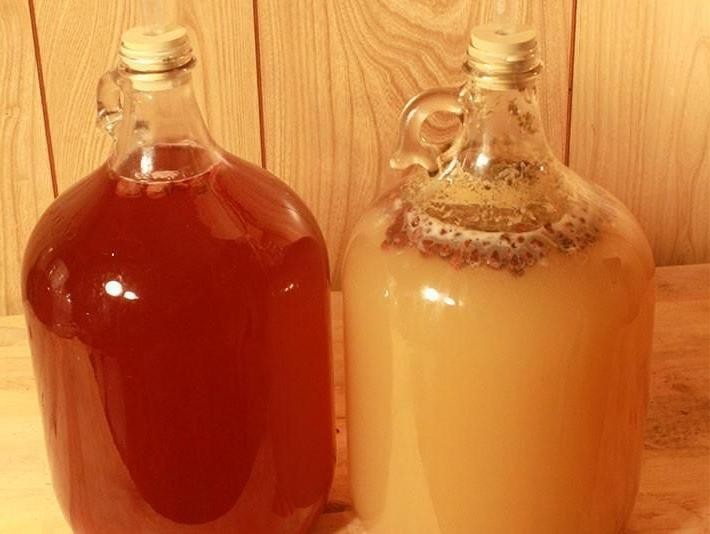
Zesty and bold, this Ancient Viking Mead brings history to your glass with minimal fuss. Perfect for those who appreciate a drink with a story.
Ingredients
- 4 cups of water (filtered tastes best)
- 1 cup of honey (local, raw honey adds depth)
- 1 packet of mead yeast (I swear by Lalvin D47 for its clean finish)
- 1 orange, sliced (unwaxed, for a brighter flavor)
- 1 cinnamon stick (adds a warm spice note)
- 5 cloves (whole, for that authentic kick)
Instructions
- Sanitize all brewing equipment with boiling water to prevent contamination.
- Heat water in a large pot to 160°F, then remove from heat.
- Stir in honey until fully dissolved, creating a must.
- Add orange slices, cinnamon stick, and cloves to the must for flavor.
- Cool the mixture to 70°F before adding yeast to avoid killing it.
- Transfer the must to a fermentation vessel and seal with an airlock.
- Store in a dark, cool place (around 65°F) for 4 weeks.
- After fermentation, siphon the mead into bottles, leaving sediment behind.
- Age bottled mead for at least 3 months for smoother taste.
Vibrant and slightly spicy, this mead improves with age. Serve chilled in horn cups for a true Viking experience.
Viking Beef and Ale Stew

Zesty flavors and hearty ingredients make this Viking Beef and Ale Stew a cold-weather favorite. Bold and robust, it’s a dish that demands attention.
Ingredients
- 2 lbs beef chuck, cut into 1-inch cubes (go for well-marbled pieces for maximum flavor)
- 2 tbsp extra virgin olive oil (my kitchen staple for richness)
- 1 large onion, diced (yellow onions work best for sweetness)
- 3 garlic cloves, minced (fresh is always better)
- 2 cups ale (choose a dark ale for depth)
- 2 cups beef broth (homemade if you have it)
- 3 carrots, sliced into 1-inch pieces (keep them chunky for texture)
- 2 potatoes, cubed (I leave the skin on for rustic appeal)
- 1 tbsp tomato paste (adds a nice umami kick)
- 1 tsp thyme (dried is fine, but fresh thyme sprigs are heavenly)
- Salt and pepper (to season, but be generous)
Instructions
- Heat olive oil in a large pot over medium-high heat until shimmering.
- Season beef cubes with salt and pepper, then brown in batches to avoid crowding. Tip: Don’t rush this step; proper browning equals flavor.
- Remove beef and set aside. In the same pot, sauté onions until translucent, about 5 minutes.
- Add garlic and cook for 1 minute until fragrant. Tip: Garlic burns quickly, so keep an eye on it.
- Stir in tomato paste and thyme, cooking for another minute to meld flavors.
- Return beef to the pot. Pour in ale and beef broth, scraping up any browned bits. Tip: Those bits are flavor gold.
- Bring to a boil, then reduce heat to low. Cover and simmer for 1.5 hours.
- Add carrots and potatoes. Continue simmering uncovered for 30 minutes, or until vegetables are tender.
- Adjust seasoning with salt and pepper before serving.
Kick back with a bowl of this stew, where the beef is fork-tender and the ale-infused broth is deeply satisfying. Serve it with crusty bread to soak up every last drop.
Herbed Viking Goat Cheese
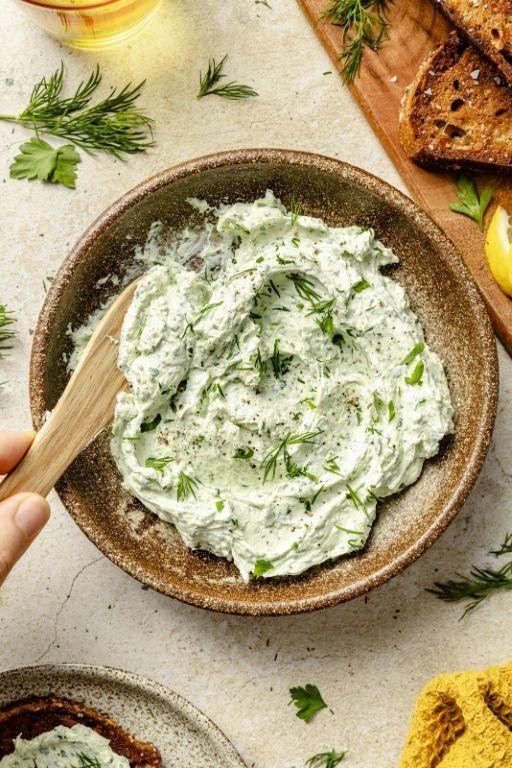
Unusual yet utterly delicious, this Herbed Viking Goat Cheese blends bold flavors with creamy texture. Perfect for those who love a twist on classic cheese spreads.
Ingredients
- 8 oz Viking goat cheese (the creamier, the better)
- 2 tbsp fresh thyme leaves (pluck them right off the stems for maximum flavor)
- 1 tbsp fresh rosemary, finely chopped (don’t skip this—it’s the star)
- 1/4 cup extra virgin olive oil (my go-to for richness)
- 1/2 tsp sea salt (crunchy flakes add texture)
- 1/4 tsp black pepper (freshly ground packs a punch)
Instructions
- Place the Viking goat cheese in a medium bowl. Let it sit at room temperature for 10 minutes to soften.
- Add the thyme leaves, chopped rosemary, olive oil, sea salt, and black pepper to the bowl.
- Mix all ingredients with a fork until well combined. Tip: For a smoother texture, use a hand mixer on low speed.
- Transfer the mixture to a serving dish. Cover and refrigerate for at least 1 hour to let the flavors meld. Tip: Overnight chilling enhances the taste.
- Before serving, let the cheese sit at room temperature for 15 minutes. Tip: This brings out the creamy texture.
Not just a spread, this Herbed Viking Goat Cheese elevates crackers, sandwiches, or even grilled vegetables. Its creamy yet crumbly texture and herby kick make it a versatile favorite.
Viking Rye Bread with Caraway Seeds
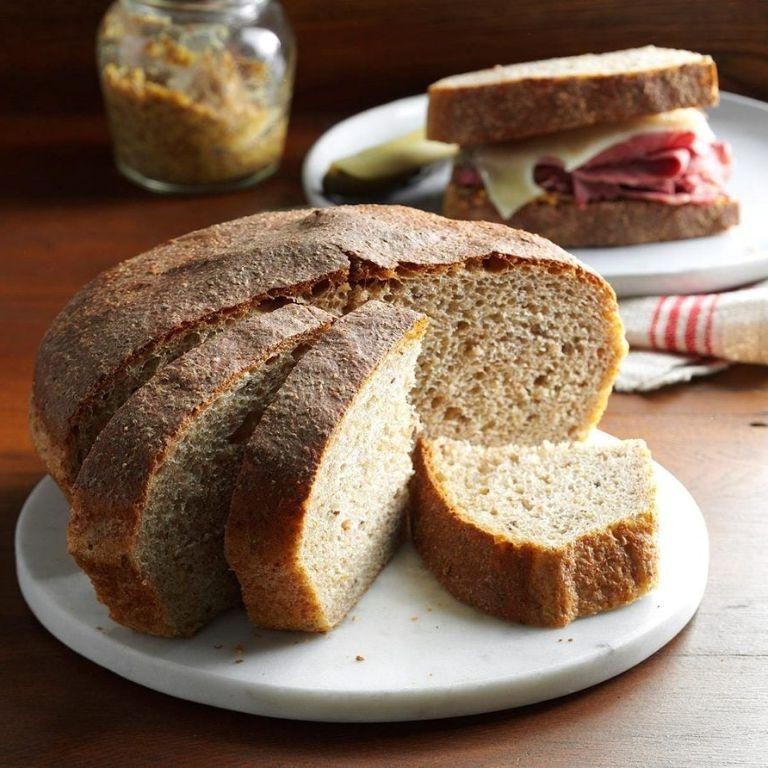
Yield a loaf that’s as hearty as a Viking’s appetite with this rye bread, speckled with caraway seeds for a bold flavor.
Ingredients
- 2 cups rye flour – the darker, the better for a deep flavor.
- 1 cup all-purpose flour – keeps the bread from being too dense.
- 1 tbsp caraway seeds – don’t skimp; they’re the star.
- 1 tsp salt – I like sea salt for its subtle crunch.
- 1 package active dry yeast – make sure it’s fresh for the best rise.
- 1 1/4 cups warm water (110°F) – too hot kills the yeast.
- 1 tbsp honey – a touch of sweetness balances the rye.
- 1 tbsp vegetable oil – keeps the loaf moist.
Instructions
- In a large bowl, mix rye flour, all-purpose flour, caraway seeds, and salt.
- Dissolve yeast and honey in warm water; let sit for 5 minutes until frothy.
- Stir oil into yeast mixture, then pour into dry ingredients.
- Knead dough on a floured surface for 10 minutes until smooth and elastic.
- Place dough in a greased bowl, cover, and let rise in a warm place for 1 hour or until doubled.
- Punch down dough, shape into a loaf, and place on a greased baking sheet.
- Cover and let rise for 30 minutes until puffy.
- Preheat oven to 375°F. Bake bread for 30-35 minutes until golden and sounds hollow when tapped.
- Cool on a wire rack before slicing.
Serve this bread with a smear of butter or as the base for a robust sandwich. The caraway seeds pop with flavor against the hearty rye.
Spiced Viking Apple Cake
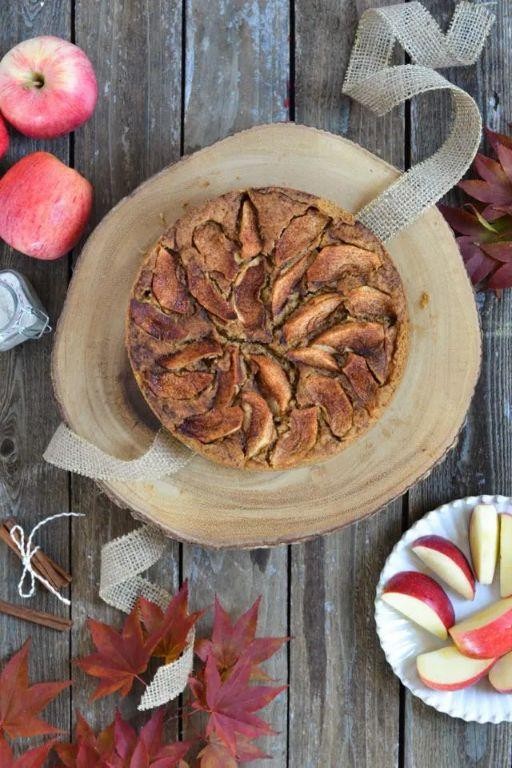
Spiced Viking Apple Cake brings warmth to any table with its rich flavors and hearty texture. Simple to make, it’s a crowd-pleaser that nods to ancient traditions.
Ingredients
- 2 cups all-purpose flour (I swear by King Arthur for consistent results)
- 1 cup granulated sugar (a little extra won’t hurt if you like it sweet)
- 1 tsp baking soda (freshness matters, so check the date)
- 1 tsp cinnamon (go for Ceylon if you can find it)
- 1/2 tsp nutmeg (freshly grated makes a difference)
- 1/2 tsp cloves (ground is fine, but whole cloves freshly ground are magical)
- 1/2 cup unsalted butter, melted (I prefer European-style for richer flavor)
- 2 large eggs (room temp eggs blend smoother)
- 1 tsp vanilla extract (pure extract, not imitation)
- 4 medium apples, peeled and diced (Honeycrisp are my favorite for balance of sweet and tart)
- 1/2 cup chopped walnuts (toasted for extra crunch)
Instructions
- Preheat your oven to 350°F. Grease a 9-inch round cake pan.
- In a large bowl, whisk together flour, sugar, baking soda, cinnamon, nutmeg, and cloves.
- Add melted butter, eggs, and vanilla to the dry ingredients. Mix until just combined.
- Fold in diced apples and walnuts. The batter will be thick.
- Pour batter into the prepared pan. Smooth the top with a spatula.
- Bake for 45 minutes, or until a toothpick inserted comes out clean.
- Let the cake cool in the pan for 10 minutes before transferring to a wire rack.
Just out of the oven, this cake boasts a moist crumb and a spicy aroma. Serve warm with a dollop of whipped cream or a scoop of vanilla ice cream for an indulgent treat.
Viking Pickled Herring
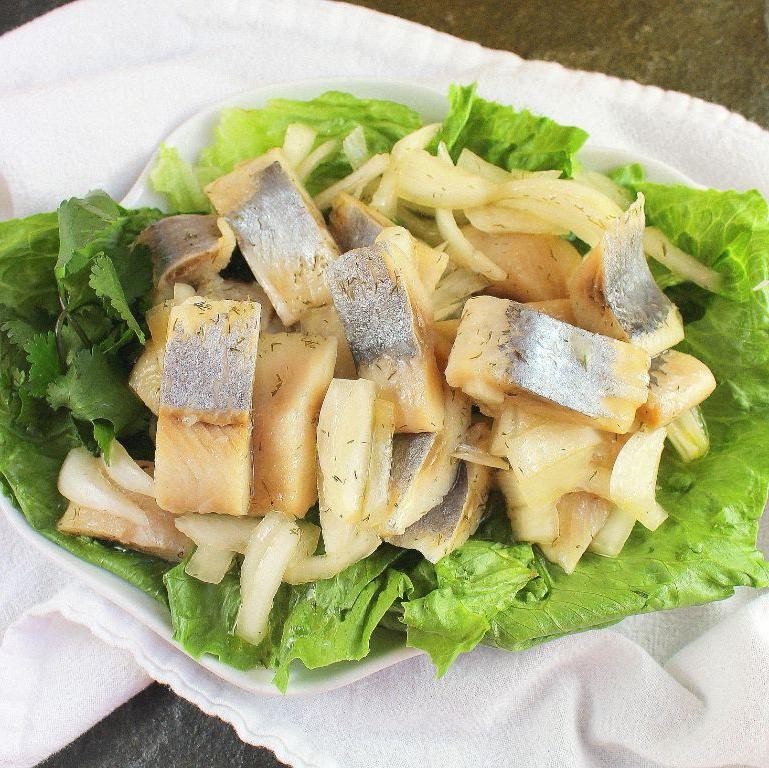
You might think pickled herring is old-school, but this Viking Pickled Herring recipe brings bold flavors that are anything but outdated. Perfect for those who love a tangy, savory bite with a hint of sweetness.
Ingredients
- 2 cups fresh herring fillets, skin-on for extra flavor
- 1 cup white vinegar, the sharper the better in my book
- 1/2 cup sugar, to balance the vinegar’s bite
- 1 tbsp whole black peppercorns, because freshly ground just doesn’t cut it here
- 1 small red onion, thinly sliced for a crisp contrast
- 1 bay leaf, my secret for depth
- 1 tsp salt, to enhance all the flavors
Instructions
- Rinse the herring fillets under cold water. Pat dry with paper towels.
- In a medium saucepan, combine vinegar, sugar, peppercorns, bay leaf, and salt. Bring to a boil over medium heat, stirring until sugar dissolves.
- Remove from heat. Let the brine cool to room temperature, about 30 minutes. Tip: Cooling prevents the herring from cooking further.
- Layer herring fillets and sliced onion in a clean glass jar. Pour the cooled brine over them, ensuring everything is submerged.
- Seal the jar. Refrigerate for at least 48 hours before serving. Tip: The longer it sits, the more flavorful it gets.
- Serve chilled. Tip: Pair with dark rye bread and a dollop of sour cream for an authentic experience.
Perfectly pickled herring offers a firm texture with a melt-in-your-mouth quality. The vinegar and sugar create a lively dance of flavors, while the onion adds a necessary crunch. Try it atop a crisp salad for a surprising twist.
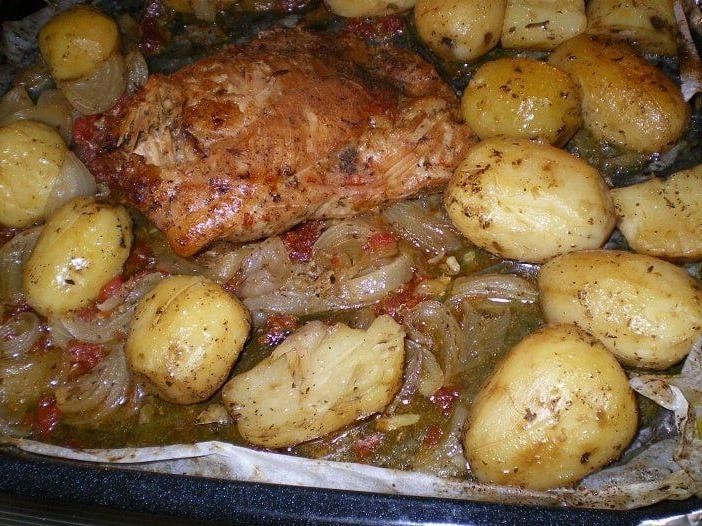
Roast Viking Chicken with Wild Mushrooms
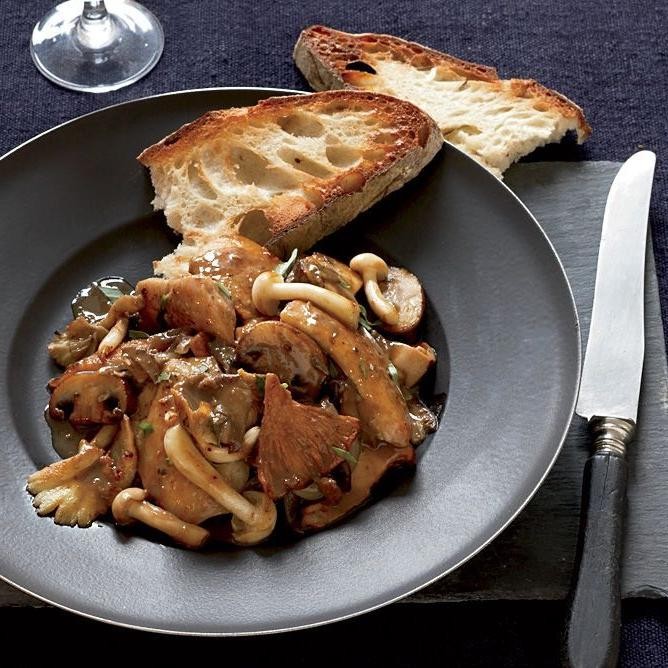
Kickstart your culinary adventure with this hearty dish that’s perfect for any season. Roast Viking Chicken with Wild Mushrooms combines robust flavors with simple techniques for a memorable meal.
Ingredients
- 1 whole chicken (about 4 lbs) – I always pat it dry for crispier skin.
- 2 cups wild mushrooms, sliced – Morels or chanterelles add an earthy depth.
- 3 tbsp extra virgin olive oil – My go-to for richness and flavor.
- 1 tbsp fresh thyme leaves – They’re brighter than dried, in my opinion.
- 1 tsp sea salt – Coarse grains for better texture.
- 1/2 tsp black pepper – Freshly ground packs more punch.
- 2 garlic cloves, minced – Because everything’s better with garlic.
Instructions
- Preheat your oven to 375°F. A hot start ensures even cooking.
- Rub the chicken all over with olive oil. This step is key for golden skin.
- Season the chicken inside and out with salt, pepper, and thyme. Don’t skimp on seasoning.
- Stuff the cavity with minced garlic for infused flavor. Tip: Loosen the skin to tuck some underneath.
- Place the chicken in a roasting pan. Arrange mushrooms around it. They’ll soak up the juices.
- Roast for 90 minutes, or until the internal temperature reaches 165°F at the thigh. Tip: Baste halfway through for extra moisture.
- Let the chicken rest for 10 minutes before carving. This keeps it juicy.
Outcome: The chicken emerges succulent with a crackling skin, while the mushrooms turn velvety and rich. Serve it over a bed of rustic mashed potatoes to catch all the flavorful juices.
Viking Berry Compote with Honey
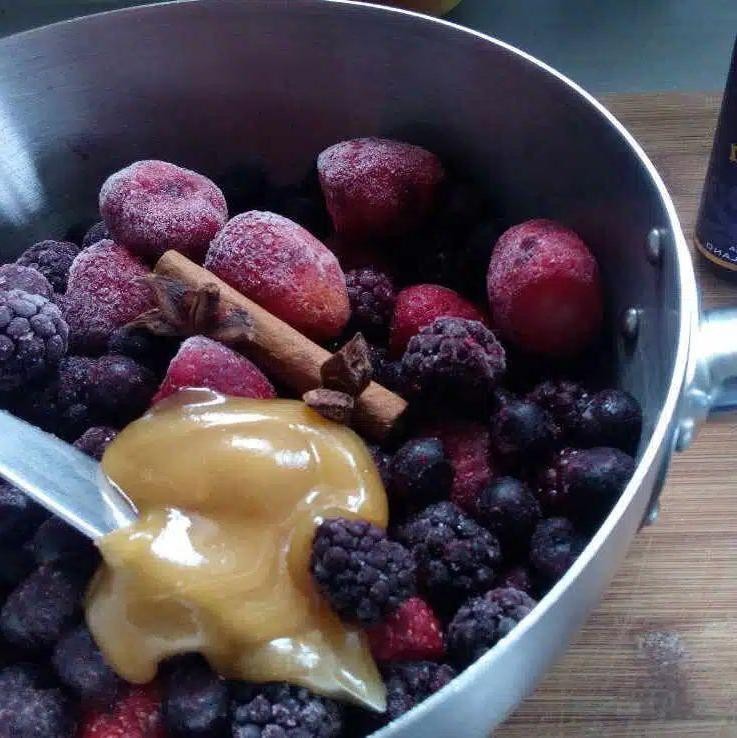
Craving something sweet yet robust? This Viking Berry Compote with Honey is a bold blend of tart and sweet, perfect for topping your morning oats or evening dessert.
Ingredients
- 2 cups mixed berries (fresh or frozen, I love a mix of raspberries, blackberries, and blueberries for depth)
- 1/4 cup honey (local honey adds a lovely floral note)
- 1 tbsp lemon juice (freshly squeezed makes all the difference)
- 1/2 tsp vanilla extract (pure vanilla for that rich aroma)
Instructions
- In a medium saucepan, combine the mixed berries, honey, and lemon juice over medium heat.
- Stir gently until the honey dissolves and the berries start to release their juices, about 5 minutes.
- Reduce heat to low and simmer for 10 minutes, stirring occasionally to prevent sticking. Tip: A wooden spoon is best to avoid crushing the berries.
- Remove from heat and stir in the vanilla extract. Tip: Letting it sit for 5 minutes off the heat enhances the flavors.
- For a smoother compote, lightly mash the berries with the back of a spoon. Tip: Leave some berries whole for texture.
Expect a vibrant, chunky compote with a perfect balance of sweetness and acidity. Drizzle over pancakes or swirl into yogurt for a delightful twist.
Traditional Viking Sausages

Viking sausages bring a hearty, ancient flavor to your modern table. Perfect for those who love bold, meaty dishes with a historical twist.
Ingredients
- 2 lbs ground pork (I find shoulder cuts give the best fat ratio)
- 1 tbsp salt (sea salt is my preference for its clean taste)
- 1 tsp ground black pepper (freshly cracked adds a nice punch)
- 1 tsp ground allspice (this is the secret spice that makes it Viking)
- 1/2 cup ice water (keeps the mixture moist during mixing)
- Natural hog casings, soaked (I like to soak mine in apple cider vinegar for extra flavor)
Instructions
- In a large bowl, combine ground pork, salt, black pepper, and allspice. Mix until spices are evenly distributed.
- Gradually add ice water to the mixture, continuing to mix until the meat becomes sticky and cohesive.
- Prepare your sausage stuffer and attach the hog casings. Fill the casings with the meat mixture, twisting into 6-inch links.
- Preheat your grill to 350°F. Grill sausages for 20 minutes, turning occasionally, until internal temperature reaches 160°F.
- Let sausages rest for 5 minutes before serving to allow juices to redistribute.
Perfectly grilled Viking sausages boast a juicy interior with a smoky, spiced crust. Serve them with a side of pickled vegetables for an authentic Norse feast experience.
Viking Leek and Onion Soup
Lusciously hearty and rooted in simplicity, this Viking Leek and Onion Soup brings a rustic charm to your table with minimal fuss.
Ingredients
- 2 large leeks, white and light green parts only, thinly sliced (I find soaking them in cold water first removes any hidden grit)
- 1 large yellow onion, thinly sliced (sweet onions work wonders here)
- 3 tbsp unsalted butter (extra virgin olive oil is my go-to for a lighter version)
- 4 cups chicken stock (homemade stock elevates the flavor)
- 1 cup heavy cream (room temperature blends smoother)
- Salt and freshly ground black pepper (to season layers as you cook)
Instructions
- Melt butter in a large pot over medium heat until foaming subsides.
- Add leeks and onion, stirring occasionally, until softened and translucent, about 10 minutes.
- Pour in chicken stock, bring to a boil, then reduce heat to simmer for 20 minutes. (Tip: Skim off any foam for a clearer soup.)
- Stir in heavy cream, simmer for another 5 minutes. (Tip: Avoid boiling after adding cream to prevent curdling.)
- Season with salt and pepper, taste and adjust. (Tip: Season in layers for depth of flavor.)
Expect a velvety texture with a sweet, oniony depth. Serve with crusty bread or top with crispy fried onions for contrast.
Smoked Viking Trout with Horseradish
Bold flavors and simple techniques make this Smoked Viking Trout with Horseradish a standout dish. Perfect for a summer evening, it’s smoky, spicy, and utterly satisfying.
Ingredients
– 1 whole Viking trout (about 2 lbs), cleaned and scaled – ask your fishmonger to do this for you.
– 2 tbsp extra virgin olive oil – my go-to for its fruity notes.
– 1 tbsp coarse sea salt – enhances the trout’s natural flavors.
– 1 tsp freshly ground black pepper – for a slight kick.
– 2 tbsp prepared horseradish – go for the creamy kind if you’re not into too much heat.
– 1 lemon, thinly sliced – for a bright, citrusy finish.
– A handful of fresh dill – because its feathery leaves are just beautiful here.
Instructions
1. Preheat your smoker to 225°F – steady and low is the key here.
2. Rub the trout inside and out with olive oil – this helps the seasoning stick.
3. Season the trout generously with salt and pepper – don’t be shy.
4. Spread horseradish inside the trout’s cavity – it’ll infuse the fish with its pungent flavor as it smokes.
5. Place lemon slices and dill inside the trout – they’ll add freshness and aroma.
6. Smoke the trout for about 1.5 hours, or until the flesh flakes easily with a fork – patience rewards you with perfection.
7. Let the trout rest for 5 minutes before serving – this keeps it juicy.
Rustic and robust, the trout’s smoky depth pairs wonderfully with the horseradish’s sharpness. Serve it on a platter with extra lemon wedges and a simple green salad for a meal that’s as beautiful as it is delicious.
Viking Oatmeal with Dried Fruits
Grab your bowls because this Viking Oatmeal with Dried Fruits is a hearty start to any day. It’s packed with energy and flavor, just like the warriors it’s named after.
Ingredients
- 1 cup steel-cut oats – for that perfect chewiness.
- 3 cups water – cold and fresh.
- 1/2 cup mixed dried fruits (apricots, raisins, cranberries) – chop the apricots for even bites.
- 1 tbsp honey – local if you can, for a touch of sweetness.
- 1/4 tsp salt – just a pinch to balance the flavors.
- 1/2 tsp cinnamon – my secret for a warm spice note.
Instructions
- Bring water to a boil in a medium saucepan over high heat.
- Stir in steel-cut oats and salt, then reduce heat to low. Simmer uncovered for 25 minutes, stirring occasionally to prevent sticking.
- While oats cook, chop dried apricots into small pieces. Mix with raisins and cranberries.
- After 25 minutes, stir in dried fruits and cinnamon. Cook for another 5 minutes until fruits soften slightly.
- Remove from heat. Drizzle honey over the top and stir well to combine.
- Let stand for 2 minutes before serving to thicken up.
Enjoy the creamy texture with bursts of sweet fruit in every spoonful. Try topping with a dollop of yogurt for extra creaminess.
Ancient Viking Garlic Butter

Wondering how to bring a taste of the Vikings to your modern kitchen? This Ancient Viking Garlic Butter is bold, simple, and packed with flavor. Perfect for slathering on bread or melting over steak.
Ingredients
- 1 cup unsalted butter (I always use grass-fed for its richer flavor)
- 4 cloves garlic, minced (fresh is key here—no jarred stuff)
- 1 tbsp fresh thyme leaves (dried works in a pinch, but fresh is best)
- 1/2 tsp sea salt (I like the subtle crunch of flaky Maldon salt)
- 1/4 tsp black pepper, freshly ground
Instructions
- Let the butter sit at room temperature for 30 minutes until soft but not melted.
- In a small bowl, combine the softened butter, minced garlic, thyme leaves, sea salt, and black pepper.
- Mix vigorously with a fork until all ingredients are fully incorporated and the butter is fluffy. Tip: For extra flavor, let the mixture sit for 10 minutes before serving to allow the garlic to mellow.
- Transfer the garlic butter to a ramekin or roll it into a log using parchment paper for easy storage. Tip: If rolling, chill for 30 minutes before slicing.
- Store in the refrigerator for up to 1 week or freeze for longer storage. Tip: Freeze slices on a tray before bagging to prevent sticking.
Unbelievably creamy with a punch of garlic, this butter transforms any dish. Try it melted over roasted vegetables or as a base for garlic bread.
Viking Wild Boar Roast with Herbs
Outstanding for a hearty feast, this Viking Wild Boar Roast with Herbs brings bold flavors to your table. Perfect for those who love a rustic, meaty dish with a herbaceous kick.
Ingredients
- 3 lbs wild boar roast (fresh or thawed, the fresher the better)
- 2 tbsp extra virgin olive oil (my go-to for richness)
- 1 tbsp coarse sea salt (for that perfect crust)
- 1 tsp black pepper (freshly ground, it makes a difference)
- 4 garlic cloves, minced (because garlic is life)
- 1 tbsp fresh rosemary, chopped (for that piney aroma)
- 1 tbsp fresh thyme leaves (adds a subtle earthiness)
- 1 cup red wine (a robust Cabernet works wonders)
Instructions
- Preheat your oven to 325°F. A steady, low heat ensures even cooking.
- Pat the wild boar roast dry with paper towels. Dry meat browns better.
- Rub the roast all over with olive oil. This helps the herbs stick.
- Mix salt, pepper, garlic, rosemary, and thyme in a bowl. Massage this mix onto the roast.
- Place the roast on a rack in a roasting pan. Elevating it prevents steaming.
- Roast for 2.5 hours, or until the internal temp hits 145°F. Use a meat thermometer for accuracy.
- Remove the roast from the oven. Let it rest for 15 minutes. Resting redistributes juices.
- While resting, deglaze the pan with red wine over medium heat. Scrape up the browned bits for a flavorful sauce.
- Slice the roast against the grain. Serve with the pan sauce drizzled over.
Hearty and aromatic, this roast boasts a tender interior with a crispy, herb-crusted exterior. Pair it with roasted root vegetables or a simple arugula salad for a complete meal.
Conclusion
Viking cuisine offers a unique glimpse into the past, blending history with hearty flavors perfect for today’s home cooks. We hope these 22 ancient recipes inspire your next culinary adventure. Don’t forget to leave a comment with your favorite dish and share this delicious journey through time on Pinterest. Happy cooking!