There’s something truly magical about Korean cuisine—its vibrant flavors, comforting dishes, and the simplicity with which you can bring them into your kitchen. Whether you’re craving the spicy kick of kimchi or the savory sweetness of bulgogi, our roundup of 22 simple and easy Korean recipes is your ticket to delicious meals any night of the week. Dive in and discover how effortless it can be to spice up your cooking routine!
Kimchi Fried Rice
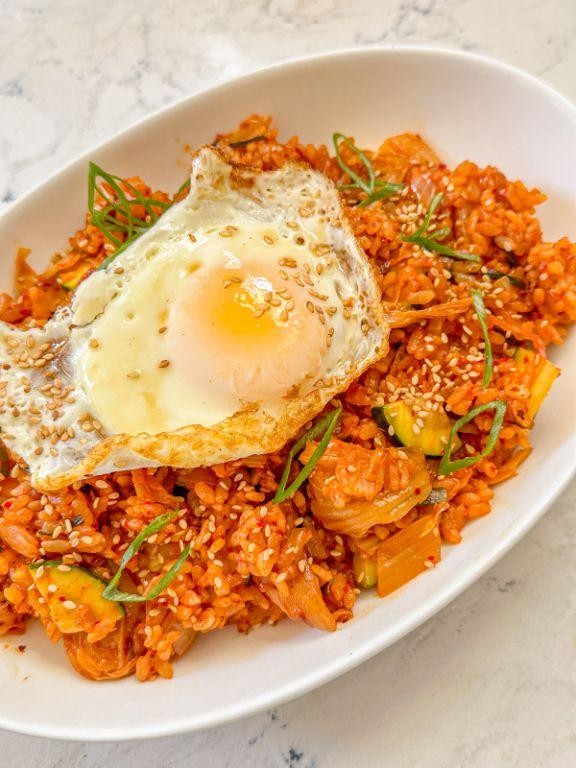
Now, as the quiet of the evening settles in, let’s turn our attention to a dish that’s both comforting and vibrant—kimchi fried rice. It’s a humble yet bold meal that brings together the tangy punch of fermented kimchi with the soothing warmth of rice, a perfect harmony of flavors for any night.
Ingredients
- 2 cups of day-old rice (I find that slightly dry rice fries up the best, giving each grain its moment to shine.)
- 1 cup of kimchi, chopped (The more fermented, the better—its deep, complex flavors are the soul of this dish.)
- 2 tablespoons of kimchi juice (Don’t skip this; it’s liquid gold for flavor.)
- 2 tablespoons of sesame oil (My go-to for that nutty aroma that fills the kitchen.)
- 1 tablespoon of soy sauce (A dash adds depth, but feel free to adjust based on your kimchi’s saltiness.)
- 2 eggs (Room temperature eggs blend more smoothly into the rice.)
- 1 green onion, thinly sliced (For a fresh crunch that contrasts beautifully with the soft rice.)
- 1 teaspoon of sugar (Just a pinch to balance the tanginess.)
Instructions
- Heat a large skillet or wok over medium-high heat and add the sesame oil, swirling to coat the pan evenly.
- Add the chopped kimchi and stir-fry for about 2 minutes, until it starts to soften and release its aromas.
- Pour in the kimchi juice and sprinkle the sugar over the kimchi, stirring to combine. Let it simmer for 1 minute to meld the flavors.
- Add the day-old rice to the skillet, breaking up any clumps with the back of your spoon. Tip: Use a pressing and folding motion to evenly distribute the kimchi without mashing the rice.
- Drizzle the soy sauce over the rice and continue to stir-fry for another 3 minutes, ensuring every grain is coated and heated through.
- Push the rice to one side of the skillet and crack the eggs into the empty space. Scramble them lightly, then fold into the rice once they’re just set. Tip: For a silkier texture, you can create a well in the center of the rice for the eggs.
- Remove from heat and sprinkle with sliced green onions. Tip: Let the residual heat wilt the onions slightly for a milder flavor.
Vibrant and hearty, this kimchi fried rice boasts a delightful contrast of textures—chewy rice, crispy bits of kimchi, and fluffy eggs. Serve it straight from the skillet for a rustic touch, or top with a fried egg for an extra layer of richness.
Bibimbap
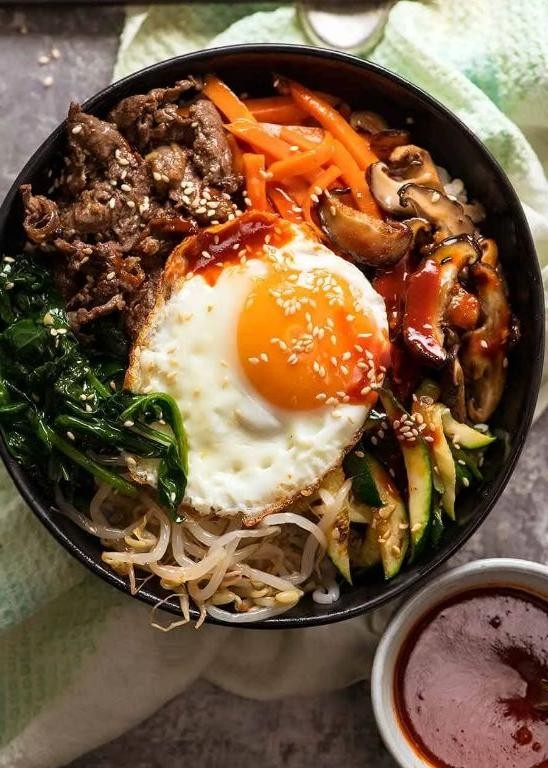
Under the soft glow of the kitchen light, there’s something deeply comforting about assembling bibimbap, a dish that feels like a quiet conversation between colors and textures. It’s a moment to pause, to layer each component with care, and to appreciate the harmony of simple, vibrant ingredients coming together.
Ingredients
- 1 cup short-grain rice (I find the stickiness of short-grain rice holds the dish together beautifully)
- 2 tbsp sesame oil (extra virgin, for its deep, nutty aroma)
- 1 tbsp soy sauce (I lean towards low-sodium to control the saltiness)
- 1 carrot, julienned (for a sweet crunch)
- 1 zucchini, julienned (adds a fresh, light texture)
- 1 cup spinach (lightly wilted, it brings a tender contrast)
- 2 eggs (room temperature, they fry more evenly)
- 1 tbsp gochujang (adjust according to your heat preference)
- 1 tsp sugar (just a hint to balance the flavors)
- 1/2 lb beef, thinly sliced (I prefer ribeye for its tenderness)
Instructions
- Rinse the rice under cold water until the water runs clear, then cook according to package instructions. Tip: Let it sit for 10 minutes after cooking for the perfect texture.
- While the rice cooks, heat 1 tbsp sesame oil in a pan over medium heat. Add the beef and soy sauce, cooking until just browned, about 3-4 minutes. Set aside.
- In the same pan, add a bit more oil if needed, and sauté the carrots and zucchini separately, each for about 2 minutes, until slightly softened but still crisp. Tip: Keep them vibrant by not overcooking.
- Briefly wilt the spinach in the pan, about 30 seconds, then remove. Tip: A quick squeeze of lemon juice can brighten the greens.
- Fry the eggs sunny-side up in the remaining oil, aiming for runny yolks.
- In a bowl, mix the gochujang with sugar and a splash of water to make a smooth sauce.
- Assemble the bibimbap by placing rice at the bottom of a bowl, arranging the beef and vegetables on top, and finishing with the egg. Drizzle with the sauce and remaining sesame oil.
Gently mixing everything together, the bibimbap transforms into a mosaic of flavors, each bite offering a different combination. The creamy yolk mingles with the spicy sauce, while the vegetables provide a crisp counterpoint. Serve it with a side of kimchi for an extra layer of complexity.
Tteokbokki
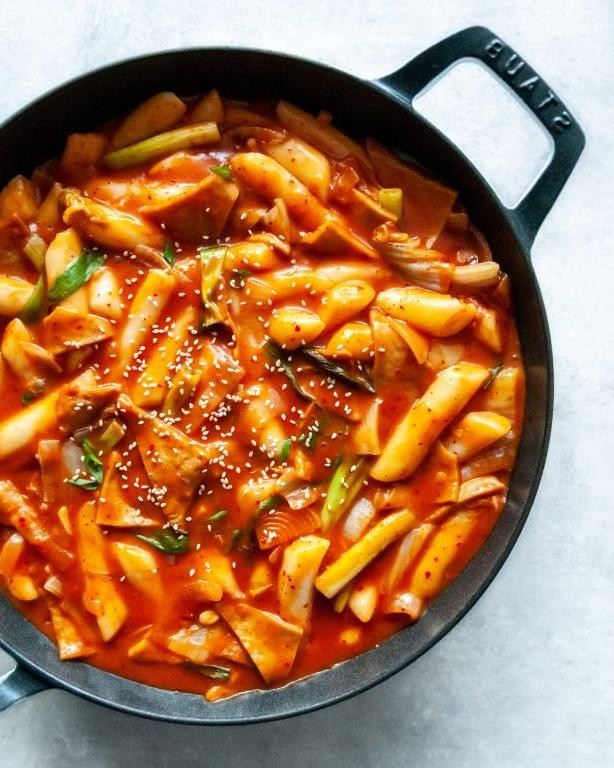
Today, as the soft glow of the morning light filters through my kitchen window, I find myself drawn to the comforting embrace of Tteokbokki, a dish that whispers tales of warmth and spice in every bite. It’s a humble yet vibrant dish that has cradled many of my quiet evenings, its chewy rice cakes and fiery sauce a testament to the beauty of simplicity.
Ingredients
– 1 pound of cylindrical rice cakes (I like to soak them in cold water for about 10 minutes to soften them up)
– 2 cups of water (filtered, if you’re like me and can taste the difference)
– 1/4 cup of gochujang (Korean red chili paste; the heart and soul of the dish)
– 1 tablespoon of sugar (just a touch to balance the heat)
– 1 tablespoon of soy sauce (I reach for the low-sodium kind to keep things in check)
– 1 teaspoon of minced garlic (because everything’s better with garlic)
– 1 green onion, thinly sliced (for that fresh, crisp finish)
– 1 teaspoon of sesame oil (my secret weapon for depth of flavor)
– 1/2 teaspoon of sesame seeds (because they make everything look prettier)
Instructions
1. In a medium saucepan, combine the water, gochujang, sugar, soy sauce, and minced garlic. Stir over medium heat until the gochujang dissolves completely, about 2 minutes.
2. Add the rice cakes to the saucepan, ensuring they’re submerged in the sauce. Bring to a gentle boil, then reduce the heat to low and simmer for 5 minutes, stirring occasionally to prevent sticking.
3. After 5 minutes, check the rice cakes for doneness; they should be tender but still pleasantly chewy. If they’re too firm, simmer for an additional 2 minutes.
4. Once the rice cakes are cooked to your liking, stir in the sesame oil and half of the sliced green onions, reserving the rest for garnish.
5. Remove from heat and transfer to a serving bowl. Sprinkle with the remaining green onions and sesame seeds.
6. Serve immediately, while the sauce is still bubbling and fragrant. Let the first bite transport you to the bustling streets of Seoul, where the air is thick with the scent of spices and the promise of culinary adventure. Linger over the dish, savoring the way the heat builds slowly, the chewiness of the rice cakes contrasting beautifully with the slick, spicy sauce. It’s a dish that invites you to slow down, to taste, to remember.
Bulgogi

Yesterday, I found myself lost in the quiet of the kitchen, the subtle aromas of soy and sesame weaving through the air as I prepared a dish that feels like a hug—Bulgogi. It’s a simple yet profound pleasure, the way the flavors meld together, offering warmth and comfort with every bite.
Ingredients
- 1.5 lbs thinly sliced beef ribeye (the marbling is key for tenderness)
- 1/2 cup soy sauce (I reach for the low-sodium version to control the saltiness)
- 3 tbsp brown sugar (it caramelizes beautifully)
- 2 tbsp sesame oil (toasted, for that deep, nutty essence)
- 3 cloves garlic, minced (because garlic is life)
- 1 small Asian pear, grated (it tenderizes the meat like magic)
- 1 tbsp grated ginger (freshly grated makes all the difference)
- 2 green onions, thinly sliced (for a pop of color and freshness)
- 1 tbsp sesame seeds (toasted, for a final sprinkle of crunch)
Instructions
- In a large bowl, whisk together the soy sauce, brown sugar, sesame oil, minced garlic, grated Asian pear, and grated ginger until the sugar dissolves completely.
- Add the thinly sliced beef to the marinade, ensuring each piece is well-coated. Cover and refrigerate for at least 1 hour, though overnight marinating brings out deeper flavors.
- Heat a large skillet or grill pan over medium-high heat until a drop of water sizzles upon contact.
- Working in batches to avoid overcrowding, cook the beef for 2-3 minutes per side, until caramelized and cooked through. Tip: Resist the urge to move the meat too soon; letting it sear properly ensures those deliciously crispy edges.
- Transfer the cooked beef to a serving plate, garnishing with sliced green onions and toasted sesame seeds.
Delightfully tender with a perfect balance of sweet and savory, this Bulgogi is a testament to the beauty of simplicity. Serve it wrapped in crisp lettuce leaves for a refreshing contrast, or atop a steaming bowl of rice to soak up every last drop of its flavorful juices.
Japchae
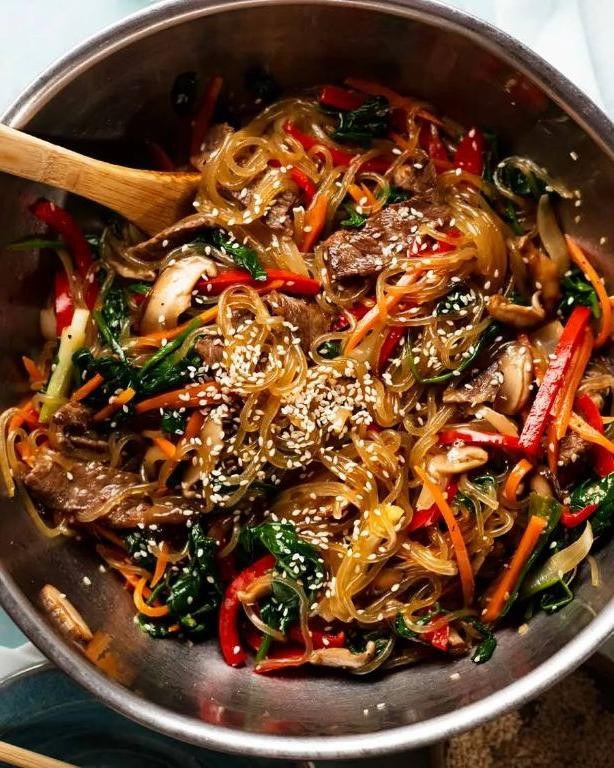
Beneath the soft glow of the kitchen light, japchae whispers stories of tradition and comfort, its glass noodles shimmering like threads of gold. This dish, a harmonious blend of textures and flavors, invites you to slow down and savor each bite, much like the gentle unfolding of a quiet evening.
Ingredients
- 8 oz sweet potato noodles (I love how they turn translucent and chewy when cooked)
- 2 tbsp sesame oil (the aroma is simply irresistible)
- 1 tbsp soy sauce (I opt for low-sodium to control the saltiness)
- 1 tbsp sugar (just a hint to balance the flavors)
- 1 clove garlic, minced (freshly minced makes all the difference)
- 1 cup spinach (lightly wilted, it adds a beautiful green contrast)
- 1 carrot, julienned (for a slight crunch and sweetness)
- 1/2 onion, thinly sliced (they caramelize beautifully)
- 2 eggs, beaten (I let them sit at room temperature for a fluffier omelet)
- 1 tbsp vegetable oil (for a neutral cooking base)
- Sesame seeds for garnish (a sprinkle adds a nice finish)
Instructions
- Soak the sweet potato noodles in warm water for 30 minutes until pliable. Tip: Don’t skip soaking; it ensures even cooking.
- In a small bowl, mix sesame oil, soy sauce, sugar, and minced garlic to create the sauce. Set aside.
- Blanch the spinach in boiling water for 30 seconds, then rinse under cold water. Squeeze out excess water and set aside.
- Heat vegetable oil in a pan over medium heat. Add the beaten eggs, swirling to form a thin layer. Cook for 2 minutes until set, then flip and cook for another minute. Roll the omelet and slice into thin strips.
- In the same pan, sauté onion and carrot for 3 minutes until slightly softened.
- Drain the noodles and add to the pan with the vegetables. Pour the sauce over and toss gently to coat. Cook for 5 minutes, stirring occasionally.
- Add the spinach and egg strips, tossing gently to combine. Tip: Use tongs for easy mixing without breaking the noodles.
- Garnish with sesame seeds before serving. Tip: Toasting the sesame seeds lightly enhances their flavor.
Gently twirl the japchae onto a plate, and watch as the noodles catch the light, their glossy sheen promising a dish that’s as delightful to eat as it is to behold. The interplay of savory, sweet, and nutty flavors, paired with the varied textures, makes each forkful a small celebration.
Korean Fried Chicken

Beneath the golden glow of the kitchen light, there’s something deeply comforting about the crisp, savory allure of Korean Fried Chicken. It’s a dish that carries the warmth of shared meals and the joy of discovering flavors that dance between sweet, spicy, and utterly irresistible.
Ingredients
- 2 lbs chicken wings (I find that wings have the perfect balance of meat and crispiness)
- 1 cup potato starch (for that unbeatable crunch)
- 1/2 cup all-purpose flour (a trusty companion in the frying process)
- 1 tbsp ginger, minced (freshly grated brings a bright, zesty note)
- 3 cloves garlic, minced (because garlic is the soul of flavor)
- 1/2 cup soy sauce (I reach for the low-sodium version to control the saltiness)
- 1/4 cup honey (for a natural sweetness that glazes beautifully)
- 2 tbsp gochujang (Korean chili paste, the heart of the dish’s spice)
- 1 tbsp sesame oil (a drizzle of this adds depth)
- Vegetable oil for frying (enough to submerge the wings, about 4 cups)
Instructions
- In a large bowl, mix the chicken wings with potato starch and all-purpose flour until evenly coated. Let them sit for 10 minutes to adhere the coating better.
- Heat vegetable oil in a deep fryer or large pot to 350°F. Use a thermometer to ensure accuracy for the perfect fry.
- Fry the wings in batches for about 8-10 minutes until golden brown and crispy. Avoid overcrowding to maintain oil temperature.
- While the wings fry, combine soy sauce, honey, gochujang, minced ginger, and garlic in a saucepan over medium heat. Stir until the sauce thickens slightly, about 5 minutes.
- Once the wings are fried, toss them in the sauce until fully coated. A gentle fold ensures every nook gets flavored without losing crispiness.
- Drizzle with sesame oil before serving for an aromatic finish.
Soaking in the sauce, each bite of the chicken offers a symphony of textures—crispy, sticky, and tender. Serve it atop a bed of steamed rice with pickled radishes on the side for a contrast that elevates the meal from great to unforgettable.
Samgyeopsal
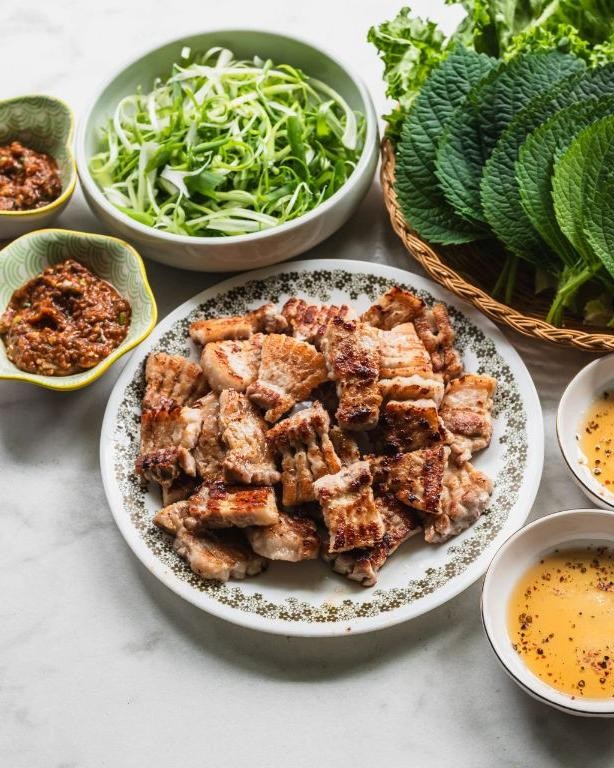
Yearning for something simple yet profoundly satisfying, I often find myself drawn to the humble elegance of Samgyeopsal. It’s a dish that speaks to the soul, offering a moment of pause in our bustling lives, a reminder of the joy found in simplicity.
Ingredients
- 1 lb pork belly slices (I look for slices with a good balance of fat and meat, about 1/4 inch thick)
- 2 tbsp coarse sea salt (the crunch it adds is irreplaceable)
- 1 tbsp sesame oil (my secret for a nutty aroma)
- 1/2 cup ssamjang (a Korean fermented soybean paste that’s my go-to for depth of flavor)
- 1 head of fresh lettuce (I prefer Bibb or romaine for their crispness and ease of wrapping)
- 2 cloves garlic, thinly sliced (because garlic makes everything better)
- 1 green onion, finely chopped (for a fresh, sharp contrast)
Instructions
- Preheat a large, heavy skillet over medium-high heat until a drop of water sizzles upon contact, about 5 minutes.
- Lay the pork belly slices in the skillet without overlapping. Cook for 3 minutes on each side, or until golden brown and crispy edges form.
- Sprinkle the coarse sea salt evenly over the cooked pork belly right in the skillet, allowing the residual heat to meld the flavors.
- Transfer the pork belly to a serving plate. Drizzle with sesame oil for an aromatic finish.
- Serve immediately with ssamjang, fresh lettuce leaves, sliced garlic, and chopped green onion on the side for wrapping.
Delightfully, the pork belly emerges with a perfect contrast of textures—crispy on the outside, tender within. The ssamjang adds a umami-rich depth that complements the pork’s richness, while the fresh lettuce wraps offer a crisp, clean finish. For a twist, try adding a thin slice of pear inside the wrap for a sweet, juicy surprise.
Kimchi Jjigae
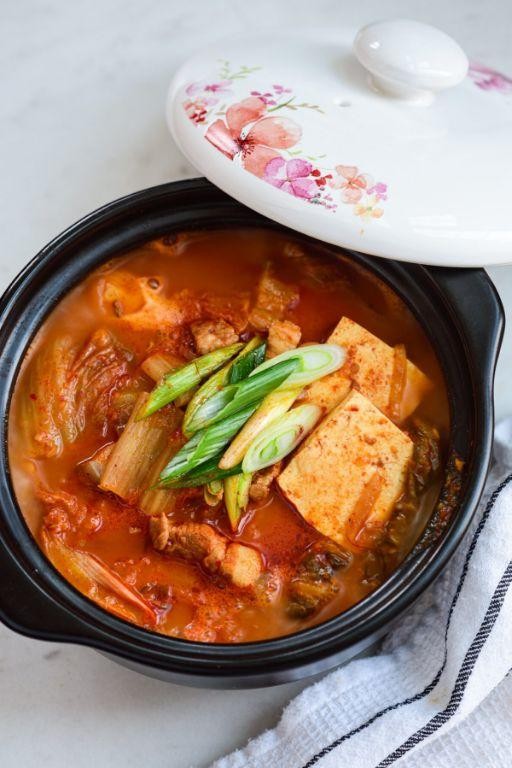
Dusk settles softly outside, and the kitchen fills with the comforting aroma of something deeply nourishing simmering on the stove. Kimchi Jjigae, a stew that wraps you in warmth, is my go-to for evenings when the soul craves something both fiery and soothing.
Ingredients
- 1 cup kimchi, aged at least a week for deeper flavor (I find the tangier, the better)
- 1/2 cup kimchi juice (this is where the magic lies, don’t skip it)
- 1 tbsp sesame oil, toasted (the nutty aroma is irreplaceable)
- 1/2 lb pork belly, thinly sliced (for richness, but tofu works beautifully for a vegetarian twist)
- 2 cups water (filtered, if you’re picky like me)
- 1 tbsp gochujang (Korean red pepper paste, adjust if you’re sensitive to heat)
- 1 tsp sugar (just a pinch to balance the flavors)
- 2 green onions, chopped (for a fresh crunch at the end)
- 1/2 block firm tofu, cubed (adds a lovely soft texture)
Instructions
- Heat the sesame oil in a medium pot over medium heat until shimmering, about 1 minute.
- Add the pork belly, cooking until it’s no longer pink, roughly 3 minutes. Tip: Render the fat slowly for more flavor.
- Stir in the kimchi and kimchi juice, sautéing for another 2 minutes to meld the flavors.
- Pour in the water, then add the gochujang and sugar, stirring until the paste dissolves completely.
- Bring the stew to a boil, then reduce to a simmer, covering the pot. Let it cook for 15 minutes. Tip: The longer it simmers, the deeper the flavors.
- Gently add the tofu cubes, simmering uncovered for another 5 minutes. Tip: Handle the tofu gently to keep the cubes intact.
- Sprinkle with chopped green onions right before serving.
Comforting in its complexity, the stew is a harmonious blend of spicy, sour, and umami, with the tofu offering a silky contrast to the hearty kimchi. Serve it piping hot with a side of steamed rice, and let the flavors transport you.
Sundubu Jjigae

Yearning for something warm and comforting on a chilly evening, I often find myself drawn to the rich, spicy depths of Sundubu Jjigae. This Korean soft tofu stew, with its silky textures and bold flavors, feels like a hug in a bowl, perfect for those moments when you need a little extra warmth.
Ingredients
- 1 tablespoon sesame oil (I love the nutty aroma it adds)
- 1/2 cup thinly sliced pork belly (or beef, but pork belly is my favorite for its richness)
- 1 tablespoon gochugaru (Korean red pepper flakes, adjust according to your spice tolerance)
- 2 cups anchovy stock (homemade is best, but store-bought works in a pinch)
- 1 pack soft tofu (about 12 oz, gently broken into large chunks)
- 1 egg (room temperature, it blends better into the stew)
- 1/2 cup sliced zucchini (adds a nice crunch)
- 2 green onions, chopped (for a fresh finish)
Instructions
- Heat the sesame oil in a medium pot over medium heat until shimmering, about 1 minute.
- Add the pork belly, cooking until it starts to brown, about 3 minutes. Tip: Don’t overcrowd the pot to ensure even browning.
- Stir in the gochugaru, cooking for 30 seconds to release its flavors without burning.
- Pour in the anchovy stock, bringing to a gentle boil over medium-high heat, about 2 minutes.
- Add the tofu and zucchini, simmering for 5 minutes until the zucchini is tender but still crisp. Tip: Stir gently to keep the tofu chunks intact.
- Crack the egg directly into the stew, letting it poach for 2 minutes until the whites are set but the yolk is still runny. Tip: For a creamier texture, stir the egg in gently.
- Garnish with green onions and serve immediately.
With each spoonful, the silky tofu melts away, revealing layers of spicy, umami-rich broth that’s both invigorating and soothing. Try serving it with a side of steamed rice to balance the heat, or dive in as is for a truly immersive experience.
Haemul Pajeon

Wandering through the flavors of the sea and the earth, Haemul Pajeon emerges as a comforting embrace, a savory pancake that marries the briny depth of seafood with the crisp, green whispers of scallions. It’s a dish that feels like a quiet afternoon by the kitchen window, simple yet deeply satisfying.
Ingredients
- 1 cup all-purpose flour (I like to sift it for a lighter texture)
- 1 cup ice-cold water (the chill makes the batter crisp up beautifully)
- 1 egg (room temperature blends more smoothly)
- 1/2 tsp salt (just enough to enhance without overpowering)
- 1 cup mixed seafood (shrimp, squid, and clams, chopped bite-sized for even cooking)
- 1 bunch scallions (cut into 2-inch lengths, the green parts add a lovely color)
- 2 tbsp vegetable oil (a neutral oil that lets the flavors shine)
Instructions
- In a large bowl, whisk together the flour, water, egg, and salt until just combined; a few lumps are okay for texture.
- Gently fold in the mixed seafood and scallions, ensuring they’re evenly distributed throughout the batter.
- Heat 1 tbsp of vegetable oil in a non-stick skillet over medium heat until shimmering, about 2 minutes.
- Pour half the batter into the skillet, spreading it gently into a round pancake about 1/2-inch thick.
- Cook for 4-5 minutes until the edges are golden and crispy, then flip carefully with a wide spatula.
- Add the remaining oil around the edges of the pancake, cooking the other side for another 4-5 minutes until equally golden.
- Transfer to a cutting board, slice into wedges, and serve immediately for the best texture.
The pancake should be crispy on the outside, tender within, with pockets of juicy seafood and the fresh bite of scallions. Try serving it with a side of soy-vinegar dipping sauce for an extra layer of flavor, or enjoy it as is, letting the simple ingredients speak for themselves.
Gimbap

Now, as the quiet morning unfolds, let me share with you the comforting embrace of Gimbap, a dish that carries the simplicity and heart of Korean cuisine into our bustling lives. It’s a harmonious blend of flavors and textures, wrapped snugly in seaweed, perfect for those moments when you crave something both nourishing and delightful.
Ingredients
- 2 cups short-grain rice (I find the stickiness of short-grain just right for rolling)
- 4 sheets of roasted seaweed (the crispier, the better for that satisfying crunch)
- 1 tbsp sesame oil (a drizzle adds a nutty aroma that’s irresistible)
- 1/2 tsp salt (just enough to enhance the flavors without overpowering)
- 1 carrot, julienned (for a sweet, colorful crunch)
- 1 cucumber, julienned (I prefer English cucumbers for their fewer seeds)
- 2 eggs, beaten (room temperature eggs blend more smoothly)
- 4 strips of cooked ham (or swap in tofu for a vegetarian twist)
- 1 tbsp vegetable oil (for a non-stick fry on the eggs)
Instructions
- Rinse the rice under cold water until the water runs clear, then cook according to package instructions. Let it cool slightly; warm rice is easier to handle.
- While the rice cooks, heat vegetable oil in a pan over medium heat. Pour the beaten eggs into the pan, tilting to spread evenly. Cook for 2 minutes until set, then flip and cook for another minute. Roll the cooked egg and slice into strips.
- Season the warm rice with sesame oil and salt, mixing gently to avoid mashing the grains.
- Lay a seaweed sheet on a bamboo mat. Spread a thin layer of rice over the seaweed, leaving a 1-inch border at the top.
- Arrange the carrot, cucumber, ham, and egg strips horizontally on the rice. Tip: Don’t overfill to make rolling easier.
- Starting from the bottom, roll the seaweed tightly using the bamboo mat. Press gently to seal the edge with a bit of water.
- Repeat with the remaining ingredients. Slice each roll into 1-inch pieces with a sharp knife for clean cuts.
Creating Gimbap is like weaving a tapestry of tastes and textures—each bite offers the softness of rice, the crispness of vegetables, and the richness of egg and ham. Serve it with a side of pickled radish for a tangy contrast, or pack it for a picnic to enjoy under the open sky.
Galbi

You might find yourself craving something deeply flavorful yet comforting, a dish that bridges the gap between the familiar and the exotic. Galbi, with its tender, marinated beef short ribs, offers just that—a taste of Korean tradition that feels both luxurious and homely.
Ingredients
– 2 lbs beef short ribs, cut flanken style (I find the thin slices cook more evenly)
– 1/2 cup soy sauce (go for the low-sodium kind to control the saltiness)
– 1/4 cup brown sugar (packed, for that perfect caramelization)
– 2 tbsp sesame oil (the aroma is irreplaceable)
– 3 cloves garlic, minced (freshly minced makes all the difference)
– 1 tbsp grated ginger (I keep mine in the freezer for easy grating)
– 1/2 Asian pear, grated (this tenderizes the meat beautifully)
– 1 tbsp honey (for a subtle sweetness that balances the soy)
– 1/2 tsp black pepper (freshly ground, to taste)
– 2 green onions, thinly sliced (for a fresh finish)
Instructions
1. In a large bowl, whisk together the soy sauce, brown sugar, sesame oil, garlic, ginger, grated pear, honey, and black pepper until the sugar is fully dissolved.
2. Add the beef short ribs to the marinade, ensuring each piece is well coated. Cover and refrigerate for at least 4 hours, though overnight marination brings out the deepest flavors.
3. Preheat your grill to medium-high heat (about 375°F) for that ideal char without burning.
4. Grill the marinated ribs for about 3-4 minutes per side, watching for the edges to caramelize but not blacken.
5. Let the ribs rest for 5 minutes off the heat; this allows the juices to redistribute, ensuring every bite is succulent.
6. Garnish with sliced green onions before serving.
The galbi comes off the grill with a sticky, glossy sheen, the meat falling off the bone with just a gentle tug. Serve it alongside a bowl of steamed rice and some crisp, quick-pickled vegetables for a meal that feels both indulgent and balanced.
Budae Jjigae

There’s something deeply comforting about Budae Jjigae, a dish born out of necessity and creativity, blending the flavors of Korean and American cuisines into a hearty, spicy stew that warms you from the inside out.
Ingredients
- 4 cups of chicken stock (homemade if you have it, for that extra depth of flavor)
- 2 tbsp gochujang (Korean red pepper paste, adjust according to your heat preference)
- 1 tbsp gochugaru (Korean red pepper flakes, for that authentic kick)
- 1 tbsp soy sauce (I always reach for the low-sodium version to control the saltiness)
- 1 tsp sugar (just a pinch to balance the heat)
- 2 cloves garlic, minced (freshly minced makes all the difference)
- 1 small onion, thinly sliced (I like them almost translucent in the stew)
- 1 cup sliced kimchi (with a bit of its juice for tanginess)
- 1/2 cup sliced spam (a nod to the dish’s origins, cut into bite-sized pieces)
- 1/2 cup sliced hot dogs (another classic addition, sliced diagonally for more surface area)
- 1/2 cup sliced tofu (firm tofu holds its shape better in the stew)
- 1 cup instant ramen noodles (added last, for that perfect chew)
- 1 cup shredded mozzarella cheese (for a melty, creamy finish)
Instructions
- In a large pot, combine the chicken stock, gochujang, gochugaru, soy sauce, sugar, and minced garlic. Bring to a gentle boil over medium heat, stirring occasionally to dissolve the gochujang completely.
- Add the sliced onion and kimchi (with its juice) to the pot. Simmer for about 5 minutes, until the onions start to soften.
- Tip: Taste the broth now and adjust the seasoning if needed. It should be spicy, slightly sweet, and savory.
- Add the spam, hot dogs, and tofu to the pot. Simmer for another 5 minutes, allowing the meats to warm through and the flavors to meld.
- Tip: If the stew is too thick, add a bit more chicken stock or water to reach your desired consistency.
- Finally, add the instant ramen noodles and cook for about 2 minutes, just until they start to soften but still have a bit of bite.
- Sprinkle the shredded mozzarella cheese over the top, cover the pot, and let it sit off the heat for a minute or two, until the cheese is melted and gooey.
- Tip: Serve the stew immediately, as the noodles will continue to soften in the hot broth.
Finished with a generous sprinkle of cheese, this Budae Jjigae is a riot of flavors and textures—spicy, savory, slightly sweet, with the noodles providing a satisfying chew. It’s perfect for sharing, straight from the pot to the table, inviting everyone to dig in and enjoy the communal warmth it brings.
Ojingeo Bokkeum
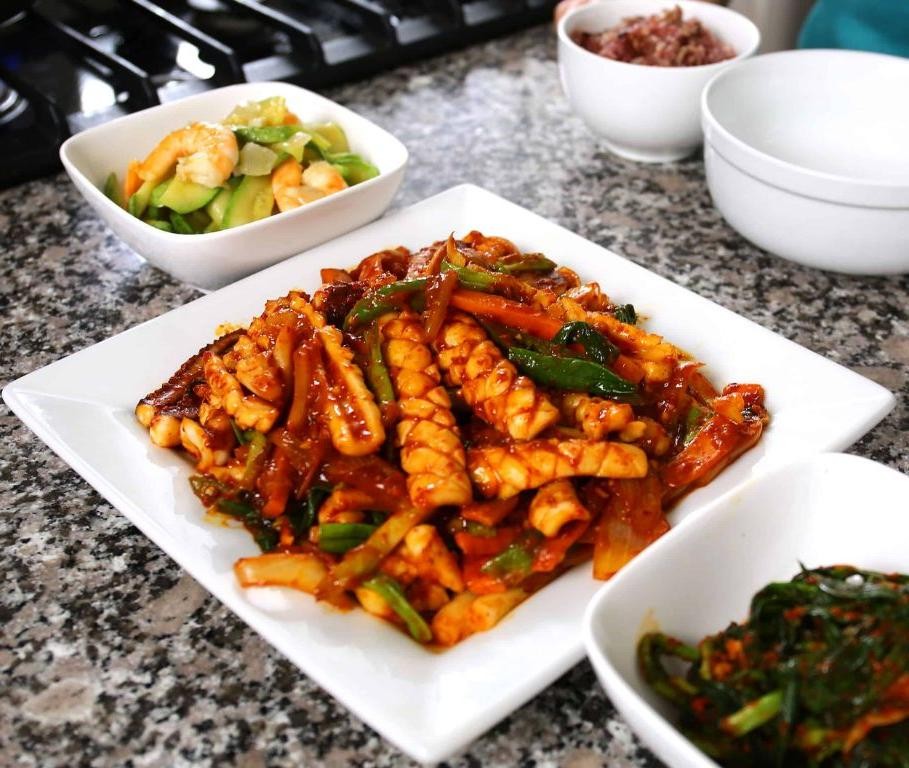
Perhaps it’s the way the spicy, sweet, and savory flavors meld together that makes Ojingeo Bokkeum such a comforting dish for me, especially on days when I crave something with a bit of heat and a lot of heart.
Ingredients
- 1 pound squid, cleaned and cut into bite-sized pieces (I find fresh squid makes all the difference, but frozen works in a pinch)
- 2 tablespoons soy sauce (I lean towards low-sodium to control the saltiness)
- 1 tablespoon gochujang (Korean chili paste, adjust according to your heat preference)
- 1 tablespoon sugar (a little sweetness balances the heat)
- 1 tablespoon minced garlic (freshly minced gives the best flavor)
- 1 teaspoon grated ginger (adds a nice zing)
- 1 tablespoon sesame oil (toasted sesame oil is my favorite for its nutty aroma)
- 1 tablespoon vegetable oil (for stir-frying)
- 1/2 cup sliced onions (I like them thin for quick cooking)
- 1/2 cup sliced bell peppers (any color, but red adds a nice pop)
- 1 teaspoon sesame seeds (for garnish, optional but recommended)
Instructions
- In a bowl, mix together soy sauce, gochujang, sugar, minced garlic, and grated ginger to make the sauce. Tip: Taste the sauce and adjust the gochujang or sugar to suit your preference.
- Heat vegetable oil in a large pan over medium-high heat. Tip: Make sure the pan is hot before adding the squid to get a nice sear.
- Add the squid to the pan and stir-fry for about 2 minutes until it starts to turn opaque. Tip: Do not overcook the squid to keep it tender.
- Add the sliced onions and bell peppers to the pan, stir-frying for another 2 minutes until they start to soften.
- Pour the sauce over the squid and vegetables, stirring well to coat everything evenly. Cook for an additional 2 minutes until everything is heated through.
- Drizzle with sesame oil and sprinkle sesame seeds on top before serving.
Ojingeo Bokkeum is best enjoyed hot, with the squid tender yet slightly chewy, and the sauce clinging to every bite. Serve it over a bowl of steamed rice or alongside some crisp, cool kimchi for a delightful contrast.
Dakgalbi
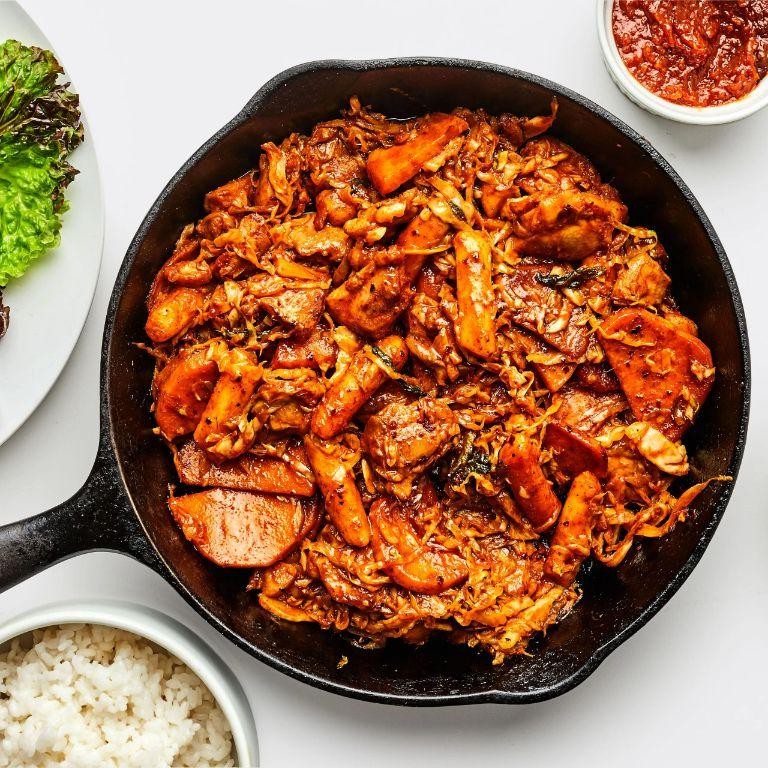
Now, as the evening light fades, I find myself drawn to the comforting embrace of Dakgalbi, a dish that marries the fiery zest of Korean flavors with the tender succulence of chicken. It’s a meal that feels like a warm hug on a cool evening, inviting you to slow down and savor each bite.
Ingredients
- 1.5 lbs boneless, skinless chicken thighs, cut into bite-sized pieces (I find thighs more flavorful than breasts)
- 2 cups sliced sweet potatoes, about 1/2 inch thick (their sweetness balances the heat beautifully)
- 1 cup sliced cabbage (adds a nice crunch)
- 1/2 cup gochujang (Korean chili paste, the soul of the dish)
- 2 tbsp soy sauce (I opt for low-sodium to control the saltiness)
- 1 tbsp sugar (just a touch to round out the flavors)
- 2 cloves garlic, minced (because garlic makes everything better)
- 1 tbsp sesame oil (for that nutty aroma)
- 1/2 cup water (to help create the sauce)
Instructions
- In a large bowl, mix together the gochujang, soy sauce, sugar, minced garlic, and sesame oil until well combined.
- Add the chicken pieces to the bowl, ensuring each piece is thoroughly coated with the marinade. Let it sit for 15 minutes at room temperature to absorb the flavors.
- Heat a large skillet or pan over medium-high heat. Add the marinated chicken and cook for about 5 minutes, stirring occasionally, until the chicken starts to brown.
- Add the sweet potatoes and cabbage to the skillet, pouring in the water to help create a sauce. Stir well to combine all the ingredients.
- Reduce the heat to medium, cover the skillet, and let it simmer for 15 minutes. Stir occasionally to prevent sticking and ensure even cooking.
- After 15 minutes, remove the lid and increase the heat to high. Cook for an additional 5 minutes to thicken the sauce slightly, stirring frequently.
- Tip: For an extra layer of flavor, sprinkle some sesame seeds on top before serving. Tip: If the sauce is too thick, add a little more water to reach your desired consistency. Tip: Letting the dish rest for a few minutes off the heat allows the flavors to meld together beautifully.
As you take your first bite, the tender chicken, the slight crunch of the vegetables, and the rich, spicy sauce come together in a harmony of flavors. Serve it with a side of steamed rice or wrap it in lettuce leaves for a refreshing contrast.
Naengmyeon
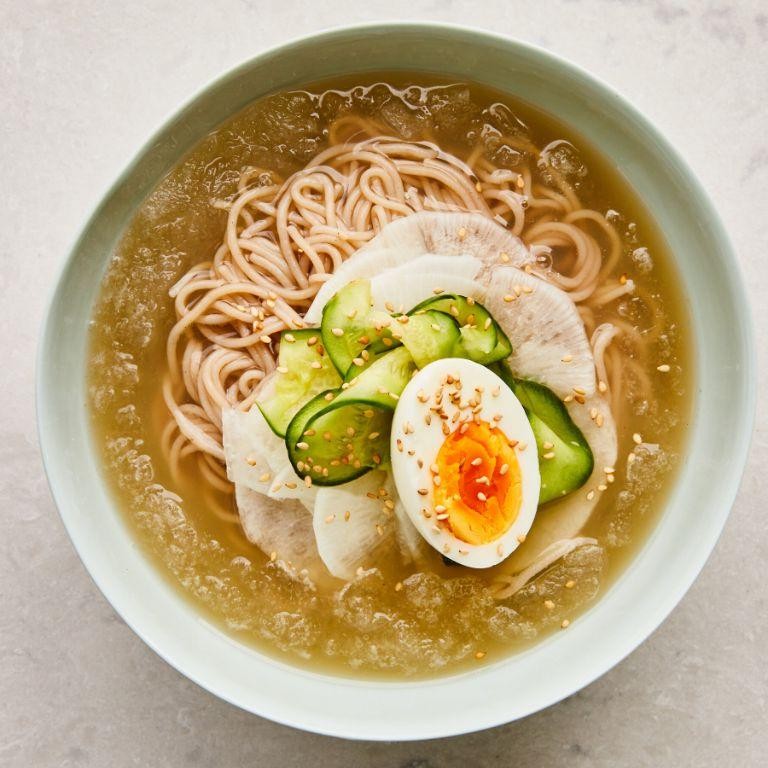
Wandering through the flavors of summer, I find myself drawn to the cool, refreshing embrace of Naengmyeon, a Korean cold noodle dish that perfectly balances tangy, sweet, and savory notes. It’s a dish that whispers of breezy evenings and the simple joy of slurping noodles under the shade.
Ingredients
- 2 packs of Naengmyeon noodles (I love the chewiness of the buckwheat ones)
- 4 cups beef broth (homemade gives it a richer depth, but store-bought works in a pinch)
- 1/2 cup Korean pear, julienned (its sweetness is a game-changer)
- 1/2 cup cucumber, julienned (for that crisp freshness)
- 2 tbsp vinegar (I lean towards apple cider for its fruity undertones)
- 1 tbsp sugar (just enough to round out the flavors)
- 1 tsp mustard powder (a tiny kick that wakes up the dish)
- 2 boiled eggs, halved (room temperature eggs blend better with the cold broth)
- Ice cubes (for serving, because the colder, the better)
Instructions
- Bring a large pot of water to a rolling boil and cook the Naengmyeon noodles according to the package instructions, usually about 3-4 minutes.
- Drain the noodles and rinse under cold water until completely cool. This stops the cooking process and removes excess starch.
- In a mixing bowl, combine the beef broth, vinegar, sugar, and mustard powder. Stir until the sugar is fully dissolved.
- Divide the cooled noodles between two serving bowls. Pour the broth mixture over the noodles until they’re just submerged.
- Arrange the julienned Korean pear and cucumber on top of the noodles. Place the halved boiled eggs on the side.
- Add a few ice cubes to each bowl to keep everything refreshingly cold until the last slurp.
Biting into Naengmyeon is like a cool wave on a hot day—the noodles are slippery and satisfying, while the broth is a tangy, sweet embrace. Serve it with a side of kimchi for an extra punch of flavor, or enjoy it as is for a pure, unadulterated taste of summer.
Yukgaejang
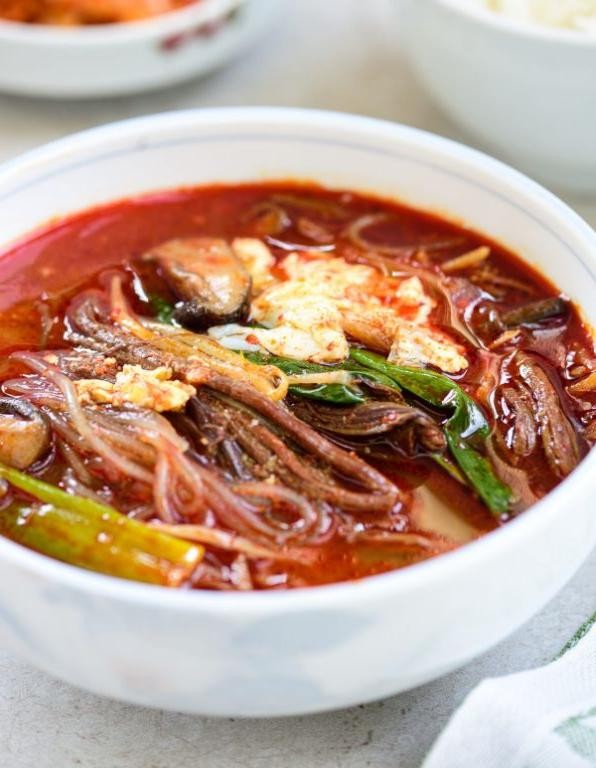
Just as the first light of dawn gently touches the earth, there’s something profoundly comforting about a bowl of Yukgaejang, a spicy Korean beef soup that warms the soul with its deep, rich flavors and tender shreds of beef. It’s a dish that speaks of home, of quiet mornings, and of the simple joy of a meal made with care.
Ingredients
- 1 pound beef brisket, thinly sliced (I find the marbling in brisket adds a wonderful richness)
- 8 cups water (filtered, if you’re like me and picky about your water)
- 1/2 cup soy sauce (I swear by the depth of flavor in Kikkoman)
- 2 tablespoons gochugaru (Korean red pepper flakes, adjust according to your heat preference)
- 4 cloves garlic, minced (freshly minced makes all the difference)
- 1 tablespoon sesame oil (toasted, for that nutty aroma)
- 2 green onions, chopped (the greener, the better for a fresh crunch)
- 1/2 cup fernbrake (gosari, soaked overnight if dried, for that authentic texture)
- 1 egg, room temperature (easier to mix in)
Instructions
- In a large pot, bring the water to a rolling boil over high heat.
- Add the beef brisket to the pot, reducing the heat to medium, and let it simmer for 30 minutes to tenderize the meat.
- Skim off any foam that rises to the surface to ensure a clear broth.
- Stir in the soy sauce, gochugaru, and minced garlic, adjusting the heat to maintain a gentle simmer for another 20 minutes.
- Add the sesame oil and chopped green onions, letting the soup cook for 5 more minutes to meld the flavors.
- Incorporate the soaked fernbrake, simmering for an additional 10 minutes until it’s tender but still has a bit of bite.
- Beat the room temperature egg lightly and drizzle it into the soup, stirring gently to create thin ribbons.
- Remove from heat and let it sit for 5 minutes before serving to allow the flavors to deepen.
Coming together in a harmonious blend of spice, umami, and slight bitterness from the fernbrake, Yukgaejang is a symphony of textures and flavors. Serve it with a side of steamed rice and kimchi for a meal that’s both grounding and exhilarating, perfect for those days when you need a little extra warmth in your life.
Jjajangmyeon
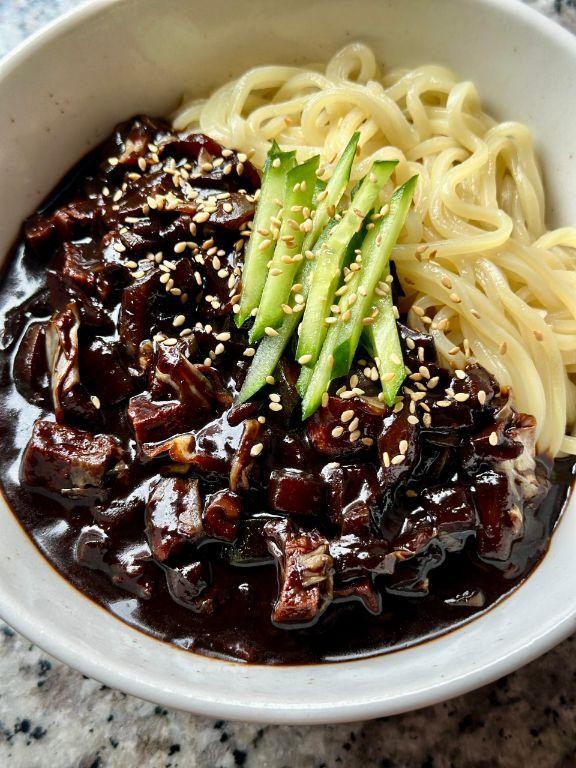
Under the soft glow of the kitchen light, there’s something deeply comforting about preparing Jjajangmyeon, a dish that feels like a warm embrace on a quiet evening. Its rich, savory sauce and tender noodles tell a story of simplicity and heart, a reminder of the joy found in the act of cooking itself.
Ingredients
– 1 package of fresh udon noodles (I find the chewiness of udon perfect for this dish)
– 1/2 cup of chunjang (Korean black bean paste, the soul of the dish)
– 1 tbsp of vegetable oil (a neutral oil works best to let the flavors shine)
– 1/2 cup of diced pork belly (for that melt-in-your-mouth richness)
– 1 cup of diced onion (they caramelize beautifully)
– 1/2 cup of diced zucchini (adds a slight crunch and freshness)
– 1/2 cup of diced potato (for a subtle sweetness and body)
– 1 cup of water (to adjust the sauce consistency)
– 1 tbsp of sugar (just a hint to balance the saltiness)
– 1 tsp of cornstarch mixed with 2 tbsp of water (for that glossy finish)
Instructions
1. Heat the vegetable oil in a large pan over medium heat, adding the pork belly to render its fat and crisp up slightly, about 5 minutes.
2. Stir in the onions, cooking until they’re translucent and starting to caramelize, around 3 minutes.
3. Add the zucchini and potato, cooking for another 5 minutes until they begin to soften.
4. Push the ingredients to the side, adding the chunjang to the center of the pan. Fry it for 2 minutes to deepen its flavor.
5. Mix everything together, then pour in the water and sugar, stirring to combine. Let it simmer for 10 minutes until the sauce thickens slightly.
6. Stir in the cornstarch mixture, cooking for another 2 minutes until the sauce is glossy and coats the back of a spoon.
7. Meanwhile, cook the udon noodles according to package instructions, then drain and rinse under cold water to stop the cooking.
8. Toss the noodles with the sauce until evenly coated.
Perhaps the most satisfying part is the first bite, where the savory depth of the sauce meets the chewy noodles, a harmony of textures and flavors. Serve it with a side of pickled radish for a bright contrast, or top with a fried egg for an extra layer of richness.
Kimchi Pancake

Under the soft glow of the kitchen light, there’s something deeply comforting about the sizzle of a kimchi pancake hitting the pan, its edges crisping to a golden perfection while the inside stays tender and packed with flavor.
Ingredients
- 1 cup all-purpose flour (I like to sift it for extra fluffiness)
- 1 cup water (cold, to keep the batter light)
- 1 cup kimchi, chopped (the more fermented, the better the flavor)
- 2 tbsp kimchi juice (this is where the magic happens)
- 1 egg (room temperature blends smoother)
- 2 tbsp vegetable oil (extra virgin olive oil works too, but it’s not traditional)
- 1/2 tsp salt (just enough to enhance the kimchi’s tang)
Instructions
- In a large bowl, whisk together the flour and water until smooth. A few lumps are okay; they’ll disappear as the batter rests.
- Add the chopped kimchi, kimchi juice, egg, and salt to the batter. Stir gently to combine. Let the batter sit for 10 minutes; this allows the flour to hydrate and the flavors to meld.
- Heat 1 tbsp of oil in a non-stick skillet over medium heat (350°F is ideal). Pour half the batter into the skillet, spreading it evenly into a round shape.
- Cook for 4-5 minutes until the edges are crispy and the bottom is golden brown. Flip carefully and cook the other side for another 4-5 minutes. Repeat with the remaining batter and oil.
- Transfer the pancake to a cutting board and slice into wedges. Serve immediately for the best texture.
Now, the kimchi pancake is a delightful contrast of textures—crispy on the outside, chewy and soft inside, with a punch of umami and spice. Try serving it with a drizzle of soy sauce mixed with a touch of sesame oil for an extra layer of flavor.
Korean Egg Roll

Perhaps there’s no simpler joy than the delicate layers of a Korean Egg Roll, a dish that whispers comfort with every bite. It’s a humble creation, yet each fold tells a story of warmth and home.
Ingredients
- 4 large eggs (I find room temperature eggs blend more smoothly, creating a silkier texture.)
- 1 tbsp unsalted butter (For that rich, golden hue and a hint of nuttiness.)
- 1/4 tsp salt (Just enough to elevate the eggs’ natural flavors.)
- 1 tbsp whole milk (A splash for tenderness, making each bite melt in your mouth.)
- 1 tsp vegetable oil (My go-to for ensuring the eggs don’t stick, lending a flawless finish.)
Instructions
- In a bowl, gently whisk together the eggs, milk, and salt until just combined; overmixing can make the rolls tough.
- Heat a non-stick skillet over medium-low heat (about 275°F) and add the vegetable oil, swirling to coat the pan evenly.
- Pour a thin layer of the egg mixture into the skillet, tilting to spread it into a uniform circle. Cook for about 2 minutes until the edges start to set.
- Using a spatula, carefully roll the egg from one side to the other, then push it to the edge of the skillet. Tip: Keep the roll tight for those beautiful, defined layers.
- Add another thin layer of egg mixture to the skillet, lifting the first roll slightly to let the new layer flow underneath. Cook for 2 minutes, then roll again, enclosing the new layer within the existing roll.
- Repeat the process until all the egg mixture is used, ensuring each layer is cooked through but still tender. Final tip: A lower heat ensures the eggs remain soft and not rubbery.
- Transfer the rolled egg to a cutting board and let it rest for a minute before slicing into 1-inch pieces. This rest period helps the layers set.
Rolling out these egg rolls reveals a mosaic of golden layers, each one tender and subtly sweet. Serve them atop a steaming bowl of rice or as a vibrant addition to a lunchbox, where their bright color and soft texture can truly shine.
Soondae
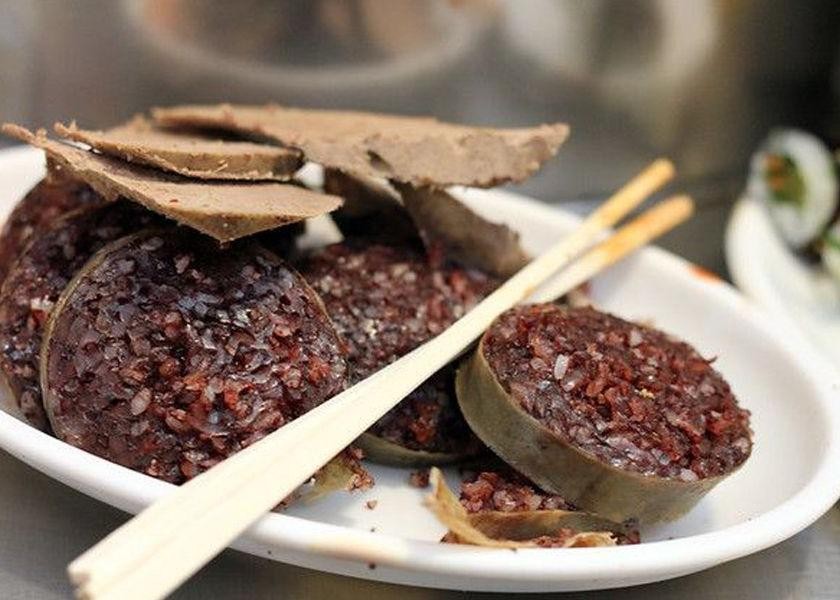
Delving into the heart of Korean street food, soondae offers a unique blend of textures and flavors that comfort the soul. It’s a dish that invites curiosity and rewards the adventurous eater with its rich, satisfying depth.
Ingredients
- 1 pound pork blood (fresh or frozen, thawed) – I find the frozen kind more accessible, but fresh has a deeper flavor.
- 1 cup sweet rice – Soaked for at least 4 hours, it becomes the perfect chewy base.
- 1/2 cup barley – Adds a nutty contrast to the sweetness of the rice.
- 1 tbsp minced garlic – Because garlic makes everything better.
- 1 tsp salt – Just enough to enhance without overpowering.
- 1/2 tsp black pepper – A subtle kick that ties the flavors together.
- Natural hog casings – Soaked in warm water for 30 minutes to soften, they’re the traditional vessel for soondae.
Instructions
- In a large bowl, mix the thawed pork blood, soaked sweet rice, barley, minced garlic, salt, and black pepper until well combined. Tip: Wearing gloves makes this process less messy.
- Carefully stuff the mixture into the prepared hog casings, tying off every 4 inches to form individual sausages. Tip: Don’t overstuff to prevent bursting during cooking.
- Bring a large pot of water to a gentle boil (around 200°F) and add the sausages. Simmer for 30 minutes. Tip: Keep the heat low to avoid breaking the casings.
- Remove the soondae from the water and let them cool slightly before slicing. Serve warm with your favorite dipping sauce.
The texture of soondae is a delightful contrast between the soft, pudding-like blood and the chewy grains, while the flavor is rich and earthy. Try serving it sliced on a bed of perilla leaves for an extra layer of freshness.
Makguksu
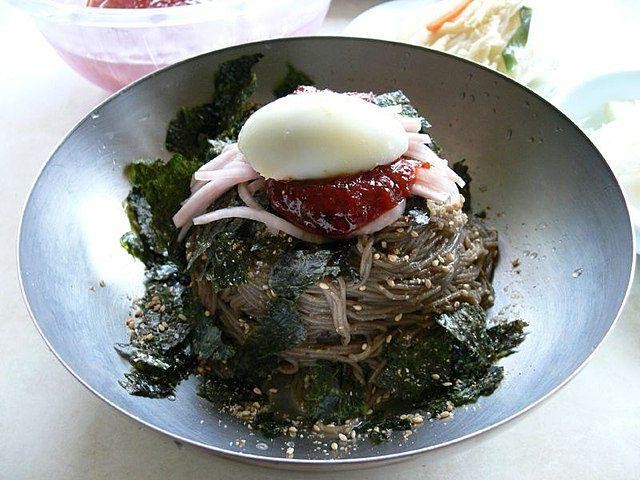
There’s something deeply comforting about the simplicity of Makguksu, a Korean buckwheat noodle dish that feels like a gentle embrace on a quiet afternoon. The cool, slippery noodles paired with a tangy, spicy broth make it a refreshing choice for those days when you crave something light yet flavorful.
Ingredients
- 2 cups buckwheat noodles (I love the nutty flavor they bring, and they’re gluten-free!)
- 4 cups cold water (for boiling the noodles, make sure it’s cold to start for the perfect texture)
- 1/2 cup cucumber, julienned (I prefer English cucumbers for their crispness and fewer seeds)
- 1/4 cup radish, julienned (adds a nice peppery crunch)
- 2 tbsp soy sauce (I use low-sodium to control the saltiness)
- 1 tbsp vinegar (apple cider vinegar is my go-to for its mild sweetness)
- 1 tsp sugar (just a pinch to balance the acidity)
- 1/2 tsp Korean red pepper flakes (gochugaru, adjust according to your heat preference)
- 1 hard-boiled egg, halved (room temperature eggs blend better with the dish)
Instructions
- Bring 4 cups of cold water to a boil in a large pot over high heat.
- Add the buckwheat noodles to the boiling water and cook for 7 minutes, stirring occasionally to prevent sticking.
- While the noodles cook, prepare an ice bath in a large bowl with cold water and ice cubes.
- Once the noodles are cooked, drain them and immediately plunge into the ice bath to stop the cooking process and cool them down.
- In a small bowl, mix together the soy sauce, vinegar, sugar, and Korean red pepper flakes to make the sauce.
- Drain the cooled noodles and divide them into two serving bowls.
- Top the noodles with the julienned cucumber and radish, then drizzle the sauce over the top.
- Garnish each bowl with a halved hard-boiled egg.
Makguksu offers a delightful contrast of textures, from the chewy noodles to the crisp vegetables, all brought together by the spicy, tangy sauce. Serve it with a side of kimchi for an extra kick, or enjoy it as is for a light, satisfying meal.
Conclusion
Just like that, you’ve got 22 simple and easy Korean recipes to bring delicious flavors into your kitchen! Whether you’re a seasoned cook or just starting out, these dishes are sure to impress. Don’t forget to leave a comment with your favorite recipe and share the love by pinning this article on Pinterest. Happy cooking!