Just as your little one hits the exciting milestone of one year, their culinary world is ready to expand beyond purees! Dive into our roundup of 17 Nutritious Baby Foods Recipes that are as delicious as they are wholesome. Perfect for busy parents, these ideas will make mealtime a breeze while ensuring your toddler gets all the nutrients they need. Let’s make every bite count!
Sweet Potato and Apple Puree
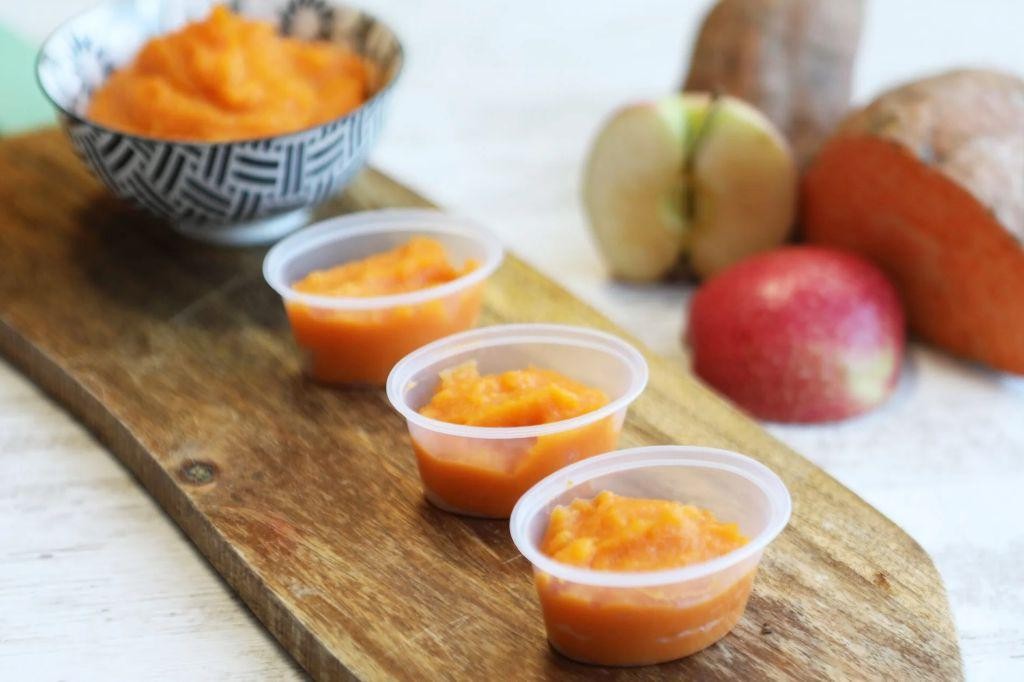
Now, let’s dive into making a comforting and nutritious Sweet Potato and Apple Puree, perfect for any season. This dish combines the natural sweetness of apples with the earthy tones of sweet potatoes, creating a harmonious blend that’s both simple and satisfying.
Ingredients
- 2 large sweet potatoes (I find the orange-fleshed ones sweeter and more vibrant)
- 2 medium apples, peeled and cored (Honeycrisp or Fuji work wonderfully for their sweetness and texture)
- 1/4 cup water (just enough to help steam the ingredients)
- 1 tbsp unsalted butter (for a rich finish, though you can omit for a vegan version)
- 1/2 tsp cinnamon (a must for that warm, spiced flavor)
Instructions
- Peel the sweet potatoes and cut them into 1-inch cubes. This size ensures they cook evenly and quickly.
- Place the sweet potato cubes and apple pieces into a medium saucepan. Add the water to the pan to prevent sticking and help steam the ingredients.
- Cover the pan and cook over medium heat for 15 minutes, or until the sweet potatoes are fork-tender. Tip: Check at the 10-minute mark to avoid overcooking.
- Once cooked, remove from heat and drain any excess water. Add the butter and cinnamon to the pan.
- Using a potato masher or immersion blender, puree the mixture until smooth. Tip: For a chunkier texture, mash by hand; for silkier, use a blender.
- Serve warm. Tip: This puree pairs beautifully with roasted meats or can be a standalone dish with a sprinkle of nuts for crunch.
Silky smooth with a hint of spice, this puree is a versatile side that delights the palate. Consider topping it with a drizzle of maple syrup or a dollop of Greek yogurt for an extra layer of flavor.
Banana Oatmeal Breakfast Bars

Banana oatmeal breakfast bars are the perfect grab-and-go option for busy mornings, combining the natural sweetness of bananas with the heartiness of oats. Begin by preheating your oven to 350°F and lining an 8×8 inch baking pan with parchment paper for easy removal.
Ingredients
- 2 cups old-fashioned oats (I love the texture they provide)
- 3 ripe bananas, mashed (the spottier, the sweeter!)
- 1/4 cup honey (for a touch of natural sweetness)
- 1/2 cup almond butter (creamy or crunchy, your choice)
- 1 tsp vanilla extract (pure vanilla makes all the difference)
- 1/2 tsp cinnamon (for that warm, cozy flavor)
- 1/4 tsp salt (to balance the sweetness)
Instructions
- In a large bowl, combine the mashed bananas, honey, almond butter, and vanilla extract until smooth.
- Add the oats, cinnamon, and salt to the wet ingredients, stirring until everything is well incorporated.
- Press the mixture firmly into the prepared baking pan, ensuring it’s evenly distributed.
- Bake for 20-25 minutes, or until the edges are golden brown and the center is set.
- Allow the bars to cool completely in the pan before cutting into squares.
So, these bars come out wonderfully chewy with a slight crispness on the edges, offering a delightful contrast. Enjoy them as is, or drizzle with a little extra honey for a sweeter treat.
Avocado and Banana Mash
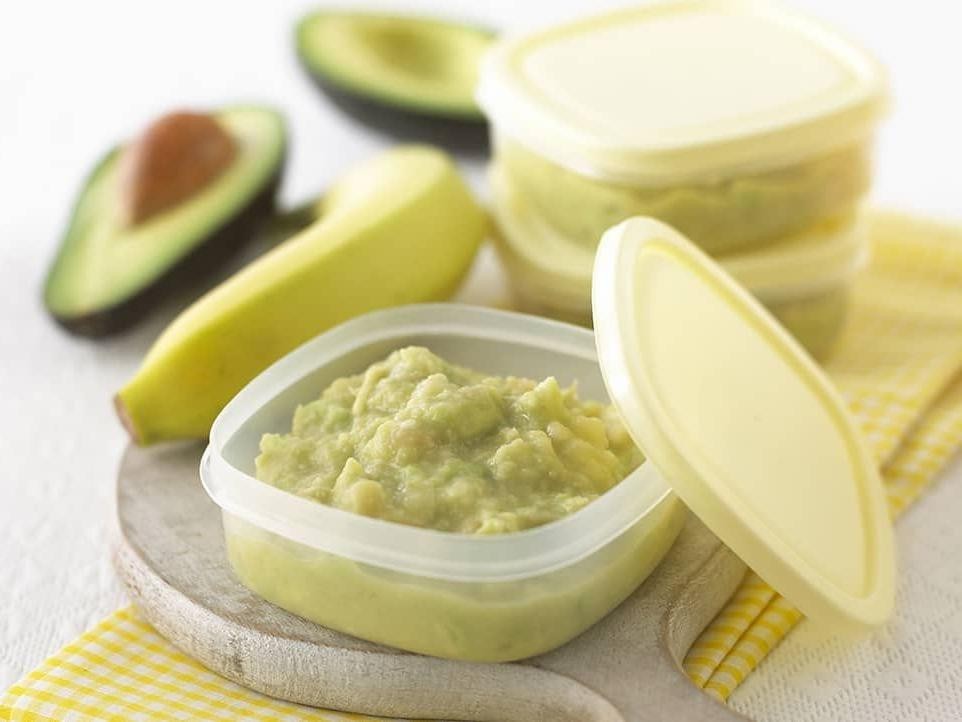
This simple yet surprisingly delightful Avocado and Banana Mash is a testament to how minimal ingredients can create a dish full of flavor and texture. Perfect for a quick breakfast or a healthy snack, it’s a recipe that even the most novice cooks can master with ease.
Ingredients
- 1 ripe avocado – look for one that’s slightly soft to the touch but not mushy.
- 1 ripe banana – the spottier, the better for natural sweetness.
- 1 tbsp honey – I love using local honey for its subtle floral notes.
- A pinch of salt – just a tiny bit to elevate the flavors.
Instructions
- Cut the avocado in half, remove the pit, and scoop the flesh into a medium-sized bowl.
- Peel the banana and add it to the bowl with the avocado.
- Using a fork, mash the avocado and banana together until you reach your desired consistency. For a smoother mash, keep going until no large chunks remain.
- Drizzle the honey over the mash and sprinkle with a pinch of salt.
- Gently stir the mixture to evenly distribute the honey and salt throughout the mash.
Buttery and creamy with a hint of sweetness, this mash is versatile enough to spread on toast, serve as a dip, or enjoy straight from the bowl. The combination of avocado’s richness and banana’s natural sugars makes it a guilt-free pleasure any time of day.
Carrot and Pea Puree
Whipping up a smooth and vibrant Carrot and Pea Puree is simpler than you might think, and it’s a fantastic way to sneak some veggies into your meals. Let’s break it down into easy-to-follow steps.
Ingredients
- 2 cups of carrots, peeled and chopped (I find organic carrots have the best flavor)
- 1 cup of frozen peas (no need to thaw, they cook quickly)
- 2 tbsp of unsalted butter (I always use unsalted to control the seasoning)
- 1/2 cup of heavy cream (for that luxurious texture)
- 1/2 tsp of salt (start with this, you can adjust later)
- 1/4 tsp of black pepper (freshly ground is my preference)
Instructions
- Place the chopped carrots in a medium saucepan and cover with water. Bring to a boil over high heat.
- Once boiling, reduce the heat to medium and simmer for 10 minutes, or until the carrots are fork-tender.
- Add the frozen peas to the saucepan and cook for an additional 2 minutes. Tip: Don’t overcook the peas to keep their bright green color.
- Drain the vegetables and return them to the saucepan. Add the butter, heavy cream, salt, and pepper.
- Using an immersion blender, puree the mixture until smooth. Tip: If the puree is too thick, add a tablespoon of warm water at a time until desired consistency is reached.
- Taste and adjust seasoning if necessary. Tip: A pinch of nutmeg can add a lovely warmth to the puree.
Enjoy this Carrot and Pea Puree as a side dish, or get creative by using it as a base for a veggie-packed pasta sauce. Its creamy texture and sweet, earthy flavors make it a hit with both kids and adults alike.
Butternut Squash and Apple Soup

On a crisp fall day, nothing warms the soul quite like a bowl of Butternut Squash and Apple Soup. This recipe combines the sweetness of apples with the earthy tones of butternut squash, creating a harmonious blend that’s both comforting and nutritious.
Ingredients
- 1 medium butternut squash, peeled and cubed (about 4 cups) – I find the pre-cut squash from the store saves time, but fresh always tastes better.
- 2 large apples, peeled and chopped (I prefer Honeycrisp for their sweetness and slight tartness)
- 1 medium onion, diced – yellow onions are my go-to for their balance of sweetness and sharpness.
- 3 cups vegetable broth – homemade is best, but a good quality store-bought works in a pinch.
- 2 tbsp extra virgin olive oil – my kitchen staple for its flavor and health benefits.
- 1 tsp ground cinnamon – adds a warm, spicy note that complements the apples beautifully.
- 1/2 tsp salt – to enhance all the flavors.
- 1/4 tsp black pepper – just enough to add a little kick.
Instructions
- Heat the olive oil in a large pot over medium heat until shimmering, about 1 minute.
- Add the diced onion and sauté until translucent, about 5 minutes, stirring occasionally to prevent burning.
- Stir in the cubed butternut squash and chopped apples, cooking for another 5 minutes to slightly soften.
- Pour in the vegetable broth, ensuring all the ingredients are submerged. Bring to a boil, then reduce heat to a simmer.
- Cover the pot and let it simmer for 20 minutes, or until the squash is fork-tender.
- Remove from heat and carefully blend the soup until smooth using an immersion blender. Tip: For a creamier texture, blend longer.
- Stir in the cinnamon, salt, and pepper, adjusting the seasoning if necessary. Tip: Taste as you go to balance the flavors to your liking.
- Return the pot to low heat for another 5 minutes to meld the flavors together. Tip: If the soup is too thick, add a little more broth to reach your desired consistency.
Finished with a silky smooth texture, this soup boasts a perfect balance of sweet and savory flavors. Serve it with a dollop of Greek yogurt or a sprinkle of toasted pumpkin seeds for an extra layer of texture and taste.
Spinach and Potato Mash
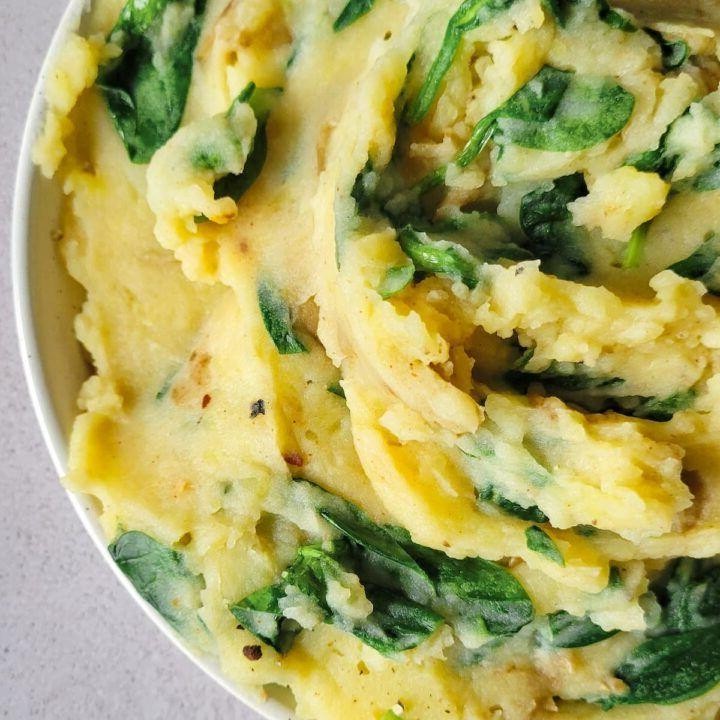
Creating a comforting and nutritious side dish doesn’t have to be complicated, and this Spinach and Potato Mash is proof. Combining the earthy flavors of potatoes with the fresh, vibrant taste of spinach, this dish is a delightful way to add some greens to your meal.
Ingredients
- 2 large russet potatoes, peeled and cubed (I find russets mash up the creamiest)
- 4 cups fresh spinach, tightly packed (baby spinach works wonderfully here)
- 1/2 cup whole milk (for that rich, creamy texture)
- 2 tbsp unsalted butter (I always use unsalted to control the dish’s saltiness)
- 1/2 tsp salt (adjust according to your preference)
- 1/4 tsp black pepper (freshly ground adds a nice kick)
Instructions
- Place the peeled and cubed potatoes in a large pot and cover with cold water by about an inch.
- Bring the pot to a boil over high heat, then reduce to a simmer and cook for 15-20 minutes, or until the potatoes are fork-tender.
- While the potatoes cook, heat a large skillet over medium heat and add the spinach. Cook for 2-3 minutes, just until wilted, then remove from heat.
- Drain the potatoes well and return them to the pot. Add the milk, butter, salt, and pepper.
- Mash the potatoes with a potato masher or fork until smooth and creamy. Tip: For extra creaminess, warm the milk and butter before adding.
- Fold in the wilted spinach until evenly distributed throughout the mash. Tip: If the mash seems too thick, add a splash more milk.
- Serve warm. Tip: A drizzle of olive oil on top before serving adds a lovely richness.
A perfect blend of creamy and fluffy, this Spinach and Potato Mash brings a pop of color and nutrition to any plate. Try serving it alongside grilled chicken or fish for a balanced meal that’s as pleasing to the eye as it is to the palate.
Pear and Blueberry Puree
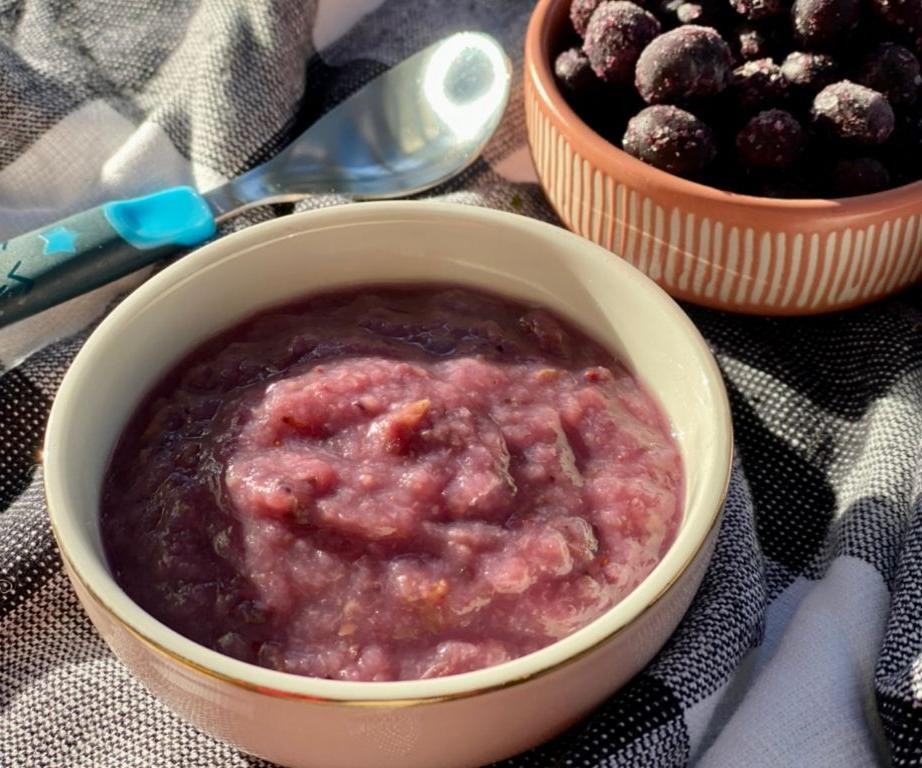
Let’s dive into making a delightful Pear and Blueberry Puree, a simple yet elegant dish that’s perfect for any occasion. This recipe is designed to guide you through each step with precision, ensuring a smooth and flavorful outcome.
Ingredients
- 2 ripe pears, peeled and cored (I find Bartlett pears work wonderfully for their sweetness and soft texture)
- 1 cup fresh blueberries (wild blueberries are my favorite for their intense flavor)
- 1 tbsp lemon juice (freshly squeezed makes all the difference)
- 1/4 cup water (filtered water ensures the puree’s taste isn’t compromised)
- 1 tbsp honey (local honey adds a lovely depth of flavor)
Instructions
- Begin by preparing the pears: after peeling and coring, chop them into 1-inch pieces to ensure even cooking.
- In a medium saucepan, combine the chopped pears, blueberries, water, and lemon juice. The lemon juice not only adds a bright note but also helps preserve the color of the fruits.
- Cook the mixture over medium heat, stirring occasionally, until the fruits are soft and easily mashed with a spoon, about 10 minutes. A tip here is to cover the saucepan for the first 5 minutes to steam the fruits, then uncover to allow some of the liquid to evaporate.
- Remove the saucepan from the heat and let it cool slightly, about 5 minutes. This makes blending safer and prevents the puree from being too watery.
- Transfer the mixture to a blender or use an immersion blender directly in the saucepan. Blend until smooth. For a chunkier texture, pulse a few times instead of blending continuously.
- Stir in the honey while the puree is still warm, adjusting the amount based on your sweetness preference. This is also the perfect time to taste and adjust the lemon juice if needed.
Delight in the smooth, velvety texture of this puree, with the sweet pears beautifully balanced by the tart blueberries. Serve it chilled as a refreshing dessert, or warm it slightly to drizzle over pancakes or yogurt for a breakfast treat.
Quinoa and Vegetable Pilaf
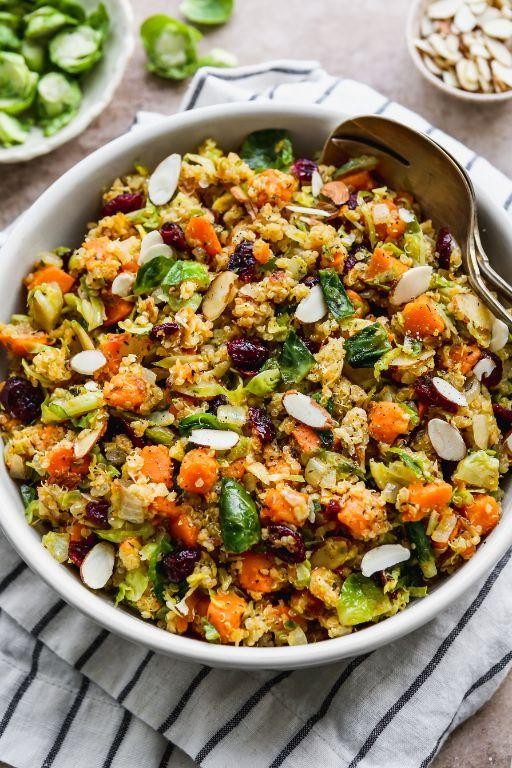
Welcome to a delightful journey of flavors with our Quinoa and Vegetable Pilaf, a dish that’s as nutritious as it is delicious. Perfect for beginners, this recipe will guide you through each step to ensure a perfect pilaf every time.
Ingredients
- 1 cup quinoa (I love the nutty flavor of tri-color quinoa, but any type works)
- 2 cups vegetable broth (homemade gives the best flavor, but store-bought is fine)
- 1 tbsp extra virgin olive oil (my go-to for its fruity notes)
- 1 medium onion, finely chopped (yellow onions are my preference for their sweetness)
- 2 cloves garlic, minced (freshly minced garlic makes all the difference)
- 1 cup mixed vegetables (carrots, peas, and bell peppers are my favorite combo)
- 1/2 tsp salt (I find this amount perfectly balances the flavors)
- 1/4 tsp black pepper (freshly ground adds a nice kick)
Instructions
- Rinse the quinoa under cold water in a fine-mesh strainer for about 2 minutes to remove its natural bitterness.
- Heat the olive oil in a medium saucepan over medium heat until shimmering, about 1 minute.
- Add the chopped onion and sauté until translucent, about 5 minutes, stirring occasionally.
- Stir in the minced garlic and cook for another 30 seconds until fragrant.
- Add the mixed vegetables to the pan and sauté for 3-4 minutes until they start to soften.
- Pour in the rinsed quinoa, vegetable broth, salt, and black pepper, stirring to combine.
- Bring the mixture to a boil, then reduce the heat to low, cover, and simmer for 15 minutes.
- After 15 minutes, turn off the heat and let the pilaf sit covered for 5 minutes to absorb any remaining liquid.
- Fluff the quinoa with a fork before serving to separate the grains and enhance the texture.
Key to this dish’s appeal is its fluffy texture and the harmonious blend of vegetables and quinoa. Serve it as a standalone meal or alongside grilled chicken for an extra protein boost.
Chicken and Sweetcorn Puree
Just when you thought comfort food couldn’t get any cozier, along comes this Chicken and Sweetcorn Puree to prove you wrong. Perfect for beginners, this recipe is a gentle introduction to blending flavors and textures into a smooth, satisfying dish.
Ingredients
- 2 cups cooked chicken, shredded (I find rotisserie chicken saves time and adds flavor)
- 1 cup sweetcorn kernels, fresh or frozen (thawed if frozen)
- 1/2 cup heavy cream (for that luxurious texture)
- 2 tbsp unsalted butter (extra virgin olive oil is my go-to, but butter wins here)
- 1 small onion, finely chopped (white or yellow, your choice)
- 1 garlic clove, minced (fresh is best, but 1/4 tsp garlic powder works in a pinch)
- 1/2 tsp salt (I prefer sea salt for its clean taste)
- 1/4 tsp black pepper (freshly ground makes all the difference)
Instructions
- In a medium saucepan over medium heat, melt the butter until it’s just beginning to foam.
- Add the chopped onion and minced garlic, sautéing until they’re soft and translucent, about 5 minutes. Tip: Stir frequently to prevent browning.
- Stir in the sweetcorn kernels, cooking for another 3 minutes to slightly soften them.
- Add the shredded chicken, salt, and pepper, mixing well to combine all the flavors.
- Pour in the heavy cream, bringing the mixture to a gentle simmer. Let it cook for 5 minutes, stirring occasionally. Tip: Keep the heat low to avoid curdling the cream.
- Transfer the mixture to a blender, pureeing until smooth. For a chunkier texture, pulse a few times instead. Tip: Be careful with hot liquids in the blender; start on low speed.
- Return the puree to the saucepan, warming it through for about 2 minutes before serving.
Great for chilly evenings, this puree boasts a velvety texture with a sweet and savory balance. Try serving it with a sprinkle of fresh herbs or a side of crusty bread for dipping.
Broccoli and Cheese Mash

Ready to transform simple ingredients into a comforting dish? Broccoli and Cheese Mash is a creamy, dreamy side that pairs perfectly with almost any main, and it’s surprisingly easy to make.
Ingredients
- 2 cups broccoli florets (fresh is best, but frozen works in a pinch)
- 1 cup sharp cheddar cheese, shredded (I love the extra tang it brings)
- 1/2 cup whole milk (for that rich, creamy texture)
- 2 tbsp unsalted butter (always my choice for a smoother mash)
- 1/2 tsp salt (to enhance all the flavors)
- 1/4 tsp black pepper (freshly ground, if you have it)
Instructions
- Bring a large pot of water to a boil over high heat. Add the broccoli florets and cook for 5 minutes, or until tender when pierced with a fork.
- Drain the broccoli well, then return it to the pot. Tip: Letting it sit for a minute helps excess water evaporate, preventing a watery mash.
- Add the butter, milk, salt, and pepper to the pot with the broccoli. Mash everything together with a potato masher until you reach your desired consistency. Tip: For a smoother texture, use a hand blender briefly.
- Stir in the shredded cheddar cheese until it’s fully melted and incorporated. Tip: Adding the cheese off the heat prevents it from becoming stringy.
You’ll love the velvety texture and the way the sharp cheese complements the mild broccoli. Try topping it with a sprinkle of extra cheese and broiling for a minute for a crispy, golden finish.
Peach and Yogurt Smoothie

Just as the summer heat peaks, there’s nothing quite like a Peach and Yogurt Smoothie to cool you down. This recipe is a breeze to make, perfect for beginners looking to whip up something refreshing and nutritious.
Ingredients
- 2 cups frozen peaches (I find frozen peaches give the smoothie a thicker texture)
- 1 cup plain Greek yogurt (for that creamy texture and a protein boost)
- 1/2 cup almond milk (or any milk you prefer; almond adds a nice nutty flavor)
- 1 tbsp honey (adjust based on how sweet your peaches are)
- 1/2 tsp vanilla extract (a splash enhances all the flavors)
Instructions
- Place the frozen peaches in the blender first to help break them down more easily.
- Add the Greek yogurt, almond milk, honey, and vanilla extract to the blender.
- Blend on high for 45 seconds, or until the mixture is completely smooth. Tip: If the smoothie is too thick, add a little more almond milk, one tablespoon at a time.
- Pour the smoothie into two glasses. Tip: For an extra chill, place the glasses in the freezer for 5 minutes before serving.
- Serve immediately. Tip: Garnish with a thin peach slice on the rim of the glass for a beautiful presentation.
Now, this Peach and Yogurt Smoothie boasts a velvety texture with the perfect balance of sweetness and tang. Try serving it with a sprinkle of granola on top for an added crunch.
Lentil and Vegetable Stew
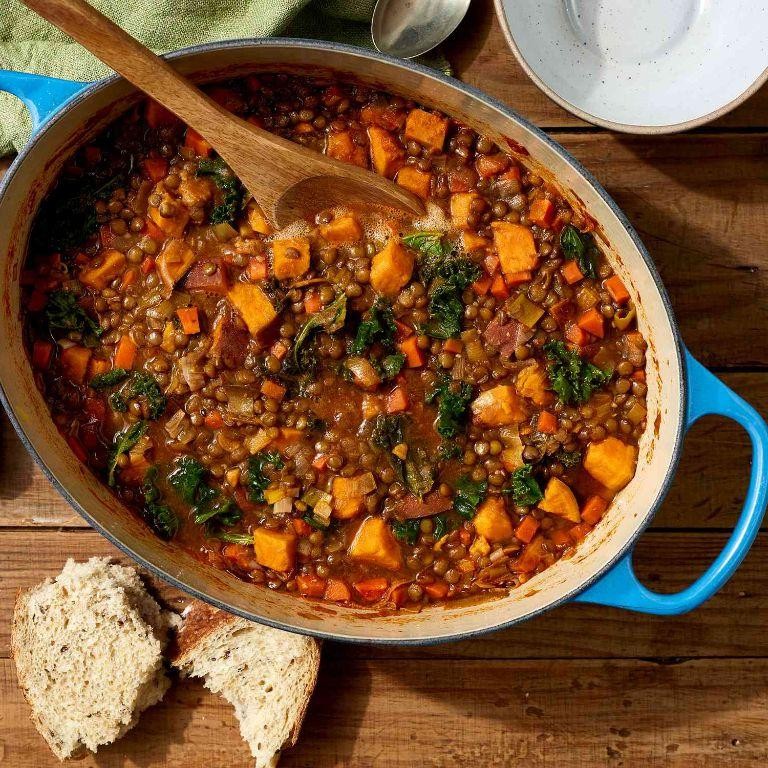
Great for those chilly evenings when you crave something hearty yet healthy, this Lentil and Vegetable Stew is a comforting bowl of goodness. Let me walk you through making this nourishing dish, perfect for beginners and seasoned cooks alike.
Ingredients
- 1 cup dried green lentils (rinsed and picked over – I find they hold their shape better than red lentils)
- 2 tbsp extra virgin olive oil (my go-to for its fruity flavor)
- 1 medium onion, diced (yellow onions are my preference for their sweetness)
- 2 carrots, peeled and diced (about 1 cup)
- 2 celery stalks, diced (about 1 cup)
- 3 garlic cloves, minced (fresh is best here for that punch of flavor)
- 4 cups vegetable broth (low-sodium to control the saltiness)
- 1 can (14.5 oz) diced tomatoes (with their juices for extra liquid)
- 1 tsp dried thyme (or 1 tbsp fresh if you have it)
- 1 bay leaf (don’t skip this – it adds depth)
- Salt and freshly ground black pepper (to taste, but start with 1/2 tsp salt)
Instructions
- Heat the olive oil in a large pot over medium heat until shimmering, about 1 minute.
- Add the onion, carrots, and celery. Cook, stirring occasionally, until the vegetables soften, about 5 minutes.
- Stir in the garlic and cook for 30 seconds until fragrant – don’t let it burn.
- Add the lentils, vegetable broth, diced tomatoes with their juices, thyme, and bay leaf. Bring to a boil.
- Reduce heat to low, cover, and simmer for 25-30 minutes, until the lentils are tender but not mushy.
- Remove the bay leaf. Season with salt and pepper. Tip: Taste as you go – you might need more salt than you think.
- Let the stew sit for 5 minutes off the heat before serving – this allows the flavors to meld beautifully.
This stew is wonderfully hearty with a slight bite from the lentils, and the vegetables add a sweet freshness. Try serving it with a dollop of Greek yogurt or a sprinkle of fresh parsley for a bright finish.
Turkey and Rice Casserole
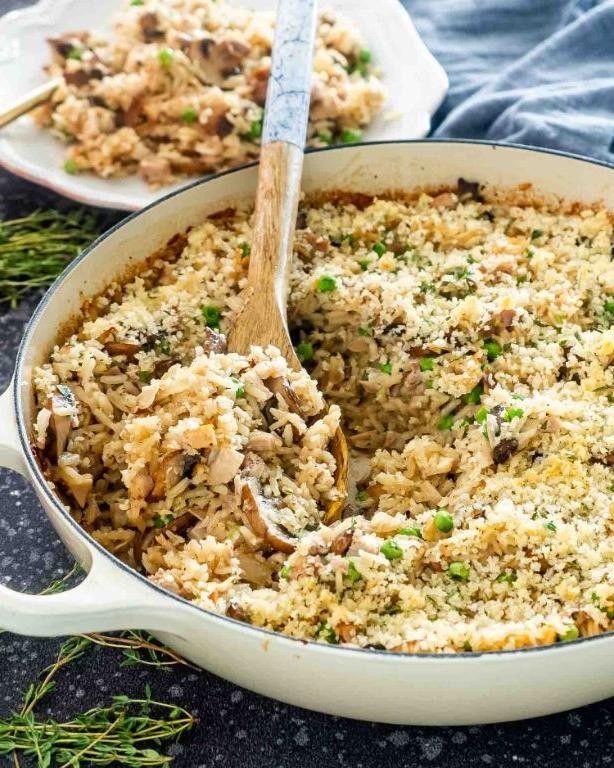
On a chilly evening, nothing beats the comforting embrace of a Turkey and Rice Casserole. This dish is a hearty, flavorful solution to your dinner dilemmas, combining simple ingredients into a meal that feels like home.
Ingredients
- 1 lb ground turkey (I find the 93% lean variety offers the perfect balance of flavor and healthiness.)
- 1 cup long-grain white rice (Basmati is my favorite for its fragrance and fluffiness.)
- 2 cups chicken broth (Homemade is best, but a good quality store-bought works in a pinch.)
- 1 cup diced onions (Yellow onions add a sweet depth.)
- 2 cloves garlic, minced (Freshly minced garlic makes all the difference.)
- 1 tbsp extra virgin olive oil (My go-to for sautéing.)
- 1 tsp dried thyme (It brings a subtle earthiness.)
- 1/2 tsp salt (Adjust based on your broth’s saltiness.)
- 1/4 tsp black pepper (Freshly ground for the best flavor.)
- 1 cup shredded cheddar cheese (Sharp cheddar adds a nice tang.)
Instructions
- Preheat your oven to 375°F (190°C) to ensure it’s ready for baking.
- Heat the olive oil in a large skillet over medium heat. Add the onions and sauté until translucent, about 5 minutes.
- Add the minced garlic and sauté for another 30 seconds, just until fragrant. Tip: Avoid browning the garlic to prevent bitterness.
- Increase the heat to medium-high and add the ground turkey. Cook, breaking it apart with a spoon, until no pink remains, about 5-7 minutes.
- Stir in the rice, chicken broth, thyme, salt, and pepper. Bring to a boil, then reduce heat to low, cover, and simmer for 15 minutes. Tip: Don’t peek! Keeping the lid on ensures the rice cooks evenly.
- Remove from heat and stir in half of the cheddar cheese. Transfer the mixture to a greased 9×13 inch baking dish.
- Sprinkle the remaining cheese on top. Bake for 20 minutes, or until the cheese is bubbly and slightly golden. Tip: For a crispier top, broil for the last 2 minutes.
Bubbly and golden, this casserole emerges from the oven with a comforting aroma. The rice is perfectly tender, enveloped in savory turkey and melted cheese, making every bite a delight. Serve it with a crisp green salad to add a fresh contrast to the rich flavors.
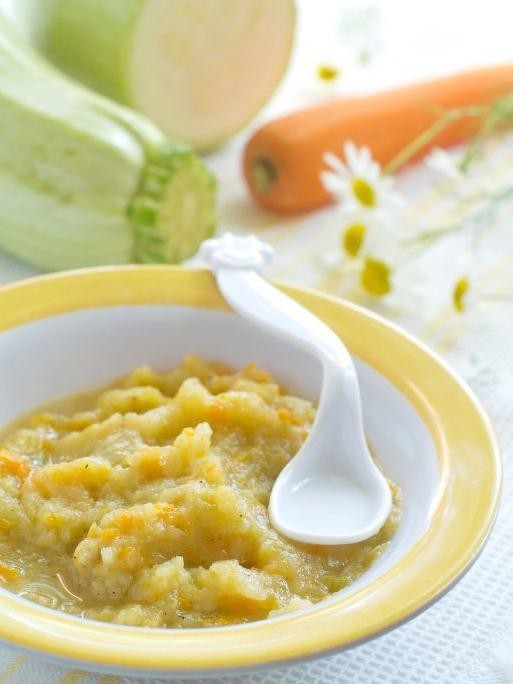
Zucchini and Corn Puree
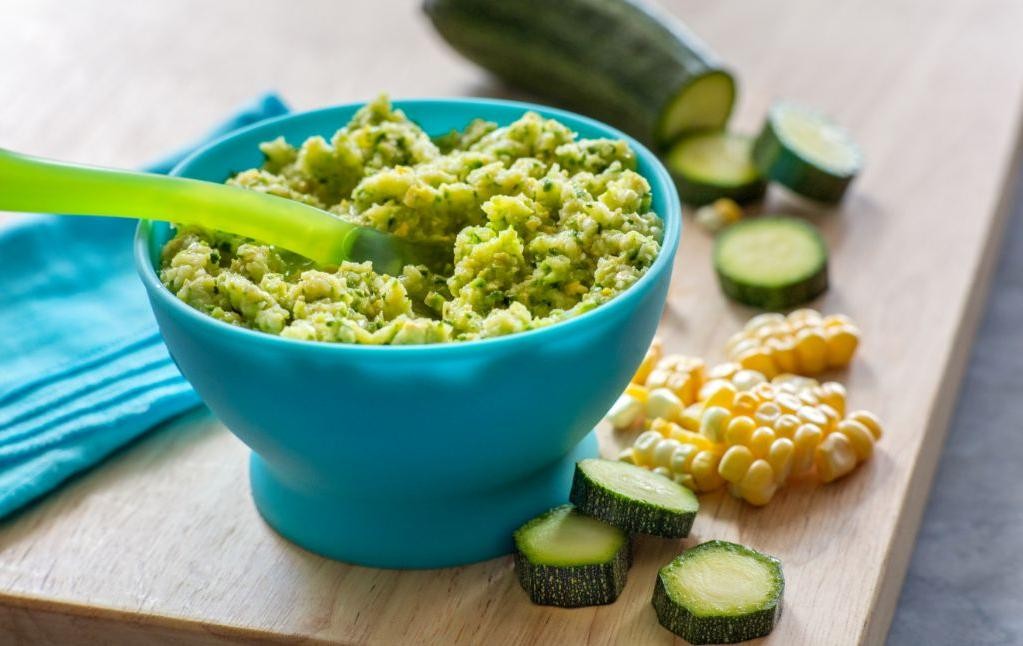
Just when you think summer veggies can’t get any better, along comes this Zucchini and Corn Puree to prove you wrong. It’s a simple, yet flavorful dish that showcases the best of the season’s produce, perfect for beginners to master.
Ingredients
- 2 medium zucchinis, chopped (I find the smaller ones are sweeter and less watery)
- 1 cup fresh corn kernels (about 2 ears, but frozen works in a pinch)
- 2 tbsp extra virgin olive oil (my go-to for its fruity flavor)
- 1/2 cup vegetable broth (homemade gives the best flavor, but store-bought is fine)
- 1 clove garlic, minced (because everything’s better with garlic)
- Salt to taste (I like to use sea salt for its subtle crunch)
Instructions
- Heat the olive oil in a medium saucepan over medium heat until shimmering, about 1 minute.
- Add the minced garlic and sauté until fragrant, about 30 seconds, being careful not to let it burn.
- Toss in the chopped zucchini and corn kernels, stirring to coat them in the oil and garlic. Cook for 5 minutes, until the zucchini starts to soften.
- Pour in the vegetable broth, bring to a simmer, then reduce the heat to low. Cover and let cook for 10 minutes, until the vegetables are very tender.
- Transfer the mixture to a blender or use an immersion blender directly in the pot to puree until smooth. If using a blender, be sure to vent the lid to let steam escape and blend in batches if necessary.
- Season with salt to taste, starting with 1/4 teaspoon and adjusting from there.
Mmm, the puree should be velvety smooth with a sweet, summery flavor from the corn and a slight earthiness from the zucchini. Try serving it as a dip with crusty bread or as a unique side to grilled meats.
Apple and Cinnamon Oatmeal
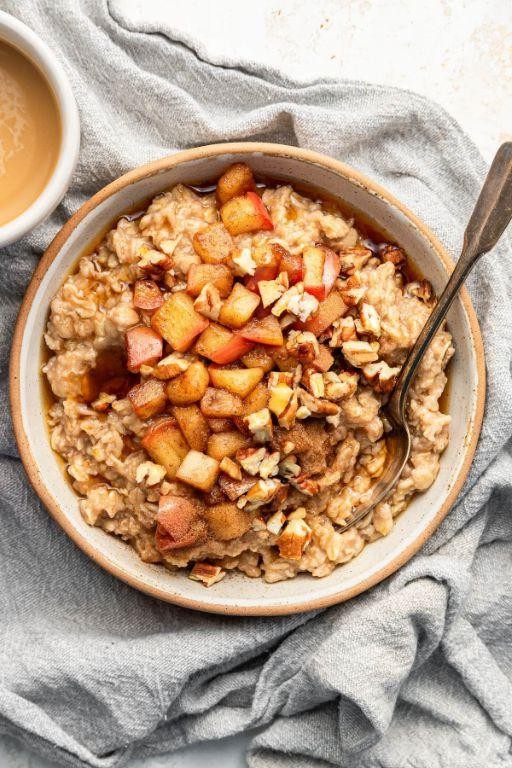
Just imagine starting your day with a warm, comforting bowl of Apple and Cinnamon Oatmeal, a dish that combines the wholesome goodness of oats with the sweet and spicy flavors of apple and cinnamon. Perfect for beginners, this recipe is straightforward and rewarding.
Ingredients
- 1 cup rolled oats (I love the texture they provide)
- 2 cups water (for a creamier texture, you can use milk)
- 1 medium apple, diced (I prefer Honeycrisp for its sweetness and crunch)
- 1 tbsp cinnamon (the heart of this dish, don’t skimp!)
- 2 tbsp honey (adjust according to your sweetness preference)
- 1 tbsp unsalted butter (for that rich, velvety finish)
- A pinch of salt (to balance the flavors)
Instructions
- In a medium saucepan, bring the water to a boil over high heat.
- Once boiling, reduce the heat to medium and stir in the rolled oats and a pinch of salt.
- Let the oats simmer for about 5 minutes, stirring occasionally to prevent sticking.
- Add the diced apple and cinnamon to the saucepan, stirring well to combine.
- Continue to cook for another 5 minutes, or until the apples are slightly softened and the oats have absorbed most of the water.
- Remove the saucepan from the heat and stir in the honey and butter until fully incorporated.
- Let the oatmeal sit for 2 minutes to thicken before serving.
Rich in flavor and with a comforting texture, this Apple and Cinnamon Oatmeal is a delightful way to kickstart your morning. Serve it with a drizzle of extra honey or a sprinkle of nuts for added crunch.
Beef and Tomato Pasta Sauce

Crafting the perfect Beef and Tomato Pasta Sauce is simpler than you might think, and it’s a fantastic way to bring hearty, comforting flavors to your table. Let’s break it down into easy-to-follow steps.
Ingredients
- 1 lb ground beef (I like using 80/20 for that perfect fat ratio)
- 2 tbsp extra virgin olive oil (my go-to for its fruity notes)
- 1 medium onion, finely diced (yellow onions are my preference for sweetness)
- 3 garlic cloves, minced (freshly minced makes all the difference)
- 28 oz canned crushed tomatoes (San Marzano tomatoes are my favorite for their depth of flavor)
- 1 tsp salt (adjust based on your tomatoes’ saltiness)
- 1/2 tsp black pepper (freshly ground for the best aroma)
- 1 tsp dried oregano (rub between your fingers to release the oils)
- 1/2 tsp red pepper flakes (optional, for a bit of heat)
- 1/4 cup fresh basil, chopped (adds a bright, fresh finish)
Instructions
- Heat the olive oil in a large skillet over medium heat until shimmering, about 2 minutes.
- Add the diced onion and cook, stirring occasionally, until translucent, about 5 minutes.
- Stir in the minced garlic and cook for 1 minute until fragrant, being careful not to burn it.
- Increase the heat to medium-high and add the ground beef, breaking it apart with a spoon. Cook until no longer pink, about 6 minutes.
- Reduce the heat to medium and add the crushed tomatoes, salt, pepper, oregano, and red pepper flakes. Stir to combine.
- Simmer the sauce uncovered for 20 minutes, stirring occasionally, to allow the flavors to meld.
- Remove from heat and stir in the fresh basil. Taste and adjust seasoning if necessary.
Delight in the rich, velvety texture of this sauce, with the beef adding a satisfying depth and the tomatoes offering a bright acidity. Serve it over al dente pasta with a sprinkle of Parmesan cheese for a classic touch, or use it as a base for a hearty lasagna.
Mango and Coconut Rice Pudding

Let’s dive into making a delightful Mango and Coconut Rice Pudding that’s perfect for any season. This recipe combines the tropical flavors of mango and coconut with the comforting texture of rice pudding, creating a dish that’s both refreshing and satisfying.
Ingredients
- 1 cup Arborio rice – its starchiness is key for creaminess.
- 1 can (13.5 oz) coconut milk – full fat for that rich flavor.
- 2 cups whole milk – because why skimp on creaminess?
- 1/2 cup sugar – adjust if your mango is very sweet.
- 1 ripe mango, diced – the star of the show, pick one that’s fragrant.
- 1/4 tsp salt – just a pinch to balance the sweetness.
- 1 tsp vanilla extract – pure vanilla makes all the difference.
Instructions
- In a medium saucepan, combine the Arborio rice, coconut milk, whole milk, sugar, and salt. Stir well to mix.
- Bring the mixture to a gentle boil over medium heat, then reduce to a simmer. Stir occasionally to prevent sticking.
- Cook for 25-30 minutes, or until the rice is tender and the mixture has thickened. Tip: The pudding will thicken more as it cools.
- Remove from heat and stir in the vanilla extract. Let it sit for 5 minutes to allow the flavors to meld.
- Gently fold in the diced mango, reserving a few pieces for garnish if desired.
- Serve warm or chill in the refrigerator for at least 2 hours for a cooler treat. Tip: For an extra touch, toast some coconut flakes to sprinkle on top.
The pudding should be creamy with a slight chew from the rice, bursting with tropical mango and coconut flavors. Try serving it in coconut shells for a fun, thematic presentation that’ll transport your guests straight to the islands.
Conclusion
Feeding your little one nutritious and delicious meals is a joy with our roundup of 17 baby food recipes perfect for 1-year-olds. Each recipe is designed to nourish and delight, making mealtime easier for busy parents. We’d love to hear which recipes become your favorites—leave a comment below! Don’t forget to share this article on Pinterest to help other parents discover these tasty options. Happy cooking!