Hungry for something light yet satisfying during Paryushan? You’re in the right place! Our roundup of 20 Delicious Paryushan Recipes for a Fulfilling Fast is packed with flavorful, easy-to-make dishes that’ll keep your spirits high and your stomach happy. From comforting soups to energizing snacks, these recipes are perfect for home cooks looking to celebrate the season with wholesome, tasty meals. Let’s dive in!
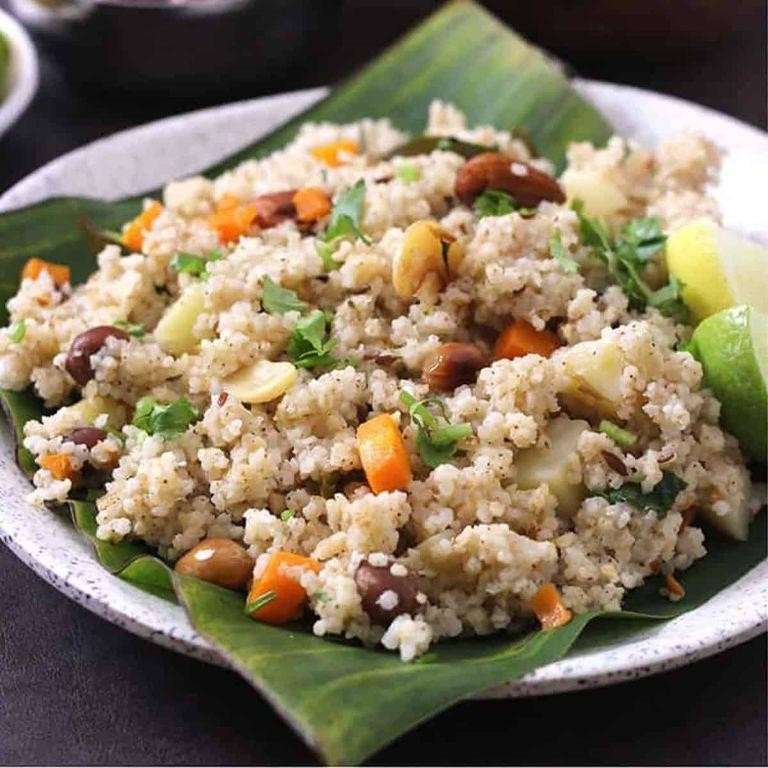
Sabudana Khichdi
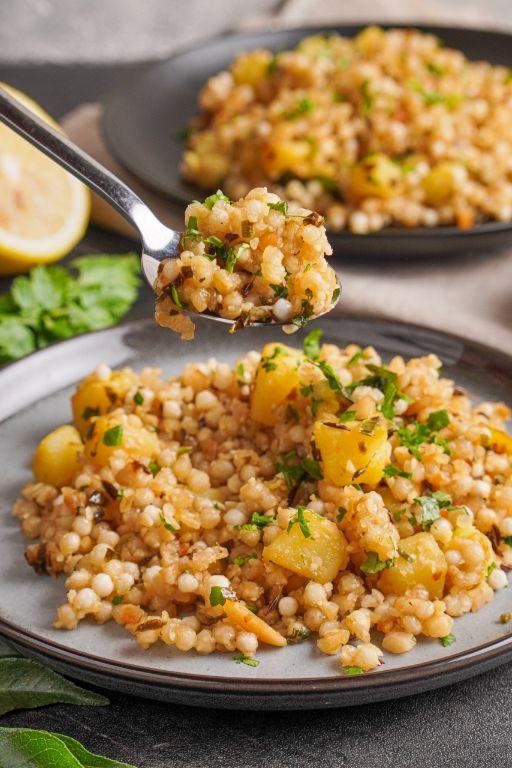
Mornings like these call for something light yet comforting, a dish that whispers of home and simplicity. Sabudana Khichdi, with its delicate pearls of tapioca, is just that—a gentle embrace to start the day.
Ingredients
- 1 cup sabudana (tapioca pearls), soaked overnight
- A couple of medium potatoes, peeled and diced
- A handful of roasted peanuts, roughly crushed
- A splash of ghee or oil
- 1 tsp cumin seeds
- A pinch of sugar
- Salt, as needed
- A few curry leaves
- 1 green chili, finely chopped (optional)
- A squeeze of lemon juice
- A sprinkle of fresh cilantro, for garnish
Instructions
- Drain the soaked sabudana well, ensuring no water remains. Tip: Press a pearl between your fingers; it should mash easily without being mushy.
- Heat a splash of ghee or oil in a pan over medium heat. Add the cumin seeds and let them sizzle for about 30 seconds until fragrant.
- Toss in the diced potatoes and a pinch of salt. Cover and cook for about 5 minutes, stirring occasionally, until they’re just tender. Tip: Don’t overcook; they should hold their shape.
- Add the green chili and curry leaves, stirring for another minute to release their aromas.
- Gently fold in the drained sabudana, roasted peanuts, and a pinch of sugar. Mix well but carefully to avoid breaking the pearls.
- Cover and cook on low heat for about 5 minutes, then check. The sabudana should turn translucent. Tip: If it sticks, sprinkle a little water and stir.
- Finish with a squeeze of lemon juice and a sprinkle of fresh cilantro.
As you take your first bite, notice the soft pearls against the slight crunch of peanuts, a dance of textures. The subtle sweetness from the sugar and the tang from the lemon make it a dish that’s both grounding and uplifting. Serve it warm, perhaps with a side of yogurt, for a meal that feels like a quiet morning stretched into the afternoon.
Kuttu Ki Puri
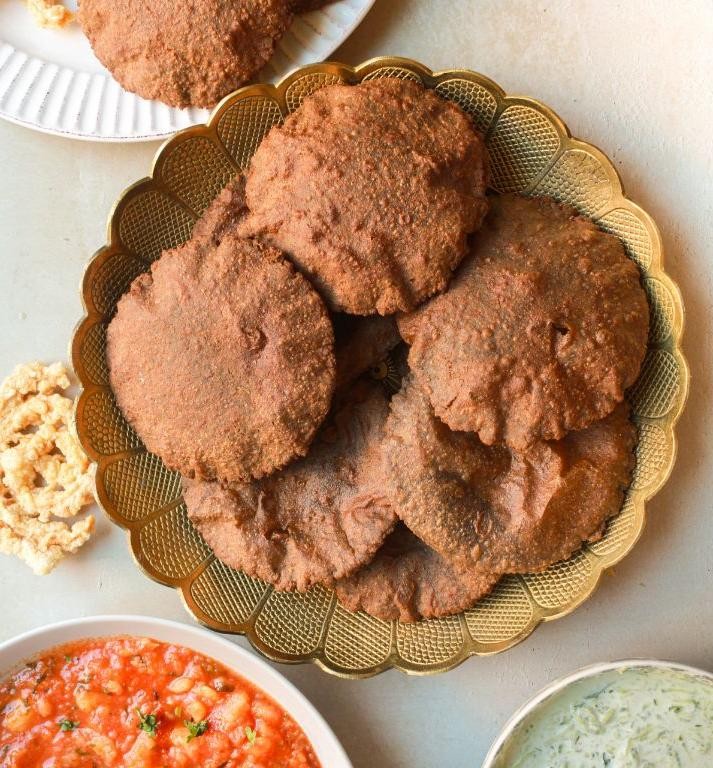
Beneath the quiet hum of the kitchen, there’s something deeply comforting about preparing Kuttu Ki Puri, a dish that whispers of tradition and warmth. It’s a simple yet profound pleasure, turning basic ingredients into something that feels like a hug.
Ingredients
- 1 cup of kuttu (buckwheat) flour, because that’s the heart of it all
- A splash of water, just enough to bring the dough together
- A couple of tablespoons of ghee, for that rich, buttery depth
- A pinch of salt, to lift all the flavors
- Oil for deep frying, because we’re going for golden perfection
Instructions
- In a large bowl, mix the kuttu flour and salt together, creating a little well in the center for the water.
- Slowly add water, a splash at a time, kneading gently until the dough comes together. It should be soft but not sticky—think of the texture of your earlobe for the perfect consistency.
- Divide the dough into small, equal portions, rolling each into a ball between your palms. Then, flatten each ball into a small disc, about 1/4 inch thick.
- Heat the oil in a deep pan over medium heat until it reaches 350°F. A tiny piece of dough should sizzle upon contact, telling you it’s just right.
- Carefully slide the puris into the hot oil, frying them one at a time. They’ll puff up beautifully—wait for that moment, then flip to ensure even cooking until both sides are a deep golden brown.
- Remove the puris with a slotted spoon, letting excess oil drip off before placing them on a paper towel-lined plate. A light dab with another paper towel ensures they’re not greasy.
So there you have it—Kuttu Ki Puri, with its crisp exterior giving way to a soft, slightly nutty interior. Serve them warm with a dollop of yogurt or a spicy potato curry, and watch how something so simple can become the highlight of the meal.
Singhare Ka Halwa
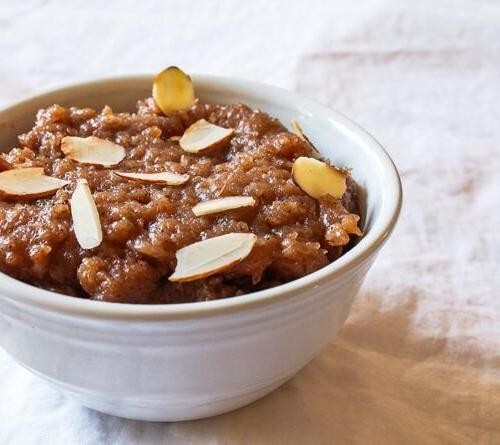
Gently, as the evening settles in, there’s a comfort in preparing something warm and nourishing, like the earthy sweetness of Singhare Ka Halwa. This dish, with its humble beginnings, transforms into a celebration of simplicity and flavor, perfect for those moments when you need a little warmth from within.
Ingredients
- 1 cup of water chestnut flour (singhare ka atta)
- 4 tablespoons of ghee (clarified butter)
- 1 cup of sugar
- 2 cups of water
- A splash of rose water
- A couple of cardamom pods, crushed
- A handful of chopped nuts (almonds and pistachios work beautifully)
Instructions
- Heat the ghee in a heavy-bottomed pan over medium heat until it melts completely, about 2 minutes.
- Add the water chestnut flour to the pan. Stir continuously to avoid lumps, roasting the flour until it turns a light golden color and releases a nutty aroma, roughly 10 minutes.
- Meanwhile, in a separate pot, bring the water to a boil. This step ensures the water is ready when needed, preventing the flour from burning.
- Slowly add the boiling water to the roasted flour, stirring constantly to prevent any lumps from forming. The mixture will thicken quickly, so keep stirring for about 5 minutes.
- Add the sugar, crushed cardamom pods, and a splash of rose water. Continue to cook on low heat, stirring occasionally, until the halwa pulls away from the sides of the pan, about 15 minutes.
- Turn off the heat and let the halwa sit for a couple of minutes. Then, garnish with the chopped nuts before serving.
Best enjoyed warm, this halwa offers a delightful contrast between the creamy texture and the crunch of nuts, with the floral hints of rose water and cardamom weaving through each bite. Serve it in small bowls, perhaps with a side of cold milk to balance its richness.
Aloo Jeera

Kneading through the memories of my childhood, I often find myself drawn to the simple yet profound flavors of Aloo Jeera, a dish that whispers the tales of comfort and warmth with every bite.
Ingredients
- 2 medium potatoes, peeled and diced into small cubes
- a couple of tablespoons of vegetable oil
- a teaspoon of cumin seeds
- a pinch of turmeric powder
- a splash of water
- salt, just enough to season
- a handful of fresh cilantro, chopped for garnish
Instructions
- Heat the vegetable oil in a pan over medium heat until it shimmers slightly, about 2 minutes.
- Add the cumin seeds to the oil and let them sizzle for about 30 seconds, until they release their aroma.
- Toss in the diced potatoes, stirring gently to coat them with the oil and cumin seeds.
- Sprinkle the turmeric powder and salt over the potatoes, mixing well to ensure even seasoning.
- Add a splash of water to the pan, then cover it with a lid to let the potatoes steam for about 10 minutes, stirring occasionally to prevent sticking.
- Once the potatoes are tender and can be easily pierced with a fork, remove the lid and let any excess water evaporate, about 2 minutes.
- Garnish with chopped cilantro before serving.
Unassuming in its simplicity, Aloo Jeera offers a delightful contrast of textures—soft potatoes with a slight bite from the cumin seeds. Try serving it alongside warm rotis or as a comforting side to brighten any meal.
Lauki Ki Kadhi
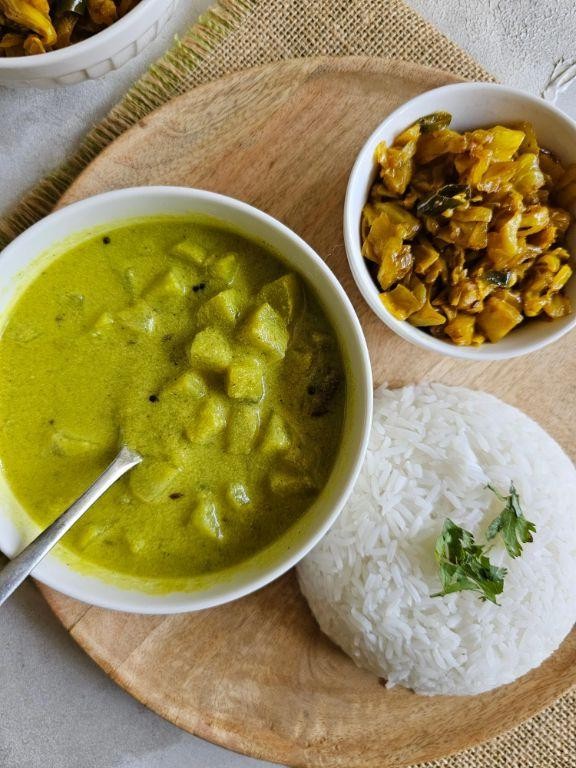
Dusk settles softly outside, and here in the kitchen, the gentle simmer of lauki ki kadhi promises comfort. This dish, a soothing blend of bottle gourd in a spiced yogurt gravy, feels like a quiet hug after a long day.
Ingredients
- 2 cups of diced bottle gourd (lauki)
- 1 cup of yogurt, whisked smooth
- 3 tablespoons of besan (gram flour)
- A splash of water to adjust consistency
- A couple of curry leaves
- 1 teaspoon of cumin seeds
- A pinch of asafoetida (hing)
- 1/2 teaspoon of turmeric powder
- 1 teaspoon of red chili powder
- 2 tablespoons of oil
- Salt, just enough to season
Instructions
- Heat oil in a deep pan over medium heat, and toss in the cumin seeds until they sizzle.
- Add the curry leaves and asafoetida, stirring for a few seconds until fragrant.
- Tip in the diced bottle gourd, turmeric, and red chili powder, sautéing until the gourd starts to soften, about 5 minutes.
- Whisk the besan into the yogurt until no lumps remain, then pour this into the pan, stirring constantly to avoid curdling.
- Add a splash of water to reach your desired consistency, and let the kadhi simmer on low heat for 15 minutes, stirring occasionally.
- Season with salt, and give it a final stir before turning off the heat.
Velvety with a hint of crunch from the gourd, this kadhi pairs beautifully with steamed rice or a warm roti. For a twist, try garnishing with fresh cilantro or a drizzle of ghee to elevate its homely charm.
Rajgira Paratha
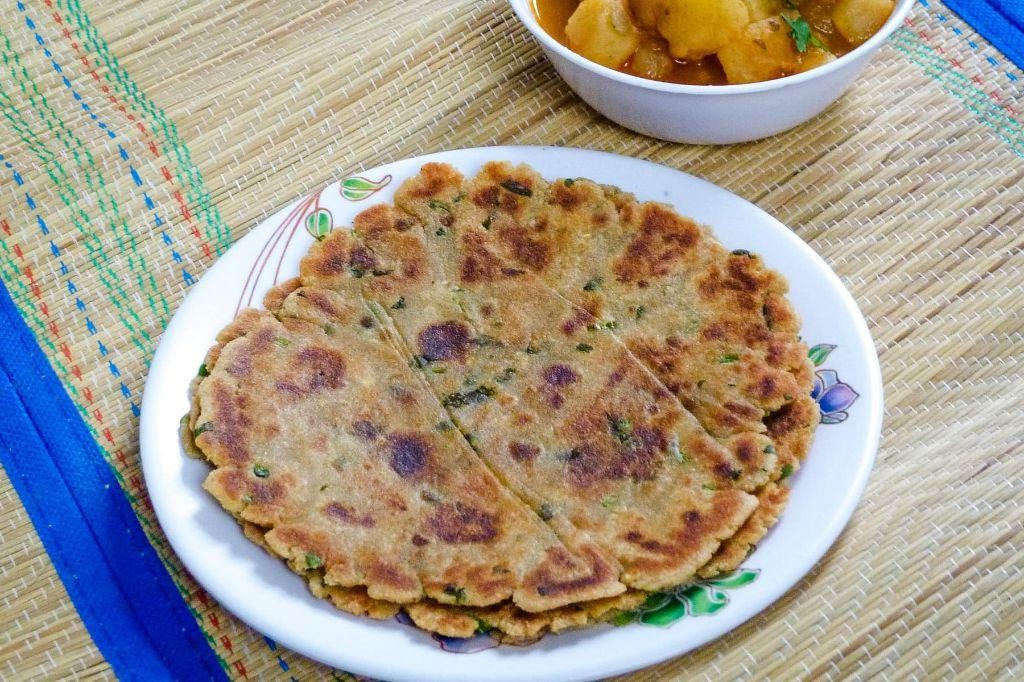
Amidst the quiet of the morning, there’s something deeply comforting about preparing Rajgira Paratha, a dish that carries the warmth of tradition and the simplicity of wholesome ingredients.
Ingredients
- 1 cup of rajgira (amaranth) flour, because its nutty flavor is just unbeatable
- A splash of water, just enough to bring the dough together
- A pinch of salt, to subtly enhance the flavors
- A couple of tablespoons of ghee, for that golden, crispy finish
Instructions
- In a large mixing bowl, combine the rajgira flour and salt, whisking them together to ensure the salt is evenly distributed.
- Slowly add water to the flour mixture, kneading gently until a soft, pliable dough forms. Tip: The dough should not stick to your hands; if it does, add a little more flour.
- Divide the dough into equal portions, rolling each into a smooth ball between your palms.
- On a lightly floured surface, flatten each ball with a rolling pin into a circle about 1/4 inch thick. Tip: If the dough cracks, moisten your hands with water and smooth the edges.
- Heat a skillet over medium heat (about 350°F) and place the rolled paratha on it.
- Cook for about 2 minutes until small bubbles appear, then flip it over.
- Spread a teaspoon of ghee on the top side, flip again, and apply ghee to the other side. Tip: Pressing lightly with a spatula ensures even cooking and a perfect golden color.
- Cook each side for another minute or until both sides are crispy and golden brown.
Kneading the dough for Rajgira Paratha is almost meditative, and the result is a delightfully crispy exterior with a soft, flavorful interior. Serve it warm with a dollop of yogurt or a drizzle of honey for a sweet contrast.
Samak Rice Pulao
As the evening light fades, there’s something deeply comforting about preparing a dish that feels like a warm embrace. Samak Rice Pulao, with its fragrant spices and tender fish, is just that—a melody of flavors that sings of home and heart.
Ingredients
- 1 cup basmati rice, rinsed until the water runs clear
- A couple of garlic cloves, minced
- A splash of olive oil
- 1 tsp cumin seeds
- 1 bay leaf
- A pinch of saffron threads, soaked in 2 tbsp warm water
- 2 cups water
- 1 lb white fish fillets, cut into chunks
- Salt, just enough to season
- A handful of fresh cilantro, chopped
Instructions
- Heat a splash of olive oil in a deep pan over medium heat. Toss in the cumin seeds and bay leaf, letting them sizzle for about 30 seconds until fragrant.
- Add the minced garlic, stirring for another 30 seconds until golden. Tip: Keep the heat medium to avoid burning the garlic.
- Stir in the rinsed basmati rice, coating it well with the oil and spices. This step ensures each grain is flavorful.
- Pour in 2 cups of water and the saffron with its soaking liquid. Bring to a boil, then reduce the heat to low, cover, and simmer for 15 minutes. Tip: Resist the urge to peek; keeping the lid on traps the steam.
- Gently place the fish chunks on top of the rice, sprinkle with salt, and cover again. Cook for another 10 minutes. The fish will steam perfectly atop the rice.
- Turn off the heat and let it sit, covered, for 5 minutes. Then, fluff the rice with a fork, mixing the fish gently into the rice. Tip: Letting it sit allows the flavors to meld beautifully.
- Garnish with chopped cilantro before serving.
Kindly savor the delicate flakes of fish nestled in fragrant rice, each bite a testament to simplicity and spice. Serve it with a side of crisp cucumber salad for a refreshing contrast.
Peanut Chutney
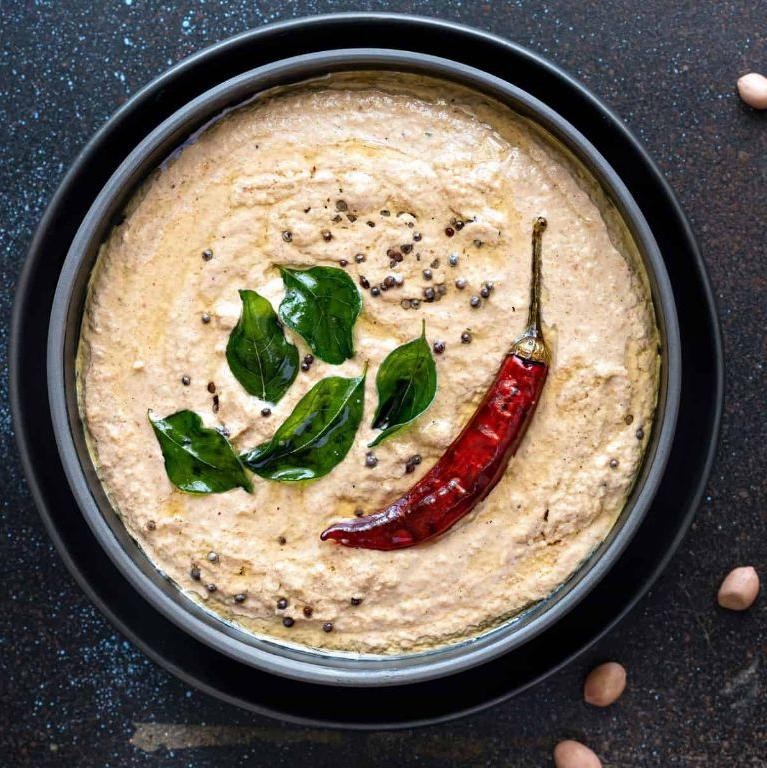
Dusk settles softly outside, and here in the kitchen, the simple act of making peanut chutney feels like a quiet rebellion against the rush of the day. It’s a humble dish, really, but its flavors are a bold whisper of comfort and spice.
Ingredients
- a cup of roasted peanuts, skins off for a smoother texture
- a couple of garlic cloves, because everything’s better with garlic
- a splash of lemon juice, to brighten things up
- a teaspoon of cumin seeds, for that earthy depth
- a pinch of salt, to tie all the flavors together
- a handful of fresh cilantro, for a burst of color and freshness
- a tablespoon of olive oil, to bring it all together
- a dash of water, just enough to get the consistency right
Instructions
- Start by tossing the roasted peanuts, garlic cloves, cumin seeds, and salt into your blender. A quick pulse here to break them down makes all the difference.
- Drizzle in the olive oil while the blender is running on low. This helps everything come together smoothly.
- Add the lemon juice and a dash of water. Blend until the mixture is mostly smooth but still has a bit of texture. Tip: scraping down the sides halfway ensures everything is evenly mixed.
- Throw in the cilantro last, blending just until it’s finely chopped and evenly distributed. Over-blending can turn your chutney a dull color, so keep an eye on it.
- Give it a taste and adjust the salt or lemon juice if needed. Sometimes, a little extra splash of water can loosen it up to your liking.
You’ll find this peanut chutney strikes a beautiful balance between creamy and chunky, with a flavor that’s nutty, tangy, and just a bit spicy. Try it slathered on warm toast or as a vibrant dip for crisp vegetables. Yours might just become the new favorite condiment in your fridge, its jar always half-empty.
Arbi Masala

Sometimes, the most comforting dishes are the ones that remind us of home, with their familiar aromas and the warmth they bring to our tables. Arbi Masala, with its tender taro root and aromatic spices, is one such dish that feels like a gentle hug on a quiet evening.
Ingredients
- 1 pound of taro root (arbi), peeled and sliced into half-inch thick pieces
- A couple of tablespoons of vegetable oil
- 1 teaspoon of cumin seeds
- A pinch of asafoetida (hing)
- 1 tablespoon of ginger-garlic paste
- 2 medium tomatoes, finely chopped
- A splash of water
- 1 teaspoon of turmeric powder
- 1 teaspoon of red chili powder
- 1 teaspoon of coriander powder
- 1 teaspoon of garam masala
- A handful of fresh coriander leaves, chopped
- Salt, just enough to season
Instructions
- Heat the vegetable oil in a pan over medium heat until it shimmers slightly.
- Add the cumin seeds and let them sizzle for about 30 seconds, until they release their aroma.
- Stir in a pinch of asafoetida, followed by the ginger-garlic paste, cooking until the raw smell disappears, about 1 minute.
- Toss in the chopped tomatoes and cook until they soften and the oil begins to separate, around 5 minutes.
- Add the taro root slices to the pan, stirring gently to coat them with the tomato mixture.
- Pour in a splash of water, then sprinkle the turmeric, red chili, coriander powder, and salt over the taro. Mix well.
- Cover the pan and let the taro cook on low heat for 15-20 minutes, stirring occasionally to prevent sticking. Tip: The taro is done when it’s tender and easily pierced with a fork.
- Uncover, sprinkle garam masala and fresh coriander leaves over the top, and give it one final stir.
- Let it sit for a couple of minutes off the heat before serving to allow the flavors to meld.
Rich in texture and bursting with earthy flavors, Arbi Masala pairs beautifully with steamed rice or warm rotis. For a twist, try serving it with a dollop of yogurt on the side to balance the spices.
Pumpkin Soup

On a quiet evening like this, there’s something deeply comforting about the idea of a warm, velvety pumpkin soup. It’s a dish that feels like a gentle hug, perfect for when the air starts to carry the first whispers of autumn.
Ingredients
- a couple of tablespoons of olive oil
- 1 medium onion, chopped
- 2 cloves of garlic, minced
- 4 cups of pumpkin puree (or about one small pumpkin, roasted and pureed)
- 4 cups of vegetable broth
- a splash of heavy cream
- a pinch of salt and pepper
- a sprinkle of nutmeg
Instructions
- Heat the olive oil in a large pot over medium heat until it shimmers, about 2 minutes.
- Add the chopped onion and minced garlic, sautéing until they’re soft and fragrant, roughly 5 minutes. Tip: Keep the heat medium to avoid browning the onions too quickly.
- Stir in the pumpkin puree, blending it well with the onions and garlic.
- Pour in the vegetable broth, stirring to combine all the ingredients smoothly. Bring the mixture to a gentle boil.
- Reduce the heat to low, letting the soup simmer uncovered for 20 minutes. This allows the flavors to meld beautifully. Tip: Stir occasionally to prevent sticking.
- After simmering, remove the pot from the heat. Use an immersion blender to puree the soup until it’s completely smooth. Tip: If you don’t have an immersion blender, a regular blender works too—just blend in batches and be careful with the hot liquid.
- Return the soup to the pot over low heat. Stir in the heavy cream, salt, pepper, and nutmeg, warming it through for another 5 minutes.
Gently ladle the soup into bowls, noticing how its creamy texture and rich, earthy flavor make it a standout dish. For a creative twist, top each serving with roasted pumpkin seeds or a drizzle of maple syrup to enhance its natural sweetness.
Banana Walnut Smoothie

Kneading through the quiet of the morning, there’s something profoundly comforting about blending a Banana Walnut Smoothie. It’s like capturing the essence of a lazy Sunday in a glass, where each sip feels like a gentle nudge to slow down and savor the moment.
Ingredients
- 2 ripe bananas, peeled and sliced
- a handful of walnuts, about 1/4 cup
- a splash of vanilla extract, roughly 1 tsp
- a couple of ice cubes
- 1 cup of almond milk
- a drizzle of honey, about 1 tbsp
Instructions
- Start by adding the sliced bananas into your blender.
- Toss in the walnuts, followed by the vanilla extract for that warm, aromatic touch.
- Drop in the ice cubes to give your smoothie a refreshing chill.
- Pour the almond milk over the ingredients, ensuring everything is submerged for an even blend.
- Drizzle the honey into the mix for a natural sweetness that complements the bananas perfectly.
- Blend on high for about 30 seconds, or until the mixture is smooth and no chunks remain. Tip: If the smoothie is too thick, add a little more almond milk to reach your desired consistency.
- Give it a quick taste and adjust the sweetness with a bit more honey if needed. Tip: For an extra flavor boost, a pinch of cinnamon can work wonders here.
- Pour the smoothie into a tall glass and enjoy immediately. Tip: Garnishing with a few walnut pieces on top adds a nice crunch and makes it look extra inviting.
Smooth and creamy with a nutty undertone, this Banana Walnut Smoothie is a delightful way to start your day or as a mid-afternoon pick-me-up. Serve it with a side of toasted whole grain bread for a satisfying, balanced breakfast.
Coconut Ladoo

On a quiet evening like this, there’s something deeply comforting about the thought of making Coconut Ladoo, a sweet treat that feels like a warm hug. Its simplicity and the joy it brings are unmatched, making it a perfect project for moments when you need a little sweetness in your life.
Ingredients
- 2 cups of finely grated coconut, because texture matters
- 1 cup of condensed milk, for that rich, creamy sweetness
- A splash of vanilla extract, just to whisper a hint of warmth
- A couple of cardamom pods, crushed, for a fragrant surprise
- A handful of chopped pistachios, because crunch is everything
Instructions
- In a non-stick pan, combine the grated coconut and condensed milk over medium heat. Stir gently to marry the flavors.
- Keep stirring the mixture for about 10 minutes, or until it starts to leave the sides of the pan. This is your cue it’s ready.
- Add the vanilla extract and crushed cardamom, stirring for another minute to infuse the mixture with their aromas.
- Remove from heat and let it cool just enough to handle. Then, shape into small balls, rolling them between your palms.
- Roll each ball in chopped pistachios, pressing lightly so they stick. This not only adds texture but a pop of color.
- Let them set in the refrigerator for about an hour, allowing the flavors to meld and the texture to firm up.
Delightfully soft with a subtle crunch, these Coconut Ladoos are a testament to the beauty of simplicity. Serve them on a platter lined with banana leaves for an extra touch of elegance, or simply enjoy them as a sweet pause in your day.
Makhana Kheer

Makhana Kheer, a comforting bowl of creamy goodness, whispers tales of tradition and warmth, perfect for those quiet evenings when the soul seeks solace in simplicity.
Ingredients
- 1 cup of makhana (fox nuts)
- 4 cups of whole milk
- a splash of rose water
- a couple of cardamom pods, crushed
- 1/2 cup of sugar
- a handful of chopped nuts (almonds and pistachios)
- a pinch of saffron strands
Instructions
- Heat a large pan over medium heat and dry roast the makhana until they turn crisp and slightly golden, about 5 minutes. Tip: Keep stirring to prevent burning.
- Once roasted, let them cool for a bit, then crush them coarsely using your hands or a mortar and pestle.
- In the same pan, bring the milk to a gentle boil over medium heat, stirring occasionally to prevent sticking.
- Add the crushed makhana to the boiling milk and simmer on low heat for about 20 minutes, stirring frequently. Tip: The mixture will thicken, so keep an eye on it to avoid scorching.
- Stir in the sugar, crushed cardamom pods, and saffron strands, mixing well until the sugar dissolves completely.
- Let the kheer simmer for another 5 minutes, then turn off the heat. Tip: The kheer will thicken further as it cools, so don’t worry if it seems a bit runny now.
- Finally, add a splash of rose water and the chopped nuts, giving it a good stir.
As the kheer cools, it sets into a lusciously thick consistency, with the fragrance of cardamom and rose water weaving through each spoonful. Serve it chilled, garnished with extra nuts and a few saffron strands for a touch of elegance.
Sweet Potato Chaat
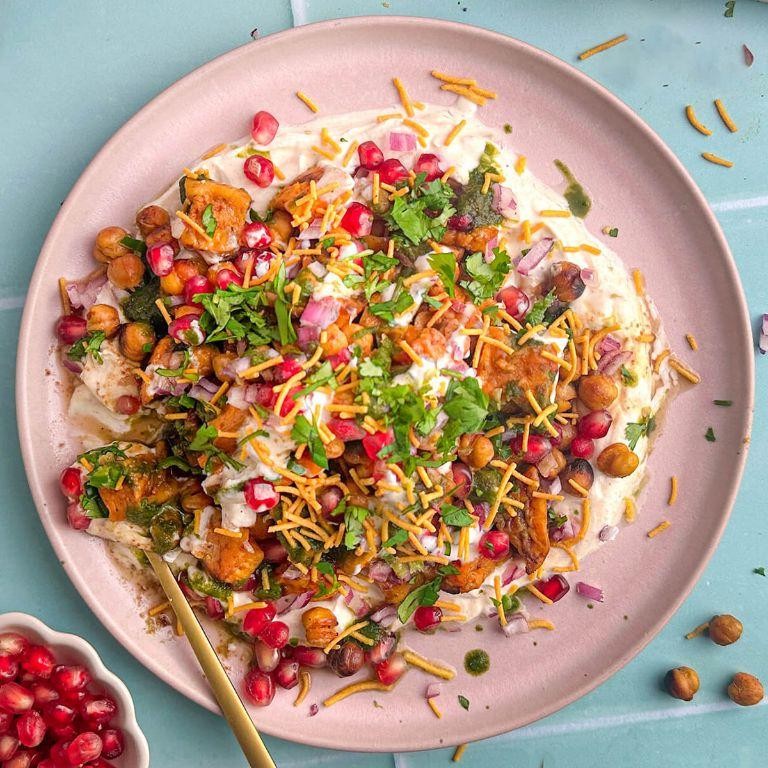
Remembering the first time I tasted Sweet Potato Chaat, it was like discovering a hidden gem in the world of flavors, a dish that perfectly balances sweetness with a tangy kick, all wrapped in the comforting warmth of spices.
Ingredients
- 2 medium sweet potatoes, peeled and cubed
- A splash of olive oil
- A couple of pinches of salt
- 1 tsp cumin seeds
- 1/2 tsp turmeric powder
- A handful of fresh cilantro, chopped
- 1 tbsp lemon juice
- A sprinkle of chaat masala
- A drizzle of tamarind chutney
Instructions
- Preheat your oven to 400°F. This high heat will help caramelize the sweet potatoes, enhancing their natural sweetness.
- Toss the cubed sweet potatoes with a splash of olive oil and a couple of pinches of salt until evenly coated. Spread them out on a baking sheet in a single layer to ensure they roast evenly.
- Roast for 25 minutes, or until the edges start to crisp and the centers are tender. Turning them halfway through will help achieve an even roast.
- While the sweet potatoes are roasting, toast 1 tsp cumin seeds in a dry pan over medium heat for about 30 seconds, until fragrant. This releases their essential oils, deepening the flavor of your chaat.
- Once the sweet potatoes are done, transfer them to a bowl. Sprinkle with the toasted cumin seeds, 1/2 tsp turmeric powder, and a handful of fresh cilantro. The turmeric not only adds color but also a subtle earthiness.
- Drizzle with 1 tbsp lemon juice and a sprinkle of chaat masala, then give everything a gentle toss. The lemon juice brightens the dish, while the chaat masala adds that signature tangy-spicy flavor.
- Finish with a drizzle of tamarind chutney for a sweet and sour contrast that ties all the flavors together.
The result is a dish where each bite offers a contrast of textures—creamy sweet potatoes against the crunch of roasted edges, all brought together by the vibrant flavors of the spices and chutney. Serve it warm as a side or top it with some yogurt for a more substantial snack.
Tomato Cucumber Salad
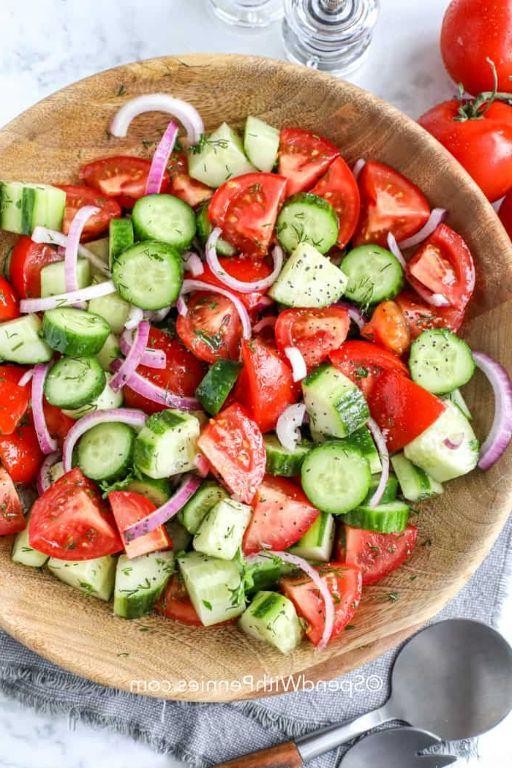
Moments like these call for simplicity, for dishes that speak softly yet leave a lasting impression. A tomato cucumber salad is just that—a humble, refreshing embrace of summer’s bounty, perfect for those quiet afternoons when the sun lingers a little too long.
Ingredients
- 2 cups of cherry tomatoes, halved
- 1 large cucumber, thinly sliced
- A splash of olive oil
- A couple of tablespoons of red wine vinegar
- A pinch of salt
- A handful of fresh basil leaves, torn
Instructions
- Start by washing the cherry tomatoes and cucumber under cold running water. Pat them dry with a clean towel.
- Halve the cherry tomatoes and place them in a large mixing bowl. Tip: For an extra burst of flavor, use a mix of tomato varieties.
- Thinly slice the cucumber and add it to the bowl with the tomatoes. Tip: Leaving the skin on adds a nice crunch and color.
- Drizzle a splash of olive oil and a couple of tablespoons of red wine vinegar over the vegetables. Tip: The ratio of oil to vinegar should be about 3:1 for the perfect balance.
- Sprinkle a pinch of salt over the salad and gently toss everything together to combine.
- Finally, tear a handful of fresh basil leaves and scatter them over the top for a fragrant finish.
Out of this simple combination comes a salad that’s crisp, juicy, and vibrant, with the basil lending a sweet, peppery note. Serve it alongside grilled fish or fold it into a wrap for a quick, satisfying lunch.
Spinach Pakora
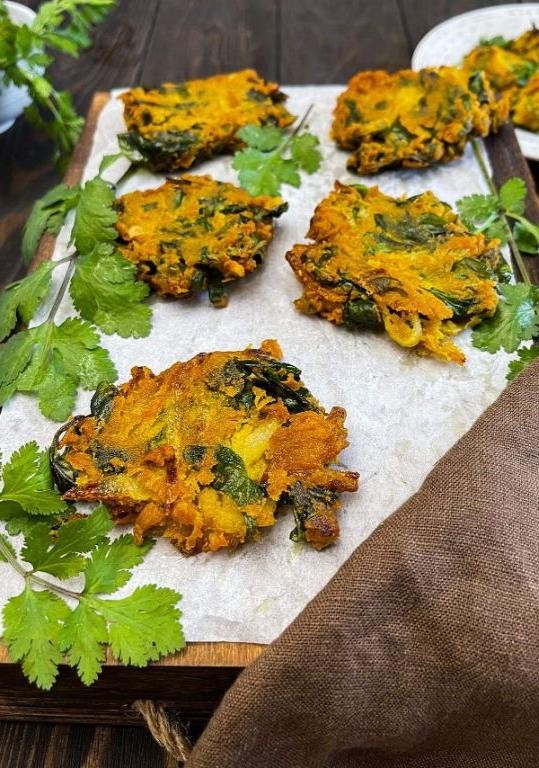
As the evening light fades, there’s something deeply comforting about the crisp, golden edges of spinach pakora, a dish that carries the warmth of spices and the freshness of greens in every bite.
Ingredients
- A couple of cups of fresh spinach, roughly chopped
- 1 cup of chickpea flour
- A splash of water, just enough to make a thick batter
- 1 teaspoon of cumin seeds
- A pinch of turmeric powder
- 1/2 teaspoon of red chili powder
- Oil for deep frying, enough to submerge the pakoras
Instructions
- In a large mixing bowl, combine the chickpea flour, cumin seeds, turmeric powder, and red chili powder.
- Slowly add water to the dry ingredients, stirring continuously to avoid lumps, until you achieve a thick batter consistency. Tip: The batter should coat the back of a spoon.
- Gently fold in the chopped spinach, ensuring each leaf is lightly coated with the batter.
- Heat oil in a deep pan over medium heat until it reaches 350°F. Tip: Test the oil by dropping a small amount of batter; if it sizzles and rises to the top, the oil is ready.
- Using a tablespoon, carefully drop spoonfuls of the batter into the hot oil, frying in batches to avoid overcrowding.
- Fry each batch for about 3-4 minutes, turning occasionally, until they’re golden brown and crisp. Tip: Keep the heat consistent to ensure even cooking.
- Remove the pakoras with a slotted spoon and drain on paper towels to absorb excess oil.
Each bite of these spinach pakoras offers a delightful crunch, giving way to the soft, flavorful interior. Serve them hot with a side of mint chutney or alongside a steaming cup of masala chai for a truly comforting experience.
Moong Dal Chilla

Remembering the quiet mornings when the kitchen felt like a sanctuary, I find myself drawn to the simplicity of Moong Dal Chilla, a dish that whispers of comfort and ease. It’s a gentle reminder that some of the most nourishing meals come from the humblest of ingredients.
Ingredients
- 1 cup of split yellow moong dal, soaked overnight
- A splash of water, just enough to blend
- A pinch of salt, to whisper its presence
- A couple of green chilies, finely chopped for a subtle kick
- A handful of fresh cilantro, roughly torn
- 1/2 tsp of turmeric powder, for its golden hue
- A drizzle of oil, for cooking
Instructions
- Drain the soaked moong dal and blend it with a splash of water until smooth, like a morning pond undisturbed.
- Stir in the salt, green chilies, cilantro, and turmeric powder into the batter, mixing gently as if folding in your thoughts.
- Heat a non-stick pan over medium heat and drizzle a bit of oil, spreading it lightly with the back of a spoon.
- Pour a ladleful of batter onto the pan, tilting it to spread the batter into a thin circle, as if drawing a moon with your hand.
- Cook for about 2 minutes until the edges lift easily, then flip with care, cooking the other side for another minute until golden spots appear like freckles.
- Tip: Keep the heat medium to avoid burning, letting the chilla cook through evenly.
- Tip: If the batter sticks, the pan might need a bit more oil or a moment to heat properly.
- Tip: For extra crispiness, let the chilla cook a tad longer on each side, listening for a slight sizzle.
- Serve hot, straight from the pan to the plate.
Just like that, you have a stack of golden Moong Dal Chillas, their edges crisp, the centers soft and yielding. They’re perfect rolled up with a dollop of yogurt or simply savored as is, a quiet meal for a quiet moment.
Avocado Chocolate Mousse
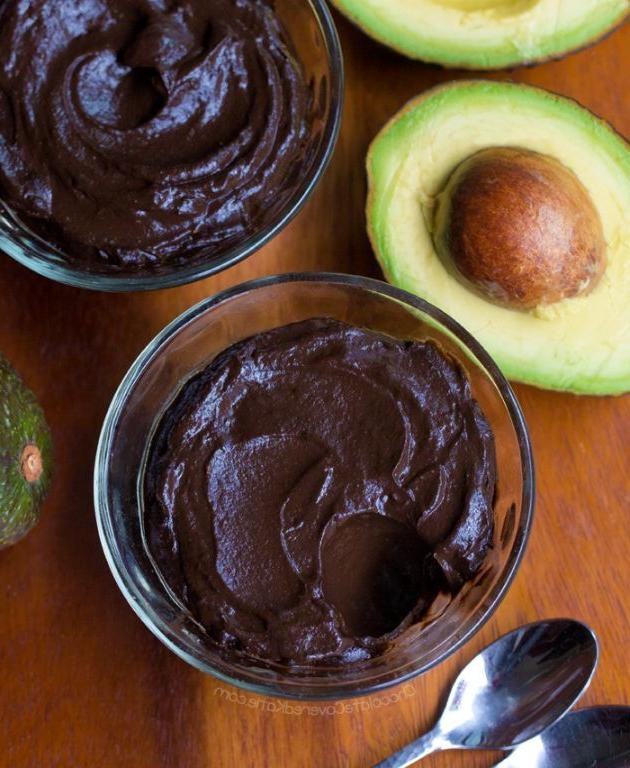
Very few things in life are as comforting as the creamy, rich texture of avocado blended into a decadent chocolate mousse. It’s a surprising twist that turns a simple fruit into a luxurious dessert, perfect for those quiet evenings when you crave something sweet yet wholesome.
Ingredients
- 2 ripe avocados, peeled and pitted
- 1/2 cup of dark chocolate chips, melted
- 1/4 cup of maple syrup, for that gentle sweetness
- A splash of vanilla extract, to round out the flavors
- A couple of tablespoons of cocoa powder, for that deep chocolatey essence
- A pinch of salt, to enhance all the flavors
Instructions
- Start by melting the dark chocolate chips in a microwave-safe bowl, heating them in 30-second bursts until smooth. Let it cool slightly so it doesn’t cook the avocado.
- In a food processor, combine the peeled and pitted avocados, melted chocolate, maple syrup, vanilla extract, cocoa powder, and a pinch of salt. Tip: Scrape down the sides of the processor to ensure everything blends evenly.
- Blend the mixture on high until it’s completely smooth and no avocado chunks remain. This might take a couple of minutes, so be patient for that perfect mousse texture.
- Once smooth, transfer the mousse into serving dishes. Tip: For an extra touch of elegance, pipe the mousse into the dishes using a pastry bag.
- Chill in the refrigerator for at least 2 hours before serving. This allows the flavors to meld and the texture to firm up. Tip: Cover the dishes with plastic wrap touching the surface of the mousse to prevent a skin from forming.
What you’ll find after the chill is a mousse that’s incredibly smooth, with a richness that belies its simple ingredients. Serve it with a sprinkle of sea salt or fresh berries to contrast the sweetness, making each bite a little celebration.
Dates and Nuts Energy Balls
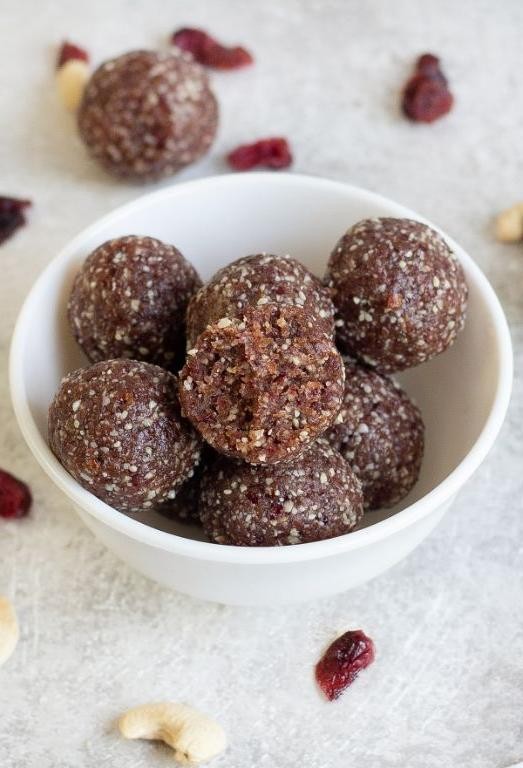
Delving into the quiet of the kitchen, I find myself reaching for the simplest of ingredients to craft something both nourishing and comforting. These dates and nuts energy balls are my go-to for a quick, wholesome treat that feels like a warm hug on a busy day.
Ingredients
- a cup of pitted dates, packed tight
- a half cup of raw almonds, because their crunch is unmatched
- a splash of vanilla extract, for that whisper of sweetness
- a couple of tablespoons of cocoa powder, because chocolate makes everything better
- a pinch of salt, to balance the flavors
Instructions
- Start by tossing the pitted dates and raw almonds into your food processor. Let them whirl together until they form a sticky, crumbly mixture.
- Add the vanilla extract, cocoa powder, and that pinch of salt. Process again until everything comes together in a dough-like consistency. Tip: If the mixture feels too dry, a teaspoon of water can bring it together.
- Roll the mixture into small, bite-sized balls. Tip: Wetting your hands slightly prevents the dough from sticking.
- Place the balls on a tray lined with parchment paper and pop them in the fridge for about 30 minutes to set. Tip: This step is crucial for the perfect texture.
Kind of magical how these little balls pack such a punch of energy and flavor, isn’t it? The texture is delightfully chewy with a satisfying crunch from the almonds, and the cocoa adds a depth that makes them irresistible. Try rolling them in shredded coconut or drizzling with melted dark chocolate for an extra special touch.
Herbal Tea with Tulsi and Ginger
Gently, as the morning light filters through the kitchen window, there’s something profoundly comforting about brewing a cup of herbal tea with tulsi and ginger. It’s a simple ritual that soothes the soul, blending the earthy sweetness of tulsi with the spicy warmth of ginger.
Ingredients
- 2 cups of water
- a handful of fresh tulsi leaves (about 10)
- a thumb-sized piece of ginger, thinly sliced
- a splash of honey (optional)
Instructions
- Bring 2 cups of water to a rolling boil in a small saucepan over medium-high heat.
- Add the thinly sliced ginger to the boiling water, reducing the heat to let it simmer gently for about 5 minutes. This allows the ginger to infuse its spicy warmth into the water.
- Toss in the fresh tulsi leaves, and let them steep in the simmering water for another 3 minutes. The leaves will soften, releasing their aromatic and earthy flavors.
- Turn off the heat and let the tea sit for a minute, allowing the flavors to meld together beautifully.
- Strain the tea into your favorite cup, pressing gently on the tulsi leaves to extract every bit of their goodness.
- If you like a touch of sweetness, stir in a splash of honey while the tea is still warm.
Perfectly balanced, this herbal tea offers a harmonious blend of flavors—ginger’s zesty kick softened by tulsi’s sweet, herbal notes. Serve it in a clear glass to admire its golden hue, or enjoy it under the stars for a moment of quiet reflection.
Conclusion
Whether you’re observing Paryushan or simply exploring new culinary horizons, these 20 delicious recipes promise a fulfilling fast with flavors that delight. We invite you to try these dishes, share your favorites in the comments, and spread the joy by pinning this article on Pinterest. Happy cooking!