Looking for some scrumptious vegan snacks that’ll dazzle your taste buds and impress your friends? Whether you’re hosting a party, need a quick bite, or just craving something deliciously plant-based, we’ve got you covered. Dive into our roundup of 20 Delicious Vegan Snack Recipes for Every Occasion—your next favorite treat is just a scroll away!
Avocado and Chickpea Toast
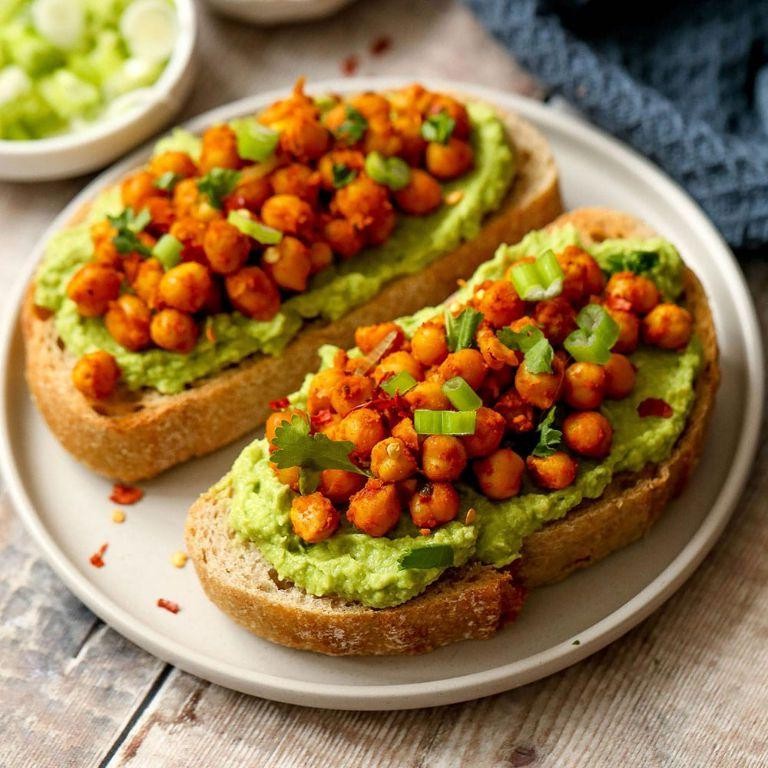
Unbelievably simple yet packed with flavor, this Avocado and Chickpea Toast has become my go-to breakfast on busy mornings. It’s a dish that reminds me of sunny weekends when I have a little extra time to savor my meal, blending creamy avocado with the hearty texture of chickpeas for a satisfying start to the day.
Ingredients
- 1 ripe avocado, creamy and slightly firm
- 1/2 cup cooked chickpeas, drained and rinsed
- 2 slices whole grain bread, thick-cut and toasted
- 1 tbsp rich extra virgin olive oil
- 1/2 tsp finely ground black pepper
- 1/4 tsp sea salt, flaky
- 1 tbsp fresh lemon juice, bright and tangy
- 1/4 tsp red pepper flakes, for a subtle heat
Instructions
- Toast the whole grain bread until golden and crisp, about 3 minutes in a toaster set to medium-high.
- While the bread toasts, mash the ripe avocado in a small bowl with the back of a fork until smooth but slightly chunky.
- Stir in the lemon juice, sea salt, and black pepper into the mashed avocado to enhance its flavor.
- In another bowl, toss the chickpeas with olive oil and red pepper flakes until evenly coated.
- Spread the mashed avocado evenly over the toasted bread slices.
- Top the avocado with the seasoned chickpeas, pressing them lightly into the avocado to adhere.
- Drizzle with a little more olive oil and a sprinkle of red pepper flakes for an extra kick, if desired.
So there you have it—a toast that’s creamy, crunchy, and bursting with flavors. The contrast between the smooth avocado and the hearty chickpeas makes every bite interesting. Try serving it with a side of mixed greens for a fuller meal or enjoy it as is for a quick, nutritious breakfast.
Sweet Potato and Black Bean Quesadillas
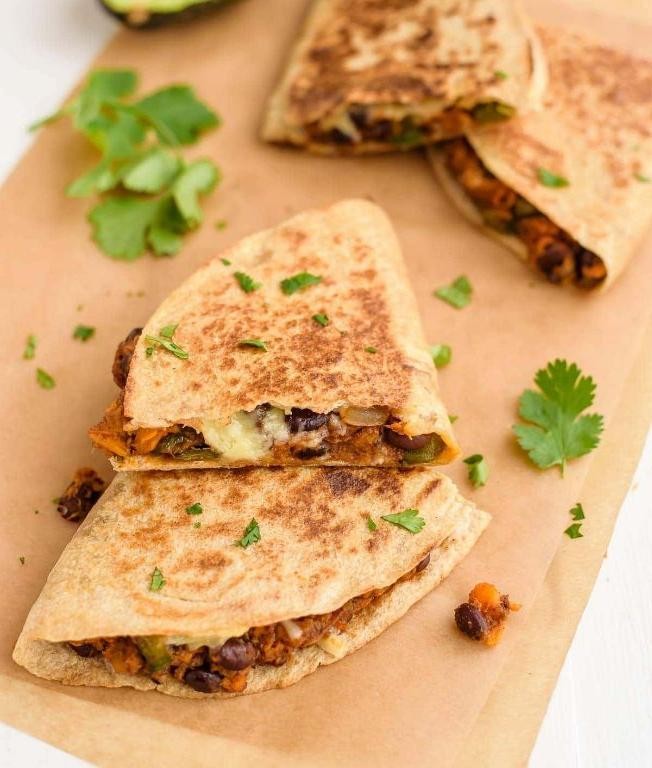
Finally, a recipe that combines my love for sweet potatoes and the convenience of a quick weeknight meal. These Sweet Potato and Black Bean Quesadillas are a game-changer, packed with flavors and textures that make every bite exciting. I remember the first time I made them; my kitchen was filled with the most inviting aromas, and they’ve been a staple in my home ever since.
Ingredients
- 1 large sweet potato, peeled and diced into 1/2-inch cubes
- 1 tbsp rich extra virgin olive oil
- 1/2 tsp ground cumin
- 1/2 tsp smoked paprika
- 1/4 tsp finely ground black pepper
- 1/2 tsp sea salt
- 1 cup canned black beans, rinsed and drained
- 1/2 cup shredded Monterey Jack cheese
- 1/2 cup shredded sharp cheddar cheese
- 4 large flour tortillas
- 1/4 cup fresh cilantro, chopped
- 1 ripe avocado, sliced
- 1/2 cup sour cream
- 1 lime, cut into wedges
Instructions
- Preheat your oven to 400°F and line a baking sheet with parchment paper.
- Toss the diced sweet potato with olive oil, cumin, smoked paprika, black pepper, and sea salt until evenly coated. Spread on the baking sheet in a single layer.
- Roast for 25 minutes, flipping halfway, until the sweet potatoes are tender and slightly caramelized. Tip: Don’t overcrowd the pan to ensure even roasting.
- In a large bowl, gently mix the roasted sweet potatoes with black beans and half of the chopped cilantro.
- Heat a large skillet over medium heat. Place one tortilla in the skillet, sprinkle with a quarter of the cheese, then spread a quarter of the sweet potato and black bean mixture over half of the tortilla.
- Fold the tortilla over the filling and cook for 2-3 minutes on each side, until the tortilla is golden and the cheese is melted. Tip: Press down gently with a spatula to help the quesadilla hold together.
- Repeat with the remaining tortillas and filling. Tip: Keep cooked quesadillas warm in the oven at 200°F while you finish the rest.
- Serve the quesadillas topped with avocado slices, a dollop of sour cream, the remaining cilantro, and lime wedges on the side.
So, there you have it—crispy on the outside, with a creamy, spiced filling that’s utterly satisfying. I love serving these with a side of tangy slaw or a simple green salad for a complete meal that’s as nutritious as it is delicious.
Vegan Chocolate Chip Cookies

Last weekend, I found myself craving something sweet but wanted to keep it plant-based. That’s when I decided to whip up a batch of these irresistible Vegan Chocolate Chip Cookies. They’re so good, you won’t even miss the butter or eggs!
Ingredients
- 1 cup creamy almond butter
- 1/2 cup pure maple syrup
- 1 tsp vanilla extract
- 1 cup almond flour
- 1/2 tsp baking soda
- 1/4 tsp sea salt
- 1/2 cup dairy-free chocolate chips
Instructions
- Preheat your oven to 350°F and line a baking sheet with parchment paper.
- In a large bowl, mix the creamy almond butter and pure maple syrup until smooth.
- Stir in the vanilla extract for that warm, aromatic flavor.
- Add the almond flour, baking soda, and sea salt to the wet ingredients, combining until a dough forms.
- Fold in the dairy-free chocolate chips evenly throughout the dough.
- Using a tablespoon, scoop the dough and roll into balls, placing them 2 inches apart on the baking sheet.
- Flatten each ball slightly with the back of a spoon for even baking.
- Bake for 10-12 minutes, or until the edges are golden but the centers are still soft.
- Let the cookies cool on the baking sheet for 5 minutes before transferring to a wire rack.
Biting into these cookies, you’ll love the chewy texture and the way the chocolate chips melt in your mouth. Serve them warm with a glass of almond milk for the ultimate vegan treat!
Roasted Almonds with Sea Salt
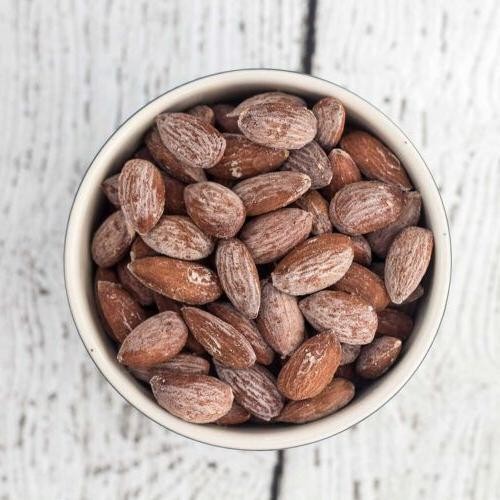
There’s something incredibly satisfying about the crunch of perfectly roasted almonds, especially when they’re kissed with just the right amount of sea salt. I remember the first time I made these at home, thinking how much better they tasted than anything store-bought, and I’ve been hooked ever since.
Ingredients
- 2 cups raw almonds (look for plump, unblemished ones)
- 1 tablespoon rich extra virgin olive oil
- 1 teaspoon flaky sea salt (the kind that sparkles like tiny diamonds)
Instructions
- Preheat your oven to 350°F (175°C), ensuring it’s fully heated for even roasting.
- In a medium bowl, toss the raw almonds with the extra virgin olive oil until each one is lightly coated. This ensures every bite is flavorful.
- Spread the almonds in a single layer on a baking sheet. Crowding can lead to steaming instead of roasting, so give them space.
- Roast in the preheated oven for 10 minutes, then stir the almonds to promote even browning. Tip: Listen for a slight crackling sound; it’s a good sign they’re roasting nicely.
- Continue roasting for another 5-10 minutes, watching closely as they can go from perfectly golden to burnt in a flash. Tip: The almonds are done when they’re fragrant and have a deep golden hue.
- Immediately transfer the roasted almonds to a clean bowl and sprinkle with the flaky sea salt while still warm. Tip: The residual heat helps the salt adhere better.
- Let the almonds cool completely before serving. They’ll crisp up as they cool, so patience is key.
Crunchy, salty, and utterly addictive, these roasted almonds are perfect as a snack on their own or as a sophisticated topping for salads and desserts. I love packing them in little jars for gifts—they’re always a hit.
Homemade Vegan Granola Bars
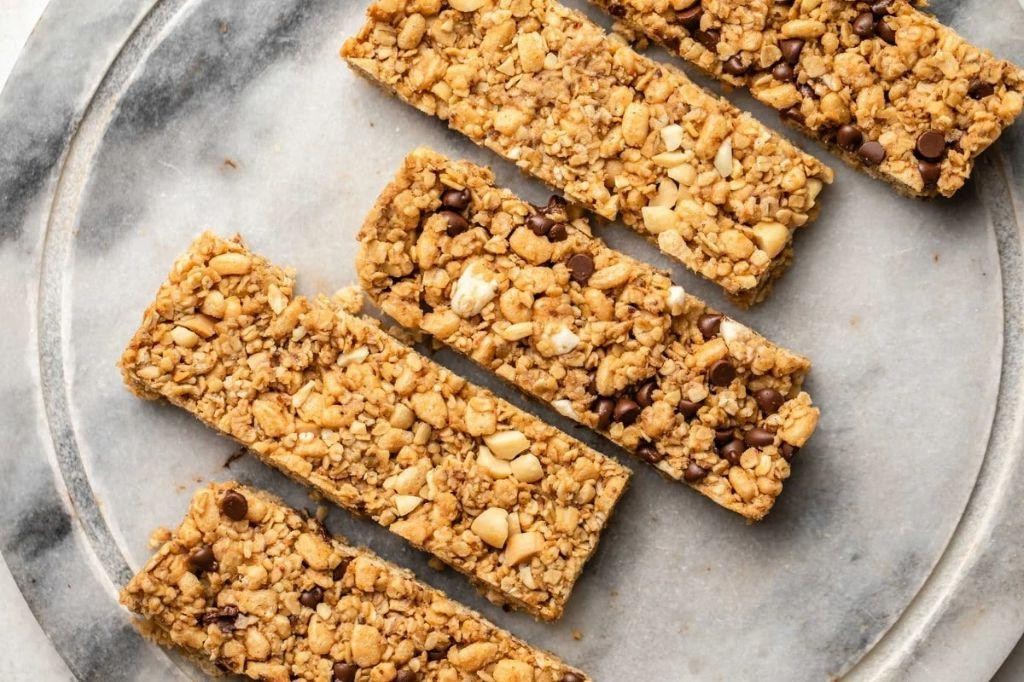
Unwrapping the joy of homemade snacks, I stumbled upon the perfect vegan granola bars recipe during a lazy Sunday experiment. It’s now my go-to for a quick energy boost, and I love how customizable it is based on what’s in my pantry.
Ingredients
- 1 cup rolled oats (thick-cut for extra crunch)
- 1/2 cup creamy almond butter (unsweetened, for a rich, nutty base)
- 1/3 cup pure maple syrup (dark, for deep sweetness)
- 1/4 cup coconut oil (unrefined, for a hint of tropical flavor)
- 1/2 cup chopped almonds (toasted, for a smoky crunch)
- 1/4 cup dried cranberries (plump, for a chewy contrast)
- 1 tsp vanilla extract (pure, for aromatic warmth)
- 1/2 tsp sea salt (fine, to balance the sweetness)
Instructions
- Preheat your oven to 350°F (175°C) and line an 8-inch square baking pan with parchment paper, leaving some overhang for easy removal.
- In a large mixing bowl, combine the rolled oats and chopped almonds, ensuring they’re evenly distributed for consistent texture.
- In a small saucepan over low heat, warm the almond butter, maple syrup, and coconut oil until fully melted and smooth, stirring constantly to prevent burning. Tip: This mixture should be warm but not boiling to keep the flavors intact.
- Remove the saucepan from heat and stir in the vanilla extract and sea salt, blending well to incorporate all the flavors.
- Pour the wet ingredients over the dry ingredients, mixing thoroughly until everything is well coated and sticky. Tip: If the mixture seems too dry, add a tablespoon of maple syrup to achieve the right consistency.
- Fold in the dried cranberries, distributing them evenly throughout the mixture for bursts of sweetness in every bite.
- Transfer the mixture to the prepared pan, pressing down firmly with the back of a spoon or your hands to compact it evenly. Tip: For extra smooth bars, place a piece of parchment paper on top and press down with a flat object like a book.
- Bake for 15-20 minutes, or until the edges are golden brown. The center may still feel soft but will firm up as it cools.
- Allow the granola bars to cool completely in the pan on a wire rack for at least 2 hours before slicing into bars or squares.
Rich in texture and flavor, these vegan granola bars offer a delightful crunch with every bite, thanks to the toasted almonds and thick-cut oats. Serve them with a drizzle of melted dark chocolate for an indulgent twist or pack them as-is for a wholesome snack on the go.
Spicy Roasted Chickpeas
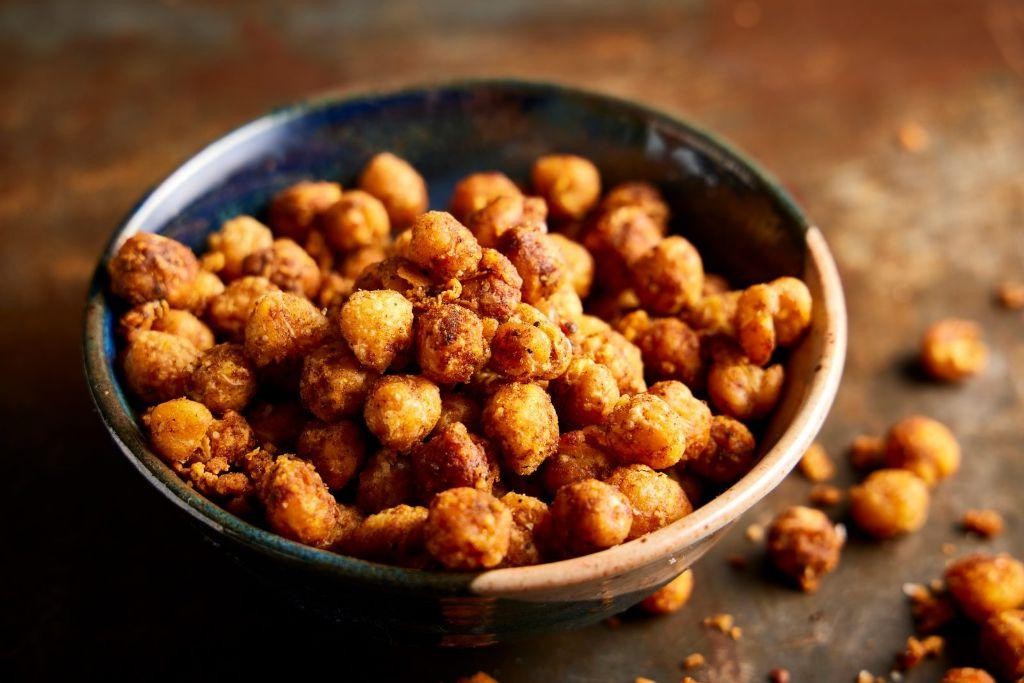
Zesty and packed with flavor, these Spicy Roasted Chickpeas are my go-to snack when I’m craving something crunchy yet healthy. I remember the first time I made them; my kitchen smelled like a cozy spice market, and I’ve been hooked ever since.
Ingredients
- 2 cups cooked chickpeas, drained and patted dry
- 1 tbsp rich extra virgin olive oil
- 1 tsp smoked paprika
- 1/2 tsp cayenne pepper
- 1/2 tsp garlic powder
- 1/2 tsp sea salt
- 1/4 tsp freshly ground black pepper
Instructions
- Preheat your oven to 400°F (200°C) and line a baking sheet with parchment paper for easy cleanup.
- In a medium bowl, toss the dried chickpeas with olive oil until evenly coated. Tip: Make sure the chickpeas are completely dry to achieve maximum crispiness.
- Add the smoked paprika, cayenne pepper, garlic powder, sea salt, and black pepper to the bowl. Stir well to ensure each chickpea is generously coated with the spice mix.
- Spread the chickpeas in a single layer on the prepared baking sheet. Tip: Avoid overcrowding to allow hot air to circulate and crisp them evenly.
- Roast in the preheated oven for 25-30 minutes, shaking the pan halfway through, until the chickpeas are golden and crunchy. Tip: Keep an eye on them during the last 5 minutes to prevent burning.
- Remove from the oven and let cool slightly before serving. The chickpeas will continue to crisp up as they cool.
Crunchy on the outside with a tender bite inside, these Spicy Roasted Chickpeas are irresistibly good. I love tossing them over salads for an extra kick or simply enjoying them by the handful as a fiery snack.
Vegan Banana Bread

How many times have you found yourself staring at a bunch of overripe bananas, wondering what to do with them? I can’t count the number of times this has happened to me, but it’s always a happy accident because it means one thing: vegan banana bread time. This recipe is my go-to for using up those bananas, and it’s so delicious, you won’t miss the eggs or dairy one bit.
Ingredients
- 3 medium overripe bananas, mashed until smooth
- 1/3 cup melted coconut oil, rich and fragrant
- 1/2 cup pure maple syrup, dark and robust
- 1 tsp pure vanilla extract, sweet and aromatic
- 1 3/4 cups whole wheat flour, finely sifted
- 1 tsp baking soda, fresh and potent
- 1/2 tsp sea salt, finely ground
- 1/2 tsp cinnamon, warm and spicy
- 1/4 cup almond milk, unsweetened and creamy
- 1 tbsp apple cider vinegar, tangy and sharp
Instructions
- Preheat your oven to 350°F (175°C) and lightly grease a 9×5 inch loaf pan with coconut oil.
- In a large mixing bowl, combine the mashed bananas, melted coconut oil, maple syrup, and vanilla extract until well blended.
- In a separate bowl, whisk together the whole wheat flour, baking soda, sea salt, and cinnamon.
- Add the dry ingredients to the wet ingredients and stir until just combined. Tip: Overmixing can lead to dense bread, so mix until you no longer see flour streaks.
- Quickly stir in the almond milk and apple cider vinegar to activate the baking soda. The batter will slightly bubble.
- Pour the batter into the prepared loaf pan and smooth the top with a spatula.
- Bake for 50-60 minutes, or until a toothpick inserted into the center comes out clean. Tip: If the top browns too quickly, loosely cover with aluminum foil.
- Allow the bread to cool in the pan for 10 minutes, then transfer to a wire rack to cool completely. Tip: This patience-testing step ensures the bread sets properly.
Just out of the oven, this vegan banana bread is moist, fragrant, and perfectly sweet with a hint of warmth from the cinnamon. Serve it warm with a dollop of almond butter or enjoy it as is with your morning coffee for a truly comforting treat.
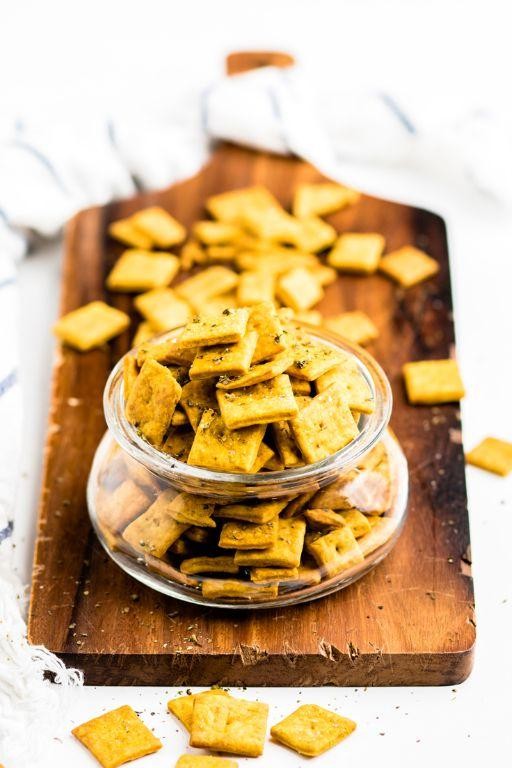
Kale Chips with Nutritional Yeast
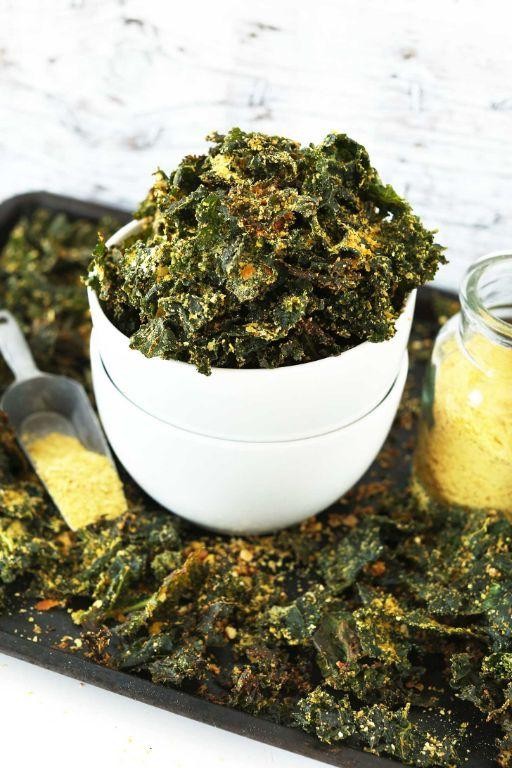
Sometimes, the simplest snacks are the ones that surprise you the most. I remember the first time I tried making kale chips at home; skeptical at first, I was blown away by how something so easy could be so deliciously addictive. Now, they’re a staple in my kitchen, especially when I’m craving something crunchy but healthy.
Ingredients
- 1 bunch of fresh, curly kale (stems removed, leaves torn into bite-sized pieces)
- 2 tablespoons of rich extra virgin olive oil
- 3 tablespoons of nutritional yeast (for a cheesy, umami flavor)
- 1/2 teaspoon of finely ground sea salt
Instructions
- Preheat your oven to 300°F (150°C) to ensure it’s ready for baking.
- In a large bowl, massage the kale pieces with olive oil until each leaf is lightly coated but not soggy.
- Sprinkle the nutritional yeast and sea salt over the kale, tossing gently to distribute the flavors evenly.
- Spread the kale out in a single layer on a baking sheet lined with parchment paper, ensuring no pieces overlap.
- Bake for 10 minutes, then rotate the baking sheet for even cooking and bake for another 10-15 minutes until the edges are just starting to brown but not burn.
- Remove from the oven and let cool for 5 minutes; the chips will crisp up as they sit.
Absolutely irresistible, these kale chips offer a perfect crunch with a savory, cheesy flavor that’s hard to resist. Try serving them alongside your favorite dip or crumbling them over popcorn for an extra flavor boost.
Quinoa and Black Bean Salad
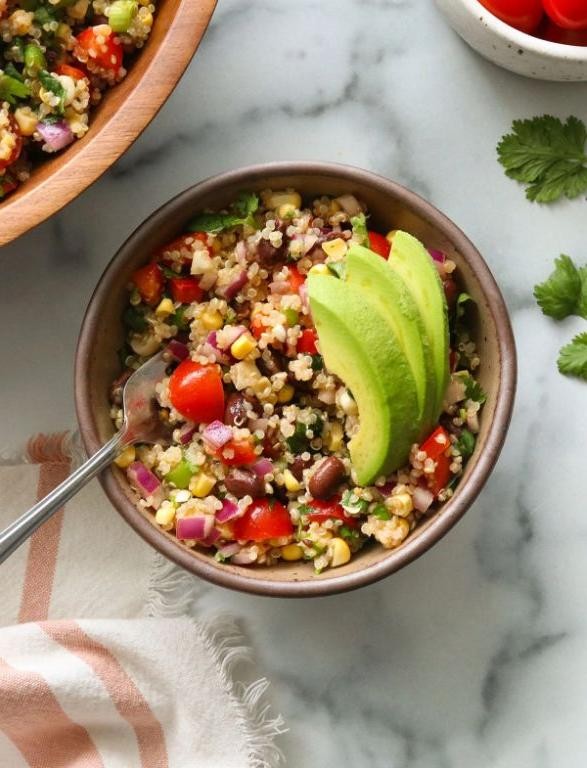
Zesty and vibrant, this Quinoa and Black Bean Salad has become my go-to dish for summer potlucks and quick, nutritious lunches. It’s a colorful medley that’s as pleasing to the eye as it is to the palate, and I love how it keeps me full without weighing me down.
Ingredients
- 1 cup quinoa, rinsed and drained
- 1 15-ounce can black beans, rinsed and drained
- 1 cup cherry tomatoes, halved
- 1/2 cup fresh cilantro, chopped
- 1/4 cup red onion, finely diced
- 2 tbsp rich extra virgin olive oil
- 1 tbsp fresh lime juice
- 1/2 tsp ground cumin
- 1/2 tsp finely ground black pepper
- 1/4 tsp sea salt
Instructions
- In a medium saucepan, bring 2 cups of water to a boil over high heat. Add the quinoa, reduce heat to low, cover, and simmer for 15 minutes, or until the water is absorbed and the quinoa is fluffy.
- While the quinoa cooks, in a large bowl, combine the black beans, cherry tomatoes, cilantro, and red onion.
- In a small bowl, whisk together the olive oil, lime juice, cumin, black pepper, and sea salt to create the dressing.
- Once the quinoa is cooked, fluff it with a fork and let it cool for 5 minutes to avoid wilting the fresh ingredients.
- Add the slightly cooled quinoa to the bowl with the vegetables and pour the dressing over the top.
- Gently toss all the ingredients together until everything is evenly coated with the dressing.
- Let the salad sit for 10 minutes before serving to allow the flavors to meld together beautifully.
Mmm, the texture of this salad is a delightful mix of fluffy quinoa and creamy black beans, with bursts of juiciness from the tomatoes. The lime and cumin give it a bright, slightly smoky flavor that’s irresistible. Try serving it in a hollowed-out bell pepper for a fun, edible bowl that adds a sweet crunch to every bite.
Vegan Pumpkin Muffins

Autumn has a way of sneaking up on us, and before we know it, we’re craving all things pumpkin. I remember the first time I tried making vegan pumpkin muffins; the kitchen was filled with such a warm, spicy aroma that it instantly became a fall staple in my home.
Ingredients
- 1 cup pure pumpkin puree, smooth and velvety
- 1/2 cup pure maple syrup, dark and robust
- 1/4 cup coconut oil, melted and slightly cooled
- 1 tsp vanilla extract, pure and fragrant
- 1 3/4 cups all-purpose flour, sifted for lightness
- 1 tsp baking soda, fresh and potent
- 1/2 tsp baking powder
- 1/2 tsp salt, fine and sea-derived
- 1 tsp ground cinnamon, sweet and spicy
- 1/2 tsp ground nutmeg, warm and aromatic
- 1/4 tsp ground cloves, pungent and earthy
- 1/4 tsp ground ginger, sharp and zesty
Instructions
- Preheat your oven to 350°F (175°C) and line a muffin tin with paper liners or lightly grease it.
- In a large bowl, whisk together the pumpkin puree, maple syrup, coconut oil, and vanilla extract until smooth and well combined.
- In a separate bowl, sift together the flour, baking soda, baking powder, salt, cinnamon, nutmeg, cloves, and ginger to ensure no lumps remain.
- Gradually add the dry ingredients to the wet ingredients, stirring gently until just combined. Overmixing can lead to dense muffins, so stop as soon as you no longer see flour streaks.
- Divide the batter evenly among the muffin cups, filling each about 3/4 full. A cookie scoop can make this process cleaner and more uniform.
- Bake for 20-25 minutes, or until a toothpick inserted into the center of a muffin comes out clean. The tops should be slightly springy to the touch.
- Allow the muffins to cool in the pan for 5 minutes before transferring them to a wire rack to cool completely. This prevents them from becoming soggy.
Delightfully moist and bursting with warm spices, these vegan pumpkin muffins are perfect with a dollop of almond butter or a drizzle of maple glaze for an extra treat. Their tender crumb and rich flavor make them a hit at any breakfast table or afternoon tea.
Coconut Yogurt with Fresh Berries
Unbelievably refreshing and simple to whip up, this Coconut Yogurt with Fresh Berries has become my go-to breakfast during these sweltering summer mornings. It’s a dish that reminds me of lazy weekends when I have a bit more time to savor the little things, like the burst of flavor from perfectly ripe berries.
Ingredients
- 1 cup of creamy, full-fat coconut yogurt
- 1/2 cup of mixed fresh berries (strawberries, blueberries, raspberries)
- 1 tbsp of golden, raw honey
- 1/4 cup of crunchy, toasted coconut flakes
- A pinch of finely ground, aromatic cinnamon
Instructions
- In a medium bowl, gently swirl the creamy, full-fat coconut yogurt to soften it slightly, making it easier to mix.
- Drizzle the golden, raw honey over the yogurt, using the back of a spoon to evenly distribute it for a balanced sweetness.
- Carefully fold in the mixed fresh berries, ensuring they’re evenly distributed without crushing them to maintain their juicy texture.
- Sprinkle the crunchy, toasted coconut flakes on top for a delightful contrast in texture.
- Finish with a pinch of finely ground, aromatic cinnamon for a warm, spicy note that complements the sweetness of the honey and berries.
The combination of the velvety coconut yogurt with the juicy berries and the crunch of toasted coconut flakes creates a symphony of textures in every bite. For an extra touch of elegance, serve it in a clear glass to showcase the beautiful layers of colors and textures.
Hummus and Veggie Wrap
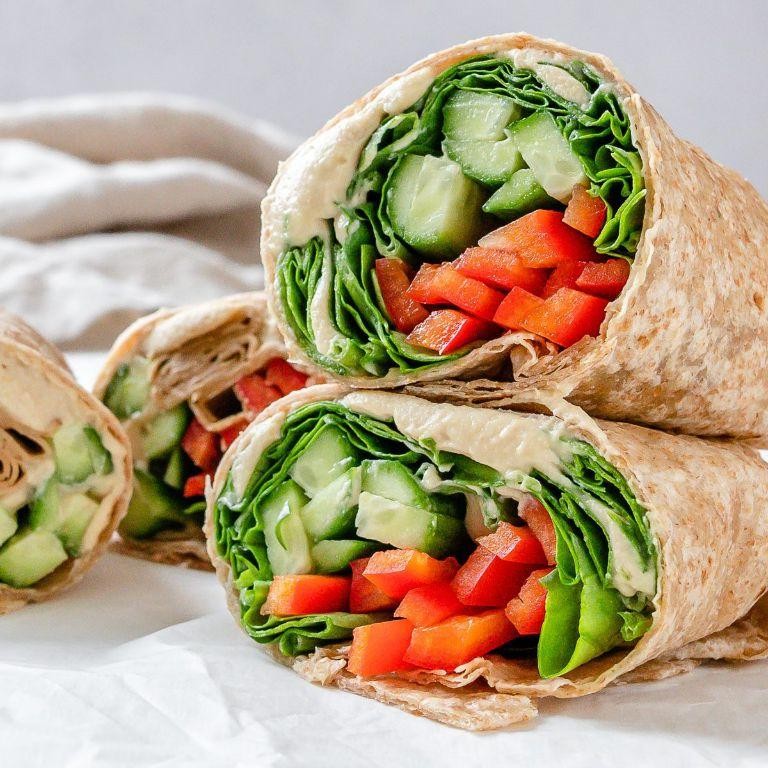
Yesterday, I found myself staring into the abyss of my fridge, wondering how to turn the random assortment of veggies into something satisfying. That’s when the idea of a Hummus and Veggie Wrap hit me—a perfect blend of creamy, crunchy, and fresh flavors that’s as nutritious as it is delicious.
Ingredients
- 1 cup creamy homemade hummus (or store-bought if you’re in a pinch)
- 2 large, flour tortillas (whole wheat for extra fiber)
- 1/2 cup thinly sliced, crisp cucumber
- 1/2 cup shredded, vibrant carrots
- 1/4 cup thinly sliced, red onion for a bit of bite
- 1/2 cup fresh, leafy spinach
- 2 tbsp rich extra virgin olive oil
- 1 tbsp freshly squeezed lemon juice for brightness
- Salt and finely ground black pepper to taste
Instructions
- Lay out the flour tortillas on a clean, flat surface.
- Spread 1/2 cup of creamy hummus evenly over each tortilla, leaving a 1-inch border around the edges.
- Layer the thinly sliced cucumber, shredded carrots, red onion, and fresh spinach on top of the hummus.
- Drizzle 1 tbsp of extra virgin olive oil and 1/2 tbsp of lemon juice over the veggies on each tortilla.
- Season lightly with salt and finely ground black pepper.
- Fold the sides of the tortilla inwards, then roll tightly from the bottom up to enclose the filling.
- Heat a non-stick skillet over medium heat (about 350°F) and lightly brush with olive oil.
- Place the wraps seam-side down in the skillet and cook for 2-3 minutes on each side, or until golden brown and crispy.
- Remove from the skillet and let cool for a minute before slicing in half diagonally.
Zesty and satisfying, these wraps offer a delightful contrast between the creamy hummus and the crisp vegetables. Serve them with a side of mixed greens or your favorite chips for a complete meal that’s as pleasing to the eye as it is to the palate.
Vegan Peanut Butter and Jelly Smoothie
Remember those lazy Sunday mornings when you’d slather peanut butter and jelly on toast and call it a day? Well, I’ve taken that classic combo and turned it into a creamy, dreamy smoothie that’s both nostalgic and nourishing. It’s my go-to when I need a quick breakfast or a post-workout refuel that feels like a treat.
Ingredients
- 1 cup unsweetened almond milk, chilled and creamy
- 2 tablespoons smooth peanut butter, rich and velvety
- 1 tablespoon chia seeds, tiny but packed with omega-3s
- 1/2 cup frozen strawberries, sweet and slightly tart
- 1 tablespoon maple syrup, pure and golden
- 1/2 teaspoon vanilla extract, fragrant and warm
- A pinch of sea salt, to enhance all the flavors
Instructions
- Pour the chilled almond milk into your blender first to ensure a smooth blend.
- Add the rich peanut butter, chia seeds, frozen strawberries, maple syrup, vanilla extract, and a pinch of sea salt.
- Blend on high for 45 seconds, or until the mixture is completely smooth and no strawberry chunks remain. Tip: If the smoothie is too thick, add a splash more almond milk and blend for another 10 seconds.
- Pour into a tall glass and let it sit for 2 minutes to allow the chia seeds to thicken the smoothie slightly. Tip: This resting time gives the smoothie a perfect spoonable consistency.
- Give it a quick stir before drinking to redistribute any chia seeds that may have settled. Tip: For an extra touch of nostalgia, serve with a side of whole grain toast cut into soldiers for dipping.
Silky with a subtle crunch from the chia seeds, this smoothie is a delightful twist on the classic PB&J. The strawberries lend a natural sweetness that pairs beautifully with the savory peanut butter, making it a balanced and satisfying drink. Try topping it with a drizzle of peanut butter and a few fresh strawberry slices for an Instagram-worthy finish.
Baked Falafel Bites

Mmm, there’s something incredibly satisfying about biting into a perfectly crispy yet tender falafel. I remember the first time I tried making them at home; the aroma of chickpeas and spices filled my kitchen, and I knew I was onto something special. These Baked Falafel Bites are my healthier twist on the classic, and they’re just as delicious.
Ingredients
- 1 1/2 cups dried chickpeas, soaked overnight and drained
- 1 small onion, roughly chopped
- 3 garlic cloves, minced
- 1/4 cup fresh parsley, finely chopped
- 1/4 cup fresh cilantro, finely chopped
- 1 tsp ground cumin
- 1 tsp ground coriander
- 1/2 tsp baking soda
- 2 tbsp rich extra virgin olive oil
- 1/2 tsp sea salt
- 1/4 tsp finely ground black pepper
Instructions
- Preheat your oven to 375°F (190°C) and line a baking sheet with parchment paper.
- In a food processor, combine the soaked chickpeas, onion, garlic, parsley, cilantro, cumin, coriander, baking soda, olive oil, salt, and black pepper. Pulse until the mixture is finely ground but not pureed.
- Using your hands, form the mixture into small balls, about 1 inch in diameter, and place them on the prepared baking sheet. Tip: Wet your hands slightly to prevent the mixture from sticking.
- Bake for 25-30 minutes, flipping halfway through, until the falafel bites are golden brown and crispy on the outside. Tip: Don’t overcrowd the baking sheet to ensure even cooking.
- Let the falafel bites cool for a few minutes before serving. Tip: They firm up as they cool, making them easier to handle.
Baked to perfection, these falafel bites have a delightful crunch on the outside while staying soft and flavorful inside. Serve them with a tangy tahini sauce or tuck them into a pita with crisp veggies for a quick, satisfying meal.
Vegan Cheese and Crackers
Remember those lazy afternoons when all you wanted was a quick, satisfying snack that didn’t compromise your vegan lifestyle? That’s exactly how I stumbled upon this delightful Vegan Cheese and Crackers recipe. It’s become my go-to for impromptu gatherings or when I need a little pick-me-up during my blogging marathons.
Ingredients
- 1 cup raw cashews, soaked overnight for creamy texture
- 2 tbsp nutritional yeast, for that cheesy flavor
- 1 tbsp fresh lemon juice, to add a bright tang
- 1/2 tsp garlic powder, for a subtle kick
- 1/4 tsp sea salt, finely ground to enhance flavors
- 1/4 cup water, to achieve the perfect consistency
- Assorted crackers, for serving
Instructions
- Drain the soaked cashews and rinse them under cold water until the water runs clear.
- In a high-speed blender, combine the cashews, nutritional yeast, lemon juice, garlic powder, and sea salt.
- Blend on high for 1 minute, then scrape down the sides with a spatula to ensure everything is well mixed.
- Add water, 1 tablespoon at a time, blending after each addition until the mixture is smooth and creamy. Tip: The consistency should resemble soft cream cheese.
- Transfer the vegan cheese to a bowl, cover, and refrigerate for at least 1 hour to firm up. Tip: This step enhances the flavors and texture.
- Serve chilled with your favorite assortment of crackers. Tip: For an extra flavor boost, drizzle with a bit of olive oil and sprinkle with fresh herbs before serving.
Fresh out of the fridge, this vegan cheese spreads like a dream over crackers, offering a creamy texture with a tangy, cheesy flavor that’s surprisingly rich. Try pairing it with some crisp apple slices or a drizzle of honey for a sweet and savory twist that’ll wow your taste buds.
Stuffed Dates with Almond Butter
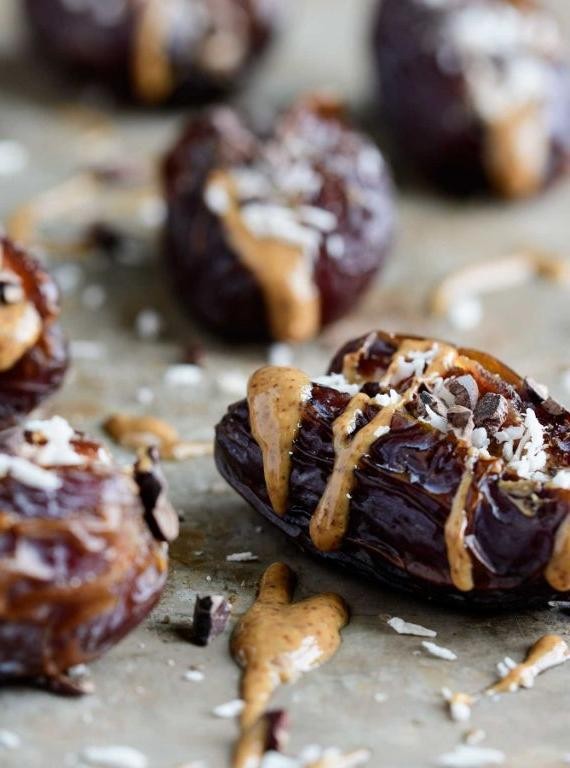
Just last week, I found myself rummaging through my pantry for a quick snack that was both satisfying and wholesome. That’s when I stumbled upon a jar of creamy almond butter and a pack of plump Medjool dates, and the idea for these stuffed dates was born. It’s a simple yet indulgent treat that never fails to hit the spot.
Ingredients
- 12 large Medjool dates, pitted and halved lengthwise
- 1/2 cup creamy almond butter, smooth and rich
- 1/4 cup roasted almonds, finely chopped for crunch
- 1 tbsp honey, pure and golden for drizzling
- A pinch of sea salt, flaky and bright to enhance flavors
Instructions
- Preheat your oven to 350°F (175°C) to toast the almonds, enhancing their nutty flavor.
- Spread the chopped almonds on a baking sheet and toast in the preheated oven for 5-7 minutes, until fragrant and lightly golden. Keep an eye on them to prevent burning.
- While the almonds cool, carefully open each halved date to create a small pocket for the almond butter.
- Using a small spoon, fill each date with about 1 teaspoon of creamy almond butter, smoothing the top for a neat appearance.
- Sprinkle the toasted almonds over the almond butter, pressing lightly to adhere.
- Drizzle each stuffed date with a thin stream of honey, adding a touch of sweetness and shine.
- Finish with a tiny pinch of flaky sea salt on top to balance the flavors and add a subtle crunch.
Combining the chewy sweetness of dates with the creamy richness of almond butter, these bites are a textural dream. For an extra special touch, serve them on a wooden board with a side of dark chocolate for dipping, making them irresistible to anyone who tries them.
Vegan Sushi Rolls

Remember the first time I tried making vegan sushi rolls? It was a game-changer in my kitchen, proving that you don’t need fish to enjoy the delicate balance of flavors and textures that sushi offers. Today, I’m sharing my go-to recipe that’s as fun to make as it is to eat.
Ingredients
- 1 cup sushi rice, sticky and perfectly cooked
- 2 tbsp rice vinegar, with a subtle sweetness
- 1 tbsp sugar, for that essential sushi rice flavor
- 1/2 tsp salt, to enhance all the flavors
- 4 nori sheets, crisp and full of ocean aroma
- 1 avocado, ripe and creamy
- 1 cucumber, fresh and crunchy
- 1 carrot, julienned for a pop of color
- 1/2 cup pickled ginger, tangy and bright
- 1/2 cup soy sauce, rich and umami-packed
- 1 tbsp wasabi, spicy and pungent
Instructions
- Rinse the sushi rice under cold water until the water runs clear, then cook according to package instructions for perfectly sticky rice.
- While the rice is still warm, gently fold in the rice vinegar, sugar, and salt, ensuring every grain is coated for that authentic sushi taste.
- Lay a nori sheet on a bamboo mat, and with wet hands, spread a thin layer of rice over the nori, leaving a 1-inch border at the top.
- Arrange thin slices of avocado, cucumber, and carrot along the bottom edge of the rice-covered nori.
- Carefully roll the sushi using the bamboo mat, applying gentle pressure to ensure a tight roll. Tip: A little water on the nori’s border helps seal the roll.
- Using a sharp knife, slice the roll into 6-8 pieces. Tip: Wetting the knife between cuts prevents sticking.
- Serve with pickled ginger, soy sauce, and wasabi on the side for dipping. Tip: For an extra touch, garnish with sesame seeds before serving.
Zesty and vibrant, these vegan sushi rolls are a testament to how plant-based ingredients can shine. The creamy avocado against the crisp cucumber and carrot, all wrapped in the umami of nori, makes every bite a delight. Try serving them on a platter with extra wasabi for those who love a kick!
Chia Seed Pudding with Mango
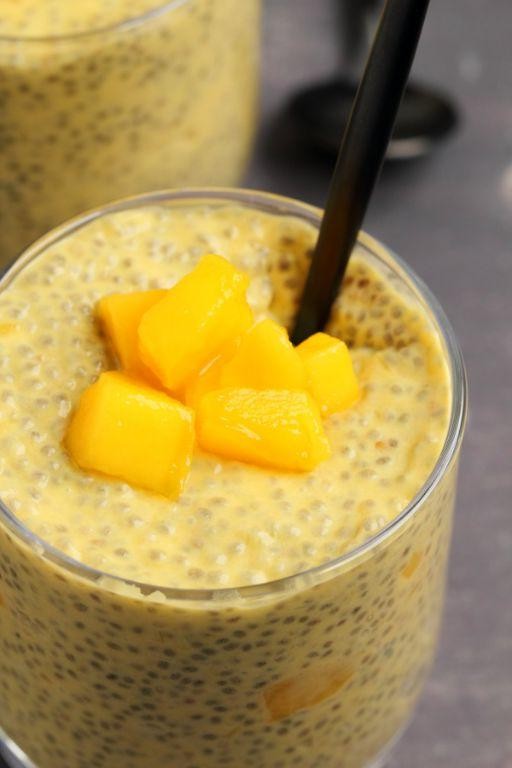
First off, let me tell you, this Chia Seed Pudding with Mango is a game-changer for my breakfast routine. It’s like waking up to a tropical vacation, minus the flight. I stumbled upon this recipe during a lazy Sunday morning when my fridge was nearly empty, and it’s been a staple ever since.
Ingredients
- 1/4 cup of organic chia seeds
- 1 cup of creamy coconut milk
- 1 tbsp of pure maple syrup
- 1/2 tsp of vanilla extract
- 1 ripe mango, diced into juicy chunks
- A pinch of sea salt
Instructions
- In a medium mixing bowl, whisk together the chia seeds, coconut milk, maple syrup, vanilla extract, and a pinch of sea salt until well combined.
- Let the mixture sit for 5 minutes, then whisk again to prevent any clumps from forming. Tip: This second whisk is crucial for a smooth pudding.
- Cover the bowl with plastic wrap and refrigerate for at least 4 hours, or overnight. The chia seeds will expand and absorb the liquid, creating a pudding-like consistency.
- Once set, give the pudding a good stir. If it’s too thick, you can thin it with a little more coconut milk. Tip: The consistency should be creamy but not runny.
- Divide the pudding into two serving bowls and top with the diced mango. Tip: For an extra touch of elegance, layer the mango chunks and pudding in a glass for a parfait effect.
Here’s the deal: the pudding is luxuriously creamy with a slight chew from the chia seeds, while the mango adds a burst of sweetness and freshness. Try serving it with a sprinkle of toasted coconut flakes for an added crunch that’ll make your taste buds sing.
Vegan Trail Mix
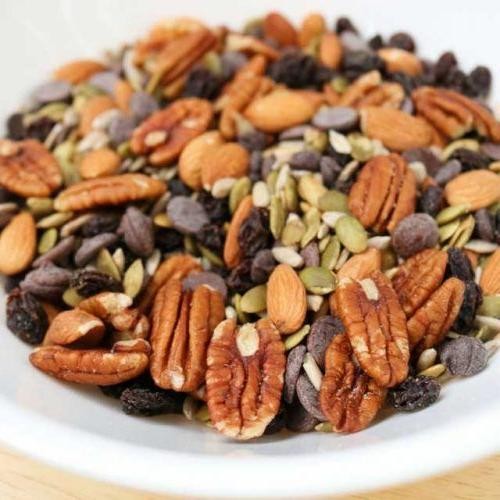
Finally, after countless hikes and snack breaks, I’ve perfected my go-to Vegan Trail Mix recipe that’s as nutritious as it is delicious. It’s the perfect blend of sweet, salty, and crunchy, making it an irresistible snack for any adventure or just a lazy afternoon at home.
Ingredients
- 1 cup of raw almonds, crunchy and packed with protein
- 1 cup of organic pumpkin seeds, lightly salted for that perfect bite
- 1/2 cup of dried cranberries, sweet and tangy
- 1/2 cup of dark chocolate chips, rich and melt-in-your-mouth
- 1 tbsp of pure maple syrup, for a hint of natural sweetness
- 1 tsp of ground cinnamon, warm and aromatic
- A pinch of sea salt, to enhance all the flavors
Instructions
- Preheat your oven to 300°F (150°C) to ensure it’s ready for toasting the nuts and seeds.
- In a large mixing bowl, combine the raw almonds and pumpkin seeds, ensuring they’re evenly mixed.
- Drizzle the maple syrup over the nut and seed mixture, then sprinkle the ground cinnamon and sea salt on top. Toss everything together until well coated. Tip: Use your hands to mix for an even coating.
- Spread the mixture evenly on a baking sheet lined with parchment paper, making sure it’s in a single layer for uniform toasting.
- Bake in the preheated oven for 15 minutes, stirring halfway through to prevent burning. Tip: Keep an eye on the mixture after 10 minutes to avoid over-toasting.
- Remove from the oven and let it cool completely on the baking sheet. This step is crucial for achieving the perfect crunch.
- Once cooled, transfer the mixture back to the mixing bowl and add the dried cranberries and dark chocolate chips. Gently toss to combine. Tip: Adding the chocolate chips last prevents them from melting.
So, there you have it—a Vegan Trail Mix that’s bursting with textures and flavors. The crunch of the almonds and pumpkin seeds paired with the chewiness of the cranberries and the smoothness of the chocolate chips creates a snack that’s truly addictive. Try packing it in small mason jars for a cute, portable snack option!
Zucchini and Carrot Fritters
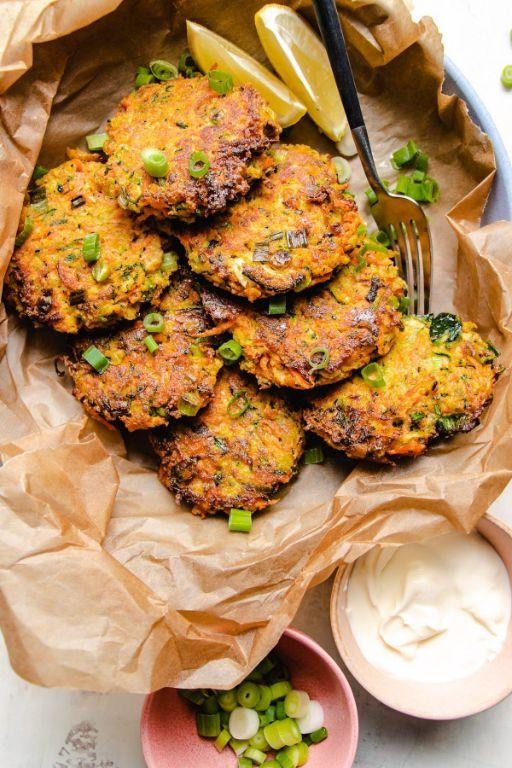
How many times have I found myself staring at a pile of zucchini and carrots in my fridge, wondering how to turn them into something delicious? Too many to count, but that’s how these zucchini and carrot fritters came to be—a crispy, golden solution to my veggie overload.
Ingredients
- 2 cups grated zucchini, squeezed dry
- 1 cup grated carrot, fresh and sweet
- 1/2 cup all-purpose flour, sifted for lightness
- 2 large farm-fresh eggs, beaten
- 2 tbsp rich extra virgin olive oil
- 1/2 tsp finely ground black pepper
- 1/2 tsp sea salt, for a clean taste
- 1/4 cup grated Parmesan cheese, sharp and nutty
- 2 tbsp fresh dill, finely chopped for a burst of flavor
Instructions
- In a large bowl, combine the grated zucchini, carrot, flour, eggs, Parmesan cheese, dill, salt, and pepper. Mix until just combined; overmixing can make the fritters tough.
- Heat the olive oil in a large skillet over medium heat until shimmering, about 2 minutes. This ensures a crispy exterior.
- For each fritter, drop 1/4 cup of the mixture into the skillet, flattening slightly with the back of a spoon. Cook in batches to avoid overcrowding.
- Cook for 3-4 minutes on each side, or until deeply golden and crispy. Flip only once to ensure even cooking.
- Transfer the cooked fritters to a paper towel-lined plate to drain any excess oil, keeping them crisp.
Just out of the pan, these fritters are a delightful contrast of crispy edges and tender centers, with the sweetness of carrots and the freshness of dill shining through. Serve them with a dollop of sour cream or atop a salad for a light, satisfying meal.
Conclusion
Vibrant and varied, this collection of 20 Delicious Vegan Snack Recipes offers something for every taste and occasion. We hope these ideas inspire your next snack time adventure. Don’t forget to try them out, share your favorites in the comments, and pin the recipes you love on Pinterest. Happy snacking!