Hey there, sweet tooth! Just because you’re managing diabetes doesn’t mean you have to skip dessert. Our roundup of 16 Delicious Dessert Recipes for Diabetics is packed with healthy, mouthwatering options that’ll satisfy your cravings without the guilt. From creamy no-bake treats to fruity delights, these recipes prove that eating well can still be indulgent. Ready to dig in? Let’s get started!
Low-Carb Chocolate Avocado Mousse
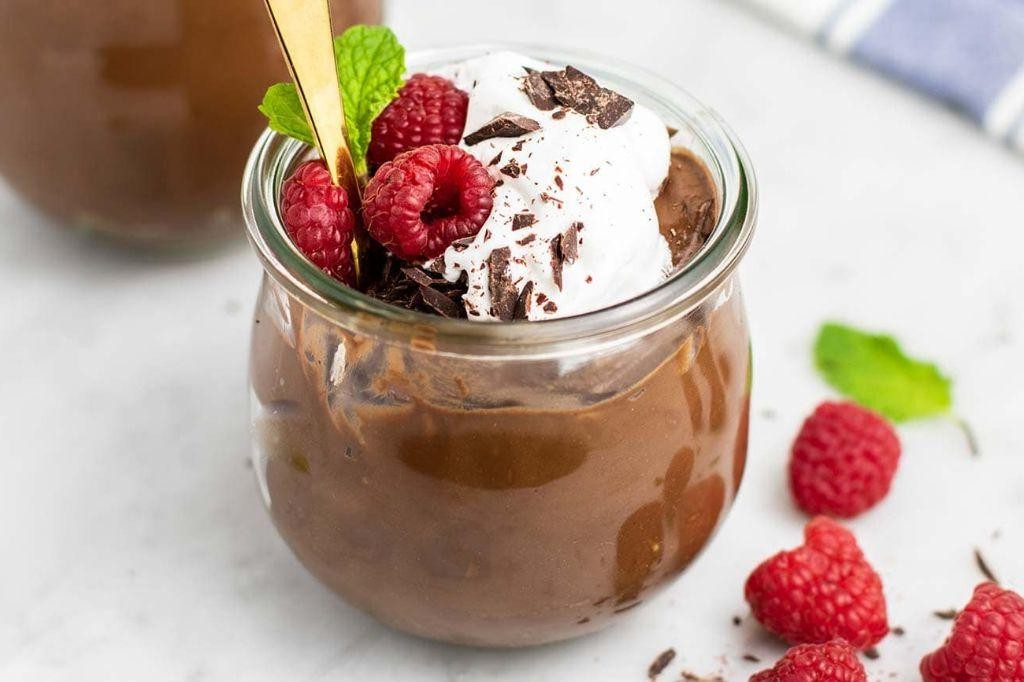
Let’s face it, we’ve all been there—craving something decadently chocolatey but not wanting to undo our healthy eating streak. Enter this dreamy Low-Carb Chocolate Avocado Mousse, a guilt-free indulgence that’s as easy to make as it is to devour.
Ingredients
- 2 ripe avocados
- 1/4 cup unsweetened cocoa powder
- 1/4 cup almond milk
- 1/4 cup erythritol
- 1 tsp vanilla extract
- 1/8 tsp salt
Instructions
- Cut the avocados in half, remove the pits, and scoop the flesh into a blender.
- Add the cocoa powder, almond milk, erythritol, vanilla extract, and salt to the blender.
- Blend on high speed for 1-2 minutes, or until the mixture is completely smooth and no avocado chunks remain. Tip: Scrape down the sides of the blender halfway through to ensure everything is well incorporated.
- Taste the mousse and adjust the sweetness by adding more erythritol if desired. Blend for an additional 30 seconds to combine.
- Transfer the mousse to serving dishes and refrigerate for at least 1 hour to allow it to set and the flavors to meld. Tip: Cover the dishes with plastic wrap to prevent a skin from forming on the surface.
- Before serving, give the mousse a quick stir to fluff it up slightly. Tip: Garnish with fresh berries or a sprinkle of cocoa powder for an extra touch of elegance.
Get ready to be amazed by how creamy and rich this mousse is, with the perfect balance of chocolatey goodness and a subtle hint of avocado. Serve it in fancy glasses for a dinner party or enjoy it straight from the bowl—no judgment here.
Sugar-Free Cheesecake with Almond Crust
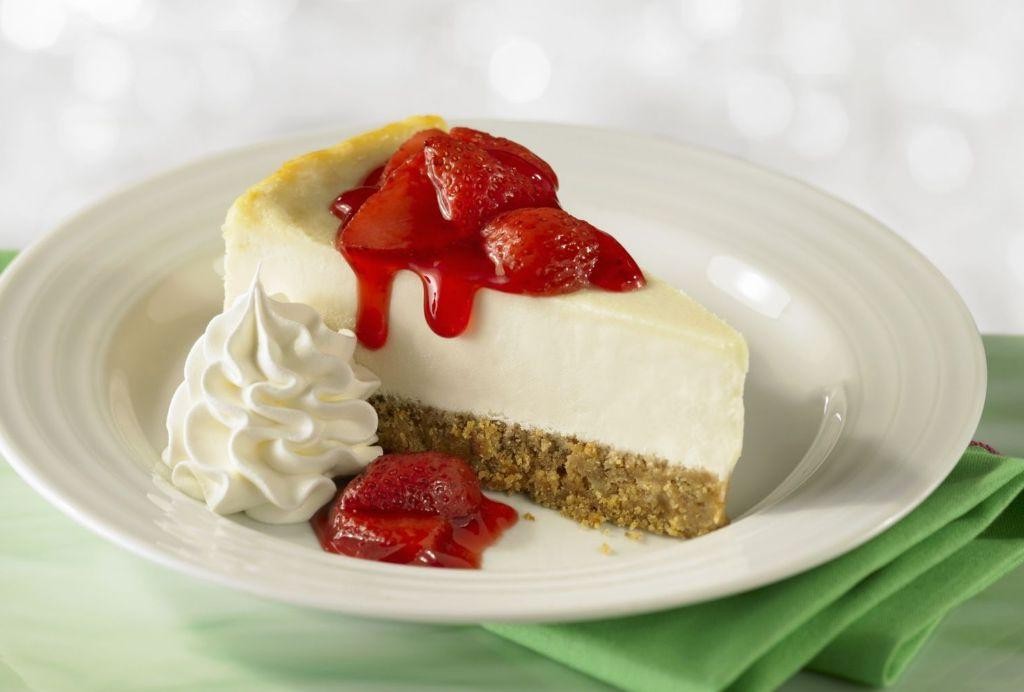
Sugar-free cheesecake? Yes, you heard that right! This guilt-free delight is about to become your new best friend, especially if you’re trying to keep things sweet without the sugar crash. With an almond crust that’s as nutty as your uncle’s jokes, this cheesecake is here to prove that healthy can be heavenly.
Ingredients
- 2 cups almond flour
- 1/4 cup melted butter
- 1 tbsp erythritol
- 16 oz cream cheese, softened
- 1/2 cup heavy cream
- 1/4 cup powdered erythritol
- 1 tsp vanilla extract
- 2 eggs
Instructions
- Preheat your oven to 350°F (175°C) to get it ready for baking magic.
- In a mixing bowl, combine 2 cups almond flour, 1/4 cup melted butter, and 1 tbsp erythritol until the mixture resembles wet sand.
- Press the almond mixture firmly into the bottom of a 9-inch springform pan to create your crust. Tip: Use the bottom of a glass to smooth it out for an even layer.
- Bake the crust for 10 minutes, then let it cool while you whip up the filling. This prevents a soggy bottom—nobody likes that!
- In a large bowl, beat 16 oz softened cream cheese until it’s smooth and lump-free. Tip: Room temperature cream cheese blends easier, so plan ahead.
- Add 1/2 cup heavy cream, 1/4 cup powdered erythritol, and 1 tsp vanilla extract to the cream cheese, mixing until well combined.
- Beat in 2 eggs one at a time, ensuring each is fully incorporated before adding the next. Tip: Overbeating can introduce too much air, leading to cracks, so mix just until combined.
- Pour the filling over the cooled crust, smoothing the top with a spatula.
- Bake for 40-45 minutes, or until the edges are set but the center still jiggles slightly.
- Turn off the oven, crack the door open, and let the cheesecake cool inside for 1 hour to prevent sudden temperature changes that can cause cracks.
- Refrigerate for at least 4 hours, or overnight, to let it set completely.
Velvety smooth with a rich, creamy texture that melts in your mouth, this cheesecake is a dream come true for anyone watching their sugar intake. Serve it with a drizzle of sugar-free chocolate sauce or fresh berries for an extra touch of elegance.
Diabetic-Friendly Apple Cinnamon Mug Cake
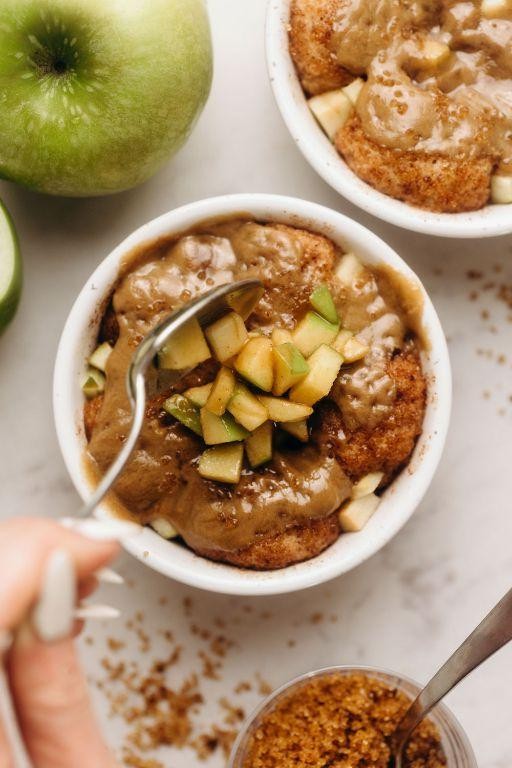
Craving something sweet but keeping an eye on sugar? This diabetic-friendly apple cinnamon mug cake is your guilt-free ticket to dessert heaven, blending the cozy flavors of fall into a single, microwaveable marvel.
Ingredients
- 1/4 cup almond flour
- 1 tbsp coconut flour
- 1/2 tsp baking powder
- 1/4 tsp cinnamon
- 1 tbsp unsweetened applesauce
- 1 tbsp almond milk
- 1/2 tsp vanilla extract
- 1 egg white
- 1 tbsp chopped apple
Instructions
- In a microwave-safe mug, whisk together 1/4 cup almond flour, 1 tbsp coconut flour, 1/2 tsp baking powder, and 1/4 tsp cinnamon until well combined.
- Add 1 tbsp unsweetened applesauce, 1 tbsp almond milk, 1/2 tsp vanilla extract, and 1 egg white to the dry ingredients. Mix until the batter is smooth.
- Fold in 1 tbsp chopped apple into the batter for that juicy, fruity bite.
- Microwave the mug on high for 90 seconds. Tip: If the cake isn’t fully set, microwave in 10-second increments until done.
- Let the mug cake cool for 1 minute before diving in. Tip: This rest period helps the flavors meld beautifully.
- For an extra touch, sprinkle a pinch of cinnamon on top before serving. Tip: A dollop of sugar-free whipped cream takes it to the next level.
Every bite of this mug cake is a fluffy, moist delight, with the apple pieces adding a surprising burst of freshness. Serve it warm for a comforting treat that feels like a hug in a mug, or get fancy with a drizzle of sugar-free caramel for that extra pizzazz.
Keto Lemon Bars with Coconut Flour
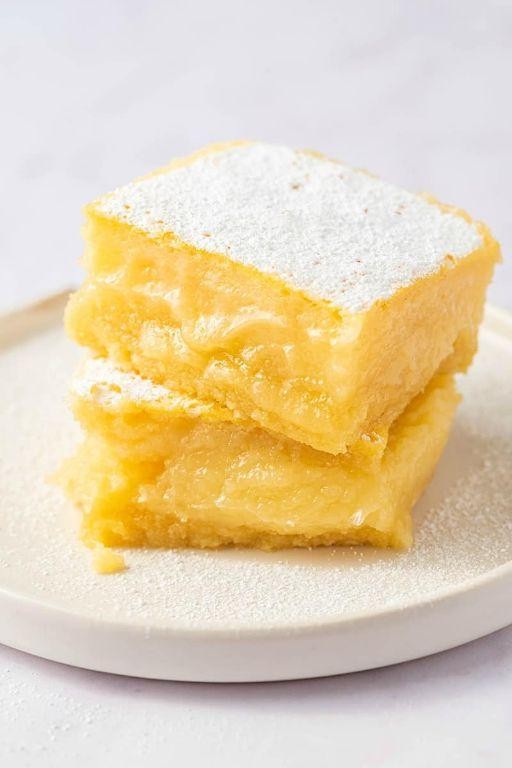
Craving something sweet but keeping it keto? These lemon bars are your guilt-free ticket to tangy, creamy bliss, with a coconut flour crust that’s so good, it’s almost criminal.
Ingredients
- 1 cup coconut flour
- 1/2 cup unsalted butter, melted
- 1/4 cup granulated erythritol
- 4 large eggs
- 1/2 cup fresh lemon juice
- 1 tbsp lemon zest
- 1/2 cup granulated erythritol
- 1/4 cup coconut milk
- 1/2 tsp vanilla extract
- Pinch of salt
Instructions
- Preheat your oven to 350°F and line an 8×8 inch baking pan with parchment paper.
- In a medium bowl, mix 1 cup coconut flour, 1/2 cup melted butter, and 1/4 cup granulated erythritol until a dough forms. Tip: The dough should stick together when pressed.
- Press the dough evenly into the bottom of the prepared pan. Bake for 15 minutes, or until lightly golden. Tip: Use the bottom of a measuring cup to smooth the crust.
- While the crust bakes, whisk together 4 eggs, 1/2 cup lemon juice, 1 tbsp lemon zest, 1/2 cup granulated erythritol, 1/4 cup coconut milk, 1/2 tsp vanilla extract, and a pinch of salt in a large bowl until smooth.
- Pour the lemon mixture over the hot crust and return to the oven. Bake for 20 minutes, or until the filling is set. Tip: The center should jiggle slightly when shaken.
- Cool completely at room temperature, then refrigerate for at least 2 hours before slicing.
Lusciously tart with a subtly sweet crust, these bars are a dream straight from the fridge. Try topping with a dollop of whipped coconut cream for an extra decadent touch.
No-Bake Peanut Butter Oatmeal Cookies
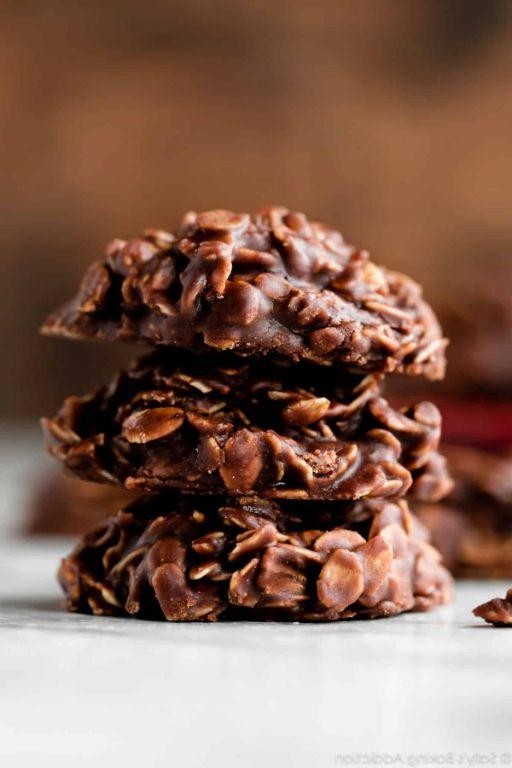
Unbelievably easy and irresistibly delicious, these no-bake peanut butter oatmeal cookies are your ticket to dessert heaven without even turning on the oven. Perfect for those days when you’re craving something sweet but your energy is as low as your patience for complicated recipes.
Ingredients
- 1 cup granulated sugar
- 1/4 cup unsalted butter
- 1/2 cup milk
- 1/4 cup cocoa powder
- 1/2 cup creamy peanut butter
- 1 tsp vanilla extract
- 3 cups quick-cooking oats
Instructions
- Line a baking sheet with parchment paper and set aside.
- In a medium saucepan, combine 1 cup granulated sugar, 1/4 cup unsalted butter, 1/2 cup milk, and 1/4 cup cocoa powder over medium heat.
- Bring the mixture to a rolling boil, stirring constantly, and let it boil for exactly 1 minute to ensure the sugar is fully dissolved.
- Remove the saucepan from heat and immediately stir in 1/2 cup creamy peanut butter and 1 tsp vanilla extract until smooth.
- Quickly fold in 3 cups quick-cooking oats, ensuring they’re evenly coated with the peanut butter mixture.
- Drop tablespoon-sized portions of the mixture onto the prepared baking sheet, spacing them about 2 inches apart.
- Let the cookies cool at room temperature for at least 30 minutes, or until they’re firm to the touch.
Every bite of these cookies is a perfect balance of chewy oats and rich peanut butter, with just enough chocolatey goodness to make them irresistible. Try serving them with a glass of cold milk or crumbled over vanilla ice cream for an extra indulgent treat.
Baked Cinnamon Apples with Walnuts
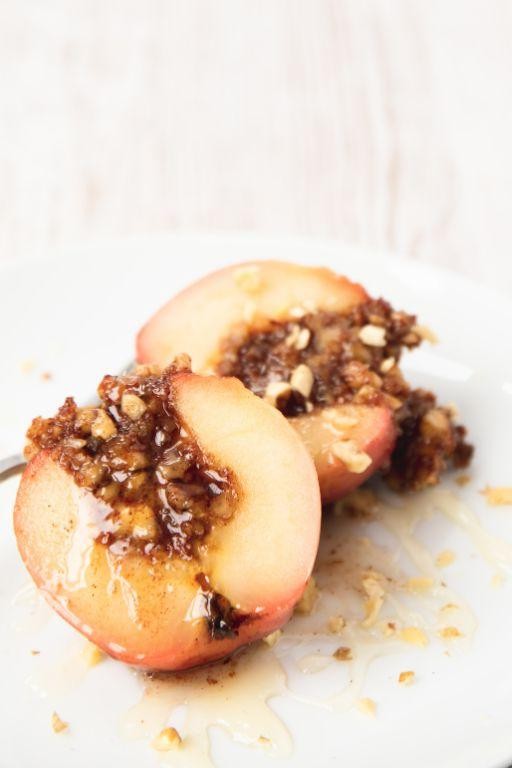
Buckle up, buttercups, because we’re about to dive into a dessert that’s as cozy as your favorite sweater and as easy as pie (but way healthier). These Baked Cinnamon Apples with Walnuts are your ticket to a guilt-free indulgence that’ll make your taste buds do a happy dance.
Ingredients
- 4 large apples, cored and sliced
- 1/2 cup walnuts, chopped
- 2 tbsp cinnamon
- 1/4 cup honey
- 1 tbsp butter, melted
- 1/2 tsp vanilla extract
Instructions
- Preheat your oven to 350°F and grease a baking dish with a light coating of butter or non-stick spray.
- In a large bowl, toss the sliced apples with cinnamon until evenly coated. Tip: For extra flavor, let the apples sit for 5 minutes to absorb the cinnamon.
- Spread the apples evenly in the prepared baking dish, then drizzle with honey and melted butter. Tip: Drizzling in a zigzag pattern ensures even distribution.
- Sprinkle the chopped walnuts over the top of the apples, pressing lightly to adhere. Tip: Toasting the walnuts beforehand can add a deeper flavor.
- Bake in the preheated oven for 25-30 minutes, or until the apples are tender and the walnuts are golden brown.
- Remove from the oven and let cool for 5 minutes before serving.
Get ready to savor the perfect harmony of soft, sweet apples and crunchy, nutty walnuts. Serve these bad boys warm with a scoop of vanilla ice cream for an extra decadent treat, or enjoy them as is for a wholesome snack that’s sure to impress.
Chia Seed Pudding with Berries
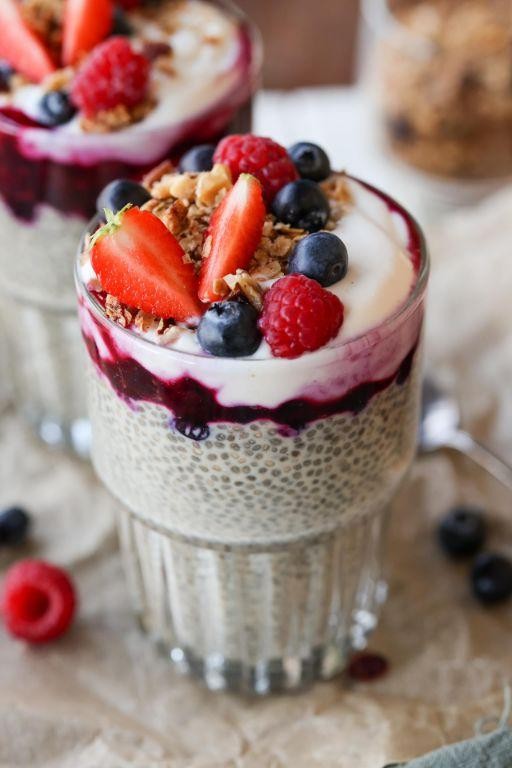
So, you’ve decided to dive into the world of chia seed pudding, and let me tell you, your taste buds are in for a treat! This no-cook, mix-and-forget dish is like the lazy person’s gourmet breakfast, but shhh—we’ll call it ‘efficient.’
Ingredients
- 1/4 cup chia seeds
- 1 cup almond milk
- 1 tbsp honey
- 1/2 tsp vanilla extract
- 1/2 cup mixed berries
Instructions
- In a medium bowl, combine 1/4 cup chia seeds and 1 cup almond milk, stirring well to prevent clumping.
- Add 1 tbsp honey and 1/2 tsp vanilla extract to the mixture, stirring until everything is evenly mixed.
- Cover the bowl with plastic wrap and refrigerate for at least 4 hours, or overnight, until the pudding has thickened to your desired consistency. Tip: Give it a stir after the first hour to ensure the chia seeds are evenly distributed.
- Once set, give the pudding a good stir to fluff it up a bit. Tip: If it’s too thick, you can thin it with a little more almond milk.
- Divide the pudding into two serving bowls and top each with 1/4 cup mixed berries. Tip: For an extra flavor boost, let the berries sit in a bit of honey before topping.
Brimming with texture and flavor, this chia seed pudding is a delightful mix of creamy and crunchy, sweet and tart. Serve it in a fancy glass to impress your brunch guests, or enjoy it straight from the bowl in your pajamas—no judgment here.
Almond Flour Blueberry Muffins
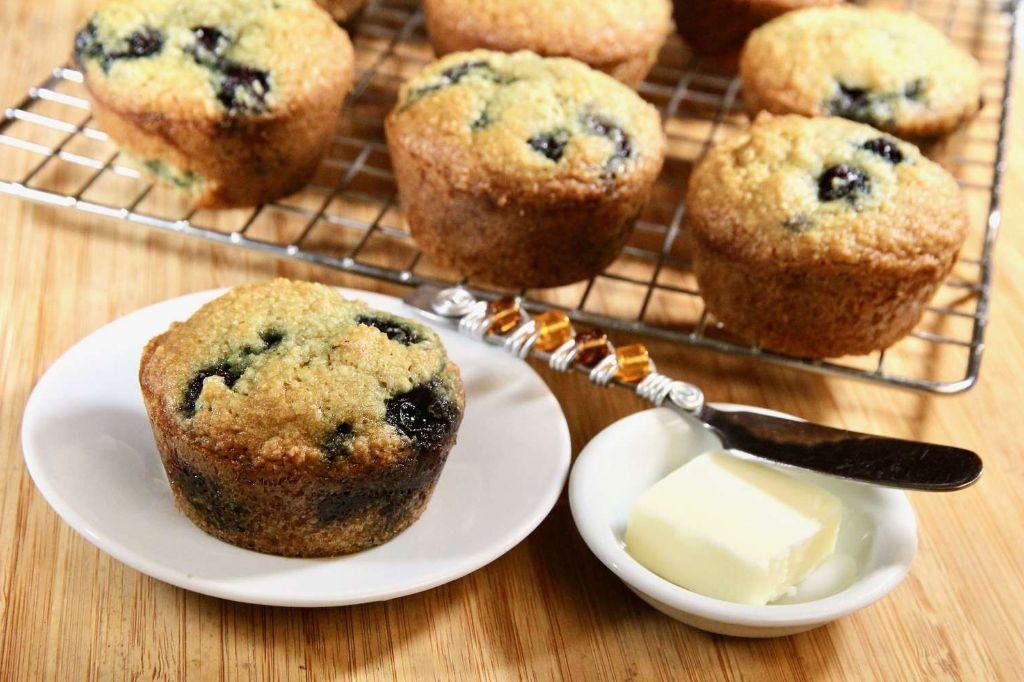
Look no further for your next baking adventure than these almond flour blueberry muffins, a delightful twist on the classic that’ll have your taste buds dancing and your kitchen smelling like a cozy café. Perfect for those mornings when you’re craving something sweet but want to keep it on the healthier side, these muffins are here to make your day a little brighter.
Ingredients
- 2 cups almond flour
- 1/2 cup maple syrup
- 1/4 cup coconut oil, melted
- 3 large eggs
- 1 tsp vanilla extract
- 1/2 tsp baking soda
- 1/4 tsp salt
- 1 cup fresh blueberries
Instructions
- Preheat your oven to 350°F and line a muffin tin with paper liners.
- In a large bowl, whisk together the almond flour, baking soda, and salt.
- In another bowl, mix the maple syrup, melted coconut oil, eggs, and vanilla extract until well combined.
- Gently fold the wet ingredients into the dry ingredients until just combined. Tip: Overmixing can lead to dense muffins, so stir until you no longer see dry flour.
- Carefully fold in the blueberries. Tip: Tossing the blueberries in a bit of almond flour before adding them can help prevent them from sinking to the bottom.
- Divide the batter evenly among the muffin cups, filling each about 3/4 full.
- Bake for 20-25 minutes, or until a toothpick inserted into the center comes out clean. Tip: Ovens vary, so start checking at the 20-minute mark to avoid overbaking.
- Let the muffins cool in the tin for 5 minutes before transferring to a wire rack to cool completely.
Now, these muffins boast a tender crumb thanks to the almond flour, with bursts of juicy blueberries in every bite. Serve them warm with a dollop of almond butter for an extra nutty flavor, or enjoy them as is for a perfectly portable breakfast or snack.
Pumpkin Spice Protein Balls
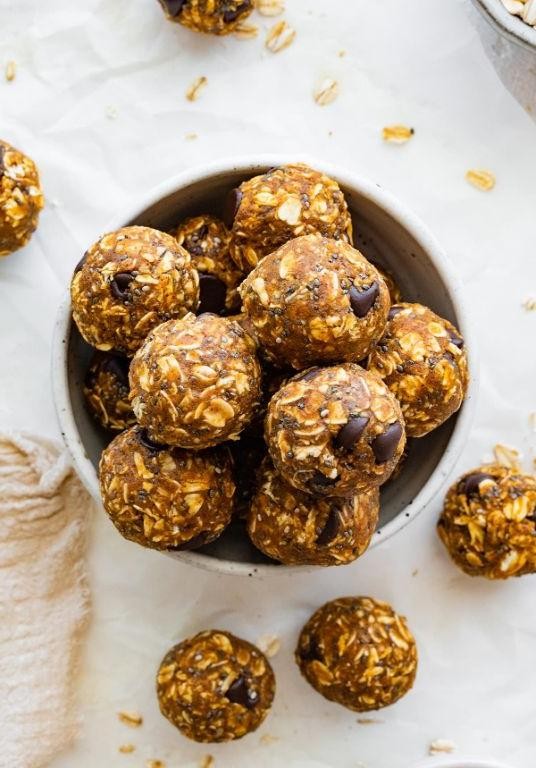
Unbelievably easy to whip up and packed with flavor, these Pumpkin Spice Protein Balls are your go-to snack for a quick energy boost or a sweet treat that doesn’t derail your health goals. Perfect for meal prep, they’re like little bites of autumn magic that you can enjoy all year round.
Ingredients
- 1 cup rolled oats
- 1/2 cup pumpkin puree
- 1/4 cup almond butter
- 2 tbsp honey
- 1 tsp vanilla extract
- 1 tsp pumpkin pie spice
- 1/2 cup vanilla protein powder
- 1/4 cup mini chocolate chips
Instructions
- In a large mixing bowl, combine 1 cup rolled oats, 1/2 cup pumpkin puree, 1/4 cup almond butter, 2 tbsp honey, 1 tsp vanilla extract, and 1 tsp pumpkin pie spice. Mix until well incorporated.
- Add 1/2 cup vanilla protein powder to the mixture. Stir until the protein powder is fully blended and the mixture becomes thick and dough-like.
- Fold in 1/4 cup mini chocolate chips evenly throughout the dough for that irresistible chocolatey surprise in every bite.
- Using your hands, roll the mixture into small balls, about 1 inch in diameter. Pro tip: lightly wet your hands to prevent the dough from sticking.
- Place the balls on a baking sheet lined with parchment paper and refrigerate for at least 30 minutes to firm up. This step is crucial for the perfect texture.
- Once set, transfer the Pumpkin Spice Protein Balls to an airtight container. Store in the refrigerator for up to a week or freeze for longer shelf life.
Bursting with the cozy flavors of pumpkin spice and the subtle sweetness of chocolate, these protein balls offer a chewy yet soft texture that’s downright addictive. Serve them as a post-workout snack, a healthy dessert, or even crumbled over yogurt for a breakfast upgrade.
Dark Chocolate Covered Strawberries

Just when you thought strawberries couldn’t get any better, along comes dark chocolate to sweep them off their feet in this decadent duo. Perfect for date night or a solo treat-yourself session, these beauties are as easy to make as they are to devour.
Ingredients
- 1 lb fresh strawberries
- 8 oz dark chocolate chips
- 1 tbsp coconut oil
Instructions
- Rinse the strawberries under cold water and pat them dry thoroughly with a paper towel. Tip: Ensure they’re completely dry to help the chocolate stick better.
- Line a baking sheet with parchment paper and set aside.
- In a microwave-safe bowl, combine the dark chocolate chips and coconut oil. Microwave in 30-second intervals, stirring between each, until fully melted. Tip: Don’t overheat to avoid seizing the chocolate.
- Hold each strawberry by the stem and dip it into the melted chocolate, swirling to coat evenly. Allow excess chocolate to drip off.
- Place the coated strawberries on the prepared baking sheet. Tip: For a professional touch, use a fork to drizzle extra chocolate over the strawberries for a decorative effect.
- Refrigerate the strawberries for at least 30 minutes, or until the chocolate is set.
Rich, velvety chocolate encases each juicy strawberry, creating a contrast that’s nothing short of magical. Serve them chilled on a fancy platter, or sneak a few straight from the fridge when no one’s looking.
Zucchini Brownies with Stevia
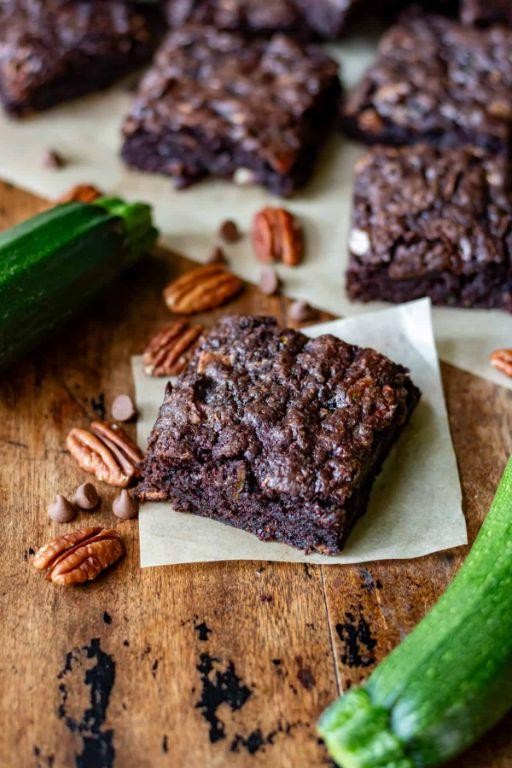
Hold onto your spatulas, folks, because we’re about to turn the humble zucchini into the star of the dessert table with these guilt-free Zucchini Brownies sweetened with stevia. Perfect for when your sweet tooth strikes but your health-conscious side is watching.
Ingredients
- 1 cup grated zucchini
- 1/2 cup almond flour
- 1/4 cup cocoa powder
- 1/4 cup stevia
- 1/4 cup coconut oil, melted
- 1 tsp vanilla extract
- 1/2 tsp baking soda
- 1/4 tsp salt
- 1/4 cup dark chocolate chips
Instructions
- Preheat your oven to 350°F and grease an 8×8 inch baking pan.
- In a large bowl, mix together the grated zucchini, almond flour, cocoa powder, stevia, melted coconut oil, vanilla extract, baking soda, and salt until well combined. Tip: Squeeze excess moisture from the zucchini to avoid soggy brownies.
- Fold in the dark chocolate chips gently into the batter.
- Pour the batter into the prepared baking pan and spread it evenly with a spatula. Tip: For extra fudgy brownies, don’t overmix the batter.
- Bake for 25 minutes or until a toothpick inserted into the center comes out mostly clean. Tip: The brownies will continue to set as they cool, so don’t overbake.
- Let the brownies cool in the pan for at least 10 minutes before slicing into squares.
Light, moist, and packed with chocolatey goodness, these brownies are a sneaky way to get your veggies in. Serve them warm with a scoop of vanilla ice cream for an irresistible contrast of temperatures and textures.
Coconut Flour Pancakes with Sugar-Free Syrup
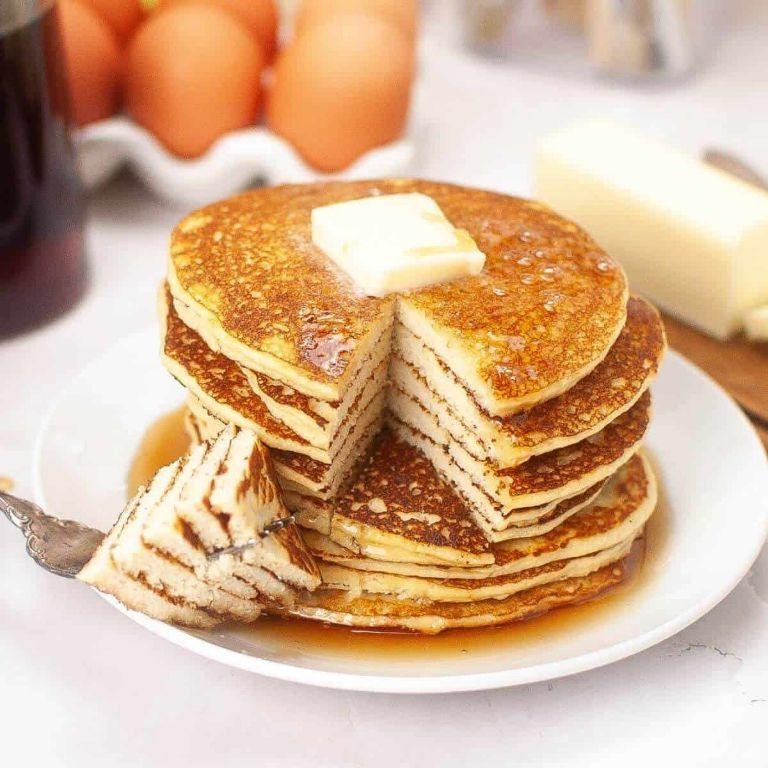
Who knew that flipping pancakes could feel like a tropical vacation? These Coconut Flour Pancakes with Sugar-Free Syrup are here to prove that breakfast can be both decadent and diet-friendly, without skimping on the fun or flavor.
Ingredients
- 1/2 cup coconut flour
- 1/4 tsp baking soda
- 1/4 tsp salt
- 4 large eggs
- 1/2 cup almond milk
- 1 tbsp coconut oil, melted
- 1 tsp vanilla extract
- 1/4 cup sugar-free syrup
Instructions
- In a large mixing bowl, whisk together 1/2 cup coconut flour, 1/4 tsp baking soda, and 1/4 tsp salt until well combined.
- Add 4 large eggs, 1/2 cup almond milk, 1 tbsp melted coconut oil, and 1 tsp vanilla extract to the dry ingredients. Whisk until the batter is smooth and free of lumps. Let the batter sit for 5 minutes to thicken.
- Heat a non-stick skillet over medium heat (350°F) and lightly grease with coconut oil.
- Pour 1/4 cup of batter onto the skillet for each pancake. Cook for 2-3 minutes, or until bubbles form on the surface and the edges look set.
- Flip the pancakes carefully and cook for an additional 1-2 minutes on the other side, or until golden brown.
- Repeat with the remaining batter, greasing the skillet as needed.
- Serve the pancakes warm, drizzled with 1/4 cup sugar-free syrup.
Fluffy, with a subtle coconutty sweetness, these pancakes are a dream come true for anyone watching their sugar intake. Try topping them with fresh berries or a dollop of whipped cream for an extra special treat.
Raspberry Chia Jam Tart
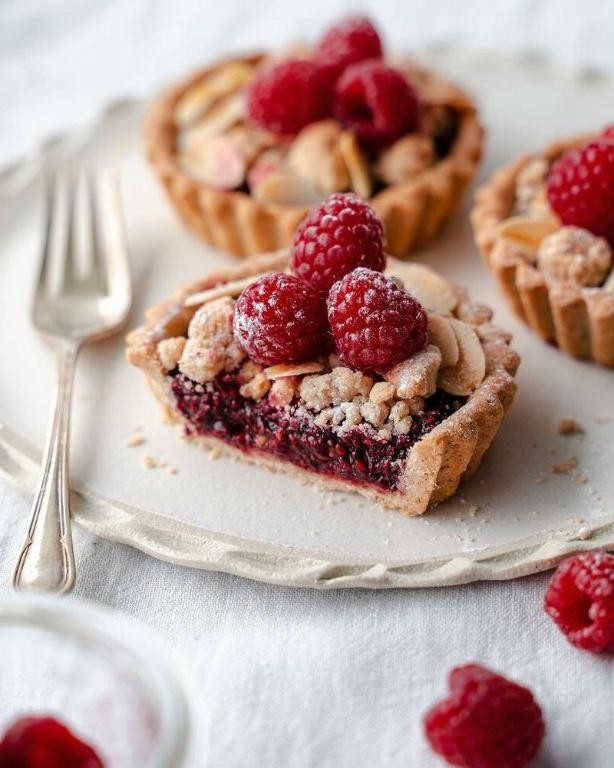
Ever find yourself staring at a jar of raspberry chia jam, wondering how to elevate it from breakfast spread to showstopper dessert? Look no further, because this Raspberry Chia Jam Tart is about to become your new best friend—easy to make, impossible to resist, and guaranteed to impress even the most discerning of taste buds.
Ingredients
- 1 1/2 cups all-purpose flour
- 1/2 cup unsalted butter, chilled and cubed
- 1/4 cup granulated sugar
- 1/4 tsp salt
- 1/4 cup ice water
- 1 cup raspberry chia jam
- 1 tbsp lemon juice
- 1 egg, beaten (for egg wash)
Instructions
- Preheat your oven to 375°F (190°C) and lightly grease a 9-inch tart pan.
- In a large bowl, whisk together the flour, sugar, and salt. Tip: Keep your butter cold for a flakier crust.
- Add the cubed butter to the flour mixture. Using your fingers or a pastry cutter, work the butter into the flour until the mixture resembles coarse crumbs.
- Gradually add ice water, 1 tablespoon at a time, mixing until the dough just comes together. Tip: Overworking the dough can make it tough, so stop as soon as it forms a ball.
- Roll out the dough on a lightly floured surface to fit your tart pan. Press it into the pan and trim any excess. Chill in the fridge for 15 minutes.
- Prick the bottom of the crust with a fork, line with parchment paper, and fill with pie weights or dried beans. Blind bake for 15 minutes.
- Remove the weights and parchment, brush the crust with beaten egg, and bake for another 5 minutes until golden. Tip: The egg wash gives the crust a beautiful shine.
- Spread the raspberry chia jam evenly over the baked crust, then drizzle with lemon juice for a bright contrast.
- Bake for 20 minutes, or until the jam is set and slightly bubbly.
This tart is a delightful dance of textures—crispy, buttery crust meets the soft, jammy center with a hint of tartness from the lemon. Serve it warm with a scoop of vanilla ice cream for an irresistible contrast, or enjoy it as is for a simple yet elegant treat.
Vanilla Bean Panna Cotta with Raspberry Sauce
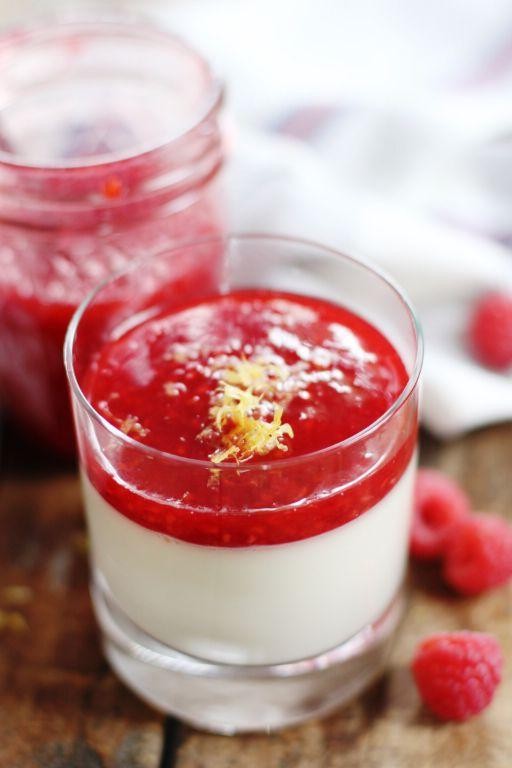
Alright, let’s dive into the creamy dream that is vanilla bean panna cotta paired with a tangy raspberry sauce. This dessert is like the little black dress of the culinary world—simple, elegant, and always in style.
Ingredients
- 2 cups heavy cream
- 1/2 cup whole milk
- 1/2 cup granulated sugar
- 1 vanilla bean, split lengthwise
- 2 1/4 tsp unflavored gelatin
- 3 tbsp cold water
- 1 cup fresh raspberries
- 1/4 cup granulated sugar
- 1 tbsp lemon juice
Instructions
- In a medium saucepan, combine heavy cream, whole milk, and 1/2 cup granulated sugar.
- Scrape the seeds from the vanilla bean into the saucepan and add the pod.
- Heat the mixture over medium heat until it begins to steam, about 5 minutes, stirring occasionally. Do not boil.
- In a small bowl, sprinkle gelatin over cold water and let stand for 5 minutes to soften.
- Remove the vanilla pod from the cream mixture and whisk in the gelatin until fully dissolved.
- Divide the mixture among 4 ramekins and refrigerate until set, at least 4 hours.
- For the raspberry sauce, combine raspberries, 1/4 cup granulated sugar, and lemon juice in a small saucepan.
- Cook over medium heat, stirring occasionally, until the raspberries break down and the sauce thickens slightly, about 10 minutes.
- Strain the sauce through a fine-mesh sieve to remove seeds, then cool to room temperature.
- To serve, run a knife around the edge of each panna cotta and invert onto a plate. Drizzle with raspberry sauce.
Velvety smooth with a hint of vanilla sophistication, this panna cotta is a textural masterpiece. The raspberry sauce adds a pop of color and a zesty contrast that’ll make your taste buds dance. Serve it with a sprinkle of fresh raspberries or a dollop of whipped cream for an extra indulgent touch.
Spiced Pecan and Date Energy Bites
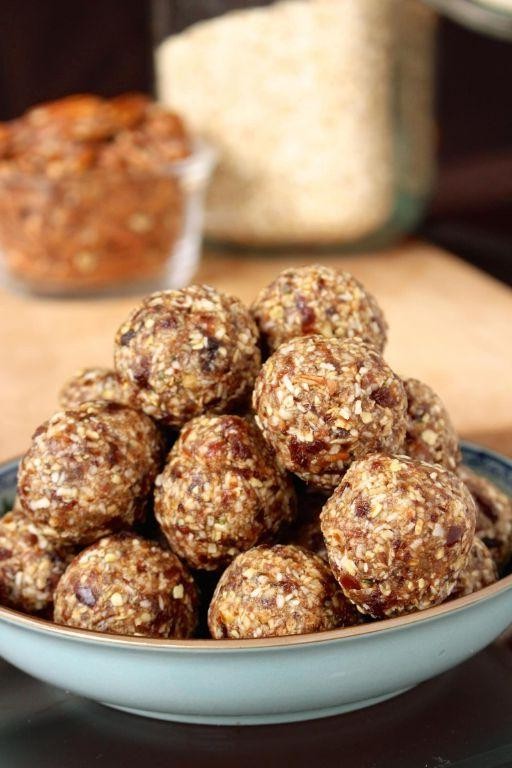
Picture this: you’re mid-afternoon, your stomach’s growling like a bear, and the vending machine’s calling your name. But wait! These Spiced Pecan and Date Energy Bites are here to save the day—no questionable snacks required.
Ingredients
- 1 cup pitted dates
- 1/2 cup raw pecans
- 1/4 cup almond butter
- 1 tbsp chia seeds
- 1/2 tsp cinnamon
- 1/4 tsp nutmeg
- 1/4 tsp sea salt
- 1 tsp vanilla extract
Instructions
- Line a baking sheet with parchment paper and set aside.
- In a food processor, combine 1 cup pitted dates, 1/2 cup raw pecans, 1/4 cup almond butter, 1 tbsp chia seeds, 1/2 tsp cinnamon, 1/4 tsp nutmeg, 1/4 tsp sea salt, and 1 tsp vanilla extract.
- Pulse the mixture until it forms a sticky dough, scraping down the sides as needed to ensure everything is evenly incorporated.
- Using a tablespoon, scoop out the mixture and roll into 1-inch balls. Tip: Wet your hands slightly to prevent sticking.
- Place the balls on the prepared baking sheet and refrigerate for at least 30 minutes to firm up. Tip: For a quicker set, pop them in the freezer for 15 minutes.
- Once firm, transfer the energy bites to an airtight container. Tip: Store them in the fridge to keep them fresh for up to 2 weeks.
Velvety smooth with a crunch, these bites are like a hug for your taste buds. Serve them atop your morning oatmeal or sneak a couple into your gym bag for a post-workout pick-me-up.
Greek Yogurt and Honey Frozen Bars
Oh boy, are you ready to turn your freezer into the coolest dessert spot in town? These Greek Yogurt and Honey Frozen Bars are the creamy, dreamy treats you didn’t know you needed, blending tangy yogurt with the sweet kiss of honey for a snack that’s as refreshing as a dive into the Aegean Sea.
Ingredients
- 2 cups Greek yogurt
- 1/4 cup honey
- 1 tsp vanilla extract
- 1/2 cup fresh berries (for topping)
Instructions
- In a medium bowl, whisk together 2 cups Greek yogurt, 1/4 cup honey, and 1 tsp vanilla extract until smooth. Tip: For an extra smooth mixture, let the yogurt sit at room temperature for 10 minutes before mixing.
- Pour the mixture into ice pop molds or a shallow dish lined with parchment paper. Tip: If using a dish, scoring the mixture before freezing makes it easier to break into bars later.
- Sprinkle 1/2 cup fresh berries evenly over the top, gently pressing them into the mixture. Tip: Mixing the berries into the yogurt can create a marbled effect for a fun visual twist.
- Freeze for at least 4 hours, or until solid. For the best texture, let the bars sit at room temperature for 5 minutes before serving.
Absolutely divine, these bars strike the perfect balance between creamy and icy, with the honey’s sweetness playing off the yogurt’s tang. Serve them on a stick for easy enjoyment or crumble over granola for a breakfast-worthy twist.
Conclusion
Just because you’re managing diabetes doesn’t mean you have to skip dessert! Our roundup of 16 delicious, diabetic-friendly recipes proves that healthy can still mean indulgent. From creamy cheesecakes to fruity delights, there’s something for every sweet tooth. We’d love to hear which recipes you try—drop a comment with your favorites and don’t forget to share the love on Pinterest. Happy baking!


