Craving something uniquely sweet and wonderfully exotic? Taro, with its delightful purple hue and nutty flavor, is the star of these 22 delicious dessert recipes that promise to whisk your taste buds on an adventure. From creamy puddings to fluffy cakes, each recipe is a testament to taro’s versatility. Perfect for home cooks looking to spice up their dessert game, these treats are sure to impress. Ready to explore? Let’s dive in!
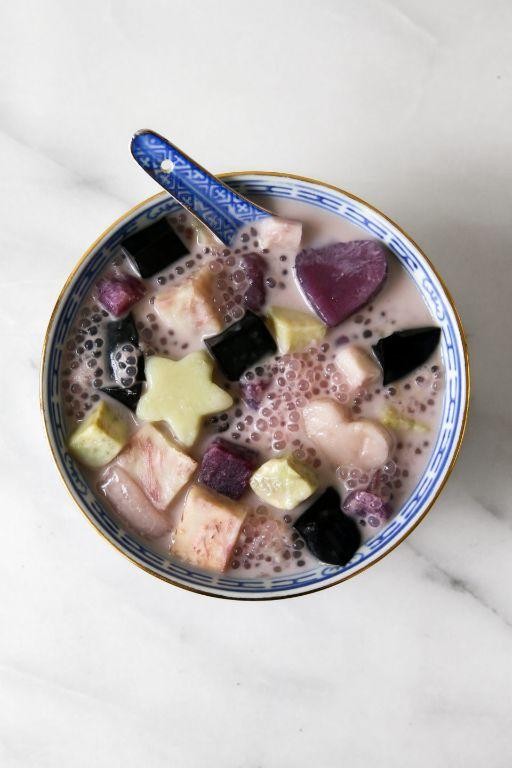
Taro Bubble Tea

Just as the summer heat peaks, a refreshing taro bubble tea offers a delightful escape, blending the earthy sweetness of taro with the creamy richness of milk and the playful chew of tapioca pearls.
Ingredients
- Taro powder – 3 tbsp
- Milk – 1 cup
- Tapioca pearls – ½ cup
- Ice – 1 cup
- Honey – 2 tbsp
Instructions
- Bring 2 cups of water to a boil in a medium saucepan over high heat.
- Add the tapioca pearls to the boiling water, stirring gently to prevent sticking, and cook for 5 minutes.
- Reduce the heat to medium and simmer the pearls for an additional 10 minutes, then remove from heat and let them sit covered for 5 minutes to achieve the perfect chewiness.
- Drain the pearls and rinse under cold water to stop the cooking process, then mix with 1 tbsp of honey to sweeten.
- In a blender, combine the taro powder, milk, remaining honey, and ice, blending on high until smooth and frothy.
- Divide the sweetened tapioca pearls between two glasses, then pour the blended taro mixture over the pearls.
- Stir gently before serving to distribute the pearls evenly throughout the drink.
Enjoy the velvety texture and the harmonious balance of flavors in this taro bubble tea, perfect for sipping on a warm afternoon or as a sweet ending to any meal. For an extra touch of elegance, garnish with a sprinkle of taro powder on top before serving.
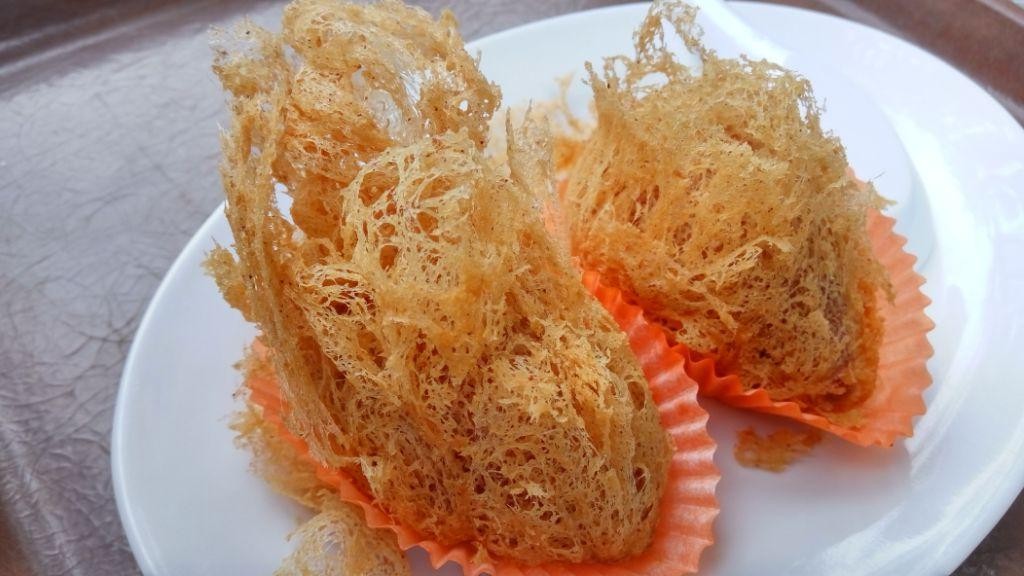
Taro Mochi
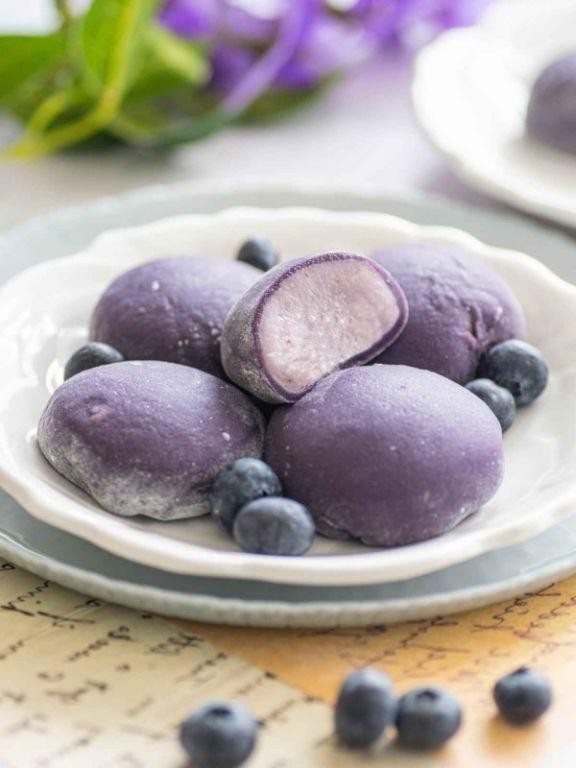
Kneading tradition with a touch of modernity, taro mochi offers a delightful chewiness paired with the subtle, earthy sweetness of taro, making it a perfect treat for those who appreciate the finer nuances of Asian desserts.
Ingredients
- Taro – 1 cup, mashed
- Glutinous rice flour – 1 cup
- Sugar – ¼ cup
- Water – ½ cup
- Cornstarch – ¼ cup, for dusting
Instructions
- In a large mixing bowl, combine the mashed taro, glutinous rice flour, and sugar until well mixed.
- Gradually add water to the mixture, kneading until a smooth, pliable dough forms. Tip: The dough should not stick to your hands; if it does, add a little more glutinous rice flour.
- Divide the dough into 12 equal pieces, rolling each into a ball. Tip: Keep the dough covered with a damp cloth to prevent it from drying out while you work.
- Bring a pot of water to a boil over high heat. Gently drop the dough balls into the boiling water, cooking until they float to the surface, about 3-4 minutes.
- Remove the mochi with a slotted spoon and immediately roll them in cornstarch to prevent sticking. Tip: Use a fine-mesh sieve to dust the cornstarch evenly for a smoother finish.
- Let the mochi cool slightly before serving to allow the texture to set.
Unveiling the mochi reveals a soft, slightly sticky exterior that gives way to a tender, flavorful center. Serve these delightful bites with a dusting of powdered sugar or alongside a cup of green tea for an authentic experience.
Taro Pudding
Yielded from the lush landscapes of the tropics, taro pudding is a velvety, subtly sweet dessert that marries the earthy notes of taro with the creamy richness of coconut milk, creating a symphony of flavors that’s both comforting and exotic.
Ingredients
- Taro – 2 cups, peeled and diced
- Coconut milk – 1 cup
- Sugar – ½ cup
- Water – 2 cups
Instructions
- In a medium saucepan, combine the diced taro and water. Bring to a boil over high heat.
- Reduce heat to medium-low, cover, and simmer for 20 minutes or until the taro is fork-tender. Tip: Stir occasionally to prevent sticking.
- Drain the taro, reserving ½ cup of the cooking water. Let the taro cool slightly.
- In a blender, puree the cooked taro, reserved cooking water, coconut milk, and sugar until smooth. Tip: For an extra silky texture, blend for at least 2 minutes.
- Pour the mixture into a clean saucepan and cook over low heat, stirring constantly, for 5 minutes or until thickened. Tip: Use a wooden spoon to stir for the best consistency.
- Remove from heat and let cool to room temperature before transferring to serving dishes.
- Chill in the refrigerator for at least 2 hours before serving.
Perfectly creamy with a hint of nuttiness, this taro pudding is a delightful treat that’s as pleasing to the palate as it is to the eye. Serve it garnished with a sprinkle of toasted coconut or a drizzle of honey for an added layer of flavor.
Taro Ice Cream
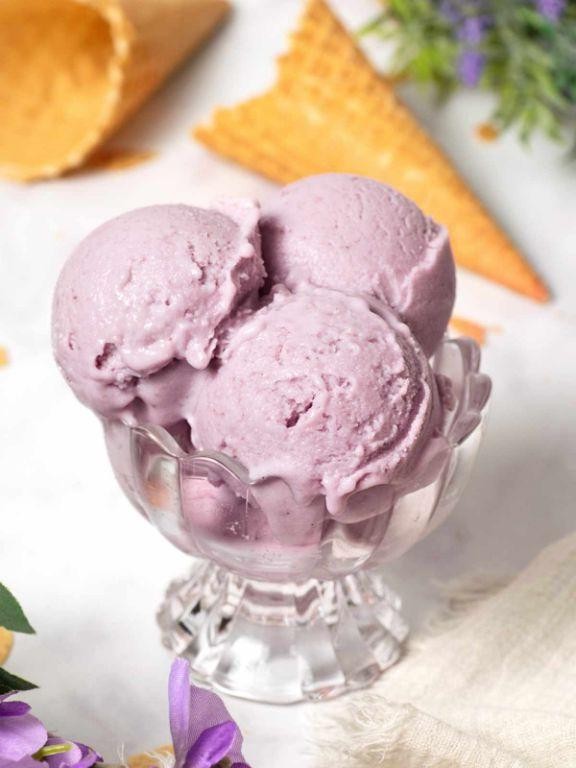
Beyond the ordinary, taro ice cream offers a delightful escape into the world of exotic flavors, blending the earthy sweetness of taro with the creamy richness of traditional ice cream. This elegant dessert is a testament to the beauty of simplicity, transforming a few key ingredients into a luxurious treat that’s as visually appealing as it is delicious.
Ingredients
- Taro root – 1 cup, peeled and diced
- Heavy cream – 1 cup
- Whole milk – 1 cup
- Sugar – ½ cup
- Vanilla extract – 1 tsp
Instructions
- In a medium saucepan, combine the diced taro root with enough water to cover. Bring to a boil over high heat, then reduce to a simmer and cook until the taro is tender, about 20 minutes. Tip: The taro should easily pierce with a fork when done.
- Drain the taro and transfer to a blender. Add the heavy cream, whole milk, sugar, and vanilla extract. Blend until smooth. Tip: For an extra smooth texture, strain the mixture through a fine-mesh sieve.
- Pour the mixture into an ice cream maker and churn according to the manufacturer’s instructions, usually about 25-30 minutes. Tip: If you don’t have an ice cream maker, freeze the mixture in a shallow dish, stirring every 30 minutes until firm, about 4 hours.
- Transfer the churned ice cream to a lidded container and freeze until firm, at least 2 hours.
Creamy and subtly sweet, this taro ice cream boasts a unique purple hue and a velvety texture that melts luxuriously on the tongue. Serve it in a crisp waffle cone for a delightful contrast or alongside a slice of coconut cake for an indulgent dessert pairing.
Taro Cheesecake
Lusciously creamy with a hint of earthy sweetness, this taro cheesecake is a modern twist on a classic dessert, blending the vibrant purple hue of taro with the rich, velvety texture of cheesecake for a visually stunning and delectably unique treat.
Ingredients
- Graham cracker crumbs – 1 ½ cups
- Butter, melted – ½ cup
- Cream cheese, softened – 24 oz
- Sugar – ¾ cup
- Taro puree – 1 cup
- Eggs – 3
- Vanilla extract – 1 tsp
Instructions
- Preheat oven to 325°F. Line the bottom of a 9-inch springform pan with parchment paper.
- Mix graham cracker crumbs and melted butter in a bowl until evenly moistened. Press the mixture firmly into the bottom of the prepared pan to form the crust. Tip: Use the bottom of a measuring cup to press the crumbs for an even layer.
- Bake the crust for 10 minutes, then remove from oven and let cool. Reduce oven temperature to 300°F.
- In a large bowl, beat cream cheese and sugar until smooth. Tip: Ensure the cream cheese is at room temperature to avoid lumps.
- Add taro puree and vanilla extract to the cream cheese mixture, beating until fully incorporated.
- Add eggs one at a time, beating well after each addition. Tip: Overbeating can incorporate too much air, causing the cheesecake to crack.
- Pour the filling over the cooled crust, smoothing the top with a spatula.
- Bake for 55-60 minutes, or until the edges are set but the center still jiggles slightly.
- Turn off the oven and leave the cheesecake inside with the door slightly ajar for 1 hour to cool gradually.
- Refrigerate the cheesecake for at least 4 hours, or overnight, before serving.
This taro cheesecake boasts a silky texture and a delicate balance of sweet and earthy flavors. For an extra touch of elegance, garnish with edible flowers or a drizzle of white chocolate before serving.
Taro Pancakes
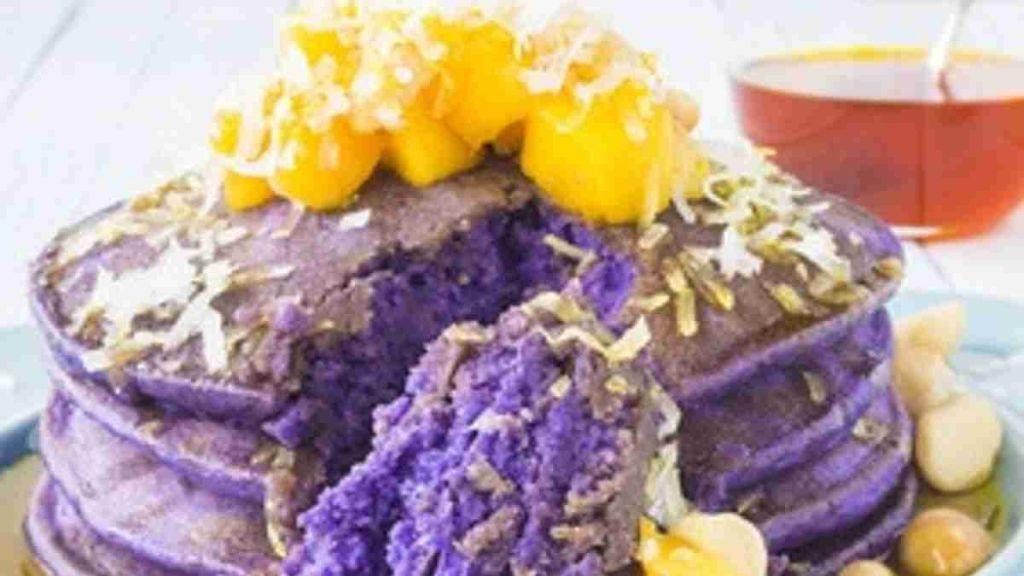
Exquisite in both flavor and presentation, taro pancakes offer a delightful twist on the classic breakfast staple, blending the subtle sweetness of taro with the comforting warmth of freshly made pancakes.
Ingredients
- Taro – 1 cup, mashed
- Flour – 1 cup
- Milk – ¾ cup
- Egg – 1
- Sugar – 2 tbsp
- Baking powder – 1 tsp
- Salt – ½ tsp
- Butter – 2 tbsp, melted
Instructions
- In a large bowl, whisk together the mashed taro, milk, egg, and melted butter until smooth.
- Add the flour, sugar, baking powder, and salt to the wet ingredients, stirring just until combined to avoid overmixing.
- Heat a non-stick skillet over medium heat (350°F) and lightly grease with butter.
- Pour ¼ cup of batter onto the skillet for each pancake, cooking until bubbles form on the surface and the edges look set, about 2-3 minutes.
- Flip the pancakes carefully and cook for another 1-2 minutes until golden brown and cooked through.
- Repeat with the remaining batter, adjusting the heat as necessary to prevent burning.
Uniquely textured with a soft interior and slightly crispy edges, these taro pancakes are a harmonious blend of earthy and sweet. Serve them stacked high with a drizzle of honey or a sprinkle of powdered sugar for an extra touch of elegance.
Taro Custard Buns
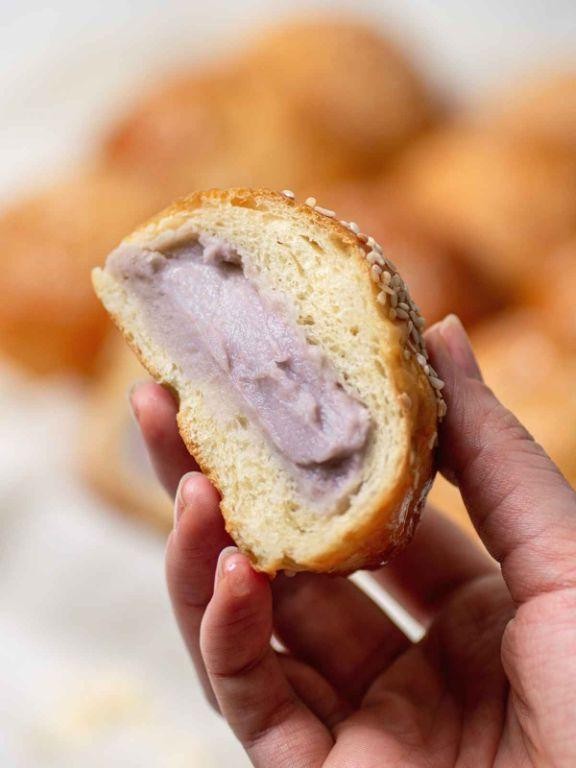
Nestled within the realm of comforting desserts, Taro Custard Buns offer a delightful fusion of soft, pillowy dough and a creamy, subtly sweet taro filling. This elegant treat, with its vibrant purple hue, is a testament to the beauty of simple ingredients transformed into something extraordinary.
Ingredients
- Flour – 2 cups
- Sugar – ¼ cup
- Yeast – 1 tsp
- Milk – ½ cup
- Taro – 1 cup, mashed
- Egg – 1
- Butter – 2 tbsp
Instructions
- In a large bowl, combine flour, sugar, and yeast. Tip: Ensure your yeast is fresh for the best rise.
- Warm milk to 110°F and mix into the dry ingredients along with the egg, stirring until a dough forms.
- Knead the dough on a floured surface for 10 minutes, then incorporate butter until the dough is smooth and elastic. Tip: The dough should pass the windowpane test when stretched.
- Cover the dough and let it rise in a warm place for 1 hour, or until doubled in size.
- While the dough rises, mix mashed taro with sugar to taste for the filling.
- Divide the dough into 8 pieces, flatten each, and spoon 1 tbsp of taro filling into the center.
- Pinch the edges to seal the filling inside, then place each bun seam-side down on a baking tray. Tip: Let the buns rest for 15 minutes before baking for a lighter texture.
- Preheat the oven to 350°F and bake the buns for 20 minutes, or until golden brown.
Out of the oven, these buns boast a tender crumb that gives way to the lush, creamy taro center. Serve them warm for a comforting treat, or at room temperature to highlight the delicate flavors of taro.
Taro Coconut Milk Soup

Kindly imagine a bowl of creamy, aromatic soup that marries the earthy sweetness of taro with the rich, tropical notes of coconut milk. This Taro Coconut Milk Soup is a comforting embrace, perfect for those seeking a dish that’s both nourishing and subtly exotic.
Ingredients
- Taro – 2 cups, peeled and cubed
- Coconut milk – 1 can (13.5 oz)
- Water – 2 cups
- Salt – ½ tsp
Instructions
- Peel the taro and cut into 1-inch cubes, ensuring uniform size for even cooking.
- In a medium pot, combine the taro cubes and water. Bring to a boil over high heat, then reduce to a simmer for 20 minutes, or until the taro is fork-tender.
- Tip: Stir occasionally to prevent sticking and ensure even cooking.
- Once the taro is cooked, gently mash half of the cubes in the pot to thicken the soup, leaving the rest whole for texture.
- Pour in the coconut milk and add the salt, stirring gently to combine. Simmer for an additional 5 minutes to meld the flavors.
- Tip: Avoid boiling after adding coconut milk to prevent separation.
- Adjust the soup’s consistency by adding a little more water if desired, then taste and adjust seasoning if necessary.
- Tip: For a smoother texture, blend the soup before adding the coconut milk.
Now, this Taro Coconut Milk Soup presents a velvety base punctuated by tender chunks of taro, offering a delightful contrast in every spoonful. Serve it garnished with a drizzle of coconut milk and a sprinkle of fresh cilantro for an extra layer of flavor and color.
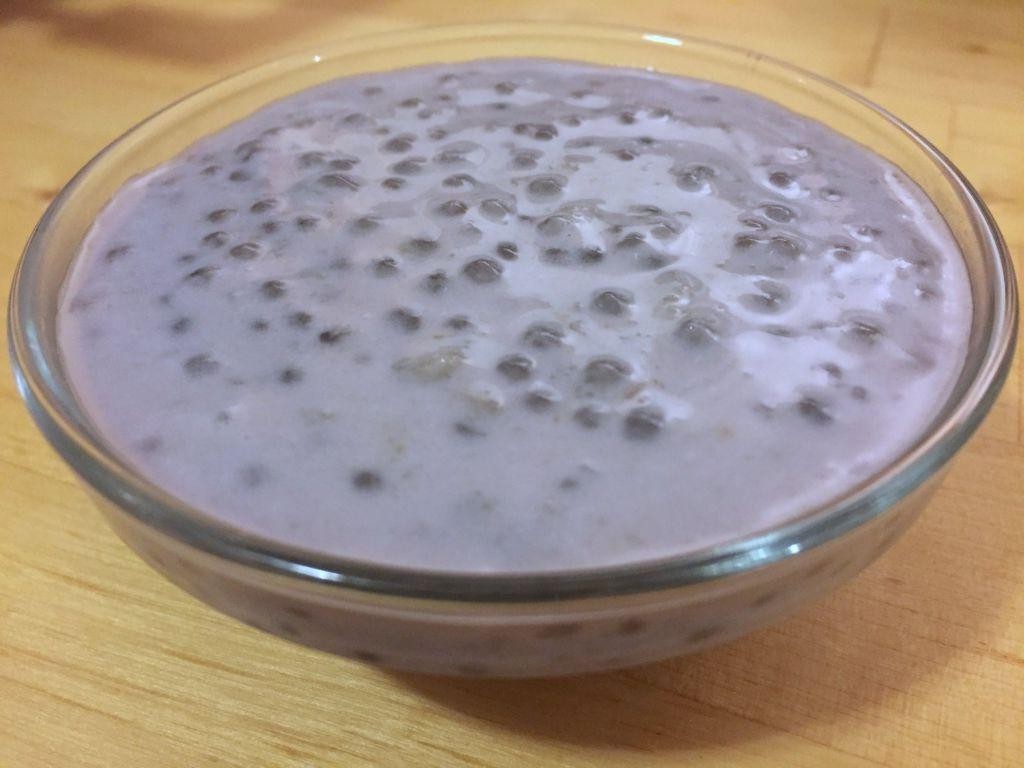
Taro Sago Dessert
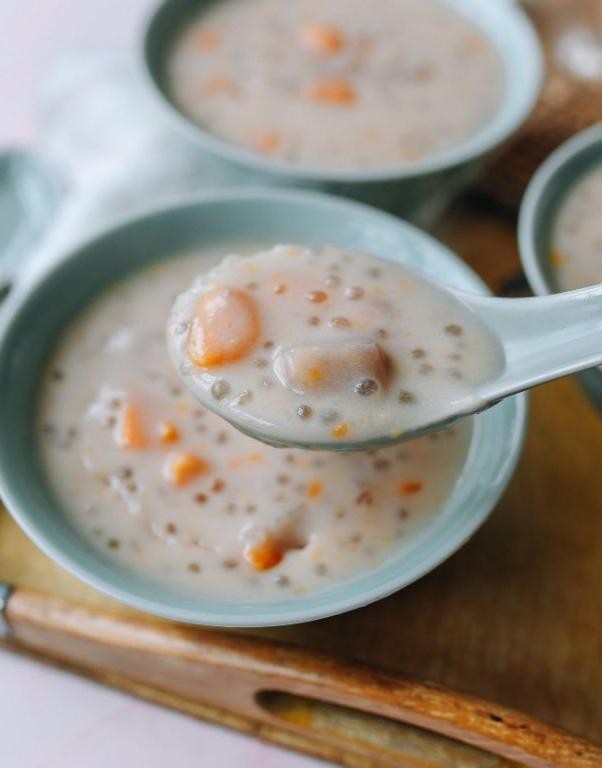
Lusciously creamy and subtly sweet, this Taro Sago Dessert is a delightful treat that combines the earthy flavors of taro with the chewy texture of sago pearls, creating a harmonious blend that’s both refreshing and satisfying.
Ingredients
- Taro – 1 cup, cubed
- Sago pearls – ½ cup
- Coconut milk – 1 cup
- Sugar – ¼ cup
- Water – 4 cups
Instructions
- Rinse the sago pearls under cold water until the water runs clear, then soak them in water for 30 minutes to soften.
- In a pot, bring 4 cups of water to a boil over high heat. Add the soaked sago pearls and cook for 15 minutes, stirring occasionally to prevent sticking, until they turn translucent.
- While the sago cooks, steam the taro cubes for 20 minutes or until they are soft and easily pierced with a fork.
- Once the taro is cooked, mash it into a smooth paste, then mix it with the coconut milk and sugar in a bowl until well combined.
- Drain the cooked sago pearls and rinse them under cold water to stop the cooking process, then add them to the taro mixture.
- Stir the mixture gently to combine all ingredients evenly, then refrigerate for at least 1 hour to chill before serving.
Generously serve this dessert chilled, where the velvety taro puree meets the playful bounce of sago pearls, offering a contrast in textures that’s as pleasing to the palate as it is to the eye. For an extra touch of elegance, garnish with a drizzle of coconut milk or a sprinkle of toasted coconut flakes.
Taro Red Bean Cake
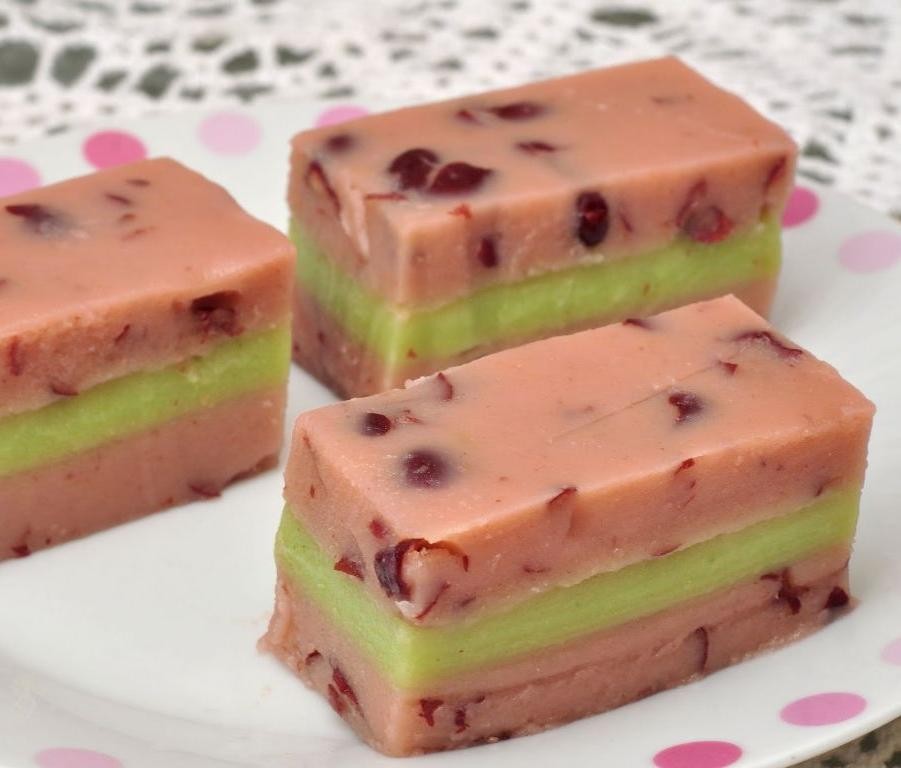
Venturing into the realm of exquisite desserts, the Taro Red Bean Cake stands as a testament to the harmonious blend of textures and flavors, offering a delicate balance between the earthy sweetness of taro and the rich, velvety depth of red bean paste.
Ingredients
- Taro – 2 cups, mashed
- Red bean paste – 1 cup
- Sugar – ½ cup
- Cornstarch – ¼ cup
- Water – ½ cup
- Butter – 2 tbsp, melted
Instructions
- Preheat your oven to 350°F (175°C) and lightly grease a 9-inch round cake pan.
- In a large bowl, combine the mashed taro, sugar, and melted butter, mixing until smooth. Tip: For a smoother texture, ensure the taro is thoroughly mashed without lumps.
- Gradually add the cornstarch to the taro mixture, stirring continuously to avoid clumps.
- Pour the water into the mixture, stirring until you achieve a uniform, slightly thick batter.
- Spread half of the taro batter into the prepared cake pan, creating an even layer.
- Carefully spread the red bean paste over the taro layer, leaving a small margin around the edges.
- Top with the remaining taro batter, smoothing the surface with a spatula. Tip: Wetting the spatula lightly can help achieve a smoother top.
- Bake for 45 minutes, or until the cake is firm to the touch and the edges are lightly golden. Tip: Insert a toothpick into the center; if it comes out clean, the cake is done.
- Allow the cake to cool in the pan for 10 minutes before transferring to a wire rack to cool completely.
Soft yet slightly chewy, the Taro Red Bean Cake delights with its contrasting layers and subtle sweetness. Serve it chilled for a refreshing treat or slightly warmed to enhance its aromatic flavors, perhaps accompanied by a dollop of whipped cream or a sprinkle of toasted sesame seeds for an extra layer of texture.
Taro Sweet Soup
Venturing into the realm of comforting desserts, this Taro Sweet Soup stands out with its velvety texture and subtly sweet, earthy flavors, making it a perfect end to any meal or a soothing treat on a quiet evening.
Ingredients
- Taro – 2 cups, peeled and cubed
- Water – 4 cups
- Sugar – ½ cup
- Coconut milk – 1 cup
Instructions
- In a large pot, combine the taro cubes and water. Bring to a boil over high heat.
- Reduce the heat to medium-low and simmer for 20 minutes, or until the taro is tender when pierced with a fork.
- Add the sugar to the pot, stirring gently until completely dissolved. Tip: For a deeper flavor, consider using brown sugar as an alternative.
- Pour in the coconut milk, stirring continuously to blend it smoothly into the soup. Heat for another 5 minutes, ensuring it doesn’t boil to prevent curdling.
- Remove from heat and let it sit for 5 minutes to allow the flavors to meld. Tip: For an extra layer of aroma, a pandan leaf can be added during the simmering process.
- Serve warm or chilled, according to preference. Tip: Garnishing with toasted sesame seeds adds a delightful crunch and nutty flavor.
Enjoy the creamy consistency and the harmonious blend of sweetness and earthiness in every spoonful. For a festive twist, serve it in hollowed-out taro shells or alongside a scoop of vanilla ice cream.
Taro Dumplings
Fusing tradition with a touch of modern flair, taro dumplings offer a delightful exploration of texture and taste, perfect for those seeking to elevate their culinary repertoire with something uniquely comforting yet sophisticated.
Ingredients
- Taro – 2 cups, mashed
- Flour – 1 cup
- Salt – ½ tsp.
- Water – ¼ cup
- Sugar – 2 tbsp
Instructions
- Peel and boil 2 medium taro roots in water until soft, about 20 minutes. Tip: Ensure the taro is fully submerged to cook evenly.
- Drain the taro and mash it into a smooth paste in a large bowl. Let it cool to room temperature.
- Add 1 cup of flour, ½ tsp. salt, and 2 tbsp sugar to the mashed taro. Mix until well combined.
- Gradually add ¼ cup water, kneading the mixture into a soft, pliable dough. Tip: The dough should not stick to your hands; adjust flour or water as needed.
- Divide the dough into small, equal portions and roll each into a ball. Flatten slightly to form dumplings.
- Heat a non-stick pan over medium heat and lightly grease it. Cook the dumplings for 3-4 minutes on each side or until golden brown. Tip: Avoid overcrowding the pan to ensure even cooking.
Meticulously crafted, these taro dumplings boast a subtly sweet flavor with a satisfyingly chewy texture. Serve them warm, drizzled with honey or alongside a scoop of vanilla ice cream for an unexpected dessert twist.
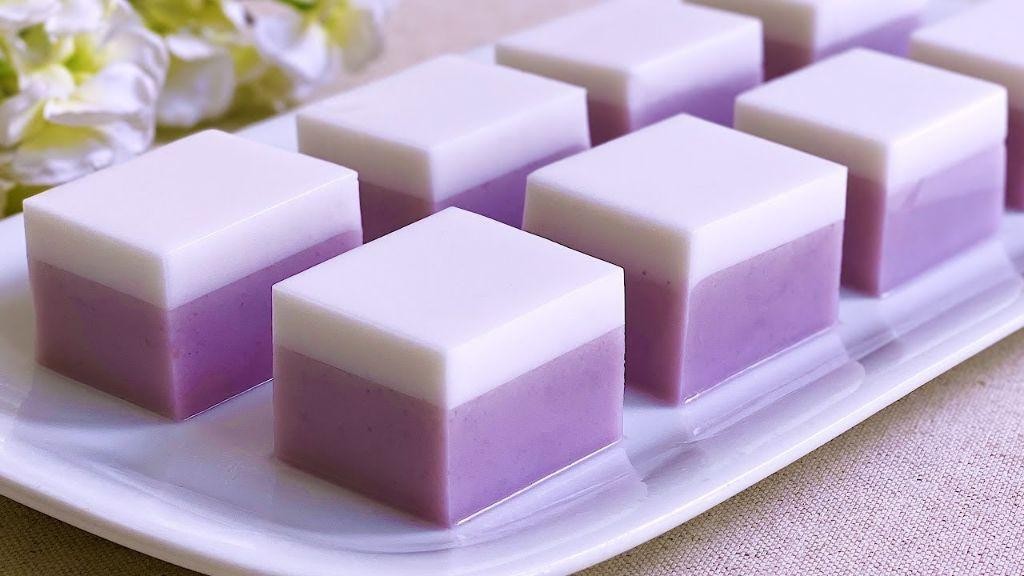
Taro Layer Cake
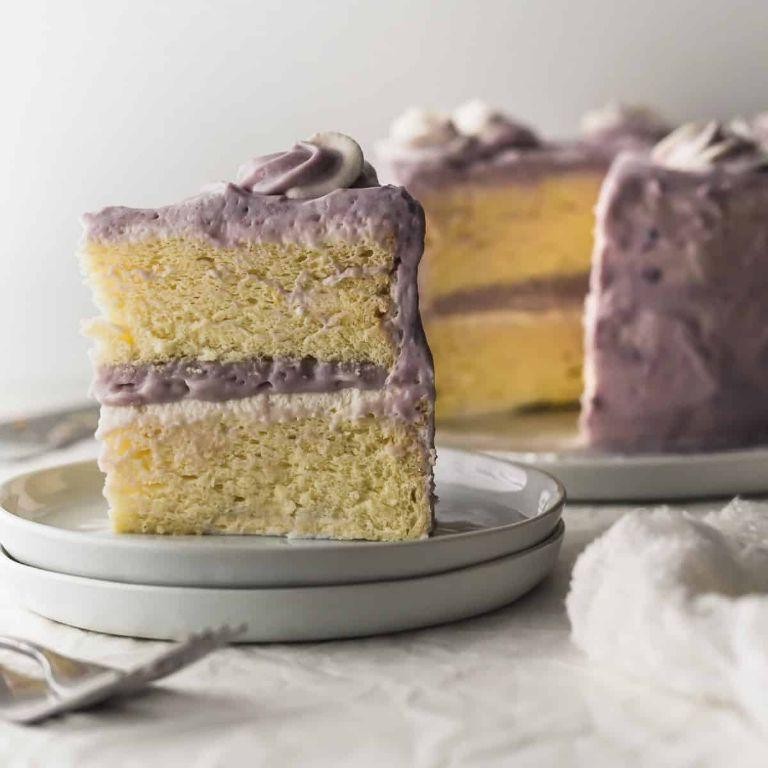
Vibrant in hue and rich in flavor, the Taro Layer Cake stands as a testament to the beauty of layered desserts, offering a visually stunning and delectably sweet experience that captivates at first glance.
Ingredients
- Taro – 2 cups, mashed
- Coconut milk – 1 cup
- Sugar – ¾ cup
- Gelatin – 2 tbsp
- Water – ½ cup
Instructions
- Peel and cube the taro, then steam until soft, about 20 minutes.
- Mash the steamed taro until smooth, ensuring no lumps remain for a silky texture.
- In a saucepan, combine coconut milk and sugar, heating over medium until the sugar dissolves, about 5 minutes.
- Dissolve gelatin in water, then stir into the coconut milk mixture until fully incorporated.
- Layer the mashed taro and coconut milk mixture alternately in a mold, starting and ending with taro for a striking contrast.
- Chill in the refrigerator for at least 4 hours, or until set firmly.
- To unmold, briefly dip the mold in warm water and invert onto a serving plate.
Celebrate the delicate balance of flavors and textures in this Taro Layer Cake, where the earthy sweetness of taro meets the creamy richness of coconut milk. Serve chilled, garnished with edible flowers or a drizzle of coconut syrup for an extra touch of elegance.
Taro Sesame Balls
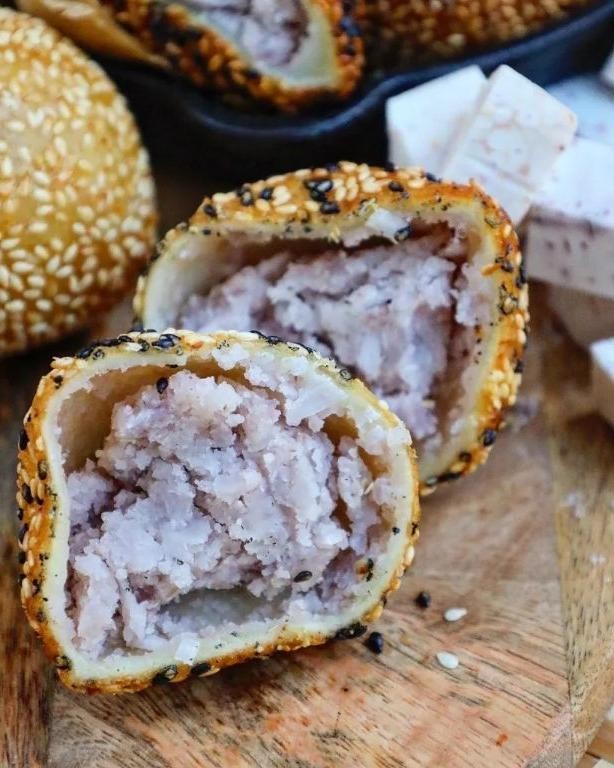
These taro sesame balls, with their delicate balance of sweet and nutty flavors, are a testament to the beauty of simple ingredients transformed into something extraordinary.
Ingredients
- Taro – 1 cup, mashed
- Sesame seeds – ½ cup
- Sugar – ¼ cup
- Glutinous rice flour – 1 cup
- Water – ½ cup
- Oil – for frying
Instructions
- In a large bowl, combine the mashed taro, sugar, and glutinous rice flour until a dough forms. Tip: Ensure the taro is completely cooled before mixing to prevent the dough from becoming sticky.
- Gradually add water, kneading until the dough is smooth and pliable. Tip: The dough should not stick to your hands; if it does, add a little more flour.
- Divide the dough into small, equal portions and roll each into a ball.
- Roll each ball in sesame seeds until fully coated. Tip: Lightly wet your hands to help the sesame seeds adhere better.
- Heat oil in a deep fryer or large pot to 350°F. Fry the balls in batches, turning occasionally, until golden brown, about 3-4 minutes. Tip: Do not overcrowd the pot to ensure even cooking.
- Remove with a slotted spoon and drain on paper towels.
Soft and chewy on the inside with a crispy sesame crust, these balls are a delightful contrast of textures. Serve them warm for a comforting treat or alongside a cup of tea for an elegant afternoon snack.
Taro Coconut Jelly
Captivating in its simplicity and exotic allure, Taro Coconut Jelly is a dessert that marries the earthy sweetness of taro with the creamy richness of coconut milk, resulting in a treat that’s as visually stunning as it is delicious.
Ingredients
- Taro – 1 cup, peeled and diced
- Coconut milk – 1 cup
- Sugar – ½ cup
- Gelatin powder – 2 tbsp
- Water – ½ cup
Instructions
- In a medium saucepan, combine the diced taro and water. Bring to a boil over medium heat, then reduce to a simmer for 15 minutes, or until the taro is soft.
- While the taro is cooking, sprinkle gelatin powder over ½ cup of cold water in a small bowl. Let it bloom for 5 minutes.
- Once the taro is soft, mash it into a smooth paste using a fork or potato masher.
- Add the coconut milk and sugar to the taro paste, stirring over low heat until the sugar is completely dissolved.
- Gently heat the bloomed gelatin in the microwave for 15 seconds, or until fully melted, then stir it into the taro mixture until well combined.
- Pour the mixture into a mold or individual serving cups. Refrigerate for at least 4 hours, or until set.
Silky and smooth, this jelly offers a delightful contrast between the creamy coconut and the subtle, nutty flavor of taro. Serve it chilled, garnished with a sprinkle of toasted coconut flakes for an added texture and a touch of elegance.
Taro Almond Cookies
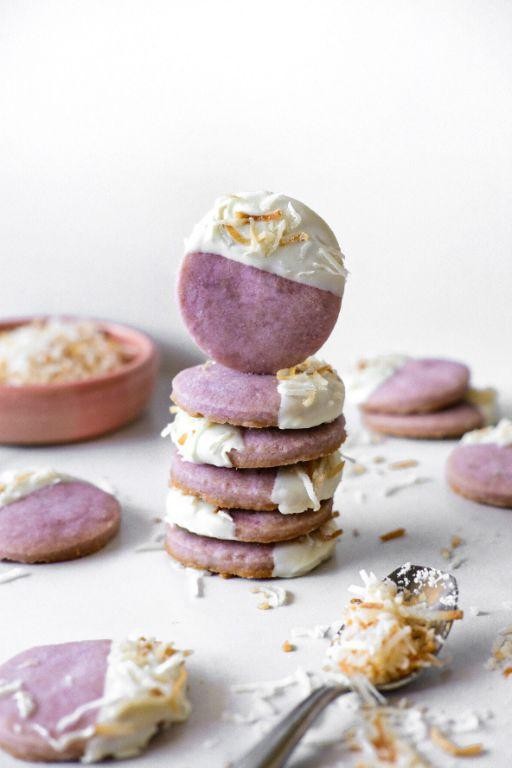
Savory and subtly sweet, these Taro Almond Cookies blend the earthy tones of taro with the rich, nutty essence of almonds, creating a delightful treat that’s as visually appealing as it is delicious. Perfect for afternoon tea or as a sophisticated dessert, these cookies are a testament to the beauty of simple ingredients coming together in harmony.
Ingredients
- Taro – 1 cup, mashed
- Almond flour – 1 cup
- Sugar – ½ cup
- Butter – ½ cup, softened
- Egg – 1
- Vanilla extract – 1 tsp
- Baking powder – ½ tsp
- Salt – ¼ tsp
Instructions
- Preheat your oven to 350°F (175°C) and line a baking sheet with parchment paper.
- In a large bowl, cream together the softened butter and sugar until light and fluffy, about 3 minutes.
- Beat in the egg and vanilla extract until well combined.
- Gently fold in the mashed taro, ensuring it’s evenly distributed throughout the mixture.
- In a separate bowl, whisk together the almond flour, baking powder, and salt.
- Gradually add the dry ingredients to the wet mixture, stirring until a cohesive dough forms.
- Using a tablespoon, scoop the dough and roll into balls, placing them 2 inches apart on the prepared baking sheet.
- Flatten each ball slightly with the back of a spoon, creating a rustic, uneven surface for a more artisanal look.
- Bake for 12-15 minutes, or until the edges are lightly golden. Tip: For extra crunch, let the cookies cool on the baking sheet for 5 minutes before transferring to a wire rack.
- Allow the cookies to cool completely on the wire rack to achieve the perfect texture. Tip: Store in an airtight container to maintain freshness.
- For an elegant presentation, dust the cooled cookies with powdered sugar or drizzle with melted chocolate. Tip: Pair with a cup of Earl Grey tea for a refined snack experience.
These Taro Almond Cookies boast a tender, crumbly texture with a moist interior, thanks to the natural sweetness and moisture of the taro. The almond flour adds a delicate nuttiness, making each bite a complex yet harmonious blend of flavors. Serve them alongside a scoop of vanilla ice cream for a decadent dessert twist.
Taro Chocolate Truffles
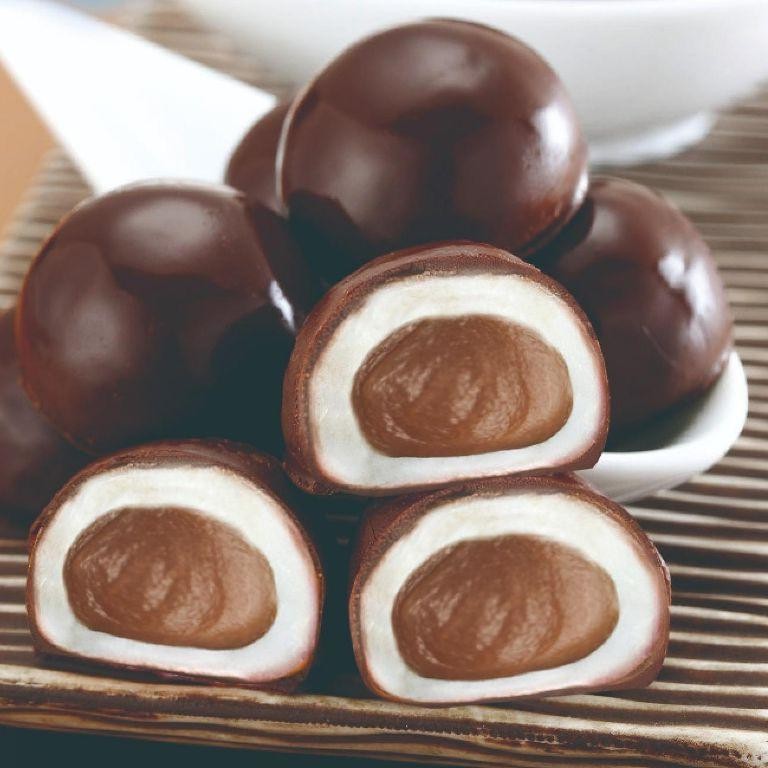
Glistening under the soft glow of your kitchen lights, these Taro Chocolate Truffles are a harmonious blend of earthy taro and rich chocolate, encased in a delicate cocoa powder dusting. Perfect for elevating your dessert game, these bite-sized delights promise a luxurious texture and a flavor that dances between sweet and subtly nutty.
Ingredients
- Taro – 1 cup, cooked and mashed
- Dark chocolate – 1 cup, chopped
- Heavy cream – ½ cup
- Cocoa powder – ¼ cup
Instructions
- In a medium bowl, combine the mashed taro and chopped dark chocolate until evenly mixed.
- Heat the heavy cream in a small saucepan over medium heat until it begins to simmer, about 2-3 minutes, then pour over the taro-chocolate mixture. Tip: Ensure the cream is hot enough to melt the chocolate but not boiling to avoid separation.
- Stir the mixture until the chocolate is completely melted and the mixture is smooth. Tip: For an extra smooth texture, pass the mixture through a fine mesh sieve.
- Cover the bowl with plastic wrap and refrigerate for at least 2 hours, or until the mixture is firm enough to handle.
- Using a small spoon or a melon baller, scoop out portions of the mixture and roll into 1-inch balls. Tip: For easier handling, lightly oil your hands to prevent sticking.
- Roll each truffle in cocoa powder until fully coated, then place on a parchment-lined tray.
- Refrigerate the truffles for another 30 minutes to set before serving.
Delightfully creamy with a velvety interior, these truffles offer a sophisticated twist on classic chocolate treats. Serve them atop a slate board for an elegant presentation, or pair with a robust espresso to highlight their deep flavors.
Taro Banana Bread
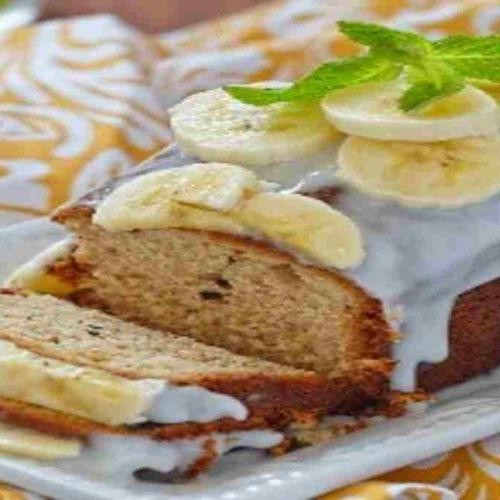
Harnessing the earthy sweetness of taro and the natural richness of bananas, this bread is a delightful twist on a classic favorite, perfect for those seeking a subtly exotic flavor profile in their baking endeavors.
Ingredients
- Flour – 2 cups
- Baking soda – 1 tsp
- Salt – ½ tsp
- Taro – 1 cup, mashed
- Bananas – 2, ripe, mashed
- Sugar – ¾ cup
- Eggs – 2
- Butter – ½ cup, melted
- Vanilla extract – 1 tsp
Instructions
- Preheat your oven to 350°F (175°C) and grease a 9×5 inch loaf pan.
- In a large bowl, whisk together the flour, baking soda, and salt.
- In another bowl, mix the mashed taro, bananas, sugar, eggs, melted butter, and vanilla extract until well combined.
- Gradually fold the dry ingredients into the wet mixture until just incorporated; avoid overmixing to ensure a tender crumb.
- Pour the batter into the prepared loaf pan and smooth the top with a spatula.
- Bake for 60-65 minutes, or until a toothpick inserted into the center comes out clean.
- Let the bread cool in the pan for 10 minutes, then transfer to a wire rack to cool completely.
Best enjoyed when the flavors have melded overnight, this taro banana bread boasts a moist, dense texture with a delicate balance of sweetness and earthiness. Serve it toasted with a smear of butter or as a unique base for French toast to elevate your breakfast game.
Taro Chiffon Cake

Whisking together the delicate flavors of taro and the airy texture of chiffon, this cake is a sublime fusion that promises to enchant your palate with every bite.
Ingredients
- Taro puree – 1 cup
- Flour – 1 ½ cups
- Sugar – ¾ cup
- Eggs – 5, separated
- Baking powder – 2 tsp
- Vegetable oil – ½ cup
- Milk – ½ cup
- Cream of tartar – ½ tsp
Instructions
- Preheat your oven to 325°F and ensure the rack is in the middle position for even baking.
- In a large bowl, sift together flour and baking powder to avoid lumps, ensuring a smooth batter.
- Whisk egg yolks with sugar until pale and creamy, then gradually incorporate vegetable oil and milk for a rich, moist texture.
- Fold in the taro puree gently to maintain its vibrant color and distinct flavor throughout the cake.
- In a separate, clean bowl, beat egg whites with cream of tartar until stiff peaks form, which is crucial for the cake’s signature lightness.
- Carefully fold the egg whites into the taro mixture in batches to preserve the airiness, a tip that guarantees the perfect chiffon texture.
- Pour the batter into an ungreased chiffon cake pan and bake for 55 minutes, or until a toothpick inserted comes out clean.
- Immediately invert the pan onto a cooling rack to prevent the cake from collapsing, a step that ensures its lofty structure.
- Once cooled, run a knife around the edges to release the cake, showcasing its beautiful, fluffy interior.
Admire the cake’s soft, pillowy texture and the subtle sweetness of taro that makes it a standout dessert. Serve it with a dusting of powdered sugar or alongside a scoop of coconut ice cream for an extra indulgent treat.
Taro Pumpkin Pie
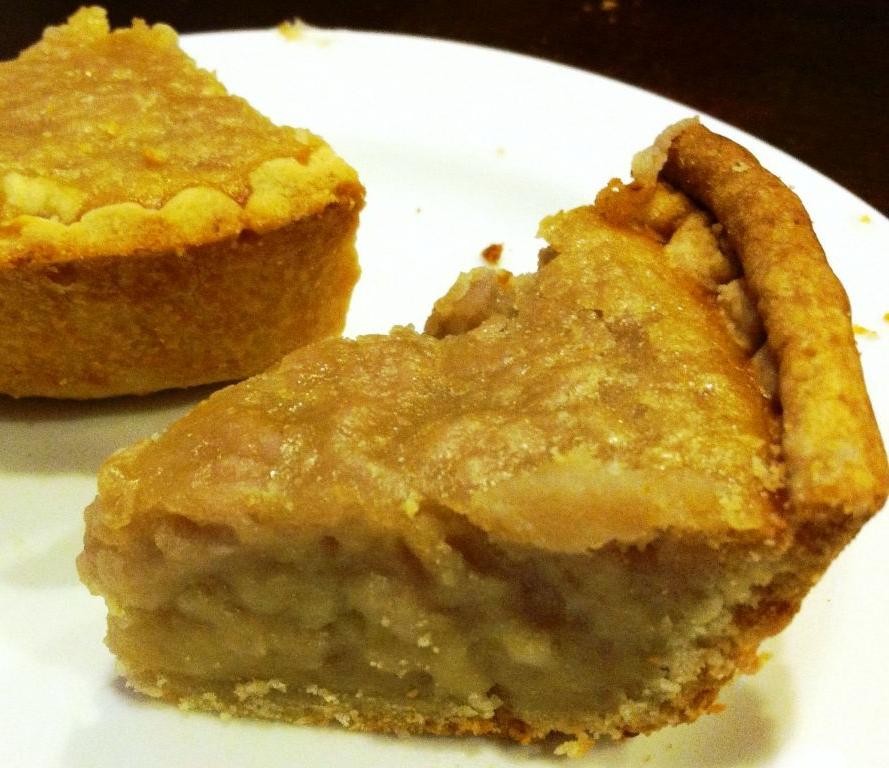
This season, taro pumpkin pie emerges as a captivating twist on the classic, blending the earthy sweetness of taro with the rich, spiced warmth of pumpkin. Perfect for autumn gatherings, this pie promises a delightful harmony of flavors and textures that will enchant your palate.
Ingredients
- Pumpkin puree – 1 cup
- Taro root, cooked and mashed – 1 cup
- Heavy cream – ½ cup
- Eggs – 2
- Sugar – ¾ cup
- Pumpkin pie spice – 1 tsp
- Salt – ½ tsp
- Pie crust – 1 (9-inch)
Instructions
- Preheat your oven to 375°F (190°C) to ensure it reaches the perfect temperature for baking.
- In a large bowl, whisk together the pumpkin puree, mashed taro, heavy cream, eggs, sugar, pumpkin pie spice, and salt until smooth. Tip: For a smoother filling, strain the mixture through a fine-mesh sieve.
- Pour the filling into the pie crust, spreading it evenly. Tip: To prevent the crust edges from burning, cover them with strips of aluminum foil.
- Bake for 50-55 minutes, or until the filling is set and a knife inserted near the center comes out clean. Tip: Allow the pie to cool on a wire rack for at least 2 hours before serving to let the flavors meld.
You’ll find the taro pumpkin pie boasts a velvety texture with a subtle nuttiness from the taro, perfectly complementing the pumpkin’s depth. Serve it with a dollop of whipped cream or a sprinkle of toasted coconut for an extra layer of flavor.
Taro Macarons
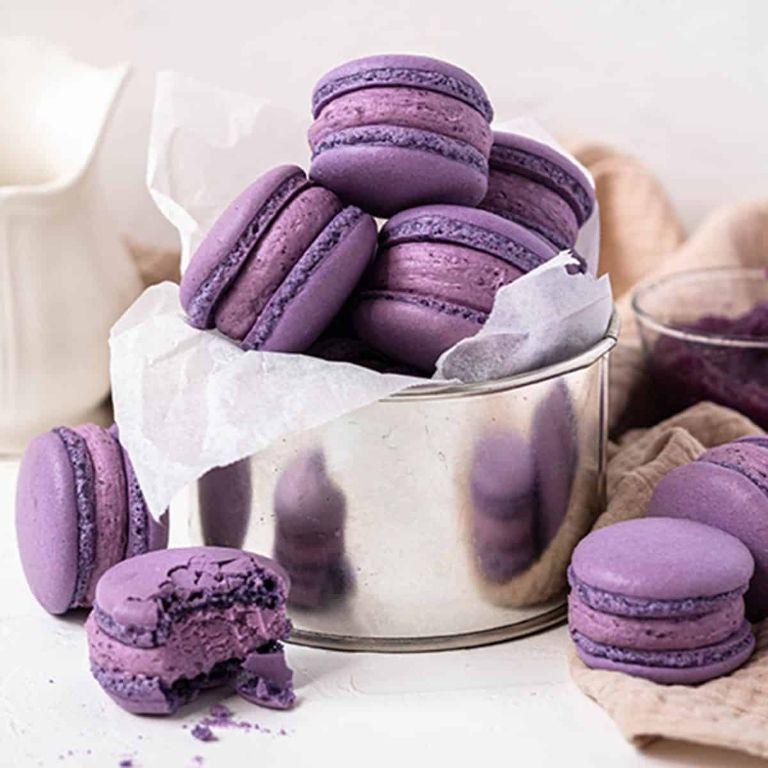
Gracefully bridging the gap between traditional French patisserie and contemporary flavor innovation, these Taro Macarons offer a delicate balance of earthy sweetness and airy texture, perfect for elevating your afternoon tea or as a sophisticated dessert option.
Ingredients
- Almond flour – 1 cup
- Powdered sugar – 1 ¾ cups
- Egg whites – 3 large
- Granulated sugar – ¼ cup
- Taro powder – 2 tbsp
- Purple food coloring – 2 drops
Instructions
- Preheat your oven to 300°F and line two baking sheets with parchment paper.
- Sift together almond flour, powdered sugar, and taro powder into a large bowl to ensure a smooth macaron shell.
- In a separate bowl, beat egg whites on medium speed until foamy, then gradually add granulated sugar, increasing speed to high until stiff peaks form.
- Gently fold the dry ingredients into the egg whites in three additions, adding purple food coloring with the last fold for a uniform hue.
- Transfer the batter to a piping bag fitted with a round tip and pipe 1-inch circles onto the prepared baking sheets, spacing them 2 inches apart.
- Tap the baking sheets firmly on the counter to release any air bubbles, then let the macarons sit at room temperature for 30 minutes until a skin forms on the surface.
- Bake for 18 minutes, rotating the pans halfway through, until the macarons are firm and easily peel off the parchment.
- Allow to cool completely on the baking sheets before filling with your choice of buttercream or ganache.
Outstanding in their delicate crispness and chewy interior, these Taro Macarons boast a subtle, nutty flavor that pairs beautifully with a lavender-infused buttercream or a simple dark chocolate ganache for a contrast in flavors.
Taro Tiramisu
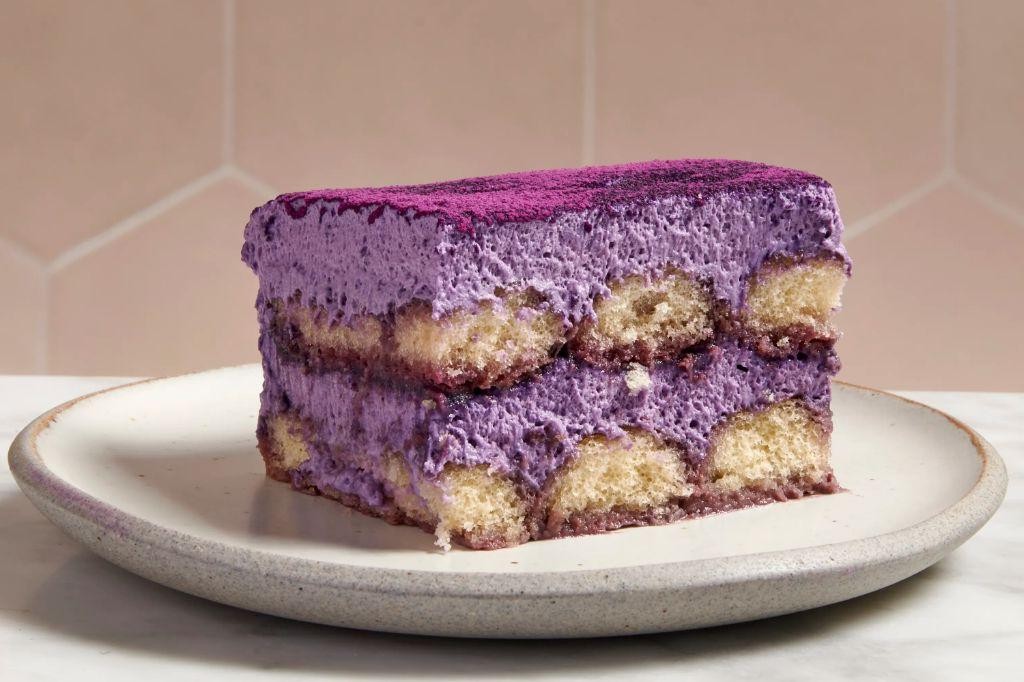
Kaleidoscopic in flavor and texture, this Taro Tiramisu reimagines the classic Italian dessert with a vibrant, earthy twist, blending the subtle sweetness of taro with the rich, creamy layers traditional to tiramisu.
Ingredients
- Ladyfingers – 24
- Taro puree – 1 cup
- Mascarpone cheese – 1 cup
- Heavy cream – 1 cup
- Sugar – ½ cup
- Espresso – ½ cup
- Cocoa powder – 2 tbsp
Instructions
- Brew ½ cup of espresso and let it cool to room temperature.
- In a mixing bowl, whip 1 cup of heavy cream and ½ cup of sugar until stiff peaks form.
- Gently fold in 1 cup of mascarpone cheese into the whipped cream until fully incorporated.
- Dip 24 ladyfingers one at a time into the cooled espresso, ensuring they are moist but not soggy, and layer them at the bottom of a 9×9 inch dish.
- Spread half of the mascarpone mixture over the ladyfingers, then top with 1 cup of taro puree, spreading evenly.
- Repeat the layers with the remaining ladyfingers, mascarpone mixture, and taro puree.
- Dust the top layer with 2 tbsp of cocoa powder using a fine mesh sieve for an even coating.
- Refrigerate the tiramisu for at least 4 hours, or overnight, to allow the flavors to meld and the dessert to set.
Silky and indulgent, this Taro Tiramisu offers a delightful contrast between the creamy layers and the tender ladyfingers, with the taro adding a unique, slightly nutty flavor. Serve chilled, garnished with fresh taro slices or a sprinkle of crushed pistachios for an extra touch of elegance.
Conclusion
Exploring these 22 delicious taro dessert recipes opens up a world of sweet, creamy, and utterly unique flavors perfect for any occasion. Whether you’re a taro enthusiast or new to this versatile ingredient, there’s something here to delight your taste buds. We’d love to hear which recipes you try and adore—don’t forget to leave a comment and share your favorites on Pinterest. Happy baking!


