Zesty winter days call for something sweet to warm the soul, and we’ve got just the thing! Dive into our collection of 16 Cozy Winter Dessert Recipes that promise to delight your taste buds and fill your home with the aromas of the season. From rich chocolates to spiced fruits, these treats are perfect for sharing or savoring solo. Ready to bake up some joy? Let’s get started!
Hot Chocolate Lava Cakes
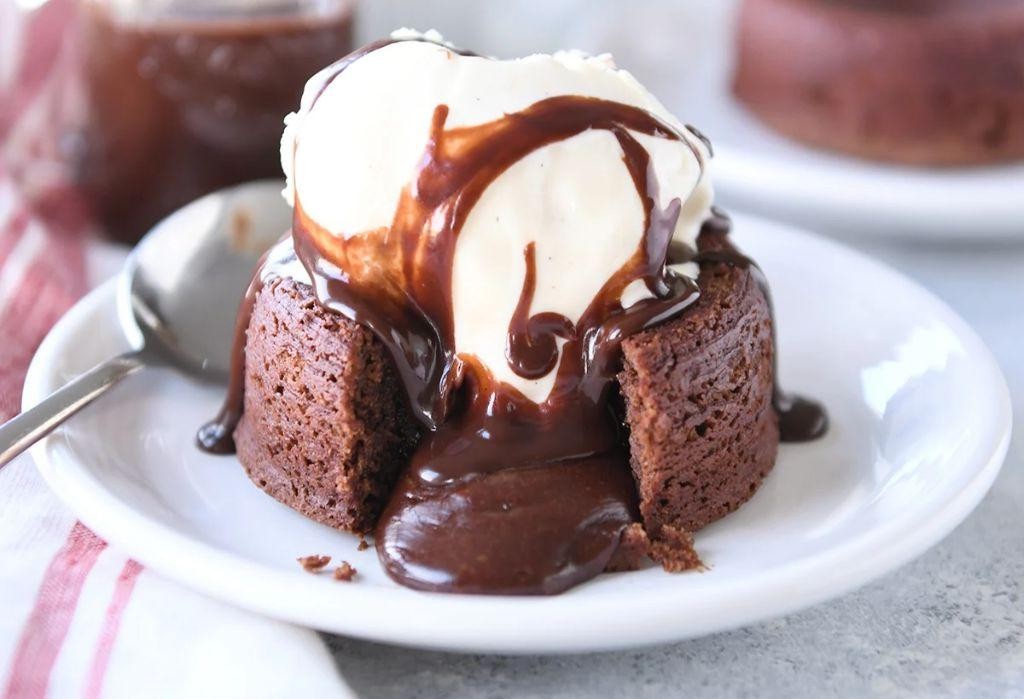
Get ready to dive into the gooey, chocolatey goodness of these lava cakes—perfect for when you need a quick dessert fix that feels fancy.
Ingredients
- 1/2 cup unsalted butter (I always use European-style for richer flavor)
- 4 oz semi-sweet chocolate chips (a heaping cup—no skimping!)
- 1 cup powdered sugar (sifted to avoid lumps)
- 2 large eggs (room temp blends smoother)
- 2 egg yolks (extra richness, trust me)
- 1 tsp vanilla extract (the real deal, not imitation)
- 1/2 cup all-purpose flour (spooned and leveled for accuracy)
- 1/4 tsp salt (just a pinch to balance the sweet)
Instructions
- Preheat your oven to 425°F—this high heat is key for that molten center.
- Butter and lightly flour four 6-oz ramekins. Tip: A pastry brush gets into all the nooks.
- Melt butter and chocolate together in 30-second microwave bursts, stirring in between.
- Whisk in powdered sugar until smooth—no lumps allowed!
- Beat in eggs and yolks one at a time, then vanilla. Tip: Room temp eggs prevent curdling.
- Gently fold in flour and salt until just combined—overmixing is the enemy.
- Divide batter evenly among ramekins. Tip: A cookie scoop keeps it mess-free.
- Bake for 12-14 minutes until edges are set but centers are soft. Watch closely!
- Let rest 1 minute, then invert onto plates. Serve immediately—lava waits for no one.
Perfectly decadent with a warm, flowing center and crisp edges. Try topping with a scoop of vanilla ice cream for the ultimate hot-cold contrast.
Peppermint Bark Cheesecake
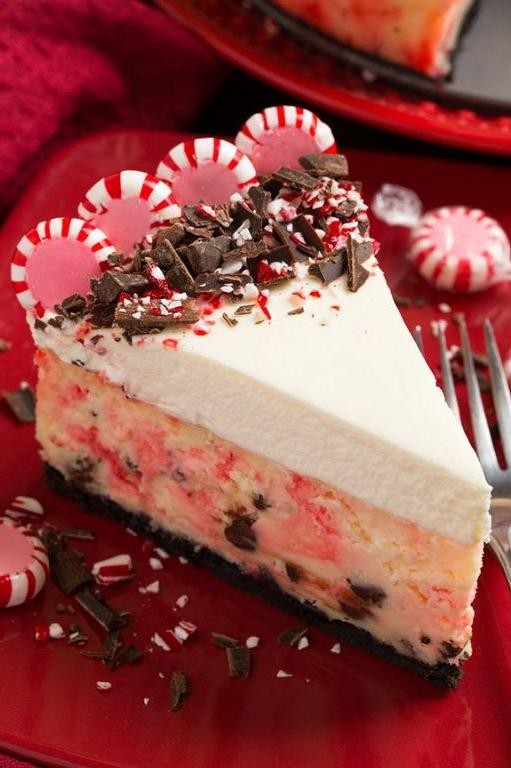
Unwrap the magic of the holidays with this Peppermint Bark Cheesecake—creamy, crunchy, and utterly irresistible. Perfect for those who dare to mix dessert with a festive crunch.
Ingredients
- 2 cups graham cracker crumbs (I always go for the honey-flavored ones for that extra sweetness)
- 1/2 cup unsalted butter, melted (trust me, the unsalted lets you control the sweetness)
- 24 oz cream cheese, softened (room temp is key for a smooth filling)
- 1 cup granulated sugar (because life’s too short for less sugar)
- 1 tsp vanilla extract (the real deal, not imitation)
- 3 large eggs (room temp eggs blend better, no lumps!)
- 1/2 cup sour cream (for that tangy twist)
- 1 cup crushed peppermint candies (reserve some for topping)
- 1 cup semi-sweet chocolate chips (melted, for drizzling)
Instructions
- Preheat your oven to 325°F. This low and slow bake prevents cracks.
- Mix graham cracker crumbs and melted butter until combined. Press firmly into a 9-inch springform pan. Tip: Use a flat-bottomed cup to press evenly.
- Bake the crust for 10 minutes. Let it cool while you make the filling.
- Beat cream cheese and sugar until smooth. Tip: Scrape the bowl often to avoid lumps.
- Add vanilla and eggs one at a time, mixing well after each. Fold in sour cream gently.
- Stir in crushed peppermint candies, saving a handful for garnish.
- Pour filling over crust. Smooth the top with a spatula.
- Bake for 50-55 minutes until the edges are set but the center slightly jiggles.
- Cool in the oven with the door ajar for 1 hour to prevent sinking.
- Chill in the fridge for at least 4 hours, preferably overnight.
- Drizzle melted chocolate over the top and sprinkle reserved peppermint pieces. Tip: Warm chocolate in short bursts in the microwave for smooth drizzling.
Kick back and admire your masterpiece—each slice is a creamy dream with a festive crunch. Serve chilled with a hot cocoa for the ultimate holiday duo.
Gingerbread Cookie Bars

Melt into the holiday spirit with these Gingerbread Cookie Bars—soft, spiced, and seriously addictive. No rolling, no cutting, just mix, bake, and devour.
Ingredients
- 1 cup unsalted butter, softened (trust me, room temp blends better)
- 1 cup brown sugar, packed (the dark kind for that deep molasses vibe)
- 1/2 cup molasses (not blackstrap—too bitter for these sweet bars)
- 1 large egg (crack it in a separate bowl to avoid shell surprises)
- 2 1/2 cups all-purpose flour (spoon and level to avoid dense bars)
- 2 tsp ground ginger (freshly ground if you’re feeling fancy)
- 1 tsp cinnamon (because it’s not gingerbread without it)
- 1/2 tsp cloves (just a pinch—they’re potent!)
- 1/2 tsp salt (balances the sweetness perfectly)
- 1 tsp baking soda (for that slight lift)
Instructions
- Preheat your oven to 350°F and line a 9×13″ baking pan with parchment paper, leaving overhang for easy removal.
- In a large bowl, cream together the softened butter and brown sugar until light and fluffy—about 3 minutes with a hand mixer.
- Beat in the molasses and egg until fully incorporated. Scrape down the sides as needed.
- Whisk together flour, ginger, cinnamon, cloves, salt, and baking soda in a separate bowl. Tip: Sift if your spices are clumpy.
- Gradually add the dry ingredients to the wet, mixing just until combined. Overmixing leads to tough bars.
- Spread the dough evenly into the prepared pan. Tip: Wet your fingers to press it down without sticking.
- Bake for 20-25 minutes, until the edges are firm and the center is just set. It’ll continue to firm up as it cools.
- Let cool in the pan for 10 minutes, then lift out using the parchment overhang to cool completely on a wire rack.
Enjoy these bars warm with a dusting of powdered sugar or go all out with a cream cheese frosting drizzle. Either way, they’re a spiced, chewy dream with just the right amount of ginger kick.
Apple Cinnamon Bread Pudding
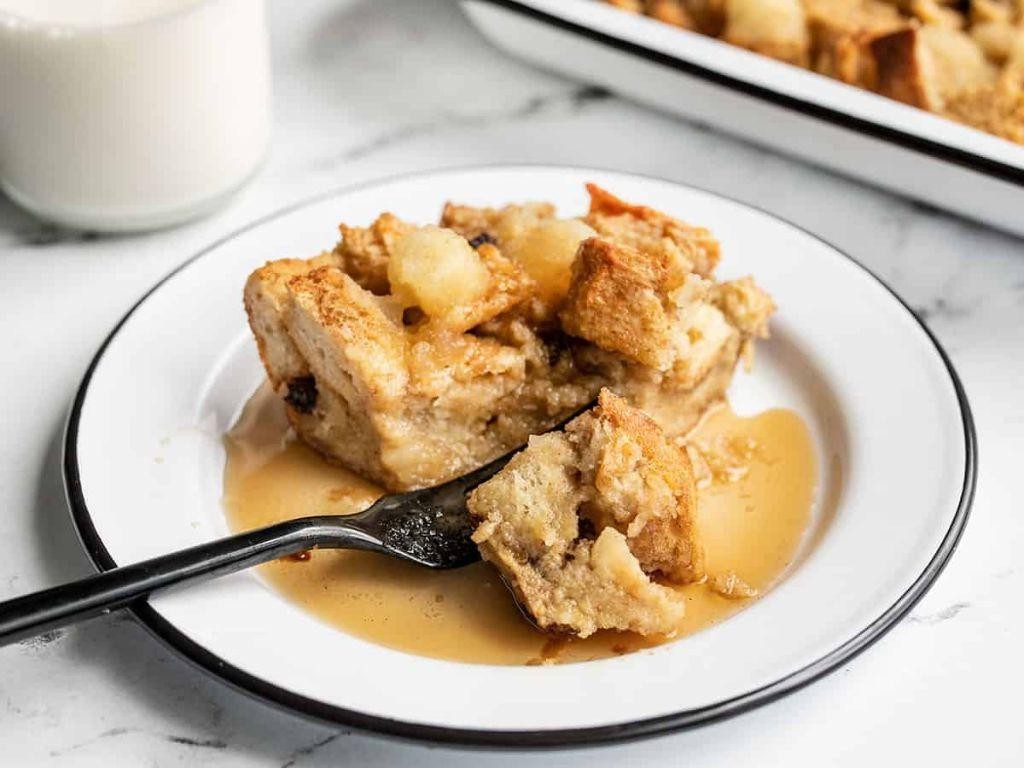
Transform your stale bread into a cozy, cinnamon-spiced dream with this Apple Cinnamon Bread Pudding. It’s the ultimate comfort dessert that’s surprisingly easy to whip up.
Ingredients
- 4 cups day-old bread, cubed (I love using brioche for extra richness)
- 2 large eggs, room temp (they blend smoother)
- 1 1/2 cups whole milk (for that creamy texture we crave)
- 1/2 cup heavy cream (because why not?)
- 1/2 cup granulated sugar (adjust if your apples are super sweet)
- 2 medium apples, peeled and diced (Honeycrisp are my go-to for balance)
- 2 tsp ground cinnamon (freshly ground packs a punch)
- 1 tsp vanilla extract (the good stuff makes a difference)
- 1/4 tsp salt (to balance the sweetness)
Instructions
- Preheat your oven to 350°F (175°C) and grease an 8-inch square baking dish.
- In a large bowl, whisk together eggs, milk, cream, sugar, vanilla, cinnamon, and salt until fully combined.
- Add the bread cubes and diced apples to the bowl, gently tossing to ensure every piece is soaked in the custard mixture. Let it sit for 10 minutes to absorb.
- Pour the mixture into the prepared baking dish, pressing down lightly to compact.
- Bake for 45-50 minutes, until the top is golden and the center is set but slightly jiggly.
- Let it cool for 10 minutes before serving to allow the custard to set further.
Zesty with cinnamon and tender from the custard, this bread pudding is a hug in dessert form. Serve warm with a scoop of vanilla ice cream for that irresistible hot-cold contrast.
Pumpkin Spice Tiramisu
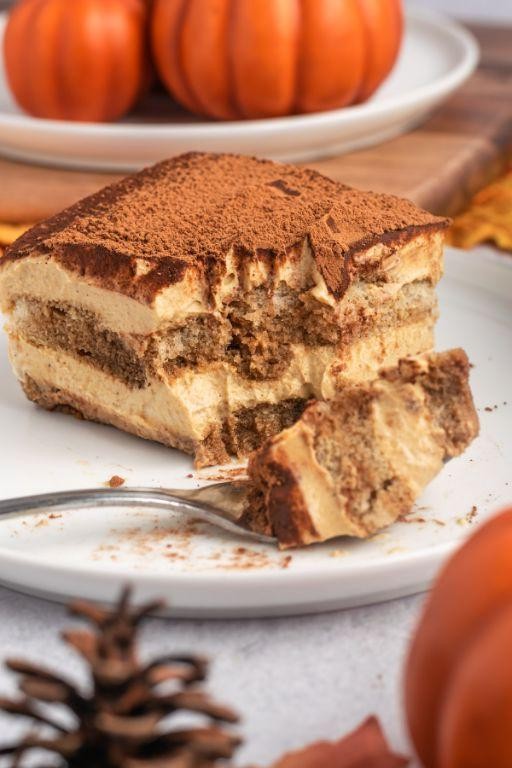
Make your fall dessert dreams come true with this Pumpkin Spice Tiramisu—layers of creamy, spiced goodness that’ll have you swooning.
Ingredients
- 1 1/2 cups heavy cream (chilled for best whipping)
- 8 oz mascarpone cheese (room temp blends smoother)
- 1/2 cup granulated sugar (I like mine slightly less sweet)
- 1 cup pumpkin puree (homemade or canned, but no pie filling!)
- 1 tsp pumpkin spice (because fall isn’t just a season, it’s a vibe)
- 1 cup strong brewed coffee, cooled (espresso works magic here)
- 24 ladyfingers (crispy, not the soft ones)
- Cocoa powder for dusting (the darker, the better)
Instructions
- Whip the heavy cream in a large bowl until stiff peaks form, about 3 minutes. Tip: Chill your bowl and whisk first for extra fluffiness.
- In another bowl, beat mascarpone, sugar, pumpkin puree, and pumpkin spice until smooth. Fold in the whipped cream gently to keep it airy.
- Quickly dip each ladyfinger into the coffee—1 second per side. They should be moist but not soggy. Layer them in a 9×13 dish.
- Spread half the pumpkin cream over the ladyfingers. Repeat layers, ending with cream. Chill for at least 4 hours, or overnight for best results. Tip: Cover with plastic wrap touching the surface to prevent a skin from forming.
- Dust with cocoa powder right before serving. Use a sieve for an even, Instagram-worthy sprinkle.
Outrageously creamy with a hint of spice, this tiramisu is fall in a bite. Serve with a drizzle of caramel or a side of spiked coffee for the ultimate indulgence.
White Chocolate Cranberry Scones
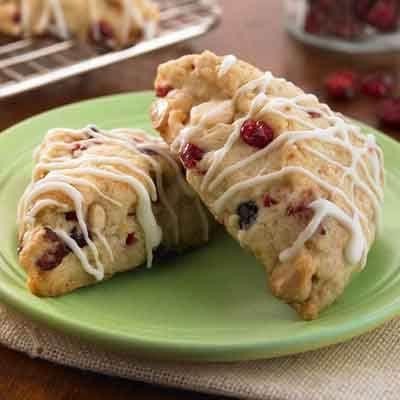
Skip the bakery line—these White Chocolate Cranberry Scones are your next kitchen flex. Sweet, tangy, and buttery, they’re the perfect pick-me-up with your morning coffee or as an afternoon treat.
Ingredients
- 2 cups all-purpose flour (I swear by King Arthur for consistent results)
- 1/3 cup granulated sugar (because life’s too short for less sweet)
- 1 tbsp baking powder (freshness is key—check the date!)
- 1/2 tsp salt (I use sea salt for a cleaner taste)
- 1/2 cup unsalted butter, cold and cubed (keep it cold for flaky layers)
- 1/2 cup heavy cream (plus extra for brushing—go for the good stuff)
- 1 large egg (room temp blends smoother)
- 1 tsp vanilla extract (real deal only, please)
- 1/2 cup dried cranberries (the chewier, the better)
- 1/2 cup white chocolate chips (splurge on Ghirardelli)
Instructions
- Preheat your oven to 400°F—no guessing, use an oven thermometer.
- In a large bowl, whisk together flour, sugar, baking powder, and salt.
- Cut in the cold butter with a pastry cutter until pea-sized crumbs form. Tip: Work fast to keep the butter cold.
- In a separate bowl, whisk cream, egg, and vanilla. Pour over dry ingredients.
- Gently fold in cranberries and white chocolate chips—don’t overmix. Tip: A few flour streaks are okay.
- Turn dough onto a floured surface, pat into a 1-inch thick circle. Cut into 8 wedges.
- Place on a parchment-lined baking sheet, brush tops with cream. Tip: This gives that golden glow.
- Bake for 15-18 minutes until edges are just golden. Let cool slightly.
How’s that for a win? These scones strike the perfect balance—crispy edges, tender middle, with bursts of cranberry and melty chocolate. Serve them warm with a dollop of clotted cream or your favorite jam for extra flair.
Maple Pecan Pie
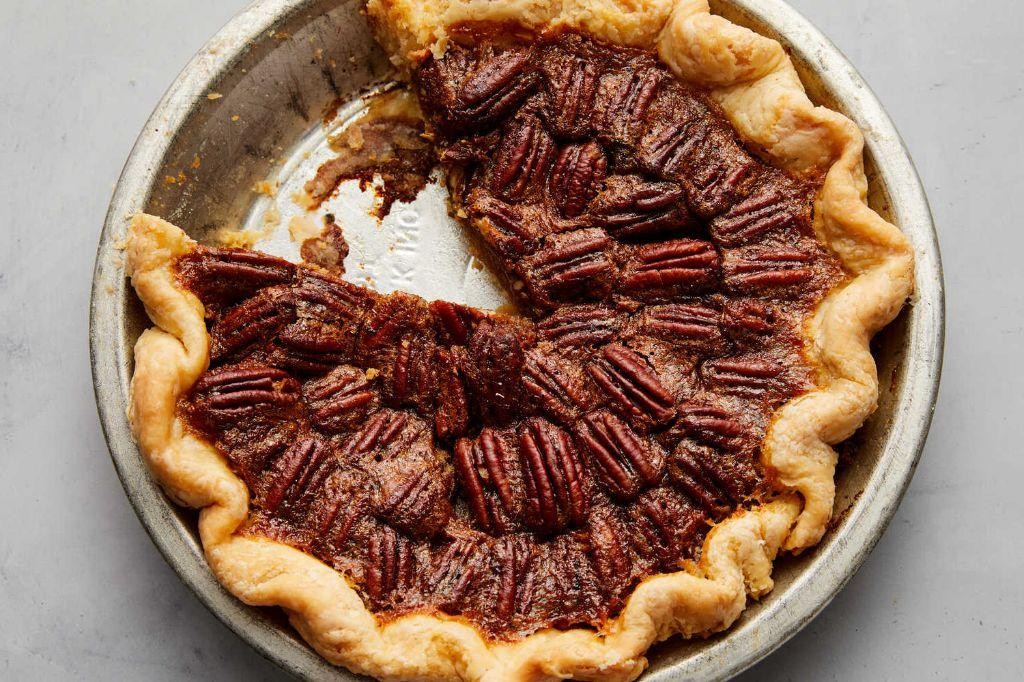
Bake this Maple Pecan Pie and watch it disappear faster than you can say ‘dessert’! Rich, buttery, and with a hint of maple sweetness, it’s a crowd-pleaser that’s surprisingly simple to whip up.
Ingredients
- 1 9-inch pie crust (homemade or store-bought, but go for the buttery ones)
- 1 cup pure maple syrup (the real deal, none of that pancake syrup stuff)
- 3 large eggs (room temp eggs blend smoother, trust me)
- 1/2 cup granulated sugar (because maple needs a little backup)
- 2 tbsp unsalted butter, melted (salted works in a pinch, but adjust other salts)
- 1 tsp vanilla extract (the good kind, it makes a difference)
- 1 1/2 cups pecan halves (toasted lightly for extra crunch)
- 1/4 tsp salt (balances the sweetness perfectly)
Instructions
- Preheat your oven to 350°F (175°C). No guessing here, precision is key.
- Roll out your pie crust and fit it into a 9-inch pie dish. Crimp the edges for that homemade touch.
- In a large bowl, whisk together the maple syrup, eggs, sugar, melted butter, vanilla extract, and salt until smooth. Tip: Strain the mixture if you’re after a super silky filling.
- Arrange the pecan halves in the bottom of the pie crust. Pour the maple mixture over them. Tip: Let the pecans float to the top for that picture-perfect finish.
- Bake for 50-60 minutes, or until the center is set but still slightly wobbly. Tip: Cover the edges with foil if they’re browning too fast.
- Cool on a wire rack for at least 2 hours. Yes, waiting is the hardest part.
Absolutely divine when served slightly warm with a scoop of vanilla ice cream. The texture? A creamy, nutty dream with a crust that’s flaky perfection. Try drizzling extra maple syrup on top for that Instagram-worthy shine.
Chai Spiced Snickerdoodles
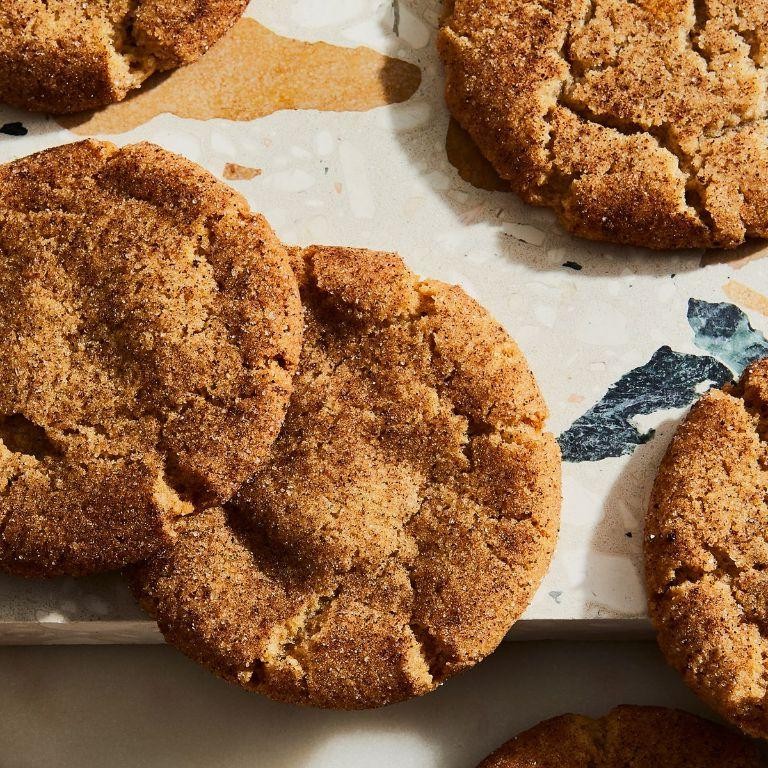
Kickstart your baking spree with these Chai Spiced Snickerdoodles—soft, chewy, and packed with warm spices that’ll make your kitchen smell like a cozy café.
Ingredients
- 1 cup unsalted butter, softened (I swear by Kerrygold for that rich flavor)
- 1 1/2 cups granulated sugar (because life’s too short for less sweet)
- 2 large eggs, room temp (they blend smoother, trust me)
- 2 3/4 cups all-purpose flour (scoop and level for perfection)
- 2 tsp cream of tartar (the secret to that signature tang)
- 1 tsp baking soda (freshness is key—check the date)
- 1/4 tsp salt (just a pinch to balance the sweet)
- 2 tbsp chai spice mix (homemade or store-bought, both rock)
- 1/4 cup sugar + 1 tbsp chai spice mix for rolling (extra sparkle and spice)
Instructions
- Preheat your oven to 350°F (no guessing—use an oven thermometer).
- Cream together butter and 1 1/2 cups sugar until light and fluffy, about 3 minutes (don’t rush this—it’s the base of your cookie’s texture).
- Beat in eggs one at a time, ensuring each is fully incorporated before adding the next (patience pays off here).
- Whisk together flour, cream of tartar, baking soda, salt, and 2 tbsp chai spice in a separate bowl (uniformity is your friend).
- Gradually mix dry ingredients into the wet until just combined (overmixing is the enemy of tenderness).
- In a small bowl, mix 1/4 cup sugar and 1 tbsp chai spice for rolling (this is where the magic happens).
- Roll dough into 1-inch balls, then coat in the chai-sugar mix (get ’em evenly coated for that perfect crunch).
- Place balls 2 inches apart on a parchment-lined baking sheet (they need their space to spread).
- Bake for 10-12 minutes until edges are just set but centers are soft (they’ll firm up as they cool).
- Let cool on the baking sheet for 5 minutes before transferring to a wire rack (resist the urge to skip this step).
Crave-worthy with a crackly sugar crust and a melt-in-your-mouth center, these snickerdoodles are your next obsession. Serve ’em warm with a dunk in cold milk or alongside your afternoon chai for the ultimate spice experience.
Caramel Apple Crisp
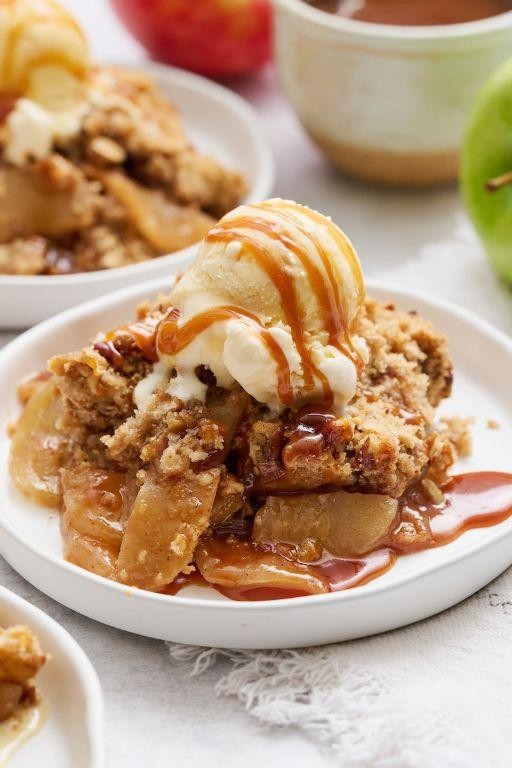
Just when you thought apple crisp couldn’t get any better, we’re throwing caramel into the mix. This Caramel Apple Crisp is your fall dessert dreams come true—warm, gooey, and impossibly easy.
Ingredients
- 6 cups thinly sliced apples (I love a mix of Granny Smith and Honeycrisp for that perfect sweet-tart balance)
- 1/2 cup caramel sauce (homemade or store-bought, no judgment here)
- 1 cup old-fashioned oats (the heartier, the better for that crisp topping)
- 1/2 cup all-purpose flour (I always sift mine to avoid lumps)
- 1/2 cup packed brown sugar (dark brown for a deeper flavor)
- 1/2 cup unsalted butter, chilled and cubed (trust me, cold butter is key)
- 1 tsp cinnamon (because what’s apple crisp without it?)
- 1/4 tsp salt (just a pinch to balance the sweetness)
Instructions
- Preheat your oven to 375°F and grease a 9×13 baking dish. No one likes sticking.
- Toss the sliced apples with 1/4 cup caramel sauce in a large bowl. Tip: Let it sit for 10 minutes to get those juices flowing.
- In another bowl, mix oats, flour, brown sugar, cinnamon, and salt. Tip: Use your fingers to rub the cold butter into the dry ingredients until it resembles coarse crumbs. This is your crisp topping.
- Spread the apple mixture evenly in the baking dish. Drizzle the remaining 1/4 cup caramel sauce over the top.
- Sprinkle the oat topping over the apples, covering them completely. No apple left behind!
- Bake for 35-40 minutes, until the topping is golden and the apples are bubbly. Tip: Place a baking sheet underneath to catch any drips—caramel is delicious but messy.
Rich with caramel and spiced just right, this crisp is best served warm with a scoop of vanilla ice cream. The contrast of the crunchy topping against the soft, caramel-coated apples? Absolute perfection.
Eggnog Panna Cotta
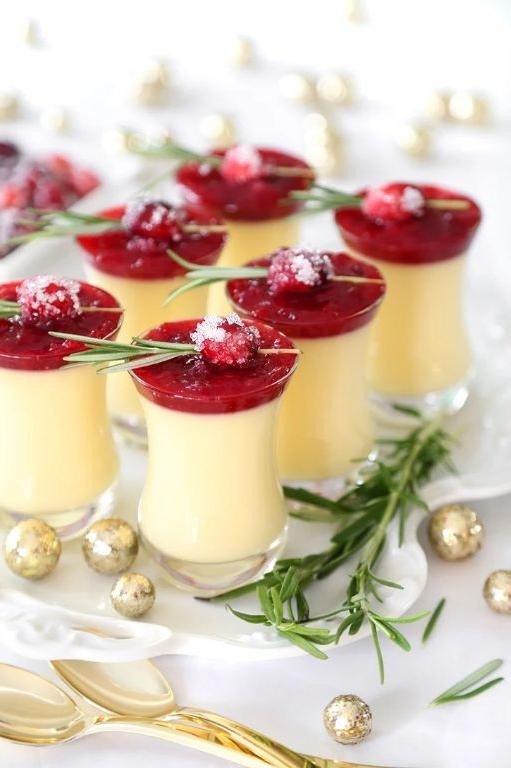
Perfect for holiday indulgence, this Eggnog Panna Cotta blends creamy luxury with festive spice. Skip the store-bought versions—this one’s a showstopper.
Ingredients
- 2 cups heavy cream (go for the good stuff—it makes all the difference)
- 1 cup whole milk (none of that skimmed nonsense here)
- 1/2 cup sugar (I like mine on the sweeter side, adjust if you must)
- 1 packet unflavored gelatin (about 2 1/4 tsp)
- 1 tsp vanilla extract (the real deal, please)
- 1/2 tsp nutmeg (freshly grated kicks it up a notch)
- 1/4 tsp cinnamon (because why not?)
- Pinch of salt (balances the sweetness perfectly)
Instructions
- In a medium saucepan, combine heavy cream, milk, and sugar. Heat over medium until sugar dissolves, about 5 minutes—don’t let it boil.
- Sprinkle gelatin over the mixture, whisking vigorously to avoid lumps. Tip: Let it sit for a minute to bloom before whisking.
- Remove from heat; stir in vanilla, nutmeg, cinnamon, and salt. Tip: Taste now to adjust spices—your future self will thank you.
- Strain mixture through a fine-mesh sieve into a jug for smoothness. Tip: This step is non-negotiable for that silky texture.
- Pour into 4 ramekins or glasses. Chill for at least 4 hours, until set. Overnight? Even better.
Silky, spiced, and irresistibly creamy—this panna cotta is a holiday dream. Serve with a sprinkle of nutmeg or a drizzle of caramel for extra flair.
Dark Chocolate Peppermint Tart
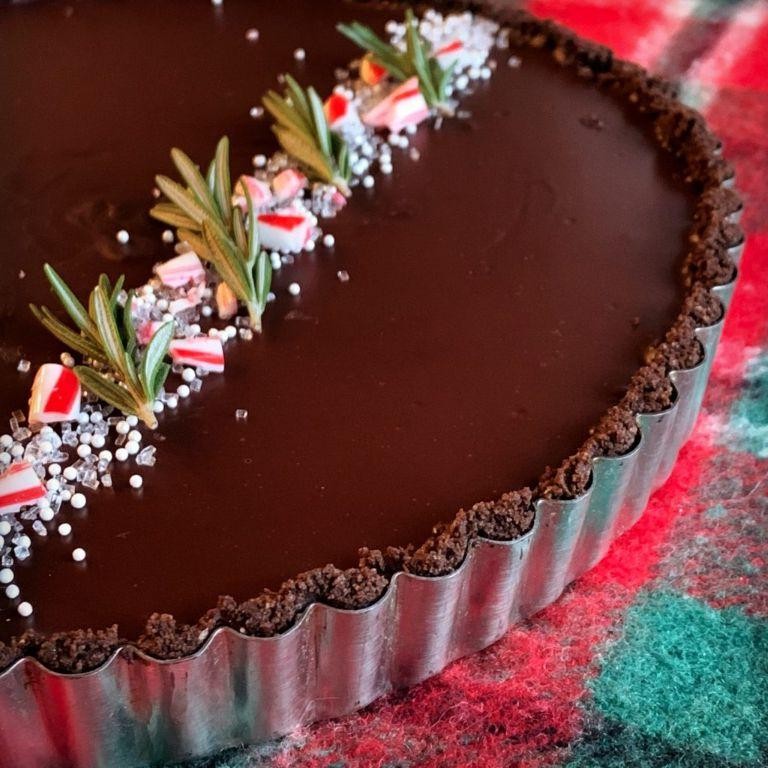
Elevate your dessert game with this Dark Chocolate Peppermint Tart—rich, refreshing, and ridiculously easy to whip up. Perfect for when you need a showstopper without the stress.
Ingredients
- 1 1/2 cups crushed chocolate graham crackers (the chocolatey base is non-negotiable for me)
- 1/2 cup unsalted butter, melted (I always use Kerrygold for that extra richness)
- 1 1/4 cups heavy cream (cold, straight from the fridge works best)
- 12 oz dark chocolate, chopped (go for 70% cacao to balance the sweetness)
- 1/4 cup powdered sugar (sifted to avoid lumps)
- 1 tsp peppermint extract (the quality here makes all the difference)
- A pinch of salt (just a dash to elevate the flavors)
- Whipped cream and crushed candy canes for garnish (because presentation is key)
Instructions
- Preheat your oven to 350°F—no guessing, just set it and forget it.
- Mix the crushed chocolate graham crackers with melted butter until it resembles wet sand. Tip: Use a fork to ensure even mixing.
- Press the mixture firmly into a 9-inch tart pan, making sure to pack it down. Bake for 10 minutes, then let it cool completely.
- While the crust cools, heat the heavy cream in a saucepan until it just begins to simmer—watch closely to avoid boiling.
- Pour the hot cream over the chopped dark chocolate, let it sit for 2 minutes, then whisk until smooth. Tip: A silicone whisk prevents scratching your bowl.
- Stir in the powdered sugar, peppermint extract, and salt until fully combined. Taste and adjust the peppermint if you’re feeling bold.
- Pour the chocolate mixture into the cooled crust, smoothing the top with a spatula. Chill in the fridge for at least 4 hours, or until set. Tip: Cover loosely with plastic wrap to avoid fridge smells.
- Before serving, top with whipped cream and a sprinkle of crushed candy canes for that festive touch.
You’ll love the contrast between the crunchy crust and the silky, minty chocolate filling. Serve it chilled with a hot cup of coffee to balance the richness—trust me, it’s a game-changer.
Spiced Pear Upside-Down Cake
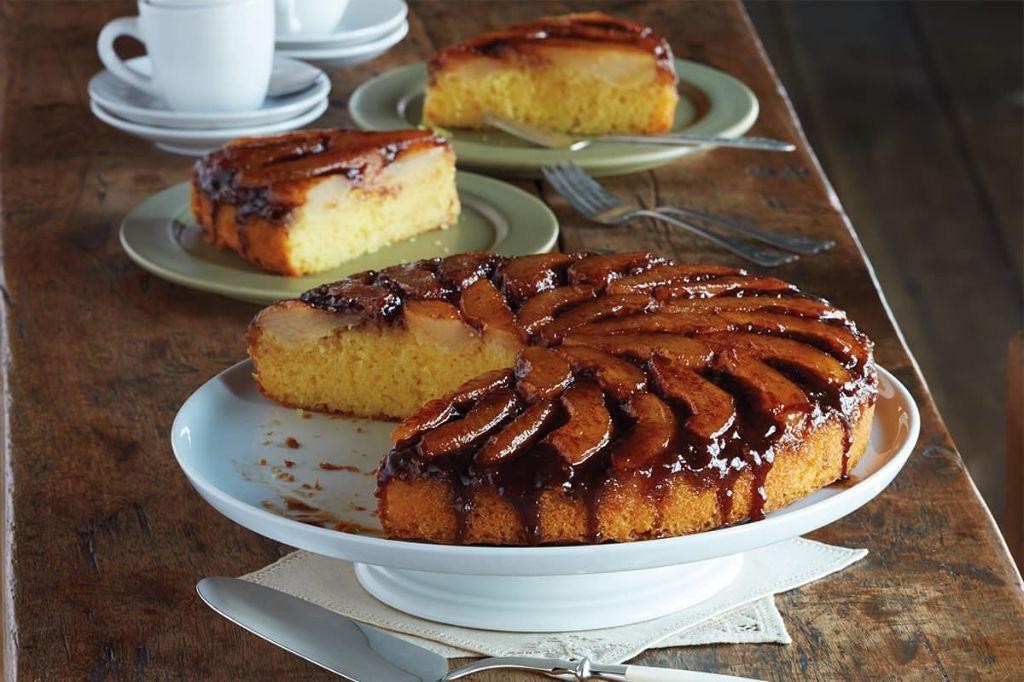
Dive into this Spiced Pear Upside-Down Cake where caramelized pears meet a fluffy, spice-infused cake. It’s a showstopper that’s surprisingly simple to whip up.
Ingredients
- 3 ripe pears, peeled and sliced (Bartletts are my fave for their sweetness)
- 1/2 cup unsalted butter, melted (I always use Kerrygold for that rich flavor)
- 1 cup packed light brown sugar (the secret to that deep caramel)
- 1 1/2 cups all-purpose flour (I swear by King Arthur for consistent results)
- 2 tsp baking powder (make sure it’s fresh for the best rise)
- 1/2 tsp salt (I like Himalayan pink for a subtle mineral touch)
- 1 tsp ground cinnamon (Saigon cinnamon has the best kick)
- 1/2 tsp ground nutmeg (freshly grated makes all the difference)
- 2 large eggs, room temp (they blend smoother when not cold)
- 1/2 cup whole milk (the fat content adds moisture)
- 1 tsp vanilla extract (splurge on the real stuff, not imitation)
Instructions
- Preheat your oven to 350°F. Grease a 9-inch round cake pan.
- Arrange the pear slices in a single layer at the bottom of the pan.
- Drizzle the melted butter over the pears, then sprinkle the brown sugar evenly on top.
- In a bowl, whisk together flour, baking powder, salt, cinnamon, and nutmeg.
- In another bowl, beat the eggs, then mix in milk and vanilla.
- Combine the wet and dry ingredients, stirring just until mixed—overmixing leads to a tough cake.
- Pour the batter over the pears, smoothing the top with a spatula.
- Bake for 40-45 minutes, until a toothpick comes out clean. Tip: Rotate the pan halfway for even baking.
- Let cool for 10 minutes, then invert onto a plate. Tip: Run a knife around the edge if it sticks.
- Serve warm. Tip: A dollop of whipped cream or vanilla ice cream takes it next level.
Just out of the oven, this cake boasts a moist crumb with a crispy caramel top. The spiced pears add a juicy, fragrant twist that’s irresistible. Try it as a brunch centerpiece or a cozy dessert with a scoop of ice cream melting on top.
Cranberry Orange Shortbread Cookies
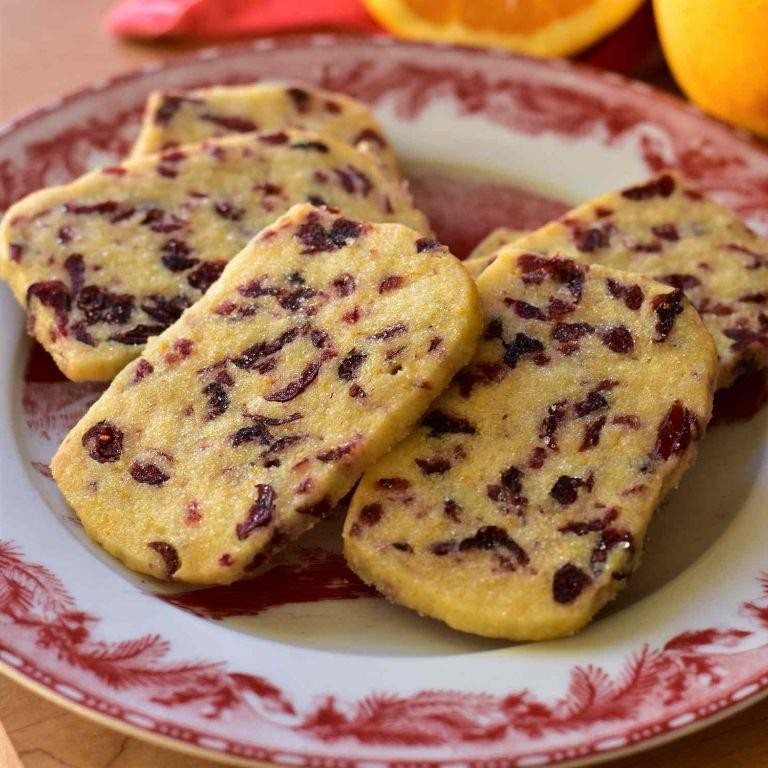
Make your taste buds dance with these buttery, zesty Cranberry Orange Shortbread Cookies. Perfect for holiday gifting or a cozy night in, they’re a foolproof crowd-pleaser.
Ingredients
- 1 cup unsalted butter, softened (trust me, room temp blends smoother)
- 1/2 cup granulated sugar (for that just-right sweetness)
- 2 cups all-purpose flour (scoop and level for accuracy)
- 1/2 tsp salt (balances the flavors beautifully)
- 1 tbsp orange zest (freshly grated packs the best punch)
- 1/2 cup dried cranberries, chopped (for little bursts of tartness)
Instructions
- Preheat your oven to 325°F (163°C) and line a baking sheet with parchment paper.
- In a large bowl, cream together the softened butter and granulated sugar until light and fluffy, about 3 minutes.
- Gradually mix in the flour and salt until just combined. Tip: Overmixing leads to tough cookies!
- Fold in the orange zest and chopped cranberries until evenly distributed.
- Roll the dough into a log about 2 inches in diameter, wrap in plastic, and chill for 30 minutes. Tip: Chilling firms up the dough for cleaner slices.
- Slice the log into 1/4-inch thick rounds and place them on the prepared baking sheet, spacing about 1 inch apart.
- Bake for 18-20 minutes, or until the edges are just starting to turn golden. Tip: They’ll continue to firm up as they cool!
- Let cool on the baking sheet for 5 minutes, then transfer to a wire rack to cool completely.
Out of the oven, these cookies boast a melt-in-your-mouth texture with a delightful contrast between the buttery shortbread and the chewy cranberries. Serve them alongside a cup of Earl Grey tea for a match made in heaven.
Baked Alaska with Winter Berries
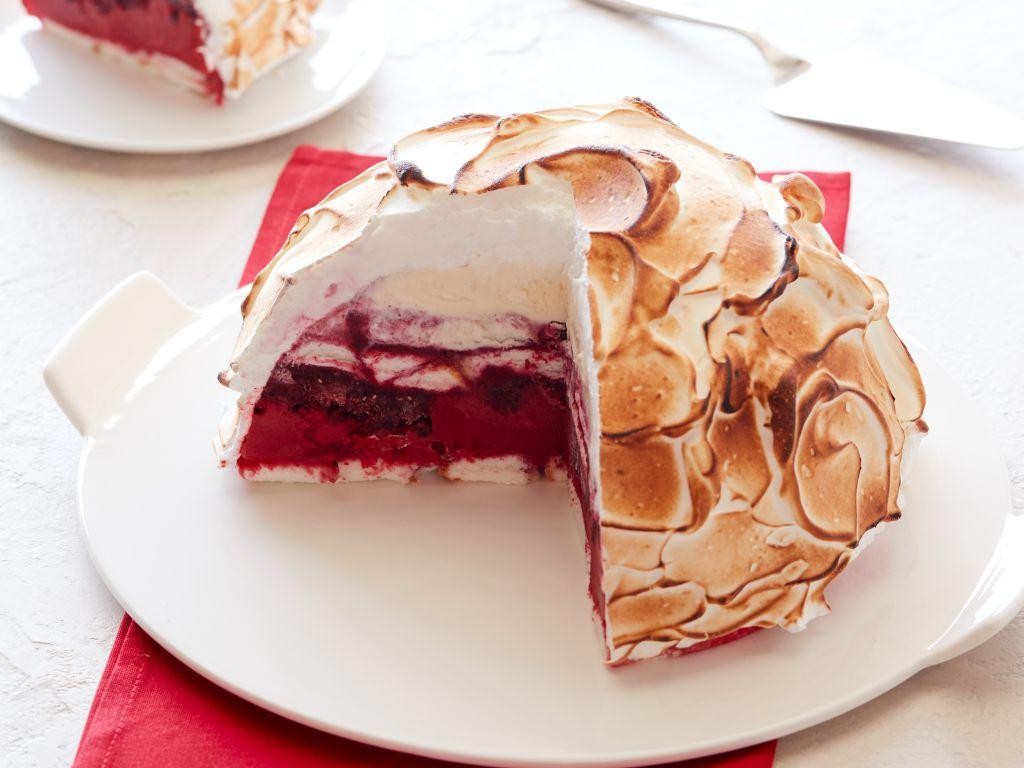
Yes, you read that right—Baked Alaska with a winter berry twist. This showstopper combines fire and ice for a dessert that’s as fun to make as it is to eat.
Ingredients
- 1 pint vanilla ice cream (go for a high-quality brand; it’s the star)
- 1 cup mixed winter berries (frozen works, but thaw them slightly)
- 4 large egg whites (room temp eggs whip up fluffier)
- 1/2 cup granulated sugar (I like mine extra fine for smoother meringue)
- 1 sponge cake, 9-inch round (homemade or store-bought, no judgment)
Instructions
- Preheat your oven to 475°F. Yes, it’s hot, but that’s the point.
- Place the sponge cake on a baking sheet. Spoon the slightly softened ice cream onto the cake, leaving a 1-inch border. Freeze for 1 hour—no shortcuts here.
- In a clean bowl, beat the egg whites until soft peaks form. Gradually add sugar, beating until stiff peaks form. Tip: A pinch of cream of tartar stabilizes the meringue.
- Remove the cake from the freezer. Quickly cover the ice cream and cake with meringue, sealing all edges. Use a spoon to create peaks for that iconic look.
- Bake for 3-5 minutes until the meringue is golden. Watch closely; it goes from perfect to burnt in seconds.
- Scatter the winter berries over the top right before serving. Tip: A drizzle of berry coulis adds extra flair.
Dig into the contrast of warm, toasty meringue and cold, creamy ice cream. The winter berries add a tart pop that cuts through the sweetness. Serve immediately for the full effect—this one’s a performance.
Salted Caramel Hot Cocoa Cookies
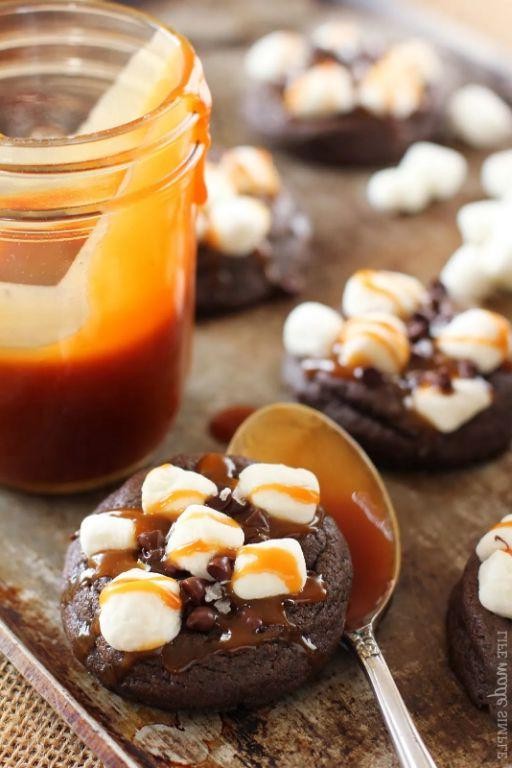
You won’t believe how these Salted Caramel Hot Cocoa Cookies will upgrade your snack game. **Bold** flavors meet gooey perfection in every bite.
Ingredients
- 1 cup unsalted butter, softened (trust me, room temp makes all the difference)
- 1 1/2 cups granulated sugar (because life’s too short for less sweet)
- 2 large eggs (room temp, for that perfect blend)
- 2 tsp vanilla extract (the good stuff, no imitations)
- 2 cups all-purpose flour (scooped and leveled, please)
- 1/2 cup cocoa powder (dark and dreamy)
- 1 tsp baking soda (freshness is key)
- 1/2 tsp salt (to make the caramel pop)
- 1 cup salted caramel chips (the star of the show)
- Sea salt flakes (for that Instagram-worthy finish)
Instructions
- Preheat your oven to 350°F (no guessing, use that oven thermometer).
- Cream together butter and sugar until fluffy (about 3 minutes, set a timer).
- Beat in eggs one at a time, then vanilla (patience makes perfect).
- Whisk flour, cocoa, baking soda, and salt in a separate bowl (no lumps allowed).
- Gradually mix dry ingredients into wet (low speed avoids a flour cloud).
- Fold in caramel chips (save a handful for topping).
- Scoop dough onto baking sheets, 2 inches apart (cookie scoop for uniform beauties).
- Bake for 10-12 minutes (edges should be set but centers soft).
- Sprinkle with sea salt and extra chips right out of the oven (hot cookies are sticky).
- Cool on sheets for 5 minutes, then transfer to racks (they firm up as they cool).
Zesty with a kick of salt, these cookies are a chewy, chocolatey dream. Serve warm with a cold glass of milk or crumble over vanilla ice cream for next-level indulgence.
Winter Spice Poached Pears
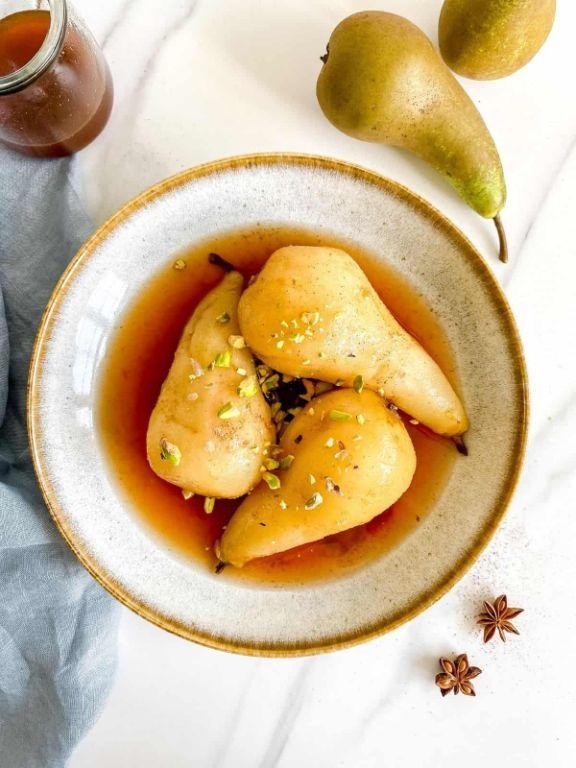
Make your winter nights unforgettable with these spiced poached pears—simple, elegant, and packed with flavor.
Ingredients
- 4 firm Bosc pears (peeled, stems left on—trust me, it’s prettier)
- 2 cups dry red wine (a bold Cabernet Sauvignon works wonders)
- 1 cup water (filtered, if you’re fancy)
- 1/2 cup granulated sugar (because life’s sweet)
- 1 cinnamon stick (the secret spice hero)
- 3 whole cloves (tiny but mighty)
- 1 star anise (for that Instagram-worthy flair)
- 1 orange (zested and juiced—fresh is best)
Instructions
- In a large pot, combine red wine, water, sugar, cinnamon stick, cloves, star anise, orange zest, and orange juice. Bring to a simmer over medium heat, stirring occasionally until sugar dissolves.
- Gently place the peeled pears into the simmering liquid. If they’re not fully submerged, spoon the liquid over them occasionally.
- Reduce heat to low and let the pears poach for 25-30 minutes, turning them halfway through for even color. They’re ready when a knife slides in easily but the pears still hold their shape.
- Using a slotted spoon, carefully remove the pears and set aside. Increase the heat to medium-high and reduce the poaching liquid by half, about 10-15 minutes, until it’s syrupy.
- Pour the reduced syrup over the pears and let them cool slightly. Serve warm or at room temperature.
Get ready for pears that are tender yet firm, with a deep, spiced wine flavor. Drizzle with extra syrup and a dollop of mascarpone for a decadent twist.
Conclusion
Cozy up your winter with these 16 delightful dessert recipes that promise to warm your heart and home. From rich chocolates to spiced fruits, there’s something for every sweet tooth. We’d love to hear which recipes become your favorites—drop us a comment below! And if you enjoyed this roundup, don’t forget to share the sweetness on Pinterest. Happy baking!


