Just because you’re eating gluten-free doesn’t mean lunch has to be boring or bland! Dive into our roundup of 17 Delicious Gluten-Free Lunch Recipes that are as healthy as they are tasty. Whether you’re meal prepping for the week or looking for a quick midday fix, these dishes promise to keep your taste buds happy and your body fueled. Let’s make lunch exciting again!
Quinoa Salad with Avocado and Lime Dressing
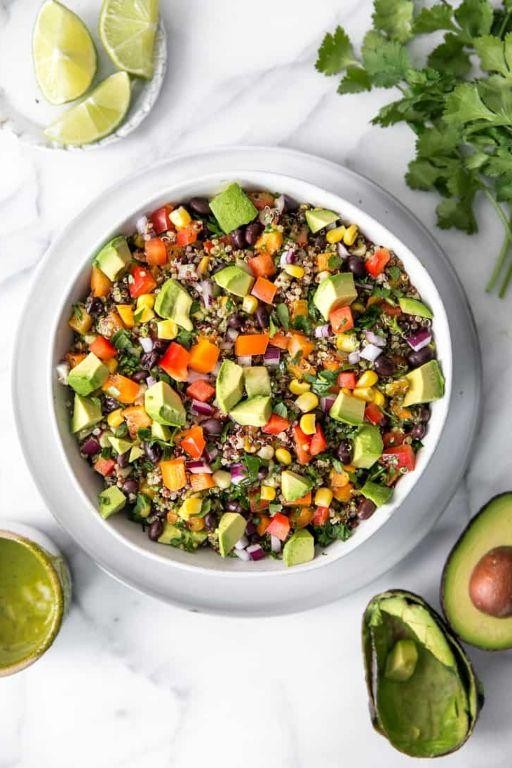
Great day to whip up something refreshing and nutritious! I stumbled upon this quinoa salad recipe during a summer picnic last year, and it’s been a staple in my kitchen ever since. The combination of creamy avocado and zesty lime dressing is just unbeatable.
Ingredients
- 1 cup quinoa (I always rinse mine under cold water to remove any bitterness)
- 2 ripe avocados (the creamier, the better for this dish)
- 1/4 cup extra virgin olive oil (my go-to for dressings)
- 2 tbsp fresh lime juice (about 1 large lime, and yes, fresh makes all the difference)
- 1/2 tsp salt (I like to use sea salt for its subtle crunch)
- 1/4 tsp black pepper (freshly ground, if you have it)
- 1 cup cherry tomatoes, halved (they add a nice pop of color and sweetness)
- 1/4 cup chopped cilantro (not a fan? Parsley works too)
Instructions
- Rinse the quinoa under cold water in a fine-mesh strainer for about 30 seconds to remove its natural coating, which can be bitter.
- Cook the quinoa according to package instructions, usually about 15 minutes in 2 cups of water, then let it sit covered for 5 minutes off the heat to fluff up.
- While the quinoa cooks, whisk together the olive oil, lime juice, salt, and pepper in a small bowl. Taste and adjust seasoning if needed—this dressing should be tangy and bright.
- Dice the avocados and halve the cherry tomatoes. Gently fold them into the cooled quinoa along with the cilantro.
- Pour the dressing over the salad and toss lightly to combine, being careful not to mash the avocados.
- Let the salad sit for about 10 minutes before serving to allow the flavors to meld together beautifully.
Key to this salad’s charm is the contrast between the fluffy quinoa and the creamy avocado, with the lime dressing tying everything together. Serve it on a bed of greens for an extra nutrient boost or alongside grilled chicken for a more substantial meal.
Gluten-Free Veggie Wrap with Hummus
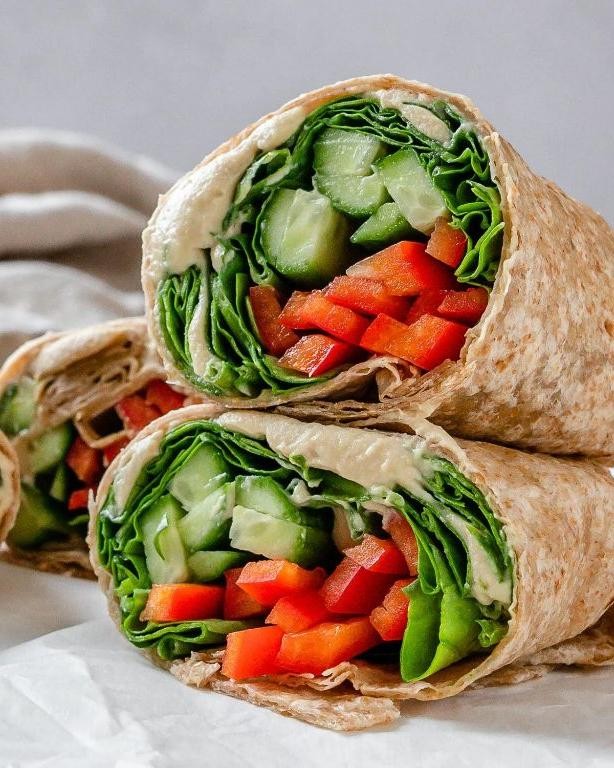
Zesty mornings call for something fresh and fulfilling, and that’s exactly what this Gluten-Free Veggie Wrap with Hummus brings to the table. I remember the first time I whipped this up; it was a lazy Sunday, and I wanted something light yet satisfying. This wrap was the answer, packed with vibrant veggies and creamy hummus, all hugged by a soft gluten-free tortilla.
Ingredients
- 1 gluten-free tortilla (I love the ones that are a bit thicker for extra chewiness)
- 1/2 cup hummus (homemade or store-bought, but go for the garlicky kind if you can)
- 1/4 cup shredded carrots (the crunchier, the better)
- 1/4 cup sliced cucumbers (I prefer English cucumbers for their thin skin and minimal seeds)
- 1/4 cup baby spinach leaves (washed and thoroughly dried to avoid a soggy wrap)
- 2 tbsp crumbled feta cheese (optional, but it adds a nice tangy contrast)
- 1 tbsp extra virgin olive oil (my go-to for a light drizzle)
Instructions
- Lay the gluten-free tortilla flat on a clean surface.
- Spread the hummus evenly over the tortilla, leaving about an inch border around the edges.
- Layer the shredded carrots, sliced cucumbers, and baby spinach leaves on top of the hummus.
- Sprinkle the crumbled feta cheese over the veggies if using.
- Drizzle the extra virgin olive oil lightly over the filling.
- Carefully fold the sides of the tortilla inwards, then roll it up tightly from the bottom to enclose the filling.
- Cut the wrap in half diagonally for easier eating and serve immediately.
Yielded a wrap that’s bursting with textures—crunchy, creamy, and fresh—all in one bite. Perfect for a quick lunch or a picnic, and if you’re feeling adventurous, try adding a sprinkle of chili flakes for a little heat.
Zucchini Noodles with Pesto and Cherry Tomatoes
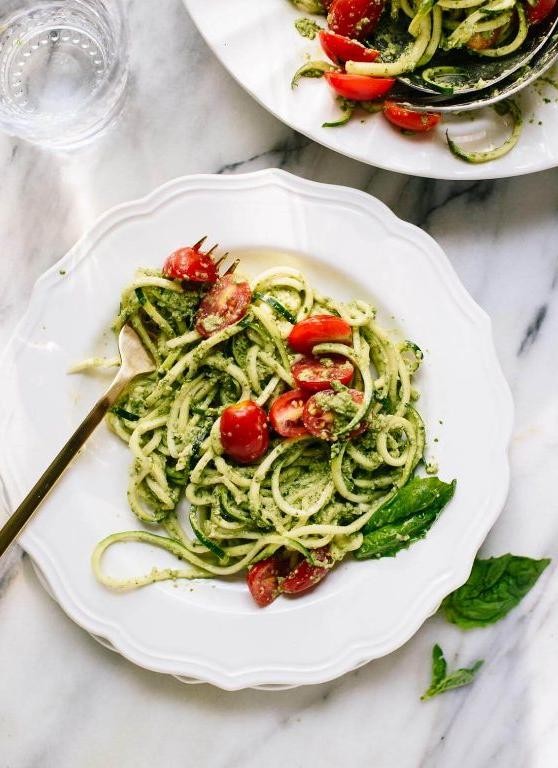
Just last week, I found myself staring at a mountain of zucchini from my garden, wondering how to turn them into something delicious without spending hours in the kitchen. That’s when I decided to whip up this quick and healthy Zucchini Noodles with Pesto and Cherry Tomatoes dish. It’s become my go-to for a light, yet satisfying meal that’s packed with flavor.
Ingredients
- 4 medium zucchinis – I like them fresh from the garden, but store-bought works just fine.
- 1 cup fresh basil leaves – The more, the merrier, I say!
- 1/2 cup grated Parmesan cheese – Because everything’s better with cheese.
- 1/3 cup extra virgin olive oil – My go-to for its fruity flavor.
- 2 cloves garlic – Freshly minced, please.
- 1/4 cup pine nuts – Toasted lightly for that extra crunch.
- 1 cup cherry tomatoes – Halved, they’re like little bursts of sunshine.
- Salt to taste – I prefer sea salt for its subtle flavor.
Instructions
- Using a spiralizer, turn the zucchinis into noodles. Tip: If you don’t have a spiralizer, a vegetable peeler works in a pinch to create wide ribbons.
- In a food processor, combine the basil, Parmesan, olive oil, garlic, and pine nuts. Pulse until smooth. Tip: Scrape down the sides occasionally to ensure everything is evenly incorporated.
- Toss the zucchini noodles with the pesto until evenly coated. Tip: Let it sit for 5 minutes to allow the flavors to meld.
- Gently fold in the cherry tomatoes.
- Season with salt to taste.
Zesty and fresh, this dish is a celebration of summer flavors. The zucchini noodles offer a satisfying crunch, while the pesto brings a creamy, herby depth. Serve it in a big bowl with a sprinkle of extra Parmesan on top for a dish that’s as beautiful as it is delicious.
Stuffed Bell Peppers with Ground Turkey and Quinoa
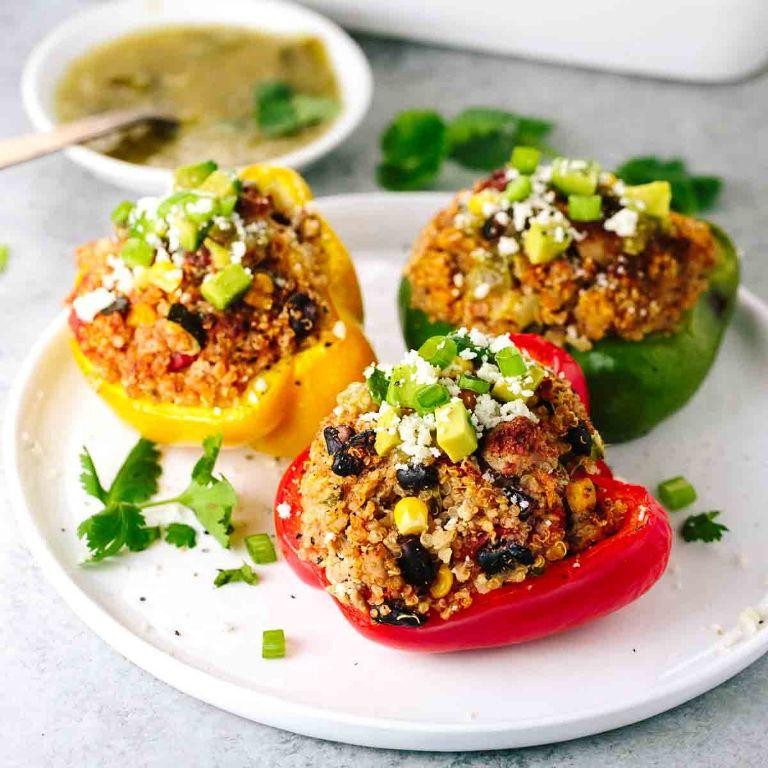
Finally, a dish that’s as nutritious as it is colorful—Stuffed Bell Peppers with Ground Turkey and Quinoa. I remember the first time I made these; it was a chilly evening, and I wanted something hearty yet healthy. These peppers were the answer, and they’ve been a staple in my kitchen ever since.
Ingredients
- 4 large bell peppers (I love using a mix of colors for a vibrant plate)
- 1 lb ground turkey (lean works best for me)
- 1 cup quinoa (rinsed well—I learned the hard way that skipping this step can make it bitter)
- 2 cups chicken broth (homemade if you have it, but store-bought is fine)
- 1 tbsp extra virgin olive oil (my go-to for sautéing)
- 1 small onion, diced (I prefer yellow for sweetness)
- 2 cloves garlic, minced (fresh is always better in my book)
- 1 tsp cumin (adds a nice warmth)
- 1/2 tsp paprika (smoked if you have it, for that extra depth)
- Salt and pepper (to taste, but don’t be shy)
- 1/2 cup shredded cheese (I use a mix of cheddar and Monterey Jack)
- Fresh cilantro for garnish (because everything’s better with a little green)
Instructions
- Preheat your oven to 375°F. This ensures everything bakes evenly.
- Cut the tops off the bell peppers and remove the seeds. A sharp knife makes this step a breeze.
- In a medium saucepan, bring the chicken broth to a boil. Add the quinoa, reduce to a simmer, cover, and cook for 15 minutes. Tip: Don’t peek! Letting the steam do its work is key.
- While the quinoa cooks, heat olive oil in a large skillet over medium heat. Add the onion and garlic, sautéing until soft, about 5 minutes.
- Add the ground turkey, breaking it apart with a spoon. Cook until no longer pink, about 7 minutes. Tip: Season as you go—I add salt and pepper here.
- Stir in the cumin and paprika, then mix in the cooked quinoa. Taste and adjust seasoning if needed.
- Spoon the mixture into the bell peppers, packing it down lightly. Top with cheese.
- Place the peppers in a baking dish and bake for 25-30 minutes, until the peppers are tender and the cheese is bubbly. Tip: For extra color, broil for the last 2 minutes.
- Garnish with fresh cilantro before serving.
Out of the oven, these peppers are a sight to behold—tender, with a satisfying bite from the quinoa and a melty cheese topping. Serve them with a side of avocado slices for a creamy contrast, or a crisp green salad to keep things light.
Gluten-Free Chicken Caesar Salad
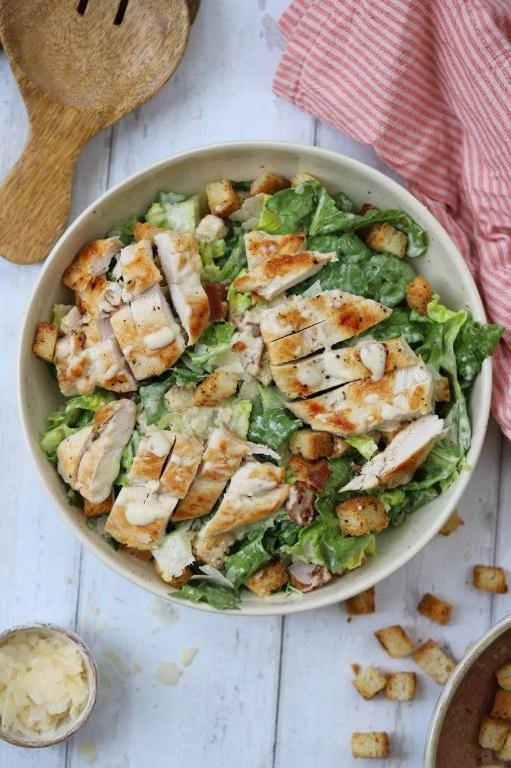
How many times have you craved a classic Caesar salad but had to skip it because of gluten? I’ve been there more times than I can count, which is why I perfected this Gluten-Free Chicken Caesar Salad that doesn’t compromise on flavor or texture.
Ingredients
- 2 boneless, skinless chicken breasts (I always go for organic, free-range for the best flavor)
- 1 tbsp extra virgin olive oil (my kitchen staple for almost everything)
- 1/2 tsp garlic powder (because fresh garlic is great, but sometimes you want the ease of powder)
- 1/2 tsp salt (I use sea salt for a cleaner taste)
- 1/4 tsp black pepper (freshly ground makes all the difference)
- 1 large head of romaine lettuce, chopped (crisp and fresh is key)
- 1/2 cup gluten-free Caesar dressing (I’ve tried many brands, and this one’s my favorite)
- 1/4 cup grated Parmesan cheese (the real deal, none of that pre-shredded stuff)
- 1 cup gluten-free croutons (homemade or store-bought, both work)
Instructions
- Preheat your oven to 375°F (190°C) to get it ready for the chicken.
- Rub the chicken breasts with olive oil, then season both sides with garlic powder, salt, and black pepper. Tip: Letting the chicken sit with the seasoning for 5 minutes enhances the flavor.
- Place the chicken on a baking sheet and bake for 25-30 minutes, or until the internal temperature reaches 165°F (74°C). Tip: Use a meat thermometer to avoid overcooking.
- While the chicken bakes, chop the romaine lettuce and place it in a large salad bowl.
- Once the chicken is done, let it rest for 5 minutes before slicing it into strips. Tip: Resting the chicken keeps it juicy.
- Add the sliced chicken, Caesar dressing, Parmesan cheese, and croutons to the bowl with the lettuce.
- Toss everything together until evenly coated with the dressing.
Every bite of this salad is a perfect mix of crunchy, creamy, and savory. Serve it with a slice of gluten-free bread for a complete meal that feels indulgent yet is totally guilt-free.
Sweet Potato and Black Bean Tacos
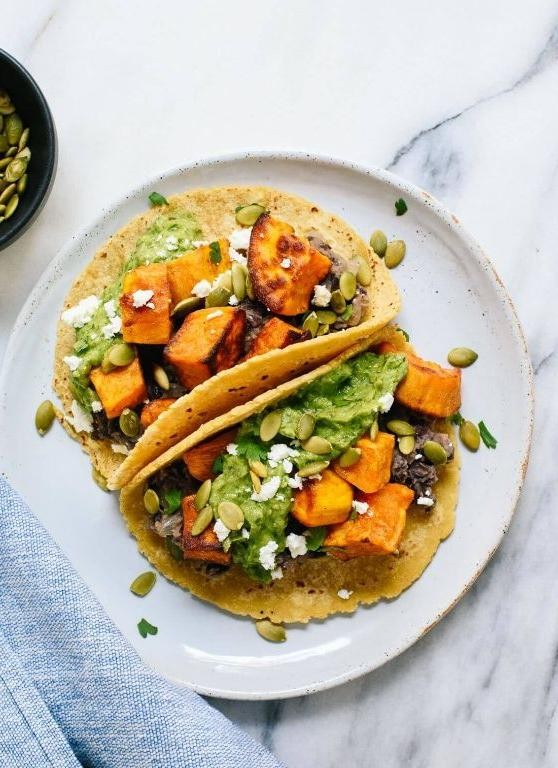
Mmm, there’s something about the combination of sweet potatoes and black beans that just feels like a hug in a taco. I stumbled upon this combo during a lazy Sunday fridge clean-out, and it’s been a staple in my kitchen ever since. Perfect for when you want something hearty yet healthy, these tacos are a breeze to whip up.
Ingredients
- 2 medium sweet potatoes, peeled and diced into 1/2-inch cubes (I find the smaller cubes cook more evenly)
- 1 can (15 oz) black beans, drained and rinsed (I always give them an extra rinse to get rid of any excess sodium)
- 1 tbsp extra virgin olive oil (my go-to for roasting veggies)
- 1 tsp ground cumin (don’t skimp on this; it’s the flavor MVP here)
- 1/2 tsp smoked paprika (for that subtle smokiness)
- 1/4 tsp salt (I like to use sea salt for its milder flavor)
- 8 small corn tortillas (warming them up makes all the difference)
- Fresh cilantro, chopped (for that fresh finish)
- 1 avocado, sliced (because avocado makes everything better)
- Lime wedges (a squeeze of lime right before eating elevates the flavors)
Instructions
- Preheat your oven to 400°F. Line a baking sheet with parchment paper for easy cleanup.
- Toss the diced sweet potatoes with olive oil, cumin, smoked paprika, and salt until evenly coated. Spread them out on the prepared baking sheet in a single layer.
- Roast for 25 minutes, flipping halfway through, until the sweet potatoes are tender and slightly caramelized at the edges.
- While the sweet potatoes roast, warm the black beans in a small saucepan over low heat. Keep them covered to retain moisture.
- Heat the corn tortillas in a dry skillet over medium heat for about 30 seconds on each side, or until they’re pliable and slightly charred.
- Assemble the tacos by layering the roasted sweet potatoes and warmed black beans on each tortilla. Top with fresh cilantro, avocado slices, and a squeeze of lime.
Just like that, you’ve got a taco that’s bursting with flavors and textures—creamy avocado, tender sweet potatoes, and hearty black beans all wrapped up in a warm tortilla. Try serving these with a side of spicy salsa or a dollop of Greek yogurt for an extra kick.
Cauliflower Rice Stir Fry with Vegetables
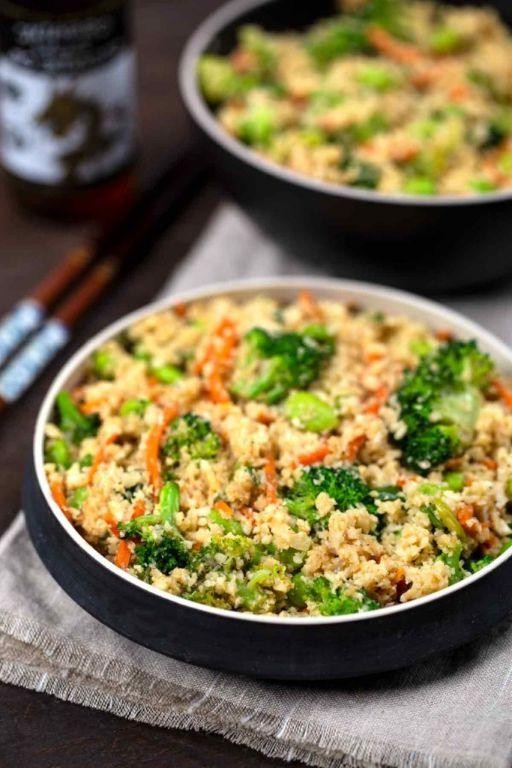
Believe it or not, I was skeptical about cauliflower rice until I tried this stir fry. It’s a game-changer for quick, healthy meals, especially on those busy weeknights when you’re tempted to order takeout.
Ingredients
- 1 large head of cauliflower, riced (about 4 cups) – I find the pre-riced bags a lifesaver, but fresh is unbeatable.
- 2 tbsp extra virgin olive oil – my kitchen staple for its flavor and health benefits.
- 1 cup diced bell peppers – I love the color and crunch red and yellow ones add.
- 1 cup sliced carrots – thinly sliced for quick cooking.
- 2 cloves garlic, minced – because what’s a stir fry without garlic?
- 2 tbsp soy sauce – low sodium is my preference to control the saltiness.
- 1 tsp sesame oil – a little goes a long way for that authentic Asian flair.
- 1/2 cup frozen peas – no need to thaw, they cook quickly in the stir fry.
Instructions
- Heat the olive oil in a large skillet over medium-high heat until shimmering, about 1 minute. Tip: The oil should be hot but not smoking to avoid burning the garlic.
- Add the minced garlic and sauté for 30 seconds until fragrant, stirring constantly to prevent sticking.
- Toss in the diced bell peppers and sliced carrots. Stir fry for 3-4 minutes until they start to soften but still retain some crunch.
- Add the riced cauliflower to the skillet. Mix well with the vegetables and cook for 5 minutes, stirring occasionally. Tip: Don’t overcrowd the pan to ensure everything cooks evenly.
- Pour in the soy sauce and sesame oil. Stir to combine and cook for another 2 minutes, allowing the flavors to meld.
- Finally, add the frozen peas and cook for 1 minute more, just until they’re heated through. Tip: Peas add a sweet pop of flavor and color, making the dish more appealing.
Perfectly tender yet crisp, this stir fry is a symphony of textures and flavors. Serve it topped with a fried egg for a protein boost or alongside grilled chicken for a more filling meal.
Gluten-Free Turkey and Cheese Roll-Ups

Last weekend, I was rummaging through my fridge, trying to whip up something quick yet satisfying for lunch, and that’s when the idea for these gluten-free turkey and cheese roll-ups hit me. They’re not only easy to make but also packed with flavors that everyone in my family loves.
Ingredients
- 4 large gluten-free tortillas (I find that warming them up for 10 seconds makes them more pliable)
- 8 slices of turkey breast (opt for the smoked variety for an extra flavor kick)
- 1 cup shredded cheddar cheese (sharp cheddar gives a nice bite)
- 1/2 cup cream cheese, softened (I leave it out for about 20 minutes before starting)
- 1 tbsp Dijon mustard (adds a tangy depth)
- 1/2 tsp garlic powder (because garlic makes everything better)
- 1/4 tsp black pepper (freshly ground, if possible)
Instructions
- Lay out the gluten-free tortillas on a clean, flat surface.
- Spread 2 tbsp of softened cream cheese evenly over each tortilla, leaving a small border around the edges.
- Sprinkle 1/4 cup of shredded cheddar cheese over the cream cheese on each tortilla.
- Place 2 slices of turkey breast on top of the cheese, ensuring they’re evenly distributed.
- Drizzle 1/4 tbsp of Dijon mustard over the turkey on each tortilla.
- Sprinkle a pinch of garlic powder and black pepper over the mustard.
- Carefully roll up each tortilla tightly, tucking in the sides as you go to secure the fillings inside.
- Heat a non-stick skillet over medium heat (about 350°F) and place the roll-ups seam side down. Cook for 2-3 minutes on each side or until the tortillas are golden and the cheese starts to melt.
- Remove from the skillet and let them cool for a minute before slicing them into 1-inch pieces.
Finally, these roll-ups are a perfect blend of creamy, tangy, and smoky flavors with a satisfyingly soft yet slightly crispy texture. Serve them with a side of pickles or a fresh salad for a complete meal that’s sure to impress.
Lentil Soup with Gluten-Free Bread
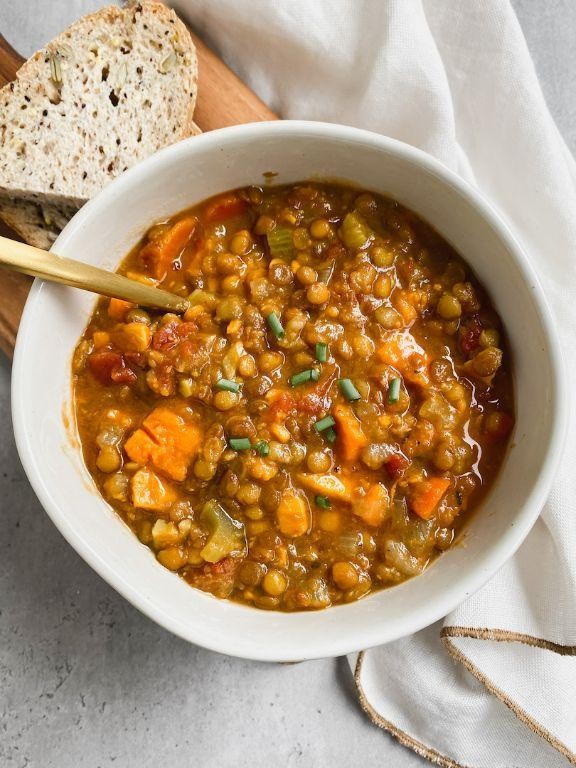
Yesterday, I found myself craving something hearty yet healthy, and that’s when this lentil soup with gluten-free bread came to mind. It’s the perfect comfort food for those days when you need a little warmth in your belly and soul.
Ingredients
- 1 cup dried green lentils (I always rinse them under cold water to remove any debris)
- 2 tbsp extra virgin olive oil (my go-to for its fruity flavor)
- 1 medium onion, diced (I like mine finely chopped for a smoother texture)
- 2 carrots, peeled and diced (adds a sweet crunch)
- 2 celery stalks, diced (for that classic soup base)
- 3 garlic cloves, minced (because more garlic is always better)
- 4 cups vegetable broth (homemade if you have it, but store-bought works fine)
- 1 tsp ground cumin (adds a warm, earthy flavor)
- 1/2 tsp smoked paprika (for a hint of smokiness)
- Salt and pepper to taste (I start with 1/2 tsp salt and adjust from there)
- Gluten-free bread for serving (toasted with a bit of olive oil is my preference)
Instructions
- Heat the olive oil in a large pot over medium heat until shimmering.
- Add the onion, carrots, and celery. Cook, stirring occasionally, until the vegetables are softened, about 5 minutes.
- Stir in the garlic, cumin, and smoked paprika. Cook for 1 minute until fragrant.
- Add the lentils and vegetable broth. Bring to a boil, then reduce heat to low. Cover and simmer for 25 minutes, or until the lentils are tender.
- Season with salt and pepper. Tip: Taste as you go to adjust the seasoning perfectly.
- While the soup simmers, toast the gluten-free bread. Tip: Brushing the bread with olive oil before toasting adds a nice crunch.
- Serve the soup hot with a side of toasted gluten-free bread. Tip: A sprinkle of fresh herbs on top adds color and freshness.
Mmm, the soup turns out creamy with the lentils just holding their shape, and the bread adds a delightful crunch. For an extra touch, drizzle a little olive oil on top before serving to bring all the flavors together.
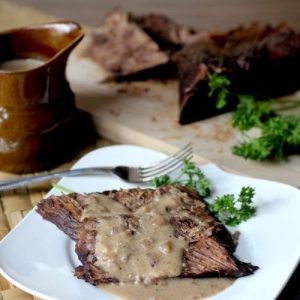
Grilled Salmon with Asparagus and Lemon Butter Sauce
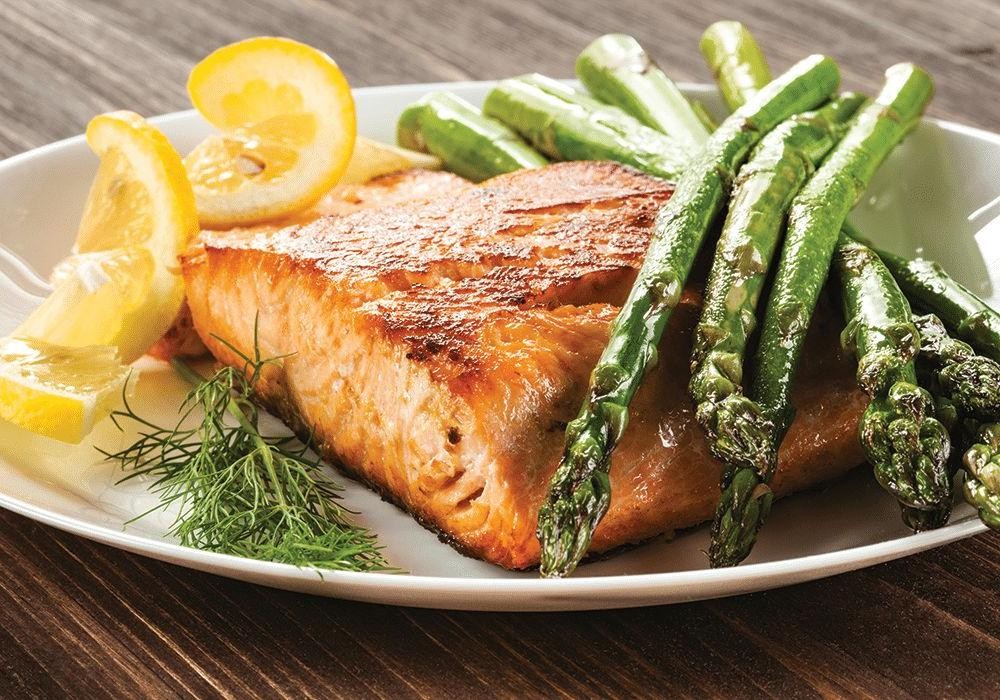
There’s something about the combination of grilled salmon and asparagus that screams summer to me. Maybe it’s the vibrant colors or the way the flavors meld together under the grill, but this dish has become a staple in my weekly rotation.
Ingredients
- 2 salmon fillets (about 6 oz each, skin-on for that crispy texture I love)
- 1 bunch of asparagus (thin spears work best here, they grill up so tender)
- 3 tbsp unsalted butter (I always use European-style for its richer flavor)
- 1 lemon (zested and juiced, because fresh is always better)
- 2 cloves garlic (minced, and yes, I always add an extra one for good measure)
- Salt and freshly ground black pepper (to season, but we’ll be specific about amounts in the steps)
- 1 tbsp olive oil (extra virgin is my go-to for its fruity notes)
Instructions
- Preheat your grill to medium-high heat, about 400°F, ensuring it’s clean to prevent sticking.
- While the grill heats, toss the asparagus with 1 tbsp olive oil, 1/4 tsp salt, and 1/8 tsp black pepper. Lay them out in a single layer on a tray.
- Season the salmon fillets with 1/4 tsp salt and 1/8 tsp black pepper on both sides. Tip: Let the salmon sit at room temperature for 10 minutes before grilling for even cooking.
- Place the salmon skin-side down and the asparagus on the grill. Cook the salmon for 4-5 minutes without flipping to get that perfect crispy skin.
- Flip the salmon and move the asparagus around to ensure even cooking. Grill for another 3-4 minutes until the salmon flakes easily with a fork.
- In a small saucepan over low heat, melt the butter with the minced garlic, lemon zest, and juice. Cook for 1-2 minutes until fragrant. Tip: Keep an eye on the garlic to prevent burning.
- Drizzle the lemon butter sauce over the grilled salmon and asparagus before serving. Tip: A sprinkle of fresh dill or parsley adds a nice color and freshness.
Lightly charred asparagus and perfectly grilled salmon with a tangy lemon butter sauce make this dish a summer favorite. Serve it with a side of quinoa or a crisp white wine for a complete meal that’s as nutritious as it is delicious.
Gluten-Free Pizza with Cauliflower Crust

Whenever I’m craving pizza but want to keep it light and gluten-free, this cauliflower crust version is my go-to. It’s surprisingly simple to make and lets me enjoy my favorite comfort food without the guilt.
Ingredients
- 1 medium head of cauliflower, riced (about 3 cups) – I find the pre-riced bags at the store a real time-saver.
- 1 large egg, beaten – Room temp eggs blend better, in my experience.
- 1 cup shredded mozzarella cheese – The more, the cheesier, right?
- 1/4 cup grated Parmesan cheese – Adds a nice salty kick.
- 1 tsp dried oregano – For that classic pizza flavor.
- 1/2 tsp garlic powder – Because everything’s better with garlic.
- 1/2 tsp salt – Just enough to enhance all the flavors.
- 1 tbsp extra virgin olive oil – My go-to for greasing the pan.
Instructions
- Preheat your oven to 400°F (200°C) and line a baking sheet with parchment paper, lightly greased with olive oil.
- In a large bowl, mix the riced cauliflower, beaten egg, mozzarella, Parmesan, oregano, garlic powder, and salt until well combined.
- Transfer the mixture onto the prepared baking sheet and press it into a 1/4-inch thick circle. Tip: Use a spatula to smooth the edges for a perfect crust.
- Bake for 20-25 minutes, or until the crust is golden and firm to the touch. Tip: Rotate the pan halfway through for even baking.
- Remove from the oven and add your favorite toppings. Tip: Less is more with toppings to keep the crust crispy.
- Return to the oven and bake for another 10-12 minutes, or until the cheese is bubbly and slightly browned.
You’ll love the crispy edges and the soft, chewy center of this cauliflower crust pizza. It’s perfect for a movie night at home, topped with fresh arugula and a drizzle of balsamic glaze for an extra gourmet touch.
Avocado and Egg Salad Lettuce Wraps
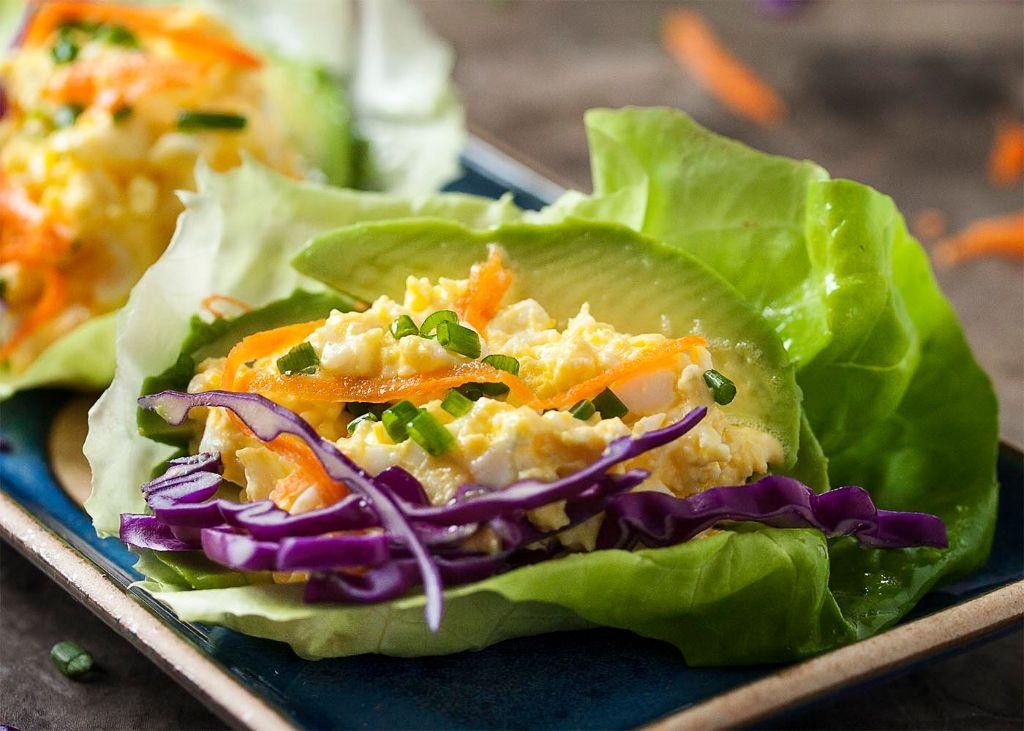
Sometimes, the simplest combinations make the most satisfying meals, and that’s exactly what I found with these Avocado and Egg Salad Lettuce Wraps. It’s a dish that reminds me of lazy Sunday mornings when I want something nutritious but don’t feel like spending hours in the kitchen.
Ingredients
- 2 large eggs (I prefer room temp eggs here for easier peeling)
- 1 ripe avocado (look for one that’s just slightly soft to the touch)
- 1 tbsp mayonnaise (I swear by the full-fat version for creaminess)
- 1 tsp Dijon mustard (adds a nice tangy kick)
- 1/4 tsp salt (I like to use sea salt for its subtle crunch)
- 1/8 tsp black pepper (freshly ground makes all the difference)
- 4 large lettuce leaves (butter lettuce is my go-to for its soft, pliable leaves)
Instructions
- Place the eggs in a small saucepan and cover with water by about an inch. Bring to a boil over high heat, then cover and remove from heat. Let sit for 12 minutes for perfectly hard-boiled eggs.
- While the eggs are cooking, halve the avocado, remove the pit, and scoop the flesh into a medium bowl. Mash lightly with a fork, leaving some chunks for texture.
- Once the eggs are done, transfer them to a bowl of ice water to cool for about 5 minutes. This stops the cooking process and makes peeling a breeze.
- Peel the eggs, then chop them into small pieces and add to the bowl with the avocado.
- Add the mayonnaise, Dijon mustard, salt, and pepper to the bowl. Gently mix everything together until well combined but still chunky.
- Divide the avocado and egg mixture evenly among the lettuce leaves, placing it in the center of each. Fold the leaves around the filling to form wraps.
Kicking back with these wraps, you’ll love the creamy texture of the avocado and egg against the crisp lettuce. They’re perfect for a light lunch or as a fresh appetizer at your next gathering.
Chickpea and Spinach Stew
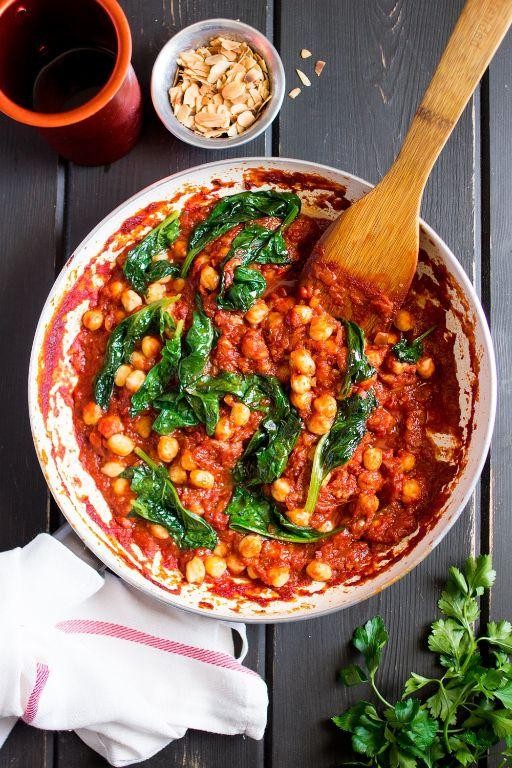
Sometimes, all I crave is a bowl of something hearty, nutritious, and bursting with flavors that remind me of home. That’s exactly what this Chickpea and Spinach Stew brings to the table—a comforting dish that’s as easy to make as it is delicious.
Ingredients
- 2 tbsp extra virgin olive oil (my go-to for its fruity notes)
- 1 large onion, diced (I love the sweetness it adds)
- 3 garlic cloves, minced (because more garlic is always better)
- 1 tsp ground cumin (for that warm, earthy flavor)
- 1/2 tsp smoked paprika (it adds a subtle smokiness that’s irresistible)
- 1 can (15 oz) chickpeas, drained and rinsed (I prefer them for their creamy texture)
- 1 can (14.5 oz) diced tomatoes (with their juices for extra sauciness)
- 2 cups fresh spinach (packed, it wilts down to just the right amount)
- Salt to taste (I start with 1/2 tsp and adjust from there)
- 1 cup vegetable broth (homemade if you have it, for deeper flavor)
Instructions
- Heat the olive oil in a large pot over medium heat until shimmering.
- Add the diced onion and cook, stirring occasionally, until translucent, about 5 minutes.
- Stir in the minced garlic, ground cumin, and smoked paprika, cooking until fragrant, about 1 minute.
- Add the chickpeas and diced tomatoes with their juices, stirring to combine.
- Pour in the vegetable broth and bring the mixture to a simmer.
- Let it simmer uncovered for 10 minutes, allowing the flavors to meld.
- Add the fresh spinach in batches, stirring until wilted, about 2 minutes.
- Season with salt to taste, starting with 1/2 tsp and adjusting as needed.
- Tip: For a thicker stew, mash some of the chickpeas against the side of the pot.
- Tip: If you like a bit of heat, a pinch of red pepper flakes works wonders.
- Tip: Serve with a squeeze of lemon juice for a bright finish.
Ladle this stew into bowls and enjoy the creamy chickpeas, tender spinach, and rich tomato broth. It’s perfect with a slice of crusty bread for dipping or over a bed of fluffy quinoa for an extra protein boost.
Gluten-Free Sushi Rolls with Cucumber and Avocado
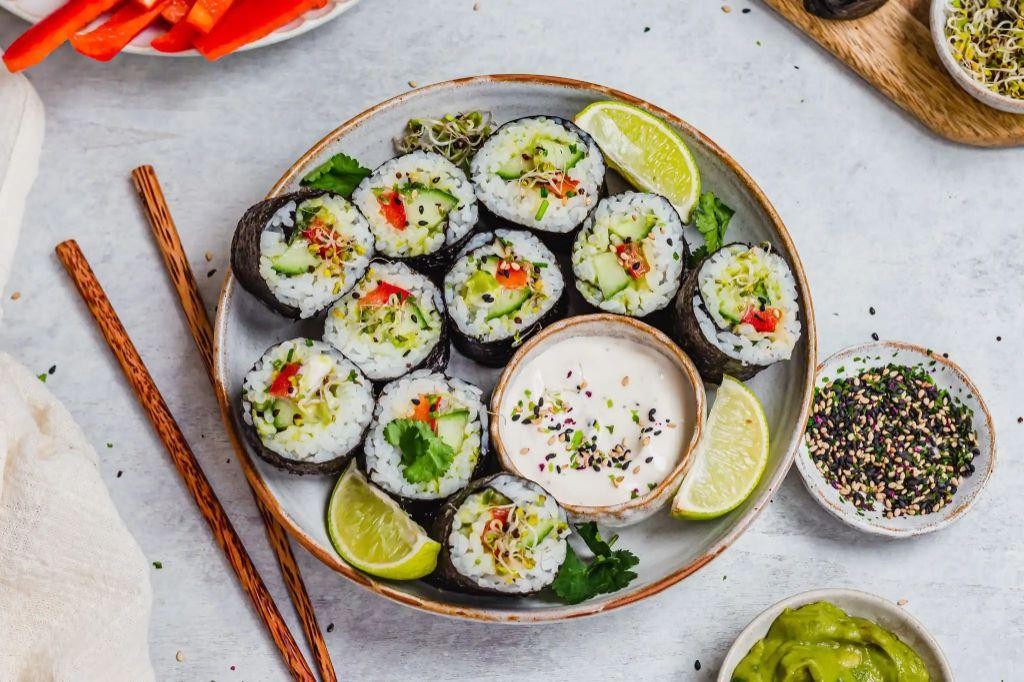
Yesterday, I found myself craving sushi but remembered my friend’s gluten intolerance. That’s when I decided to whip up these gluten-free sushi rolls with cucumber and avocado. They’re not only safe for my friend but also a refreshing treat for anyone looking for a light, healthy meal.
Ingredients
- 1 cup sushi rice – I always rinse mine until the water runs clear to remove excess starch.
- 1 1/4 cups water – for perfectly fluffy rice.
- 2 tbsp rice vinegar – my secret for that authentic sushi flavor.
- 1 tbsp sugar – just a touch to balance the vinegar’s tang.
- 1/2 tsp salt – enhances all the flavors.
- 1 ripe avocado – I like mine just soft enough to slice easily.
- 1/2 cucumber – seeded and julienned for that perfect crunch.
- 4 sheets nori – the backbone of any good sushi roll.
- 1 tbsp sesame seeds – for a little nutty flavor and crunch.
Instructions
- Rinse the sushi rice under cold water until the water runs clear, then drain well.
- Combine the rice and water in a rice cooker or pot. If using a pot, bring to a boil, then reduce heat to low, cover, and simmer for 20 minutes.
- While the rice cooks, mix the rice vinegar, sugar, and salt in a small bowl until dissolved. Tip: Warming the mixture slightly helps the sugar dissolve faster.
- Once the rice is done, transfer it to a large bowl and gently fold in the vinegar mixture. Let it cool to room temperature. Tip: Fanning the rice can speed up the cooling process.
- Place a nori sheet on a bamboo mat. With wet hands, spread a thin layer of rice over the nori, leaving a 1-inch border at the top.
- Sprinkle sesame seeds over the rice, then arrange avocado slices and cucumber strips in a line near the bottom edge.
- Roll the sushi tightly from the bottom, using the mat to help. Tip: A little water on the nori’s border helps seal the roll.
- Slice the roll into 6-8 pieces with a sharp, wet knife for clean cuts.
Perfect for a summer afternoon, these rolls offer a delightful contrast between the creamy avocado and crisp cucumber. Serve them with a side of gluten-free soy sauce or wasabi for an extra kick.
Baked Chicken Thighs with Roasted Vegetables
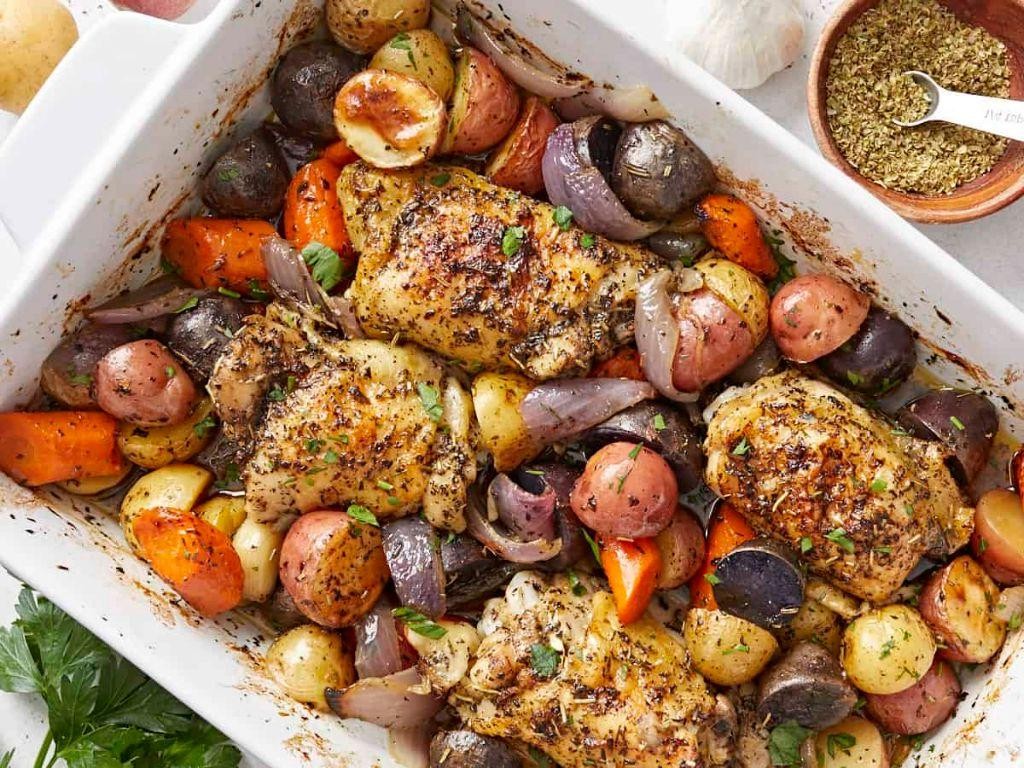
Many evenings, I find myself craving something hearty yet straightforward to prepare, and that’s when baked chicken thighs with roasted vegetables come to mind. It’s a dish that feels like a warm hug, with the chicken turning out juicy every time and the veggies caramelizing just right.
Ingredients
- 4 bone-in, skin-on chicken thighs (trust me, the skin adds so much flavor)
- 2 cups of baby potatoes, halved (I love using a mix of colors for a vibrant plate)
- 1 cup of carrots, chopped into 1-inch pieces (they sweeten beautifully when roasted)
- 2 tbsp extra virgin olive oil (my go-to for roasting)
- 1 tsp garlic powder (because everything’s better with garlic)
- 1 tsp dried thyme (it pairs wonderfully with chicken)
- Salt and pepper (I’m generous with both for maximum flavor)
Instructions
- Preheat your oven to 400°F (200°C). A hot oven is key for crispy skin and tender veggies.
- In a large bowl, toss the baby potatoes and carrots with 1 tbsp of olive oil, garlic powder, thyme, salt, and pepper until evenly coated.
- Spread the vegetables on a baking sheet in a single layer. This ensures they roast instead of steam.
- Rub the chicken thighs with the remaining olive oil, then season both sides generously with salt and pepper.
- Place the chicken thighs skin-side up on top of the vegetables. The chicken fat will drip down, flavoring the veggies as they cook.
- Bake for 35-40 minutes, until the chicken skin is golden and crispy, and the vegetables are tender. A meat thermometer should read 165°F (74°C) when inserted into the thickest part of the thigh.
- Let the dish rest for 5 minutes before serving. This allows the juices to redistribute, making the chicken even more succulent.
Coming out of the oven, the chicken thighs are irresistibly crispy on the outside and moist inside, while the vegetables are perfectly caramelized. Serve this dish with a sprinkle of fresh herbs or a dollop of creamy mashed potatoes for an extra comforting meal.
Gluten-Free Pasta with Garlic and Olive Oil
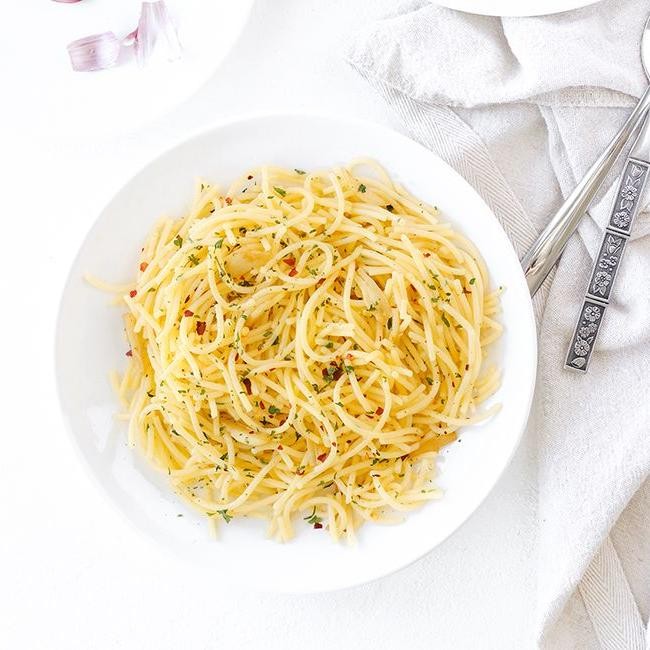
Pasta nights are my favorite, especially when I can whip up something both delicious and gluten-free without sacrificing flavor. This Gluten-Free Pasta with Garlic and Olive Oil is a testament to simplicity meeting taste, and it’s become a staple in my kitchen for those busy weeknights.
Ingredients
- 8 oz gluten-free pasta (I love the texture of brown rice pasta for this dish)
- 1/4 cup extra virgin olive oil (my go-to for its fruity notes)
- 4 garlic cloves, thinly sliced (the thinner, the better for even cooking)
- 1/2 tsp red pepper flakes (adjust based on your heat preference)
- Salt, to taste (I always use sea salt for its clean flavor)
- Fresh parsley, chopped (for garnish, and I’m generous with it)
Instructions
- Bring a large pot of salted water to a boil over high heat. Tip: Salting the water well is key to flavorful pasta.
- Add the gluten-free pasta to the boiling water and cook according to package instructions, usually about 8-10 minutes, until al dente. Tip: Stir occasionally to prevent sticking.
- While the pasta cooks, heat the olive oil in a large skillet over medium heat. Add the sliced garlic and red pepper flakes, cooking until the garlic is golden, about 2 minutes. Tip: Watch the garlic closely to avoid burning.
- Drain the pasta, reserving 1/2 cup of the pasta water.
- Add the drained pasta to the skillet with the garlic oil, tossing to coat. If the pasta seems dry, add a splash of the reserved pasta water to loosen it.
- Season with salt to taste and toss again.
- Garnish with chopped parsley before serving.
Delightfully simple, this dish boasts a perfect balance of garlicky goodness with a hint of heat. The gluten-free pasta holds up beautifully, offering a satisfying chew. Serve it with a sprinkle of vegan parmesan for an extra layer of flavor or alongside a crisp green salad for a complete meal.
Shrimp and Avocado Salad with Lime Dressing
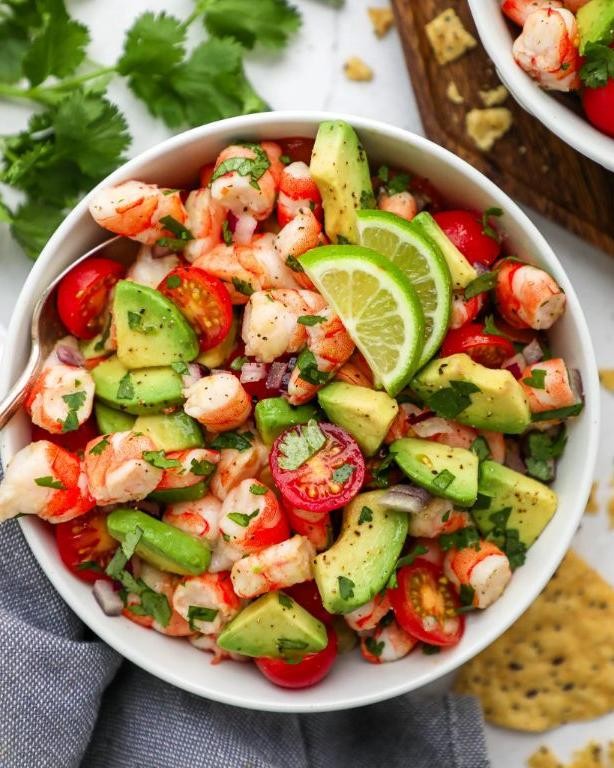
Vibrant flavors and fresh ingredients come together in this Shrimp and Avocado Salad with Lime Dressing, a dish that’s as pleasing to the eye as it is to the palate. I remember the first time I made this salad; it was a hot summer day, and I was craving something light yet satisfying. This recipe was the perfect answer, and it’s been a staple in my kitchen ever since.
Ingredients
- 1 lb large shrimp, peeled and deveined (I like to buy them fresh from the local fish market for the best flavor)
- 2 ripe avocados, diced (wait until they’re just soft to the touch for perfect creaminess)
- 1/4 cup extra virgin olive oil (my go-to for dressings because of its fruity notes)
- 2 tbsp fresh lime juice (about 1 large lime, and yes, fresh makes all the difference)
- 1/4 cup chopped cilantro (if you’re not a fan, parsley works too, but cilantro adds a nice zing)
- Salt to taste (I use sea salt for a cleaner taste)
Instructions
- In a large bowl, toss the shrimp with 1 tbsp of olive oil and a pinch of salt until evenly coated.
- Heat a skillet over medium-high heat (about 375°F) and cook the shrimp for 2-3 minutes per side, until they turn pink and opaque. Tip: Don’t overcrowd the skillet to ensure each shrimp gets a nice sear.
- Remove the shrimp from the heat and let them cool to room temperature. This prevents the avocados from getting too mushy when mixed.
- In a small bowl, whisk together the remaining olive oil, lime juice, and a pinch of salt to create the dressing. Tip: Taste as you go to balance the acidity and oil to your liking.
- In a large serving bowl, gently combine the cooled shrimp, diced avocados, and chopped cilantro.
- Drizzle the lime dressing over the salad and toss lightly to coat. Tip: Use a folding motion to keep the avocados intact for a prettier presentation.
The creamy avocados and tender shrimp are a match made in heaven, with the lime dressing adding a bright, tangy contrast. Serve this salad over a bed of mixed greens for an extra crunch, or enjoy it as is for a light, refreshing meal.
Conclusion
Exploring these 17 delicious gluten-free lunch recipes opens up a world of healthy, flavorful options for any home cook. Whether you’re gluten-sensitive or simply looking to mix up your meal routine, there’s something here for everyone. We’d love to hear which recipes become your favorites—drop us a comment below! And don’t forget to share the love by pinning this article on Pinterest for others to discover. Happy cooking!