Mmm… nothing says ‘I love you’ quite like a homemade dessert shared between two. Whether you’re celebrating a special occasion or simply indulging in a sweet moment together, our collection of 16 Delicious Dessert Recipes for Two Sweethearts is sure to inspire. From decadent chocolates to fruity delights, these easy-to-make treats are perfect for creating memories. Ready to whisk up some romance? Let’s dive into these irresistible recipes!
Chocolate Lava Cakes for Two
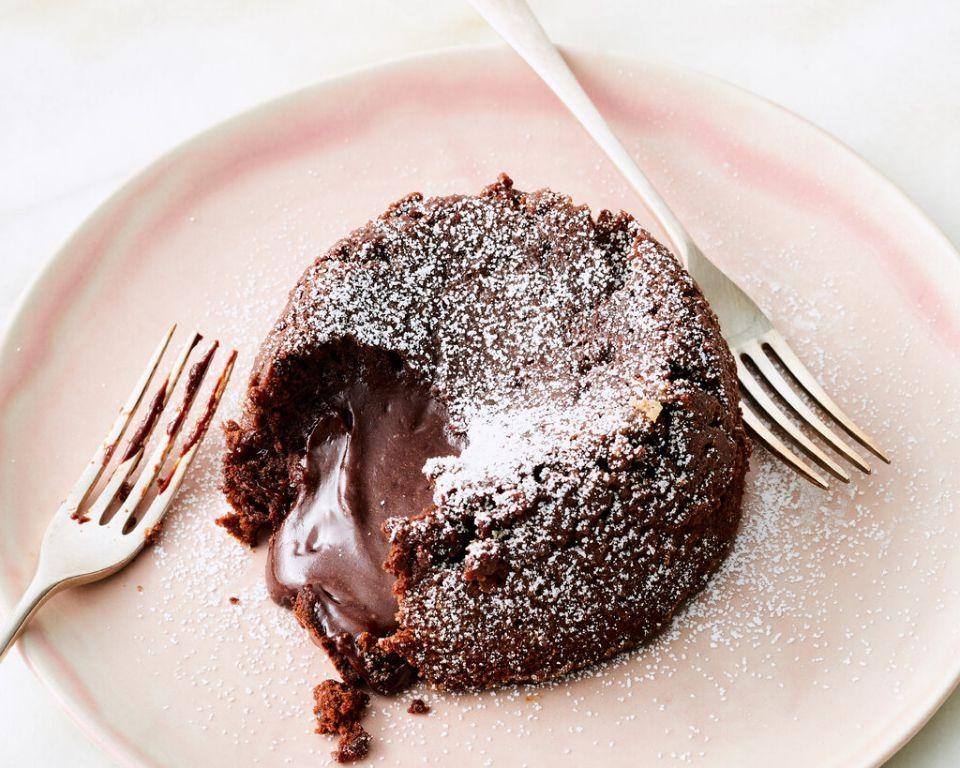
Creating a decadent Chocolate Lava Cake for two is simpler than you might think, perfect for a cozy evening in. Carefully follow these steps to achieve a dessert that’s rich on the inside with a perfectly baked exterior.
Ingredients
- For the cakes:
- 1/2 cup semi-sweet chocolate chips
- 1/4 cup unsalted butter
- 1/4 cup granulated sugar
- 1 large egg
- 1 large egg yolk
- 1/2 teaspoon vanilla extract
- 1/8 teaspoon salt
- 2 tablespoons all-purpose flour
Instructions
- Preheat your oven to 425°F (220°C). Grease two 6-ounce ramekins with butter and dust with flour to prevent sticking.
- In a microwave-safe bowl, combine the chocolate chips and butter. Microwave in 30-second intervals, stirring after each, until fully melted and smooth.
- Whisk in the sugar until well combined, then add the egg, egg yolk, vanilla extract, and salt, mixing thoroughly after each addition.
- Gently fold in the flour until just combined, being careful not to overmix to keep the cakes light.
- Divide the batter evenly between the prepared ramekins. Place them on a baking sheet for easier handling.
- Bake for 12-14 minutes, or until the edges are firm but the center is soft. Tip: The cakes should jiggle slightly when shaken.
- Let the cakes cool for 1 minute, then run a knife around the edges to loosen. Invert onto plates and serve immediately.
Rich and molten, these Chocolate Lava Cakes offer a delightful contrast between the warm, gooey center and the tender cake exterior. Serve with a scoop of vanilla ice cream or a dusting of powdered sugar for an extra special touch.
Strawberry Cheesecake in a Jar
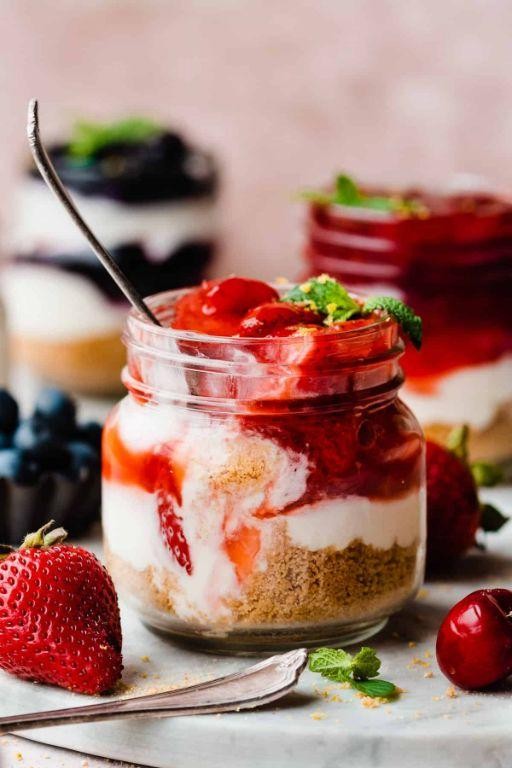
Whipping up a delightful dessert doesn’t have to be complicated, especially when it comes to making Strawberry Cheesecake in a Jar. This recipe simplifies the classic cheesecake into individual servings, perfect for beginners and seasoned cooks alike.
Ingredients
- For the crust:
- 1 cup graham cracker crumbs
- 3 tbsp melted butter
- 1 tbsp sugar
- For the filling:
- 8 oz cream cheese, softened
- 1/4 cup sugar
- 1 tsp vanilla extract
- 1/2 cup heavy cream
- For the topping:
- 1 cup fresh strawberries, sliced
- 2 tbsp sugar
Instructions
- In a medium bowl, mix graham cracker crumbs, melted butter, and 1 tbsp sugar until well combined. Press 2 tbsp of the mixture into the bottom of each jar to form the crust.
- Using an electric mixer, beat the softened cream cheese, 1/4 cup sugar, and vanilla extract on medium speed until smooth, about 2 minutes. Tip: Ensure the cream cheese is at room temperature to avoid lumps.
- In a separate bowl, whip the heavy cream until stiff peaks form, then gently fold into the cream cheese mixture until fully incorporated.
- Divide the filling evenly among the jars, smoothing the top with a spoon. Chill in the refrigerator for at least 2 hours to set. Tip: For a firmer set, chill overnight.
- While the cheesecake chills, combine sliced strawberries and 2 tbsp sugar in a small bowl. Let sit for 30 minutes to macerate, stirring occasionally.
- Top each chilled cheesecake with the macerated strawberries before serving. Tip: For an extra touch, garnish with a mint leaf or a drizzle of chocolate sauce.
Offering a creamy texture with a crunchy crust and fresh strawberry topping, these individual cheesecakes are as pleasing to the eye as they are to the palate. Serve them at your next gathering for a fuss-free dessert that’s sure to impress.
Mini Apple Pies
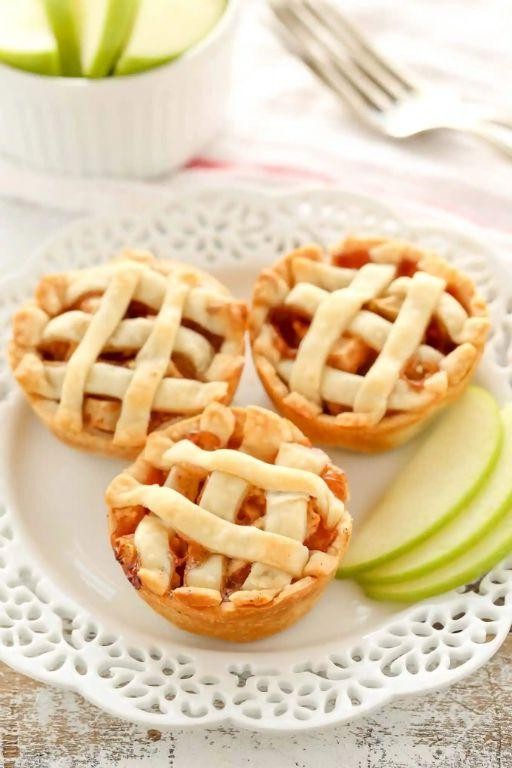
Whipping up a batch of Mini Apple Pies is a delightful way to bring the cozy flavors of fall into your kitchen any time of year. These bite-sized treats are perfect for sharing, offering a buttery crust and a sweet, cinnamon-spiced apple filling in every bite.
Ingredients
- For the crust:
- 2 cups all-purpose flour
- 1/2 tsp salt
- 2/3 cup unsalted butter, chilled and diced
- 4-6 tbsp ice water
- For the filling:
- 2 medium apples, peeled and finely diced
- 1/4 cup granulated sugar
- 1 tsp ground cinnamon
- 1 tbsp lemon juice
Instructions
- Preheat your oven to 375°F (190°C) and lightly grease a mini muffin tin.
- In a large bowl, whisk together the flour and salt for the crust. Tip: Keeping your butter cold ensures a flaky crust.
- Add the diced butter to the flour mixture. Use your fingers or a pastry cutter to blend until the mixture resembles coarse crumbs.
- Gradually add ice water, one tablespoon at a time, stirring until the dough just comes together. Tip: Overworking the dough can make it tough.
- Roll out the dough on a lightly floured surface to about 1/8-inch thickness. Use a round cutter to cut out circles slightly larger than your muffin tin cups.
- Press each dough circle into a muffin cup, ensuring it covers the bottom and sides.
- In another bowl, mix the diced apples, sugar, cinnamon, and lemon juice for the filling. Tip: Lemon juice prevents the apples from browning and adds a bright flavor.
- Spoon the apple mixture into each dough-lined cup, filling just below the rim.
- Bake for 20-25 minutes, or until the crust is golden and the filling is bubbly.
Delightfully crisp on the outside with a tender, spiced apple center, these Mini Apple Pies are a hit at any gathering. Serve them warm with a scoop of vanilla ice cream for an extra special treat.
Two-Layer Red Velvet Cupcakes
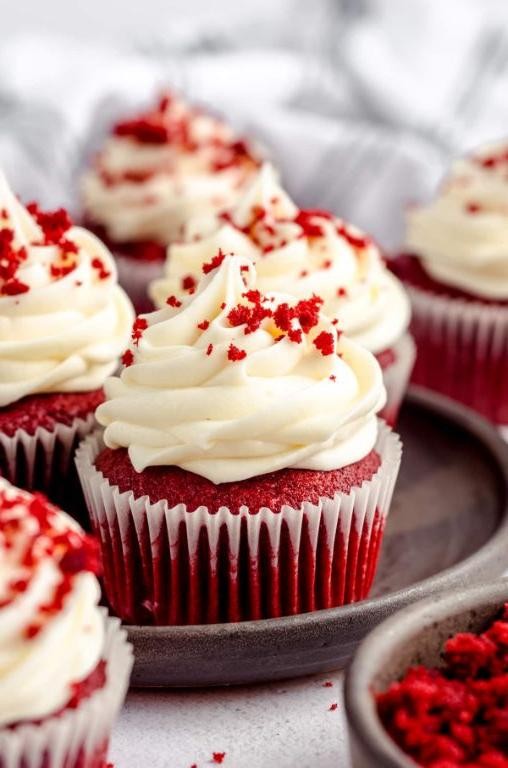
Here’s how to create the perfect Two-Layer Red Velvet Cupcakes, a delightful treat that combines the rich flavors of cocoa and buttermilk with a creamy frosting. Follow these steps carefully to ensure your cupcakes are as delicious as they are beautiful.
Ingredients
- For the cupcakes:
- 2 1/2 cups all-purpose flour
- 1 1/2 cups granulated sugar
- 1 tsp baking soda
- 1 tsp salt
- 1 tbsp cocoa powder
- 1 1/2 cups vegetable oil
- 1 cup buttermilk, room temperature
- 2 large eggs, room temperature
- 2 tbsp red food coloring
- 1 tsp vanilla extract
- 1 tsp white vinegar
- For the frosting:
- 8 oz cream cheese, softened
- 1/2 cup unsalted butter, softened
- 4 cups powdered sugar
- 1 tsp vanilla extract
Instructions
- Preheat your oven to 350°F (175°C) and line a muffin tin with cupcake liners.
- In a large bowl, whisk together the flour, sugar, baking soda, salt, and cocoa powder until well combined.
- Add the vegetable oil, buttermilk, eggs, red food coloring, vanilla extract, and white vinegar to the dry ingredients. Mix on medium speed until smooth, about 2 minutes. Tip: Scrape down the sides of the bowl to ensure all ingredients are fully incorporated.
- Fill each cupcake liner 2/3 full with batter. Tip: Use an ice cream scoop for evenly sized cupcakes.
- Bake for 20-22 minutes, or until a toothpick inserted into the center comes out clean. Tip: Avoid opening the oven door too early to prevent the cupcakes from sinking.
- Allow the cupcakes to cool in the pan for 5 minutes, then transfer to a wire rack to cool completely.
- For the frosting, beat the cream cheese and butter together on high speed until smooth, about 2 minutes.
- Gradually add the powdered sugar, one cup at a time, beating well after each addition. Stir in the vanilla extract.
- Once the cupcakes are completely cool, frost them generously with the cream cheese frosting.
These Two-Layer Red Velvet Cupcakes boast a moist, tender crumb and a tangy cream cheese frosting that perfectly balances the sweetness. For an extra touch, garnish with red velvet crumbs or a sprinkle of cocoa powder before serving.
Banana Split for Two
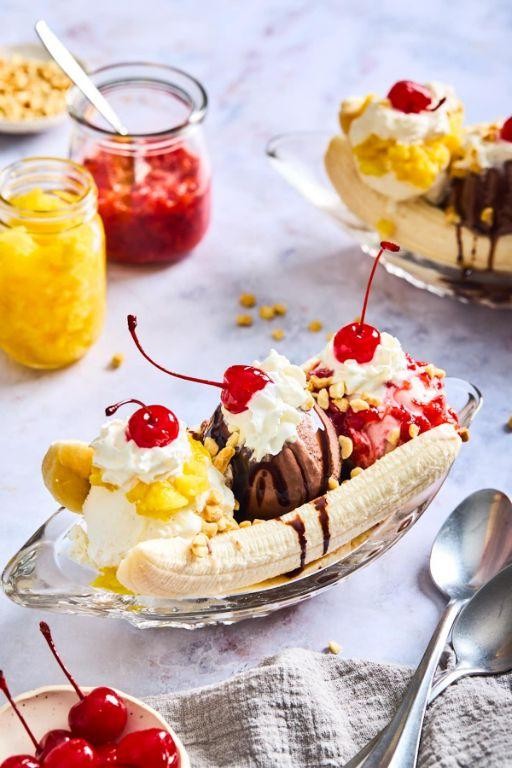
This delightful dessert is perfect for sharing with someone special. Today, we’re making a classic Banana Split for Two, a timeless treat that combines the sweetness of bananas with the richness of ice cream and toppings.
Ingredients
- For the base:
- 2 ripe bananas
- 2 scoops vanilla ice cream
- 2 scoops chocolate ice cream
- For the toppings:
- 1/4 cup chocolate syrup
- 1/4 cup strawberry syrup
- 1/4 cup whipped cream
- 2 maraschino cherries
- 2 tbsp chopped nuts
Instructions
- Peel the bananas and slice them lengthwise. Arrange the banana halves in two serving dishes.
- Place one scoop of vanilla ice cream and one scoop of chocolate ice cream between the banana halves in each dish.
- Drizzle 2 tablespoons of chocolate syrup and 2 tablespoons of strawberry syrup over the ice cream in each dish.
- Top each banana split with 2 tablespoons of whipped cream.
- Garnish each with a maraschino cherry and sprinkle 1 tablespoon of chopped nuts over the top.
- Serve immediately with spoons and enjoy the creamy, fruity, and nutty flavors melding together perfectly.
The combination of cold ice cream, warm syrups, and fresh bananas creates a delightful contrast in temperatures and textures. For an extra touch, serve with a side of wafer cookies or a drizzle of caramel sauce.
Molten Caramel Chocolate Skillets
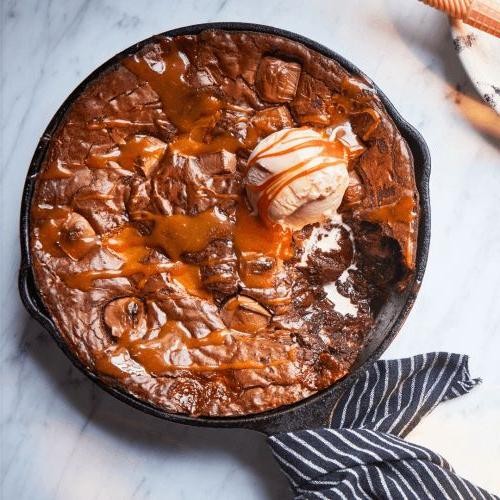
Creating a dessert that combines the gooey richness of caramel with the deep flavor of chocolate is simpler than you might think. Let’s dive into making Molten Caramel Chocolate Skillets, a treat that’s sure to impress.
Ingredients
- For the chocolate batter:
- 1 cup all-purpose flour
- 1/2 cup granulated sugar
- 1/4 cup unsweetened cocoa powder
- 1/2 tsp baking powder
- 1/4 tsp salt
- 1/2 cup milk
- 1/4 cup melted butter
- 1 tsp vanilla extract
- For the caramel center:
- 1/2 cup caramel sauce
Instructions
- Preheat your oven to 350°F (175°C) and lightly grease a small cast-iron skillet or baking dish.
- In a medium bowl, whisk together the flour, sugar, cocoa powder, baking powder, and salt until well combined.
- Add the milk, melted butter, and vanilla extract to the dry ingredients. Stir until the batter is smooth and free of lumps.
- Pour half of the chocolate batter into the prepared skillet, spreading it evenly with a spatula.
- Dollop the caramel sauce over the batter in the skillet, then cover with the remaining chocolate batter.
- Bake for 20-25 minutes, or until the edges are set but the center is still slightly soft. A toothpick inserted into the edge should come out clean, but the center should be gooey.
- Let the skillet cool for 5 minutes before serving. This allows the caramel to set slightly, making it easier to serve.
Lightly dust the top with powdered sugar or serve with a scoop of vanilla ice cream for an extra indulgent treat. The contrast between the warm, molten caramel center and the rich chocolate exterior is simply irresistible.
Peanut Butter Chocolate Chip Cookies for Two
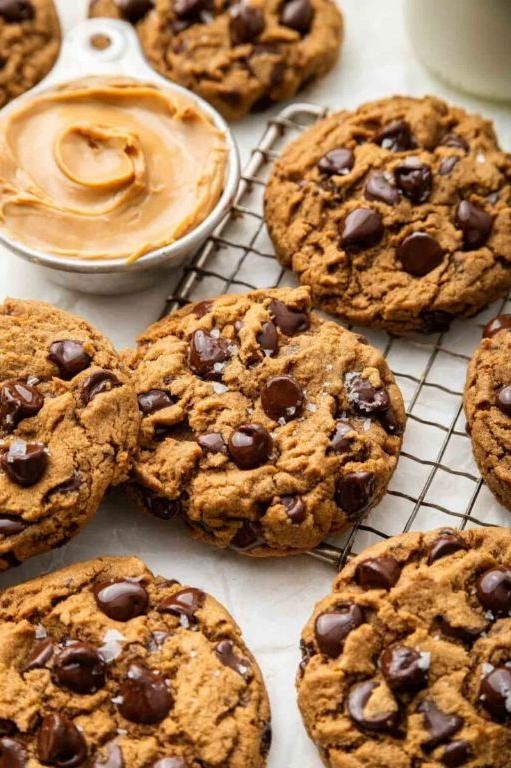
Kneading together the perfect blend of sweet and savory, these Peanut Butter Chocolate Chip Cookies for Two are a delightful treat that’s just the right size for sharing. Let’s dive into creating these delicious cookies with a method that ensures success every time.
Ingredients
- For the dough:
- 1/4 cup creamy peanut butter
- 2 tbsp unsalted butter, softened
- 3 tbsp granulated sugar
- 2 tbsp packed light brown sugar
- 1 large egg yolk
- 1/2 tsp vanilla extract
- 1/4 tsp baking soda
- 1/4 cup all-purpose flour
- 2 tbsp mini chocolate chips
Instructions
- Preheat your oven to 350°F (175°C) and line a baking sheet with parchment paper.
- In a medium bowl, cream together the peanut butter, unsalted butter, granulated sugar, and light brown sugar until smooth. Tip: Ensure the butter is softened to room temperature for easier mixing.
- Beat in the egg yolk and vanilla extract until fully incorporated.
- Stir in the baking soda, then gently fold in the all-purpose flour until just combined. Tip: Overmixing the flour can lead to tough cookies, so mix until you no longer see streaks of flour.
- Fold in the mini chocolate chips, distributing them evenly throughout the dough.
- Divide the dough into two equal portions and place them on the prepared baking sheet, spacing them about 2 inches apart. Flatten each slightly with the back of a spoon. Tip: For uniformly shaped cookies, use a cookie scoop or your hands to form the dough into balls before flattening.
- Bake for 10-12 minutes, or until the edges are lightly golden but the centers are still soft.
- Allow the cookies to cool on the baking sheet for 5 minutes before transferring to a wire rack to cool completely.
Ultimate in comfort, these cookies boast a soft, chewy texture with a perfect balance of peanut butter richness and melty chocolate chips. Serve them warm with a glass of cold milk for an indulgent treat, or pack them as a sweet surprise in a lunchbox.
Vanilla Bean Panna Cotta
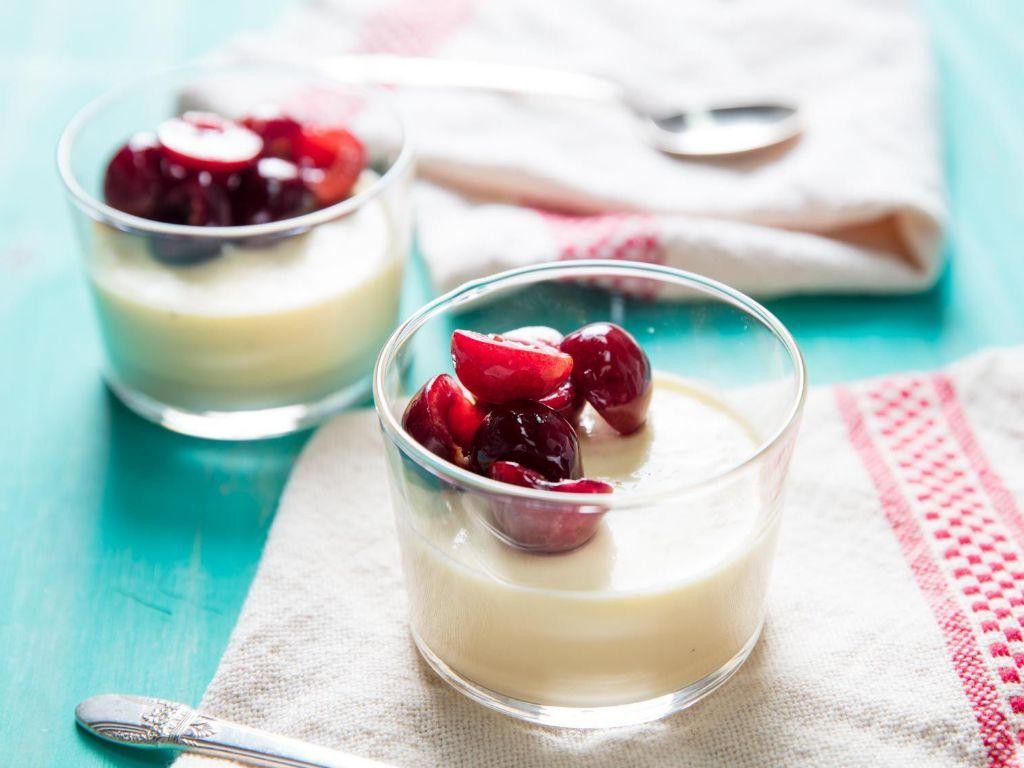
Just when you thought desserts couldn’t get any more elegant, vanilla bean panna cotta comes along to prove you wrong. This silky, creamy treat is surprisingly simple to make, requiring just a few ingredients and a bit of patience as it sets to perfection.
Ingredients
- For the panna cotta:
- 2 cups heavy cream
- 1/2 cup whole milk
- 1/2 cup granulated sugar
- 1 vanilla bean, split and seeds scraped
- 2 1/4 tsp unflavored gelatin
- 3 tbsp cold water
Instructions
- In a small bowl, sprinkle the gelatin over the cold water and let it bloom for 5 minutes.
- In a medium saucepan over medium heat, combine the heavy cream, milk, sugar, and vanilla bean seeds. Heat the mixture until it’s warm and the sugar has dissolved, about 5 minutes, stirring occasionally.
- Remove the saucepan from the heat and whisk in the bloomed gelatin until completely dissolved.
- Strain the mixture through a fine-mesh sieve into a large measuring cup to remove any undissolved gelatin bits or vanilla bean pod pieces.
- Divide the mixture evenly among 4 ramekins or glasses. Cover with plastic wrap and refrigerate for at least 4 hours, or until set.
- To serve, run a knife around the edge of each panna cotta and invert onto a plate, or serve directly in the glasses.
Lusciously smooth with a delicate vanilla aroma, this panna cotta is a dreamy dessert that’s as versatile as it is delicious. Try topping it with fresh berries or a drizzle of caramel for an extra touch of indulgence.
Lemon Blueberry Parfaits
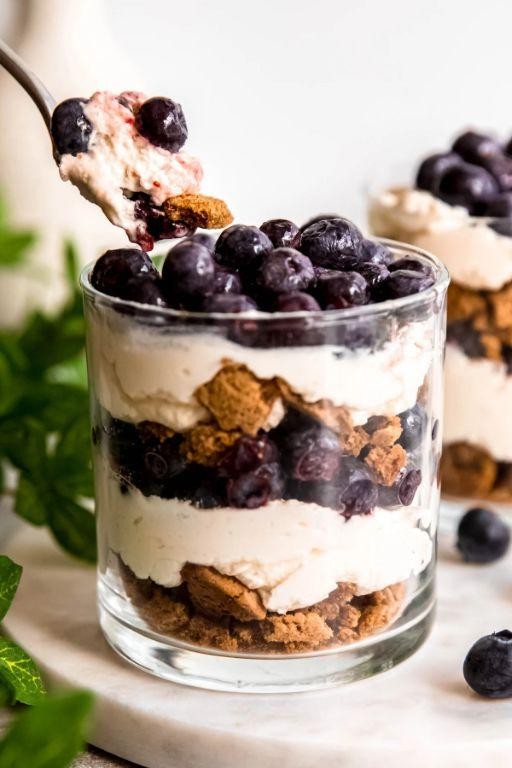
TThis delightful Lemon Blueberry Parfait is a refreshing treat that combines the tangy zest of lemon with the sweet burst of blueberries, layered beautifully for a visually appealing dessert. Perfect for beginners, this recipe is straightforward and rewarding.
Ingredients
- For the lemon cream:
- 1 cup heavy cream
- 1/2 cup powdered sugar
- 2 tbsp lemon zest
- 1/4 cup lemon juice
- For the blueberry sauce:
- 1 cup blueberries
- 1/4 cup sugar
- 1 tbsp water
- For assembly:
- 1 cup granola
- Fresh blueberries for garnish
Instructions
- In a large bowl, whip the heavy cream until soft peaks form, about 3 minutes on medium speed.
- Gradually add the powdered sugar, lemon zest, and lemon juice to the whipped cream, folding gently to combine. Tip: Ensure the cream is cold for best whipping results.
- In a small saucepan, combine blueberries, sugar, and water. Cook over medium heat until the blueberries burst and the sauce thickens, about 5 minutes. Tip: Stir occasionally to prevent sticking.
- Remove the blueberry sauce from heat and let it cool to room temperature, about 10 minutes.
- To assemble, layer granola, lemon cream, and blueberry sauce in serving glasses. Repeat the layers until the glasses are filled. Tip: Use a piping bag for the lemon cream for neat layers.
- Garnish the top with fresh blueberries before serving.
MThese Lemon Blueberry Parfaits offer a delightful contrast of textures, from the crunchy granola to the smooth lemon cream and juicy blueberries. Serve them chilled for a refreshing summer dessert, or as a elegant brunch option.
Dark Chocolate Mousse
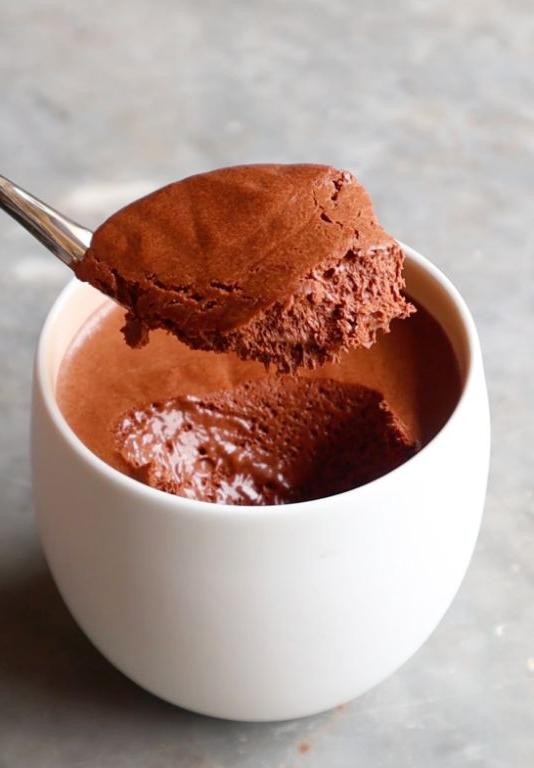
Begin your culinary journey with this exquisite Dark Chocolate Mousse, a dessert that combines the richness of dark chocolate with the lightness of whipped cream to create a perfectly balanced treat. Follow these steps carefully to ensure a smooth, velvety mousse every time.
Ingredients
- For the chocolate mixture:
- 8 oz high-quality dark chocolate, chopped
- 1/2 cup water
- 2 tbsp granulated sugar
- For the whipped cream:
- 1 cup heavy cream, cold
- 1 tbsp powdered sugar
- For the egg whites:
- 3 large egg whites
- 1/4 tsp cream of tartar
Instructions
- Place the chopped dark chocolate, water, and granulated sugar in a heatproof bowl. Set over a pot of simmering water (double boiler) and stir until the chocolate is completely melted and the mixture is smooth. Remove from heat and let cool slightly.
- In a separate bowl, whip the heavy cream and powdered sugar until soft peaks form. Be careful not to over-whip, as the cream can become grainy.
- In another clean, dry bowl, beat the egg whites with the cream of tartar until stiff peaks form. This will give your mousse its light, airy texture.
- Gently fold the whipped cream into the cooled chocolate mixture until no white streaks remain. Then, carefully fold in the beaten egg whites, trying to keep as much air in the mixture as possible.
- Divide the mousse among serving glasses and refrigerate for at least 4 hours, or until set. For best results, cover with plastic wrap to prevent a skin from forming on the surface.
Rich in flavor yet light as air, this Dark Chocolate Mousse is a testament to the magic of simple ingredients coming together. Serve it with a sprinkle of cocoa powder or fresh berries for an elegant finish.
Raspberry White Chocolate Fondue
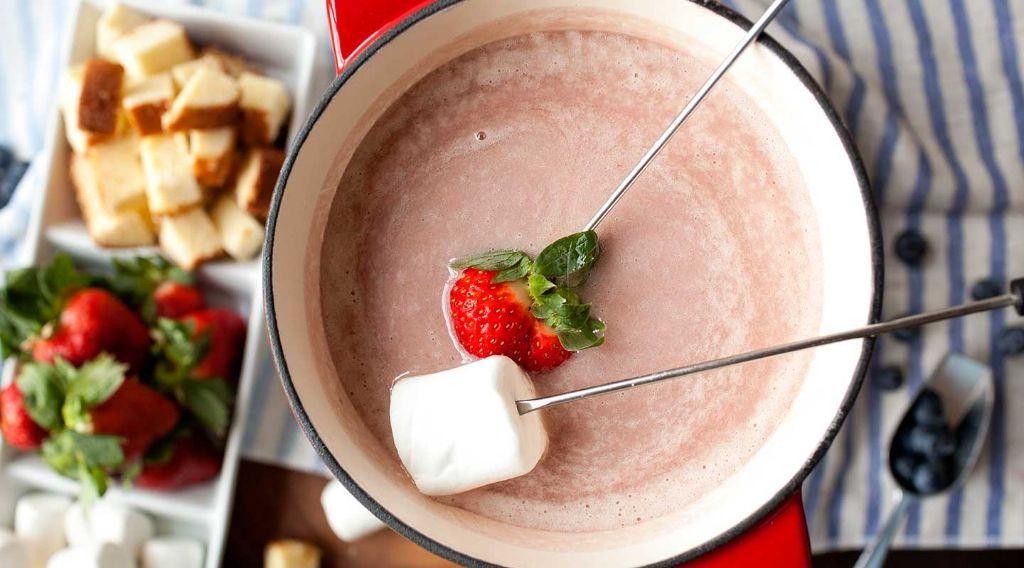
Whisking together the perfect blend of sweet and tart, this Raspberry White Chocolate Fondue is a dreamy dessert that’s surprisingly simple to make. Whether you’re hosting a cozy gathering or treating yourself, this fondue promises a delightful experience with every dip.
Ingredients
- For the fondue:
- 1 cup heavy cream
- 12 oz white chocolate, finely chopped
- 1/2 cup raspberry jam
- 1 tsp vanilla extract
- For serving:
- Assorted fruits (strawberries, bananas, apples)
- Pound cake, cut into cubes
- Marshmallows
Instructions
- In a medium saucepan, heat the heavy cream over medium heat until it begins to simmer, about 5 minutes. Tip: Stir occasionally to prevent a skin from forming on the surface.
- Reduce the heat to low and add the finely chopped white chocolate. Stir continuously until the chocolate is completely melted and the mixture is smooth, about 3 minutes.
- Add the raspberry jam and vanilla extract to the saucepan. Stir until the jam is fully incorporated and the fondue has a uniform pink hue, about 2 minutes. Tip: For a smoother texture, you can strain the raspberry jam before adding it to remove any seeds.
- Transfer the fondue to a fondue pot or a serving bowl. Keep warm over a low flame or in a warm water bath to maintain the perfect dipping consistency.
- Arrange the assorted fruits, pound cake cubes, and marshmallows around the fondue pot for dipping. Tip: For an extra touch, lightly toast the marshmallows before serving for a smoky flavor contrast.
Velvety and rich, this fondue boasts a luxurious texture that clings beautifully to every dipper. The bright raspberry cuts through the sweetness of the white chocolate, creating a balanced flavor profile. Serve it with a side of sparkling wine to elevate the indulgence.
Pumpkin Spice Crepes
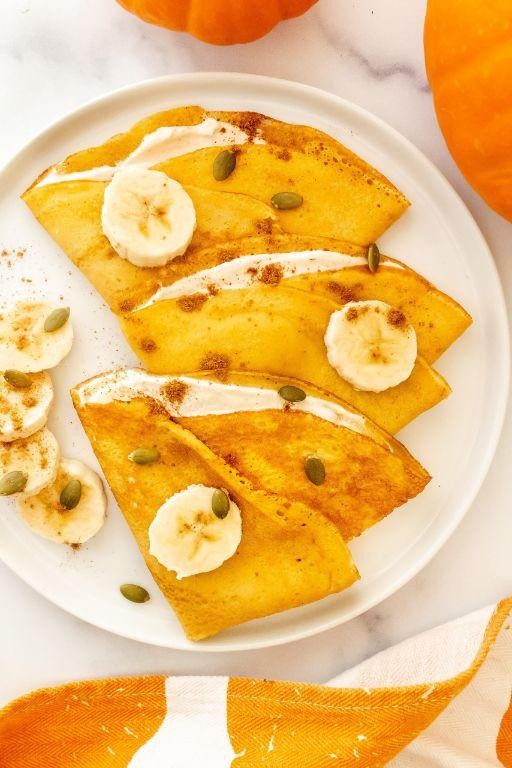
Delight in the warm, aromatic flavors of fall with these pumpkin spice crepes, a perfect blend of seasonal spices and smooth, tender crepes. Designed for beginners, this recipe walks you through each step to ensure your crepes turn out perfectly thin and flavorful every time.
Ingredients
- For the batter:
- 1 cup all-purpose flour
- 2 tbsp granulated sugar
- 1 tsp pumpkin pie spice
- 1/4 tsp salt
- 1 1/4 cups whole milk
- 2 large eggs
- 1 tbsp unsalted butter, melted
- 1/2 cup pumpkin puree
- For serving:
- Maple syrup, to taste
- Whipped cream, optional
Instructions
- In a large mixing bowl, whisk together the flour, sugar, pumpkin pie spice, and salt until well combined.
- In another bowl, beat the milk, eggs, melted butter, and pumpkin puree until smooth.
- Gradually add the wet ingredients to the dry ingredients, whisking continuously to avoid lumps. Let the batter rest for 10 minutes to allow the flour to hydrate.
- Heat a non-stick skillet over medium heat (350°F) and lightly grease it with butter or cooking spray.
- Pour 1/4 cup of batter into the center of the skillet, tilting it in a circular motion to spread the batter evenly into a thin layer.
- Cook the crepe for about 2 minutes, or until the edges start to lift and the bottom is lightly golden. Flip carefully and cook for another 1-2 minutes on the other side.
- Repeat with the remaining batter, stacking the cooked crepes on a plate and covering them with a towel to keep warm.
- Serve the crepes warm, drizzled with maple syrup and topped with whipped cream if desired.
Enjoy the delicate texture and rich, spiced flavor of these pumpkin spice crepes, perfect for a cozy breakfast or a festive dessert. For an extra touch, sprinkle with additional pumpkin pie spice or top with toasted pecans for crunch.
Cinnamon Sugar Donut Holes
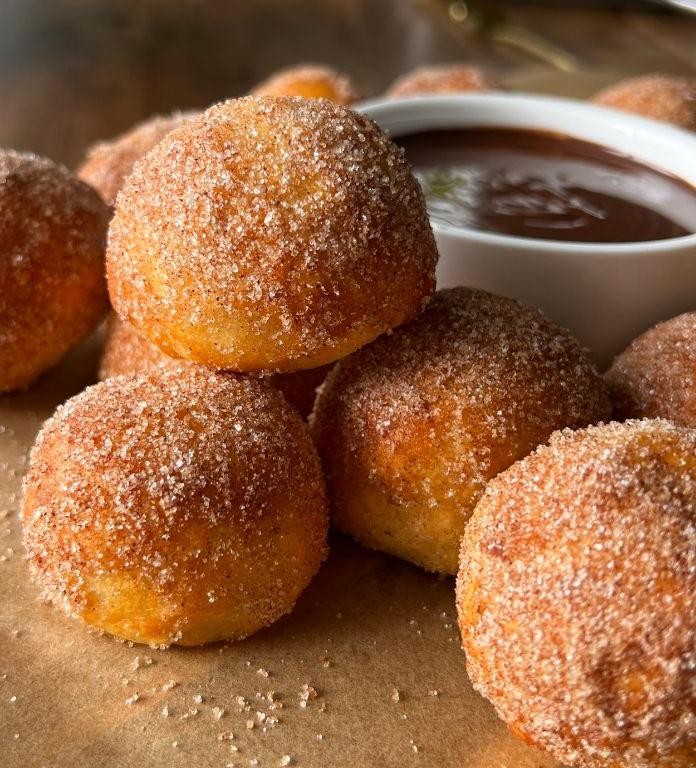
Great for any occasion, these Cinnamon Sugar Donut Holes are a delightful treat that combines the warmth of cinnamon with the sweetness of sugar in a bite-sized package. Perfect for beginners, this recipe guides you through each step to ensure delicious results every time.
Ingredients
- For the dough:
- 2 cups all-purpose flour
- 1/2 cup granulated sugar
- 1 tbsp baking powder
- 1/2 tsp salt
- 1/2 cup milk
- 1 large egg
- 2 tbsp unsalted butter, melted
- 1 tsp vanilla extract
- For the coating:
- 1/2 cup granulated sugar
- 1 tbsp ground cinnamon
- 4 tbsp unsalted butter, melted
Instructions
- Preheat your oven to 350°F (175°C) and lightly grease a mini muffin tin.
- In a large bowl, whisk together the flour, sugar, baking powder, and salt.
- In another bowl, mix the milk, egg, melted butter, and vanilla extract until well combined.
- Pour the wet ingredients into the dry ingredients and stir until just combined; avoid overmixing to keep the dough tender.
- Spoon the dough into the prepared muffin tin, filling each cup about 2/3 full.
- Bake for 10-12 minutes, or until the donut holes are lightly golden and a toothpick inserted comes out clean.
- While the donut holes bake, mix the sugar and cinnamon in a small bowl for the coating.
- Once baked, let the donut holes cool for 2 minutes, then roll each in melted butter followed by the cinnamon sugar mixture.
- Serve warm for the best flavor and texture.
These Cinnamon Sugar Donut Holes boast a soft, fluffy interior with a crispy, sugary exterior. For an extra special touch, serve them with a side of warm caramel or chocolate dipping sauce.
Cherry Almond Galette
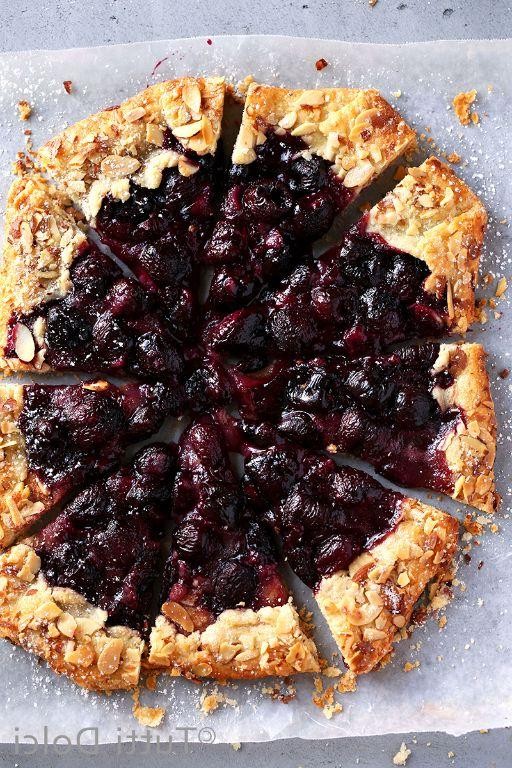
Unveiling the simplicity of rustic desserts, this Cherry Almond Galette combines the tartness of cherries with the nutty warmth of almonds, all wrapped in a flaky, buttery crust. Perfect for beginners, this recipe guides you through each step with precision, ensuring a delightful outcome every time.
Ingredients
- For the crust:
- 1 1/4 cups all-purpose flour
- 1/2 teaspoon salt
- 1/2 cup unsalted butter, chilled and diced
- 4 tablespoons ice water
- For the filling:
- 2 cups fresh cherries, pitted and halved
- 1/4 cup granulated sugar
- 1 tablespoon cornstarch
- 1/2 teaspoon almond extract
- For the topping:
- 1/4 cup sliced almonds
- 1 tablespoon milk
- 1 tablespoon granulated sugar
Instructions
- In a large bowl, whisk together 1 1/4 cups all-purpose flour and 1/2 teaspoon salt.
- Add 1/2 cup diced unsalted butter to the flour mixture. Use your fingers to rub the butter into the flour until the mixture resembles coarse crumbs.
- Gradually add 4 tablespoons ice water, one tablespoon at a time, mixing until the dough just comes together. Tip: Avoid overworking the dough to keep it tender.
- Shape the dough into a disk, wrap in plastic, and refrigerate for at least 30 minutes.
- Preheat your oven to 375°F (190°C) and line a baking sheet with parchment paper.
- In another bowl, combine 2 cups cherries, 1/4 cup sugar, 1 tablespoon cornstarch, and 1/2 teaspoon almond extract. Set aside.
- On a floured surface, roll the chilled dough into a 12-inch circle. Transfer to the prepared baking sheet.
- Spoon the cherry mixture onto the center of the dough, leaving a 2-inch border. Fold the edges over the filling, pleating as you go.
- Brush the crust with 1 tablespoon milk and sprinkle with 1 tablespoon sugar and 1/4 cup sliced almonds. Tip: Brushing with milk gives the crust a golden finish.
- Bake for 35-40 minutes, or until the crust is golden and the filling is bubbly. Tip: Place a baking sheet underneath to catch any drips.
Rich in flavor and texture, this galette boasts a crisp crust with a juicy, almond-infused cherry center. Serve it warm with a scoop of vanilla ice cream for an irresistible contrast of temperatures and tastes.
Salted Caramel Brownies
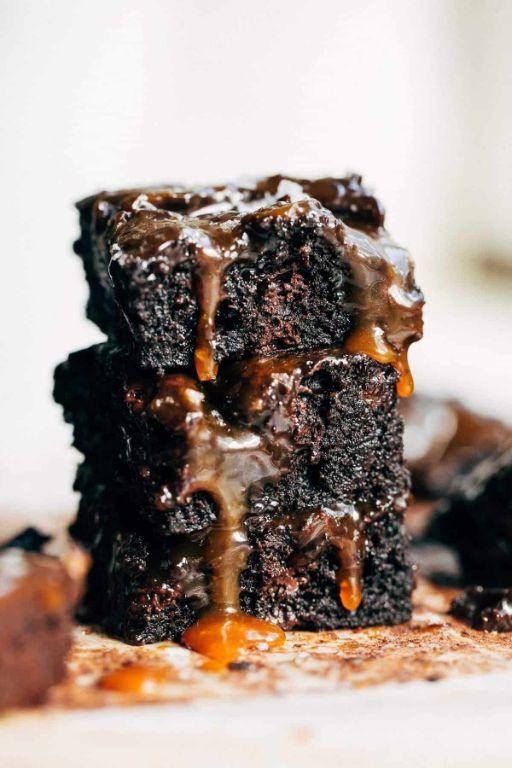
Whipping up a batch of salted caramel brownies is a delightful way to indulge in a perfect balance of sweet and salty flavors. This guide will walk you through each step to ensure your brownies come out fudgy, rich, and swirled with luscious caramel.
Ingredients
- For the brownie batter:
- 1 cup unsalted butter, melted
- 2 cups granulated sugar
- 4 large eggs
- 1 tsp vanilla extract
- 1 cup all-purpose flour
- 1/2 cup cocoa powder
- 1/4 tsp salt
- For the salted caramel sauce:
- 1 cup granulated sugar
- 6 tbsp unsalted butter, cubed
- 1/2 cup heavy cream
- 1 tsp sea salt
Instructions
- Preheat your oven to 350°F (175°C) and line a 9×13 inch baking pan with parchment paper, leaving an overhang on the sides for easy removal.
- In a large bowl, whisk together the melted butter and sugar until well combined. Tip: Ensure the butter is slightly cooled to avoid cooking the eggs.
- Add the eggs one at a time, whisking well after each addition, then stir in the vanilla extract.
- Sift in the flour, cocoa powder, and salt, folding gently until just combined. Avoid overmixing to keep the brownies tender.
- Pour the batter into the prepared pan, spreading it evenly with a spatula.
- For the caramel sauce, heat the sugar in a medium saucepan over medium heat, stirring constantly until it melts and turns amber in color. Tip: Keep a close eye to prevent burning.
- Carefully whisk in the butter until melted, then slowly pour in the heavy cream, stirring continuously. Remove from heat and stir in the sea salt.
- Drizzle the caramel sauce over the brownie batter and use a knife to swirl it gently into the batter.
- Bake for 25-30 minutes, or until a toothpick inserted into the center comes out with a few moist crumbs. Tip: The brownies will continue to set as they cool.
- Allow the brownies to cool completely in the pan before lifting them out using the parchment overhang and cutting into squares.
Now these brownies boast a gooey center with a crackly top, enhanced by the rich, salty caramel swirls. Serve them slightly warmed with a scoop of vanilla ice cream for an extra decadent treat.
Mini Key Lime Pies
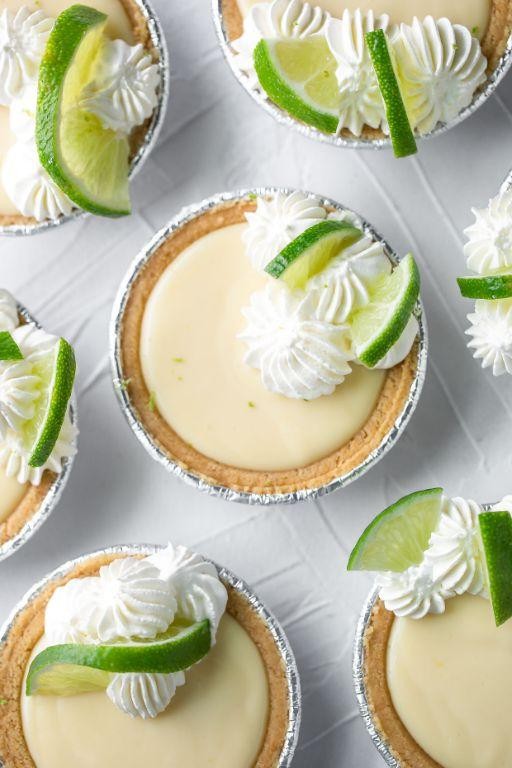
Zesty and refreshing, these Mini Key Lime Pies are the perfect bite-sized treat to brighten up any occasion. With a buttery graham cracker crust and a tangy lime filling, they’re surprisingly simple to make, even for beginners.
Ingredients
- For the crust:
- 1 1/2 cups graham cracker crumbs
- 1/4 cup granulated sugar
- 6 tbsp unsalted butter, melted
- For the filling:
- 1 can (14 oz) sweetened condensed milk
- 1/2 cup key lime juice
- 2 large egg yolks
Instructions
- Preheat your oven to 350°F (175°C) and line a muffin tin with paper liners.
- In a medium bowl, mix the graham cracker crumbs, sugar, and melted butter until well combined. Tip: The mixture should hold together when pressed.
- Press about 1 tablespoon of the crust mixture into the bottom of each muffin liner, using the back of a spoon to compact it firmly.
- Bake the crusts for 5 minutes, then remove from the oven and let cool slightly. Tip: This pre-baking helps prevent a soggy crust.
- In another bowl, whisk together the sweetened condensed milk, key lime juice, and egg yolks until smooth.
- Pour the filling over the crusts, filling each liner almost to the top.
- Bake for 15 minutes, or until the filling is set but still slightly jiggly in the center. Tip: Overbaking can cause the filling to crack.
- Let the pies cool at room temperature, then refrigerate for at least 2 hours before serving.
Airy yet rich, these Mini Key Lime Pies offer a delightful contrast between the crunchy crust and creamy filling. Serve them chilled with a dollop of whipped cream and a lime zest garnish for an extra touch of elegance.
Conclusion
You’ve just discovered a treasure trove of sweetness with our 16 Delicious Desserts Recipes for Two Sweethearts. Perfect for cozy nights in or celebrating love, these recipes promise to delight. We’d love to hear which one stole your heart—drop a comment below! And if you enjoyed this roundup, don’t forget to share the love on Pinterest. Happy baking!