Welcome to the most wonderful time of the year for your taste buds! Our roundup of 16 Delicious Best Christmas Recipes is your ticket to a festive feast that’ll dazzle your family and friends. From cozy comfort foods to show-stopping seasonal favorites, we’ve got everything you need to make your holiday meals unforgettable. So, grab your apron, and let’s dive into these merry culinary delights!
Roast Turkey with Herb Butter

Everyone knows that a roast turkey is the star of the show at any holiday table, but this herb butter version? It’s a game-changer. You’re going to love how the butter keeps the meat juicy and infuses it with flavor.
Ingredients
- 1 whole turkey (about 12-14 lbs)
- 1 cup of unsalted butter, softened
- a handful of fresh rosemary, chopped
- a handful of fresh thyme, chopped
- a couple of garlic cloves, minced
- a splash of olive oil
- salt and pepper, just enough to season
Instructions
- Preheat your oven to 325°F. Make sure it’s fully heated before the turkey goes in.
- In a bowl, mix the softened butter, rosemary, thyme, and garlic until it’s all combined. This is your herb butter.
- Pat the turkey dry with paper towels. This helps the skin get crispy.
- Gently loosen the skin over the turkey breast and thighs with your fingers. Be careful not to tear it.
- Spread half of the herb butter under the skin, directly on the meat. Rub the rest all over the outside of the turkey.
- Drizzle the turkey with olive oil and season generously with salt and pepper.
- Place the turkey on a rack in a roasting pan, breast side up. Tuck the wings under the body.
- Roast in the preheated oven for about 3 to 3.5 hours, or until a meat thermometer reads 165°F in the thickest part of the thigh.
- Let the turkey rest for at least 20 minutes before carving. This keeps all those delicious juices inside.
Golden and aromatic, this roast turkey is incredibly moist with a crispy, flavorful skin. Serve it with the pan juices drizzled over the top, or get creative by using leftovers in sandwiches or salads the next day.
Honey Glazed Ham with Pineapple
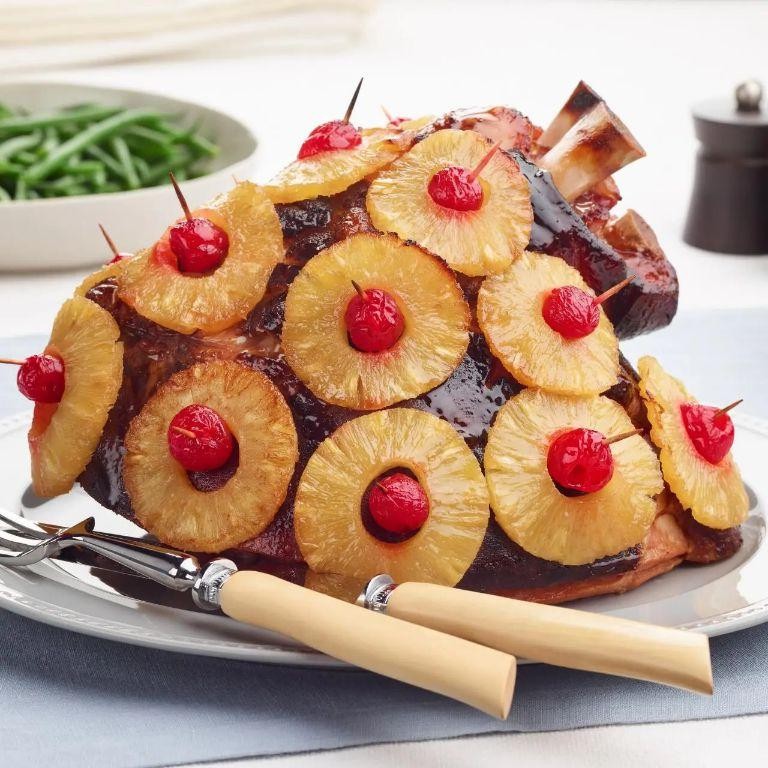
Just imagine pulling a honey glazed ham out of the oven, its sweet aroma mingling with the tangy pineapple topping. It’s the perfect centerpiece for your next gathering, and guess what? It’s easier to make than you think.
Ingredients
- 1 fully cooked ham (about 8-10 lbs)
- A cup of honey
- A couple of tablespoons of Dijon mustard
- A splash of apple cider vinegar
- A can of pineapple slices (keep the juice!)
- A handful of maraschino cherries
- A pinch of ground cloves
Instructions
- Preheat your oven to 325°F. Place the ham in a roasting pan, cut side down.
- In a bowl, whisk together the honey, Dijon mustard, apple cider vinegar, and a splash of pineapple juice until smooth. This is your glaze.
- Brush half of the glaze over the ham, making sure to get into all the nooks and crannies. Tip: Use a silicone brush for easy cleanup.
- Arrange the pineapple slices and cherries on top of the ham, securing them with toothpicks if needed.
- Pour the remaining glaze over the ham. Sprinkle a pinch of ground cloves for that extra warmth.
- Cover the ham loosely with foil and bake for about 1.5 hours, basting with the pan juices every 30 minutes.
- Remove the foil and bake for another 30 minutes, or until the glaze is sticky and the ham is heated through. Tip: The internal temperature should reach 140°F.
- Let the ham rest for 10 minutes before slicing. This keeps all those delicious juices inside.
Ready to dig in? The ham is juicy with a perfect balance of sweet and tangy, while the pineapple adds a tropical twist. Serve it with a side of roasted veggies or slice it up for sandwiches the next day.
Classic Beef Wellington
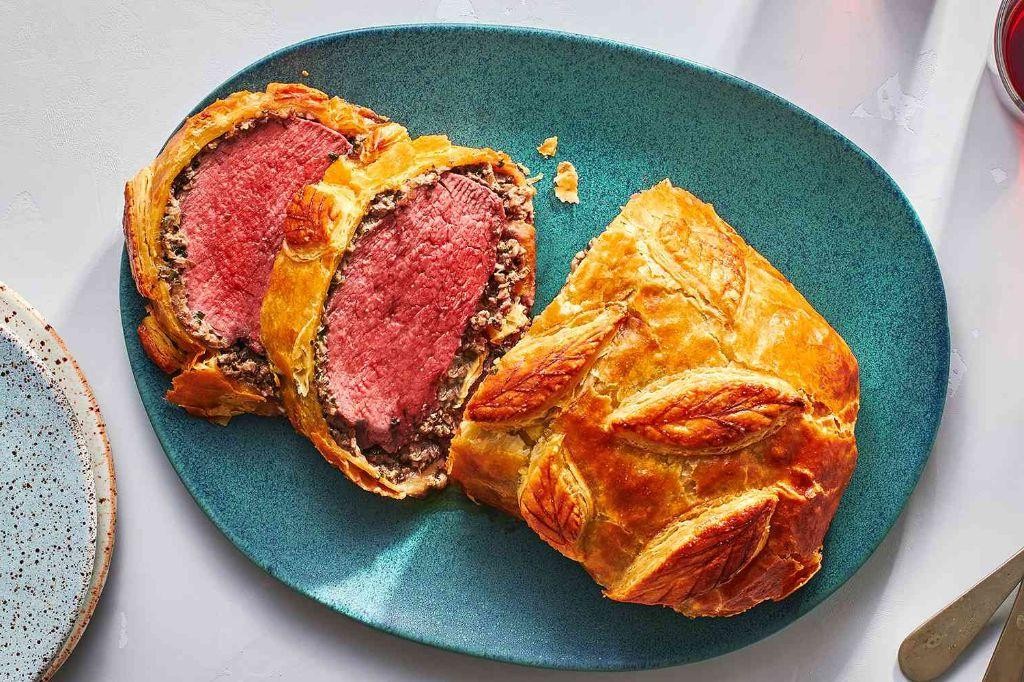
Alright, let’s dive into making a Classic Beef Wellington that’ll impress at any dinner party. You’ll love how the tender beef, savory mushroom duxelles, and flaky pastry come together.
Ingredients
- 1 1/2 lbs beef tenderloin
- A couple of tbsp olive oil
- A pinch of salt and pepper
- 2 cups mushrooms, finely chopped
- A splash of white wine
- 1 sheet puff pastry, thawed
- 2 tbsp Dijon mustard
- 1 egg, beaten (for egg wash)
Instructions
- Preheat your oven to 425°F (220°C).
- Season the beef tenderloin with salt and pepper all over.
- Heat olive oil in a pan over high heat. Sear the beef on all sides until browned, about 2 minutes per side. Tip: Don’t move the beef around too much to get a good crust.
- Remove the beef and brush it all over with Dijon mustard. Let it cool.
- In the same pan, add the mushrooms and a splash of white wine. Cook until the liquid evaporates and the mushrooms are dry, about 10 minutes. Tip: Squeeze out any excess moisture from the mushrooms to prevent a soggy pastry.
- Roll out the puff pastry on a floured surface. Spread the mushroom mixture in the center, place the beef on top, and wrap the pastry around it, sealing the edges.
- Brush the pastry with beaten egg for a golden finish. Tip: Make a few small slits on top to let steam escape.
- Bake for 25-30 minutes until the pastry is golden and puffed.
- Let it rest for 10 minutes before slicing.
Unbelievable how the crisp pastry gives way to the juicy, medium-rare beef inside. Serve it with a simple green salad to cut through the richness, or go all out with roasted potatoes for a hearty meal.
Garlic Mashed Potatoes
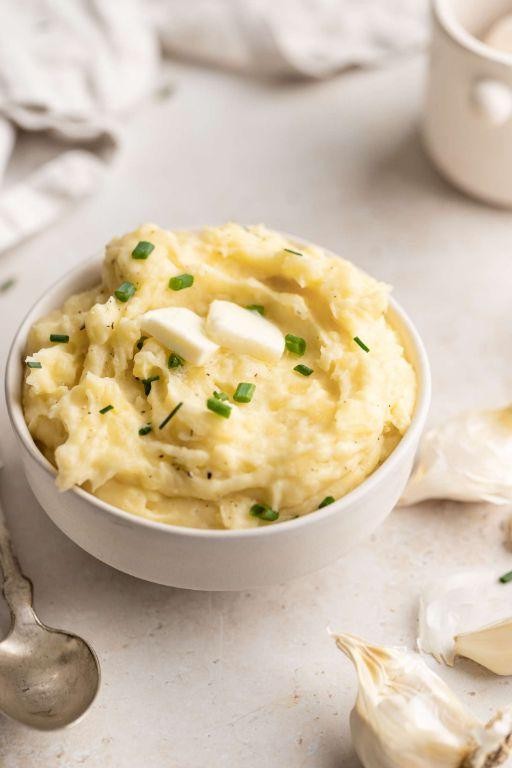
You know those sides that just make everything better? Garlic mashed potatoes are that dish. Creamy, buttery, and packed with flavor, they’re the ultimate comfort food.
Ingredients
- 2 pounds of potatoes, peeled and chopped
- 4 cloves of garlic, minced
- 1/2 cup of butter
- 1/2 cup of milk
- A splash of heavy cream
- Salt, to your liking
Instructions
- Boil the chopped potatoes in a large pot of salted water until they’re fork-tender, about 15-20 minutes.
- While the potatoes cook, melt the butter in a small saucepan over low heat. Add the minced garlic and sauté until fragrant, about 1-2 minutes. Tip: Don’t let the garlic brown or it’ll turn bitter.
- Drain the potatoes well and return them to the pot. Tip: Let them sit for a minute to evaporate any excess water for fluffier mash.
- Mash the potatoes with a potato masher or fork until smooth.
- Stir in the garlic butter, milk, and a splash of heavy cream until everything is well combined and creamy. Tip: Warm the milk and cream before adding to keep the mash hot.
- Season with salt to your liking and give it one final stir.
Rich and velvety, these garlic mashed potatoes are a dream. Try topping them with a pat of butter and some fresh chives for an extra touch of elegance.
Creamy Green Bean Casserole
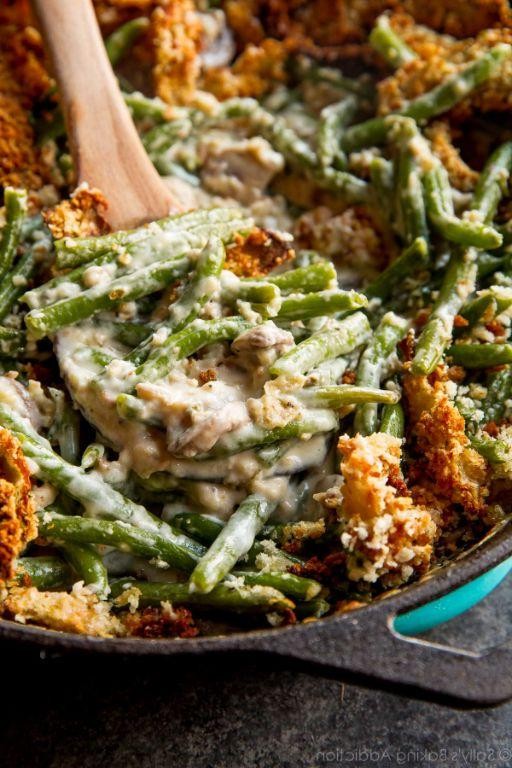
Ever find yourself craving something cozy yet a bit fancy for dinner? This creamy green bean casserole is your answer, blending simplicity with that homemade comfort we all love.
Ingredients
- 2 cups of fresh green beans, trimmed and halved
- 1 can (10.5 oz) of creamy mushroom soup
- A splash of milk
- A couple of dashes of black pepper
- 1 1/3 cups of French fried onions
- 1 cup of shredded cheddar cheese
Instructions
- Preheat your oven to 350°F (175°C). This ensures it’s just right for baking your casserole to perfection.
- Boil the green beans in salted water for 5 minutes, then drain. They should be bright green and slightly tender.
- In a mixing bowl, combine the mushroom soup, milk, and black pepper. Stir until smooth. Tip: If you like it creamier, add a tad more milk.
- Fold in the green beans and half of the French fried onions into the soup mixture. This is where the magic starts to happen.
- Transfer the mixture to a baking dish, spreading it evenly. Sprinkle the shredded cheddar cheese on top.
- Bake for 25 minutes. Then, add the remaining French fried onions and bake for 5 more minutes until golden and bubbly. Tip: Keep an eye on the onions to prevent burning.
- Let it sit for 5 minutes before serving. This allows the casserole to set, making it easier to scoop. Tip: A quick rest means better flavor melding.
Perfectly creamy with a crunchy onion topping, this casserole is a dream. Try serving it alongside grilled chicken for a meal that’s sure to impress.
Sweet Potato Casserole with Marshmallows
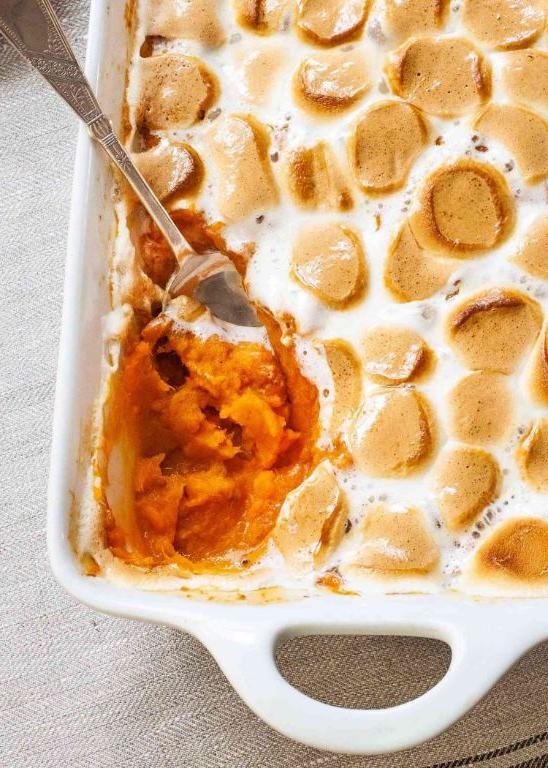
Kick off your holiday feast with this cozy sweet potato casserole topped with gooey marshmallows. It’s the perfect blend of sweet and savory that’ll have everyone asking for seconds.
Ingredients
- 3 cups of mashed sweet potatoes (about 3 large ones)
- A half cup of granulated sugar
- A couple of eggs, beaten
- A splash of vanilla extract
- A pinch of salt
- 4 tbsp of butter, melted
- A cup of mini marshmallows
Instructions
- Preheat your oven to 350°F and grease a baking dish lightly.
- In a large bowl, mix the mashed sweet potatoes, sugar, beaten eggs, vanilla extract, salt, and melted butter until smooth. Tip: For extra smooth potatoes, run them through a food processor.
- Pour the mixture into the greased baking dish and spread it evenly.
- Bake for 25 minutes or until the edges start to pull away from the dish. Tip: The center should be set but still a bit jiggly.
- Remove from the oven and evenly scatter the mini marshmallows over the top.
- Switch the oven to broil and return the dish to the oven for about 2 minutes, or until the marshmallows are golden brown. Tip: Watch closely to prevent burning!
Here’s the deal: the marshmallows get all toasty on top while the sweet potato stays creamy underneath. Serve it warm right out of the oven for that irresistible pull of melted marshmallow strings.
Homemade Cranberry Sauce
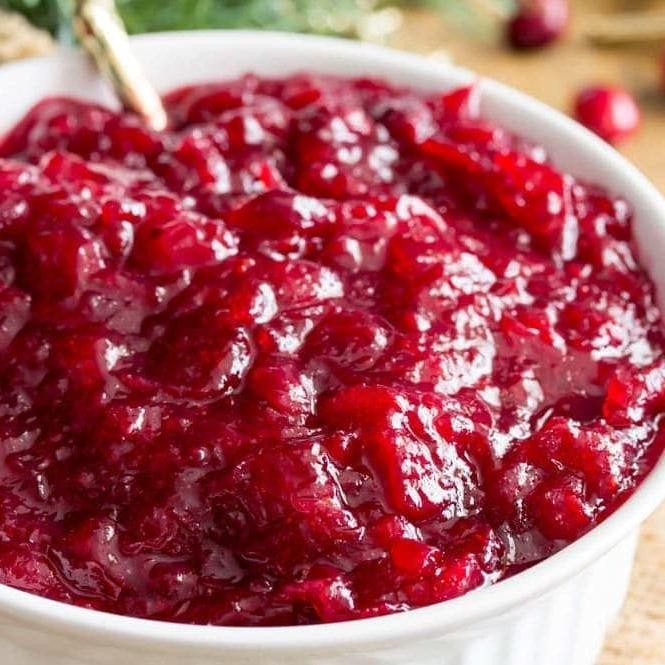
Got a hankering for something sweet, tangy, and utterly homemade? This cranberry sauce is your go-to for adding a burst of flavor to any meal, and it’s easier to whip up than you might think.
Ingredients
- 12 oz fresh cranberries
- 1 cup granulated sugar
- 1 cup water
- A splash of orange juice
- A couple of orange zest strips
Instructions
- Rinse the cranberries under cold water and pick out any stems or squishy berries.
- In a medium saucepan, combine the cranberries, sugar, and water. Stir to mix.
- Turn the heat to medium-high and bring the mixture to a boil. Tip: Keep an eye on it to prevent boiling over.
- Once boiling, reduce the heat to low and let it simmer. Stir occasionally. Tip: The cranberries will start to pop open—that’s when you know it’s working!
- After about 10 minutes, when the sauce has thickened, add the splash of orange juice and the orange zest strips. Stir well.
- Remove from heat and let it cool. Tip: The sauce will thicken more as it cools, so don’t worry if it seems a bit thin at first.
Delightfully chunky with a perfect balance of sweet and tart, this cranberry sauce is a game-changer. Try it slathered on toast or as a bold topping for your morning yogurt.
Traditional Christmas Pudding
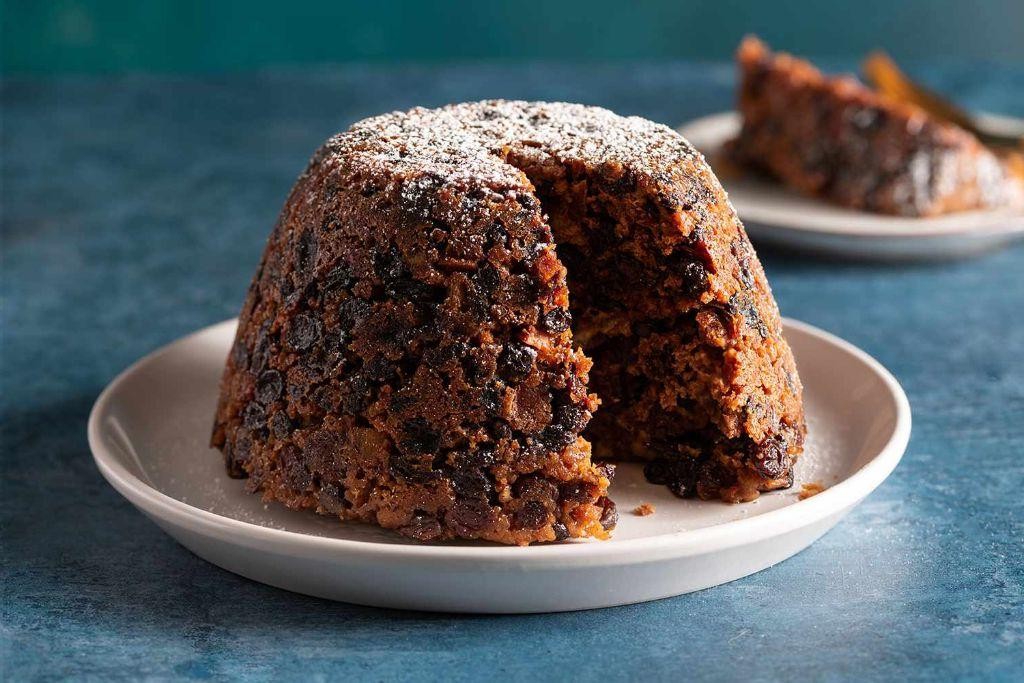
Hey, you know that rich, boozy dessert that screams Christmas? That’s the traditional Christmas pudding we’re diving into today. It’s a festive must-have, packed with dried fruits and a hint of spice, all steamed to perfection.
Ingredients
- A cup of all-purpose flour
- A couple of cups of mixed dried fruits (think raisins, currants, and chopped dates)
- A splash of brandy or rum
- Half a cup of brown sugar
- A teaspoon of mixed spice
- Two eggs, beaten
- A stick of butter, melted
- A quarter cup of breadcrumbs
- A pinch of salt
Instructions
- Grab a large bowl and mix the flour, dried fruits, brown sugar, mixed spice, breadcrumbs, and salt together.
- Pour in the melted butter, beaten eggs, and that splash of brandy or rum. Stir until everything’s well combined.
- Tip: If the mixture feels too dry, add a tad more brandy or rum to loosen it up.
- Grease a pudding basin with a bit of butter and spoon the mixture in, pressing down lightly.
- Cover the top with a double layer of parchment paper and foil, securing it tightly with string to keep the steam out.
- Place the basin in a large pot and fill it with boiling water until it reaches halfway up the basin. Cover the pot and let it steam for about 5 hours on a low simmer.
- Tip: Check the water level every now and then to make sure it doesn’t boil dry, adding more boiling water as needed.
- Once done, carefully remove the basin and let the pudding cool slightly before turning it out onto a plate.
- Tip: For an extra festive touch, warm a bit more brandy or rum, pour it over the pudding, and light it up at the table for a dazzling flame effect.
This pudding comes out moist, dense, and bursting with fruity flavors, with a lovely warmth from the spices and booze. Serve it with a dollop of brandy butter or a scoop of vanilla ice cream for a decadent finish.
Eggnog Cheesecake
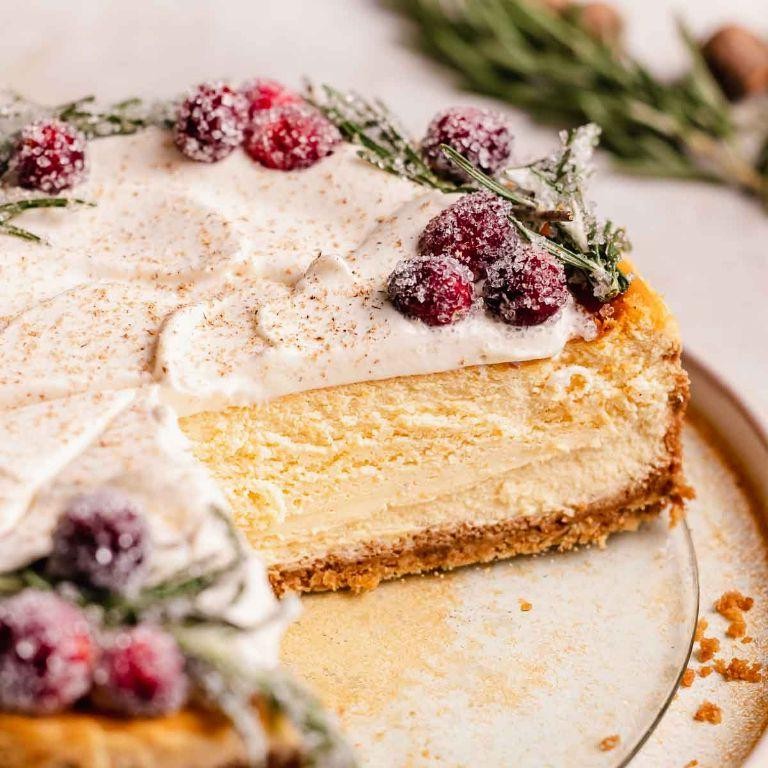
Alright, you’re in for a treat with this Eggnog Cheesecake recipe. It’s the perfect blend of creamy, spiced holiday cheer and rich, indulgent dessert that’ll have everyone asking for seconds.
Ingredients
- 2 cups of graham cracker crumbs
- 1/2 cup of melted butter
- 3 packages (8 oz each) of cream cheese, softened
- 1 cup of sugar
- 3 eggs
- 1 cup of eggnog
- 1 tsp of vanilla extract
- 1/2 tsp of nutmeg
- A splash of rum (optional, but highly recommended)
Instructions
- Preheat your oven to 325°F. This low and slow approach is key for a crack-free top.
- Mix the graham cracker crumbs and melted butter until it feels like wet sand. Press firmly into the bottom of a 9-inch springform pan. Tip: Use a flat-bottomed cup to press it down evenly.
- Beat the cream cheese and sugar together until smooth. Add eggs one at a time, mixing well after each.
- Stir in the eggnog, vanilla, nutmeg, and that splash of rum. Pour over the crust.
- Bake for 55-60 minutes. The center should still jiggle slightly when shaken—it’ll set as it cools. Tip: Run a knife around the edge to prevent cracking.
- Turn off the oven, crack the door, and let it cool inside for an hour. This gradual cooling helps avoid sudden temperature changes.
- Chill in the fridge for at least 4 hours, though overnight is better. Tip: The longer it chills, the cleaner your slices will be.
Best served cold, this cheesecake is luxuriously creamy with a hint of spice from the eggnog. Try topping it with a dollop of whipped cream and a sprinkle of cinnamon for an extra festive touch.
Gingerbread Cookies

Baking gingerbread cookies is like wrapping your kitchen in a warm, spicy hug. You’ll love how these little guys fill your home with holiday vibes, no matter the season.
Ingredients
- 3 cups all-purpose flour
- 1 tbsp ground ginger
- 1 tsp cinnamon
- 1/2 tsp cloves
- 1/2 tsp baking soda
- 1/4 tsp salt
- 3/4 cup unsalted butter, softened
- 3/4 cup brown sugar, packed
- 1 large egg
- 1/2 cup molasses
- a splash of vanilla extract
Instructions
- Preheat your oven to 350°F and line a couple of baking sheets with parchment paper.
- In a medium bowl, whisk together the flour, ginger, cinnamon, cloves, baking soda, and salt. Tip: Sifting the flour can make your cookies extra tender.
- In a large bowl, beat the butter and brown sugar until fluffy, about 2 minutes.
- Add the egg, molasses, and vanilla to the butter mixture, beating until just combined.
- Gradually mix in the dry ingredients until a dough forms. Tip: If the dough feels sticky, chill it for 30 minutes for easier handling.
- Roll the dough out on a floured surface to about 1/4 inch thick and cut into shapes with cookie cutters.
- Place the cookies on the prepared sheets, about 2 inches apart, and bake for 8-10 minutes until the edges are just firm. Tip: For softer cookies, pull them out when they’re slightly underdone.
- Let cool on the sheets for 5 minutes, then transfer to a wire rack to cool completely.
Out of the oven, these cookies are crisp at the edges with a chewy center, packed with deep molasses and spice flavors. Try sandwiching them with cream cheese frosting for an extra indulgent treat.
Peppermint Bark
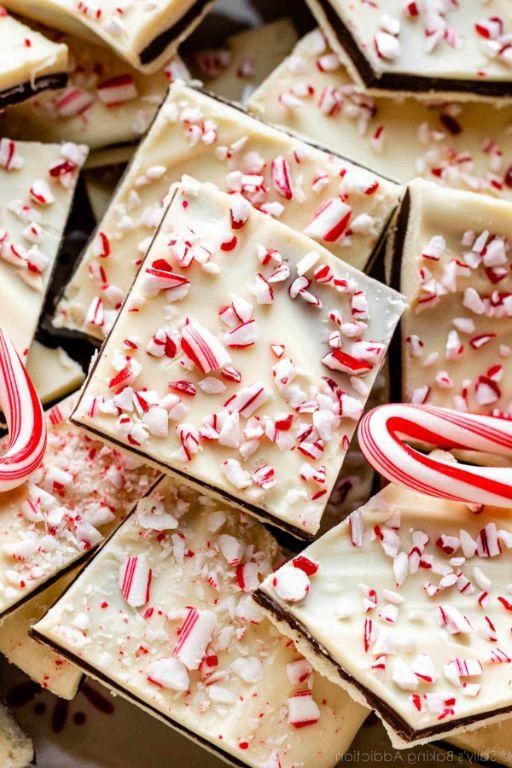
Very few treats scream holiday cheer quite like peppermint bark. It’s that perfect mix of sweet, minty, and crunchy that you can’t resist sneaking just one more piece of.
Ingredients
- 2 cups of white chocolate chips
- 1 cup of dark chocolate chips
- a splash of peppermint extract
- a couple of candy canes, crushed
Instructions
- Line a baking sheet with parchment paper and set it aside.
- In a microwave-safe bowl, melt the dark chocolate chips in 30-second intervals, stirring in between, until smooth. Tip: Don’t overheat to avoid seizing.
- Spread the melted dark chocolate evenly over the prepared baking sheet. Pop it in the fridge for about 15 minutes to set.
- While that’s chilling, melt the white chocolate chips the same way, then stir in the peppermint extract. Tip: A little extract goes a long way, so start with a small splash.
- Pour the white chocolate over the set dark chocolate layer, spreading it out smoothly.
- Immediately sprinkle the crushed candy canes over the top before the white chocolate sets. Tip: Crush the candy canes finely for even distribution.
- Chill the bark in the fridge for at least 30 minutes, or until completely firm.
- Once set, break the bark into pieces. The contrast between the rich dark chocolate and the minty white layer is irresistible. Try serving it alongside a hot cocoa for the ultimate holiday treat.
Christmas Fruitcake
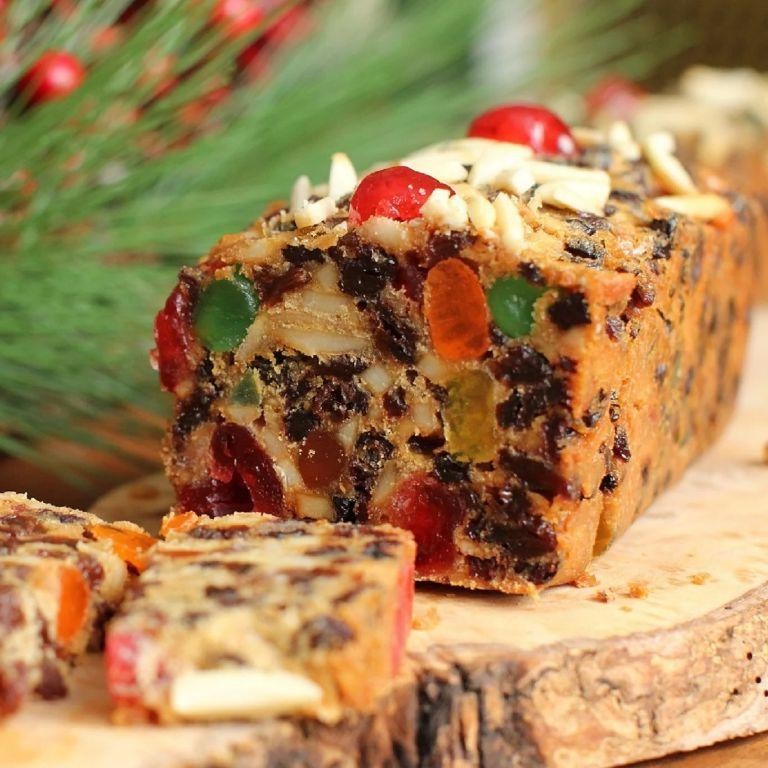
Did you know that Christmas fruitcake is one of those timeless treats that brings a little holiday magic to any table? You can almost smell the spices just thinking about it, right?
Ingredients
- 2 cups of all-purpose flour
- 1 cup of brown sugar, packed
- A splash of vanilla extract
- 3 large eggs
- A stick of butter, softened
- A couple of cups of mixed dried fruits (think cherries, raisins, and apricots)
- A pinch of salt
- 1 tsp of baking powder
- A dash of cinnamon and nutmeg
- 1/2 cup of orange juice
Instructions
- Preheat your oven to 325°F and grease a loaf pan.
- In a big bowl, cream together the butter and brown sugar until fluffy.
- Beat in the eggs one at a time, then add the vanilla extract.
- Tip: Make sure your butter is at room temperature for easier mixing.
- Sift together the flour, baking powder, salt, cinnamon, and nutmeg, then gradually mix into the wet ingredients.
- Fold in the mixed dried fruits and orange juice until just combined.
- Tip: Soak your dried fruits in orange juice overnight for extra flavor.
- Pour the batter into the prepared pan and smooth the top.
- Bake for about 1 hour or until a toothpick comes out clean.
- Tip: Cover the cake with foil halfway through if it’s browning too quickly.
- Let it cool in the pan for 10 minutes, then transfer to a wire rack.
Ultimate comfort in every bite, this fruitcake is moist, rich, and packed with festive flavors. Try serving it with a dollop of whipped cream or a slice of sharp cheddar for a surprising twist.
Roasted Brussels Sprouts with Bacon
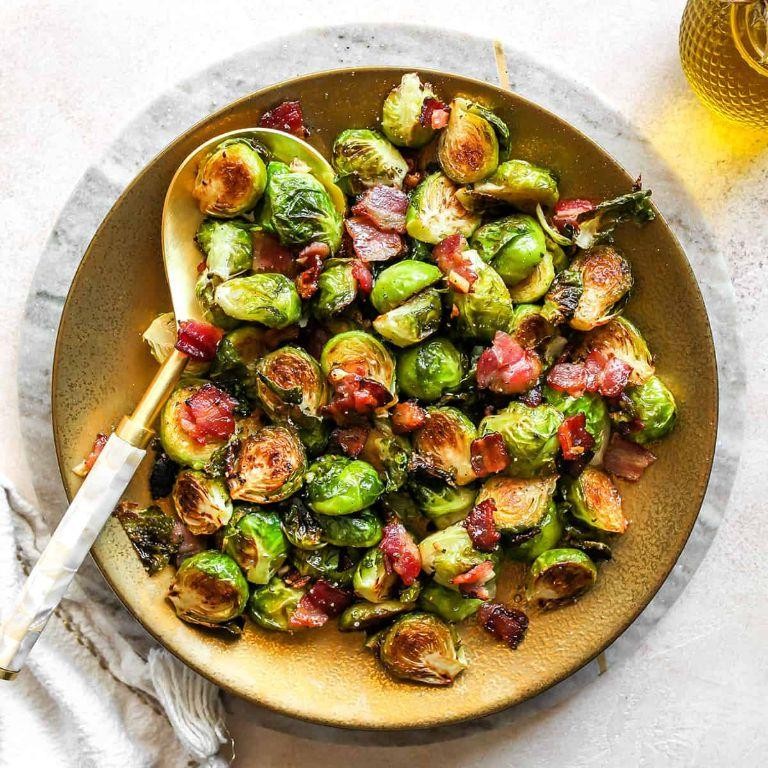
Forget everything you thought you knew about Brussels sprouts. This roasted version with crispy bacon is a game-changer, turning even the skeptics into fans with its irresistible combo of flavors.
Ingredients
- 1 pound of Brussels sprouts, trimmed and halved
- 4 slices of thick-cut bacon, chopped
- 2 tablespoons of olive oil
- A good pinch of salt
- A couple of grinds of black pepper
- 1 tablespoon of balsamic vinegar (optional, for a splash of tang)
Instructions
- Preheat your oven to 400°F (200°C). This ensures everything cooks evenly and gets that perfect crisp.
- Toss the halved Brussels sprouts and chopped bacon with olive oil, salt, and pepper in a large bowl. Tip: Make sure each sprout is nicely coated for maximum flavor.
- Spread everything out on a baking sheet in a single layer. Crowding the pan steams the sprouts instead of roasting them, so give them space.
- Roast for 20-25 minutes, stirring halfway through, until the sprouts are tender and the bacon is crispy. Keep an eye out for that golden-brown color.
- Drizzle with balsamic vinegar right before serving, if you’re using it. It adds a lovely brightness to the dish.
Every bite delivers a mix of crispy, salty bacon and tender, slightly sweet sprouts. Try serving them over a bed of creamy polenta for a comforting meal that’s anything but ordinary.
Apple Cider Glazed Carrots
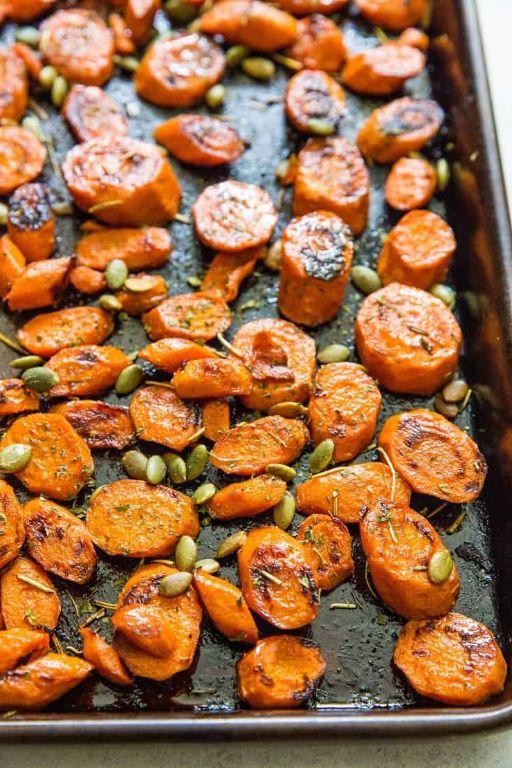
Perfect for those cozy fall evenings, these apple cider glazed carrots bring a sweet and tangy twist to your table. You’ll love how the cider caramelizes into a sticky, flavorful glaze that makes these carrots irresistible.
Ingredients
- 1 pound of carrots, peeled and sliced into sticks
- A splash of olive oil
- A couple of tablespoons of apple cider
- A pinch of salt
- A dash of cinnamon
- A tablespoon of honey
Instructions
- Preheat your oven to 400°F. This high heat helps caramelize the glaze.
- Toss the carrot sticks with a splash of olive oil and a pinch of salt on a baking sheet. Spread them out so they roast evenly.
- Roast for 20 minutes, then give them a stir. Tip: Don’t overcrowd the pan, or they’ll steam instead of roast.
- While the carrots are roasting, mix together a couple of tablespoons of apple cider, a dash of cinnamon, and a tablespoon of honey in a small bowl.
- After the initial 20 minutes, pour the cider mixture over the carrots and toss to coat. Tip: Use a spatula to scrape up any browned bits for extra flavor.
- Return to the oven for another 10-15 minutes, until the glaze is sticky and the carrots are tender. Tip: Keep an eye on them to prevent burning.
Velvety soft with a glossy, sweet-tart glaze, these carrots are a standout side. Try serving them with a sprinkle of fresh thyme for an herby contrast.
Pumpkin Pie with Whipped Cream
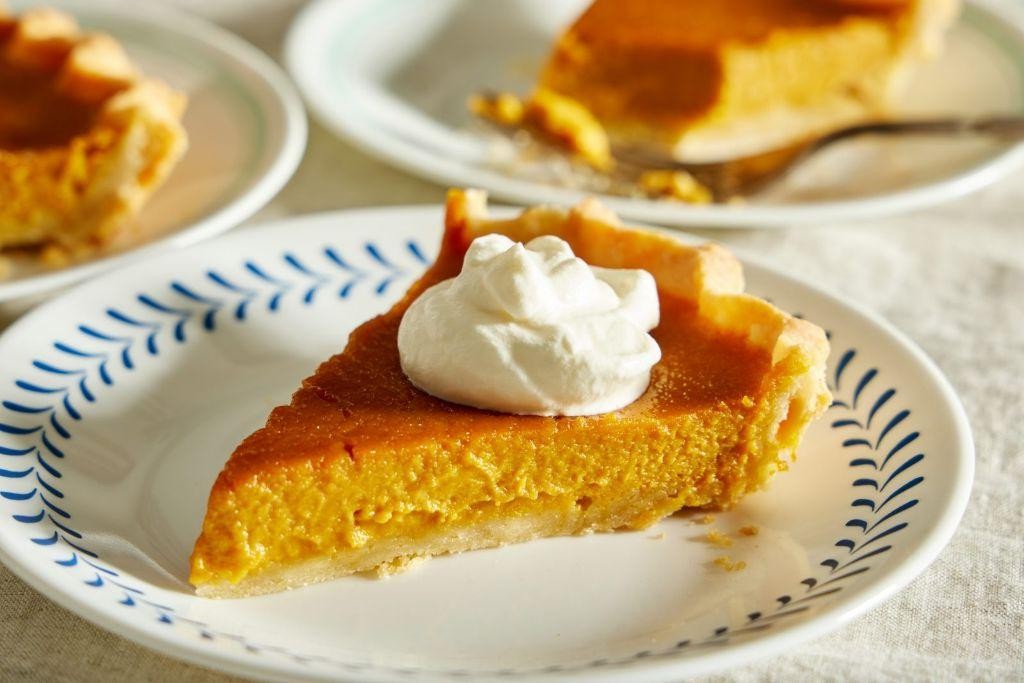
There’s nothing quite like the cozy embrace of pumpkin pie, especially when it’s topped with a cloud of whipped cream. You know, the kind that makes every bite feel like a hug from the inside.
Ingredients
- 1 1/2 cups of pumpkin puree (the real deal, not the pie filling)
- 3/4 cup of sugar (because sweet is the name of the game)
- 1/2 teaspoon of salt (just a pinch to balance the sweet)
- 1 teaspoon of cinnamon (for that warm, spicy kick)
- 1/2 teaspoon of ginger (a little zing never hurt anyone)
- 1/4 teaspoon of cloves (tiny but mighty)
- 2 large eggs (the glue that holds it all together)
- 1 cup of evaporated milk (rich and creamy, just how we like it)
- 1 unbaked 9-inch pie shell (homemade or store-bought, no judgment here)
- A splash of vanilla extract (because vanilla makes everything better)
- 1 cup of heavy cream (for that whipped cloud on top)
- A couple of tablespoons of powdered sugar (to sweeten the deal)
Instructions
- Preheat your oven to 425°F. This gets it nice and hot for the perfect pie crust.
- In a large bowl, mix the pumpkin puree, sugar, salt, cinnamon, ginger, and cloves until it’s all friends.
- Beat in the eggs one at a time, then stir in the evaporated milk and vanilla. Tip: Don’t overmix, or your pie might get tough.
- Pour the filling into the pie shell. Tip: Place the pie on a baking sheet to catch any spills and make moving it easier.
- Bake for 15 minutes at 425°F, then reduce the heat to 350°F and bake for another 40-50 minutes. Tip: The pie is done when a knife inserted near the center comes out clean.
- Let the pie cool on a wire rack. This is tough, but patience makes perfect.
- While the pie cools, whip the heavy cream and powdered sugar until soft peaks form. This is your fluffy crown.
- Serve the pie with a generous dollop of whipped cream. Go wild with the swirls!
Golden and spiced, this pumpkin pie is creamy with just the right amount of sweetness. Try serving it with a drizzle of caramel for an extra decadent twist.
Chocolate Yule Log
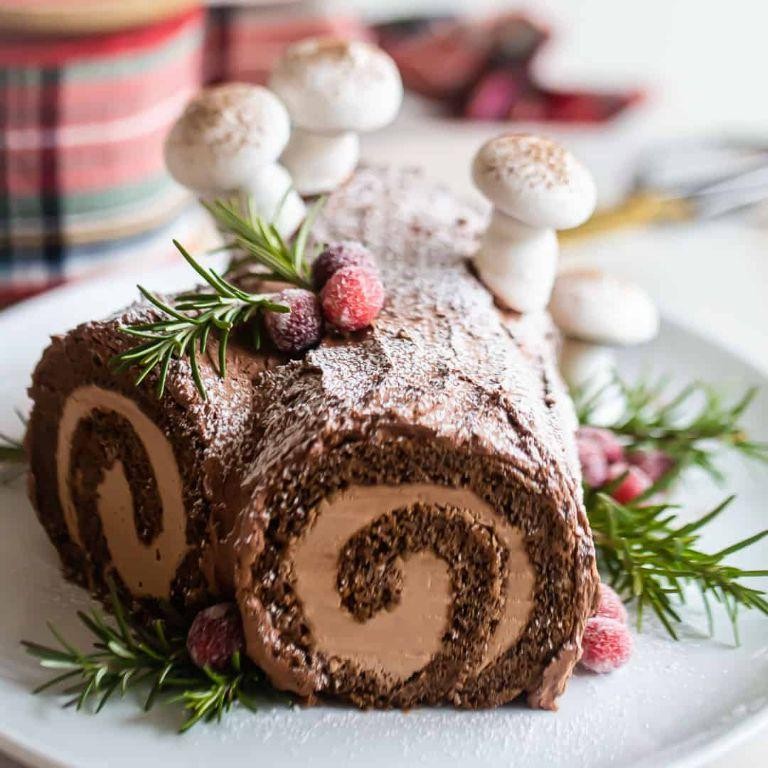
Oh, the Chocolate Yule Log is that show-stopping dessert you’ve been dreaming of, perfect for impressing your guests or treating yourself. It’s easier than you think, with a rich chocolate flavor that’s absolutely irresistible.
Ingredients
- 1 cup of all-purpose flour
- 3/4 cup of granulated sugar
- 1/3 cup of unsweetened cocoa powder
- 1 teaspoon of baking soda
- 1/2 teaspoon of salt
- 1/2 cup of vegetable oil
- 2 large eggs
- 1 teaspoon of vanilla extract
- 1/2 cup of boiling water
- 1 cup of heavy cream
- 2 tablespoons of powdered sugar
- a splash of vanilla extract for the cream
Instructions
- Preheat your oven to 350°F and grease a 10×15 inch jelly roll pan, then line it with parchment paper.
- In a large bowl, whisk together the flour, sugar, cocoa powder, baking soda, and salt.
- Add the oil, eggs, and vanilla extract to the dry ingredients, mixing until just combined.
- Carefully stir in the boiling water until the batter is smooth. Tip: The batter will be thin, but that’s exactly what you want.
- Pour the batter into the prepared pan, spreading it evenly.
- Bake for 12-15 minutes, or until the cake springs back when lightly touched. Tip: Don’t overbake, or it’ll be hard to roll.
- While the cake is still warm, gently roll it up from the short end with the parchment paper inside. Let it cool completely on a wire rack.
- For the filling, whip the heavy cream, powdered sugar, and vanilla extract until stiff peaks form.
- Unroll the cooled cake, spread the whipped cream evenly, then roll it back up without the parchment paper. Tip: Use a spatula to smooth the cream for an even layer.
- Chill the log in the fridge for at least an hour before serving to set the shape.
So, there you have it—a Chocolate Yule Log that’s as fun to make as it is to eat. The texture is wonderfully light and spongy, with a creamy filling that melts in your mouth. Try dusting the top with powdered sugar or cocoa powder for a festive touch.
Conclusion
Brimming with festive cheer, our roundup of 16 Delicious Best Christmas Recipes is your ticket to a memorable holiday feast. From savory mains to sweet treats, there’s something for every home cook to love. We invite you to try these recipes, share your favorites in the comments, and spread the joy by pinning this article on Pinterest. Happy cooking and merry Christmas!


