Are you ready to elevate your mini burger game? Sliders are the perfect bite-sized treats that pack a punch of flavor, making them ideal for any gathering or a fun family dinner. From classic cheeseburgers to creative twists, our roundup of 23 Delicious Best Slider Recipes is sure to inspire your next meal. Dive in and discover your new favorite way to enjoy these amazing little sandwiches!
Classic Beef Sliders with Cheese
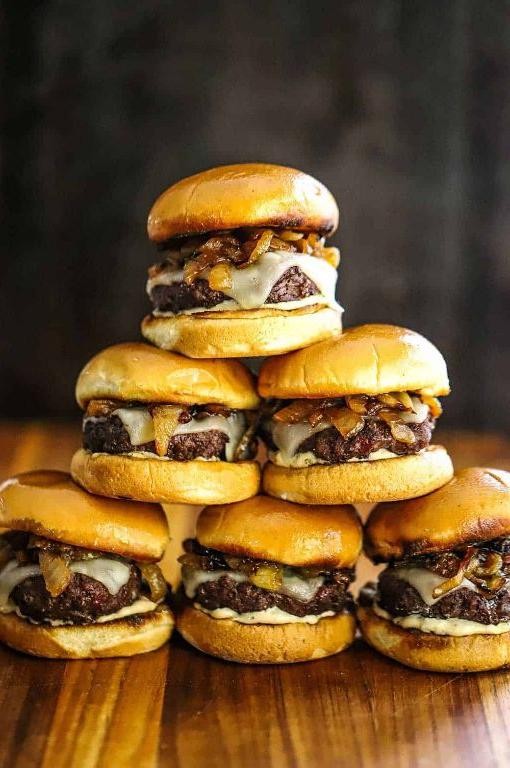
Craving something small but mighty in flavor? These Classic Beef Sliders with Cheese are my go-to when I need a crowd-pleaser that’s as fun to make as it is to eat. I remember the first time I made these for a game day party—they disappeared before halftime!
Ingredients
- 1 lb ground beef (I like 80/20 for the perfect juicy bite)
- 1 tbsp Worcestershire sauce (a splash more if you’re feeling bold)
- 1 tsp garlic powder (because everything’s better with garlic)
- 1 tsp onion powder (for that subtle depth)
- Salt and pepper (I’m generous here, seasoning is key)
- 12 slider buns (I opt for Hawaiian rolls for a sweet contrast)
- 6 slices American cheese (torn in half because melty perfection)
- 2 tbsp butter, melted (for that golden, buttery finish)
Instructions
- Preheat your oven to 350°F (175°C) and line a baking sheet with parchment paper for easy cleanup.
- In a bowl, mix the ground beef, Worcestershire sauce, garlic powder, onion powder, salt, and pepper until just combined—overmixing can make the sliders tough.
- Divide the mixture into 12 equal portions and shape into small patties, slightly larger than the buns since they’ll shrink a bit.
- Heat a skillet over medium-high heat and cook the patties for about 2 minutes per side, just until they’re nicely seared but not fully cooked through.
- Place the bottom halves of the buns on the prepared baking sheet, top each with a patty, then a half slice of cheese, and finally the top bun.
- Brush the tops of the buns with melted butter for that irresistible golden crust.
- Bake for 10 minutes, or until the cheese is melty and the buns are toasted to perfection.
Fresh out of the oven, these sliders are a symphony of textures—crispy bun, juicy beef, and oozy cheese. Try serving them with a side of pickles and a spicy mayo for an extra kick!
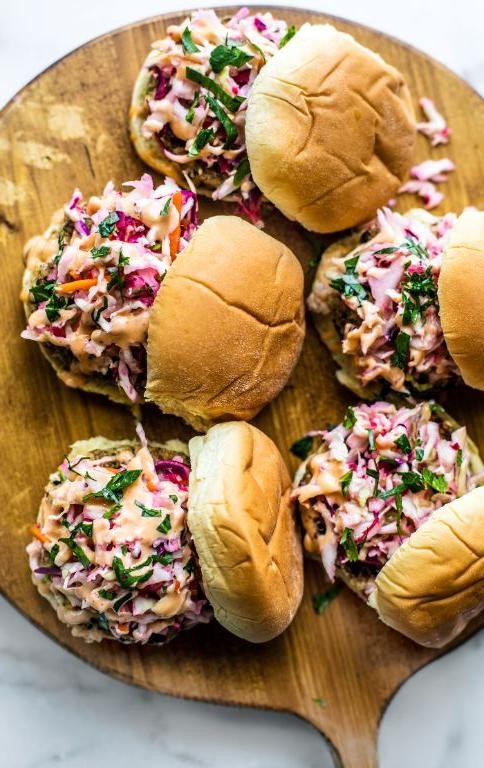
Pulled Pork Sliders with Coleslaw
Backyard barbecues and family gatherings have always been my favorite settings for sharing food that brings people together. Today, I’m thrilled to share my go-to recipe for Pulled Pork Sliders with Coleslaw, a dish that never fails to disappear first from the table.
Ingredients
- 3 lbs pork shoulder (I find the marbling in pork shoulder makes for the juiciest pulled pork)
- 1 cup apple cider vinegar (this adds a tangy depth that balances the richness of the pork)
- 1/2 cup ketchup (for that classic BBQ sauce base)
- 1/4 cup brown sugar (I like dark brown for its molasses notes)
- 1 tbsp smoked paprika (it’s all about that smoky flavor)
- 1 tsp garlic powder (because garlic makes everything better)
- 1 tsp onion powder (for a subtle sharpness)
- 1/2 tsp cayenne pepper (just enough to warm the palate)
- Salt and pepper to taste (I’m generous with the pepper for a bit of bite)
- 1 package slider buns (toasted slightly for that perfect crunch)
- 2 cups coleslaw mix (I prefer the crunch of fresh cabbage)
- 1/2 cup mayonnaise (the creamier, the better for slaw)
- 1 tbsp lemon juice (a splash brightens up the slaw)
Instructions
- Preheat your oven to 300°F. Slow and low is the key to tender pulled pork.
- Season the pork shoulder generously with salt, pepper, smoked paprika, garlic powder, onion powder, and cayenne pepper. Massage the spices into the meat to ensure every bite is flavorful.
- Place the pork in a Dutch oven or a deep baking dish. Pour the apple cider vinegar around the pork, then cover tightly with a lid or aluminum foil.
- Bake for 4 hours, or until the pork is fork-tender. Tip: Resist the urge to peek; keeping the lid on traps the moisture.
- While the pork cooks, mix the ketchup and brown sugar in a small bowl to create your BBQ sauce. Set aside.
- Once the pork is done, remove it from the oven and let it rest for 10 minutes. Then, shred it using two forks. Tip: Save the cooking juices to mix back into the pork for extra moisture.
- Toss the shredded pork with the BBQ sauce until well coated.
- In a separate bowl, combine the coleslaw mix, mayonnaise, and lemon juice for the slaw. Tip: Let the slaw sit for at least 10 minutes before serving to allow the flavors to meld.
- Toast the slider buns lightly for added texture.
- Assemble the sliders by placing a generous amount of pulled pork on each bun, topped with a spoonful of coleslaw.
Nothing beats the combination of tender, smoky pulled pork with the crisp, refreshing slaw on a soft bun. Serve these sliders with extra BBQ sauce on the side for dipping, and watch them disappear before your eyes.
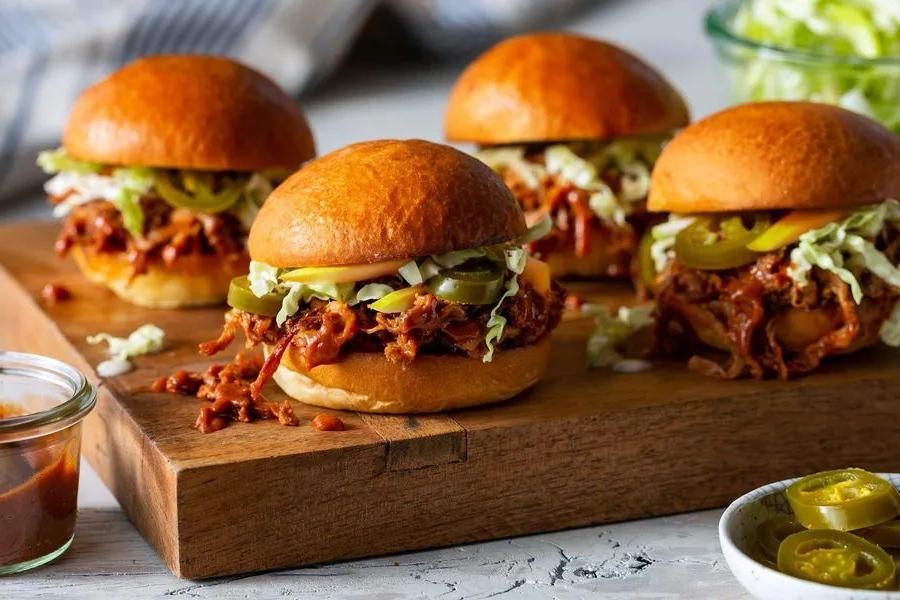
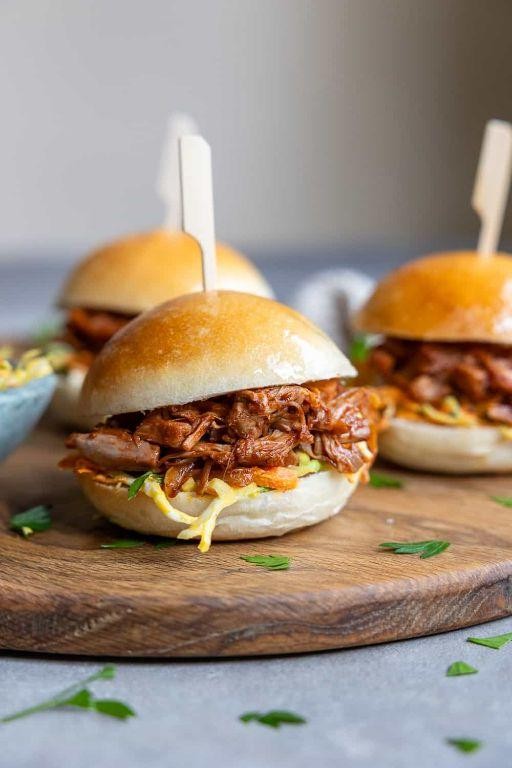
BBQ Chicken Sliders
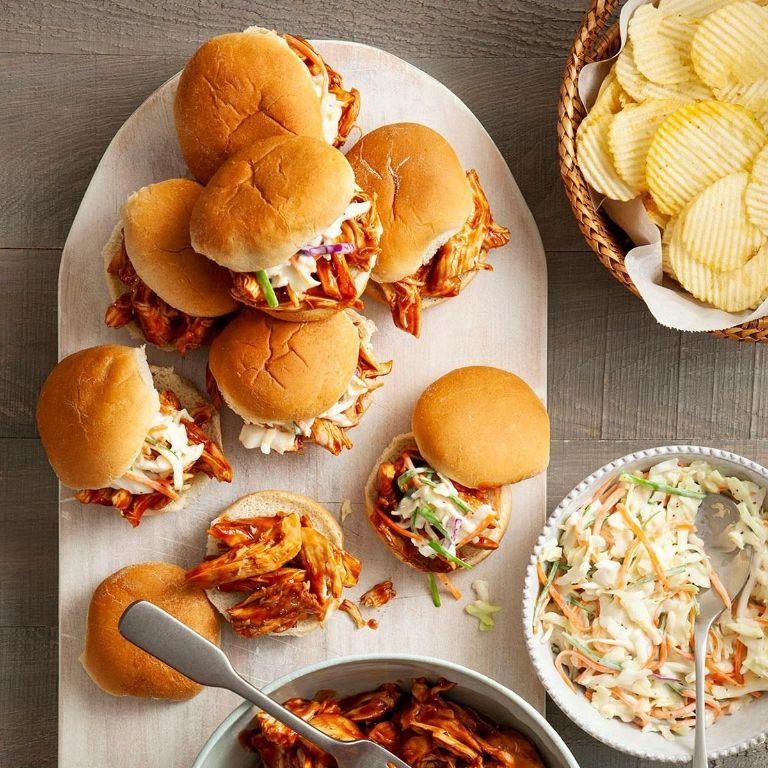
Finally, a recipe that’s as fun to make as it is to eat! These BBQ Chicken Sliders are my go-to for casual get-togethers, and they’ve never failed to impress. The combination of smoky, sweet, and tangy flavors wrapped in a soft bun is simply irresistible.
Ingredients
- 2 cups shredded cooked chicken (I love using leftovers from a rotisserie chicken for this)
- 1 cup your favorite BBQ sauce (I swear by the smoky depth of a hickory-flavored one)
- 1/2 cup coleslaw mix (for that crunch and freshness)
- 12 slider buns (brioche buns are my top pick for their buttery softness)
- 1 tbsp olive oil (extra virgin, always, for that fruity note)
- 1/2 tsp garlic powder (because everything’s better with garlic)
- 1/2 tsp onion powder (for an extra layer of flavor)
Instructions
- Preheat your oven to 350°F (175°C) to get those buns perfectly toasted.
- In a medium bowl, mix the shredded chicken with BBQ sauce, garlic powder, and onion powder until well combined. Tip: Letting it sit for 10 minutes allows the flavors to meld beautifully.
- Brush the inside of each slider bun lightly with olive oil and place them on a baking sheet. Tip: This step ensures they get golden and crispy without drying out.
- Evenly distribute the BBQ chicken mixture among the bottom halves of the buns.
- Top each with a spoonful of coleslaw mix before covering with the top bun halves. Tip: The coleslaw adds a refreshing contrast to the rich BBQ flavor.
- Bake in the preheated oven for about 10 minutes, or until the buns are toasted and the filling is heated through.
Just out of the oven, these sliders are a delightful mix of textures—soft, crispy, and crunchy all at once. Serve them with extra BBQ sauce on the side for dipping, or pair with a crisp pickle spear for that perfect bite.
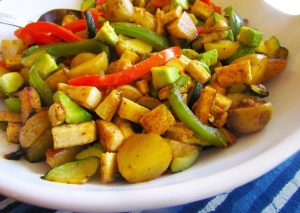
Turkey and Avocado Sliders
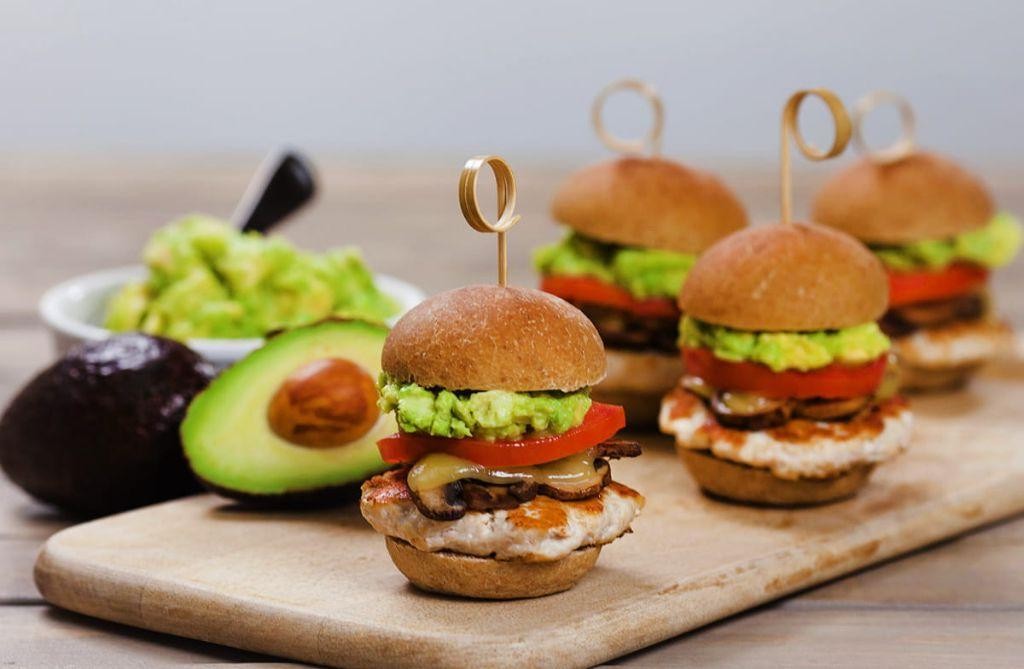
After a long day of experimenting in the kitchen, I stumbled upon a combination that’s now a staple in my household—Turkey and Avocado Sliders. They’re the perfect blend of creamy and savory, and honestly, they’ve saved me from more than one dinner dilemma.
Ingredients
- 1 lb ground turkey (I find the 93% lean works best for juicy sliders)
- 1 ripe avocado (the kind that yields slightly to pressure—trust me, it makes a difference)
- 1/2 cup panko breadcrumbs (for that perfect crunch)
- 1 large egg (I prefer room temp eggs here—they bind better)
- 1 tbsp olive oil (extra virgin olive oil is my go-to)
- 1 tsp garlic powder (because everything’s better with garlic)
- 1/2 tsp salt (I use sea salt for a cleaner taste)
- 1/4 tsp black pepper (freshly ground, if you have it)
- 8 slider buns (toasted, if you’re into that)
Instructions
- In a large bowl, combine the ground turkey, panko breadcrumbs, egg, garlic powder, salt, and black pepper. Mix until just combined—overmixing can make the sliders tough.
- Form the mixture into 8 equal-sized patties, about 1/2 inch thick. Pro tip: Wet your hands to prevent sticking.
- Heat the olive oil in a large skillet over medium heat (350°F if you’re using a thermometer).
- Cook the patties for 4-5 minutes on each side, or until they reach an internal temperature of 165°F. No guessing here—use a meat thermometer.
- While the patties cook, slice the avocado. Another pro tip: Run your knife around the pit, twist, and scoop with a spoon for clean slices.
- Toast the slider buns if desired. I like mine just golden—about 2 minutes in the oven at 350°F does the trick.
- Assemble the sliders: Place a turkey patty on each bun bottom, top with avocado slices, and crown with the bun top.
Ready to serve, these sliders are a symphony of textures—crispy on the outside, tender on the inside, with the avocado adding a buttery contrast. Try them with a side of sweet potato fries for a meal that’s as colorful as it is delicious.
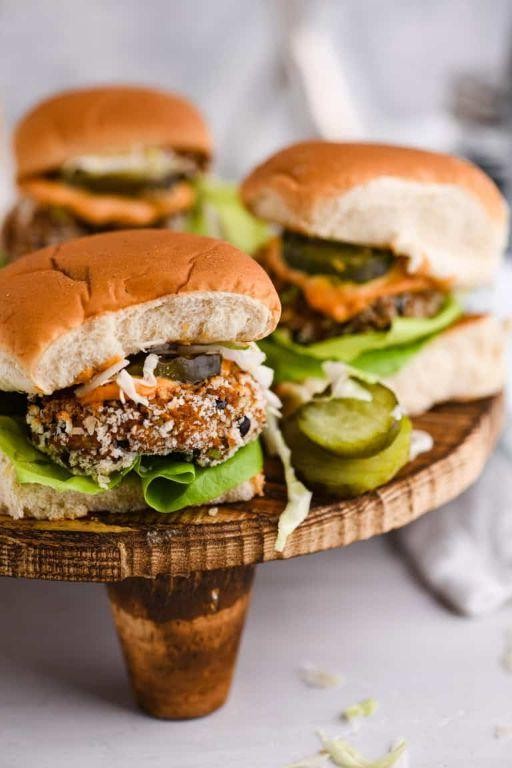
Vegetarian Black Bean Sliders

Believe it or not, these Vegetarian Black Bean Sliders were born out of a desperate attempt to use up some leftover black beans in my pantry. Now, they’re a staple at my family gatherings, loved even by the most devout meat-eaters.
Ingredients
- 1 can (15 oz) black beans, drained and rinsed (I swear by the no-salt-added variety for better control over the seasoning)
- 1/2 cup breadcrumbs (I often use panko for that extra crunch)
- 1 large egg, lightly beaten (room temp eggs blend more smoothly, in my experience)
- 2 tbsp extra virgin olive oil (my go-to for its flavor and health benefits)
- 1 tsp ground cumin (because what’s a black bean dish without it?)
- 1/2 tsp smoked paprika (for that subtle smokiness)
- 1/4 cup finely chopped red onion (for a bit of crunch and color)
- Salt to taste (I start with 1/4 tsp and adjust from there)
- Slider buns and your favorite toppings for serving
Instructions
- Preheat your oven to 375°F and line a baking sheet with parchment paper for easy cleanup.
- In a large bowl, mash the black beans with a fork until mostly smooth but with some chunks remaining for texture.
- Add the breadcrumbs, egg, olive oil, cumin, smoked paprika, red onion, and salt to the bowl. Mix until well combined. Tip: Let the mixture sit for 5 minutes to allow the breadcrumbs to absorb moisture, making it easier to form patties.
- Form the mixture into 8 small patties, about 2 inches in diameter. Tip: Wet your hands slightly to prevent sticking.
- Place the patties on the prepared baking sheet and bake for 20 minutes, flipping halfway through, until they’re firm and lightly crispy on the outside.
- Serve the sliders on buns with your favorite toppings. Tip: A slice of avocado and a dollop of Greek yogurt make for a creamy contrast to the spicy patties.
What makes these sliders stand out is their perfect balance of textures—crispy on the outside, tender on the inside, with a smoky flavor that’s hard to resist. Try serving them with a side of sweet potato fries for a complete meal that’s sure to impress.
Buffalo Chicken Sliders
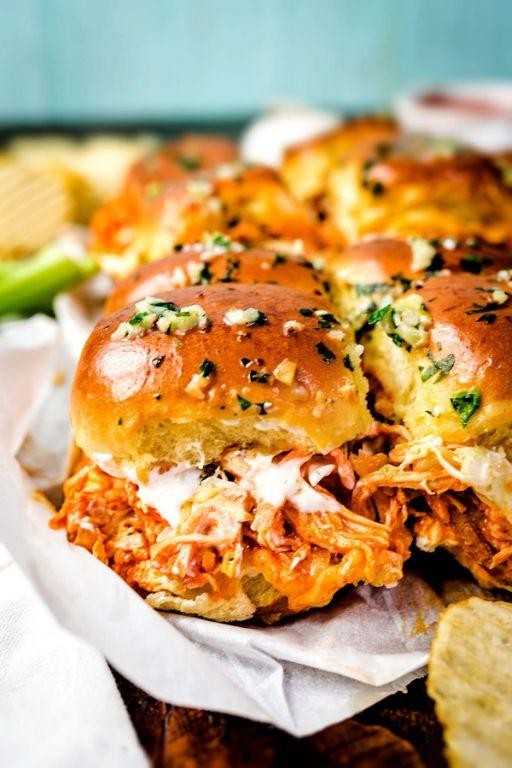
Zesty flavors and a kick of heat make these Buffalo Chicken Sliders a game-day favorite in my household. I remember the first time I whipped these up for a casual get-together; they disappeared before I could even grab one!
Ingredients
- 2 cups shredded cooked chicken (I love using leftovers from a rotisserie chicken for this)
- 1/2 cup buffalo sauce (Frank’s RedHot is my go-to for that authentic tang)
- 1/4 cup ranch dressing (homemade or store-bought, but make sure it’s creamy)
- 12 slider buns (King’s Hawaiian sweet rolls add a nice contrast to the spice)
- 1/2 cup shredded cheddar cheese (sharp cheddar melts beautifully)
- 2 tbsp unsalted butter (I always use unsalted to control the dish’s saltiness)
Instructions
- Preheat your oven to 350°F (175°C) to get it ready for toasting the sliders.
- In a mixing bowl, combine the shredded chicken and buffalo sauce until the chicken is evenly coated. Tip: Let the mixture sit for 5 minutes to allow the flavors to meld.
- Spread the ranch dressing on the bottom halves of the slider buns. This acts as a delicious base and helps keep the buns from getting soggy.
- Evenly distribute the buffalo chicken mixture over the ranch-covered buns.
- Sprinkle the shredded cheddar cheese over the chicken. Tip: For extra melty cheese, place the sliders under the broiler for the last 2 minutes of baking.
- Place the top halves of the buns over the cheese and lightly brush the tops with melted butter. Tip: Brushing with butter gives the buns a golden, slightly crispy finish.
- Bake in the preheated oven for 10-12 minutes, or until the cheese is melted and the buns are lightly toasted.
Buttery, spicy, and utterly addictive, these sliders pack a punch with every bite. Serve them with extra ranch or blue cheese dressing on the side for dipping, and watch them fly off the plate!
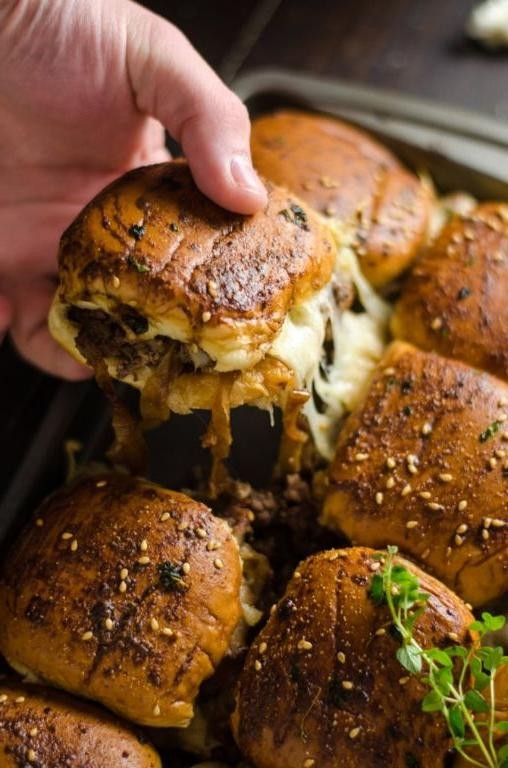
Philly Cheesesteak Sliders
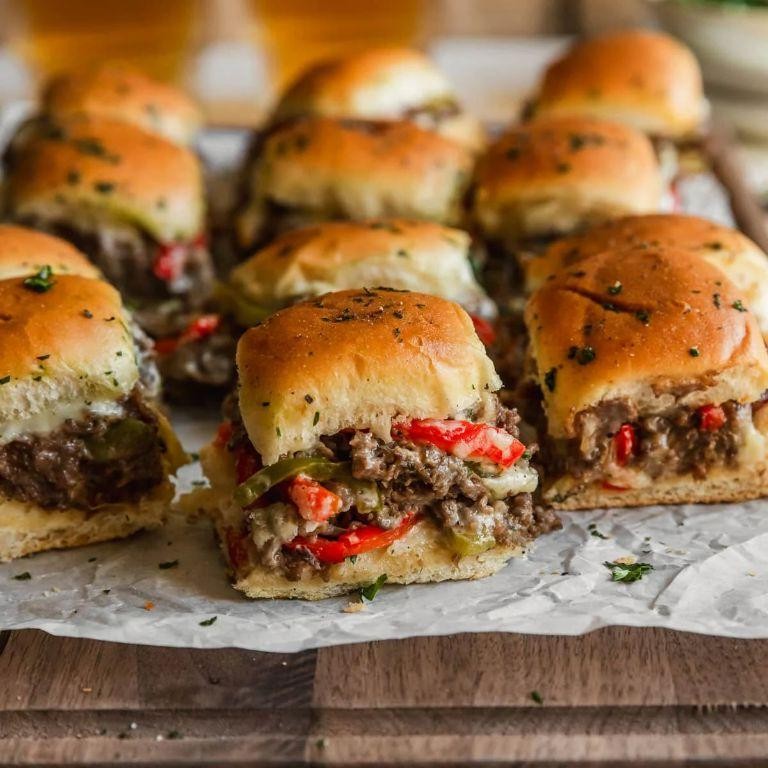
Waking up to the aroma of sizzling onions and beef is my kind of morning, especially when it’s for these Philly Cheesesteak Sliders. They’re the perfect blend of hearty and cheesy, and I love how they bring a little bit of Philadelphia right into my kitchen.
Ingredients
- 1 lb ribeye steak, thinly sliced (I swear by ribeye for its marbling and flavor)
- 1 large onion, thinly sliced (yellow onions are my go-to for sweetness)
- 1 green bell pepper, thinly sliced (adds a nice crunch and color)
- 8 slider buns (I like them soft but sturdy enough to hold the filling)
- 8 slices provolone cheese (the meltiness is unbeatable)
- 2 tbsp unsalted butter, melted (for that golden, buttery finish)
- 1 tbsp olive oil (extra virgin is my kitchen staple)
- Salt and pepper to taste (I’m generous with the pepper for a bit of kick)
Instructions
- Preheat your oven to 350°F (175°C) to get it ready for toasting the sliders.
- Heat olive oil in a large skillet over medium-high heat. Add the onions and bell peppers, cooking until they’re soft and slightly caramelized, about 5-7 minutes. Tip: Don’t rush this step; the sweetness comes out with patience.
- Push the veggies to one side of the skillet and add the sliced ribeye. Season with salt and pepper, and cook until the beef is no longer pink, about 3-4 minutes. Tip: Thin slices cook quickly, so keep an eye to avoid overcooking.
- Combine the beef and veggies in the skillet, then divide the mixture evenly among the bottom halves of the slider buns.
- Top each slider with a slice of provolone cheese, then cover with the top bun halves.
- Brush the tops of the sliders with melted butter for that irresistible golden crust.
- Bake in the preheated oven for 10 minutes, or until the cheese is melted and the buns are lightly toasted. Tip: If you like extra crispy buns, broil for the last minute.
Last bite into these sliders reveals a juicy, flavorful filling with the perfect amount of cheese pull. Serve them with a side of pickles or a simple salad to cut through the richness, and watch them disappear in no time.
Hawaiian Ham and Pineapple Sliders

Perfect for those lazy summer evenings when you crave something sweet, savory, and utterly satisfying, these Hawaiian Ham and Pineapple Sliders are a game-changer. I stumbled upon this recipe during a backyard BBQ mishap, and now it’s my go-to for feeding a crowd without breaking a sweat.
Ingredients
- 1 package (12 count) Hawaiian sweet rolls – their softness is unmatched for sliders.
- 1/2 cup mayonnaise – I swear by Duke’s for its tangy richness.
- 1 tbsp Dijon mustard – adds a subtle kick that balances the sweetness.
- 1 lb thinly sliced deli ham – go for the honey-glazed variety if you can find it.
- 1 cup pineapple slices, drained – fresh is great, but canned works in a pinch.
- 6 slices Swiss cheese – melts like a dream over the warm ingredients.
- 1/4 cup unsalted butter, melted – I always have Kerrygold on hand for its flavor.
- 1 tbsp brown sugar – just enough to caramelize the tops beautifully.
- 1/2 tsp garlic powder – my secret weapon for depth of flavor.
Instructions
- Preheat your oven to 350°F (175°C) and grab a 9×13 inch baking dish.
- Without separating the rolls, slice the entire package horizontally to create a top and bottom layer. Place the bottom layer in the baking dish.
- Spread the mayonnaise evenly over the bottom layer of rolls. This acts as a moisture barrier, keeping the bread from getting soggy.
- Layer the ham over the mayonnaise, folding the slices to fit if necessary.
- Arrange the pineapple slices over the ham, then top with Swiss cheese slices.
- Place the top layer of rolls over the cheese. Tip: Press down gently to compact the layers slightly.
- In a small bowl, mix the melted butter, brown sugar, and garlic powder. Brush this mixture evenly over the top of the rolls.
- Cover the baking dish with aluminum foil and bake for 20 minutes. Then, remove the foil and bake for an additional 5 minutes, or until the tops are golden and the cheese is bubbly.
- Let the sliders rest for 5 minutes before slicing into individual servings. This allows the cheese to set slightly, making them easier to handle.
Ready to serve, these sliders are a delightful mix of sweet, salty, and buttery with a slight crunch from the caramelized top. I love pairing them with a simple side of sweet potato fries for a meal that’s sure to impress.
Greek Lamb Sliders with Tzatziki
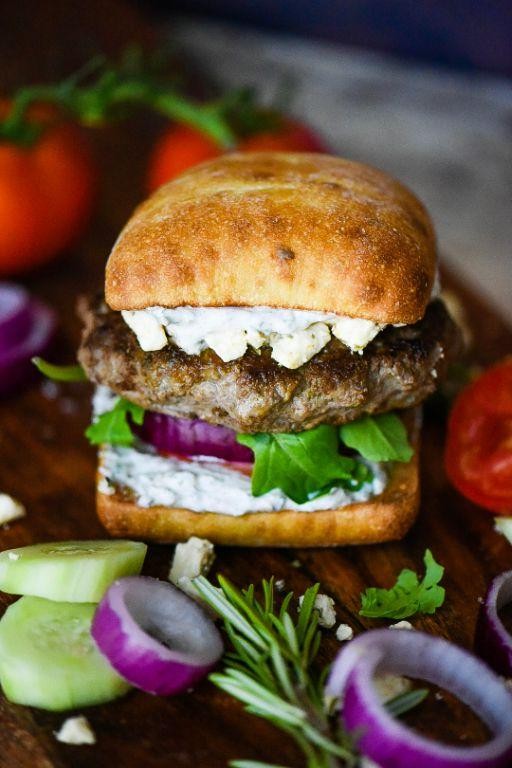
Remember those summer evenings when the grill is fired up, and the air is filled with the scent of something delicious? That’s exactly what these Greek Lamb Sliders with Tzatziki bring to mind. I stumbled upon this recipe during a friend’s backyard BBQ, and it’s been a staple in my summer cooking ever since.
Ingredients
- 1 lb ground lamb (I find the fat content here makes for juicier sliders)
- 1/2 cup finely chopped red onion (for a bit of crunch and sweetness)
- 2 cloves garlic, minced (because garlic makes everything better)
- 1 tbsp dried oregano (my go-to herb for that authentic Greek flavor)
- 1 tsp ground cumin (adds a warm, earthy note)
- 1/2 tsp salt (I like to use sea salt for its clean taste)
- 1/4 tsp black pepper (freshly ground, if possible)
- 1/2 cup Greek yogurt (the base for our tzatziki, full-fat for creaminess)
- 1/4 cup grated cucumber (squeeze out the excess water to keep the tzatziki thick)
- 1 tbsp lemon juice (for a bright, tangy kick)
- 1 tbsp extra virgin olive oil (my favorite for dressing)
- Slider buns (toasted lightly for that perfect crunch)
Instructions
- In a large bowl, combine the ground lamb, red onion, garlic, oregano, cumin, salt, and black pepper. Mix gently with your hands to avoid overworking the meat.
- Form the mixture into small patties, about 2 inches in diameter. Pro tip: Make a small indentation in the center of each patty to prevent puffing up during cooking.
- Preheat your grill or skillet to medium-high heat (about 375°F). Grill the patties for 3-4 minutes on each side, or until they reach an internal temperature of 160°F.
- While the patties cook, mix the Greek yogurt, grated cucumber, lemon juice, and olive oil in a small bowl to make the tzatziki. Season lightly with salt if needed.
- Toast the slider buns lightly on the grill for about 30 seconds per side, just until they’re golden and have those lovely grill marks.
- Assemble the sliders by placing a lamb patty on each bun and topping with a generous dollop of tzatziki.
How these sliders come together is nothing short of magical. The lamb is juicy and flavorful, perfectly complemented by the cool, creamy tzatziki. Serve them with a side of crispy sweet potato fries or a fresh Greek salad for a meal that’s sure to impress.
Spicy Sriracha Shrimp Sliders
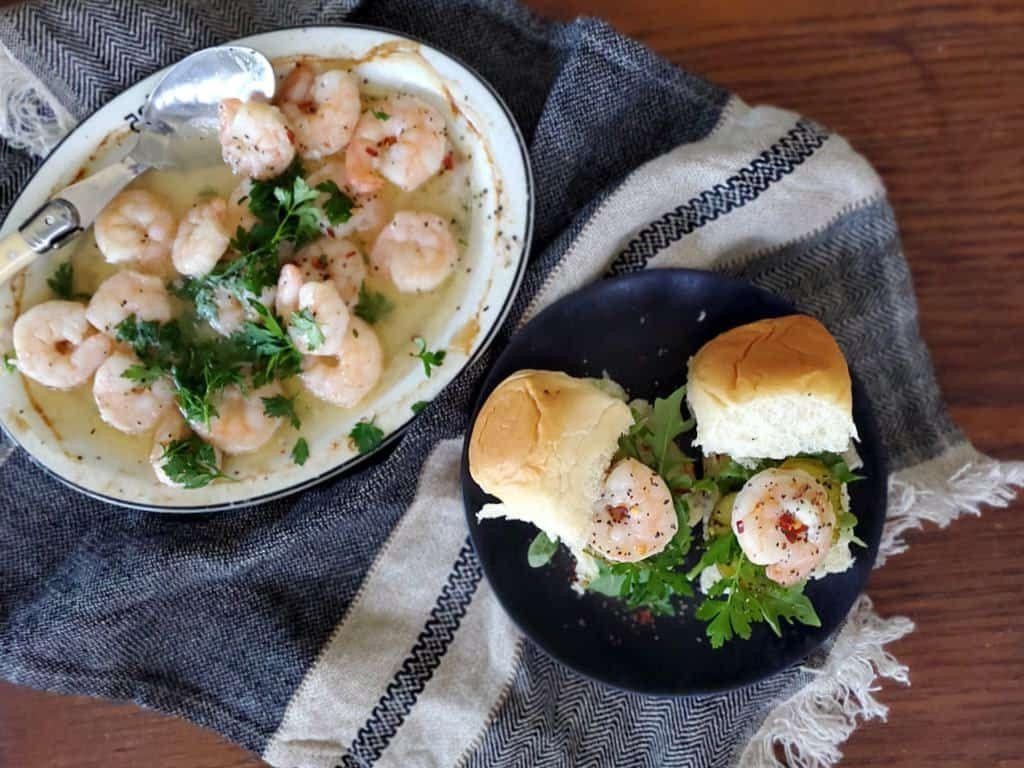
Last summer, I stumbled upon the most irresistible combination of flavors at a tiny beachside shack, and I’ve been obsessed with recreating it at home ever since. These Spicy Sriracha Shrimp Sliders are my take on that unforgettable bite, perfect for when you’re craving something with a kick but don’t want to spend hours in the kitchen.
Ingredients
- 1 lb medium shrimp, peeled and deveined (I like to keep the tails on for a prettier presentation)
- 2 tbsp Sriracha sauce (adjust based on your heat preference, but don’t skimp—this is where the magic happens)
- 1 tbsp honey (for that perfect sweet-spicy balance)
- 1 tbsp soy sauce (I use low-sodium to control the saltiness)
- 1 tbsp lime juice (freshly squeezed, please—it makes all the difference)
- 1 tbsp olive oil (extra virgin is my go-to for its fruity notes)
- 4 slider buns, toasted (I opt for brioche for its buttery richness)
- 1/2 cup coleslaw mix (for a crunchy contrast)
- 1/4 cup cilantro, chopped (because everything’s better with fresh herbs)
Instructions
- In a medium bowl, whisk together Sriracha, honey, soy sauce, and lime juice until well combined. Tip: Taste the sauce now and adjust the Sriracha or honey to suit your palate.
- Add the shrimp to the bowl, tossing to coat evenly. Let marinate for 15 minutes at room temperature—no longer, or the lime juice will start to cook the shrimp.
- Heat olive oil in a large skillet over medium-high heat. Once hot, add the shrimp in a single layer, reserving the marinade. Cook for 2 minutes per side, just until pink and opaque. Tip: Don’t overcrowd the pan, or you’ll steam the shrimp instead of searing them.
- Pour the reserved marinade into the skillet, bringing to a boil for 1 minute to thicken slightly and ensure it’s safe to eat. Tip: This step not only cooks the marinade but also glazes the shrimp beautifully.
- Toast the slider buns lightly—this adds texture and prevents them from getting soggy.
- Assemble the sliders: Place a spoonful of coleslaw on the bottom bun, top with 3-4 shrimp, and garnish with cilantro. Serve immediately.
Out of the oven, these sliders are a riot of textures and flavors—the juicy, spicy shrimp against the crisp coleslaw and soft, sweet buns is nothing short of addictive. Try serving them with a side of sweet potato fries for a meal that’s sure to impress.
Mushroom Swiss Sliders
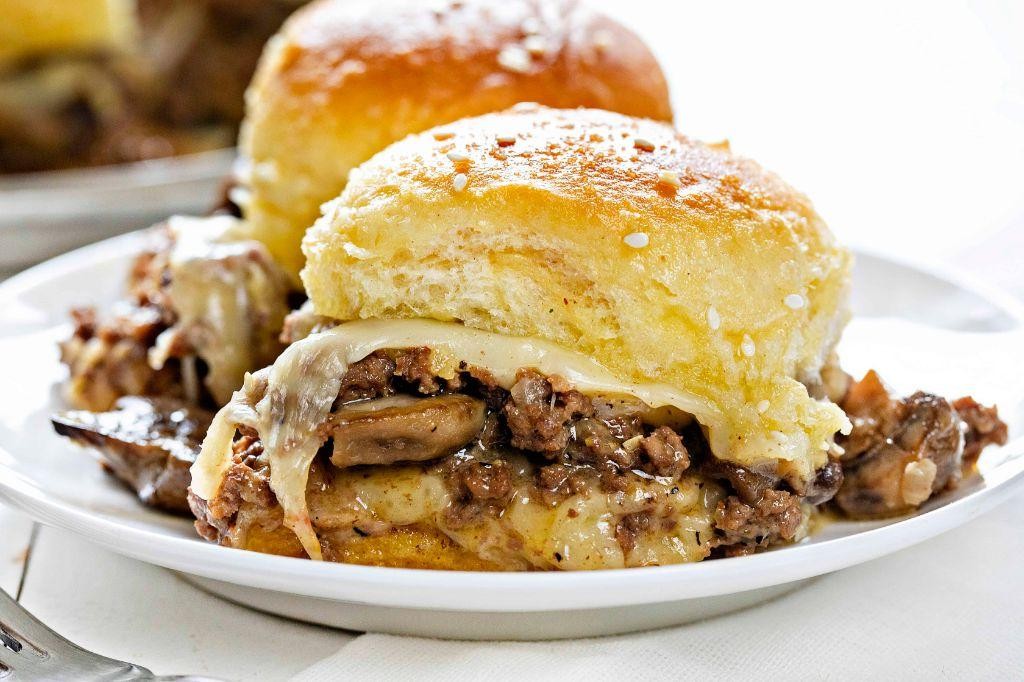
First off, let me tell you, these Mushroom Swiss Sliders are the little bites of heaven you didn’t know you needed in your life. Perfect for game day or a cozy night in, they’re my go-to when I want something delicious without spending hours in the kitchen.
Ingredients
- 1 lb ground beef (I like to use 80/20 for that perfect juiciness)
- 1 tbsp olive oil (extra virgin is my kitchen staple)
- 1 cup sliced mushrooms (baby bellas add a nice depth of flavor)
- 1 small onion, finely chopped (because who doesn’t love a bit of sweetness?)
- 1 tsp garlic powder (for that quick flavor boost)
- 1 tsp Worcestershire sauce (a little secret ingredient of mine)
- 6 slices Swiss cheese (trust me, it melts like a dream)
- 12 slider buns (I opt for Hawaiian rolls for a sweet contrast)
- Salt and pepper to taste (but be generous with the pepper!)
Instructions
- Heat olive oil in a skillet over medium heat until shimmering, about 2 minutes.
- Add onions and mushrooms, sautéing until they’re golden and soft, roughly 5 minutes. Tip: Don’t crowd the pan to get a nice sear on those mushrooms.
- Push the veggies to one side, add the ground beef, breaking it apart with a spatula. Cook until no pink remains, about 6 minutes. Tip: Season the beef as it cooks for even flavor distribution.
- Stir in garlic powder and Worcestershire sauce, combining everything well. Let it cook for another minute.
- Preheat your oven to 350°F (175°C) and line a baking sheet with parchment paper.
- Slice the slider buns in half if they’re not pre-sliced, and lay the bottoms on the baking sheet.
- Evenly distribute the beef and mushroom mixture over the bun bottoms, then top each with a slice of Swiss cheese.
- Place the top halves of the buns over the cheese and cover the baking sheet loosely with foil.
- Bake for 10 minutes, then remove the foil and bake for another 5 minutes until the cheese is bubbly and the buns are slightly toasted. Tip: Keep an eye on them to prevent over-browning.
Serve these sliders warm and watch them disappear. The combination of juicy beef, earthy mushrooms, and melty Swiss cheese is irresistible. For an extra kick, a side of spicy mayo dipping sauce does wonders.
Jalapeño Popper Sliders

After a long day of testing recipes, there’s nothing I crave more than something spicy, cheesy, and utterly comforting. That’s how these Jalapeño Popper Sliders came to be—a perfect blend of heat, creaminess, and that irresistible slider size that makes them impossible to resist.
Ingredients
- 1 lb ground beef (I like an 80/20 mix for juiciness)
- 12 slider buns (brioche works wonders here)
- 4 oz cream cheese, softened (room temp blends smoother)
- 1/2 cup shredded cheddar cheese (sharp for that extra kick)
- 2 jalapeños, finely diced (seeds in if you dare)
- 1 tbsp garlic powder (my secret flavor booster)
- 1 tsp salt (I always use sea salt for its clean taste)
- 1/2 tsp black pepper (freshly ground, please)
- 2 tbsp unsalted butter, melted (for that golden bun finish)
Instructions
- Preheat your oven to 375°F (190°C) and line a baking sheet with parchment paper.
- In a large bowl, mix the ground beef, garlic powder, salt, and black pepper until just combined. Overmixing can make the sliders tough.
- Divide the beef mixture into 12 equal portions and shape into small patties, slightly larger than the buns since they’ll shrink.
- Heat a skillet over medium-high heat and cook the patties for 2-3 minutes per side, just until seared. They’ll finish cooking in the oven.
- In a small bowl, mix the cream cheese, cheddar cheese, and diced jalapeños until well combined.
- Place the bottom halves of the buns on the prepared baking sheet, top each with a seared patty, then a dollop of the cheese mixture.
- Cover with the top bun halves and brush the tops with melted butter for a golden finish.
- Bake for 10-12 minutes, or until the cheese is bubbly and the buns are toasted.
Mouthwatering doesn’t even begin to describe these sliders. The creamy, spicy filling oozes out with every bite, perfectly complementing the juicy beef. Serve them with a side of cool ranch or extra jalapeños for those who love an extra kick.
Bacon Cheeseburger Sliders
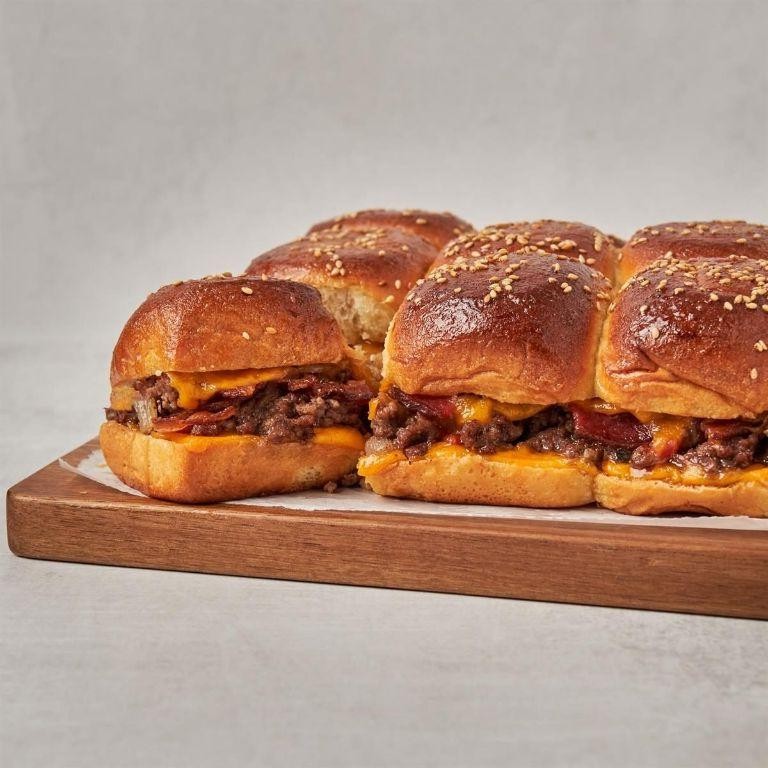
Mmm, there’s something about the smell of sizzling bacon that instantly makes my kitchen feel like home. These Bacon Cheeseburger Sliders are my go-to when I need a crowd-pleaser that’s as fun to make as it is to eat. Perfect for game day or a casual get-together, they’re a mini version of the classic burger with all the smoky, cheesy goodness.
Ingredients
- 1 lb ground beef (I like 80/20 for the juiciest sliders)
- 6 slices bacon (thick-cut gives the best crunch)
- 1 cup shredded cheddar cheese (sharp cheddar melts beautifully)
- 1/4 cup mayonnaise (a secret for extra moist sliders)
- 1 tbsp mustard (yellow or Dijon, depending on your kick preference)
- 12 slider buns (potato rolls are my favorite for their softness)
- 1 tbsp butter, melted (for that golden bun finish)
- 1 tsp garlic powder (because everything’s better with garlic)
Instructions
- Preheat your oven to 350°F and line a baking sheet with parchment paper for easy cleanup.
- Cook the bacon in a skillet over medium heat until crispy, about 8 minutes. Drain on paper towels and crumble once cool.
- In a bowl, mix the ground beef, mayonnaise, mustard, and garlic powder until just combined. Overmixing can make the sliders tough.
- Form the beef mixture into 12 small patties, about 2 inches in diameter. They’ll shrink a bit, so don’t make them too thick.
- Place the patties on the prepared baking sheet and bake for 10 minutes. Flip, then top each with cheese and crumbled bacon.
- Bake for another 5 minutes, or until the cheese is melted and the patties are cooked through.
- Brush the slider buns with melted butter and toast in the oven for 2-3 minutes, just until golden.
- Assemble the sliders by placing a patty on each bun bottom, then topping with the bun top. Serve warm.
Perfectly juicy with a crispy bacon crunch, these sliders are a hit every time. Try serving them with a side of pickles or a spicy aioli for an extra flavor boost.
Sweet Potato and Black Bean Sliders
These sweet potato and black bean sliders are my go-to when I need something hearty yet healthy. They’re packed with flavor and have the perfect balance of sweet and savory. I first made them for a summer BBQ, and they were such a hit that they’ve become a staple in my recipe rotation.
Ingredients
- 1 large sweet potato, peeled and diced (about 2 cups) – I find the orange-fleshed ones are sweeter.
- 1 can (15 oz) black beans, drained and rinsed – I always opt for low-sodium to control the salt.
- 1/2 cup breadcrumbs – Panko gives a nice crunch, but any will do.
- 1 tsp cumin – Toasted and ground fresh if you’re feeling fancy.
- 1/2 tsp smoked paprika – This adds a subtle smokiness that I love.
- 1 tbsp olive oil – Extra virgin is my pantry staple.
- Salt to taste – I start with 1/4 tsp and adjust from there.
Instructions
- Preheat your oven to 375°F (190°C) and line a baking sheet with parchment paper.
- Place the diced sweet potato in a microwave-safe bowl, cover with a damp paper towel, and microwave for 5 minutes until tender. Tip: This step saves time, but you can also roast them for deeper flavor.
- In a large bowl, mash the black beans with a fork, leaving some whole for texture.
- Add the cooked sweet potato, breadcrumbs, cumin, smoked paprika, and salt to the bowl with the beans. Mix until well combined. Tip: If the mixture feels too wet, add a bit more breadcrumbs.
- Form the mixture into 8 small patties, about 1/2 inch thick.
- Heat olive oil in a skillet over medium heat. Cook the patties for 3-4 minutes on each side until golden brown. Tip: Don’t overcrowd the skillet to ensure even cooking.
- Transfer the patties to the prepared baking sheet and bake for 10 minutes to firm up.
Keep these sliders warm until serving, and watch them disappear at your next gathering. The texture is crispy on the outside, soft and flavorful on the inside. Serve them on mini buns with a slice of avocado and a dollop of Greek yogurt for an extra creamy touch.
Reuben Sliders

Perfect for game day or a cozy night in, these Reuben Sliders are my go-to when I’m craving something hearty yet easy to whip up. I remember the first time I made these for a friend’s gathering, and they disappeared in minutes—proof that good food brings people together.
Ingredients
- 1 package (12 count) Hawaiian sweet rolls – their slight sweetness balances the savory fillings perfectly.
- 1/2 lb thinly sliced corned beef – I like to ask the deli to slice it a bit thicker for more texture.
- 1 cup sauerkraut, drained – squeeze out the excess liquid to prevent soggy sliders.
- 6 slices Swiss cheese – I sometimes use Gruyère for a nuttier flavor.
- 1/4 cup Thousand Island dressing – homemade or store-bought, both work great here.
- 2 tbsp unsalted butter, melted – for that golden, crispy top.
- 1 tsp caraway seeds – optional, but they add a nice crunch and flavor.
Instructions
- Preheat your oven to 350°F (175°C) and line a baking sheet with parchment paper for easy cleanup.
- Without separating the rolls, slice the entire package of Hawaiian sweet rolls in half horizontally to create a top and bottom layer.
- Spread the bottom half with Thousand Island dressing, then layer on the corned beef, sauerkraut, and Swiss cheese. Tip: Distribute the ingredients evenly to ensure every bite is flavorful.
- Place the top half of the rolls over the filling, then brush the melted butter over the tops and sprinkle with caraway seeds if using. Tip: The butter helps the tops get beautifully golden.
- Bake for 15-20 minutes, or until the cheese is melted and the tops are golden brown. Tip: Cover with foil if the tops are browning too quickly.
- Remove from the oven and let cool for a couple of minutes before slicing into individual sliders.
You’ll love the melty cheese and tangy sauerkraut against the sweet rolls. Try serving these with a side of pickles for an extra crunch and acidity that cuts through the richness.
Caprese Sliders with Balsamic Glaze
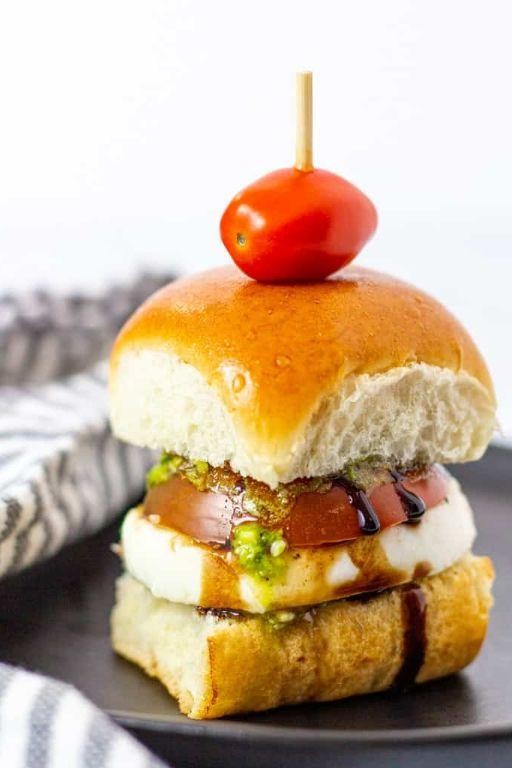
Whenever I’m hosting a summer gathering, these Caprese Sliders with Balsamic Glaze are my go-to for a quick, flavorful appetizer that always impresses. The combination of fresh basil, juicy tomatoes, and creamy mozzarella, all drizzled with a sweet and tangy balsamic reduction, is simply irresistible.
Ingredients
- 1 package (12 count) Hawaiian sweet rolls – their slight sweetness perfectly complements the savory fillings.
- 8 oz fresh mozzarella cheese, sliced – I always look for the freshest mozzarella I can find; it makes all the difference.
- 2 large tomatoes, sliced – ripe, garden-fresh tomatoes are my preference here.
- 1/4 cup fresh basil leaves – nothing beats the aroma of fresh basil.
- 1/2 cup balsamic vinegar – I opt for a high-quality vinegar for a smoother glaze.
- 2 tbsp honey – this adds a lovely sweetness to balance the vinegar’s tang.
- 1/4 cup extra virgin olive oil – my kitchen staple for its rich flavor.
- Salt and pepper to taste – I’m generous with the pepper for a bit of spice.
Instructions
- Preheat your oven to 350°F (175°C) to warm the rolls slightly before assembling.
- In a small saucepan, combine balsamic vinegar and honey over medium heat. Bring to a simmer, then reduce heat to low and let it thicken for about 10 minutes, stirring occasionally. Tip: The glaze is ready when it coats the back of a spoon.
- Slice the Hawaiian rolls in half horizontally and place the bottom half on a baking sheet. Drizzle with half of the olive oil.
- Layer the mozzarella slices, tomato slices, and basil leaves on the bottom half of the rolls. Tip: Overlapping the ingredients ensures every bite is packed with flavor.
- Place the top half of the rolls over the fillings and brush with the remaining olive oil. Bake for 5-7 minutes, just until the cheese begins to melt. Tip: Watch closely to avoid over-baking; the rolls should be warm but not crispy.
- Remove from the oven, drizzle with the balsamic glaze, and season with salt and pepper. Slice into individual sliders and serve immediately.
Perfect for any occasion, these sliders offer a delightful contrast of textures, from the soft, warm rolls to the creamy cheese and fresh, crisp basil. For an extra touch, serve them with a side of the remaining balsamic glaze for dipping.
Chicken Parmesan Sliders

Whenever I think of comfort food that’s both easy to make and a crowd-pleaser, Chicken Parmesan Sliders come to mind. They’re perfect for game day, a family dinner, or when you’re craving something cheesy and delicious without spending hours in the kitchen.
Ingredients
- 1 lb chicken breast, thinly sliced (I find that thinner slices cook more evenly and quickly)
- 1 cup marinara sauce (homemade or your favorite store-bought brand)
- 1 cup shredded mozzarella cheese (because more cheese is always better)
- 1/2 cup grated Parmesan cheese (the real deal, not the powdered stuff)
- 12 slider buns (I like to use Hawaiian rolls for a touch of sweetness)
- 2 tbsp extra virgin olive oil (my go-to for frying)
- 1 tsp garlic powder (for that extra flavor kick)
- 1 tsp Italian seasoning (because it’s not Chicken Parmesan without it)
- Salt and pepper to taste (though I usually go heavy on the pepper)
Instructions
- Preheat your oven to 375°F (190°C) to get it ready for the sliders.
- Heat the extra virgin olive oil in a large skillet over medium heat. Tip: The oil is ready when it shimmers but doesn’t smoke.
- Season the chicken slices with garlic powder, Italian seasoning, salt, and pepper.
- Cook the chicken in the skillet for about 4-5 minutes on each side, or until golden brown and cooked through. Tip: Don’t overcrowd the pan to ensure each piece gets nicely browned.
- Spread a thin layer of marinara sauce on the bottom half of each slider bun.
- Place a piece of cooked chicken on each bun, then top with mozzarella and Parmesan cheeses.
- Cover with the top half of the buns and wrap the entire tray in aluminum foil. Tip: Wrapping them tightly ensures the cheese melts perfectly without drying out the buns.
- Bake in the preheated oven for about 10 minutes, or until the cheese is melted and bubbly.
Mmm, the moment you unwrap these sliders, the aroma of melted cheese and seasoned chicken is irresistible. The buns are soft yet slightly crispy from the oven, and the chicken is perfectly tender. Serve them with a side of extra marinara for dipping, and watch them disappear in no time.
Fish Tacos Sliders
Warm summer evenings call for something light yet satisfying, and that’s exactly where these Fish Tacos Sliders come into play. I remember the first time I whipped these up for a backyard gathering; the combination of crispy fish and fresh toppings had everyone coming back for seconds.
Ingredients
- 1 lb white fish fillets (I swear by cod for its flakiness)
- 1 cup all-purpose flour (for that perfect golden crust)
- 1 tsp garlic powder (because everything’s better with garlic)
- 1/2 tsp smoked paprika (adds a subtle depth)
- 1/2 cup buttermilk (my secret for extra crispy fish)
- 12 slider buns (toasted lightly for crunch)
- 1 cup shredded cabbage (for a fresh crunch)
- 1/2 cup diced tomatoes (I like them ripe and juicy)
- 1/4 cup chopped cilantro (freshness is key)
- 1 lime, cut into wedges (don’t skip the squeeze at the end)
- 1/2 cup mayonnaise (mixed with a bit of lime zest for the sauce)
- 1 tbsp vegetable oil (for frying)
Instructions
- Cut the fish fillets into slider-sized pieces, about 2 inches each.
- In a shallow bowl, mix flour, garlic powder, and smoked paprika.
- Pour buttermilk into another shallow bowl.
- Dip each fish piece into buttermilk, then coat evenly with the flour mixture.
- Heat vegetable oil in a skillet over medium-high heat (350°F is ideal).
- Fry the fish pieces for 3-4 minutes per side, until golden and crispy.
- While the fish cooks, toast the slider buns lightly for about 1 minute.
- Spread a thin layer of the lime-mayonnaise sauce on each bun.
- Place a piece of fried fish on the bottom half of each bun.
- Top with shredded cabbage, diced tomatoes, and chopped cilantro.
- Squeeze a lime wedge over each slider before serving.
Crunchy on the outside, tender on the inside, these sliders are a burst of flavors and textures. Serve them with extra lime wedges on the side for that extra zing, and watch them disappear before your eyes.
Eggplant Parmesan Sliders
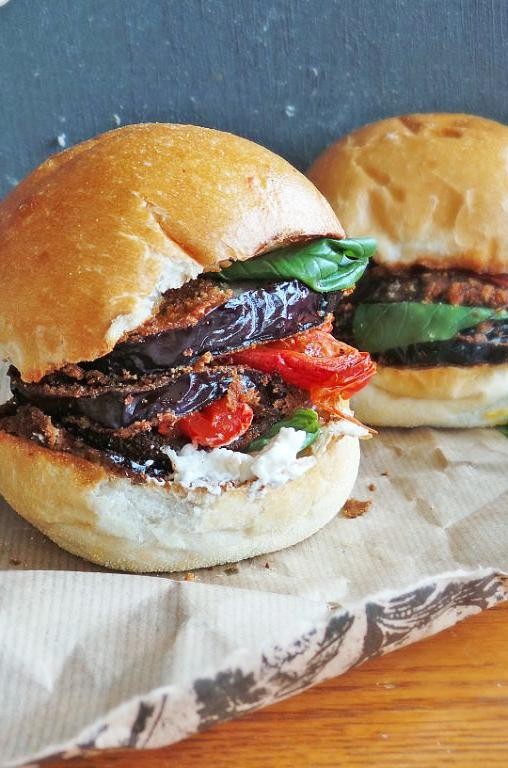
Last weekend, I found myself staring at a pile of eggplants from my garden, wondering how to turn them into something both comforting and crowd-pleasing. That’s when the idea for these Eggplant Parmesan Sliders hit me—perfect for a summer gathering or a cozy night in.
Ingredients
- 2 medium eggplants, sliced into 1/2-inch rounds (I always salt mine and let them sit for 30 minutes to draw out bitterness)
- 1 cup all-purpose flour (for that perfect, light coating)
- 2 large eggs, beaten (room temp eggs blend better, in my experience)
- 1 cup Italian-style breadcrumbs (homemade if you’re feeling fancy)
- 1/2 cup grated Parmesan cheese (the real deal, please)
- 2 cups marinara sauce (my nonna’s recipe is my go-to)
- 1 cup shredded mozzarella cheese (because more cheese is always better)
- 1/4 cup extra virgin olive oil (for frying, it adds a nice flavor)
- 12 slider buns (toasted lightly for extra crunch)
- Fresh basil leaves (for a pop of color and freshness)
Instructions
- Preheat your oven to 375°F and line a baking sheet with parchment paper.
- After salting the eggplant slices, pat them dry with paper towels to remove excess moisture.
- Dredge each slice in flour, then dip in beaten eggs, and finally coat with a mixture of breadcrumbs and Parmesan cheese.
- Heat olive oil in a large skillet over medium heat and fry the eggplant slices until golden brown, about 3 minutes per side. Tip: Don’t overcrowd the pan to ensure even cooking.
- Transfer the fried slices to the prepared baking sheet, top each with a spoonful of marinara sauce and a sprinkle of mozzarella.
- Bake for 10 minutes, or until the cheese is bubbly and slightly golden. Tip: Keep an eye on them to prevent burning.
- Toast the slider buns lightly for about 2 minutes in the oven or a toaster.
- Assemble the sliders by placing a cheesy eggplant slice on each bun bottom, adding a fresh basil leaf, and topping with the other half of the bun. Tip: Serve immediately for the best texture.
Fresh out of the oven, these sliders are a delightful mix of crispy, cheesy, and saucy, with the eggplant tender inside. I love serving them with a side of extra marinara for dipping, making them a hit at any table.
Pesto Chicken Sliders

Yesterday, I found myself craving something both comforting and a bit fancy for dinner, and that’s how these Pesto Chicken Sliders came to life. Perfect for a cozy night in or a casual get-together, they’re a hit every time I make them.
Ingredients
- 1 lb ground chicken (I find that thigh meat adds more flavor)
- 1/2 cup basil pesto (homemade if you have it, but store-bought works in a pinch)
- 1/4 cup grated Parmesan cheese (the real deal, please)
- 1 tbsp olive oil (extra virgin is my go-to for its fruity notes)
- 1 tsp garlic powder (because fresh garlic can be too overpowering here)
- 1/2 tsp salt (I like to use sea salt for its subtle crunch)
- 1/4 tsp black pepper (freshly ground makes all the difference)
- 12 slider buns (I opt for brioche for that buttery softness)
Instructions
- Preheat your oven to 375°F (190°C) to get it ready for toasting the buns later.
- In a large bowl, mix the ground chicken, pesto, Parmesan, garlic powder, salt, and pepper until just combined. Overmixing can make the sliders tough.
- Divide the mixture into 12 equal portions and shape each into a small patty, about the size of your slider buns.
- Heat the olive oil in a large skillet over medium heat. Once hot, add the patties in batches to avoid overcrowding.
- Cook the patties for about 4 minutes on each side, or until they’re golden brown and reach an internal temperature of 165°F (74°C).
- While the patties cook, split the slider buns and place them on a baking sheet. Toast in the oven for about 3 minutes, just until they’re lightly golden.
- Assemble the sliders by placing a pesto chicken patty on the bottom half of each bun. Add a small dollop of extra pesto on top if you’re feeling fancy, then crown with the top bun.
The sliders are juicy with a herby punch from the pesto, and the brioche buns add a sweet contrast. Serve them with a side of sweet potato fries or a crisp salad for a meal that’s sure to impress.
Caramelized Onion and Swiss Sliders
Just last week, I found myself staring into the fridge, pondering what to whip up for a quick yet satisfying dinner. That’s when the idea of Caramelized Onion and Swiss Sliders came to mind—a dish that’s as fun to make as it is to eat, perfect for those nights when you want something delicious without the fuss.
Ingredients
- 1 tbsp extra virgin olive oil (my go-to for its fruity notes)
- 2 large yellow onions, thinly sliced (I swear by Vidalias for their natural sweetness)
- 1 tsp salt (to help draw out the onions’ moisture)
- 1 tbsp brown sugar (for that deep caramelization)
- 1 lb ground beef (80/20 blend for juiciness)
- 1 tsp garlic powder (because everything’s better with garlic)
- 1/2 tsp black pepper (freshly ground, please)
- 12 slider buns (I like them slightly toasted)
- 6 slices Swiss cheese (cut in half to fit the sliders)
Instructions
- Heat olive oil in a large skillet over medium-low heat. Patience is key here—low and slow wins the race.
- Add the sliced onions and salt, stirring occasionally. After 10 minutes, sprinkle the brown sugar over the onions. Continue cooking for another 20 minutes until deeply golden. Tip: Resist the urge to stir too often to allow proper caramelization.
- While the onions cook, preheat your oven to 350°F. This ensures it’s ready for toasting the buns later.
- In a bowl, mix the ground beef with garlic powder and black pepper. Form into 12 small patties. Tip: Make a slight indentation in the center of each patty to prevent bulging during cooking.
- Cook the patties in a skillet over medium heat for 3 minutes per side, or until nicely seared.
- Place the bottom halves of the buns on a baking sheet. Top each with a patty, a spoonful of caramelized onions, and a half slice of Swiss cheese. Broil for 2 minutes, or until the cheese is bubbly. Tip: Watch closely to avoid burning the buns.
- Cap with the top bun halves and serve immediately.
Crunchy, melty, and utterly irresistible, these sliders are a testament to the magic of caramelized onions. Try serving them with a side of pickles for an extra tangy contrast.
BBQ Jackfruit Sliders
Gathering around the grill has always been my favorite summer pastime, but lately, I’ve been swapping out the usual meats for something a bit more unexpected—jackfruit! These BBQ Jackfruit Sliders are a game-changer for anyone looking to mix up their BBQ routine with a plant-based twist that’s just as satisfying.
Ingredients
- 2 cans young green jackfruit in water (I always drain and rinse mine to remove any briney taste)
- 1 cup BBQ sauce (go for your favorite brand—mine’s the smoky kind with a hint of molasses)
- 1 tbsp olive oil (extra virgin is my kitchen staple)
- 1/2 tsp garlic powder (because everything’s better with garlic)
- 1/2 tsp smoked paprika (for that irresistible smoky flavor)
- 1/4 tsp salt (I like to use sea salt for a cleaner taste)
- 6 slider buns (toasted lightly for that perfect crunch)
- 1/2 cup coleslaw (homemade or store-bought, your call)
Instructions
- Heat olive oil in a large skillet over medium heat. This is where the magic starts—getting that jackfruit perfectly tender.
- Add the drained jackfruit to the skillet, breaking it apart with a fork as it cooks. It should start to resemble pulled pork after about 5 minutes.
- Sprinkle in the garlic powder, smoked paprika, and salt. Stir well to coat every piece. Tip: Don’t rush this step—letting the spices toast a bit brings out their flavors.
- Pour in the BBQ sauce, stirring to combine. Reduce heat to low and let it simmer for 10 minutes. The sauce should thicken slightly, clinging to the jackfruit.
- While the jackfruit simmers, toast your slider buns until they’re just golden. Tip: A quick toast adds texture and prevents sogginess.
- Assemble your sliders by piling the BBQ jackfruit onto the buns, then topping with a spoonful of coleslaw. Tip: The coleslaw adds a refreshing crunch that balances the smoky sweetness.
Wrapped in a soft bun with the tangy crunch of coleslaw, these sliders are a delightful mix of textures and flavors. Serve them up at your next BBQ and watch even the meat-lovers come back for seconds.
Buffalo Cauliflower Sliders
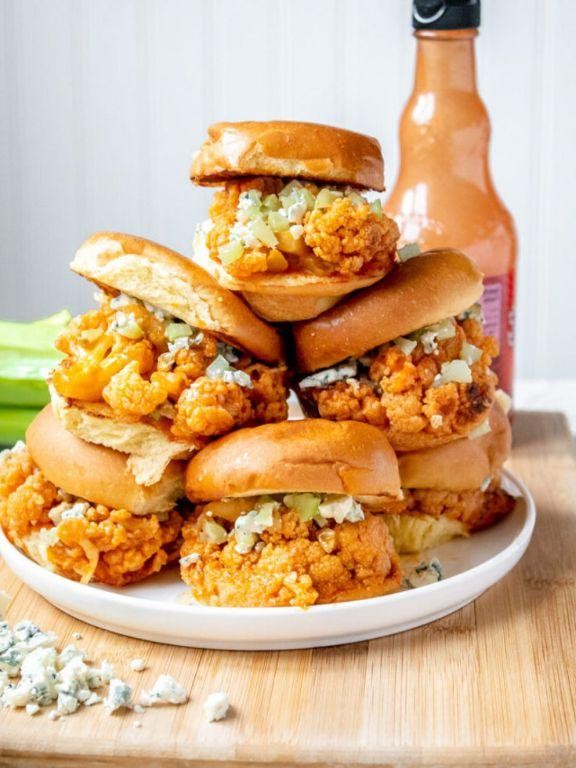
Yesterday, I was craving something spicy yet vegetarian, and that’s when these Buffalo Cauliflower Sliders came to mind. Perfect for game day or a cozy night in, they’re a healthier twist on a classic favorite that doesn’t skimp on flavor.
Ingredients
- 1 head of cauliflower, cut into florets (the smaller, the crispier they’ll get)
- 1 cup all-purpose flour (I swear by King Arthur for consistent results)
- 1 cup water (cold water makes the batter smoother)
- 1 tsp garlic powder (because everything’s better with garlic)
- 1/2 tsp salt (I use sea salt for a cleaner taste)
- 1/2 cup buffalo sauce (Frank’s RedHot is my go-to for that authentic tang)
- 1 tbsp melted butter (unsalted, so I can control the saltiness)
- 6 slider buns (brioche buns add a nice sweetness)
- 1/2 cup ranch dressing (homemade or store-bought, both work)
- 1 cup shredded lettuce (for that essential crunch)
Instructions
- Preheat your oven to 450°F and line a baking sheet with parchment paper. A hot oven is key for crispy cauliflower.
- In a large bowl, whisk together the flour, water, garlic powder, and salt until smooth. The batter should coat the back of a spoon.
- Toss the cauliflower florets in the batter until fully coated, then spread them out on the baking sheet. Don’t crowd them, or they’ll steam instead of crisp up.
- Bake for 20 minutes, flipping halfway through, until golden and crispy. This ensures even cooking on both sides.
- While the cauliflower bakes, mix the buffalo sauce and melted butter in a small bowl. This combo gives the sauce a richer flavor.
- Once the cauliflower is done, toss it in the buffalo sauce mixture until evenly coated. Return to the oven for 5 minutes to let the sauce set.
- Toast the slider buns lightly for about 2 minutes in the oven. It adds a nice texture contrast to the soft cauliflower.
- Assemble the sliders by placing a generous amount of buffalo cauliflower on each bun, topped with ranch dressing and shredded lettuce.
Every bite of these sliders offers a perfect balance of spicy, tangy, and crunchy. Serve them with extra ranch on the side for dipping, or add some sliced avocado for a creamy contrast.
Conclusion
Brimming with flavor and variety, our roundup of 23 delicious slider recipes offers something for every taste and occasion. Whether you’re hosting a party or just spicing up dinner, these mini delights are sure to impress. We’d love to hear which recipes you try and adore—drop us a comment below! Don’t forget to share your favorites on Pinterest so others can enjoy these tasty bites too. Happy cooking!