Valentine’s Day is the perfect excuse to indulge in something sweet, and we’ve got the ultimate lineup to make your celebration unforgettable. From rich chocolate truffles to creamy raspberry cheesecakes, these 18 decadent dessert recipes are sure to win over any heart. Whether you’re planning a romantic dinner or just treating yourself, get ready to fall in love with every bite. Let’s dive into these irresistible treats!
Chocolate Covered Strawberry Heart Cake
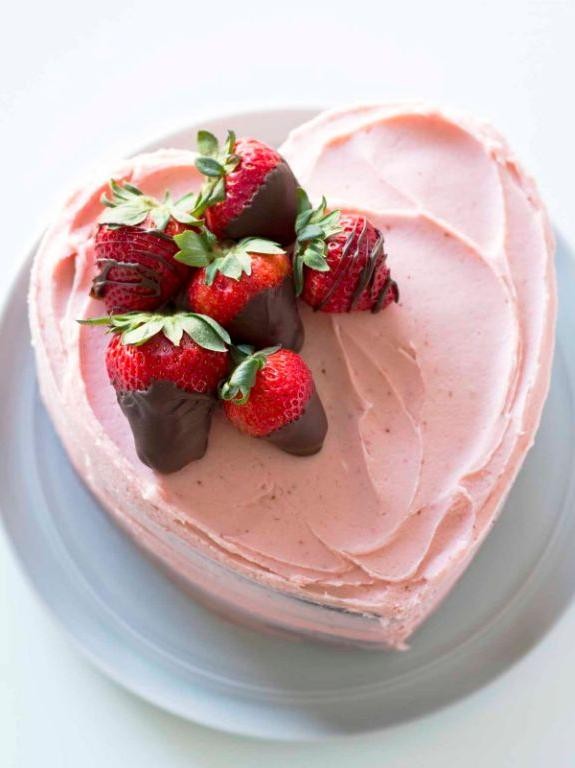
Nothing says ‘I love you’ quite like a homemade Chocolate Covered Strawberry Heart Cake. I remember the first time I attempted this recipe; it was for my partner’s birthday, and despite the mess in my kitchen, the result was a showstopper. This cake combines the richness of chocolate with the freshness of strawberries, creating a perfect balance of flavors.
Ingredients
- 2 cups all-purpose flour
- 1 3/4 cups granulated sugar
- 3/4 cup unsweetened cocoa powder
- 1 1/2 tsp baking powder
- 1 1/2 tsp baking soda
- 1 tsp salt
- 2 large eggs
- 1 cup whole milk
- 1/2 cup vegetable oil
- 2 tsp vanilla extract
- 1 cup boiling water
- 1 lb fresh strawberries
- 8 oz semisweet chocolate
- 1/2 cup heavy cream
Instructions
- Preheat your oven to 350°F (175°C) and grease two 9-inch heart-shaped cake pans.
- In a large bowl, sift together 2 cups all-purpose flour, 1 3/4 cups granulated sugar, 3/4 cup unsweetened cocoa powder, 1 1/2 tsp baking powder, 1 1/2 tsp baking soda, and 1 tsp salt.
- Add 2 large eggs, 1 cup whole milk, 1/2 cup vegetable oil, and 2 tsp vanilla extract to the dry ingredients. Mix until just combined.
- Gradually stir in 1 cup boiling water until the batter is smooth. The batter will be thin; this is normal.
- Divide the batter evenly between the prepared pans. Bake for 30-35 minutes, or until a toothpick inserted into the center comes out clean.
- Let the cakes cool in the pans for 10 minutes, then transfer to a wire rack to cool completely.
- While the cakes cool, hull and slice 1 lb fresh strawberries. Set aside.
- In a microwave-safe bowl, combine 8 oz semisweet chocolate and 1/2 cup heavy cream. Microwave in 30-second intervals, stirring between each, until smooth.
- Place one cake layer on a serving plate. Spread a layer of the chocolate ganache over the top, then arrange half of the sliced strawberries on top.
- Place the second cake layer on top. Cover the entire cake with the remaining ganache and decorate with the rest of the strawberries.
Kindly note, this cake is as delightful to look at as it is to eat, with the ganache adding a glossy finish that makes the strawberries pop. Serve it at room temperature to enjoy the full spectrum of flavors, or pair it with a scoop of vanilla ice cream for an extra indulgent treat.
Raspberry White Chocolate Cheesecake
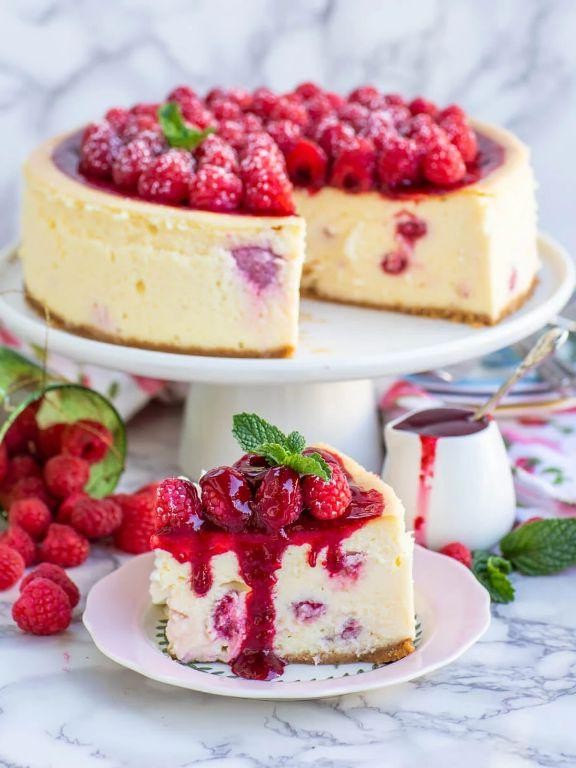
Last summer, I stumbled upon the most divine raspberry white chocolate cheesecake at a local bakery, and it was love at first bite. Since then, I’ve been on a mission to recreate that perfect balance of tart raspberries and creamy white chocolate in my own kitchen, and I’m thrilled to share my version with you today.
Ingredients
- 1 1/2 cups graham cracker crumbs
- 1/4 cup granulated sugar
- 1/2 cup unsalted butter, melted
- 24 oz cream cheese, softened
- 3/4 cup granulated sugar
- 3 large eggs
- 1 tsp vanilla extract
- 1 cup white chocolate chips, melted
- 1 cup fresh raspberries
- 1/4 cup raspberry jam
Instructions
- Preheat your oven to 325°F (163°C). This ensures a gentle bake for a creamy cheesecake.
- Mix 1 1/2 cups graham cracker crumbs, 1/4 cup sugar, and 1/2 cup melted butter in a bowl until well combined. Tip: Press the mixture firmly into the bottom of a 9-inch springform pan to prevent crumbling.
- Bake the crust for 10 minutes, then let it cool. This step helps the crust hold its shape.
- Beat 24 oz softened cream cheese and 3/4 cup sugar until smooth. Tip: Ensure the cream cheese is at room temperature to avoid lumps.
- Add 3 eggs, one at a time, mixing well after each addition, then stir in 1 tsp vanilla extract.
- Fold in 1 cup melted white chocolate chips until fully incorporated.
- Pour the filling over the cooled crust and smooth the top with a spatula.
- Drop 1 cup fresh raspberries and 1/4 cup raspberry jam in dollops over the filling, then swirl gently with a knife for a marbled effect.
- Bake for 45-50 minutes until the edges are set but the center is slightly wobbly. Tip: A water bath can prevent cracks, but if they appear, they add character!
- Turn off the oven, crack the door, and let the cheesecake cool inside for 1 hour to prevent sinking.
- Refrigerate for at least 4 hours, preferably overnight, before serving.
Out of the oven, this cheesecake is a showstopper with its creamy texture and bursts of raspberry freshness. Serve it chilled with a drizzle of melted white chocolate and a few extra raspberries on top for an extra touch of elegance.
Red Velvet Cupcakes with Cream Cheese Frosting
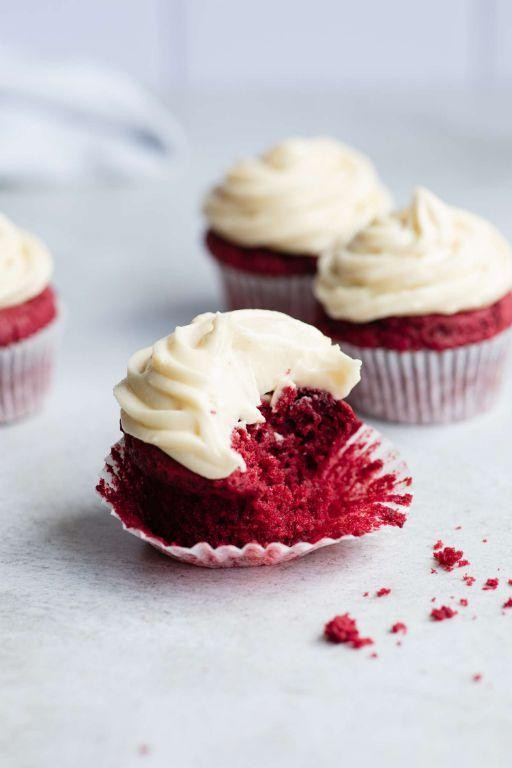
Kind of like a little piece of heaven, these Red Velvet Cupcakes with Cream Cheese Frosting have been my go-to for every special occasion since I first stumbled upon the recipe in my grandmother’s old cookbook. There’s something about the vibrant red color paired with the tangy cream cheese frosting that makes them irresistible.
Ingredients
- 1 1/4 cups all-purpose flour
- 1/2 cup unsweetened cocoa powder
- 1 tsp baking soda
- 1/2 tsp salt
- 1 cup granulated sugar
- 1/2 cup unsalted butter, softened
- 2 large eggs
- 1 tsp vanilla extract
- 1/2 cup buttermilk
- 1 tbsp red food coloring
- 1 tsp white vinegar
- 8 oz cream cheese, softened
- 1/4 cup unsalted butter, softened
- 2 cups powdered sugar
- 1 tsp vanilla extract
Instructions
- Preheat your oven to 350°F and line a muffin tin with cupcake liners.
- In a medium bowl, whisk together 1 1/4 cups all-purpose flour, 1/2 cup cocoa powder, 1 tsp baking soda, and 1/2 tsp salt. Tip: Sifting the dry ingredients ensures a smoother batter.
- In a large bowl, beat 1 cup granulated sugar and 1/2 cup butter until light and fluffy, about 3 minutes.
- Add 2 eggs, one at a time, then 1 tsp vanilla extract, beating well after each addition.
- Alternately add the dry ingredients and 1/2 cup buttermilk to the butter mixture, starting and ending with the dry ingredients. Tip: Do not overmix to keep the cupcakes tender.
- Stir in 1 tbsp red food coloring and 1 tsp white vinegar until just combined.
- Divide the batter evenly among the prepared muffin cups, filling each about 2/3 full.
- Bake for 18-20 minutes, or until a toothpick inserted into the center comes out clean. Tip: Rotate the pan halfway through baking for even cooking.
- Let the cupcakes cool in the pan for 5 minutes, then transfer to a wire rack to cool completely.
- For the frosting, beat 8 oz cream cheese and 1/4 cup butter until smooth. Gradually add 2 cups powdered sugar and 1 tsp vanilla extract, beating until fluffy.
- Frost the cooled cupcakes with the cream cheese frosting.
Perfectly moist with a velvety crumb, these cupcakes are a dream with their slight cocoa flavor and creamy frosting. Try topping them with fresh berries for a pop of color and a hint of freshness.
Love Potion Chocolate Mousse

Goodness, have you ever had one of those days where only chocolate will do? I remember whipping up this Love Potion Chocolate Mousse on a whim during a rainy afternoon, and it turned out to be the perfect comfort food. It’s rich, velvety, and just the right amount of sweet to lift your spirits.
Ingredients
- 1 cup heavy cream
- 8 oz semisweet chocolate, chopped
- 3 tbsp unsalted butter
- 2 large eggs, separated
- 1/4 cup granulated sugar
- 1 tsp vanilla extract
- 1/8 tsp salt
Instructions
- Place the chopped chocolate and butter in a heatproof bowl. Microwave in 30-second intervals, stirring each time, until fully melted and smooth. Tip: Avoid overheating to prevent the chocolate from seizing.
- In a separate bowl, whisk the egg yolks with 2 tbsp of sugar until pale and slightly thickened. Gradually mix in the melted chocolate mixture and vanilla extract.
- Using an electric mixer, beat the egg whites with the remaining sugar and salt until stiff peaks form. Tip: Ensure the bowl and beaters are completely clean for the best volume.
- Gently fold the egg whites into the chocolate mixture in two additions, being careful not to deflate the mixture. Tip: Use a spatula and fold in a figure-eight motion for even incorporation.
- Divide the mousse among serving glasses and refrigerate for at least 4 hours, or until set.
Decadent doesn’t even begin to describe this mousse. The texture is so light yet indulgent, with a deep chocolate flavor that’s perfectly balanced. Try serving it with a sprinkle of sea salt or fresh berries for an extra special touch.
Strawberry Champagne Truffles
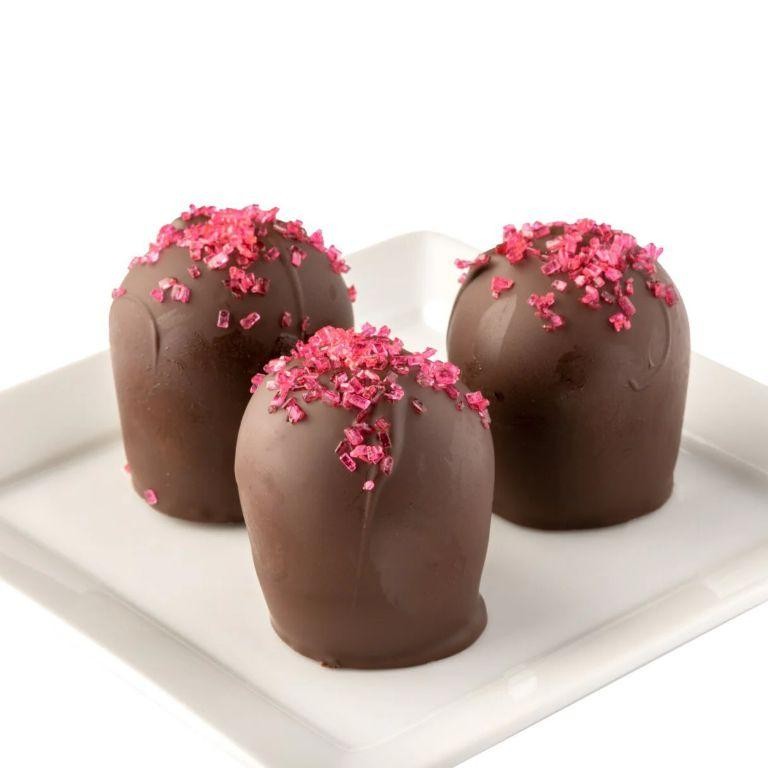
Craving something sweet with a touch of elegance? These Strawberry Champagne Truffles are my go-to when I want to impress guests or treat myself to a little luxury. The combination of ripe strawberries and bubbly champagne wrapped in smooth chocolate is simply irresistible.
Ingredients
- 1 cup heavy cream
- 8 oz semisweet chocolate, finely chopped
- 2 tbsp unsalted butter
- 1/4 cup champagne
- 1/2 cup freeze-dried strawberries, crushed
- 1/2 cup cocoa powder
Instructions
- In a small saucepan, heat 1 cup heavy cream over medium heat until it just begins to simmer, about 3-4 minutes. Tip: Stir occasionally to prevent a skin from forming on the surface.
- Remove the saucepan from heat and add 8 oz semisweet chocolate, stirring until completely melted and smooth.
- Stir in 2 tbsp unsalted butter until fully incorporated, then gently mix in 1/4 cup champagne. Tip: The mixture may look separated at first, but keep stirring until it comes together.
- Fold in 1/2 cup crushed freeze-dried strawberries until evenly distributed throughout the mixture.
- Cover the mixture with plastic wrap, pressing it directly onto the surface, and refrigerate for at least 2 hours until firm. Tip: Chilling overnight ensures the easiest handling.
- Using a small scoop or spoon, portion the mixture into 1-inch balls and roll between your palms to smooth.
- Roll each truffle in 1/2 cup cocoa powder to coat evenly, then place on a parchment-lined tray.
- Refrigerate the truffles for another 30 minutes to set before serving.
Just bite into one of these truffles to experience the burst of strawberry flavor followed by the subtle champagne finish. They’re perfect for gifting in a decorative box or serving alongside a glass of bubbly for an extra special touch.
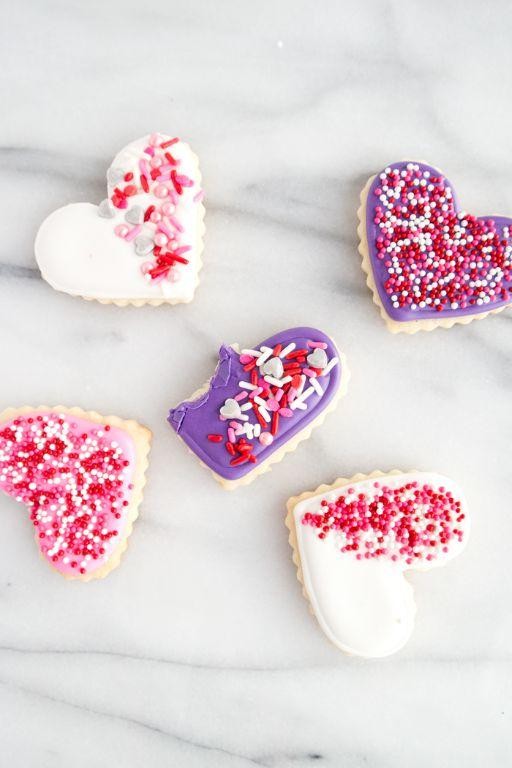
Valentine’s Day Sugar Cookies
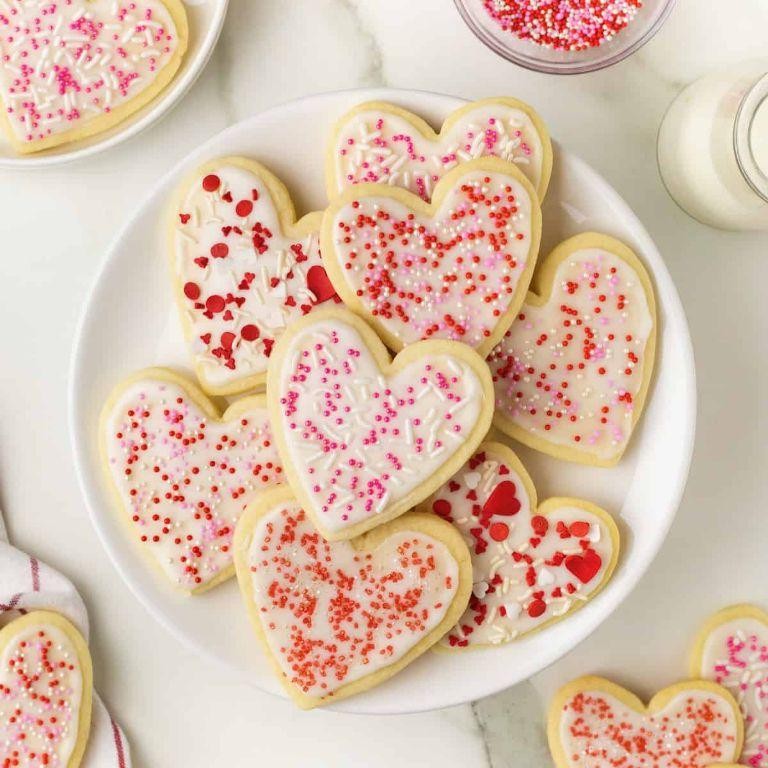
Valentine’s Day is the perfect occasion to whip up something sweet and heartfelt, and what better way to show your love than with homemade sugar cookies? I remember the first time I made these for my significant other; the kitchen was a mess, but the smiles they brought were worth every sprinkle.
Ingredients
- 3 cups all-purpose flour
- 1 tsp baking powder
- 1/2 tsp salt
- 1 cup unsalted butter, softened
- 1 cup granulated sugar
- 1 large egg
- 2 tsp vanilla extract
- 1/2 cup powdered sugar (for rolling)
Instructions
- Preheat your oven to 350°F (175°C) and line baking sheets with parchment paper.
- In a medium bowl, whisk together 3 cups all-purpose flour, 1 tsp baking powder, and 1/2 tsp salt. Set aside.
- In a large bowl, beat 1 cup softened unsalted butter and 1 cup granulated sugar until light and fluffy, about 3 minutes.
- Beat in 1 large egg and 2 tsp vanilla extract until well combined.
- Gradually add the dry ingredients to the wet ingredients, mixing until just combined. Tip: Overmixing can lead to tough cookies.
- Roll the dough into 1-inch balls, then roll each ball in 1/2 cup powdered sugar to coat.
- Place the balls on the prepared baking sheets, spacing them about 2 inches apart. Tip: Flatten slightly with the bottom of a glass for even baking.
- Bake for 10-12 minutes, or until the edges are just starting to turn golden. Tip: Cookies will continue to cook on the baking sheet, so remove them when they’re slightly underdone.
- Let the cookies cool on the baking sheets for 5 minutes before transferring to a wire rack to cool completely.
These cookies come out perfectly soft with a slight crunch from the powdered sugar coating. They’re not too sweet, making them the ideal canvas for your Valentine’s Day decorations. Try sandwiching them with raspberry jam for an extra special treat.
Dark Chocolate Raspberry Tart
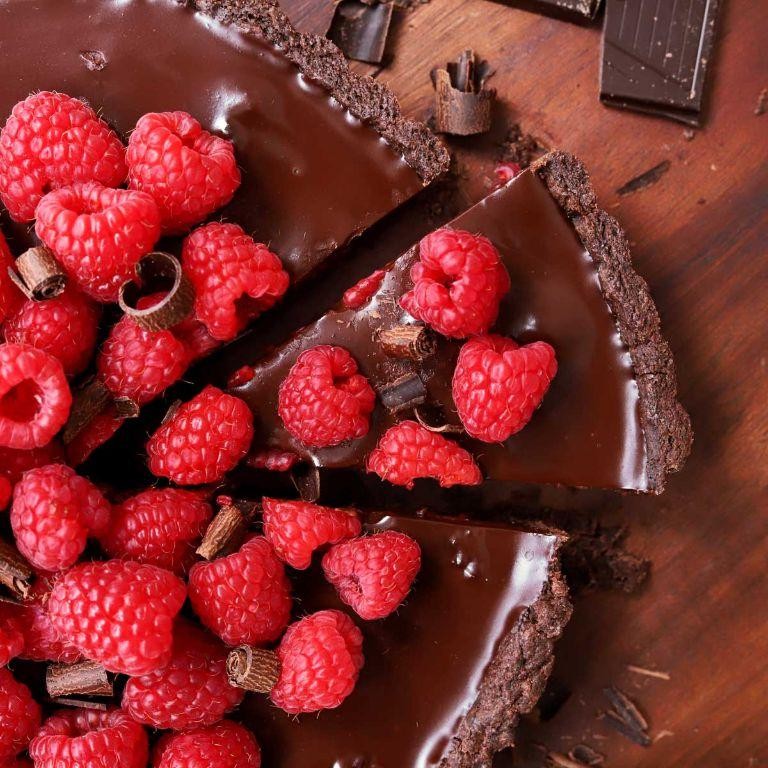
Remember the first time you bit into something so perfectly balanced between sweet and tart that it made your taste buds dance? That’s exactly what happened to me when I first tried this Dark Chocolate Raspberry Tart. It’s become my go-to dessert for dinner parties, and today, I’m sharing how you can recreate this magic in your own kitchen.
Ingredients
- 1 1/2 cups all-purpose flour
- 1/2 cup powdered sugar
- 1/2 cup unsalted butter, cold and cubed
- 1/4 tsp salt
- 1 cup dark chocolate chips
- 1/2 cup heavy cream
- 1 cup fresh raspberries
- 1 tbsp granulated sugar
Instructions
- Preheat your oven to 350°F (175°C) to ensure it’s ready for baking.
- In a large bowl, mix 1 1/2 cups all-purpose flour, 1/2 cup powdered sugar, and 1/4 tsp salt until combined.
- Add 1/2 cup cold, cubed unsalted butter to the dry ingredients. Use your fingers to rub the butter into the flour until the mixture resembles coarse crumbs.
- Press the mixture firmly into a 9-inch tart pan, ensuring an even layer on the bottom and sides. Tip: Chilling the crust for 15 minutes before baking can prevent shrinking.
- Bake the crust for 15-20 minutes, or until lightly golden. Let it cool completely on a wire rack.
- While the crust cools, heat 1/2 cup heavy cream in a small saucepan over medium heat until it just begins to simmer. Remove from heat.
- Pour the hot cream over 1 cup dark chocolate chips in a heatproof bowl. Let sit for 2 minutes, then stir until smooth.
- Pour the chocolate ganache into the cooled crust, spreading evenly with a spatula.
- Arrange 1 cup fresh raspberries on top of the ganache. Tip: For a glossy finish, lightly brush the raspberries with a mixture of 1 tbsp granulated sugar and 1 tbsp water heated until the sugar dissolves.
- Refrigerate the tart for at least 2 hours, or until the ganache is set. Tip: For clean slices, dip your knife in hot water before cutting.
Kicking back with a slice of this tart, the crisp crust gives way to the velvety chocolate and bursts of raspberry. It’s a showstopper on its own, but for an extra touch, serve with a dollop of whipped cream or a sprinkle of sea salt.
White Chocolate Raspberry Blondies
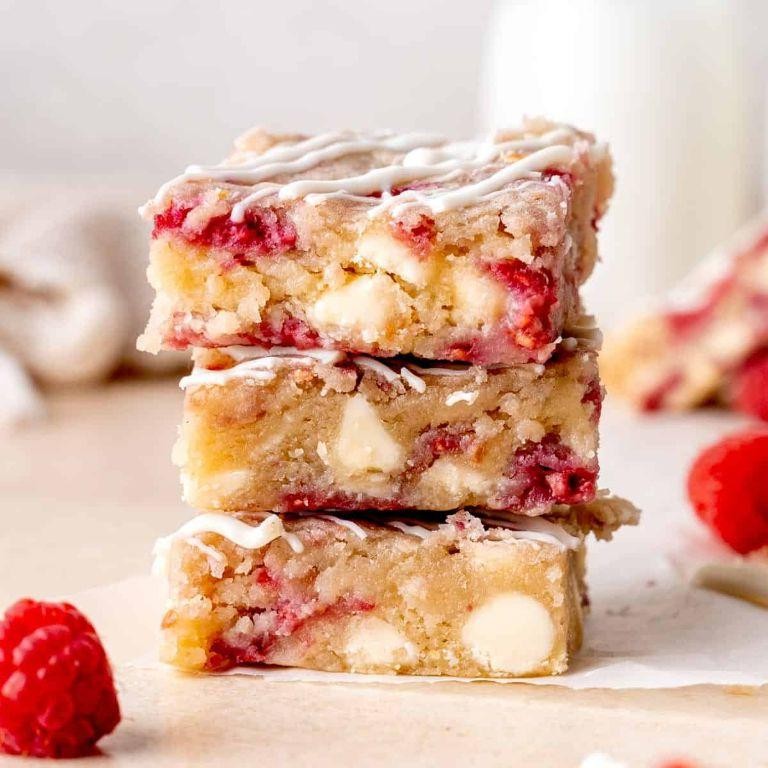
Unbelievably, the first time I tried making White Chocolate Raspberry Blondies, I was skeptical about the combination. But oh, how wrong I was! The sweet, creamy white chocolate paired with the tart raspberries creates a symphony of flavors that’s hard to resist. It’s become my go-to dessert for summer picnics, and I’m excited to share the recipe with you.
Ingredients
- 1 cup unsalted butter, melted
- 1 1/2 cups granulated sugar
- 2 large eggs
- 1 tsp vanilla extract
- 2 cups all-purpose flour
- 1/2 tsp salt
- 1 cup white chocolate chips
- 1 cup fresh raspberries
Instructions
- Preheat your oven to 350°F and line a 9×13 inch baking pan with parchment paper, leaving an overhang on the sides for easy removal.
- In a large bowl, whisk together the melted butter and granulated sugar until well combined.
- Add the eggs one at a time, whisking well after each addition, then stir in the vanilla extract.
- Tip: For a richer flavor, you can brown the butter before melting it. Just cook it over medium heat until it turns a golden brown color and smells nutty.
- Gently fold in the flour and salt until just combined, being careful not to overmix.
- Fold in the white chocolate chips and raspberries, distributing them evenly throughout the batter.
- Tip: Toss the raspberries in a little flour before adding them to the batter to prevent them from sinking to the bottom.
- Spread the batter evenly into the prepared pan and smooth the top with a spatula.
- Bake for 25-30 minutes, or until the edges are golden and a toothpick inserted into the center comes out clean.
- Tip: Don’t overbake! The blondies will continue to set as they cool, so it’s okay if they seem a little soft in the middle.
- Allow the blondies to cool completely in the pan before lifting them out using the parchment overhang and cutting into squares.
Every bite of these blondies is a delightful contrast between the chewy, buttery base and the bursts of juicy raspberries. For an extra indulgent treat, serve them warm with a scoop of vanilla ice cream on top.
Heart-Shaped Chocolate Lava Cakes
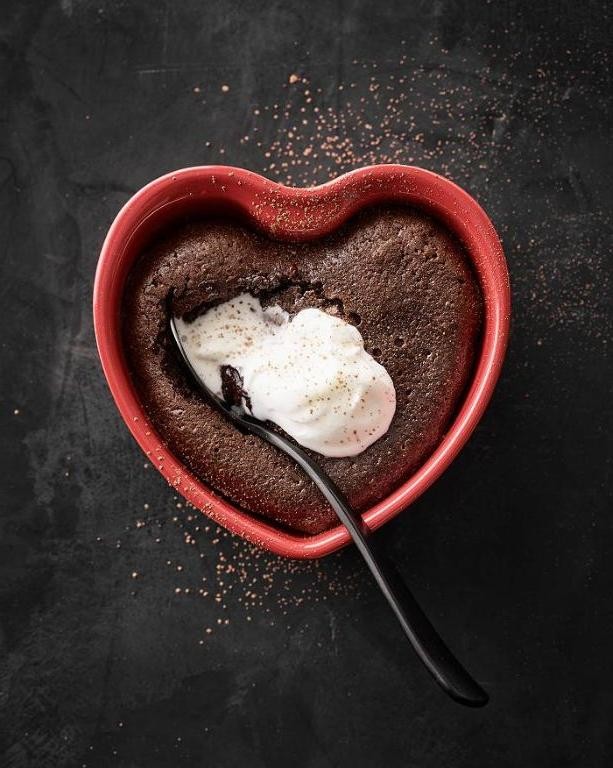
Yesterday, I found myself craving something sweet, romantic, and utterly indulgent—something that would make any ordinary day feel special. That’s when I decided to whip up these Heart-Shaped Chocolate Lava Cakes, a dessert that’s as fun to make as it is to eat. Perfect for Valentine’s Day, anniversaries, or just because, these cakes are sure to impress.
Ingredients
- 1/2 cup unsalted butter
- 6 oz semi-sweet chocolate
- 1/4 cup granulated sugar
- 2 large eggs
- 2 large egg yolks
- 1 tsp vanilla extract
- 1/4 cup all-purpose flour
- 1/8 tsp salt
- Powdered sugar for dusting
Instructions
- Preheat your oven to 425°F (220°C). Grease four heart-shaped ramekins with butter and dust with flour, tapping out the excess.
- In a medium bowl, melt the butter and chocolate together in the microwave in 30-second intervals, stirring until smooth. Tip: Ensure the chocolate doesn’t overheat to avoid seizing.
- Whisk in the granulated sugar until fully combined.
- Add the eggs, egg yolks, and vanilla extract to the chocolate mixture, whisking until the mixture is smooth and glossy.
- Gently fold in the flour and salt until just combined. Tip: Overmixing can lead to dense cakes, so fold lightly.
- Divide the batter evenly among the prepared ramekins, filling each about 3/4 full.
- Bake for 12-14 minutes, or until the edges are set but the centers are still soft. Tip: The cakes should jiggle slightly when shaken—this ensures a molten center.
- Let the cakes cool in the ramekins for 1 minute, then invert onto plates. Dust with powdered sugar and serve immediately.
Gooey, rich, and decadently chocolatey, these lava cakes are a dream come true for any chocolate lover. Serve them with a scoop of vanilla ice cream or fresh berries for an extra touch of elegance.
Cherry Almond Galette
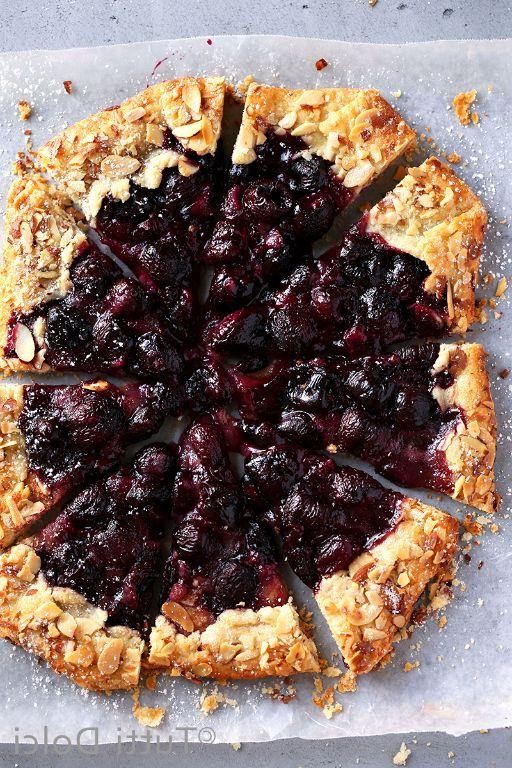
Very few things in life are as satisfying as pulling a rustic, fruit-filled galette out of the oven. The Cherry Almond Galette is my go-to when I want something that feels fancy but is surprisingly simple to make. It’s the kind of dessert that makes you look like a pro, even if you’re more of a ‘measure with your heart’ kind of cook, like me.
Ingredients
- 1 1/4 cups all-purpose flour
- 1/2 tsp salt
- 1/2 cup unsalted butter, chilled and diced
- 1/4 cup ice water
- 2 cups fresh cherries, pitted and halved
- 1/4 cup granulated sugar
- 1 tbsp cornstarch
- 1/2 tsp almond extract
- 1 egg, beaten
- 1 tbsp sliced almonds
- 1 tbsp turbinado sugar
Instructions
- In a large bowl, whisk together 1 1/4 cups all-purpose flour and 1/2 tsp salt.
- Add 1/2 cup chilled, diced unsalted butter to the flour mixture. Use your fingers to work the butter into the flour until the mixture resembles coarse crumbs.
- Gradually add 1/4 cup ice water, stirring until the dough comes together. Tip: If the dough feels too dry, add more water a tablespoon at a time.
- Shape the dough into a disk, wrap in plastic, and refrigerate for at least 1 hour.
- Preheat your oven to 375°F and line a baking sheet with parchment paper.
- In a separate bowl, toss 2 cups pitted and halved cherries with 1/4 cup granulated sugar, 1 tbsp cornstarch, and 1/2 tsp almond extract.
- Roll out the chilled dough on a floured surface into a 12-inch circle. Transfer to the prepared baking sheet.
- Arrange the cherry mixture in the center of the dough, leaving a 2-inch border. Fold the edges over the cherries, pleating as you go.
- Brush the crust with 1 beaten egg and sprinkle with 1 tbsp sliced almonds and 1 tbsp turbinado sugar.
- Bake for 35-40 minutes, or until the crust is golden and the cherries are bubbly. Tip: Place a baking sheet on the rack below to catch any drips.
- Let the galette cool for 10 minutes before slicing. Tip: Serve warm with a scoop of vanilla ice cream for an extra treat.
Perfectly imperfect, this galette boasts a flaky, buttery crust with a juicy, almond-kissed cherry filling. The turbinado sugar adds a delightful crunch, making each bite a textural dream. Try serving it at your next brunch for a show-stopping centerpiece that’s as delicious as it is beautiful.
Pink Velvet Macarons
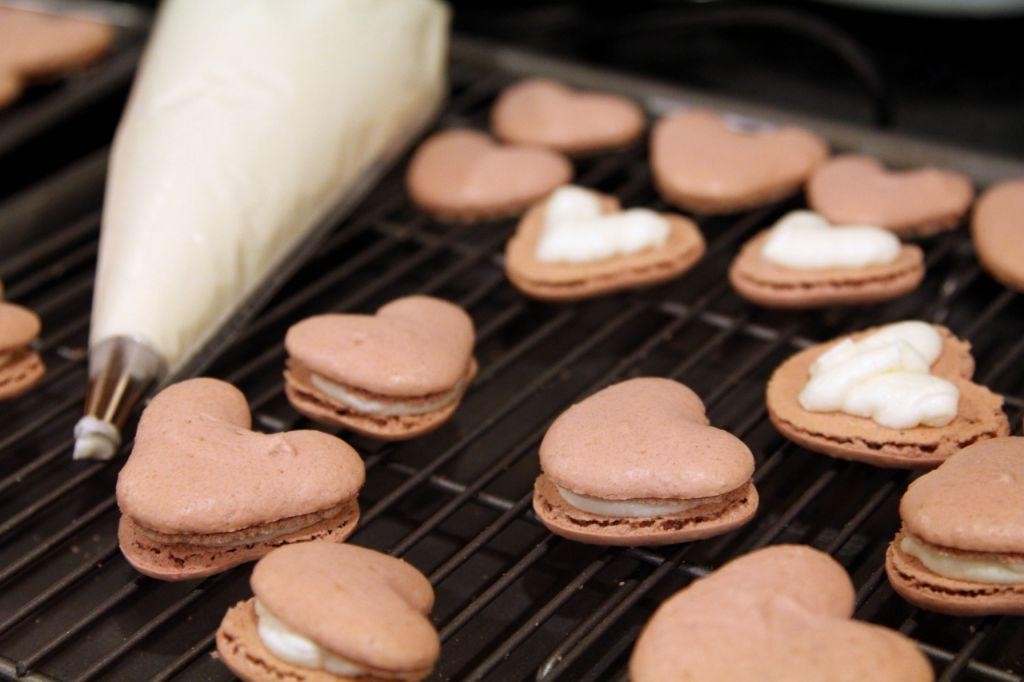
Back when I first stumbled upon the idea of making Pink Velvet Macarons, I was both excited and a bit intimidated. There’s something about their delicate appearance and the precision required that makes them a true test of a baker’s skill. But trust me, the result is worth every minute spent perfecting them.
Ingredients
- 1 3/4 cups powdered sugar
- 1 cup almond flour
- 3 large egg whites
- 1/4 cup granulated sugar
- 1/2 tsp vanilla extract
- 1/2 tsp white vinegar
- 1/4 tsp salt
- 1/2 tsp red food coloring
Instructions
- Preheat your oven to 300°F and line two baking sheets with parchment paper.
- Sift together the powdered sugar and almond flour into a large bowl to ensure a smooth macaron shell.
- In a separate bowl, beat the egg whites on medium speed until foamy, then gradually add the granulated sugar, vanilla extract, white vinegar, and salt, increasing the speed to high until stiff peaks form.
- Gently fold in the sifted dry ingredients into the egg white mixture in two additions, being careful not to deflate the whites.
- Add the red food coloring and fold until the batter flows like lava and a ribbon of batter dissolves back into itself after 10 seconds.
- Transfer the batter to a piping bag fitted with a round tip and pipe 1-inch circles onto the prepared baking sheets, spacing them about 1 inch apart.
- Tap the baking sheets firmly on the counter a few times to release any air bubbles, then let the macarons sit at room temperature for 30 minutes until a skin forms on the surface.
- Bake for 18 minutes, rotating the pans halfway through, until the macarons are set and can be lifted off the parchment without sticking.
- Let the macarons cool completely on the baking sheets before filling.
Now, these Pink Velvet Macarons are not just a treat for the eyes but a delight to bite into, with their crisp shell giving way to a chewy interior. Serve them at your next brunch or package them prettily as a heartfelt gift—either way, they’re bound to impress.
Luscious Lemon Love Cake
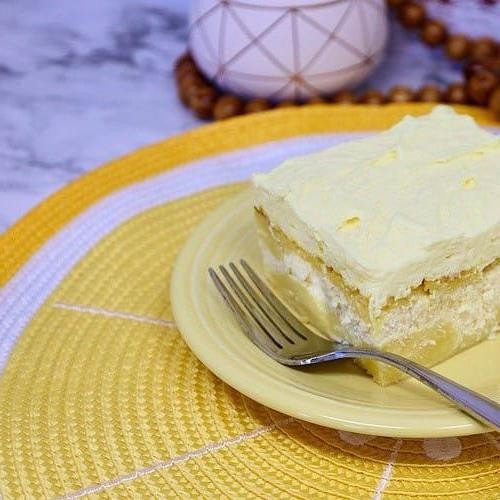
Zesty flavors and a touch of sunshine are what this Luscious Lemon Love Cake brings to the table. I remember the first time I baked this cake; it was for my best friend’s birthday, and the way the lemon zest perfumed the entire house was nothing short of magical. It’s become my go-to recipe for celebrations, or frankly, any day that needs a little extra love.
Ingredients
- 1 1/2 cups all-purpose flour
- 1 cup granulated sugar
- 1/2 cup unsalted butter, softened
- 2 large eggs
- 1/2 cup whole milk
- 2 tbsp lemon zest
- 1/4 cup fresh lemon juice
- 1 tsp baking powder
- 1/2 tsp salt
Instructions
- Preheat your oven to 350°F (175°C) and grease a 9-inch round cake pan.
- In a large bowl, cream together 1/2 cup unsalted butter and 1 cup granulated sugar until light and fluffy.
- Beat in 2 large eggs one at a time, ensuring each is fully incorporated before adding the next.
- Stir in 2 tbsp lemon zest and 1/4 cup fresh lemon juice until well combined.
- In a separate bowl, whisk together 1 1/2 cups all-purpose flour, 1 tsp baking powder, and 1/2 tsp salt.
- Alternately add the dry ingredients and 1/2 cup whole milk to the butter mixture, beginning and ending with the dry ingredients.
- Pour the batter into the prepared cake pan and smooth the top with a spatula.
- Bake for 25-30 minutes, or until a toothpick inserted into the center comes out clean.
- Allow the cake to cool in the pan for 10 minutes before transferring to a wire rack to cool completely.
This cake is a delightful balance of tangy and sweet, with a moist, tender crumb that melts in your mouth. Try serving it with a dollop of whipped cream and fresh berries for an extra special treat.
Valentine’s Day Chocolate Fondue
Nothing says love quite like sharing a pot of rich, melty chocolate fondue with your special someone. I remember my first attempt at making this decadent treat; it was a Valentine’s Day disaster that turned into a hilarious memory. Now, I’ve perfected the recipe, and I’m excited to share it with you.
Ingredients
- 1 cup heavy cream
- 12 oz semi-sweet chocolate chips
- 1 tbsp unsalted butter
- 1 tsp vanilla extract
- 1/8 tsp salt
Instructions
- In a medium saucepan, heat the heavy cream over medium heat until it begins to simmer, about 5 minutes. Tip: Stir occasionally to prevent a skin from forming on the surface.
- Reduce the heat to low and add the chocolate chips, stirring continuously until the chocolate is completely melted and the mixture is smooth, about 3 minutes. Tip: Using a silicone spatula helps scrape the sides and bottom of the pan for even melting.
- Stir in the butter, vanilla extract, and salt until fully incorporated, about 1 minute. Tip: The butter adds a silky texture, so don’t skip it!
- Remove the saucepan from the heat and transfer the fondue to a fondue pot or a serving bowl. Keep warm over a low flame or a tea light.
Silky smooth with a deep chocolate flavor, this fondue is perfect for dipping strawberries, marshmallows, or even pieces of pound cake. For an extra touch of romance, serve it with a side of sparkling wine to complement the sweetness.
Strawberry Rose Panna Cotta
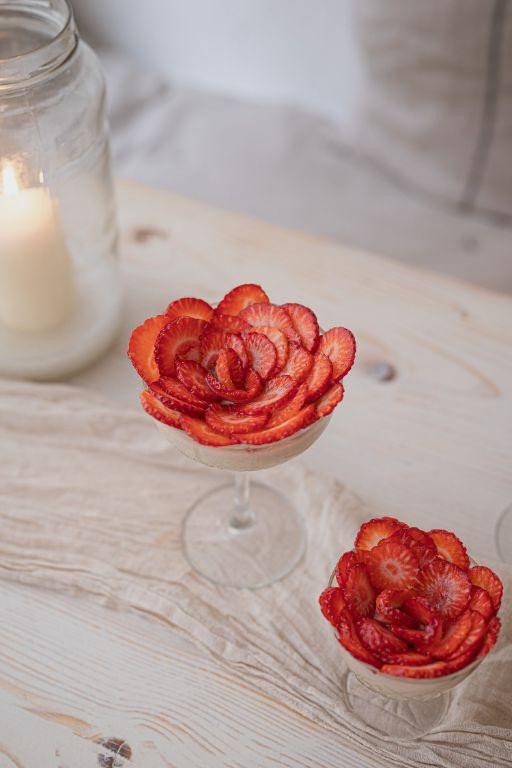
Believe it or not, the first time I tried making Strawberry Rose Panna Cotta, it was a complete disaster. The flavors were there, but the texture? Let’s just say it was more like a soup than a dessert. After a few trials (and errors), I’ve perfected this recipe that’s as foolproof as it is delicious.
Ingredients
- 2 cups heavy cream
- 1/2 cup whole milk
- 1/2 cup granulated sugar
- 1 tbsp rose water
- 1 tsp vanilla extract
- 2 tsp unflavored gelatin
- 1 cup fresh strawberries, hulled and pureed
Instructions
- In a small bowl, sprinkle 2 tsp unflavored gelatin over 1/4 cup cold water. Let it bloom for 5 minutes.
- In a saucepan over medium heat, combine 2 cups heavy cream, 1/2 cup whole milk, and 1/2 cup granulated sugar. Heat until the sugar dissolves, about 5 minutes, stirring occasionally.
- Remove the saucepan from heat. Stir in the bloomed gelatin until completely dissolved.
- Add 1 tbsp rose water and 1 tsp vanilla extract to the mixture, stirring to combine.
- Divide the mixture evenly among 4 serving glasses. Refrigerate for at least 4 hours, or until set.
- Once set, top each panna cotta with 1/4 cup of fresh strawberry puree.
My favorite part about this dessert is the contrast between the creamy panna cotta and the vibrant strawberry topping. For an extra touch of elegance, garnish with edible rose petals or a sprinkle of crushed pistachios before serving.
Molten Chocolate Soufflé
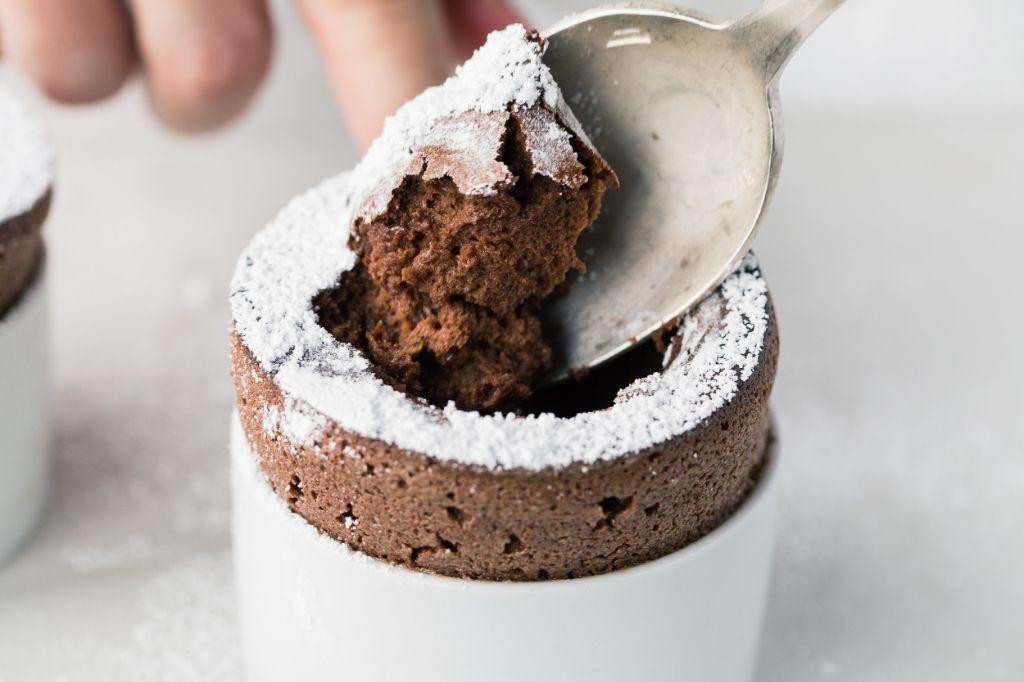
Yesterday, as I was rummaging through my kitchen for a quick dessert fix, I stumbled upon the perfect excuse to indulge in my all-time favorite: Molten Chocolate Soufflé. There’s something magical about breaking into that delicate crust to reveal a river of warm, gooey chocolate—pure bliss!
Ingredients
- 1/2 cup unsalted butter
- 4 oz semi-sweet chocolate
- 1/4 cup granulated sugar
- 2 large eggs
- 2 large egg yolks
- 1 tsp vanilla extract
- 1/8 tsp salt
- 2 tbsp all-purpose flour
Instructions
- Preheat your oven to 425°F and butter four 6-ounce ramekins, then dust them with sugar.
- In a microwave-safe bowl, melt the butter and chocolate together in 30-second intervals, stirring until smooth.
- Whisk in the sugar until fully combined, then add the eggs, egg yolks, vanilla extract, and salt, mixing well.
- Gently fold in the flour until just incorporated—overmixing can deflate the batter.
- Divide the batter evenly among the prepared ramekins and place them on a baking sheet.
- Bake for 12-14 minutes until the edges are set but the centers are still soft. Tip: The soufflés should jiggle slightly when shaken.
- Let them sit for 1 minute before serving. Run a knife around the edges to loosen if necessary.
So, there you have it—a dessert that’s as fun to make as it is to eat. The contrast between the crispy exterior and the molten center is nothing short of spectacular. Serve it with a scoop of vanilla ice cream for an extra decadent touch.
Vanilla Bean Heart Cookies
Every time I bake these Vanilla Bean Heart Cookies, I’m reminded of the cozy afternoons spent in my grandmother’s kitchen, where the scent of vanilla was as comforting as her hugs. These cookies are not just treats; they’re little edible hugs, perfect for sharing with loved ones or savoring with a cup of tea on a quiet day.
Ingredients
- 2 cups all-purpose flour
- 1/2 tsp baking powder
- 1/4 tsp salt
- 1/2 cup unsalted butter, softened
- 3/4 cup granulated sugar
- 1 large egg
- 1 vanilla bean, seeds scraped
- 1 tbsp whole milk
Instructions
- Preheat your oven to 350°F (175°C) and line a baking sheet with parchment paper.
- In a medium bowl, whisk together 2 cups all-purpose flour, 1/2 tsp baking powder, and 1/4 tsp salt. Set aside.
- In a large bowl, cream together 1/2 cup softened unsalted butter and 3/4 cup granulated sugar until light and fluffy, about 3 minutes.
- Beat in 1 large egg, followed by the seeds from 1 vanilla bean and 1 tbsp whole milk, mixing until well combined.
- Gradually add the dry ingredients to the wet ingredients, mixing until just combined. Tip: Overmixing can lead to tough cookies, so stop as soon as the flour disappears.
- Roll the dough out on a lightly floured surface to about 1/4-inch thickness. Tip: If the dough sticks, chill it for 30 minutes to make it easier to handle.
- Use a heart-shaped cookie cutter to cut out cookies, re-rolling the scraps as needed.
- Place the cookies on the prepared baking sheet, spacing them about 2 inches apart.
- Bake for 10-12 minutes, or until the edges are just starting to turn golden. Tip: For even baking, rotate the baking sheet halfway through the cooking time.
- Let the cookies cool on the baking sheet for 5 minutes before transferring to a wire rack to cool completely.
Rich in vanilla flavor with a tender, buttery texture, these cookies are a delight. Try sandwiching them with a dollop of raspberry jam for an extra special treat.
Espresso Dark Chocolate Truffles
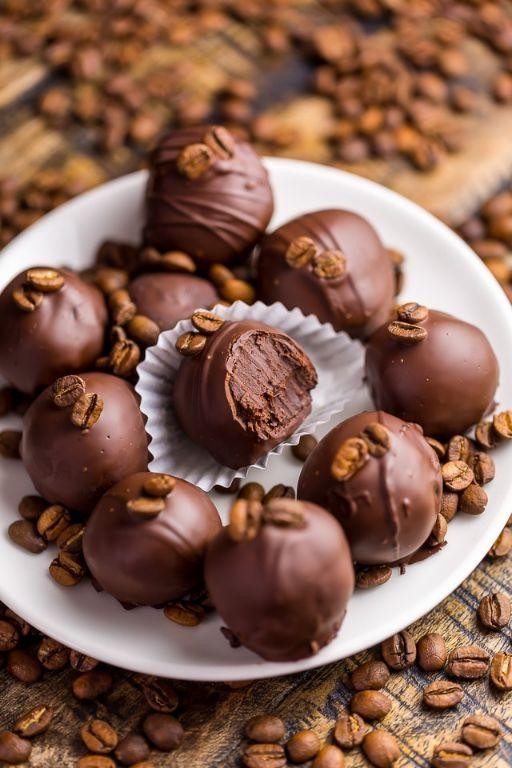
Finally, a treat that combines my two greatest loves: coffee and chocolate. These Espresso Dark Chocolate Truffles are the perfect pick-me-up, whether you’re hosting a dinner party or just need a little something sweet after a long day. I remember the first time I made these, the rich aroma filled my kitchen, and I knew I had stumbled upon something special.
Ingredients
- 1 cup heavy cream
- 8 oz dark chocolate, finely chopped
- 2 tbsp unsalted butter
- 1 tbsp instant espresso powder
- 1/2 cup cocoa powder
Instructions
- In a small saucepan, heat the heavy cream over medium heat until it begins to simmer, about 3 minutes. Tip: Watch closely to avoid boiling.
- Remove the saucepan from heat and add the finely chopped dark chocolate, butter, and espresso powder. Let sit for 2 minutes to soften.
- Stir the mixture until smooth and fully combined. Tip: If the chocolate isn’t melting completely, place the saucepan over low heat for a few seconds, stirring constantly.
- Pour the mixture into a shallow dish and refrigerate for at least 2 hours, or until firm. Tip: Covering the dish with plastic wrap prevents a skin from forming on the surface.
- Using a melon baller or a teaspoon, scoop out portions of the chilled chocolate mixture and roll into 1-inch balls.
- Place the cocoa powder in a shallow bowl. Roll each truffle in the cocoa powder until fully coated.
- Arrange the truffles on a parchment-lined tray and refrigerate for another 30 minutes to set.
Zesty with a deep coffee flavor, these truffles have a melt-in-your-mouth texture that’s simply irresistible. For an extra touch, serve them with a dusting of sea salt or alongside a shot of espresso to really bring out the flavors.
Berry Love Parfait
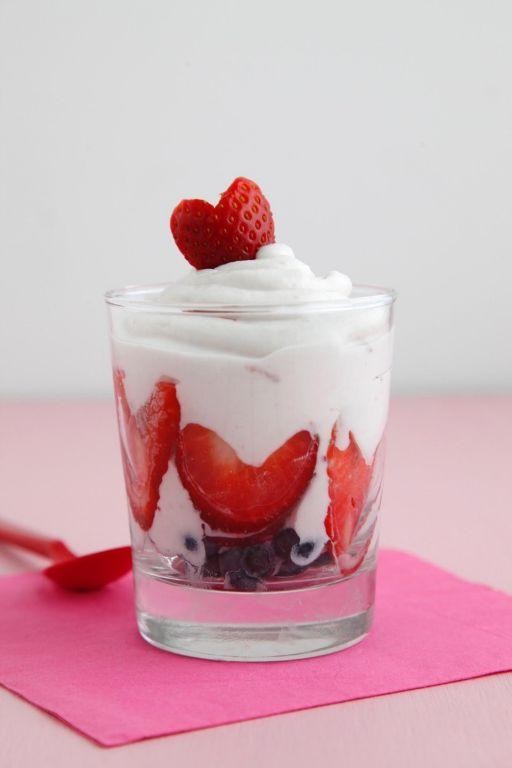
How many times have I found myself staring into the fridge, craving something sweet yet healthy, only to settle for a less-than-satisfying snack? That’s exactly why I created the ‘Berry Love Parfait’—a delightful layering of fresh berries, creamy yogurt, and crunchy granola that’s as nutritious as it is indulgent. It’s my go-to breakfast or dessert, especially when I need a quick pick-me-up that feels like a treat.
Ingredients
- 1 cup Greek yogurt
- 1/2 cup mixed berries (strawberries, blueberries, raspberries)
- 1/4 cup granola
- 1 tbsp honey
Instructions
- In a clear glass, start by adding a 1/2 cup of Greek yogurt to create the first layer.
- Top the yogurt with 1/4 cup of mixed berries for a burst of color and flavor.
- Sprinkle 2 tbsp of granola over the berries to add a satisfying crunch.
- Drizzle 1/2 tbsp of honey over the granola for a touch of sweetness.
- Repeat the layers once more, starting with the remaining yogurt, followed by berries, granola, and a final drizzle of honey.
- Let the parfait sit for 5 minutes before serving to allow the granola to slightly soften, enhancing the texture.
Best enjoyed fresh, this parfait offers a perfect balance of creamy, crunchy, and sweet with every spoonful. For an extra special touch, serve it in a mason jar with a sprig of mint on top—it’s as Instagram-worthy as it is delicious.
Conclusion
There you have it—18 decadent Valentine’s desserts that are sure to sweeten your celebrations! Whether you’re baking for love or just because, these recipes promise to delight. We’d love to hear which ones stole your heart. Don’t forget to share your favorites in the comments and pin this roundup for your next baking adventure. Happy Valentine’s Day, and happier baking!