Dive into a world of flavor with our roundup of 20 Delicious Sauce Recipes for Every Occasion! Whether you’re whipping up a quick weeknight dinner, celebrating seasonal produce, or craving some comfort food magic, we’ve got a sauce to match your mood. From creamy to zesty, these recipes are your ticket to transforming any meal into a memorable feast. Let’s get saucy!
Classic Homemade Tomato Sauce
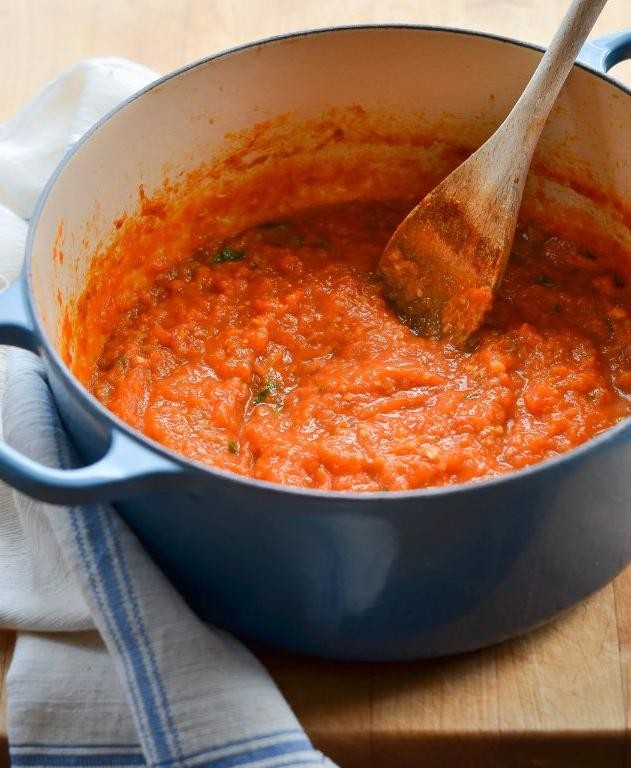
Very few dishes are as versatile and beloved as a classic homemade tomato sauce. Whether you’re dressing pasta, layering lasagna, or simply dipping bread into it, mastering this sauce is a game-changer for any home cook.
Ingredients
- 2 tbsp extra virgin olive oil (my go-to for its fruity depth)
- 1 medium onion, finely diced (I find yellow onions sweeter here)
- 3 garlic cloves, minced (freshly minced releases more flavor)
- 28 oz canned whole tomatoes (San Marzano tomatoes are my favorite for their sweetness and low acidity)
- 1 tsp salt (adjust based on your tomatoes’ saltiness)
- 1/2 tsp black pepper (freshly ground adds a nice kick)
- 1 tbsp sugar (just a pinch to balance the acidity)
- 5 fresh basil leaves (torn, not chopped, to preserve their essence)
Instructions
- Heat the olive oil in a large saucepan over medium heat until shimmering, about 2 minutes.
- Add the diced onion and cook, stirring occasionally, until translucent, about 5 minutes. Tip: Don’t rush this step; caramelizing the onions slightly can add depth.
- Stir in the minced garlic and cook until fragrant, about 30 seconds. Tip: Garlic burns easily, so keep the heat moderate.
- Add the canned tomatoes, breaking them up with your spoon or a potato masher. Tip: If you prefer a smoother sauce, blend the tomatoes before adding.
- Season with salt, pepper, and sugar, then bring the sauce to a simmer.
- Reduce the heat to low and let it simmer uncovered for 30 minutes, stirring occasionally. The sauce should thicken slightly.
- Remove from heat and stir in the torn basil leaves. The residual heat will wilt them perfectly.
Your sauce should be rich and velvety, with a balance of sweetness and acidity. Try it over spaghetti with a sprinkle of Parmesan, or use it as a base for a heartier meat sauce. You’ll never go back to store-bought after this.
Creamy Alfredo Sauce
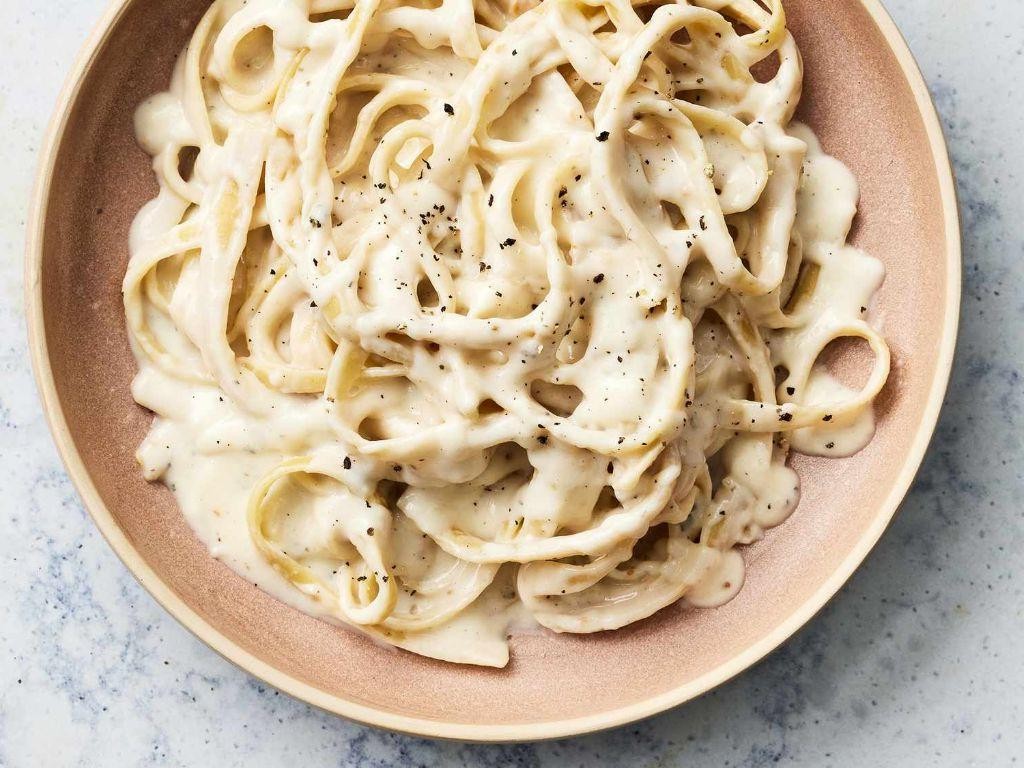
First, let’s dive into making a creamy Alfredo sauce that’s both luxurious and surprisingly simple to whip up. Perfect for coating your favorite pasta, this sauce is a game-changer for weeknight dinners.
Ingredients
- 1/2 cup unsalted butter (I always use unsalted to control the sauce’s saltiness)
- 1 cup heavy cream (for that rich, velvety texture)
- 2 cloves garlic, minced (freshly minced garlic makes all the difference)
- 1 1/2 cups freshly grated Parmesan cheese (the fresher, the better for melting smoothly)
- 1/4 tsp salt (adjust based on your preference)
- 1/4 tsp black pepper (freshly ground adds a nice kick)
Instructions
- In a medium saucepan, melt the butter over low heat to avoid browning.
- Add the minced garlic to the melted butter, sautéing for about 1 minute until fragrant but not browned.
- Slowly pour in the heavy cream, stirring constantly to combine with the butter and garlic.
- Increase the heat to medium and bring the mixture to a gentle simmer, stirring occasionally.
- Gradually whisk in the grated Parmesan cheese until the sauce is smooth and the cheese is fully melted.
- Season the sauce with salt and black pepper, stirring to incorporate the seasonings evenly.
- Remove the saucepan from the heat once the sauce reaches your desired consistency, remembering it will thicken slightly as it cools.
Rich and creamy, this Alfredo sauce clings beautifully to pasta, offering a decadent flavor with every bite. Try tossing it with fettuccine and a sprinkle of parsley for a classic presentation, or get creative by using it as a base for a gourmet pizza.
Spicy Sriracha Mayo
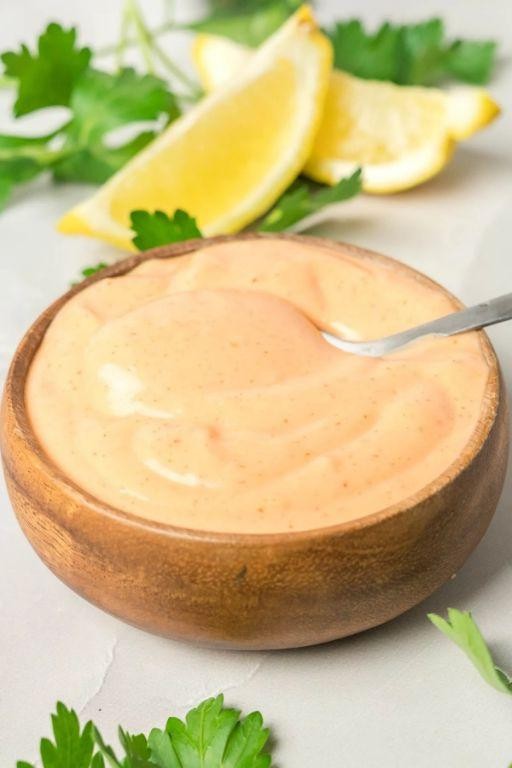
Very few condiments can transform a dish from mundane to extraordinary as effortlessly as Spicy Sriracha Mayo. This creamy, fiery blend is not just a sauce but a game-changer for sandwiches, burgers, and even fries. Let me guide you through making your own batch with ease.
Ingredients
- 1 cup mayonnaise (I swear by Duke’s for its rich texture)
- 2 tbsp Sriracha sauce (adjust based on your heat preference, but this is a good starting point)
- 1 tbsp lime juice (freshly squeezed makes all the difference)
- 1 tsp garlic powder (for that subtle depth)
- 1/2 tsp smoked paprika (my secret for a smoky undertone)
Instructions
- In a medium mixing bowl, add the mayonnaise. Ensure the bowl is large enough to comfortably stir without making a mess.
- Squeeze the lime juice into the bowl, making sure to catch any seeds. Fresh lime juice brightens the mayo beautifully.
- Add the Sriracha sauce, garlic powder, and smoked paprika to the bowl. The Sriracha not only adds heat but a vibrant color.
- Using a whisk or a fork, stir all the ingredients together until fully combined and smooth. Tip: Stir in one direction to avoid splattering.
- Taste the mixture and adjust the Sriracha or lime juice if needed. Remember, the flavors will meld and intensify slightly after resting.
- Cover the bowl with plastic wrap or transfer the mayo to an airtight container. Let it chill in the refrigerator for at least 30 minutes before serving. Tip: This resting time allows the flavors to marry.
How this Spicy Sriracha Mayo turns out is nothing short of magical—creamy with a kick, smoky with a hint of lime. Try it drizzled over grilled corn or as a bold dip for sweet potato fries for an unforgettable taste experience.
Rich and Velvety Béchamel Sauce
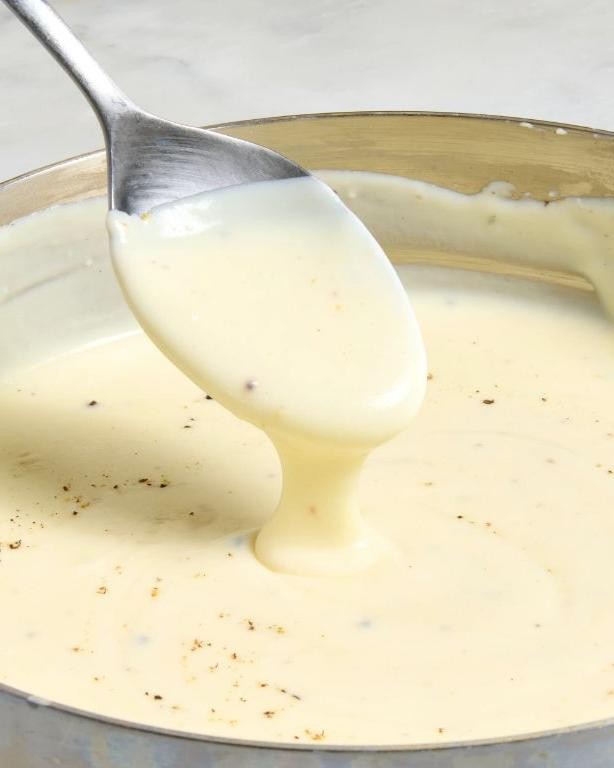
Kickstart your culinary journey with this Rich and Velvety Béchamel Sauce, a classic French mother sauce that’s surprisingly simple to master. Let me guide you through each step to ensure a smooth, lump-free sauce every time.
Ingredients
- 4 tbsp unsalted butter (I always use unsalted to control the sauce’s saltiness)
- 1/4 cup all-purpose flour (sifted to avoid lumps)
- 2 cups whole milk (warmed slightly for a smoother blend)
- 1/2 tsp salt (adjust based on your preference)
- 1/4 tsp freshly grated nutmeg (a little goes a long way in adding depth)
Instructions
- Melt the butter in a medium saucepan over medium heat until fully liquid but not browned, about 2 minutes.
- Whisk in the flour vigorously to form a smooth paste (roux), cooking for about 2 minutes to eliminate the raw flour taste.
- Gradually add the warm milk, whisking constantly to prevent lumps from forming.
- Continue to cook the sauce, stirring frequently, until it thickens enough to coat the back of a spoon, about 5-7 minutes.
- Remove from heat and stir in the salt and nutmeg, adjusting the seasoning to your liking.
Here’s your silky, creamy Béchamel Sauce, ready to elevate your dishes. Its luxurious texture and subtle nutmeg aroma make it perfect for lasagnas, gratins, or as a base for a decadent mac and cheese. Experiment with adding cheeses or herbs to customize it to your meal.
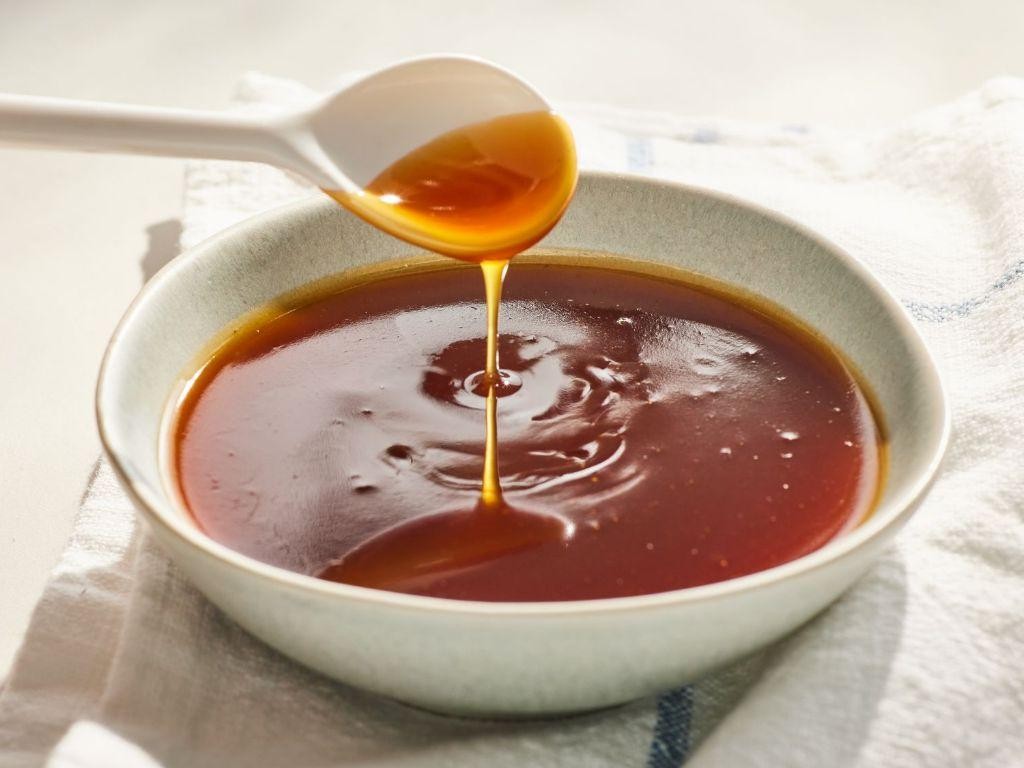
Tangy BBQ Sauce

Today, we’re diving into the world of homemade BBQ sauces with a tangy twist that’s sure to elevate your grilling game. This recipe is perfect for beginners, offering a straightforward path to a flavorful sauce that pairs wonderfully with just about anything you can throw on the grill.
Ingredients
- 1 cup ketchup (I always reach for the organic kind for a cleaner taste)
- 1/2 cup apple cider vinegar (the tangier, the better in my book)
- 1/4 cup brown sugar (packed tightly for that deep molasses flavor)
- 2 tbsp Worcestershire sauce (a splash adds umami depth)
- 1 tbsp smoked paprika (for that irresistible smoky note)
- 1 tsp garlic powder (because everything’s better with garlic)
- 1/2 tsp onion powder (a little goes a long way)
- 1/2 tsp black pepper (freshly ground for the best flavor)
Instructions
- In a medium saucepan, combine all the ingredients over medium heat. Stir well to ensure the brown sugar dissolves completely.
- Once the mixture starts to simmer, reduce the heat to low. Let it cook for 20 minutes, stirring occasionally to prevent sticking. Tip: A wooden spoon is perfect for stirring as it doesn’t react with the acidic ingredients.
- After 20 minutes, check the consistency. The sauce should coat the back of a spoon. If it’s too thick, add a tablespoon of water at a time until desired consistency is reached. Tip: Remember, the sauce will thicken slightly as it cools.
- Remove the saucepan from the heat and let the sauce cool to room temperature before using. Tip: For an extra smooth texture, blend the sauce with an immersion blender before cooling.
With its perfect balance of tangy and sweet, this BBQ sauce is a versatile condiment that’s not just for ribs. Try it as a glaze for roasted vegetables or mix it into your next batch of baked beans for an extra flavor kick.
Fresh Basil Pesto
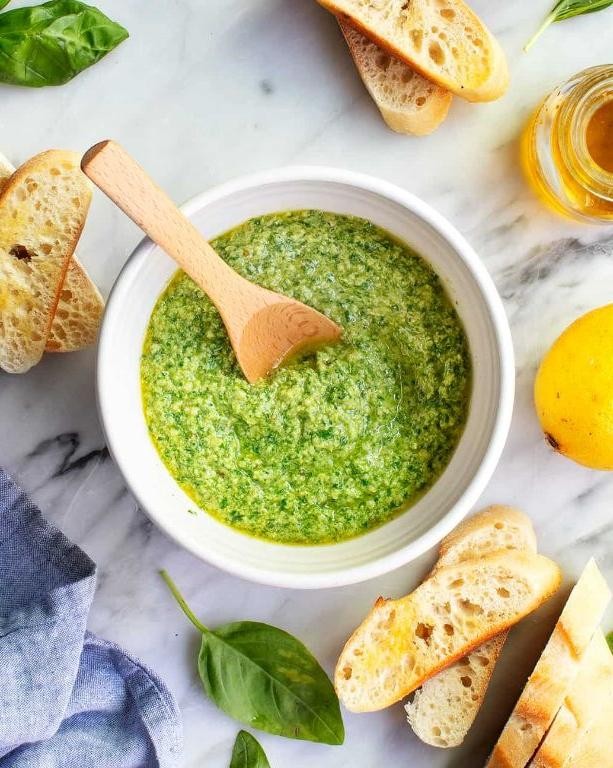
Zesty and vibrant, Fresh Basil Pesto is a classic sauce that transforms simple dishes into something extraordinary. Today, we’ll walk through making this aromatic condiment from scratch, ensuring even beginners can achieve that perfect, herbaceous balance.
Ingredients
- 2 cups fresh basil leaves (packed tightly; the fresher, the better for that vibrant color)
- 1/2 cup extra virgin olive oil (my go-to for its fruity notes)
- 1/3 cup pine nuts (lightly toasted for a deeper flavor)
- 2 garlic cloves (freshly minced to avoid any bitterness)
- 1/2 cup freshly grated Parmesan cheese (the real deal, please)
- 1/4 teaspoon salt (adjust based on your cheese’s saltiness)
- 1/8 teaspoon freshly ground black pepper (for a slight kick)
Instructions
- In a dry skillet over medium heat, toast the pine nuts until golden, about 3 minutes, stirring constantly to prevent burning.
- Combine the basil leaves, toasted pine nuts, minced garlic, Parmesan cheese, salt, and pepper in a food processor.
- Pulse the mixture a few times to break down the ingredients, then scrape down the sides with a spatula to ensure even processing.
- With the processor running, slowly drizzle in the olive oil until the pesto is smooth and well combined, about 1 minute.
- Taste and adjust seasoning if necessary, remembering the cheese adds saltiness.
Whisking this pesto into pasta, spreading it on sandwiches, or dolloping it over grilled meats showcases its versatility. The texture should be creamy yet slightly coarse, with a bright, garlicky flavor that sings of summer.
Zesty Lemon Butter Sauce
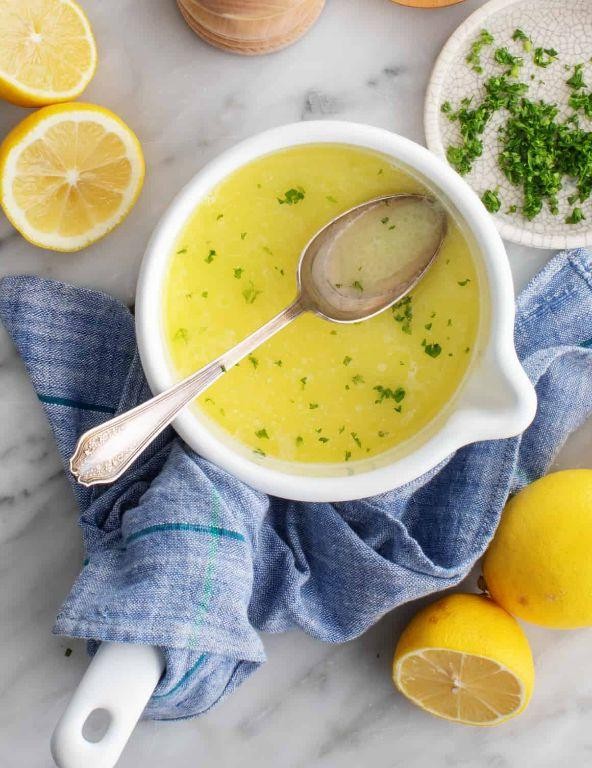
Here’s how to whip up a Zesty Lemon Butter Sauce that’ll elevate any dish from good to unforgettable. This sauce is a game-changer for seafood, pasta, or even as a vibrant drizzle over grilled vegetables.
Ingredients
- 1/2 cup unsalted butter (I always use unsalted to control the saltiness perfectly)
- 2 tbsp fresh lemon juice (freshly squeezed makes all the difference)
- 1 tsp lemon zest (for that extra zing)
- 1/4 tsp salt (adjust based on your preference)
- 1/8 tsp black pepper (freshly ground is my go-to for the best flavor)
Instructions
- Melt the butter in a small saucepan over low heat, stirring occasionally to ensure it doesn’t brown.
- Once the butter is fully melted, remove the saucepan from the heat to prevent overheating.
- Whisk in the fresh lemon juice and lemon zest until the mixture is smooth and well combined.
- Season the sauce with salt and black pepper, whisking again to distribute the seasonings evenly.
- Let the sauce sit for a minute off the heat to allow the flavors to meld together beautifully.
So, this Zesty Lemon Butter Sauce is silky, rich, and bursting with bright citrus notes. Try it drizzled over grilled salmon or tossed with warm pasta for a simple yet elegant meal.
Smoky Chipotle Sauce
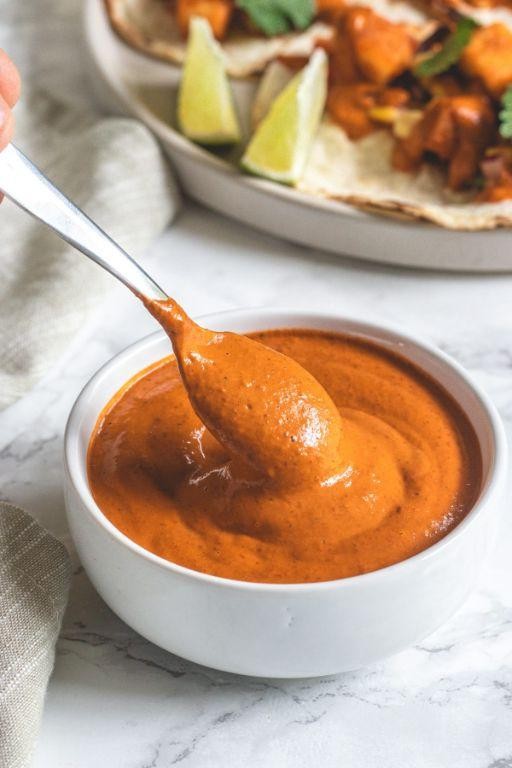
Now, let’s dive into making a Smoky Chipotle Sauce that’s sure to add a bold flavor to any dish. This guide will walk you through each step, ensuring even beginners can achieve that perfect smoky kick.
Ingredients
- 2 canned chipotle peppers in adobo sauce (I love the smoky depth they add, but adjust based on your heat preference.)
- 1 cup mayonnaise (For a creamier texture, I always go with full-fat mayo.)
- 1 tbsp lime juice (Freshly squeezed makes all the difference here.)
- 1 tsp garlic powder (It’s my secret for a quick flavor boost.)
- 1/2 tsp smoked paprika (This enhances the smokiness without adding heat.)
- 1/4 tsp salt (I find this amount perfectly balances the flavors.)
Instructions
- In a blender, combine the chipotle peppers, mayonnaise, lime juice, garlic powder, smoked paprika, and salt.
- Blend on high for 30 seconds, or until the mixture is completely smooth. Tip: Scrape down the sides of the blender halfway through to ensure everything is well incorporated.
- Taste the sauce and adjust the seasoning if necessary. Tip: If you prefer a thinner consistency, add a teaspoon of water at a time until desired texture is reached.
- Transfer the sauce to an airtight container and refrigerate for at least 1 hour before serving. Tip: This resting time allows the flavors to meld together beautifully.
Velvety smooth with a smoky, slightly spicy profile, this Smoky Chipotle Sauce is fantastic as a dip, sandwich spread, or drizzled over grilled meats. Try mixing it into your next batch of deviled eggs for an unexpected twist.
Sweet and Sour Sauce
Understanding the balance between sweet and sour can transform your dishes, and mastering this sauce is a game-changer for any home cook. Let’s dive into creating a versatile Sweet and Sour Sauce that’s perfect for dipping, glazing, or stirring into your favorite dishes.
Ingredients
- 1 cup ketchup (I find Heinz gives the best consistency and flavor)
- 1/2 cup brown sugar, packed (dark brown sugar adds a deeper flavor)
- 1/2 cup apple cider vinegar (the tanginess is key)
- 1/4 cup pineapple juice (use the juice from canned pineapple for extra sweetness)
- 2 tbsp soy sauce (low sodium works great if you’re watching salt intake)
- 1 tbsp cornstarch (this is our thickening hero)
- 1/4 cup water (room temperature to help dissolve the cornstarch)
- 1 tsp garlic powder (for that subtle kick)
- 1/2 tsp ginger powder (fresh grated ginger can be used for more zing)
Instructions
- In a medium saucepan, combine ketchup, brown sugar, apple cider vinegar, pineapple juice, and soy sauce over medium heat. Stir until the sugar dissolves completely, about 3 minutes.
- In a small bowl, whisk together cornstarch and water until smooth. This is your slurry that will thicken the sauce.
- Slowly pour the slurry into the saucepan, stirring constantly to prevent lumps. Tip: Always add slurry to a simmering liquid for even thickening.
- Bring the mixture to a gentle boil, then reduce heat to low. Simmer for 5 minutes, stirring occasionally, until the sauce thickens to your desired consistency. Tip: The sauce will thicken more as it cools.
- Stir in garlic powder and ginger powder. Simmer for an additional 2 minutes to blend the flavors. Tip: Taste and adjust the sweetness or tanginess by adding more sugar or vinegar if needed.
Just like that, you’ve got a glossy, vibrant Sweet and Sour Sauce with the perfect balance of flavors. Its thick consistency clings beautifully to chicken wings, and it’s also fantastic as a glaze for grilled shrimp. Experiment by adding a dash of red pepper flakes for a spicy twist.
Garlic Parmesan Sauce
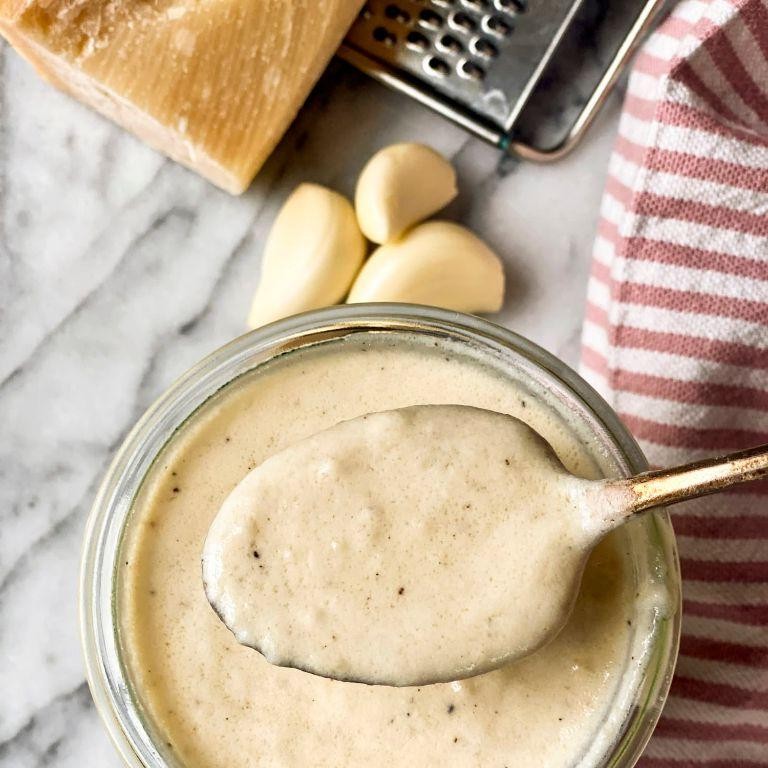
Elevate your pasta night with this creamy Garlic Parmesan Sauce, a simple yet luxurious addition that transforms any dish into a gourmet experience. Perfect for beginners, this recipe walks you through each step to ensure a smooth, flavorful sauce every time.
Ingredients
- 1/2 cup unsalted butter (I always use unsalted to control the sauce’s saltiness)
- 4 cloves garlic, minced (fresh garlic makes all the difference here)
- 2 cups heavy cream (for that rich, velvety texture)
- 1 cup grated Parmesan cheese (the real deal, not the powdered kind)
- 1/2 tsp salt (adjust based on your preference)
- 1/4 tsp black pepper (freshly ground adds a nice kick)
Instructions
- In a medium saucepan, melt the butter over medium heat until it’s fully liquid and just starting to bubble.
- Add the minced garlic to the butter, sautéing for about 1 minute until fragrant but not browned. Tip: Keep the heat medium to avoid burning the garlic.
- Slowly pour in the heavy cream, stirring constantly to combine with the butter and garlic. Increase the heat to medium-high and bring the mixture to a gentle simmer.
- Reduce the heat to low and gradually whisk in the grated Parmesan cheese until the sauce is smooth and the cheese is fully melted. Tip: Adding the cheese slowly prevents clumping.
- Season the sauce with salt and black pepper, stirring well to incorporate. Let it simmer for another 2-3 minutes to thicken slightly. Tip: The sauce should coat the back of a spoon when it’s ready.
Buttery and rich with a sharp Parmesan tang, this Garlic Parmesan Sauce clings beautifully to pasta, creating a dish that’s both comforting and elegant. Try tossing it with fettuccine and a sprinkle of parsley for a classic take, or drizzle over roasted vegetables for a decadent side.
Hollandaise Sauce

Starting with the basics, Hollandaise sauce is a creamy, buttery delight that elevates any dish it graces, from eggs Benedict to steamed asparagus. Mastering this sauce is a rite of passage for any home chef, and with a bit of patience, you’ll find it’s surprisingly straightforward.
Ingredients
- 3 large egg yolks (I find room temperature yolks blend more smoothly)
- 1 tablespoon lemon juice (freshly squeezed for that bright, tangy kick)
- 1/2 cup unsalted butter (melted but not hot, to prevent scrambling the eggs)
- 1/4 teaspoon salt (a pinch more if you’re like me and love a slightly savory edge)
- A pinch of cayenne pepper (optional, for a subtle warmth)
Instructions
- In a medium heatproof bowl, whisk together the egg yolks and lemon juice until the mixture is light and frothy.
- Place the bowl over a saucepan of gently simmering water (double boiler method), ensuring the bottom of the bowl doesn’t touch the water. Tip: This indirect heat is key to avoiding curdled eggs.
- Continue whisking constantly for about 5 minutes, until the mixture thickens enough to coat the back of a spoon. Tip: If it gets too hot, lift the bowl briefly to cool it down.
- Slowly drizzle in the melted butter, a few drops at a time at first, whisking continuously to emulsify the sauce. Tip: Adding the butter too quickly can cause the sauce to break.
- Once all the butter is incorporated and the sauce is thick, remove from heat and whisk in the salt and cayenne pepper.
Whisking up this Hollandaise sauce rewards you with a velvety texture and a rich, tangy flavor that’s utterly irresistible. Drizzle it over poached eggs for a classic Benedict, or get creative by pairing it with grilled salmon for a luxurious twist.
Thai Peanut Sauce
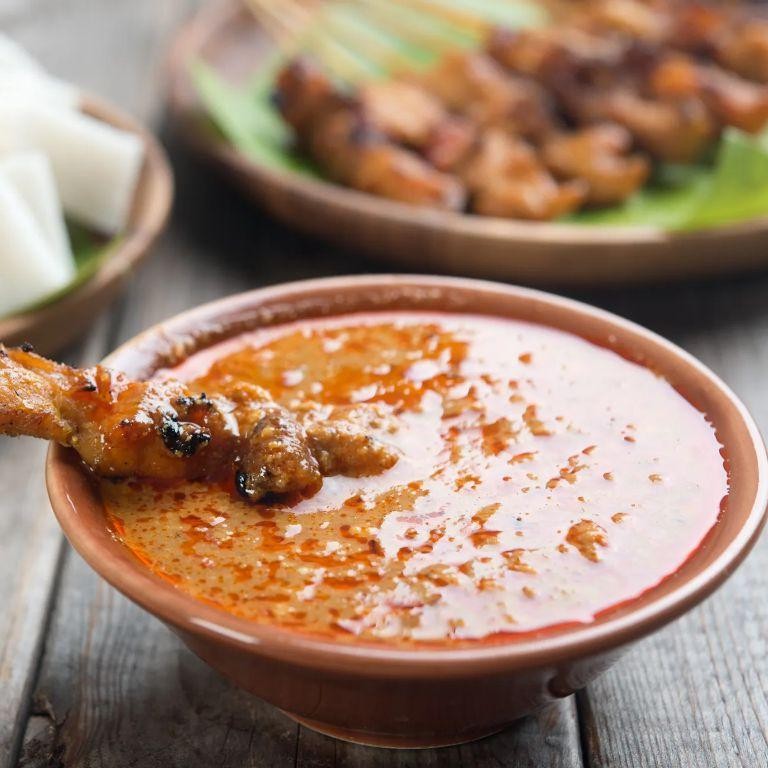
Very few sauces can claim the versatility and universal appeal of Thai Peanut Sauce. Whether you’re dressing up a salad, dunking spring rolls, or slathering it on grilled chicken, this creamy, nutty delight is a game-changer in the kitchen.
Ingredients
- 1 cup creamy peanut butter (I swear by the natural, unsweetened kind for the best flavor)
- 1/3 cup coconut milk (full-fat gives it that luxurious texture)
- 2 tbsp soy sauce (low sodium works great if you’re watching your salt intake)
- 2 tbsp lime juice (freshly squeezed makes all the difference)
- 1 tbsp honey (or maple syrup for a vegan twist)
- 1 tsp grated ginger (the fresher, the zingier)
- 1 clove garlic, minced (because everything’s better with garlic)
- 1/2 tsp crushed red pepper flakes (adjust to your heat preference)
Instructions
- In a medium bowl, combine the peanut butter and coconut milk. Whisk until smooth and creamy.
- Add the soy sauce, lime juice, and honey to the bowl. Stir well to incorporate all the ingredients.
- Mix in the grated ginger, minced garlic, and red pepper flakes. Ensure everything is evenly distributed.
- Let the sauce sit for at least 10 minutes before serving to allow the flavors to meld together beautifully.
Silky smooth with a perfect balance of sweet, salty, and spicy, this Thai Peanut Sauce is a dream. Try drizzling it over a bowl of steaming noodles or using it as a bold dip for fresh veggies.
Mushroom Gravy
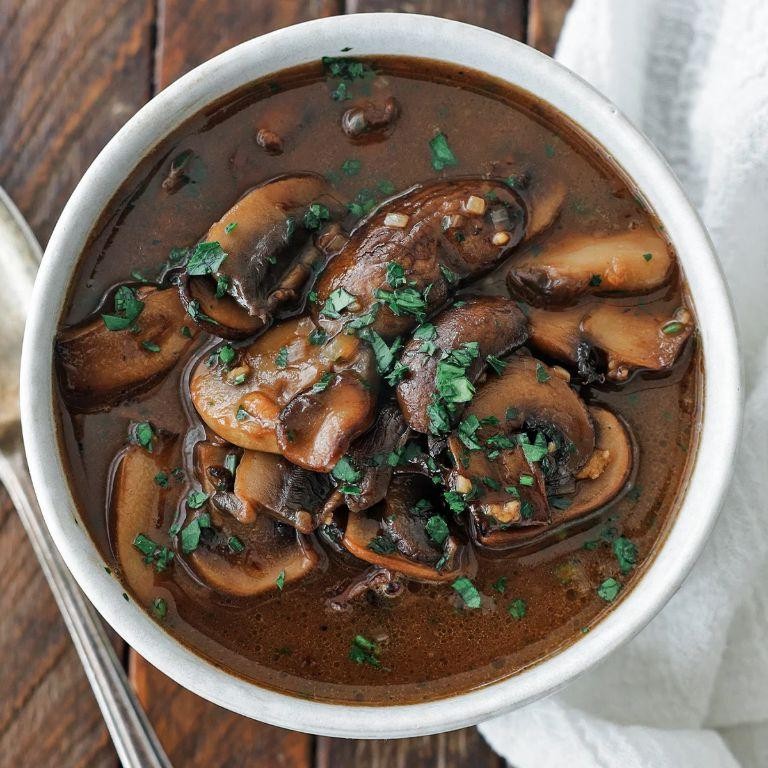
Whisking up a batch of homemade mushroom gravy is simpler than you might think, and it’s a game-changer for elevating your meals. Whether you’re drizzling it over mashed potatoes or smothering a steak, this recipe will guide you through each step with precision.
Ingredients
- 2 tbsp unsalted butter (I always use unsalted to control the seasoning better)
- 8 oz cremini mushrooms, sliced (their earthy flavor is perfect here)
- 1 small yellow onion, finely diced (about 1/2 cup)
- 2 cloves garlic, minced (freshly minced garlic makes all the difference)
- 2 tbsp all-purpose flour (this is our thickening agent)
- 2 cups beef broth (vegetable broth works for a vegetarian version)
- 1/2 tsp dried thyme (or 1 tsp fresh if you have it)
- Salt and freshly ground black pepper (to taste, but I recommend starting with 1/4 tsp salt)
Instructions
- Melt the butter in a medium saucepan over medium heat until it’s just beginning to foam.
- Add the sliced mushrooms and diced onion to the pan, cooking until the mushrooms have released their moisture and both are golden brown, about 8-10 minutes.
- Stir in the minced garlic and cook for another 30 seconds until fragrant—this builds the flavor base.
- Sprinkle the flour over the mushroom mixture, stirring constantly to coat everything evenly and cook out the raw flour taste, about 1 minute.
- Gradually whisk in the beef broth, ensuring no lumps form, then bring the mixture to a simmer.
- Add the thyme, salt, and pepper, then reduce the heat to low. Let the gravy simmer gently for 5-7 minutes, stirring occasionally, until it thickens to your desired consistency.
- Taste and adjust the seasoning if necessary before serving.
Rich and velvety, this mushroom gravy boasts a deep umami flavor that complements both simple and sophisticated dishes alike. Try it over roasted vegetables for a cozy, comforting twist.
Avocado Lime Crema
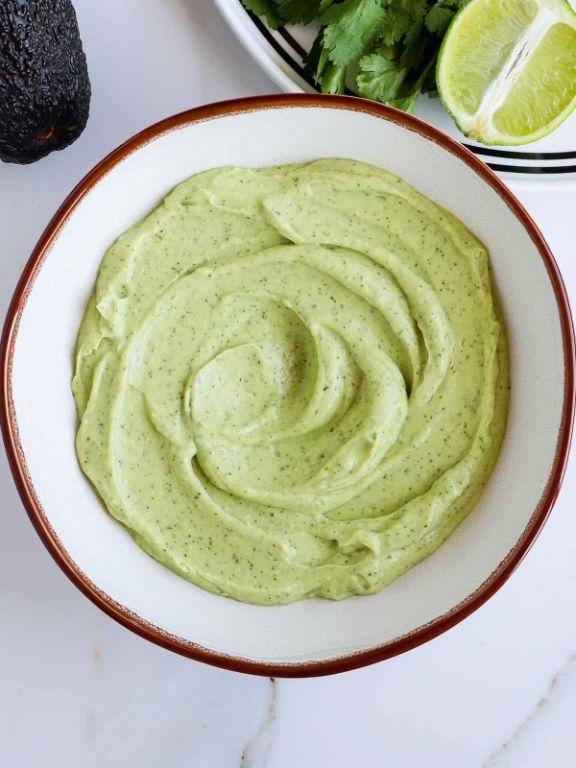
For a creamy, zesty topping that elevates any dish, this Avocado Lime Crema is a must-try. It’s simple to make and packs a punch of flavor, perfect for beginners looking to add a gourmet touch to their meals.
Ingredients
- 1 ripe avocado – choose one that’s slightly soft to the touch for the creamiest texture.
- 1/2 cup sour cream – full fat works best for richness, but light is okay if you’re watching calories.
- 2 tbsp fresh lime juice – about 1 large lime, freshly squeezed makes all the difference.
- 1/4 tsp salt – I like sea salt for its clean, crisp flavor.
- 1/4 tsp garlic powder – adds a subtle depth without overpowering the lime.
Instructions
- Cut the avocado in half, remove the pit, and scoop the flesh into a blender.
- Add the sour cream, lime juice, salt, and garlic powder to the blender.
- Blend on high for 30 seconds, or until the mixture is completely smooth. Tip: If the crema is too thick, add a teaspoon of water at a time until desired consistency is reached.
- Taste and adjust seasoning if necessary. Tip: A little more lime juice can brighten the flavor if it’s too bland.
- Transfer the crema to a serving bowl. Tip: For best flavor, let it sit in the fridge for at least 30 minutes before serving to allow the flavors to meld.
Delightfully smooth with a tangy kick, this Avocado Lime Crema is fantastic drizzled over tacos, grilled chicken, or even as a dip for fresh veggies. Its vibrant green color and creamy texture make it as visually appealing as it is delicious.
Chimichurri Sauce
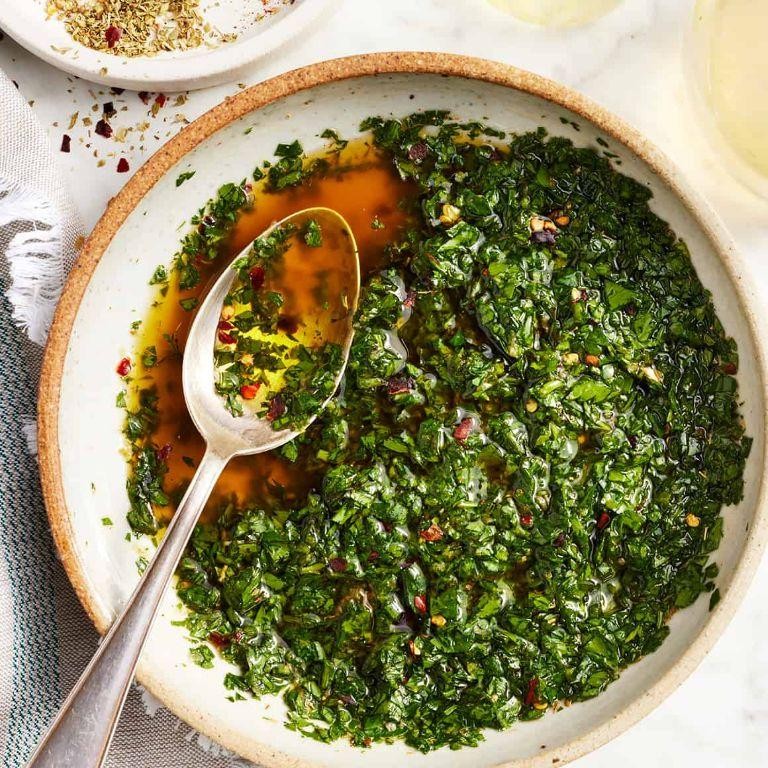
Begin by exploring the vibrant flavors of Chimichurri Sauce, a fresh, herbaceous condiment that’s as versatile as it is delicious. Perfect for grilling season, this sauce brings a bright, tangy kick to any dish it accompanies.
Ingredients
- 1 cup fresh parsley, finely chopped (I like to pack it lightly for a more herb-forward flavor)
- 4 cloves garlic, minced (fresh is key here for that sharp, aromatic punch)
- 1/2 cup extra virgin olive oil (my go-to for its fruity notes)
- 1/4 cup red wine vinegar (adds a nice tangy depth)
- 1 tsp salt (fine sea salt dissolves better)
- 1/2 tsp crushed red pepper flakes (adjust based on your heat preference)
Instructions
- In a medium bowl, combine the finely chopped parsley and minced garlic.
- Slowly drizzle in the extra virgin olive oil while stirring to emulsify the mixture.
- Add the red wine vinegar, salt, and crushed red pepper flakes, stirring well to combine. Tip: Letting the sauce sit for 10 minutes before serving enhances the flavors.
- Taste and adjust seasoning if necessary, though the measurements provided are a great starting point. Tip: For a smoother sauce, pulse all ingredients in a food processor for a few seconds.
- Transfer the sauce to a serving bowl or jar. Tip: Store any leftovers in the refrigerator, but bring to room temperature before serving for the best flavor.
Enjoy the vibrant green hue and the burst of fresh, tangy flavors this Chimichurri Sauce adds to grilled meats, vegetables, or even as a bold salad dressing. Its versatility and ease of preparation make it a must-try for any home cook looking to elevate their dishes.
Maple Mustard Sauce
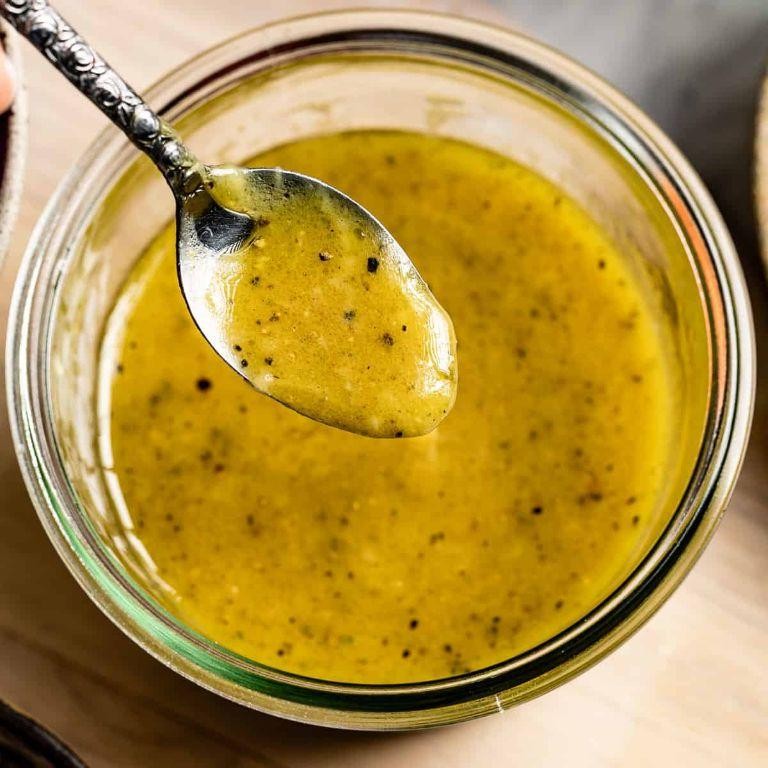
First, let’s dive into making a Maple Mustard Sauce that’s both versatile and packed with flavor, perfect for elevating your dishes from good to unforgettable.
Ingredients
- 1/2 cup pure maple syrup (the darker the better for a robust flavor)
- 1/4 cup Dijon mustard (I find this brand offers the perfect balance of tang and spice)
- 2 tbsp apple cider vinegar (for that slight fruity sharpness)
- 1 tbsp whole grain mustard (adds a lovely texture and pop of flavor)
- 1/4 tsp garlic powder (just a hint to round it all out)
Instructions
- In a medium saucepan, combine the pure maple syrup, Dijon mustard, apple cider vinegar, whole grain mustard, and garlic powder. Tip: Whisking as you add each ingredient ensures a smooth blend from the start.
- Place the saucepan over medium heat and bring the mixture to a gentle simmer, stirring frequently. Tip: Keep the heat moderate to prevent the sugars in the maple syrup from burning.
- Once simmering, reduce the heat to low and let the sauce cook for about 5 minutes, stirring occasionally, until it slightly thickens. Tip: The sauce should coat the back of a spoon when it’s ready.
- Remove the saucepan from the heat and let the sauce cool for a few minutes before serving. This allows the flavors to meld beautifully.
After cooling, this Maple Mustard Sauce boasts a glossy finish with a perfect harmony of sweet and tangy notes. Try drizzling it over roasted vegetables or using it as a glaze for grilled chicken to truly showcase its versatility.
Romesco Sauce
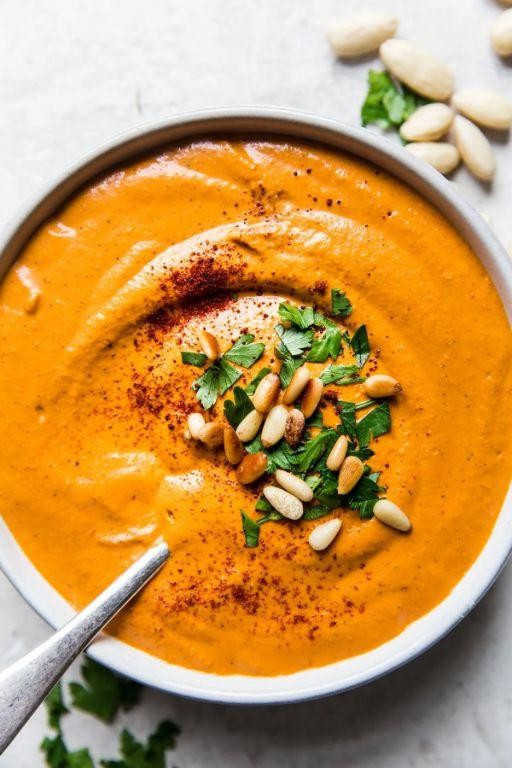
Here’s how to make Romesco Sauce, a vibrant and versatile condiment that’s as easy to whip up as it is delicious. Whether you’re drizzling it over grilled vegetables or using it as a dip, this sauce brings a smoky, nutty flavor to any dish.
Ingredients
- 1 cup roasted red peppers (I find jarred ones work just fine, but roasting your own adds a deeper flavor)
- 1/2 cup toasted almonds (Toast them lightly for a nuttier taste)
- 1/4 cup extra virgin olive oil (My go-to for its fruity notes)
- 2 tbsp sherry vinegar (Adds a nice tang)
- 1 garlic clove (Fresh is best here)
- 1 tsp smoked paprika (For that essential smoky flavor)
- 1/2 tsp salt (Adjust based on your preference)
- 1 slice of day-old bread (Torn into pieces, it thickens the sauce beautifully)
Instructions
- In a blender, combine the roasted red peppers, toasted almonds, olive oil, sherry vinegar, garlic clove, smoked paprika, and salt. Tip: For a smoother sauce, blend the almonds first until finely ground.
- Add the torn bread pieces to the blender. Tip: Soaking the bread in a bit of water beforehand can help achieve a smoother consistency.
- Blend all the ingredients on high speed until the mixture is smooth and homogenous. Tip: If the sauce is too thick, add a tablespoon of water at a time until you reach your desired consistency.
- Taste the sauce and adjust the seasoning with more salt or vinegar if needed.
Unbelievably versatile, this Romesco Sauce boasts a creamy texture with a perfect balance of smoky, nutty, and tangy flavors. Try it as a bold spread on sandwiches or as a vibrant accompaniment to grilled fish for an extra flavor punch.
Tzatziki Sauce
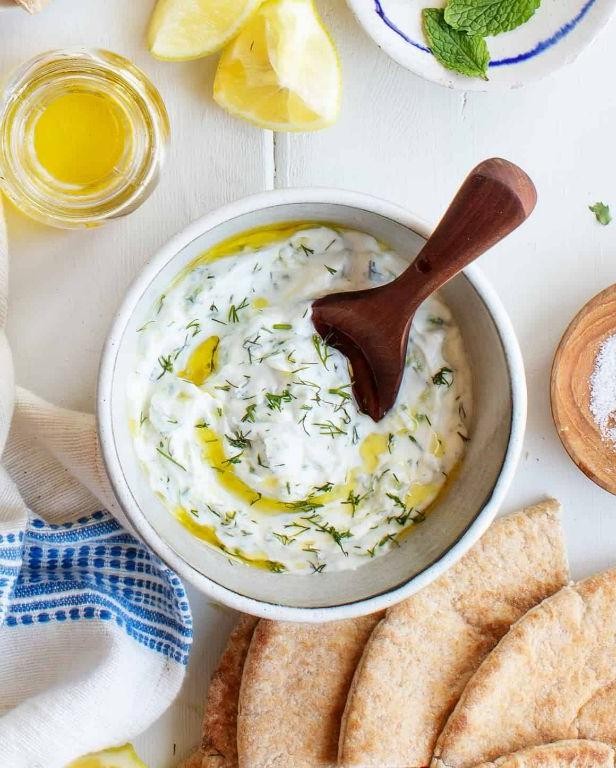
Begin by exploring the refreshing and versatile Tzatziki Sauce, a creamy cucumber-yogurt blend that’s perfect for dipping, spreading, or dressing. This guide will walk you through each step to create this Mediterranean staple with ease.
Ingredients
- 1 cup Greek yogurt (I always go for full-fat for extra creaminess)
- 1 medium cucumber, peeled and grated (English cucumbers work best for their minimal seeds)
- 2 cloves garlic, minced (freshly minced garlic gives the best flavor punch)
- 1 tbsp extra virgin olive oil (my go-to for its fruity notes)
- 1 tbsp fresh dill, chopped (dried dill can substitute in a pinch, but fresh is ideal)
- 1 tsp lemon juice (freshly squeezed for that bright acidity)
- 1/2 tsp salt (adjust to your liking, but this is a good starting point)
Instructions
- Place the grated cucumber in a clean kitchen towel and squeeze out as much liquid as possible. This step is crucial to prevent a watery sauce.
- In a medium bowl, combine the Greek yogurt, squeezed cucumber, minced garlic, olive oil, chopped dill, lemon juice, and salt.
- Stir the mixture until all ingredients are well incorporated. Tip: Letting the sauce sit for 10 minutes before serving allows the flavors to meld beautifully.
- Cover the bowl with plastic wrap and refrigerate for at least 1 hour. Chilling enhances the sauce’s thickness and flavor profile.
- Give the sauce a final stir before serving. Tip: If the sauce seems too thick after chilling, a splash of water can adjust the consistency.
Yield a sauce that’s luxuriously creamy with a crisp cucumber bite and a garlicky zing. Try it as a vibrant topping for grilled meats or a refreshing dip for pita chips.
Caramelized Onion Sauce
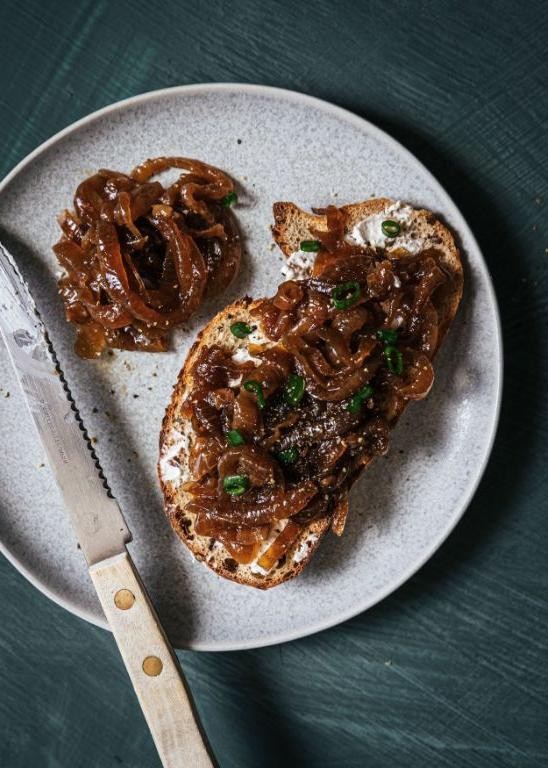
When you’re looking to add a rich, deeply flavorful touch to your dishes, caramelized onion sauce is a game-changer. It’s surprisingly simple to make, and the result is a versatile sauce that elevates everything from burgers to pasta.
Ingredients
- 2 large yellow onions, thinly sliced (I find yellow onions offer the perfect balance of sweetness and sharpness)
- 2 tbsp unsalted butter (for that rich, creamy base)
- 1 tbsp extra virgin olive oil (my go-to for its fruity notes)
- 1 tsp granulated sugar (helps speed up the caramelization process)
- 1/2 tsp salt (to draw out the onions’ moisture)
- 1/4 cup water (to deglaze the pan and pick up all those tasty bits)
- 1/2 cup heavy cream (for a luxurious texture)
Instructions
- In a large skillet over medium heat, melt the butter with the olive oil. The combination prevents the butter from burning.
- Add the thinly sliced onions, sugar, and salt to the skillet. Stir to coat the onions evenly.
- Reduce the heat to medium-low and cook the onions, stirring occasionally, for about 40 minutes until they’re deeply golden brown. Tip: Don’t rush this process; low and slow is the key to perfect caramelization.
- Once the onions are caramelized, add the water to the skillet to deglaze it, scraping up any browned bits from the bottom. Tip: These bits are packed with flavor, so make sure to get them all.
- Stir in the heavy cream and simmer the sauce for an additional 5 minutes until it thickens slightly. Tip: For a smoother sauce, you can blend it at this stage, but I love the texture of the onion pieces.
Every spoonful of this caramelized onion sauce is a blend of sweet, savory, and creamy notes. Try it drizzled over a grilled steak or stirred into mashed potatoes for an extra layer of flavor.
Blue Cheese Dressing

Sometimes, the simplest recipes bring the most joy, and that’s exactly what this Blue Cheese Dressing does. It’s a creamy, tangy delight that elevates any salad or wing to new heights.
Ingredients
- 1 cup mayonnaise (I swear by Duke’s for its rich flavor)
- 1/2 cup sour cream (full-fat gives the best texture)
- 1/2 cup buttermilk (shake the carton well before measuring)
- 4 oz blue cheese, crumbled (I love the boldness of Roquefort)
- 1 tbsp lemon juice (freshly squeezed makes all the difference)
- 1 tsp Worcestershire sauce (a secret umami booster)
- 1/2 tsp garlic powder (for a subtle kick)
- 1/4 tsp salt (I prefer sea salt for its clean taste)
- 1/4 tsp black pepper (freshly ground, please)
Instructions
- In a medium bowl, combine the mayonnaise, sour cream, and buttermilk. Whisk until smooth and fully incorporated.
- Add the crumbled blue cheese to the bowl. Gently fold it into the mixture, leaving some chunks for texture.
- Stir in the lemon juice, Worcestershire sauce, garlic powder, salt, and black pepper. Mix until everything is evenly distributed.
- Cover the bowl with plastic wrap and refrigerate for at least 2 hours. This chilling time allows the flavors to meld beautifully.
- Before serving, give the dressing a quick stir. If it’s too thick, thin it with a splash of buttermilk until you reach the desired consistency.
Creamy and packed with bold flavors, this Blue Cheese Dressing is a game-changer for your salads and appetizers. Try drizzling it over a wedge salad or using it as a dip for buffalo wings to really let it shine.
Conclusion
With these 20 delicious sauce recipes, you’re all set to elevate any meal, no matter the occasion! We hope you find inspiration to try them out and discover new favorites. Don’t forget to share which recipes you loved in the comments and pin this article on Pinterest to keep these tasty ideas handy. Happy cooking!


