Hey there, savvy home cooks! Ever find yourself staring into the fridge, wondering how to whip up something tasty without breaking the bank? You’re not alone. Our roundup of 18 Delicious Struggle Meals is here to save the day—packed with budget-friendly, flavor-packed recipes that prove you don’t need to splurge to enjoy a satisfying meal. Let’s dive into these wallet-friendly wonders that’ll keep both your stomach and your wallet full!
Spaghetti with Garlic and Olive Oil

Today feels like one of those quiet evenings where the simplicity of a meal can speak volumes. There’s something deeply comforting about the aroma of garlic gently sizzling in olive oil, a reminder that the best dishes often come from the humblest ingredients.
Ingredients
- a pound of spaghetti
- a generous 1/3 cup of extra virgin olive oil
- 4 cloves of garlic, thinly sliced
- a pinch of red pepper flakes
- a handful of fresh parsley, chopped
- salt, just enough to season the pasta water
Instructions
- Fill a large pot with water, add a generous pinch of salt, and bring to a rolling boil over high heat.
- Add the spaghetti to the boiling water, stirring occasionally to prevent sticking, and cook for 8-10 minutes or until al dente.
- While the pasta cooks, heat the olive oil in a large pan over medium-low heat. Add the sliced garlic and a pinch of red pepper flakes, cooking until the garlic is golden and fragrant, about 2-3 minutes. Tip: Keep the heat low to avoid burning the garlic.
- Reserve 1/2 cup of pasta water, then drain the spaghetti and add it directly to the pan with the garlic oil.
- Toss the spaghetti with the garlic oil, adding a splash of the reserved pasta water to help the sauce cling to the pasta. Tip: The starch in the pasta water is key for a silky sauce.
- Remove from heat, stir in the chopped parsley, and give it one final toss. Tip: Adding the parsley off the heat preserves its vibrant color and fresh flavor.
Unassuming yet unforgettable, this dish wraps you in the warmth of garlic-infused oil with just the right kick of heat. Serve it with a sprinkle of Parmesan or a side of crusty bread to soak up every last drop of that golden oil.
Bean and Cheese Quesadillas

Bean and cheese quesadillas are the kind of comfort food that feels like a warm hug on a chilly evening. They’re simple, satisfying, and endlessly adaptable to whatever you have in your pantry.
Ingredients
- a couple of large flour tortillas
- a cup of shredded cheese (cheddar or a Mexican blend works great)
- a half cup of cooked black beans, drained and rinsed
- a splash of olive oil
- a pinch of salt
- a sprinkle of chili powder (optional, for a little kick)
Instructions
- Heat a large skillet over medium heat and add a splash of olive oil, just enough to lightly coat the bottom.
- Place one tortilla in the skillet, then sprinkle half of the cheese evenly over it.
- Spread the black beans over the cheese, then sprinkle the remaining cheese on top. This layering helps everything melt together beautifully.
- Top with the second tortilla and press down gently with a spatula. Cook for about 3 minutes, or until the bottom tortilla is golden and crispy.
- Carefully flip the quesadilla and cook for another 3 minutes on the other side. If the cheese isn’t fully melted, cover the skillet for the last minute to trap the heat.
- Transfer the quesadilla to a cutting board, let it sit for a minute (this makes it easier to slice), then cut into wedges.
You’ll love the way the crispy tortilla gives way to the gooey, cheesy center, with the beans adding just the right amount of heartiness. Try serving it with a dollop of sour cream or a side of fresh salsa for an extra burst of flavor.
Ramen Noodle Stir Fry

As the morning light filters through the kitchen window, there’s something comforting about the simplicity of transforming humble ingredients into a meal that feels like a warm hug. Ramen noodle stir fry, with its vibrant colors and inviting aromas, is just the dish to bring that comfort to life, blending the familiar with a touch of creativity.
Ingredients
- a couple of packs of ramen noodles, seasoning packets set aside for another use
- a splash of vegetable oil
- a handful of mixed vegetables (think bell peppers, carrots, and snap peas), thinly sliced
- a clove of garlic, minced
- a tablespoon of soy sauce
- a teaspoon of sesame oil
- a pinch of red pepper flakes, for a gentle heat
- a sprinkle of green onions, chopped, for garnish
Instructions
- Bring a pot of water to a rolling boil and cook the ramen noodles for about 3 minutes, just until they’re tender but still have a bit of bite. Drain and set aside.
- Heat a splash of vegetable oil in a large skillet over medium-high heat. Tip: The oil should shimmer but not smoke, indicating it’s ready.
- Toss in the mixed vegetables and stir-fry for about 4 minutes, until they’re bright and slightly tender but still crisp.
- Add the minced garlic and a pinch of red pepper flakes, stirring for just 30 seconds until fragrant to avoid burning the garlic.
- Slide the cooked noodles into the skillet, followed by a tablespoon of soy sauce and a teaspoon of sesame oil. Toss everything together for another 2 minutes, ensuring the noodles are evenly coated and heated through.
- Garnish with chopped green onions before serving. Tip: For an extra layer of flavor, a drizzle of chili oil or a squeeze of lime juice can elevate the dish beautifully.
How the noodles cling to the sauce, with each bite offering a crunch from the vegetables and a warmth from the pepper flakes, makes this stir fry a delightful play of textures and flavors. Serve it straight from the skillet for a rustic touch, or plate it with a side of pickled ginger for a contrasting tang.
Egg Fried Rice

Kind of like the comfort of a well-worn sweater, egg fried rice is that simple, satisfying dish that feels like a hug from the inside. It’s the kind of meal you can whip up with what’s left in the fridge, yet it never fails to delight with its golden hues and the gentle whisper of soy sauce.
Ingredients
- 2 cups of day-old rice, because it fries up better
- A couple of eggs, beaten
- A splash of vegetable oil, just enough to coat the pan
- 2 tablespoons of soy sauce, for that deep, savory note
- A handful of frozen peas and carrots, for a pop of color and sweetness
- A pinch of salt, to balance the flavors
Instructions
- Heat a large pan or wok over medium-high heat and add the vegetable oil, swirling to coat the bottom evenly.
- Pour in the beaten eggs, letting them set for about 30 seconds before scrambling them gently into soft curds.
- Add the day-old rice to the pan, breaking up any clumps with the back of your spoon for even frying.
- Sprinkle in the frozen peas and carrots, stirring frequently to distribute the colors and textures throughout the rice.
- Drizzle the soy sauce over the rice, tossing everything together until each grain is kissed with its rich flavor.
- Season with a pinch of salt, tasting as you go to ensure the balance is just right.
- Continue to cook for another 2-3 minutes, until the rice is heated through and has a slightly crispy edge to some of the grains.
Mmm, the final dish is a tapestry of textures—soft, fluffy rice with little bursts of crispness and the occasional tender bite of vegetable. Serve it straight from the pan, maybe with a sprinkle of green onions on top for a fresh contrast, or alongside a simple cucumber salad to round out the meal.
Potato and Onion Omelette

Gently, the morning light filters through the kitchen window, casting a warm glow on the counter where a simple yet comforting dish begins to take shape. Today, it’s all about the humble potato and onion omelette, a dish that feels like a quiet hug on a lazy weekend morning.
Ingredients
- A couple of medium potatoes, peeled and thinly sliced
- One small onion, thinly sliced
- A splash of olive oil
- Three large eggs
- A pinch of salt
- A dash of black pepper
Instructions
- Heat a splash of olive oil in a non-stick skillet over medium heat (about 350°F).
- Add the thinly sliced potatoes and onions to the skillet, spreading them out evenly. Cook for about 10 minutes, stirring occasionally, until they’re soft and slightly golden. Tip: Don’t rush this step; the slow cooking brings out the sweetness of the onions.
- While the potatoes and onions cook, whisk the eggs in a bowl with a pinch of salt and a dash of black pepper until well combined.
- Pour the egg mixture over the cooked potatoes and onions in the skillet. Tip: Tilt the skillet to ensure the eggs cover the vegetables evenly.
- Reduce the heat to low and cover the skillet. Let it cook for about 5 minutes, or until the eggs are set and the edges start to pull away from the pan. Tip: If you prefer a firmer top, you can briefly place the skillet under a broiler for the last minute.
- Carefully slide the omelette onto a plate, folding it over if desired.
Comforting in its simplicity, this omelette boasts a tender texture with pockets of sweet onions and soft potatoes. Serve it with a side of fresh greens or a dollop of sour cream for an extra touch of richness.
Peanut Butter and Banana Sandwich

Gently, the morning light filters through the kitchen window, casting a warm glow on the counter where a simple yet comforting dish comes to life. The peanut butter and banana sandwich, a humble classic, whispers of childhood memories and lazy Sunday mornings.
Ingredients
- a couple of slices of your favorite bread
- a generous smear of creamy peanut butter
- one ripe banana, sliced
- a drizzle of honey (optional, for a touch of sweetness)
- a pinch of cinnamon (optional, for a bit of spice)
Instructions
- Lay out two slices of bread on a clean, flat surface.
- Spread a generous amount of peanut butter evenly on one side of each slice. Tip: For easier spreading, let the peanut butter sit at room temperature for a few minutes if it’s too stiff.
- Arrange the banana slices in a single layer over the peanut butter on one slice of bread. Tip: If you’re adding honey or cinnamon, now’s the time to drizzle or sprinkle it over the bananas.
- Carefully place the second slice of bread, peanut butter side down, on top of the bananas to form a sandwich. Tip: Press down gently but firmly to help the sandwich hold together without squishing the bananas too much.
- If desired, cut the sandwich in half diagonally for easier handling. Serve immediately.
Perfectly balanced between creamy and crunchy, sweet and savory, this sandwich is a testament to simplicity. Try it toasted for a warm, melty variation that elevates the flavors even further.
Tomato Soup with Grilled Cheese

Zesty afternoons call for comfort in a bowl, and nothing whispers home quite like the classic duo of tomato soup and grilled cheese. It’s a dance of simplicity and warmth, where each spoonful and bite brings a little more light to the day.
Ingredients
- A couple of tablespoons of butter
- A splash of olive oil
- One medium onion, diced
- Two cloves of garlic, minced
- A 28-ounce can of whole peeled tomatoes
- Two cups of vegetable broth
- A pinch of sugar
- Salt and freshly ground black pepper to your liking
- A handful of fresh basil leaves
- Four slices of your favorite bread
- Two cups of shredded cheddar cheese
Instructions
- Melt a tablespoon of butter with a splash of olive oil in a large pot over medium heat. Tip: This combo prevents the butter from burning.
- Add the diced onion and cook until translucent, about 5 minutes, stirring occasionally.
- Stir in the minced garlic and cook for another minute until fragrant.
- Pour in the canned tomatoes with their juice and the vegetable broth. Bring to a simmer.
- Add a pinch of sugar, salt, and pepper. Simmer for 20 minutes, allowing the flavors to meld.
- While the soup simmers, butter one side of each bread slice for the grilled cheese.
- Heat a skillet over medium heat. Place two slices of bread, buttered side down, in the skillet.
- Sprinkle a cup of cheddar cheese on each slice, then top with the remaining slices, buttered side up.
- Cook until the bread is golden and the cheese starts to melt, about 3 minutes per side. Tip: Cover the skillet with a lid to help the cheese melt evenly.
- Once the soup has simmered, blend it until smooth with an immersion blender or in batches in a regular blender. Tip: For extra silkiness, strain the soup through a fine mesh sieve.
- Stir in the fresh basil leaves just before serving.
Oozing with creamy texture and bright tomato flavor, this soup pairs perfectly with the crispy, cheesy sandwich. Try dipping the grilled cheese into the soup for the ultimate comfort bite, or garnish with a drizzle of cream and extra basil for a touch of elegance.
Pasta with Butter and Parmesan

Fond memories often come wrapped in the simplest of dishes, and tonight, as the light fades, I find myself drawn to the comforting embrace of pasta with butter and Parmesan. It’s a dish that whispers of home, of quiet evenings, and of the joy found in the uncomplicated.
Ingredients
- 8 ounces of your favorite pasta
- 4 tablespoons of unsalted butter
- a generous handful of freshly grated Parmesan cheese
- a splash of pasta water
- a pinch of salt
Instructions
- Bring a large pot of salted water to a rolling boil over high heat.
- Add the pasta to the boiling water, stirring occasionally to prevent sticking, and cook according to the package instructions until al dente, about 8-10 minutes.
- Reserve a splash of pasta water, then drain the pasta and return it to the pot.
- Over low heat, add the butter to the pasta, stirring gently until it melts and coats each strand evenly.
- Remove the pot from the heat and sprinkle in the grated Parmesan, tossing the pasta until the cheese is fully incorporated and creates a creamy sauce. If needed, add a splash of the reserved pasta water to loosen the sauce.
- Season with a pinch of salt, tasting as you go to ensure the flavors are balanced.
Kindly note how the pasta carries the richness of the butter and the sharp, salty bite of the Parmesan, creating a dish that’s both comforting and elegantly simple. Serve it in a warm bowl, perhaps with a side of crusty bread to sop up any remaining sauce, and let the simplicity speak for itself.
Tuna Salad Sandwich

Just like the quiet mornings when the world seems to pause, a tuna salad sandwich offers a moment of simplicity and comfort. It’s a humble dish that carries the warmth of home, perfect for those reflective days when you need a gentle nudge of nostalgia.
Ingredients
- a couple of cans of tuna in water, drained
- a good dollop of mayonnaise, about 1/2 cup
- a splash of lemon juice, roughly 1 tbsp
- a handful of celery, finely chopped
- a pinch of salt and pepper
- a couple of slices of your favorite bread
- a few leaves of lettuce
- a slice or two of tomato
Instructions
- In a medium bowl, flake the drained tuna with a fork until it’s evenly broken up.
- Add the mayonnaise to the tuna, mixing gently until the tuna is well coated but still has some texture.
- Squeeze in the lemon juice, then toss in the chopped celery, stirring to combine everything evenly.
- Season the mixture with a pinch of salt and pepper, tasting as you go to adjust the flavors to your liking.
- Toast the bread slices lightly, just until they’re golden and crisp around the edges.
- Lay a few lettuce leaves on one slice of bread, then spoon the tuna salad on top, spreading it out to the edges.
- Add a slice or two of tomato on top of the tuna, then cap it with the second slice of bread.
- Cut the sandwich in half if you like, and serve immediately for the best texture and flavor.
Perfect for a lazy afternoon, the sandwich is creamy with a slight crunch from the celery, all hugged by the soft embrace of toasted bread. Try adding a sprinkle of dill or a dash of hot sauce for a little twist that makes it uniquely yours.
Homemade Pancakes with Syrup

There’s something deeply comforting about the ritual of making pancakes on a quiet morning, the way the batter pours smoothly onto the skillet, promising warmth and sweetness with every flip.
Ingredients
- 1 cup of all-purpose flour
- 2 tablespoons of sugar
- A pinch of salt
- 1 teaspoon of baking powder
- 1 cup of milk, plus a splash more if needed
- 1 large egg
- 2 tablespoons of melted butter, plus a bit more for the skillet
- A drizzle of maple syrup for serving
Instructions
- In a large bowl, whisk together the flour, sugar, salt, and baking powder until well combined.
- Make a well in the center of the dry ingredients and pour in the milk, egg, and melted butter. Whisk until just combined; a few lumps are okay. Tip: Overmixing can lead to tough pancakes.
- Heat a non-stick skillet over medium heat and add a small pat of butter, swirling to coat the surface.
- Pour 1/4 cup of batter onto the skillet for each pancake. Cook until bubbles form on the surface and the edges look set, about 2-3 minutes. Tip: Wait for those bubbles to know it’s time to flip.
- Flip the pancakes and cook for another 1-2 minutes until golden brown. Tip: Adjust the heat if they’re browning too quickly.
- Serve warm with a generous drizzle of maple syrup.
Velvety and light, these pancakes have just the right amount of sweetness, making them perfect for a lazy weekend brunch. Try stacking them high with fresh berries between the layers for an extra special touch.
Scrambled Eggs with Toast
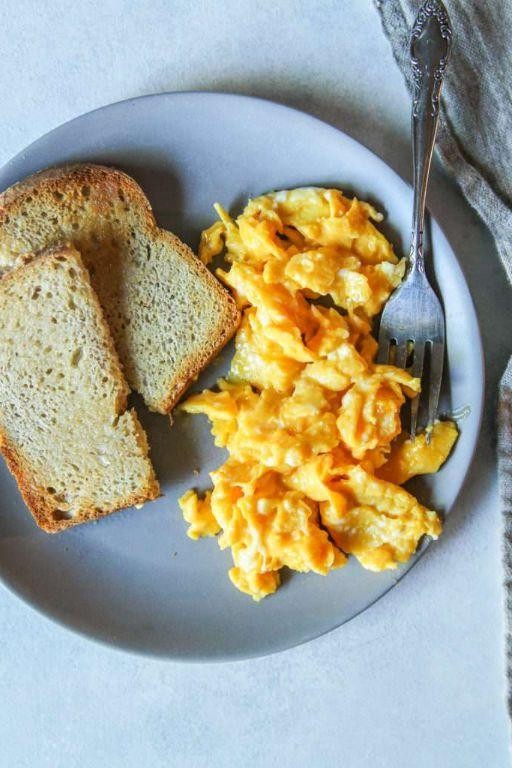
Flickering morning light finds me in the kitchen, where the simplest of meals feels like a quiet celebration. Today, it’s just scrambled eggs with toast, a humble duo that never fails to comfort.
Ingredients
- A couple of large eggs
- A splash of whole milk
- A pat of unsalted butter
- A slice of your favorite bread
- A pinch of salt
- A twist of freshly ground black pepper
Instructions
- Crack the eggs into a bowl, add the milk, and whisk until just combined—overmixing can make the eggs tough.
- Heat a non-stick skillet over medium-low heat and melt the butter, swirling to coat the pan evenly.
- Pour in the egg mixture. Let it sit undisturbed for about 20 seconds, then gently push the eggs across the pan with a spatula, forming soft curds.
- Continue cooking, stirring occasionally, until the eggs are softly set and slightly runny in places, about 3-4 minutes. Remember, they’ll keep cooking off the heat.
- While the eggs cook, toast your bread until golden and crisp.
- Season the eggs with salt and pepper right at the end to keep them tender.
- Serve immediately, with the toast on the side for scooping up the creamy eggs.
Here, the eggs are velvety and rich, with the toast offering a satisfying crunch. Try topping them with a sprinkle of chives or a dollop of crème fraîche for a little extra flourish.
Vegetable Stir Fry with Rice

Now, as the light fades gently into the evening, there’s something deeply comforting about preparing a meal that’s both simple and nourishing. This vegetable stir fry with rice is just that—a humble dish that brings warmth to the table with minimal fuss.
Ingredients
- a couple of cups of jasmine rice
- a splash of olive oil
- a handful of broccoli florets
- a couple of carrots, sliced thin
- a bell pepper, diced
- a clove of garlic, minced
- a tablespoon of soy sauce
- a teaspoon of sesame oil
- a pinch of red pepper flakes
Instructions
- Rinse the jasmine rice under cold water until the water runs clear, then cook according to package instructions, usually about 15-20 minutes.
- While the rice cooks, heat a splash of olive oil in a large pan over medium-high heat.
- Add the broccoli, carrots, and bell pepper to the pan, stirring occasionally, for about 5 minutes until they start to soften.
- Toss in the minced garlic and cook for another minute, just until fragrant—be careful not to let it burn.
- Drizzle in the soy sauce and sesame oil, then sprinkle with red pepper flakes, stirring everything together for a final minute to combine the flavors.
- Serve the stir fry over the cooked rice, ensuring each plate gets a generous mix of vegetables and grains.
Gently, the crisp-tender vegetables meet the fluffy rice, creating a dish that’s as pleasing to the palate as it is to the eye. For an extra touch, top with a sprinkle of sesame seeds or a few slices of avocado for creaminess.
Macaroni and Cheese

Under the soft glow of the kitchen light, there’s something deeply comforting about stirring a pot of macaroni and cheese, the steam rising like a gentle sigh. It’s a dish that feels like a warm hug, simple yet endlessly satisfying, especially on a quiet evening like this.
Ingredients
- 2 cups of elbow macaroni
- 2 cups of sharp cheddar cheese, shredded
- 1 cup of whole milk
- 2 tablespoons of unsalted butter
- a splash of heavy cream
- a pinch of salt
- a couple of grinds of black pepper
Instructions
- Bring a large pot of salted water to a rolling boil over high heat.
- Add the elbow macaroni to the boiling water and cook for 8 minutes, stirring occasionally to prevent sticking.
- While the pasta cooks, melt the butter in a separate saucepan over medium heat until it’s just beginning to bubble.
- Slowly whisk in the milk and heavy cream, heating the mixture until it’s warm but not boiling, about 3 minutes.
- Reduce the heat to low and gradually add the shredded cheddar cheese, stirring constantly until the sauce is smooth and creamy.
- Drain the macaroni and return it to the pot, then pour the cheese sauce over the pasta, stirring gently to coat every piece.
- Season with a pinch of salt and a couple of grinds of black pepper, then let it sit for a minute to thicken slightly.
When you scoop into it, the macaroni and cheese should be luxuriously creamy, with the sharp cheddar lending a depth of flavor that’s both rich and comforting. Try topping it with a sprinkle of smoked paprika or breadcrumbs for a little crunch, or serve it alongside a crisp green salad to cut through the richness.
Baked Beans on Toast
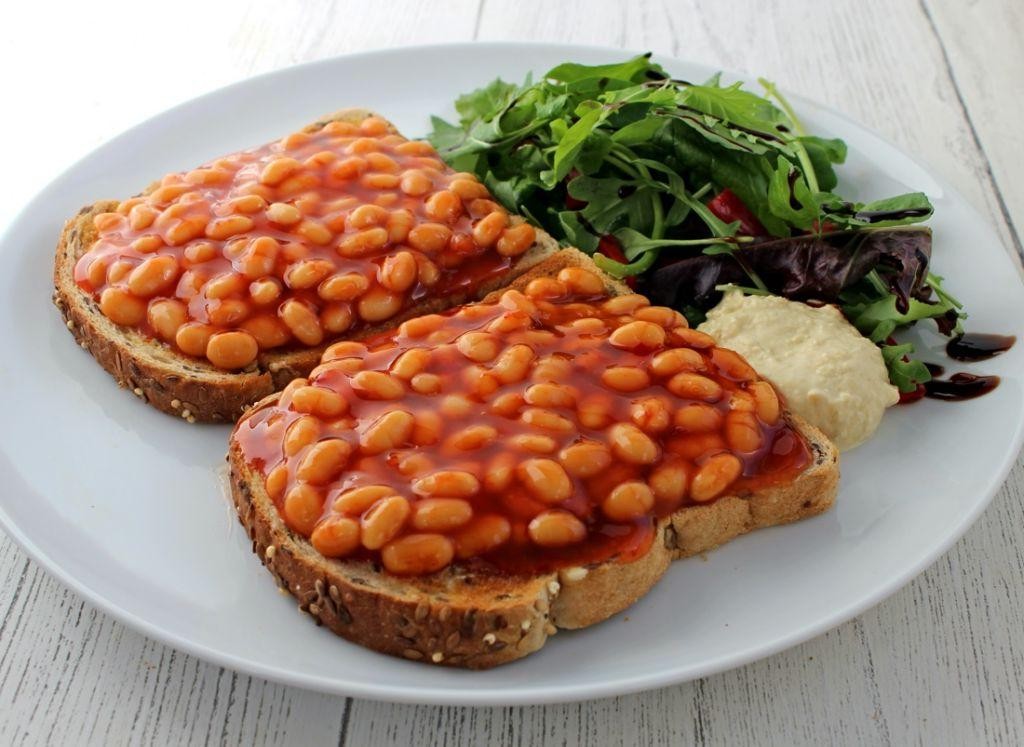
Under the soft glow of the morning light, there’s something deeply comforting about the simplicity of baked beans on toast, a dish that feels like a warm hug on a quiet day.
Ingredients
- A can of your favorite baked beans (about 15 oz)
- A couple of slices of thick-cut bread
- A splash of olive oil
- A pinch of salt
- A dash of black pepper
- A tablespoon of butter
Instructions
- Preheat your oven to 350°F to keep the toast warm while you prepare the beans.
- Heat a splash of olive oil in a small saucepan over medium heat, then pour in the baked beans.
- Stir the beans occasionally, letting them simmer for about 5 minutes until they’re bubbling and hot throughout. Tip: For a richer flavor, add a tablespoon of butter to the beans as they heat.
- While the beans are warming, toast your bread until it’s golden and crisp. Tip: For extra crunch, brush the bread with a little olive oil before toasting.
- Once the toast is ready, place it on a baking sheet and keep it warm in the oven for no more than 2 minutes to avoid drying out.
- Season the beans with a pinch of salt and a dash of black pepper, then spoon them generously over the toast.
- Serve immediately, perhaps with a sprinkle of grated cheese on top for an extra layer of flavor. Tip: Let the cheese melt slightly from the heat of the beans for the best texture.
Velvety beans atop crisp toast create a delightful contrast, while the butter and cheese add a richness that turns this simple meal into something special. Try serving it with a side of avocado for a creamy twist.
Chickpea Salad
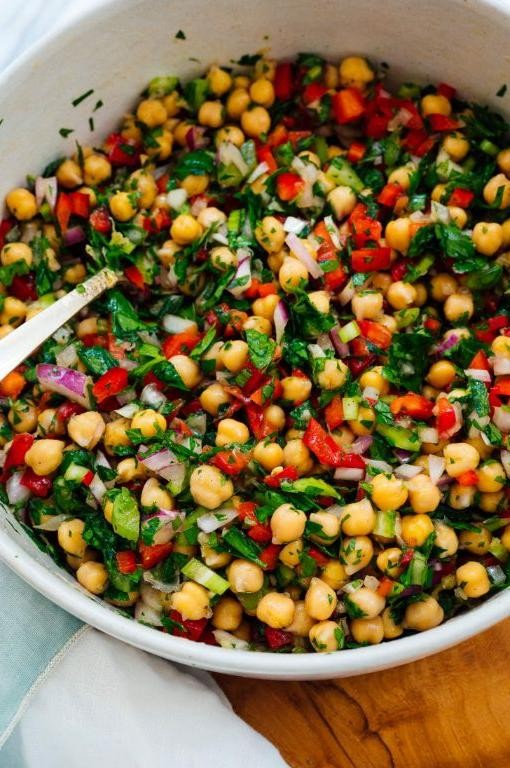
Falling into the rhythm of a quiet kitchen morning, I find myself reaching for the humble chickpea, a canvas waiting for flavors to dance upon it. This salad is a whisper of simplicity, a gentle nudge towards nourishment that feels both grounding and light.
Ingredients
- A couple of cups of cooked chickpeas, rinsed and patted dry
- A splash of olive oil, about 2 tablespoons
- A squeeze of lemon juice, roughly 1 tablespoon
- A handful of chopped parsley, maybe 1/4 cup
- A pinch of salt, to bring it all together
- A dash of cumin, about 1/2 teaspoon, for warmth
Instructions
- In a large bowl, gently toss the chickpeas with olive oil until they’re lightly coated, ensuring each one gets a little love.
- Add the lemon juice, parsley, salt, and cumin to the bowl, mixing everything with a soft hand to keep the chickpeas whole.
- Let the salad sit for about 10 minutes at room temperature, allowing the flavors to meld together beautifully.
- Tip: For an extra layer of texture, toast the chickpeas in a dry pan over medium heat for 5 minutes before mixing. They’ll add a delightful crunch.
- Tip: If you’re not a fan of parsley, cilantro or dill would make a lovely substitute, bringing their own unique brightness to the dish.
- Tip: A final drizzle of olive oil before serving can elevate the salad, making it glisten and taste even more luxurious.
You’ll notice the salad has a comforting chewiness from the chickpeas, brightened by the lemon and herbs, with a subtle warmth from the cumin. Try serving it atop a slice of toasted sourdough for a simple, yet satisfying meal.
Corn and Bean Tacos

Just imagine the warmth of a summer evening, the kind where the air feels like a gentle hug, and the only thing missing is a plate of something simple, yet utterly satisfying. That’s where these corn and bean tacos come in, a humble dish that feels like a celebration of the little things.
Ingredients
- a couple of cups of corn kernels, fresh or frozen
- a can of black beans, rinsed and drained
- a splash of olive oil
- a teaspoon of ground cumin
- a pinch of salt
- a handful of fresh cilantro, chopped
- a lime, cut into wedges
- a pack of small corn tortillas
- a dollop of sour cream
- a sprinkle of crumbled queso fresco
Instructions
- Heat a splash of olive oil in a large skillet over medium heat until it shimmers.
- Add the corn kernels and cook, stirring occasionally, until they start to get a bit golden, about 5 minutes.
- Toss in the black beans, cumin, and a pinch of salt, stirring to combine everything nicely. Let it all heat through for another 2-3 minutes.
- Warm the corn tortillas in a dry skillet over medium heat for about 30 seconds on each side, or until they’re soft and pliable.
- Divide the corn and bean mixture evenly among the tortillas.
- Top each taco with a sprinkle of fresh cilantro, a dollop of sour cream, and a bit of crumbled queso fresco.
- Serve with lime wedges on the side for squeezing over the top.
Now, these tacos are all about the contrast – the creamy beans against the crisp corn, the cool sour cream with the warm tortillas. Try serving them with a side of sliced avocado or a spicy salsa for an extra layer of flavor.
French Toast with Cinnamon

Zipping through the quiet morning, there’s something deeply comforting about the aroma of cinnamon wafting through the air, especially when it’s mingling with the sweet, eggy scent of French toast. It’s a simple pleasure, really, but one that feels like a warm hug on a lazy Sunday.
Ingredients
- A couple of thick slices of brioche or challah bread
- 2 large eggs
- A splash of whole milk
- A teaspoon of vanilla extract
- A generous sprinkle of ground cinnamon
- A tablespoon of unsalted butter
- A drizzle of maple syrup for serving
Instructions
- In a shallow bowl, whisk together the eggs, milk, vanilla extract, and cinnamon until well combined. Tip: Letting this mixture sit for a minute helps the flavors meld.
- Heat a non-stick skillet over medium heat and melt the butter, swirling to coat the pan evenly. Tip: The butter should foam but not brown; adjust the heat if necessary.
- Dip each slice of bread into the egg mixture, allowing it to soak for about 20 seconds per side. The bread should be saturated but not falling apart.
- Transfer the soaked bread to the skillet and cook for 2-3 minutes on each side, or until golden brown and slightly crisp. Tip: Don’t rush the cooking; lower heat ensures the inside cooks without burning the outside.
- Serve immediately with a drizzle of maple syrup. Just out of the pan, the French toast is wonderfully crisp on the outside, custardy within, with the cinnamon lending a warm, spicy note that’s irresistible. Try topping with fresh berries for a bright contrast.
Lentil Soup with Bread

Today, as the light fades softly outside, I find myself drawn to the simplicity and warmth of a bowl of lentil soup paired with a slice of crusty bread. It’s a dish that feels like a gentle hug, perfect for moments when the world seems a bit too much.
Ingredients
- a couple of cups of dried lentils, rinsed
- a splash of olive oil
- one large onion, diced
- two carrots, chopped
- two celery stalks, sliced
- three cloves of garlic, minced
- a teaspoon of cumin
- a half teaspoon of smoked paprika
- six cups of vegetable broth
- a bay leaf
- salt and pepper, just enough to season
- a loaf of crusty bread, for serving
Instructions
- Heat a splash of olive oil in a large pot over medium heat until it shimmers.
- Add the diced onion, chopped carrots, and sliced celery, stirring occasionally until they soften, about 5 minutes.
- Stir in the minced garlic, cumin, and smoked paprika, cooking for another minute until fragrant.
- Pour in the rinsed lentils and vegetable broth, then drop in the bay leaf.
- Bring the mixture to a boil, then reduce the heat to low, covering the pot with a lid.
- Let the soup simmer gently for about 25 minutes, or until the lentils are tender but not mushy.
- Season with salt and pepper, remembering that you can always add more but can’t take it away.
- Remove the bay leaf before serving.
- Toast slices of crusty bread until golden and crisp, perfect for dipping.
Zesty with a hint of smokiness, this lentil soup is wonderfully hearty yet light, with each spoonful offering a comforting blend of flavors. Serve it with the toasted bread on the side for a satisfying crunch, or tear the bread into chunks and stir it right into the soup for a more rustic experience.
Conclusion
We hope these 18 budget-friendly ‘struggle meals’ inspire your next delicious, affordable dish! Perfect for home cooks across North America, these recipes prove that great taste doesn’t have to come with a high price tag. Try them out, share your favorites in the comments, and don’t forget to pin this article on Pinterest for your next grocery haul. Happy cooking!


