Dive into the world of plant-based perfection with our roundup of 18 Creamy Vegan Cheese Recipes that promise to delight your taste buds and impress your dinner guests! Whether you’re a seasoned vegan or just cheese-curious, these recipes are your ticket to creamy, dreamy goodness without the dairy. Get ready to spread, melt, and sprinkle your way to vegan cheese bliss—let’s get started!
Cashew Mozzarella Sticks
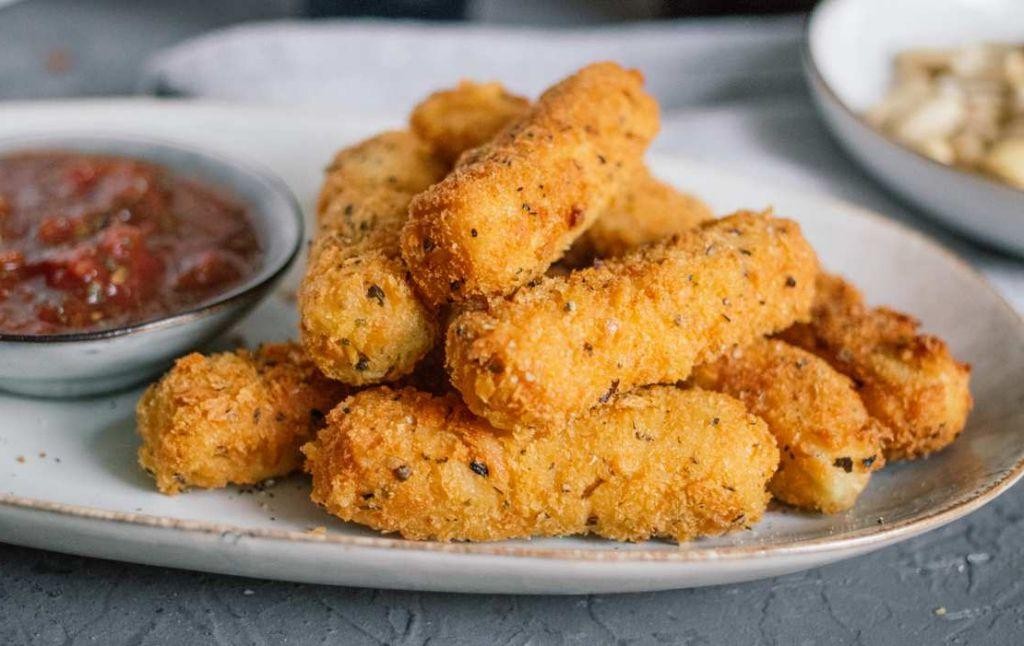
Last weekend, I stumbled upon the most delightful twist on a classic appetizer that I just have to share with you. It combines the creamy, dreamy texture of mozzarella with the rich, buttery crunch of cashews, creating a snack that’s impossible to resist. Trust me, once you try these Cashew Mozzarella Sticks, you’ll be hooked!
Ingredients
- For the sticks:
- 1 cup raw cashews, soaked overnight
- 1 cup water
- 2 tbsp nutritional yeast
- 1 tsp garlic powder
- 1 tsp onion powder
- 1/2 tsp salt
- 1 package (8 oz) mozzarella cheese, cut into sticks
- For the crust:
- 1 cup breadcrumbs
- 1/2 cup all-purpose flour
- 2 eggs, beaten
- 1/2 tsp paprika
Instructions
- Drain the soaked cashews and blend them with water, nutritional yeast, garlic powder, onion powder, and salt until smooth. This is your cashew cream.
- Dip each mozzarella stick into the cashew cream, ensuring it’s fully coated. Tip: Use a fork to let excess cream drip off for an even layer.
- Roll the coated sticks in flour, then dip into beaten eggs, and finally coat with breadcrumbs mixed with paprika. Tip: For extra crunch, double coat by repeating the egg and breadcrumb steps.
- Place the sticks on a baking sheet lined with parchment paper and freeze for 30 minutes. This helps the coating adhere better during frying.
- Heat oil in a deep fryer or large pot to 375°F. Fry the sticks in batches until golden brown, about 2-3 minutes. Tip: Don’t overcrowd the pot to maintain the oil temperature.
- Remove with a slotted spoon and drain on paper towels.
Velvety on the inside with a crispy, golden exterior, these Cashew Mozzarella Sticks are a game-changer. Serve them with a side of marinara sauce for dipping, or get creative by drizzling them with a bit of truffle oil for an extra luxurious touch.
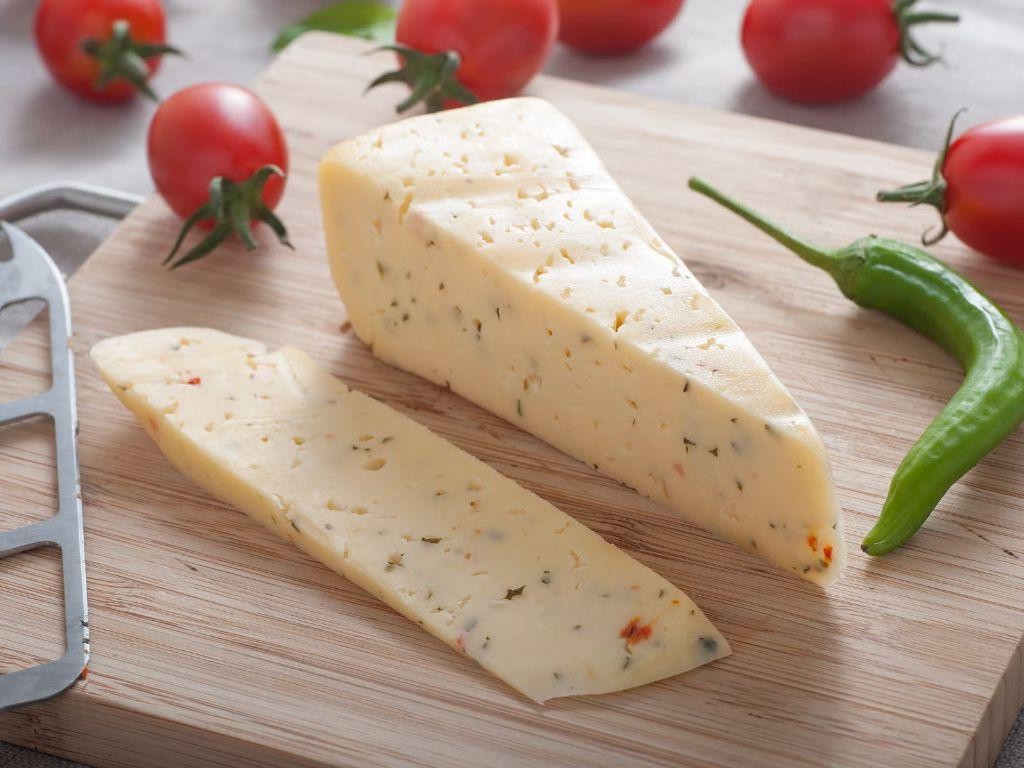
Almond Feta Cheese
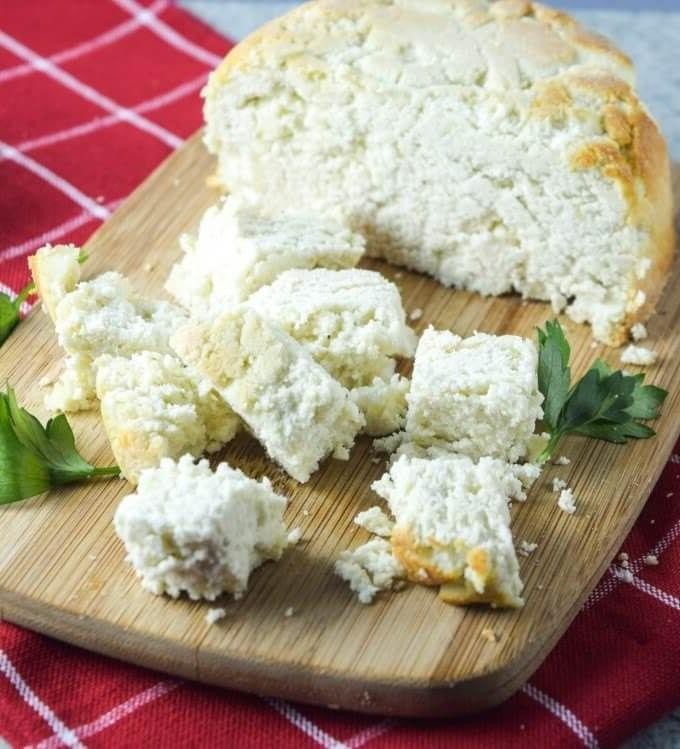
Unbelievable as it may sound, I stumbled upon the magic of Almond Feta Cheese during a lazy Sunday experiment in my kitchen. It’s a game-changer for anyone looking to add a creamy, tangy twist to their plant-based dishes, and trust me, it’s simpler to make than you’d think.
Ingredients
- For the almond feta:
- 2 cups raw almonds, soaked overnight
- 1/4 cup lemon juice
- 3 tbsp olive oil
- 2 cloves garlic, minced
- 1 tsp salt
- For the brine:
- 1 cup water
- 1 tbsp salt
Instructions
- Drain and rinse the soaked almonds, then blend them with lemon juice, olive oil, garlic, and salt until smooth. Tip: A high-speed blender works best for a silky texture.
- Transfer the mixture to a cheesecloth and squeeze out excess moisture. Shape it into a small block. Tip: The tighter you wrap it, the firmer your cheese will be.
- Prepare the brine by dissolving salt in water, then submerge the almond block in it for 24 hours in the fridge. Tip: This step is crucial for developing that signature feta tang.
- After brining, remove the cheese from the liquid and let it air dry on a rack for another 24 hours to develop a slight crust.
Mmm, the result? A beautifully crumbly yet creamy cheese with a punchy flavor that elevates salads, pastas, or even your morning toast. Try crumbling it over a warm bowl of roasted vegetables for a delightful contrast.
Coconut Yogurt Cheese
Yesterday, I stumbled upon the creamiest coconut yogurt at my local health food store, and it sparked an idea for a dairy-free cheese that’s both simple and satisfying. Let me share how you can transform this humble ingredient into a spreadable delight that’ll wow even the most skeptical cheese lovers.
Ingredients
- For the cheese:
- 2 cups unsweetened coconut yogurt
- 1 tbsp lemon juice
- 1/2 tsp salt
- For straining:
- Cheesecloth
- Fine mesh strainer
Instructions
- Line a fine mesh strainer with cheesecloth and place it over a bowl to catch the liquid.
- Pour the coconut yogurt into the cheesecloth-lined strainer, ensuring it’s evenly distributed.
- Add the lemon juice and salt to the yogurt, gently mixing to combine without pressing down too hard.
- Fold the edges of the cheesecloth over the yogurt to cover it completely.
- Place the setup in the refrigerator and let it strain for at least 12 hours, or up to 24 hours for a firmer cheese.
- After straining, carefully unwrap the cheesecloth to reveal your coconut yogurt cheese.
- Transfer the cheese to a serving dish, shaping it as desired with a spoon or spatula.
Every bite of this coconut yogurt cheese offers a tangy, slightly sweet flavor with a luxuriously creamy texture that’s perfect on crackers or as a dip for fresh veggies. Try spreading it on toast with a drizzle of honey for a delightful breakfast twist.
Sunflower Seed Parmesan
Here’s a little secret from my kitchen that I’ve been absolutely obsessed with lately—Sunflower Seed Parmesan. It’s my go-to when I’m looking for that cheesy, umami kick without the dairy, and trust me, it’s a game-changer for sprinkling over pasta, salads, or even popcorn. I stumbled upon this recipe during a lazy Sunday experiment, and now, it’s a staple in my pantry.
Ingredients
- For the Sunflower Seed Parmesan:
- 1 cup raw sunflower seeds
- 2 tbsp nutritional yeast
- 1/2 tsp garlic powder
- 1/2 tsp onion powder
- 1/4 tsp salt
Instructions
- Preheat your oven to 350°F (175°C) to toast the sunflower seeds, enhancing their nutty flavor.
- Spread the sunflower seeds evenly on a baking sheet and toast them in the oven for 5-7 minutes, or until they’re lightly golden. Keep an eye on them to prevent burning.
- Let the toasted sunflower seeds cool for about 5 minutes. This prevents the nutritional yeast from melting when blended.
- In a food processor, combine the cooled sunflower seeds, nutritional yeast, garlic powder, onion powder, and salt.
- Pulse the mixture until it reaches a fine, parmesan-like consistency. Be careful not to over-process, or it might turn into sunflower seed butter.
- Transfer your Sunflower Seed Parmesan to an airtight container. It can be stored in the fridge for up to 2 weeks, but I doubt it’ll last that long!
This Sunflower Seed Parmesan is wonderfully crunchy with a deep, savory flavor that’s surprisingly cheesy. Try it over roasted vegetables for an extra flavor boost, or mix it into your favorite vegan mac and cheese for that perfect finishing touch.
Macadamia Nut Ricotta

Very few things in life bring me as much joy as discovering a recipe that’s both indulgent and surprisingly simple to make. This Macadamia Nut Ricotta is one of those gems—a creamy, dreamy spread that’s perfect for everything from toast to pasta. I stumbled upon this recipe during a lazy Sunday experiment, and it’s been a staple in my kitchen ever since.
Ingredients
- For the ricotta:
- 2 cups raw macadamia nuts, soaked overnight
- 1/2 cup water
- 2 tbsp lemon juice
- 1/2 tsp sea salt
Instructions
- Drain the soaked macadamia nuts and rinse them under cold water.
- In a high-speed blender, combine the macadamia nuts, water, lemon juice, and sea salt.
- Blend on high for 1-2 minutes, scraping down the sides as needed, until the mixture is smooth and creamy. Tip: If the mixture is too thick, add water 1 tbsp at a time until desired consistency is reached.
- Transfer the ricotta to a bowl and let it sit at room temperature for 30 minutes to allow the flavors to meld. Tip: For a tangier flavor, let it sit for up to 1 hour.
- Store the ricotta in an airtight container in the refrigerator for up to 5 days. Tip: The ricotta will thicken slightly upon chilling, so adjust the consistency with a little water if needed before serving.
Unbelievably creamy with a subtle nutty flavor, this Macadamia Nut Ricotta is a versatile delight. Try it spread on warm bread with a drizzle of honey, or dolloped over roasted vegetables for a rich, dairy-free twist.
Tofu Based Cream Cheese
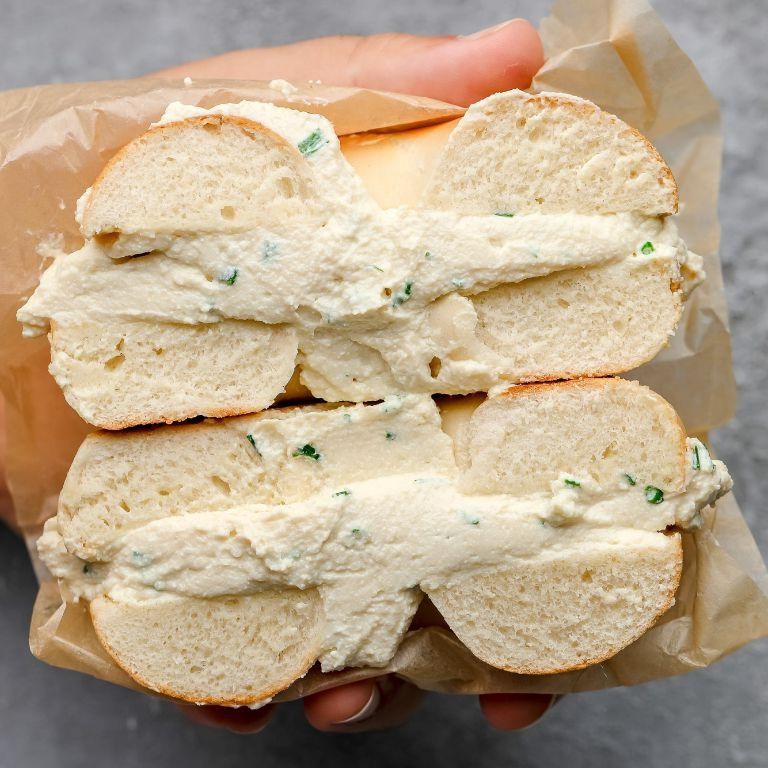
Goodness, have you ever found yourself staring at your fridge, craving something creamy and spreadable but wanting to keep it plant-based? That was me last Sunday, and that’s how this tofu-based cream cheese came to life. It’s surprisingly simple, delightfully creamy, and has become my go-to for bagels and beyond.
Ingredients
- For the cream cheese base:
- 1 block (14 oz) firm tofu, drained and pressed
- 2 tbsp lemon juice
- 1 tbsp apple cider vinegar
- 1/2 tsp salt
- For flavor enhancement:
- 1 tbsp nutritional yeast
- 1/2 tsp garlic powder
- 1/4 tsp onion powder
Instructions
- Start by draining the tofu. Wrap the block in a clean kitchen towel and place a heavy object on top for 15 minutes to press out excess water.
- Once pressed, crumble the tofu into a food processor. Add lemon juice, apple cider vinegar, and salt. Blend until smooth, scraping down the sides as needed. Tip: For extra creaminess, blend for a full 2 minutes.
- Add nutritional yeast, garlic powder, and onion powder to the food processor. Blend again until all ingredients are fully incorporated and the mixture is smooth. Tip: Taste and adjust seasonings here if you prefer a stronger flavor.
- Transfer the cream cheese to an airtight container and refrigerate for at least 1 hour before serving. Tip: This resting time allows the flavors to meld together beautifully.
Deliciously creamy with a subtle tang, this tofu-based cream cheese is a game-changer for your morning toast or as a dip for fresh veggies. Try stirring in some chives or smoked paprika for an extra flavor kick!
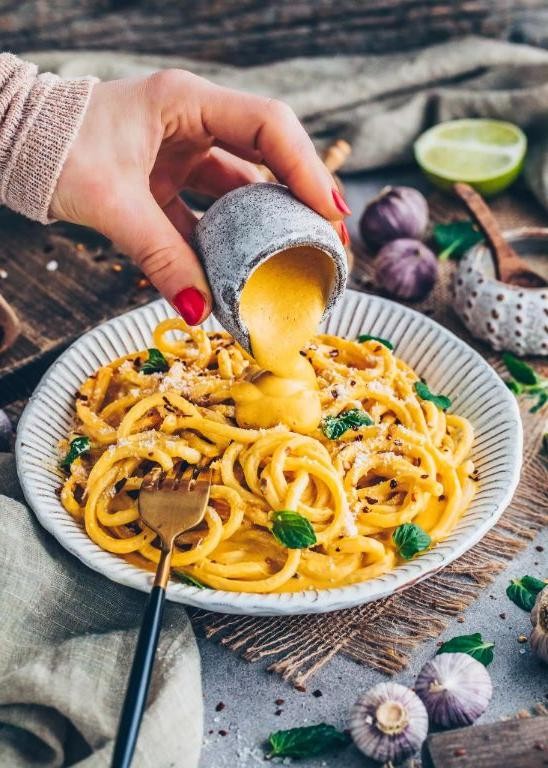
Vegan Cheddar Cheese Sauce
How many times have I craved something creamy, cheesy, and utterly comforting, only to remember my commitment to veganism? Too many to count. That’s why I perfected this Vegan Cheddar Cheese Sauce—it’s my go-to for nachos, mac ‘n’ cheese, or even drizzled over steamed broccoli. Trust me, it’s a game-changer.
Ingredients
- For the sauce:
- 1 cup raw cashews, soaked overnight
- 1 cup water
- 1/4 cup nutritional yeast
- 1 tbsp lemon juice
- 1 tsp garlic powder
- 1 tsp onion powder
- 1/2 tsp turmeric
- 1/2 tsp salt
Instructions
- Drain the soaked cashews and rinse them under cold water.
- In a high-speed blender, combine the cashews, water, nutritional yeast, lemon juice, garlic powder, onion powder, turmeric, and salt.
- Blend on high for 1-2 minutes, or until the mixture is completely smooth. Tip: If the sauce is too thick, add water 1 tbsp at a time until desired consistency is reached.
- Transfer the sauce to a small saucepan and heat over medium-low heat, stirring constantly, for 3-5 minutes, or until warm. Tip: Keep the heat low to prevent the sauce from thickening too much.
- Once heated through, remove from heat. Tip: For an extra cheesy flavor, stir in a pinch of smoked paprika.
Now, this sauce is velvety, rich, and has that unmistakable cheddar tang. I love pouring it over a baked potato or mixing it into a vegan mac ‘n’ cheese for that ultimate comfort food experience.
Pumpkin Seed Queso Dip
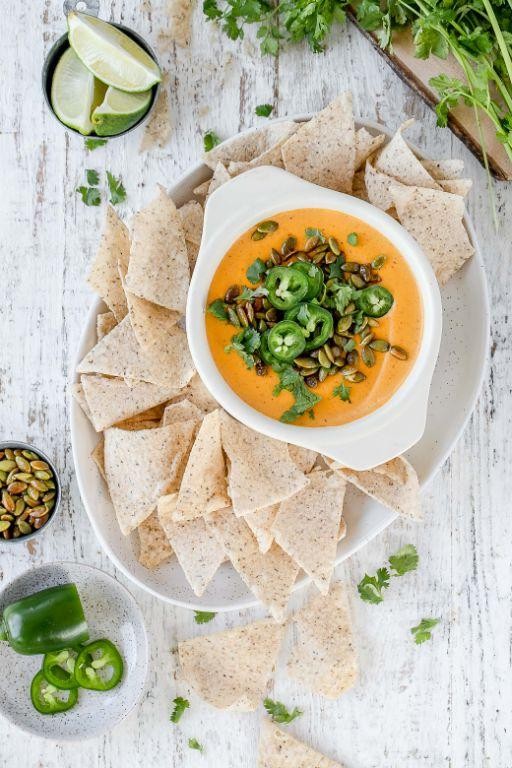
Remember those chilly autumn evenings when all you crave is something warm, cheesy, and slightly nutty to dip your favorite chips into? That’s exactly where my Pumpkin Seed Queso Dip comes into play, a recipe born out of my love for blending traditional flavors with a twist.
Ingredients
- For the dip:
- 1 cup raw pumpkin seeds
- 2 cups shredded Monterey Jack cheese
- 1 cup heavy cream
- 1/2 tsp ground cumin
- 1/4 tsp cayenne pepper
- 1 tbsp olive oil
- For serving:
- Tortilla chips
- Fresh cilantro leaves
Instructions
- Preheat your oven to 350°F (175°C) to get it ready for toasting the pumpkin seeds.
- Spread the pumpkin seeds on a baking sheet in a single layer and toast in the preheated oven for 5-7 minutes, or until they start to pop and become fragrant. Tip: Keep an eye on them to prevent burning.
- Heat olive oil in a medium saucepan over medium heat. Add the toasted pumpkin seeds, cumin, and cayenne pepper, stirring for about 1 minute to toast the spices.
- Reduce the heat to low and add the heavy cream, stirring continuously until the mixture is warm but not boiling.
- Gradually add the shredded Monterey Jack cheese, stirring until the cheese is completely melted and the dip is smooth. Tip: For an extra smooth texture, you can blend the mixture with an immersion blender.
- Transfer the dip to a serving bowl and garnish with fresh cilantro leaves. Tip: Serve immediately for the best texture and flavor.
Perfectly creamy with a delightful crunch from the pumpkin seeds, this queso dip is a game-changer for your next gathering. Try pairing it with sweet potato chips for an unexpected but delicious twist.
Avocado Lime Cheese Spread

Zesty and vibrant, this Avocado Lime Cheese Spread has become my go-to for quick gatherings or when I need a little pick-me-up snack. It’s the perfect blend of creamy, tangy, and fresh, and today, I’m sharing how you can whip it up in no time.
Ingredients
- For the spread:
- 2 ripe avocados, peeled and pitted
- 1/2 cup cream cheese, softened
- 1/4 cup sour cream
- 2 tbsp lime juice
- 1/2 tsp salt
- 1/4 tsp black pepper
- For garnish:
- 1 tbsp chopped cilantro
- 1/2 lime, thinly sliced
Instructions
- In a medium bowl, mash the avocados with a fork until smooth but slightly chunky.
- Add the softened cream cheese, sour cream, lime juice, salt, and black pepper to the bowl with the avocados.
- Mix all the ingredients together until well combined and creamy. Tip: For an extra smooth texture, use a hand mixer on low speed.
- Taste the spread and adjust the seasoning if necessary. Tip: If you prefer a tangier spread, add an extra tablespoon of lime juice.
- Transfer the spread to a serving bowl and garnish with chopped cilantro and lime slices. Tip: For best flavor, let the spread chill in the refrigerator for at least 30 minutes before serving.
Just like that, you’ve got a creamy, dreamy spread that’s bursting with flavor. The avocado gives it a rich, buttery texture, while the lime adds a refreshing zing. Serve it with crackers, on toast, or as a unique topping for grilled chicken—it’s versatile and always a hit.
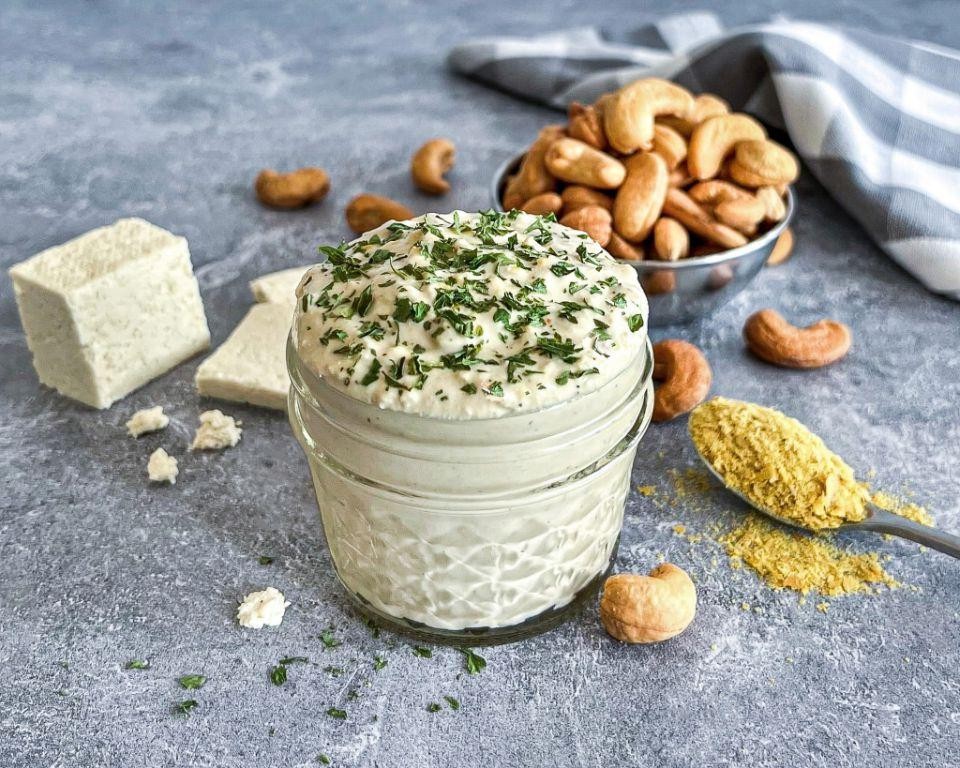
Herbed Cashew Cheese Ball
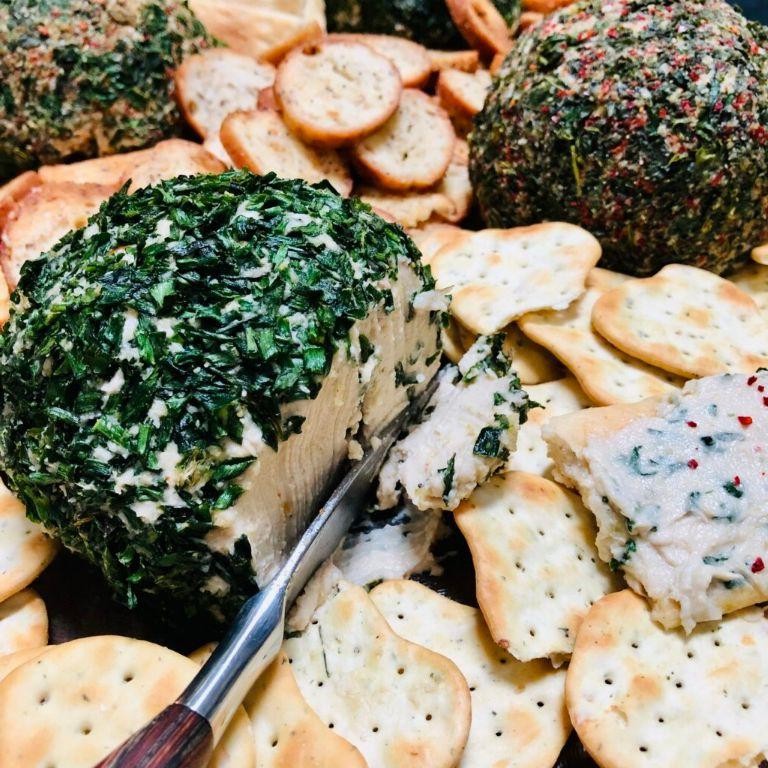
Sometimes, the simplest ingredients come together to create something unexpectedly delightful. That’s exactly what happened when I first made this Herbed Cashew Cheese Ball—a creamy, tangy, and herb-infused delight that’s perfect for any gathering or a quiet night in.
Ingredients
- For the cheese ball:
- 2 cups raw cashews, soaked overnight
- 1/4 cup nutritional yeast
- 2 tbsp lemon juice
- 1 tbsp apple cider vinegar
- 1/2 tsp salt
- For the herb coating:
- 2 tbsp fresh parsley, finely chopped
- 1 tbsp fresh dill, finely chopped
- 1 tbsp fresh chives, finely chopped
Instructions
- Drain the soaked cashews and rinse them under cold water.
- In a food processor, combine the cashews, nutritional yeast, lemon juice, apple cider vinegar, and salt. Process until smooth, scraping down the sides as needed. Tip: For extra creaminess, add a tablespoon of water if the mixture is too thick.
- Transfer the mixture to a bowl, cover, and refrigerate for at least 2 hours to firm up. Tip: Chilling makes the cheese ball easier to shape.
- In a small bowl, mix together the parsley, dill, and chives.
- Remove the cashew mixture from the fridge and shape it into a ball using your hands. Tip: Wet your hands slightly to prevent sticking.
- Roll the cheese ball in the herb mixture until fully coated.
- Serve immediately or refrigerate until ready to serve. The flavors deepen when allowed to sit for a few hours.
Unbelievably creamy and packed with fresh herb flavors, this cheese ball is a hit every time. Try serving it with crisp apple slices or a selection of crackers for a delightful contrast in textures.
Vegan Blue Cheese Dressing
Never did I think I’d find a vegan blue cheese dressing that could rival the real deal, but here we are. After countless experiments in my tiny kitchen, I’ve landed on a version that’s creamy, tangy, and utterly addictive. It’s perfect for drizzling over salads, dipping veggies, or even as a bold sandwich spread.
Ingredients
- For the base:
- 1 cup raw cashews, soaked overnight
- 1/2 cup water
- 2 tbsp lemon juice
- 1 tbsp apple cider vinegar
- For the flavor:
- 1/4 cup nutritional yeast
- 1 tsp garlic powder
- 1 tsp onion powder
- 1/2 tsp salt
- For the blue cheese effect:
- 1/4 cup crumbled firm tofu
- 1 tbsp white miso paste
Instructions
- Drain the soaked cashews and add them to a high-speed blender with water, lemon juice, and apple cider vinegar. Blend until completely smooth, scraping down the sides as needed. Tip: Soaking the cashews overnight ensures the creamiest texture.
- Add the nutritional yeast, garlic powder, onion powder, and salt to the blender. Blend again until all ingredients are well incorporated.
- Transfer the mixture to a bowl and gently fold in the crumbled tofu and white miso paste. Tip: The tofu adds that classic blue cheese texture, so don’t overmix.
- Let the dressing sit in the refrigerator for at least 30 minutes before serving to allow the flavors to meld. Tip: The dressing thickens as it chills, so adjust with a little water if needed after chilling.
Finally, this dressing is luxuriously creamy with a punchy tang and those delightful tofu crumbles mimicking blue cheese’s signature bite. Try it drizzled over a wedge salad or as a daring dip for buffalo cauliflower wings.
Sweet Potato Cheese Sauce
Last weekend, I found myself staring at a mountain of sweet potatoes in my pantry, wondering how to turn them into something irresistibly creamy and cheesy. That’s when this Sweet Potato Cheese Sauce was born—a game-changer for my nachos, pasta, and even as a dip for veggies. It’s surprisingly simple, and the sweetness of the potatoes balances the sharpness of the cheese perfectly.
Ingredients
- For the sauce:
- 2 cups peeled and diced sweet potatoes
- 1 cup water
- 1/2 cup milk
- 1/4 cup unsalted butter
- 1/2 cup shredded sharp cheddar cheese
- 1/4 cup grated Parmesan cheese
- 1/2 tsp salt
- 1/4 tsp garlic powder
Instructions
- Place the diced sweet potatoes and water in a medium saucepan. Bring to a boil over high heat.
- Reduce heat to medium-low, cover, and simmer for 15 minutes, or until the sweet potatoes are very tender.
- Drain any excess water, then add the milk, butter, cheddar cheese, Parmesan cheese, salt, and garlic powder to the saucepan.
- Using an immersion blender, blend the mixture until smooth and creamy. If you don’t have an immersion blender, a regular blender will work—just be careful with the hot liquid.
- Return the saucepan to low heat and stir constantly for 2-3 minutes, until the cheese is fully melted and the sauce is heated through.
Ultra creamy and packed with flavor, this Sweet Potato Cheese Sauce is a versatile delight. Try it drizzled over roasted broccoli for a comforting side dish, or as a unique twist on mac and cheese. The natural sweetness of the potatoes makes it a hit with kids and adults alike.
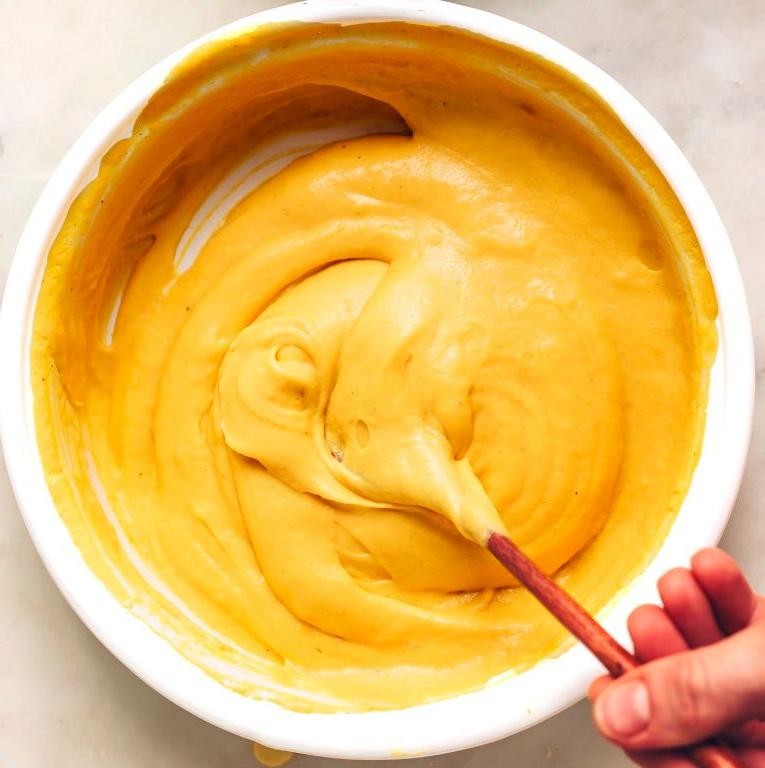
Chickpea Flour Cheese
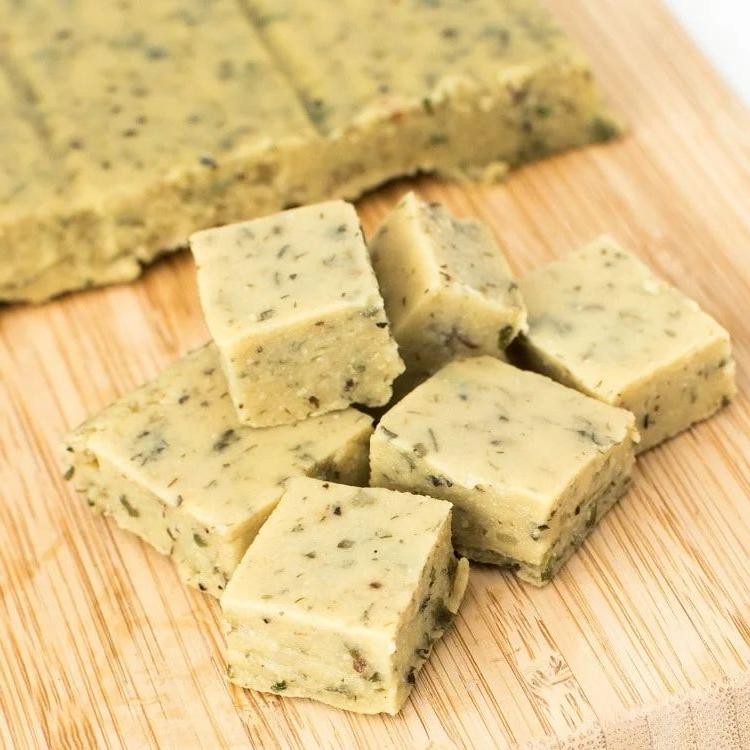
Remember the first time I stumbled upon chickpea flour cheese? It was during a lazy Sunday brunch at a friend’s place, and I was instantly hooked by its creamy texture and rich flavor. Since then, it’s become a staple in my kitchen, especially when I’m craving something cheesy but want to keep it plant-based.
Ingredients
- For the cheese base:
- 1 cup chickpea flour
- 2 cups water
- 1/4 cup nutritional yeast
- 1 tbsp lemon juice
- 1 tsp salt
- For seasoning:
- 1/2 tsp garlic powder
- 1/2 tsp onion powder
- 1/4 tsp turmeric (for color)
Instructions
- In a medium saucepan, whisk together the chickpea flour and water until smooth to avoid lumps.
- Place the saucepan over medium heat and bring the mixture to a simmer, stirring constantly to prevent sticking.
- Once simmering, reduce the heat to low and continue to cook for 5 minutes, stirring frequently, until the mixture thickens to a paste-like consistency.
- Remove from heat and immediately stir in the nutritional yeast, lemon juice, salt, garlic powder, onion powder, and turmeric until well combined.
- Transfer the mixture to a lined or lightly greased container and smooth the top with a spatula.
- Let it cool at room temperature for 10 minutes, then refrigerate for at least 2 hours to set.
My favorite thing about this chickpea flour cheese is its versatility. Spread it on crackers for a quick snack, or melt it into your favorite pasta dish for a creamy, cheesy sauce. The texture is surprisingly similar to traditional cheese, with a tangy flavor that’s absolutely addictive.
Vegan Gouda Cheese Slices
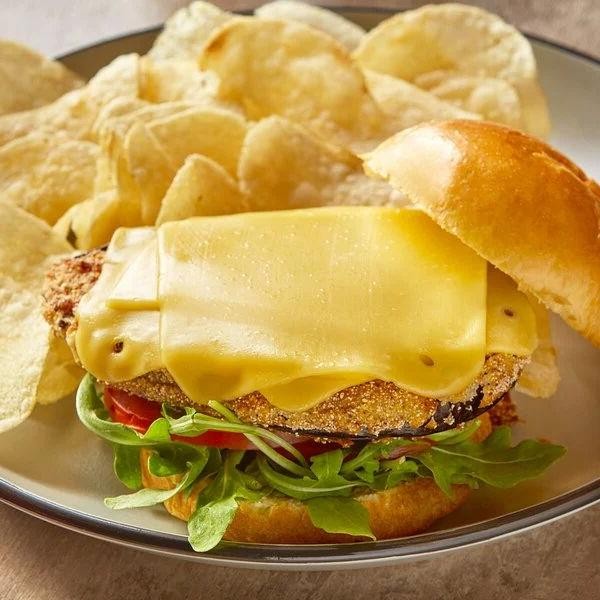
Unbelievable as it may seem, crafting your own Vegan Gouda Cheese Slices at home is simpler than you’d think, and the result is just as creamy and satisfying as the dairy version. I remember the first time I tried making it; the kitchen smelled like a gourmet cheese shop, and the slices melted perfectly on my morning toast.
Ingredients
- For the cheese base:
- 1 cup raw cashews, soaked overnight
- 1/2 cup water
- 2 tbsp nutritional yeast
- 1 tbsp lemon juice
- 1 tsp salt
- For setting:
- 1 tbsp agar powder
- 1/4 cup water
Instructions
- Drain the soaked cashews and blend them with 1/2 cup water, nutritional yeast, lemon juice, and salt until completely smooth.
- In a small saucepan, mix agar powder with 1/4 cup water and bring to a boil over medium heat, stirring constantly for 2 minutes until fully dissolved.
- Quickly pour the agar mixture into the blender with the cashew mixture and blend for another 30 seconds to combine thoroughly.
- Immediately transfer the mixture to a lined loaf pan, smoothing the top with a spatula.
- Let it cool at room temperature for 10 minutes, then refrigerate for at least 4 hours until firm.
- Once set, remove from the pan and slice as desired.
This Vegan Gouda Cheese has a wonderfully firm yet sliceable texture, with a tangy, nutty flavor that’s perfect for sandwiches or cheese boards. Try melting it over a baked potato for a decadent twist.
Spicy Pepper Jack Cheese
Many of my summer gatherings have been saved by this Spicy Pepper Jack Cheese recipe. It’s the perfect blend of heat and creaminess, and today, I’m sharing how you can whip it up for your next barbecue or cozy night in.
Ingredients
- For the cheese mixture:
- 2 cups shredded Pepper Jack cheese
- 1 cup heavy cream
- 1 tbsp cornstarch
- For the spice blend:
- 1 tsp cayenne pepper
- 1/2 tsp smoked paprika
Instructions
- In a medium saucepan, combine the heavy cream and cornstarch over medium heat, whisking until the cornstarch is fully dissolved.
- Gradually add the shredded Pepper Jack cheese to the saucepan, stirring constantly to ensure a smooth melt without clumping.
- Once the cheese is fully melted and the mixture is smooth, stir in the cayenne pepper and smoked paprika for that signature spicy kick.
- Reduce the heat to low and let the mixture simmer for 5 minutes, stirring occasionally to prevent sticking.
- Remove from heat and let it sit for 2 minutes to thicken slightly before serving.
Velvety smooth with a fiery finish, this Spicy Pepper Jack Cheese is a crowd-pleaser. Serve it with crusty bread or drizzle over nachos for an extra indulgent treat.
Zucchini Based Cheese Sauce

Have you ever found yourself staring at a pile of zucchini in your garden or at the store, wondering what to do with it all? I was in the same boat until I discovered how to transform this humble veggie into a creamy, dreamy cheese sauce that’s both nutritious and indulgent. It’s become my go-to for sneaking veggies into meals without a peep from the picky eaters at my table.
Ingredients
- For the sauce:
- 2 cups zucchini, peeled and chopped
- 1 cup sharp cheddar cheese, shredded
- 1/2 cup milk
- 2 tbsp butter
- 1 tbsp all-purpose flour
- 1/2 tsp garlic powder
- 1/2 tsp salt
Instructions
- Steam the chopped zucchini until tender, about 5 minutes. Tip: Over-steaming can make the zucchini watery, so keep an eye on it.
- In a saucepan, melt the butter over medium heat. Stir in the flour to create a roux, cooking for 1 minute until golden. Tip: Constant stirring prevents the roux from burning.
- Gradually whisk in the milk, ensuring no lumps form. Cook until the mixture thickens slightly, about 2 minutes.
- Add the steamed zucchini, cheddar cheese, garlic powder, and salt to the saucepan. Tip: For an extra smooth sauce, blend the mixture with an immersion blender until creamy.
- Cook on low heat, stirring occasionally, until the cheese is fully melted and the sauce is heated through, about 3 minutes.
Absolutely velvety with a subtle sweetness from the zucchini, this sauce clings beautifully to pasta or makes a decadent dip for pretzels. Try it drizzled over roasted vegetables for an extra layer of flavor that’ll have everyone asking for seconds.
Vegan Cheese Fondue

Gathering around a pot of melty, gooey fondue is one of my favorite ways to bring friends and family together, and this vegan cheese fondue is no exception. Inspired by a chilly evening when I craved something rich and comforting without the dairy, this recipe has become a staple in my kitchen.
Ingredients
- For the fondue base:
- 1 cup raw cashews, soaked overnight
- 1 cup unsweetened almond milk
- 2 tbsp nutritional yeast
- 1 tbsp lemon juice
- 1 tsp garlic powder
- 1 tsp onion powder
- 1/2 tsp salt
- For thickening:
- 2 tbsp tapioca starch
Instructions
- Drain the soaked cashews and add them to a high-speed blender along with almond milk, nutritional yeast, lemon juice, garlic powder, onion powder, and salt. Blend until completely smooth, about 2 minutes.
- Pour the blended mixture into a medium saucepan and whisk in the tapioca starch until no lumps remain.
- Cook the mixture over medium heat, stirring constantly with a wooden spoon, until it thickens and becomes stretchy, about 5 minutes. Tip: If the fondue seems too thick, add a splash more almond milk to reach your desired consistency.
- Once the fondue is smooth and stretchy, reduce the heat to low to keep it warm until serving. Tip: A fondue pot or a slow cooker on the lowest setting works great for keeping the fondue at the perfect temperature.
- Serve immediately with your favorite dippers like crusty bread, steamed vegetables, or apple slices. Tip: For an extra flavor boost, sprinkle some smoked paprika or chopped herbs on top before serving.
Here’s the thing about this vegan cheese fondue—it’s incredibly creamy and has a tangy, cheesy flavor that’ll make you do a double-take. I love serving it with a variety of dippers for a fun, interactive meal that’s sure to impress even the most skeptical of cheese lovers.
Carrot Cheese Sauce
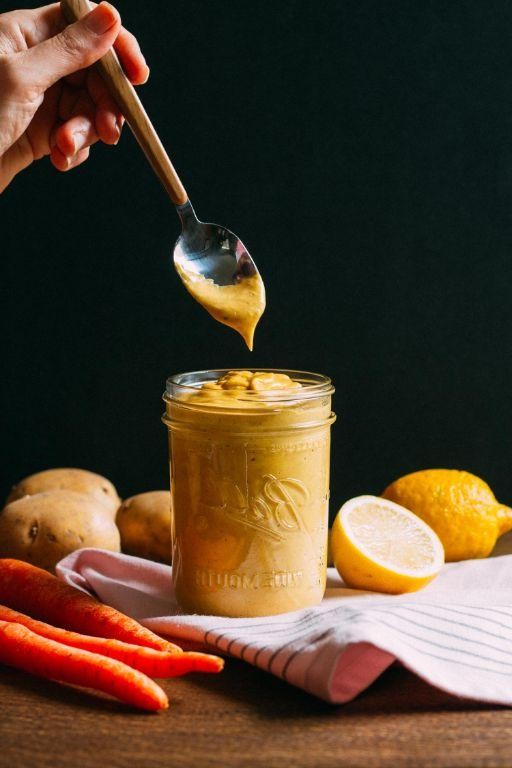
Whisking up something creamy and dreamy in the kitchen is my idea of a perfect afternoon, and this Carrot Cheese Sauce is no exception. Inspired by a farmer’s market haul that left me with more carrots than I knew what to do with, this sauce became a happy accident that’s now a staple in my home.
Ingredients
- For the sauce:
- 2 cups peeled and chopped carrots
- 1 cup shredded cheddar cheese
- 1/2 cup milk
- 2 tbsp butter
- 1 tbsp all-purpose flour
- 1/2 tsp garlic powder
- 1/2 tsp salt
Instructions
- Place the chopped carrots in a pot and cover with water. Bring to a boil over high heat, then reduce to a simmer for 15 minutes, or until the carrots are very soft.
- Drain the carrots and transfer them to a blender. Add the milk and blend until smooth. Tip: For an extra smooth sauce, strain the blended mixture through a fine mesh sieve.
- In the same pot, melt the butter over medium heat. Whisk in the flour and cook for 1 minute to make a roux.
- Slowly whisk in the carrot puree, ensuring no lumps form. Cook for 2 minutes, stirring constantly.
- Reduce the heat to low and stir in the cheddar cheese, garlic powder, and salt until the cheese is completely melted and the sauce is smooth. Tip: If the sauce is too thick, add a little more milk until you reach the desired consistency.
- Serve immediately. Tip: This sauce is fantastic over steamed vegetables, pasta, or as a unique dip for pretzels.
Delightfully creamy with a subtle sweetness from the carrots, this sauce is a versatile way to sneak some veggies into your meals. Try swirling it into mac and cheese for an extra nutrient boost or dolloping it over baked potatoes for a colorful twist.
Conclusion
We hope this roundup of 18 creamy vegan cheese recipes inspires your next kitchen adventure! Whether you’re a seasoned vegan or just dairy-curious, there’s something here for everyone. Don’t forget to try these delicious recipes, share your favorites in the comments, and pin this article to your Pinterest board for easy access. Happy cooking!


