Are you tired of the same old lunch routine? Spice up your midday meals with our roundup of 20 Delicious Lunch Meat Recipes for Quick Meals! Whether you’re craving something hearty, light, or packed with flavor, we’ve got you covered. Perfect for busy weekdays or lazy weekends, these recipes are sure to delight your taste buds and simplify your cooking. Let’s dive in and transform your lunch game today!
Classic Ham and Cheese Sandwich

Very few dishes are as universally loved and easy to prepare as the classic ham and cheese sandwich. This guide will walk you through creating this timeless favorite with precision and ease, ensuring a delicious result every time.
Ingredients
- 2 slices whole wheat bread
- 1 tbsp mayonnaise
- 1 tsp mustard
- 2 oz sliced ham
- 1 oz sliced cheddar cheese
- 1 tbsp butter, softened
Instructions
- Lay out 2 slices of whole wheat bread on a clean, flat surface.
- Spread 1 tbsp mayonnaise evenly on one slice of bread.
- Spread 1 tsp mustard evenly on the other slice of bread.
- Layer 2 oz of sliced ham on top of the mayonnaise-covered slice.
- Place 1 oz of sliced cheddar cheese on top of the ham.
- Combine the two slices of bread, with the mustard-covered slice on top, to form a sandwich.
- Heat a skillet over medium heat (350°F) and spread 1 tbsp of softened butter evenly on one side of the sandwich.
- Place the sandwich, buttered side down, in the skillet and cook for 3-4 minutes, or until the bread is golden brown and the cheese begins to melt.
- Butter the top side of the sandwich, then flip and cook for an additional 3-4 minutes.
- Remove the sandwich from the skillet and let it rest for 1 minute before cutting.
Rich in flavor and perfectly balanced in texture, this ham and cheese sandwich is a testament to simplicity done right. Serve it with a side of pickles or a crisp apple for a delightful contrast.
Turkey Club Wrap

Building a delicious Turkey Club Wrap is easier than you think, and with this step-by-step guide, you’ll be rolling up a tasty lunch in no time. Begin by gathering all your ingredients to ensure a smooth cooking process.
Ingredients
- 2 large flour tortillas
- 1/2 cup mayonnaise
- 1 tbsp Dijon mustard
- 4 slices turkey breast
- 4 slices cooked bacon
- 1/2 cup shredded lettuce
- 1/4 cup diced tomatoes
- 1/4 cup sliced avocado
- 2 slices Swiss cheese
Instructions
- Lay out the flour tortillas on a clean, flat surface.
- Spread 1/4 cup of mayonnaise evenly over each tortilla.
- Drizzle 1/2 tbsp of Dijon mustard over the mayonnaise on each tortilla.
- Layer 2 slices of turkey breast on each tortilla, covering half of the surface area.
- Place 2 slices of bacon on top of the turkey on each tortilla.
- Distribute the shredded lettuce evenly over the bacon on each tortilla.
- Sprinkle the diced tomatoes and sliced avocado over the lettuce.
- Top each tortilla with 1 slice of Swiss cheese.
- Fold the sides of the tortillas inward, then roll tightly from the bottom to enclose the fillings.
- Cut each wrap in half diagonally before serving.
Great job! Your Turkey Club Wraps are now ready to enjoy, offering a perfect blend of creamy, crunchy, and savory flavors in every bite. For an extra touch, serve them with a side of sweet potato fries or a crisp green salad.
Bologna and Egg Breakfast Sandwich

Unlock the secret to a hearty start to your day with this simple yet satisfying Bologna and Egg Breakfast Sandwich. Perfect for those mornings when you need something quick but don’t want to compromise on flavor or nutrition.
Ingredients
- 2 slices bologna
- 1 large egg
- 1 English muffin, split
- 1 tbsp butter
- 1 slice American cheese
Instructions
- Heat a non-stick skillet over medium heat (350°F) and add 1 tbsp butter, allowing it to melt and coat the pan evenly.
- Place the 2 slices of bologna in the skillet, cooking for 2 minutes on each side until lightly browned. Tip: Avoid overcrowding the pan to ensure even cooking.
- Remove the bologna from the skillet and set aside on a paper towel to drain excess grease.
- In the same skillet, crack the 1 large egg, cooking for 3 minutes for a runny yolk or 4 minutes for a firmer yolk. Tip: For a perfectly round egg, you can use an egg ring.
- While the egg cooks, toast the split English muffin until golden brown, about 2 minutes in a toaster or toaster oven.
- Assemble the sandwich by placing the cooked egg on the bottom half of the English muffin, followed by the slice of American cheese, and then the bologna slices. Top with the other half of the English muffin. Tip: The heat from the egg and bologna will help melt the cheese slightly, enhancing the flavor.
Juxtaposing the creamy texture of the melted cheese with the slight crispiness of the bologna and the softness of the egg, this sandwich offers a delightful contrast in every bite. Serve it with a side of fresh fruit or a small salad for a balanced breakfast.
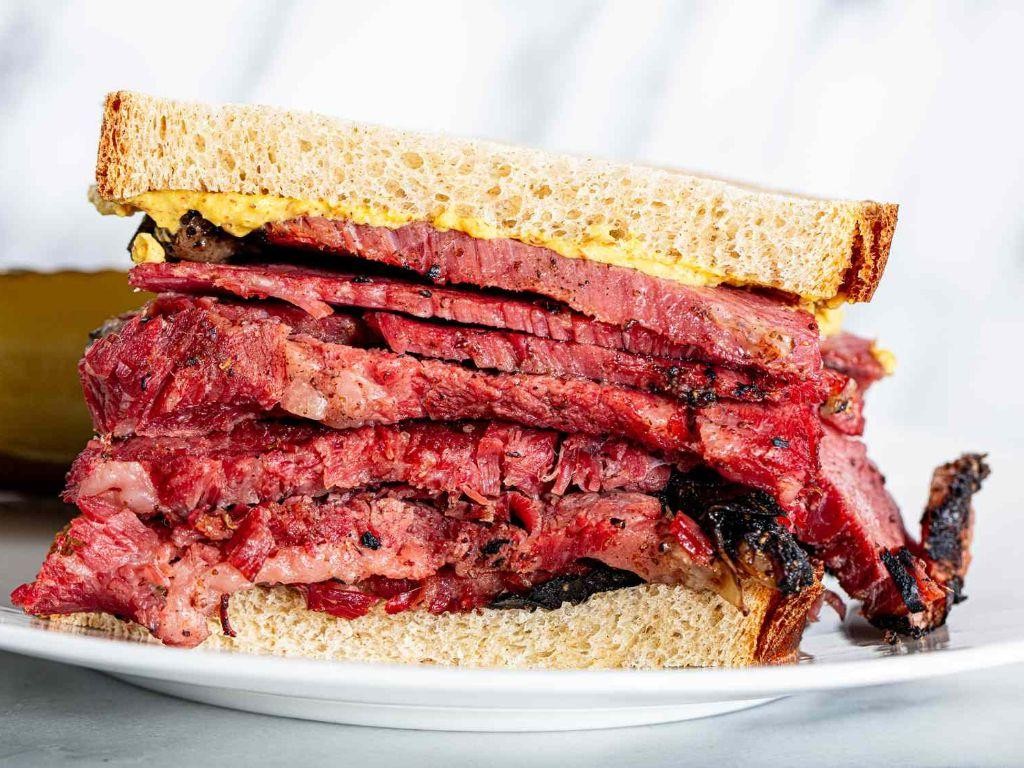
Pastrami Reuben Sandwich

Preparing a Pastrami Reuben Sandwich is a delightful journey through layers of flavor, combining the richness of pastrami with the tang of sauerkraut and the creaminess of Russian dressing, all hugged by crispy rye bread. Let’s break down the process to ensure every bite is as perfect as the last.
Ingredients
- 2 slices rye bread
- 4 oz pastrami
- 1/2 cup sauerkraut, drained
- 2 tbsp Russian dressing
- 1 tbsp butter, softened
- 2 slices Swiss cheese
Instructions
- Preheat a skillet over medium heat, about 350°F, to ensure even cooking.
- Butter one side of each rye bread slice lightly to achieve a golden crust.
- Place one slice of bread, buttered side down, in the skillet. Layer with 2 oz pastrami, 1/4 cup sauerkraut, 1 tbsp Russian dressing, and 1 slice Swiss cheese.
- Top with the second slice of bread, buttered side up, pressing down gently to seal the sandwich.
- Cook for 3-4 minutes on each side or until the bread is golden brown and the cheese starts to melt, flipping carefully with a spatula.
- Remove from heat and let rest for 1 minute before slicing to allow the flavors to meld together.
Now, the Pastrami Reuben Sandwich boasts a crispy exterior with a gooey, flavorful interior. Serve it with a side of pickles or potato chips for a classic deli experience that’s both satisfying and indulgent.
Salami and Pepperoni Pizza

Preparing a Salami and Pepperoni Pizza at home is simpler than you might think, and with this guide, you’ll achieve a deliciously crispy crust topped with savory meats and melted cheese. Perfect for a weekend dinner or a fun cooking project, this recipe walks you through each step to ensure success.
Ingredients
- 1 1/2 cups warm water (110°F)
- 1 tbsp sugar
- 1 tbsp active dry yeast
- 3 1/2 cups all-purpose flour
- 1 tsp salt
- 2 tbsp olive oil
- 1/2 cup pizza sauce
- 2 cups shredded mozzarella cheese
- 1/2 cup sliced salami
- 1/2 cup sliced pepperoni
Instructions
- In a large bowl, combine warm water, sugar, and yeast. Let sit for 5 minutes until frothy.
- Add flour, salt, and olive oil to the yeast mixture. Stir until a dough forms.
- Knead the dough on a floured surface for 5 minutes until smooth and elastic.
- Place the dough in a greased bowl, cover, and let rise in a warm place for 1 hour or until doubled in size.
- Preheat oven to 475°F and place a pizza stone or baking sheet inside to heat.
- Roll out the dough on a floured surface to a 12-inch circle. Transfer to a piece of parchment paper.
- Spread pizza sauce evenly over the dough, leaving a 1-inch border for the crust.
- Sprinkle mozzarella cheese over the sauce, then arrange salami and pepperoni on top.
- Transfer the pizza (on the parchment) to the preheated pizza stone or baking sheet. Bake for 12-15 minutes until the crust is golden and the cheese is bubbly.
- Let the pizza cool for 5 minutes before slicing. Tip: For extra crispiness, bake the pizza directly on the oven rack for the last 2 minutes.
Just out of the oven, this pizza boasts a crispy crust with a chewy interior, layered with tangy sauce, gooey cheese, and spicy meats. Serve it with a side of garlic knots or a fresh salad for a complete meal that’s sure to impress.
Chicken Salad with Lunch Meat
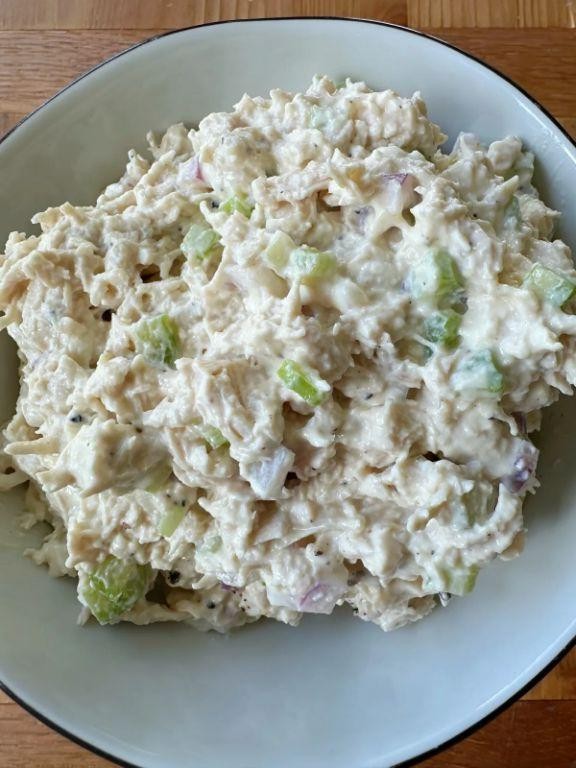
Every home cook needs a reliable chicken salad recipe in their repertoire, and this version with lunch meat is both easy to master and delightfully flavorful. Let’s walk through the process together, ensuring you end up with a dish that’s as satisfying to make as it is to eat.
Ingredients
- 2 cups cooked chicken, shredded
- 1/2 cup lunch meat, diced
- 1/4 cup mayonnaise
- 1 tbsp mustard
- 1/2 cup celery, finely chopped
- 1/4 cup red onion, finely diced
- 1/2 tsp salt
- 1/4 tsp black pepper
Instructions
- In a large mixing bowl, combine the shredded chicken and diced lunch meat.
- Add the mayonnaise and mustard to the bowl, stirring until the chicken and lunch meat are evenly coated.
- Mix in the chopped celery and diced red onion, ensuring all ingredients are well distributed.
- Season the mixture with salt and black pepper, adjusting the amounts slightly if needed after tasting.
- Cover the bowl with plastic wrap and refrigerate for at least 30 minutes to allow the flavors to meld together.
Serve this chicken salad on a bed of crisp lettuce for a refreshing crunch, or between slices of your favorite bread for a hearty sandwich. The combination of tender chicken, savory lunch meat, and crunchy vegetables creates a delightful texture contrast, while the creamy dressing ties all the flavors together beautifully.
Roast Beef and Cheddar Panini

When the craving for something hearty and cheesy strikes, this Roast Beef and Cheddar Panini is your go-to solution. With its crispy exterior and melty interior, it’s a sandwich that promises satisfaction with every bite.
Ingredients
- 2 slices sourdough bread
- 4 oz roast beef, thinly sliced
- 2 slices cheddar cheese
- 1 tbsp mayonnaise
- 1 tbsp Dijon mustard
- 1 tbsp butter, softened
Instructions
- Preheat your panini press to 375°F. If you don’t have a panini press, a skillet and a heavy pan can work as a substitute.
- Spread 1 tbsp mayonnaise on one slice of sourdough bread and 1 tbsp Dijon mustard on the other slice. This combination adds a tangy depth to the sandwich.
- Layer 4 oz of roast beef and 2 slices of cheddar cheese between the prepared bread slices. Ensure the cheese is evenly distributed for consistent melting.
- Butter the outside of the sandwich with 1 tbsp softened butter. This step is crucial for achieving that golden, crispy exterior.
- Place the sandwich in the preheated panini press and cook for 5 minutes, or until the bread is golden brown and the cheese has melted. If using a skillet, cook for 3-4 minutes on each side over medium heat, pressing down with the heavy pan.
- Remove the sandwich from the press or skillet and let it rest for a minute before cutting. This allows the cheese to set slightly, making the sandwich easier to handle.
You’ll love the contrast between the crispy sourdough and the tender, juicy roast beef, all brought together by the creamy cheddar. For an extra kick, serve with a side of pickles or a spicy aioli.
Prosciutto and Melon Salad

For a refreshing summer dish that balances sweet and savory flavors, this Prosciutto and Melon Salad is a perfect choice. Follow these steps to create a dish that’s as pleasing to the eye as it is to the palate.
Ingredients
- 1/2 cantaloupe, peeled and cubed
- 4 slices prosciutto, torn into pieces
- 1 tbsp extra virgin olive oil
- 1 tsp balsamic vinegar
- 1/4 tsp salt
- 1/4 tsp black pepper
- 1/4 cup fresh mint leaves, chopped
Instructions
- Place the cubed cantaloupe in a large mixing bowl.
- Add the torn prosciutto pieces to the bowl with the cantaloupe.
- In a small bowl, whisk together the extra virgin olive oil and balsamic vinegar until well combined.
- Drizzle the olive oil and balsamic mixture over the cantaloupe and prosciutto.
- Sprinkle the salt and black pepper evenly over the salad.
- Gently toss the salad to ensure all ingredients are evenly coated with the dressing.
- Add the chopped mint leaves to the salad and toss lightly to incorporate.
- Let the salad sit for 5 minutes before serving to allow the flavors to meld together.
With its juicy melon, salty prosciutto, and fresh mint, this salad offers a delightful contrast of textures and flavors. Serve it on a warm day for a light and satisfying meal.
Corned Beef Hash

Gather around as we dive into the comforting world of Corned Beef Hash, a classic dish that combines simplicity with hearty flavors. Perfect for beginners, this recipe will guide you through each step to create a delicious meal that’s both satisfying and easy to make.
Ingredients
- 2 cups cooked corned beef, diced
- 3 cups potatoes, peeled and diced
- 1/2 cup onion, finely chopped
- 2 tbsp unsalted butter
- 1 tbsp vegetable oil
- 1/2 tsp salt
- 1/4 tsp black pepper
- 2 tbsp fresh parsley, chopped
Instructions
- Heat a large skillet over medium heat and add 1 tbsp vegetable oil and 2 tbsp unsalted butter.
- Add 3 cups diced potatoes to the skillet, spreading them out in an even layer. Cook for 10 minutes, stirring occasionally, until they start to soften.
- Tip: For even cooking, make sure the potato pieces are roughly the same size.
- Add 1/2 cup finely chopped onion to the skillet with the potatoes. Cook for another 5 minutes until the onions are translucent.
- Stir in 2 cups diced corned beef, 1/2 tsp salt, and 1/4 tsp black pepper. Mix well to combine all the ingredients.
- Press the mixture down firmly with a spatula to form a compact layer. Cook for 7-10 minutes without stirring to allow a crispy crust to form on the bottom.
- Tip: Resist the urge to stir too often; this helps achieve that desirable crispy texture.
- Flip sections of the hash over with the spatula and cook for another 5 minutes to crisp the other side.
- Remove from heat and sprinkle with 2 tbsp chopped fresh parsley before serving.
- Tip: For an extra touch, serve with a side of fried or poached eggs on top.
Offering a delightful contrast between the crispy exterior and tender interior, this Corned Beef Hash is a versatile dish that shines at any meal. Try serving it with a dollop of sour cream or alongside a fresh green salad for a complete dining experience.
Ham and Pineapple Skewers

Skewering together the perfect blend of sweet and savory, these Ham and Pineapple Skewers are a delightful treat that’s as fun to make as it is to eat. Simple yet flavorful, they’re ideal for beginners looking to impress at their next barbecue.
Ingredients
- 1 cup cubed ham
- 1 cup pineapple chunks
- 2 tbsp olive oil
- 1 tbsp honey
- 1/2 tsp ground black pepper
Instructions
- Preheat your grill to medium heat, approximately 350°F, ensuring it’s clean and lightly oiled to prevent sticking.
- In a small bowl, whisk together 2 tbsp olive oil, 1 tbsp honey, and 1/2 tsp ground black pepper to create a glaze.
- Thread alternating pieces of 1 cup cubed ham and 1 cup pineapple chunks onto skewers, leaving a small space between each piece for even cooking.
- Brush the skewers generously with the prepared glaze, coating all sides for maximum flavor.
- Place the skewers on the preheated grill, cooking for 3-4 minutes per side, or until the ham is lightly charred and the pineapple is caramelized.
- Remove the skewers from the grill and let them rest for 2 minutes before serving to allow the juices to redistribute.
Ready to serve, these skewers offer a juicy texture with a perfect balance of smoky ham and sweet pineapple. For an extra touch, drizzle with remaining glaze or serve alongside a fresh green salad for a complete meal.
Turkey and Avocado Roll-Ups
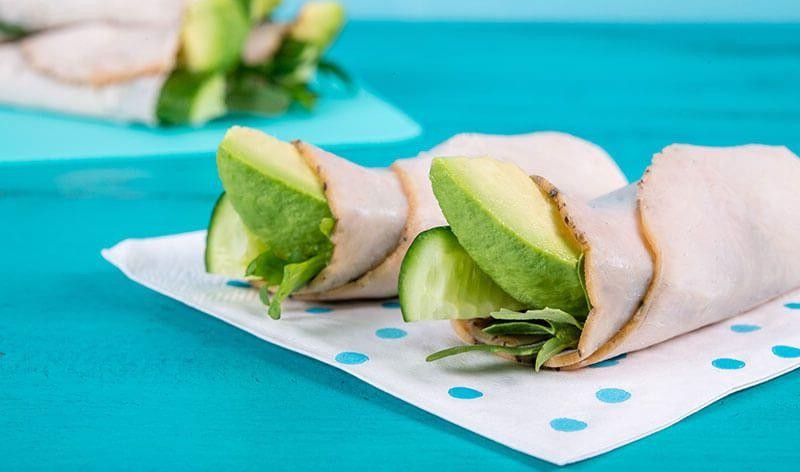
Here’s a simple yet delicious recipe for Turkey and Avocado Roll-Ups that’s perfect for a quick lunch or a healthy snack. Follow these steps carefully to create a dish that’s both nutritious and satisfying.
Ingredients
- 4 large whole wheat tortillas
- 1 lb thinly sliced turkey breast
- 2 ripe avocados, sliced
- 1/2 cup shredded cheddar cheese
- 1/4 cup mayonnaise
- 1 tbsp Dijon mustard
- 1/2 tsp garlic powder
- 1/2 tsp onion powder
- 1/4 tsp salt
- 1/4 tsp black pepper
Instructions
- Lay out the 4 whole wheat tortillas on a clean, flat surface.
- In a small bowl, mix together the mayonnaise, Dijon mustard, garlic powder, onion powder, salt, and black pepper until well combined.
- Spread an even layer of the mayonnaise mixture onto each tortilla, covering the entire surface.
- Layer the thinly sliced turkey breast evenly over the mayonnaise mixture on each tortilla.
- Place avocado slices on top of the turkey, distributing them evenly across each tortilla.
- Sprinkle shredded cheddar cheese over the avocado slices on each tortilla.
- Starting at one end, tightly roll up each tortilla, ensuring the fillings are compact and secure inside.
- Using a sharp knife, slice each rolled tortilla into 1-inch pieces, discarding the ends if desired.
- Arrange the roll-ups on a serving platter and serve immediately, or refrigerate for up to 2 hours before serving for a firmer texture.
Offering a creamy texture from the avocado and a savory bite from the turkey, these roll-ups are a crowd-pleaser. For an extra kick, serve with a side of spicy salsa or a drizzle of hot sauce.
Bologna and Mustard Pretzel Bites

Sometimes, the simplest ingredients come together to create the most satisfying snacks. Today, we’re diving into a recipe that combines the classic flavors of bologna and mustard with the satisfying crunch of pretzel bites, perfect for any gathering or a quick treat.
Ingredients
- 1 cup all-purpose flour
- 1 tsp baking powder
- 1/2 tsp salt
- 1/2 cup water
- 1 tbsp olive oil
- 4 slices bologna, diced
- 2 tbsp mustard
- 1 egg, beaten
- Coarse salt for sprinkling
Instructions
- Preheat your oven to 375°F and line a baking sheet with parchment paper.
- In a large bowl, whisk together 1 cup all-purpose flour, 1 tsp baking powder, and 1/2 tsp salt.
- Add 1/2 cup water and 1 tbsp olive oil to the dry ingredients, stirring until a dough forms. Tip: If the dough is too sticky, add a little more flour.
- Roll the dough into small balls, about 1 inch in diameter, and flatten slightly with your palm.
- Place a small piece of diced bologna and a dab of mustard in the center of each dough circle.
- Fold the dough over the filling, sealing the edges tightly to form a bite-sized pouch.
- Brush each pretzel bite with the beaten egg and sprinkle with coarse salt. Tip: For extra shine, you can brush the bites with egg wash twice.
- Bake for 15-20 minutes, or until the pretzel bites are golden brown. Tip: Rotate the baking sheet halfway through for even browning.
- Remove from the oven and let cool for 5 minutes before serving.
These bologna and mustard pretzel bites offer a delightful contrast between the soft, savory filling and the crisp, salty exterior. Try serving them with a side of extra mustard for dipping, or pack them in a lunchbox for a tasty surprise.
Pastrami on Rye with Spicy Mustard
Let’s dive into creating a classic Pastrami on Rye with Spicy Mustard, a sandwich that balances savory, spicy, and tangy flavors perfectly. This guide will walk you through each step to ensure your sandwich is as delicious as it is straightforward to make.
Ingredients
- 8 oz pastrami, thinly sliced
- 2 slices rye bread
- 2 tbsp spicy mustard
- 1 tbsp unsalted butter, softened
- 2 slices Swiss cheese
- 1/4 cup sauerkraut, drained
Instructions
- Preheat a skillet over medium heat (350°F) for even toasting.
- Spread 1 tbsp of spicy mustard evenly on one side of each rye bread slice.
- Layer 4 oz of pastrami on the mustard side of one bread slice, ensuring even coverage.
- Place 1 slice of Swiss cheese on top of the pastrami, followed by 1/4 cup of sauerkraut.
- Top with the second slice of rye bread, mustard side down, to assemble the sandwich.
- Spread 1/2 tbsp of softened butter on the outer side of each bread slice for golden toasting.
- Place the sandwich in the preheated skillet, cooking for 3-4 minutes on each side or until the bread is golden brown and the cheese begins to melt.
- Remove from heat, let it sit for 1 minute, then slice diagonally for serving.
Combining the crunch of toasted rye with the melt-in-your-mouth pastrami and the sharpness of spicy mustard, this sandwich is a flavor powerhouse. Serve it with a side of pickles or a crisp salad to cut through the richness.
Salami and Cheese Stuffed Peppers

Always looking for a simple yet impressive dish to serve at your next gathering? These Salami and Cheese Stuffed Peppers combine the bold flavors of salami and melted cheese with the sweet crunch of bell peppers, creating a perfect appetizer or side dish that’s sure to delight.
Ingredients
- 4 large bell peppers
- 1 cup shredded mozzarella cheese
- 1/2 cup diced salami
- 1 tbsp olive oil
- 1/2 tsp salt
- 1/4 tsp black pepper
Instructions
- Preheat your oven to 375°F (190°C) to ensure it’s ready for baking.
- Cut the tops off the bell peppers and remove the seeds and membranes inside, creating a hollow space for the filling.
- In a mixing bowl, combine the shredded mozzarella cheese and diced salami, ensuring an even distribution of ingredients.
- Drizzle the olive oil over the bell peppers, then season the inside with salt and black pepper for enhanced flavor.
- Stuff each bell pepper with the salami and cheese mixture, packing it gently to fill the cavity completely.
- Place the stuffed peppers on a baking sheet and bake in the preheated oven for 20-25 minutes, or until the peppers are tender and the cheese is bubbly and slightly golden.
- Let the peppers cool for 5 minutes before serving to allow the filling to set slightly, making them easier to handle.
With their juicy texture and a harmonious blend of savory salami and gooey cheese, these stuffed peppers are a crowd-pleaser. Try serving them atop a bed of arugula for a fresh contrast or alongside a dipping sauce of marinara for an extra flavor kick.
Chicken and Ham Caesar Salad
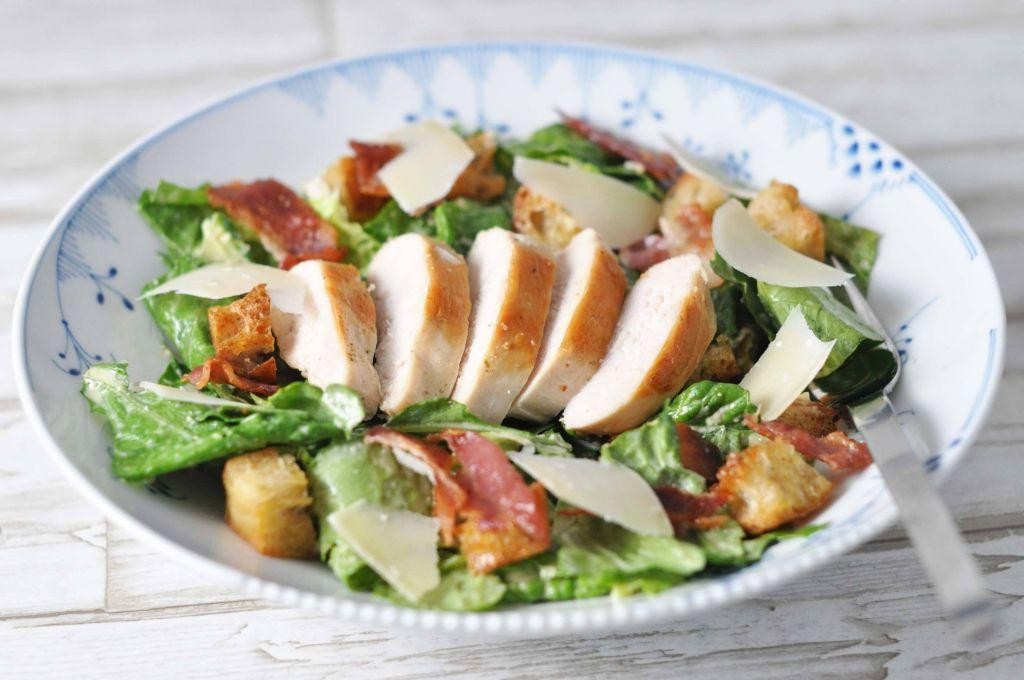
Begin by gathering your ingredients and prepping your workspace for a delicious Chicken and Ham Caesar Salad that’s both hearty and refreshing. This recipe is perfect for those looking to combine simplicity with gourmet flavors.
Ingredients
- 2 cups romaine lettuce, chopped
- 1 cup cooked chicken breast, diced
- 1/2 cup ham, diced
- 1/4 cup grated Parmesan cheese
- 1/4 cup Caesar dressing
- 1/2 cup croutons
- 1 tbsp lemon juice
- 1/2 tsp black pepper
Instructions
- In a large mixing bowl, combine 2 cups chopped romaine lettuce, 1 cup diced cooked chicken breast, and 1/2 cup diced ham.
- Add 1/4 cup grated Parmesan cheese to the bowl.
- Pour 1/4 cup Caesar dressing over the salad ingredients.
- Sprinkle 1/2 cup croutons evenly over the salad.
- Drizzle 1 tbsp lemon juice across the top for a fresh zing.
- Season with 1/2 tsp black pepper, tossing gently to combine all ingredients without crushing the croutons.
- Let the salad sit for 5 minutes before serving to allow the flavors to meld together.
Key to this salad’s appeal is the crisp texture of the romaine against the tender chicken and ham, with the creamy Caesar dressing tying everything together. For an extra touch, serve it in a hollowed-out bread bowl to make it a meal that’s as fun to eat as it is delicious.
Roast Beef and Horseradish Crostini

Mastering the art of creating the perfect Roast Beef and Horseradish Crostini starts with understanding the balance of flavors and textures. This recipe guides you through each step to achieve a delightful appetizer that’s both elegant and easy to make.
Ingredients
- 1 baguette, sliced into 1/2 inch pieces
- 2 tbsp olive oil
- 1/2 cup horseradish sauce
- 1/2 lb roast beef, thinly sliced
- 1/4 cup arugula
- 1/4 tsp salt
- 1/4 tsp black pepper
Instructions
- Preheat your oven to 375°F to prepare for toasting the baguette slices.
- Arrange the baguette slices on a baking sheet in a single layer. Brush each slice lightly with olive oil on both sides.
- Sprinkle the salt and black pepper evenly over the oiled baguette slices for added flavor.
- Bake in the preheated oven for 5-7 minutes, or until the edges are golden brown and crispy. Tip: Keep an eye on them to prevent burning.
- Remove the baking sheet from the oven and let the crostini cool for 2 minutes to crisp up further.
- Spread a thin layer of horseradish sauce on each crostini, adjusting the amount based on your preference for spice.
- Top each crostini with a slice of roast beef, folding it gently to fit the size of the bread.
- Garnish with a few leaves of arugula for a peppery contrast and a pop of color. Tip: The arugula adds a fresh, slightly bitter taste that complements the richness of the beef and horseradish.
- Serve immediately to enjoy the contrast of the crispy crostini with the tender roast beef and creamy horseradish sauce. Tip: For an extra touch, drizzle with a bit more olive oil before serving.
How the crispy texture of the crostini contrasts beautifully with the tender roast beef, while the horseradish sauce adds a creamy, spicy kick. Serve these at your next gathering for a sophisticated yet simple appetizer that’s sure to impress.
Prosciutto-Wrapped Asparagus

Mastering the art of Prosciutto-Wrapped Asparagus is simpler than you might think, and it’s a perfect way to elevate your appetizer game with minimal effort. This dish combines the salty crispness of prosciutto with the tender, earthy flavors of asparagus, creating a harmonious bite that’s both elegant and easy to make.
Ingredients
- 1 lb asparagus, trimmed
- 8 slices prosciutto
- 1 tbsp olive oil
- 1/4 tsp black pepper
Instructions
- Preheat your oven to 400°F (204°C) and line a baking sheet with parchment paper for easy cleanup.
- Divide the asparagus into 8 equal bundles, each containing about 3-4 spears, depending on their thickness.
- Wrap each asparagus bundle with a slice of prosciutto, starting at the bottom and spiraling upwards to cover most of the spears.
- Place the wrapped bundles on the prepared baking sheet, ensuring they’re not touching to allow for even cooking.
- Drizzle the olive oil evenly over the bundles and sprinkle with black pepper.
- Bake in the preheated oven for 12-15 minutes, or until the prosciutto is crispy and the asparagus is tender when pierced with a fork.
- Let the bundles cool for 2 minutes on the baking sheet before serving to allow the prosciutto to set.
Enjoy the delightful contrast of textures between the crispy prosciutto and the tender asparagus. For an extra touch of elegance, serve these bundles upright in a tall glass or arrange them on a platter with a drizzle of balsamic glaze.
Corned Beef and Cabbage Soup

Kickstart your cooking journey with this comforting Corned Beef and Cabbage Soup, a hearty dish that combines tender corned beef with the subtle sweetness of cabbage, all simmered in a flavorful broth. Perfect for beginners, this recipe guides you through each step to ensure a delicious outcome.
Ingredients
- 1 tbsp olive oil
- 1 cup diced onion
- 2 cloves garlic, minced
- 4 cups beef broth
- 2 cups water
- 1 lb corned beef, cut into 1-inch pieces
- 2 cups chopped cabbage
- 1 cup diced carrots
- 1 cup diced potatoes
- 1 tsp black pepper
Instructions
- Heat 1 tbsp olive oil in a large pot over medium heat until shimmering, about 1 minute.
- Add 1 cup diced onion and sauté until translucent, about 5 minutes, stirring occasionally.
- Stir in 2 cloves minced garlic and cook for 30 seconds until fragrant.
- Pour in 4 cups beef broth and 2 cups water, then bring to a boil over high heat.
- Add 1 lb corned beef pieces, reduce heat to low, and simmer for 20 minutes to infuse flavors.
- Tip: Skim off any foam that rises to the surface for a clearer broth.
- Add 2 cups chopped cabbage, 1 cup diced carrots, and 1 cup diced potatoes to the pot.
- Season with 1 tsp black pepper, then simmer for another 25 minutes until vegetables are tender.
- Tip: For extra flavor, let the soup sit for 10 minutes off the heat before serving.
- Check the seasoning and adjust if necessary, ensuring all ingredients are fully cooked.
- Tip: Serve with a slice of crusty bread to soak up the delicious broth.
Now, this Corned Beef and Cabbage Soup boasts a rich, savory broth with melt-in-your-mouth beef and perfectly cooked vegetables. For a creative twist, top with a dollop of sour cream and a sprinkle of fresh dill before serving.
Ham and Swiss Quiche

Every home cook needs a reliable quiche recipe in their repertoire, and this Ham and Swiss Quiche is a perfect choice for any meal of the day. Follow these steps to create a dish that’s as satisfying to make as it is to eat.
Ingredients
- 1 9-inch pie crust
- 1 cup diced ham
- 1 cup shredded Swiss cheese
- 4 large eggs
- 1 cup heavy cream
- 1/2 tsp salt
- 1/4 tsp black pepper
- 1/4 tsp ground nutmeg
Instructions
- Preheat your oven to 375°F (190°C).
- Place the pie crust in a 9-inch pie dish and crimp the edges decoratively.
- Evenly distribute the diced ham and shredded Swiss cheese over the bottom of the pie crust.
- In a medium bowl, whisk together the eggs, heavy cream, salt, pepper, and nutmeg until well combined.
- Pour the egg mixture over the ham and cheese in the pie crust.
- Bake for 35-40 minutes, or until the quiche is set and the top is lightly golden. A knife inserted into the center should come out clean.
- Let the quiche cool for 10 minutes before slicing and serving.
Rich and creamy with a perfectly flaky crust, this quiche is a delightful balance of savory ham and nutty Swiss cheese. Serve it warm with a side salad for a light lunch or brunch, or enjoy a slice cold for a quick and satisfying snack.
Turkey and Cranberry Sandwich
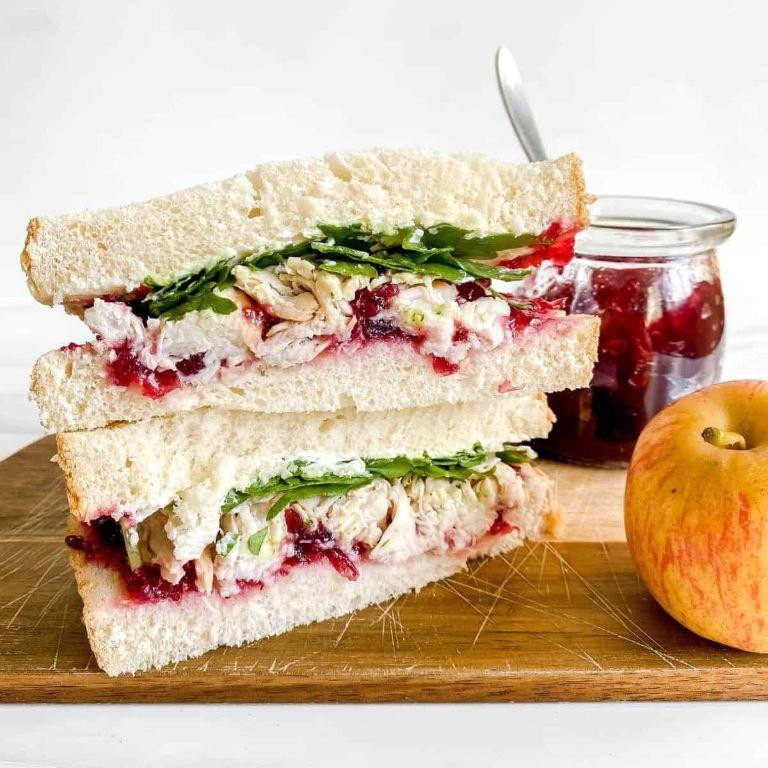
Mastering the art of making a Turkey and Cranberry Sandwich is simpler than you might think, especially when you follow these straightforward steps. This classic combination brings together savory and sweet flavors in a way that’s both comforting and satisfying.
Ingredients
- 2 slices whole wheat bread
- 3 oz sliced roasted turkey
- 2 tbsp cranberry sauce
- 1 tbsp mayonnaise
- 1 leaf lettuce
- 1 slice cheddar cheese
Instructions
- Lay out the 2 slices of whole wheat bread on a clean, flat surface.
- Spread 1 tbsp mayonnaise evenly on one side of each bread slice.
- On one slice, layer the 3 oz sliced roasted turkey evenly over the mayonnaise.
- Spread 2 tbsp cranberry sauce over the turkey, ensuring an even layer.
- Place 1 leaf lettuce on top of the cranberry sauce, followed by the 1 slice cheddar cheese.
- Top with the second slice of bread, mayonnaise side down, pressing gently to adhere.
- Cut the sandwich diagonally for easier handling and serve immediately.
Remember, the key to a perfect sandwich is in the layering—start with the mayonnaise to create a moisture barrier that keeps the bread from getting soggy. For an extra crunch, toast the bread lightly before assembling. And if you’re feeling adventurous, try adding a thin layer of mashed avocado for a creamy texture contrast. Ready to enjoy, this Turkey and Cranberry Sandwich offers a delightful mix of textures, from the soft bread to the crisp lettuce, and a balance of flavors that’s hard to resist. Serve it with a side of sweet potato fries for a complete meal.
Conclusion
We hope these 20 delicious lunch meat recipes inspire your next quick and tasty meal! Whether you’re packing a lunch or whipping up a speedy dinner, there’s something here for everyone. Don’t forget to try your favorites, share your thoughts in the comments, and pin this article on Pinterest to keep these ideas handy. Happy cooking!