Dive into the rich, chocolatey world of cocoa powder with our roundup of 18 Delicious Easy Cocoa Powder Recipes! Whether you’re whipping up a quick dessert for unexpected guests or craving a cozy, homemade treat, these simple recipes are your ticket to sweet satisfaction. Perfect for home cooks of all levels, let’s explore how cocoa powder can transform your baking game. Ready to get started?
Chocolate Mug Cake
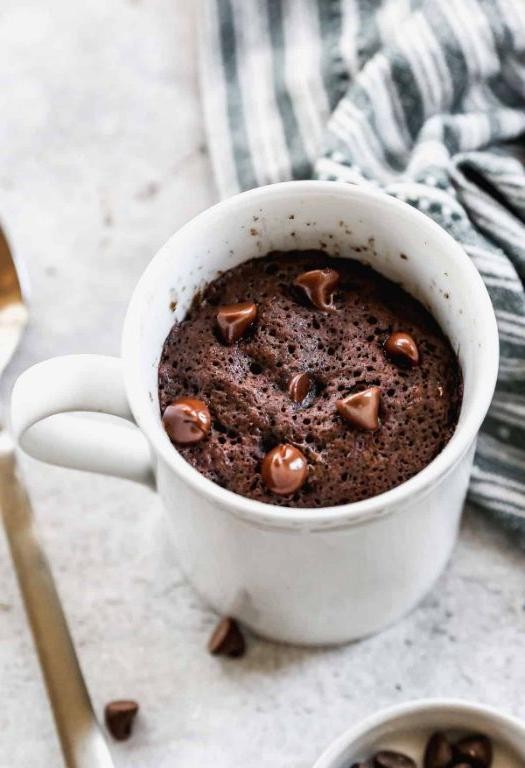
Perfect for those late-night cravings or a quick dessert fix, this chocolate mug cake is your go-to solution. You’ll love how easy and fast it is to whip up, using just a few ingredients you probably already have in your pantry.
Ingredients
- 4 tbsp all-purpose flour (I like to sift mine for extra fluffiness)
- 2 tbsp granulated sugar (because who doesn’t love a little sweetness?)
- 2 tbsp unsweetened cocoa powder (the darker, the better for that rich chocolate flavor)
- 1/4 tsp baking powder (this little guy makes your cake rise)
- 3 tbsp milk (whole milk gives the best texture, but any works)
- 1 tbsp vegetable oil (or melted butter for a richer taste)
- 1/4 tsp vanilla extract (a dash of vanilla makes everything better)
- A pinch of salt (to balance the sweetness)
Instructions
- Grab your favorite microwave-safe mug. The bigger, the better to avoid overflow.
- Add the flour, sugar, cocoa powder, baking powder, and salt to the mug. Whisk them together until well combined.
- Pour in the milk, vegetable oil, and vanilla extract. Stir until the batter is smooth with no lumps.
- Microwave on high for 1 minute and 30 seconds. Keep an eye on it after 1 minute to prevent overcooking.
- Let it cool for a minute before diving in. It’ll be hot, but the wait is worth it.
Just imagine digging into this warm, fluffy cake with its rich chocolatey goodness. Top it with a scoop of vanilla ice cream or a drizzle of caramel for an extra treat.
Homemade Hot Cocoa Mix
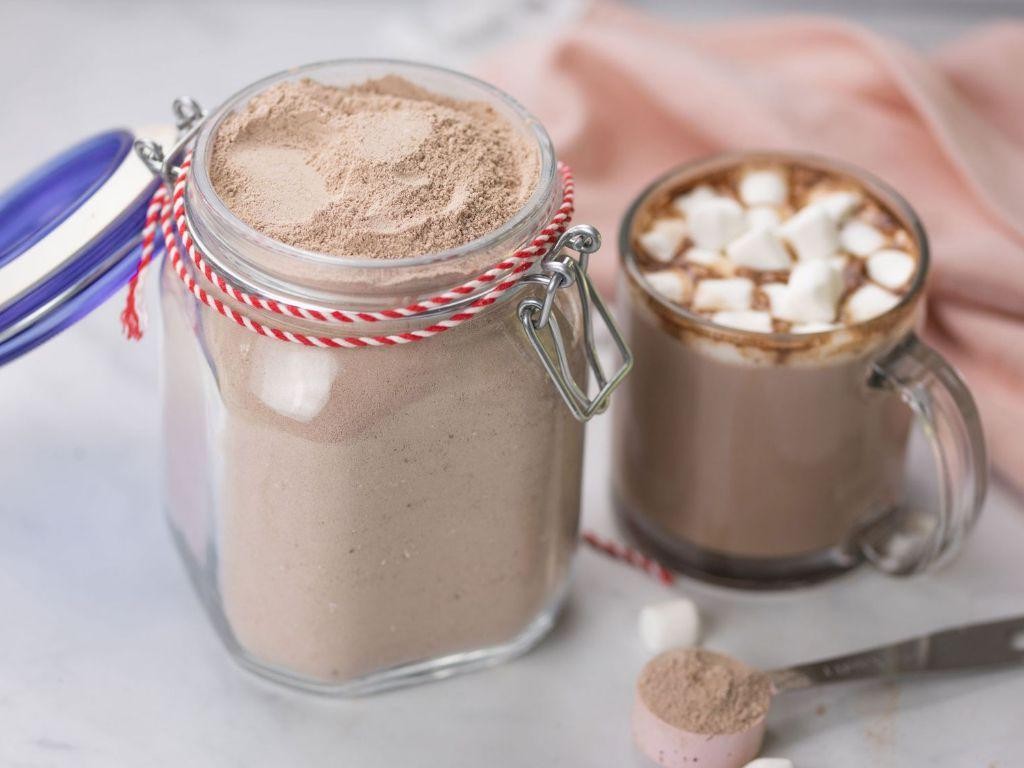
Remember those chilly evenings when all you crave is something warm and chocolatey? This homemade hot cocoa mix is your quick fix, blending rich flavors with the coziness of your favorite blanket.
Ingredients
- 1 cup powdered sugar – because granulated just doesn’t blend the same.
- 1 cup cocoa powder – go for the dark stuff for a deeper flavor.
- 2 1/2 cups powdered milk – it’s the secret to that creamy texture.
- 1 tsp salt – just a pinch to balance the sweetness.
- 2 tbsp cornstarch – for that silky smooth finish.
- 1 cup mini chocolate chips – because more chocolate is always better.
Instructions
- Grab a large bowl and whisk together the powdered sugar and cocoa powder until no lumps remain.
- Add the powdered milk and salt, mixing well to ensure everything is evenly distributed.
- Sprinkle in the cornstarch, whisking again to avoid any clumps.
- Fold in the mini chocolate chips gently, so they’re evenly spread throughout the mix.
- Store your mix in an airtight container, and it’ll be ready whenever you need a chocolate hug.
Here’s a tip: For an extra rich cup, use whole milk instead of water when you’re ready to drink. The texture is luxuriously smooth, with a chocolate intensity that’s just right. Try topping it with whipped cream and a sprinkle of cocoa powder for that café-style treat at home.
Easy Chocolate Fudge
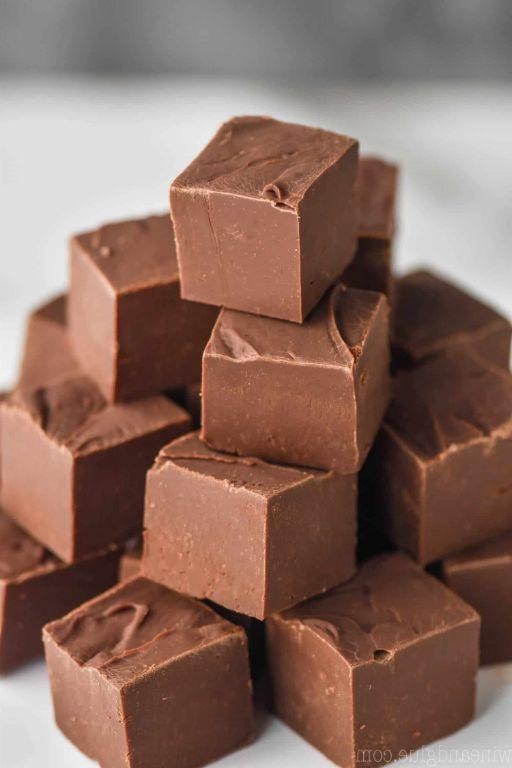
Now, who doesn’t love a piece of rich, creamy chocolate fudge? It’s the perfect sweet treat to whip up when you’re craving something chocolatey without spending hours in the kitchen.
Ingredients
- 2 cups of semi-sweet chocolate chips (I find these melt the smoothest)
- 1 can (14 oz) of sweetened condensed milk (this is the secret to creamy fudge)
- 1/2 cup of unsalted butter (room temp makes it easier to mix)
- 1 tsp of vanilla extract (pure vanilla gives the best flavor)
- A pinch of salt (just to balance the sweetness)
Instructions
- Line an 8×8 inch baking pan with parchment paper, leaving some overhang for easy removal later.
- In a medium saucepan, combine the chocolate chips, sweetened condensed milk, and butter. Melt them together over low heat, stirring constantly to avoid burning.
- Once the mixture is smooth and fully melted, remove from heat. Stir in the vanilla extract and a pinch of salt.
- Pour the fudge mixture into the prepared pan, spreading it evenly with a spatula.
- Let the fudge cool at room temperature for about 2 hours, then refrigerate for another 2 hours to set completely.
- Once set, use the parchment paper overhang to lift the fudge out of the pan. Cut into small squares with a sharp knife.
Oh, the joy of biting into a piece of this fudge! It’s incredibly smooth, with a deep chocolate flavor that’s not too sweet. Try topping it with a sprinkle of sea salt or chopped nuts for an extra special touch.
Chocolate Pancakes
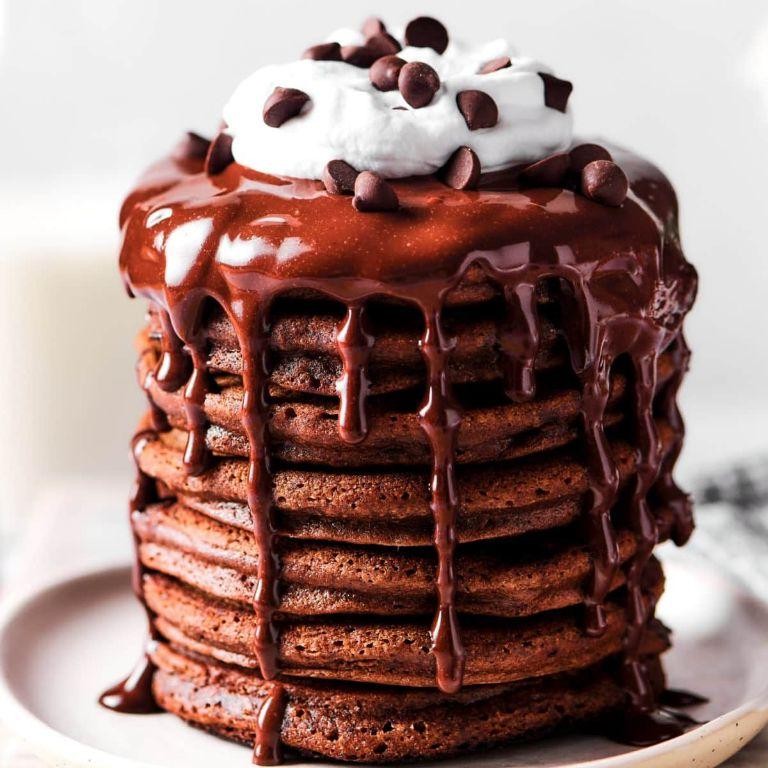
You know those mornings when you just need something a little extra to start your day right? Chocolate pancakes are my go-to for turning an ordinary breakfast into a mini celebration.
Ingredients
- 1 cup all-purpose flour (I swear by King Arthur for the fluffiest pancakes)
- 2 tbsp cocoa powder (the darker, the better for that rich chocolate flavor)
- 2 tbsp sugar (because a little sweetness never hurt anybody)
- 1 tsp baking powder (the secret to getting them nice and puffy)
- 1/2 tsp salt (to balance all that sweetness)
- 1 cup milk (whole milk makes them extra tender)
- 1 large egg (room temp eggs blend smoother, just sayin’)
- 2 tbsp melted butter (plus extra for the pan, because butter makes everything better)
- 1 tsp vanilla extract (the real deal, none of that imitation stuff)
Instructions
- In a large bowl, whisk together the flour, cocoa powder, sugar, baking powder, and salt until no lumps remain.
- In another bowl, beat the milk, egg, melted butter, and vanilla extract until well combined.
- Pour the wet ingredients into the dry ingredients and stir just until combined. A few lumps are okay—overmixing makes tough pancakes.
- Heat a non-stick skillet over medium heat and brush with a little melted butter.
- Pour 1/4 cup of batter for each pancake onto the skillet. Cook until bubbles form on the surface and the edges look set, about 2-3 minutes.
- Flip the pancakes and cook for another 1-2 minutes until they’re fluffy and cooked through.
- Serve immediately with your favorite toppings. Maple syrup and fresh berries are a classic combo, but a dollop of whipped cream takes it over the top.
Best enjoyed hot off the griddle, these chocolate pancakes are irresistibly fluffy with a deep chocolate flavor that’s not too sweet. Try stacking them high with layers of peanut butter in between for a decadent twist.
Chocolate Smoothie Bowl
Craving something sweet but want to keep it healthy? This chocolate smoothie bowl is your answer—it’s like dessert for breakfast, but packed with nutrients to kickstart your day.
Ingredients
- 1 frozen banana (trust me, it makes the bowl extra creamy)
- 1/2 cup frozen strawberries (for a slight tang that balances the chocolate)
- 2 tbsp cocoa powder (I go for the dark kind for a richer flavor)
- 1/2 cup almond milk (any milk works, but almond keeps it light)
- 1 tbsp honey (adjust if you like it sweeter)
- A handful of granola (for that crunch we all love)
- A few slices of banana and a sprinkle of chia seeds (for topping, because we eat with our eyes first)
Instructions
- In a blender, combine the frozen banana, frozen strawberries, cocoa powder, almond milk, and honey.
- Blend on high until smooth. Tip: If it’s too thick, add a splash more almond milk.
- Pour the smoothie into a bowl. Tip: Use the back of a spoon to swirl it for a prettier presentation.
- Top with granola, banana slices, and chia seeds. Tip: Add the toppings in sections for a more Instagram-worthy bowl.
Rich in flavor and creamy in texture, this bowl is a delight. Try drizzling a little extra honey on top or adding a few dark chocolate chips for an extra treat.
Chocolate Oatmeal
Zesty mornings call for something sweet, and this chocolate oatmeal is your ticket to a cozy start. You’ll love how it turns your usual breakfast into a decadent treat.
Ingredients
- 1 cup rolled oats (the old-fashioned kind for that perfect chew)
- 2 cups milk (whole milk makes it creamier, but any works)
- 2 tbsp cocoa powder (I go for the dark kind for a rich flavor)
- 1 tbsp honey (or maple syrup if you’re feeling fancy)
- A pinch of salt (trust me, it makes the chocolate pop)
- 1/2 tsp vanilla extract (the good stuff, not imitation)
- Dark chocolate chips (because more chocolate is always better)
Instructions
- Grab a medium saucepan and pour in the milk. Heat it over medium heat until it’s just about to simmer, but don’t let it boil.
- Stir in the oats, cocoa powder, honey, and salt. Keep the heat at medium and let it cook for about 5 minutes, stirring occasionally.
- Once the oatmeal starts to thicken, add the vanilla extract. Give it a good stir and cook for another 2 minutes.
- Remove the saucepan from the heat. Let it sit for a minute to thicken up even more.
- Scoop the oatmeal into bowls and sprinkle with dark chocolate chips. They’ll melt slightly from the heat, creating little pockets of joy.
Yield to the creamy texture and rich chocolate flavor that’s not too sweet. Try topping it with sliced bananas or a dollop of peanut butter for an extra treat.
Chocolate Banana Bread
Baking this chocolate banana bread feels like a warm hug on a lazy Sunday morning. You’ll love how the chocolate and banana flavors meld together, creating a moist, irresistible loaf that’s perfect with your morning coffee or as an afternoon pick-me-up.
Ingredients
- 3 ripe bananas (the spottier, the better for sweetness)
- 1/2 cup unsalted butter, melted (I like to let it cool slightly so it doesn’t cook the eggs)
- 3/4 cup granulated sugar (you can adjust this down to 1/2 cup if your bananas are super sweet)
- 1 large egg, room temperature (it blends smoother with the batter)
- 1 tsp vanilla extract (the real deal, not imitation)
- 1 1/2 cups all-purpose flour (spooned and leveled to avoid a dense loaf)
- 1/4 cup cocoa powder (I use Dutch-processed for a richer flavor)
- 1 tsp baking soda (make sure it’s fresh for the best rise)
- 1/2 tsp salt (just a pinch to balance the sweetness)
- 1 cup chocolate chips (because more chocolate is always better)
Instructions
- Preheat your oven to 350°F (175°C) and grease a 9×5 inch loaf pan. A light spray of cooking oil does the trick.
- In a large bowl, mash the bananas with a fork until smooth. A few small lumps are okay for texture.
- Stir in the melted butter, sugar, egg, and vanilla extract until well combined. Tip: Mixing by hand keeps the batter from overworking.
- Sift together the flour, cocoa powder, baking soda, and salt directly into the wet ingredients. This prevents clumps and ensures even distribution.
- Gently fold the dry ingredients into the wet until just combined. Overmixing leads to tough bread.
- Fold in the chocolate chips, saving a handful to sprinkle on top before baking for a pretty finish.
- Pour the batter into the prepared loaf pan and smooth the top. Sprinkle the reserved chocolate chips over the batter.
- Bake for 50-60 minutes, or until a toothpick inserted into the center comes out mostly clean with a few moist crumbs. Tip: Ovens vary, so start checking at 50 minutes.
- Let the bread cool in the pan for 10 minutes, then transfer to a wire rack to cool completely. This step is crucial for easy slicing.
Let this chocolate banana bread cool slightly before diving in—the wait is worth it. The crust is slightly crisp, giving way to a tender, chocolatey interior studded with melty chips. Serve it warm with a dollop of whipped cream or toast a slice the next day for an extra cozy treat.
Chocolate Chip Cookies
Now, who doesn’t love a classic chocolate chip cookie? You know, the kind that’s crispy on the edges, chewy in the middle, and packed with melty chocolate chips. Perfect for any day, really.
Ingredients
- 1 cup unsalted butter, softened (I like to leave mine out for an hour before starting)
- 3/4 cup granulated sugar (because who doesn’t love a little sweetness?)
- 3/4 cup packed brown sugar (the secret to that chewy center)
- 2 large eggs, room temperature (they mix in better this way)
- 1 tsp vanilla extract (the good stuff, please)
- 2 1/4 cups all-purpose flour (scooped and leveled for accuracy)
- 1 tsp baking soda (freshness is key here)
- 1/2 tsp salt (balances the sweetness perfectly)
- 2 cups semi-sweet chocolate chips (because more is always better)
Instructions
- Preheat your oven to 375°F (190°C). This ensures it’s just right when your dough is ready.
- In a large bowl, cream together the softened butter, granulated sugar, and brown sugar until light and fluffy. Tip: Don’t rush this step; it’s the foundation of your cookies.
- Beat in the eggs one at a time, then stir in the vanilla. Tip: Adding eggs one by one ensures they incorporate evenly.
- In another bowl, whisk together the flour, baking soda, and salt. Gradually add this to the butter mixture, mixing just until combined. Tip: Overmixing leads to tough cookies, so go easy.
- Fold in the chocolate chips. The dough will be thick and chunky—just how you want it.
- Drop rounded tablespoons of dough onto ungreased baking sheets, spacing them about 2 inches apart.
- Bake for 9 to 11 minutes, or until golden brown. Let them cool on the baking sheets for 2 minutes before transferring to wire racks.
Kind of magical how these cookies turn out, right? The edges are crisp, the centers soft and gooey, and the chocolate chips are just begging to be devoured. Try serving them warm with a glass of cold milk for the ultimate experience.
Chocolate Pudding
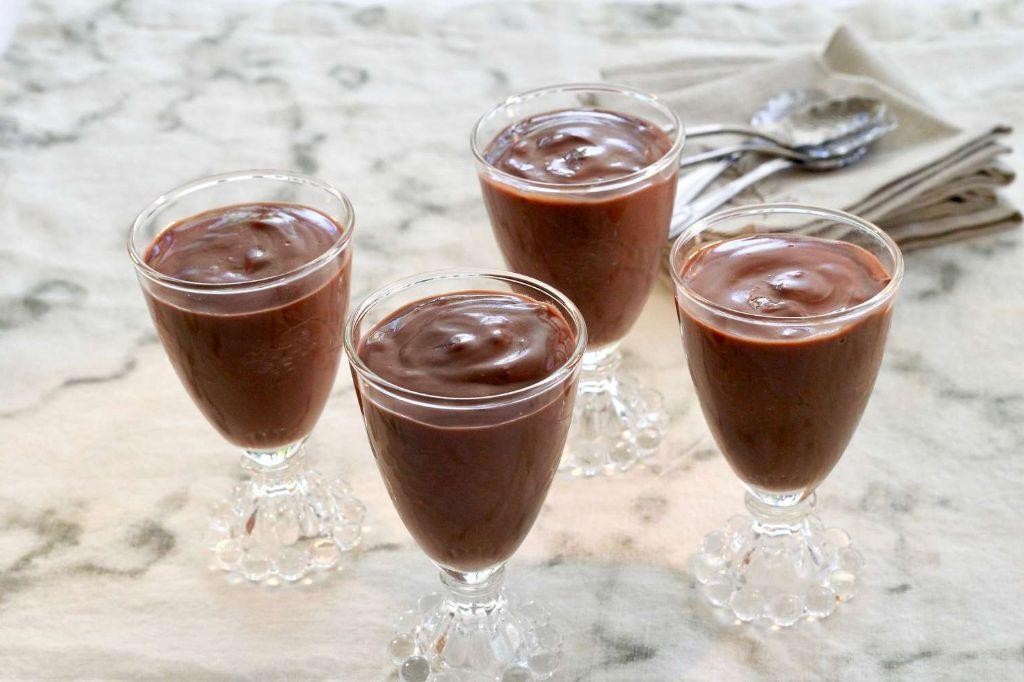
Let me tell you about the creamiest chocolate pudding you’ll ever make. It’s the kind of dessert that feels like a hug in a bowl, perfect for those days when you need a little comfort.
Ingredients
- 2 cups whole milk (the richer, the better for that velvety texture)
- 1/2 cup granulated sugar (I like to use a bit less if I’m topping it with whipped cream)
- 1/4 cup unsweetened cocoa powder (go for the good stuff—it makes all the difference)
- 3 tbsp cornstarch (this is your thickening hero)
- 1/4 tsp salt (just a pinch to balance the sweetness)
- 1 tsp vanilla extract (pure vanilla is my jam)
- 2 tbsp unsalted butter (because butter makes everything better)
Instructions
- In a medium saucepan, whisk together the sugar, cocoa powder, cornstarch, and salt until no lumps remain.
- Gradually whisk in the milk, making sure to scrape the sides to incorporate all the dry ingredients.
- Place the saucepan over medium heat and cook, stirring constantly with a wooden spoon, until the mixture thickens and starts to bubble, about 5-7 minutes. Tip: Keep stirring to avoid any lumps forming.
- Once bubbling, cook for another 2 minutes, then remove from heat.
- Stir in the vanilla extract and butter until the butter is completely melted and the pudding is smooth. Tip: The butter adds a lovely shine and richness to the pudding.
- Pour the pudding into serving dishes and cover with plastic wrap directly on the surface to prevent a skin from forming. Tip: Pressing the plastic wrap onto the pudding is a game-changer for texture.
- Chill in the refrigerator for at least 2 hours, or until set.
Dig into this pudding and you’ll find it’s luxuriously smooth with a deep chocolate flavor that’s not too sweet. Serve it with a dollop of whipped cream or a sprinkle of sea salt for an extra special touch.
Chocolate Covered Strawberries

Craving something sweet but want to keep it simple? Chocolate covered strawberries are your go-to. They’re easy, elegant, and always a hit.
Ingredients
- 1 lb fresh strawberries (look for the reddest, juiciest ones you can find)
- 8 oz semi-sweet chocolate chips (I swear by Ghirardelli for that perfect melt)
- 1 tbsp coconut oil (this little secret makes the chocolate extra shiny)
Instructions
- Wash the strawberries gently under cold water and pat them dry thoroughly with a paper towel. Any water will make the chocolate seize.
- In a microwave-safe bowl, combine the chocolate chips and coconut oil. Microwave in 30-second bursts, stirring in between, until smooth. Tip: Don’t overheat, or the chocolate will burn.
- Hold each strawberry by the stem and dip it into the melted chocolate, swirling to coat evenly. Let the excess drip off.
- Place the dipped strawberries on a parchment-lined baking sheet. Tip: For a fancy touch, drizzle with white chocolate or sprinkle with nuts before the chocolate sets.
- Chill in the refrigerator for at least 30 minutes, or until the chocolate is firm. Tip: If you’re in a hurry, the freezer can speed things up, but don’t leave them in too long or they’ll get icy.
Ready to indulge? The combination of juicy strawberries and rich chocolate is irresistible. Try serving them on a platter with a dusting of powdered sugar for an extra special touch.
Chocolate Energy Balls
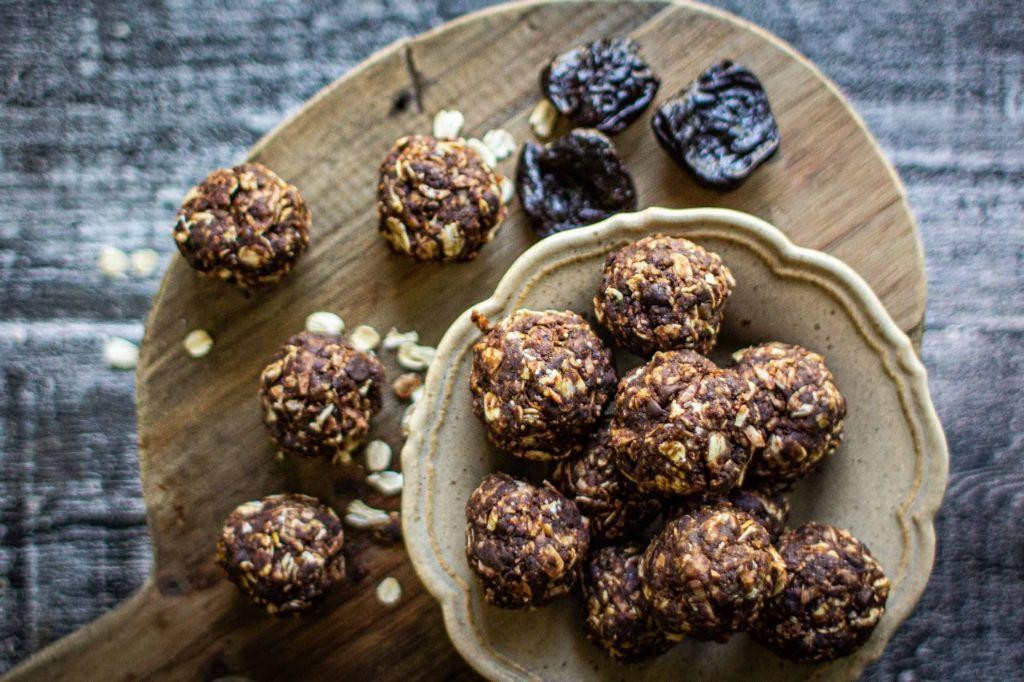
Ready to whip up a snack that’s as easy to make as it is delicious? These chocolate energy balls are your go-to for a quick energy boost, packed with flavors you’ll love.
Ingredients
- 1 cup rolled oats (the heartier, the better for texture)
- 1/2 cup peanut butter (creamy or crunchy, your call)
- 1/3 cup honey (local if you can, for that extra sweetness)
- 1/4 cup cocoa powder (I go for dark cocoa for a richer taste)
- 1/4 cup mini chocolate chips (because more chocolate is always better)
- 1 tsp vanilla extract (pure vanilla makes all the difference)
- A pinch of salt (just to balance the sweetness)
Instructions
- In a large bowl, mix the rolled oats, peanut butter, honey, cocoa powder, mini chocolate chips, vanilla extract, and salt until well combined. Tip: If the mixture feels too dry, add a bit more honey or peanut butter to help it stick together.
- Roll the mixture into 1-inch balls with your hands. Tip: Wetting your hands slightly can prevent the mixture from sticking too much.
- Place the balls on a baking sheet lined with parchment paper and chill in the refrigerator for at least 30 minutes to firm up. Tip: For a quicker set, you can pop them in the freezer for about 15 minutes.
Out of the fridge, these chocolate energy balls are perfectly chewy with a rich chocolatey flavor that’s not too sweet. Try rolling them in coconut flakes or crushed nuts before chilling for an extra texture twist.
Chocolate Avocado Mousse
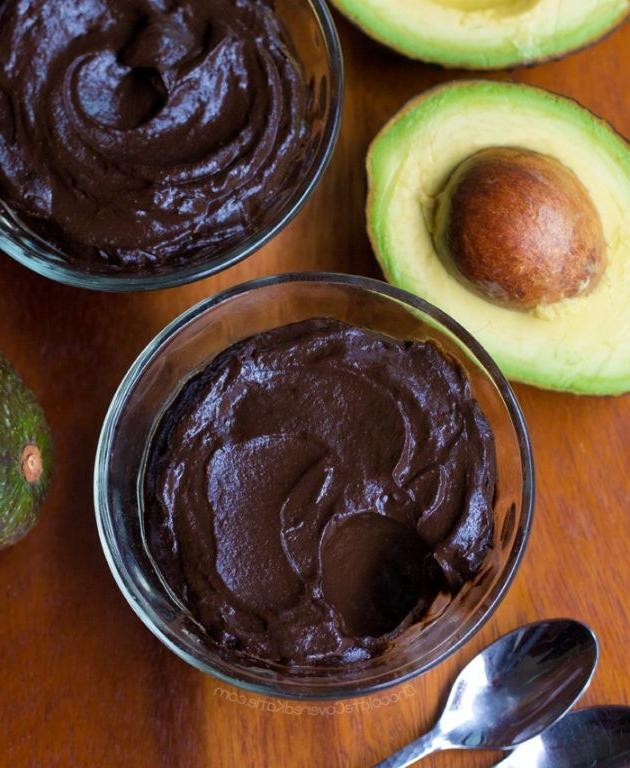
Who knew that blending avocados could lead to such a decadent dessert? This Chocolate Avocado Mousse is creamy, rich, and surprisingly healthy. You’ll love how easy it is to whip up.
Ingredients
- 2 ripe avocados – the softer, the better for that smooth texture.
- 1/4 cup cocoa powder – I like using dark cocoa for an extra chocolatey punch.
- 1/4 cup maple syrup – pure maple syrup adds the perfect sweetness.
- 1 tsp vanilla extract – a splash of vanilla makes everything better.
- A pinch of salt – just a tiny bit to balance the flavors.
- 1/2 cup coconut milk – full-fat for that luxurious creaminess.
Instructions
- Scoop the avocados into a blender. Make sure they’re ripe for the creamiest mousse.
- Add the cocoa powder, maple syrup, vanilla extract, and salt to the blender.
- Pour in the coconut milk. This is where the magic happens, blending everything into a smooth consistency.
- Blend on high for about 1 minute, or until completely smooth. Tip: Stop and scrape down the sides if needed.
- Taste and adjust sweetness if necessary, but trust me, it’s usually perfect as is.
- Chill in the fridge for at least 30 minutes before serving. Tip: This helps the flavors meld together beautifully.
- Serve in small cups or glasses. Tip: Garnish with fresh berries or a sprinkle of cocoa powder for an Instagram-worthy finish.
Out of this world creamy and chocolatey, this mousse is a dream come true for avocado and chocolate lovers alike. Try it with a dollop of whipped cream on top for an extra treat.
Chocolate Rice Krispie Treats
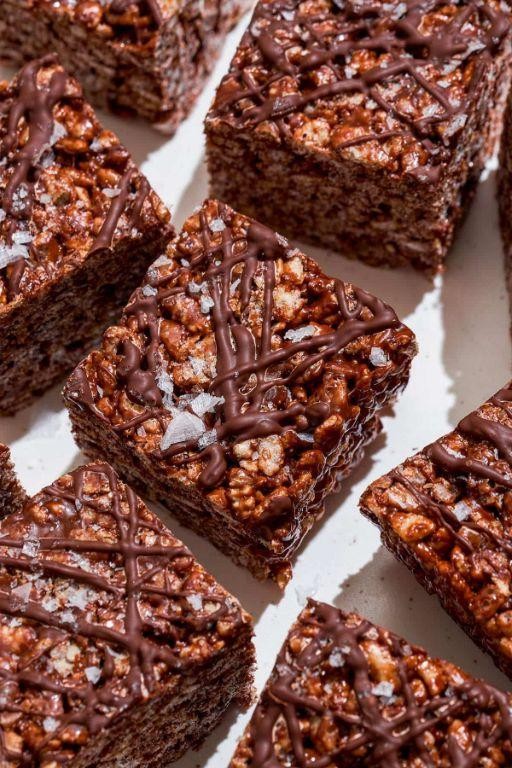
Sometimes, you just need a quick, no-bake treat that hits the sweet spot without any fuss. Chocolate Rice Krispie Treats are your go-to for those moments, combining the classic snap of cereal with a rich chocolatey twist.
Ingredients
- 6 cups Rice Krispies cereal (the fresher, the better for that perfect crunch)
- 10 oz mini marshmallows (I find they melt faster than the big ones)
- 3 tbsp unsalted butter (go for the good stuff, it makes a difference)
- 1/2 cup semi-sweet chocolate chips (because life’s too short for anything less)
- 1 tsp vanilla extract (the real deal, not the imitation stuff)
Instructions
- Grease a 9×13 inch baking dish with butter or cooking spray. This ensures your treats won’t stick, making cleanup a breeze.
- In a large pot, melt the butter over low heat. Keep it low to avoid browning the butter, which can alter the flavor.
- Add the marshmallows to the melted butter, stirring constantly until completely melted. This should take about 3-4 minutes. Tip: A silicone spatula works wonders here to prevent sticking.
- Remove the pot from heat and quickly stir in the vanilla extract and chocolate chips until the chocolate is fully melted and the mixture is smooth.
- Immediately fold in the Rice Krispies cereal, ensuring each piece is evenly coated with the marshmallow-chocolate mixture. Work fast before it starts to set.
- Press the mixture firmly into the prepared baking dish using a piece of parchment paper or a greased spatula. Tip: Wetting your hands slightly can help prevent sticking when pressing.
- Let the treats cool at room temperature for at least 1 hour before cutting into squares. Patience is key here for clean cuts.
Velvety chocolate meets the nostalgic crunch of Rice Krispies in these irresistible treats. For an extra indulgent twist, drizzle melted chocolate on top or sprinkle with sea salt before serving.
Chocolate Zucchini Muffins

These chocolate zucchini muffins are the perfect way to sneak some veggies into your dessert. They’re moist, chocolatey, and just sweet enough to satisfy your cravings without feeling guilty.
Ingredients
- 1 1/2 cups all-purpose flour (I like to use unbleached for a lighter texture)
- 1/2 cup cocoa powder (go for the good stuff—it makes a difference)
- 1 tsp baking soda (make sure it’s fresh for the best rise)
- 1/2 tsp salt (I always use sea salt for a cleaner taste)
- 1/2 cup granulated sugar (you can adjust this to your liking)
- 1/2 cup brown sugar (packed, for that deep molasses flavor)
- 1/2 cup vegetable oil (or melted coconut oil for a tropical twist)
- 2 large eggs (room temp eggs blend better, in my experience)
- 1 tsp vanilla extract (pure vanilla is my go-to for the best flavor)
- 1 1/2 cups grated zucchini (squeeze out the excess water to keep the muffins from getting soggy)
- 1/2 cup chocolate chips (because more chocolate is always better)
Instructions
- Preheat your oven to 350°F and line a muffin tin with paper liners or grease it well.
- In a large bowl, whisk together the flour, cocoa powder, baking soda, and salt until well combined.
- In another bowl, mix the granulated sugar, brown sugar, oil, eggs, and vanilla until smooth.
- Fold the wet ingredients into the dry ingredients until just combined—don’t overmix!
- Gently stir in the grated zucchini and chocolate chips until evenly distributed.
- Divide the batter evenly among the muffin cups, filling each about 3/4 full.
- Bake for 20-25 minutes, or until a toothpick inserted into the center comes out clean.
- Let the muffins cool in the tin for 5 minutes, then transfer to a wire rack to cool completely.
Warm these muffins up and serve with a dollop of whipped cream for an extra indulgent treat. The zucchini keeps them incredibly moist, while the chocolate chips add little pockets of melty goodness in every bite.
Chocolate Peanut Butter Cups

So, you’re craving something sweet, salty, and downright irresistible? Chocolate peanut butter cups are your answer. They’re easy to make, no-bake, and totally customizable to your taste.
Ingredients
- 1 cup creamy peanut butter (I swear by the natural kind for that perfect drizzle)
- 1/2 cup powdered sugar (sift it if you’re feeling fancy)
- 2 cups semi-sweet chocolate chips (because life’s too short for milk chocolate)
- 1 tbsp coconut oil (this little secret makes the chocolate melt like a dream)
Instructions
- Line a mini muffin tin with paper liners. Trust me, skipping this is a sticky mistake.
- In a bowl, mix peanut butter and powdered sugar until smooth. If it’s too thick, a splash of vanilla extract loosens it up nicely.
- Melt chocolate chips and coconut oil in 30-second bursts in the microwave, stirring in between. Don’t walk away—chocolate burns faster than you’d think.
- Spoon a small amount of melted chocolate into each liner, just enough to cover the bottom. Pop it in the freezer for 5 minutes to set.
- Roll peanut butter mixture into small balls, flatten slightly, and place on the hardened chocolate. Leave room for the top layer!
- Cover each peanut butter disc with more melted chocolate, smoothing the top with the back of a spoon.
- Freeze for at least 30 minutes, or until completely set. Patience is key here.
Perfectly creamy peanut butter encased in a crisp chocolate shell—these bites are a dream. Try sprinkling sea salt on top before the chocolate sets for an extra kick.
Chocolate Granola
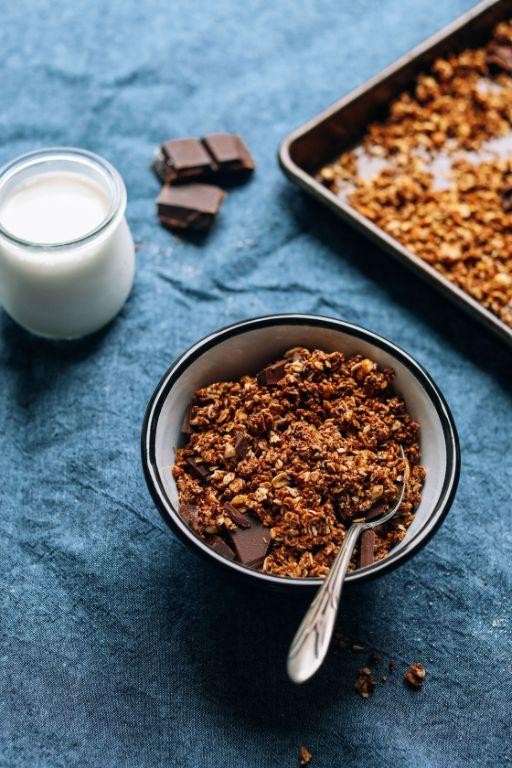
Mmm, who doesn’t love a crunchy, chocolatey start to their day? This chocolate granola is your ticket to a delicious breakfast or snack that’s as easy to make as it is to devour.
Ingredients
- 3 cups old-fashioned oats (the heartier, the better for that perfect crunch)
- 1/2 cup cocoa powder (I go for the dark kind for a richer flavor)
- 1/2 cup honey (local if you can find it, for that extra touch of sweetness)
- 1/4 cup coconut oil, melted (it gives the granola a lovely subtle flavor)
- 1 tsp vanilla extract (the real deal, not imitation)
- 1/2 cup chopped almonds (because every bite needs a bit of crunch)
- A pinch of salt (just to balance all that sweetness)
Instructions
- Preheat your oven to 300°F (150°C) and line a baking sheet with parchment paper.
- In a large bowl, mix the oats, cocoa powder, and chopped almonds together.
- In a smaller bowl, whisk together the honey, melted coconut oil, vanilla extract, and a pinch of salt until smooth.
- Pour the wet ingredients over the dry ingredients and stir until everything is evenly coated. Tip: Use a spatula to scrape the sides of the bowl to ensure no dry spots remain.
- Spread the mixture onto the prepared baking sheet in an even layer. Tip: Pressing it down slightly will help create those coveted clusters.
- Bake for 20 minutes, then stir the granola gently to ensure even baking. Tip: Keep an eye on it after stirring to prevent the edges from burning.
- Return to the oven for another 10-15 minutes, or until the granola is dry to the touch and smells heavenly.
- Let the granola cool completely on the baking sheet—it’ll crisp up as it cools.
Look at that! You’ve just made a batch of chocolate granola that’s packed with deep cocoa flavors and satisfying crunch. Serve it over yogurt, with milk, or just by the handful for a quick energy boost.
Chocolate Ice Cream
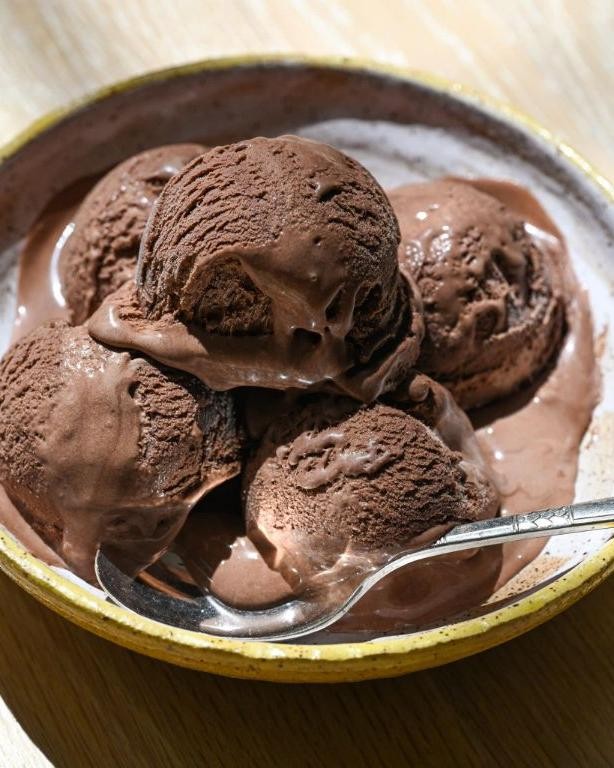
Who doesn’t love a creamy, dreamy bowl of chocolate ice cream on a warm day? It’s the perfect treat to cool down and satisfy your sweet tooth.
Ingredients
- 2 cups heavy cream (the richer, the better for that creamy texture)
- 1 cup whole milk (I swear by whole milk for the best flavor)
- 3/4 cup granulated sugar (adjust if you like it less sweet)
- 2/3 cup unsweetened cocoa powder (go for the good stuff, it makes a difference)
- 1 tsp vanilla extract (pure vanilla adds a lovely depth)
- 1/4 tsp salt (just a pinch to balance the sweetness)
Instructions
- In a medium saucepan, whisk together the milk, sugar, cocoa powder, and salt over medium heat until the sugar dissolves, about 5 minutes. Tip: Keep the heat medium to avoid scorching the milk.
- Remove the saucepan from the heat and stir in the heavy cream and vanilla extract. Tip: Letting the mixture cool slightly before adding the vanilla preserves its flavor.
- Pour the mixture into a bowl, cover, and refrigerate for at least 4 hours, or overnight. Tip: Chilling the mixture thoroughly ensures your ice cream will be super creamy.
- Pour the chilled mixture into an ice cream maker and churn according to the manufacturer’s instructions, usually about 20-25 minutes.
- Transfer the churned ice cream to a freezer-safe container and freeze for at least 2 hours before serving. This step is crucial for that perfect scoopable texture.
Ultra-creamy with a deep chocolate flavor, this ice cream is a dream. Try serving it with a drizzle of hot fudge or a sprinkle of sea salt for an extra special treat.
Chocolate Crepes
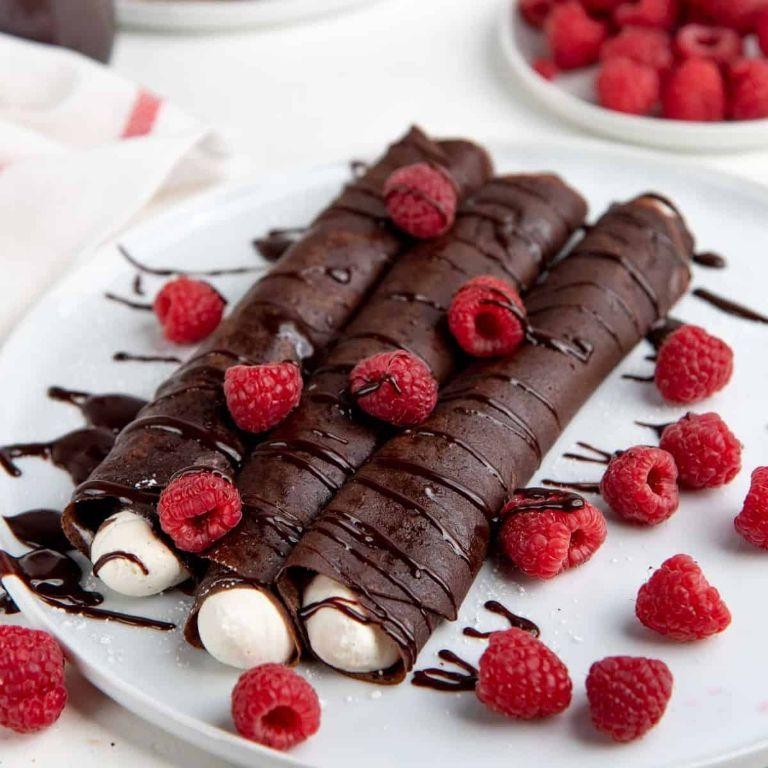
Mmm, who doesn’t love starting their day with something sweet? These chocolate crepes are your ticket to a delicious morning or a fancy dessert that’s surprisingly easy to whip up.
Ingredients
- 1 cup all-purpose flour (I like to sift mine for extra fluffiness)
- 2 tbsp cocoa powder (the darker, the better for that rich chocolate flavor)
- 2 tbsp sugar (adjust if you like it less sweet)
- 1/4 tsp salt (just a pinch to balance the sweetness)
- 1 1/2 cups milk (whole milk makes them extra creamy)
- 2 large eggs (room temp eggs blend smoother)
- 2 tbsp melted butter (plus a bit more for the pan)
- 1 tsp vanilla extract (the real stuff makes a difference)
Instructions
- In a large bowl, whisk together the flour, cocoa powder, sugar, and salt until well combined.
- Add the milk, eggs, melted butter, and vanilla extract to the dry ingredients. Whisk until the batter is smooth and free of lumps. Let it rest for 10 minutes; this helps the flour absorb the liquid.
- Heat a non-stick skillet over medium heat (about 350°F) and lightly butter it. Pour 1/4 cup of batter into the center of the skillet, tilting it to spread the batter thinly.
- Cook for about 1-2 minutes until the edges start to lift. Flip the crepe carefully and cook for another 30 seconds on the other side.
- Repeat with the remaining batter, buttering the skillet as needed. Stack the cooked crepes on a plate to keep them warm.
Light, with a delicate chocolate flavor, these crepes are perfect rolled up with fresh berries or drizzled with caramel sauce for an extra indulgent treat.
Conclusion
We hope this roundup of 18 delicious and easy cocoa powder recipes inspires your next baking adventure! From decadent desserts to cozy drinks, there’s something for every sweet tooth. Don’t forget to try your favorites, share your thoughts in the comments, and pin this article on Pinterest for later. Happy baking!