Thanksgiving is all about gratitude, gathering, and of course, great food! But who says the feast can’t be both delicious and plant-based? Whether you’re hosting a vegan guest or simply looking to add more greens to your table, our roundup of 20 Delicious Vegan Thanksgiving Recipes has something for everyone. From savory mains to decadent desserts, get ready to fall in love with these cruelty-free classics. Let’s dig in!
Vegan Mushroom Wellington
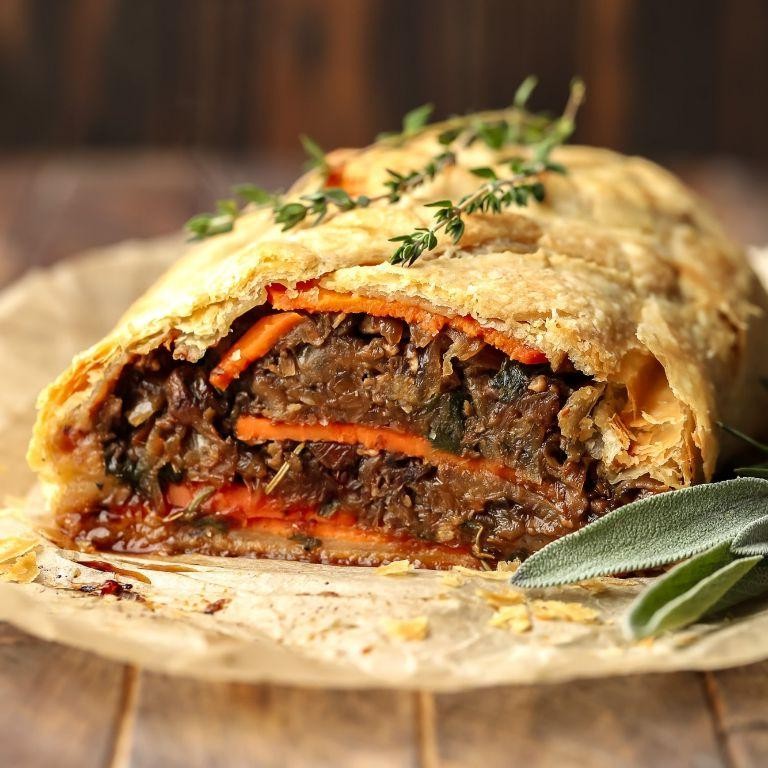
Sometimes, the most comforting dishes are those that remind us of the earth’s generosity, like this Vegan Mushroom Wellington, a hearty centerpiece that’s as nourishing as it is elegant.
Ingredients
- 2 cups finely chopped mushrooms (cremini or button work well)
- 1 tbsp olive oil (or any neutral oil)
- 1/2 cup diced onions
- 2 cloves garlic, minced
- 1 cup cooked lentils (green or brown, for texture)
- 1 tbsp soy sauce (adjust to taste)
- 1 tsp thyme (dried or fresh)
- 1 sheet puff pastry (thawed if frozen)
- 1 tbsp plant-based milk (for brushing)
Instructions
- Preheat your oven to 400°F (200°C) to ensure it’s ready for baking.
- Heat olive oil in a pan over medium heat, then add onions and garlic, sautéing until translucent, about 5 minutes.
- Add the chopped mushrooms to the pan, cooking until they release their moisture and become tender, roughly 8 minutes.
- Stir in the cooked lentils, soy sauce, and thyme, mixing well to combine all the flavors. Cook for another 2 minutes, then remove from heat to cool slightly.
- Roll out the puff pastry on a lightly floured surface to a rectangle large enough to encase the mushroom mixture.
- Spread the cooled mushroom mixture evenly over one half of the pastry, leaving a border around the edges.
- Fold the other half of the pastry over the filling, sealing the edges by pressing down with a fork or your fingers.
- Brush the top of the pastry with plant-based milk for a golden finish, then make a few small slits on top to allow steam to escape.
- Bake in the preheated oven for 25-30 minutes, or until the pastry is puffed and golden brown.
Unveiling the Wellington reveals a flaky crust giving way to a savory, umami-rich filling, with the lentils adding a delightful bite. Serve it sliced, alongside a crisp green salad or roasted vegetables, for a meal that feels both indulgent and wholesome.
Sweet Potato and Black Bean Enchiladas
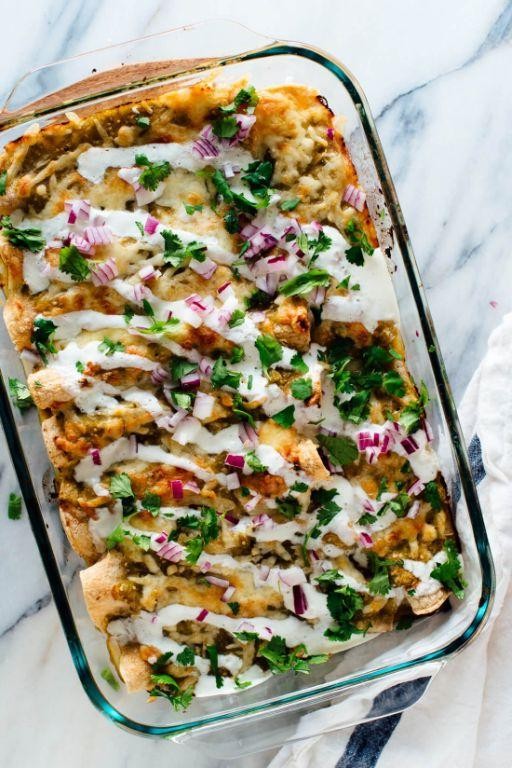
Vividly remembering the first time I made these enchiladas, the warmth of the kitchen and the aromatic blend of spices filling the air, I knew this dish was something special. It’s a comforting embrace of sweet and savory, wrapped in a soft tortilla, perfect for those evenings when you crave something hearty yet wholesome.
Ingredients
- 2 cups mashed sweet potatoes (about 2 medium, peeled and boiled until soft)
- 1 can (15 oz) black beans, drained and rinsed (for extra flavor, sauté with onions and garlic)
- 8 flour tortillas (8-inch, for a gluten-free option, use corn tortillas)
- 2 cups enchilada sauce (homemade or store-bought, adjust spice level to preference)
- 1 cup shredded cheese (cheddar or Monterey Jack, for melting)
- 1 tbsp olive oil (or any neutral oil, for greasing the baking dish)
- 1 tsp ground cumin (toasted for deeper flavor)
- 1/2 tsp smoked paprika (for a subtle smokiness)
- Salt to taste (start with 1/2 tsp and adjust)
Instructions
- Preheat your oven to 375°F (190°C) and lightly grease a 9×13 inch baking dish with olive oil.
- In a large bowl, mix the mashed sweet potatoes, black beans, cumin, smoked paprika, and salt until well combined.
- Warm the tortillas for about 30 seconds in the microwave or on a dry skillet to make them pliable.
- Spread 1/2 cup of enchilada sauce evenly over the bottom of the prepared baking dish.
- Divide the sweet potato and black bean mixture evenly among the tortillas, rolling each tightly and placing seam side down in the dish.
- Pour the remaining enchilada sauce over the rolled tortillas, ensuring they’re fully covered to prevent drying out.
- Sprinkle the shredded cheese evenly over the top.
- Bake for 20-25 minutes, or until the cheese is bubbly and slightly golden.
- Let the enchiladas sit for 5 minutes before serving to allow the filling to set.
How the melted cheese stretches with each bite, revealing the creamy sweet potato and hearty black beans, is a delight. Serve these enchiladas with a side of crisp salad or avocado slices for a refreshing contrast.
Lentil Loaf with Maple Glaze
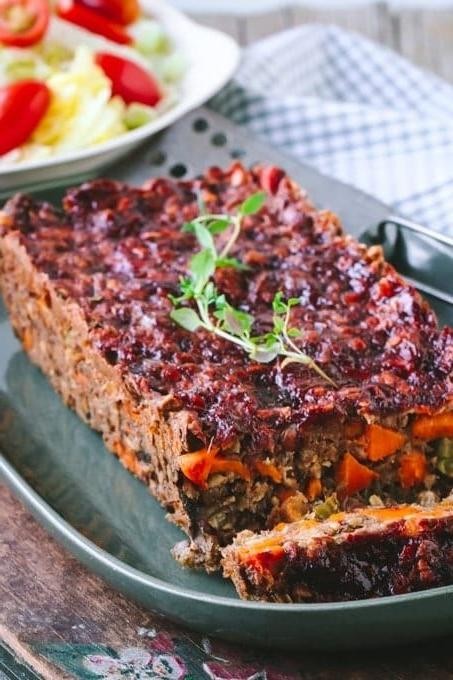
Beneath the quiet hum of the kitchen, the lentil loaf emerges as a humble yet hearty centerpiece, its maple glaze catching the light like morning dew. This dish, a tapestry of textures and flavors, invites a moment of pause, a return to simplicity.
Ingredients
- 1 cup dried green lentils, rinsed (for a firmer texture)
- 2 cups vegetable broth (or water for a lighter taste)
- 1 tbsp olive oil (or any neutral oil)
- 1 small onion, finely diced (about 1/2 cup)
- 2 cloves garlic, minced (adjust to taste)
- 1 cup rolled oats (for binding)
- 1/4 cup maple syrup (plus 2 tbsp for glaze)
- 1 tbsp soy sauce (or tamari for gluten-free)
- 1 tsp smoked paprika (for depth)
- 1/2 tsp salt (adjust to taste)
- 1/4 tsp black pepper (freshly ground preferred)
Instructions
- Preheat oven to 375°F (190°C) and lightly grease a loaf pan with olive oil.
- In a medium saucepan, combine lentils and vegetable broth. Bring to a boil, then reduce heat to low, cover, and simmer for 25 minutes, or until lentils are tender and liquid is absorbed.
- While lentils cook, heat olive oil in a skillet over medium heat. Add onion and garlic, sautéing until soft and translucent, about 5 minutes.
- In a large bowl, mix cooked lentils, sautéed onions and garlic, rolled oats, 1/4 cup maple syrup, soy sauce, smoked paprika, salt, and pepper until well combined.
- Press the mixture firmly into the prepared loaf pan, smoothing the top with a spatula.
- Bake for 30 minutes. Then, brush the top with remaining 2 tbsp maple syrup and bake for an additional 10 minutes, until the glaze is sticky and the edges are crisp.
- Let the loaf rest in the pan for 10 minutes before slicing to allow it to set.
Zesty and satisfying, the lentil loaf offers a delightful contrast between its crispy exterior and moist, flavorful interior. Serve it warm, alongside a crisp green salad or roasted vegetables, for a meal that feels both nourishing and indulgent.
Roasted Brussels Sprouts with Balsamic Glaze
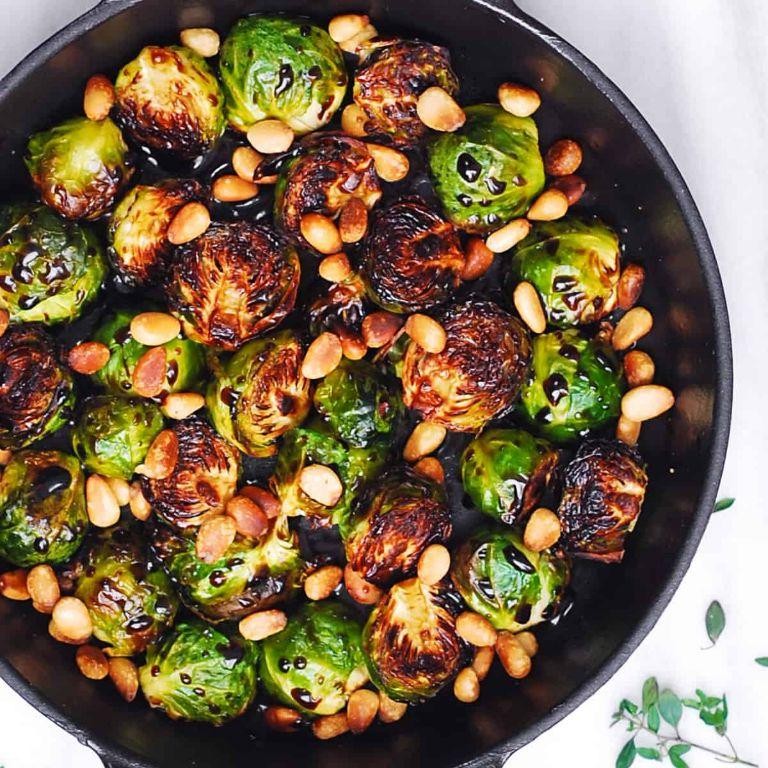
Gently, the oven hums to life, a quiet prelude to the transformation of simple Brussels sprouts into a dish that whispers of caramelized edges and a tangy-sweet glaze. This recipe, a humble ode to the underrated vegetable, invites you to slow down and savor the process as much as the result.
Ingredients
- 1 lb Brussels sprouts, trimmed and halved (look for uniform size for even cooking)
- 2 tbsp olive oil (or any neutral oil)
- 1/2 tsp salt (adjust to taste)
- 1/4 tsp black pepper (freshly ground preferred)
- 2 tbsp balsamic vinegar (a good quality one makes a difference)
- 1 tbsp honey (or maple syrup for a vegan option)
Instructions
- Preheat your oven to 400°F (200°C), ensuring the rack is in the middle position for even heat distribution.
- In a large bowl, toss the Brussels sprouts with olive oil, salt, and pepper until evenly coated. Tip: Don’t overcrowd the bowl to ensure each piece gets properly seasoned.
- Spread the sprouts in a single layer on a baking sheet, cut side down. This promotes better caramelization. Tip: Use parchment paper for easier cleanup.
- Roast for 20-25 minutes, until the sprouts are tender and the edges are golden brown. Tip: Halfway through, give the pan a gentle shake to rotate the sprouts for even browning.
- While the sprouts roast, in a small saucepan over medium heat, combine balsamic vinegar and honey. Simmer for 3-5 minutes, stirring occasionally, until the mixture thickens slightly to a glaze consistency.
- Once the sprouts are done, drizzle the balsamic glaze over them and toss gently to coat. Serve immediately.
Caramelized to perfection, these Brussels sprouts offer a delightful contrast between their crispy exterior and tender heart, with the balsamic glaze adding a bright, sweet note. Consider serving them atop a creamy polenta or alongside a robust roast for a meal that feels both nourishing and indulgent.
Butternut Squash and Sage Risotto
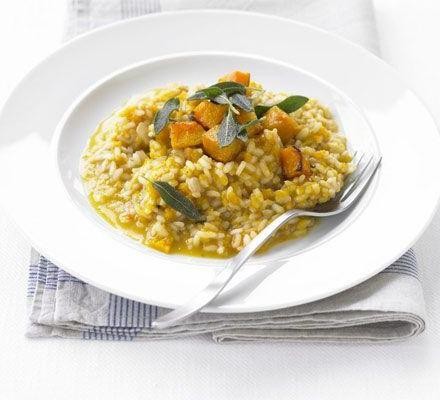
There’s something deeply comforting about the process of making risotto, a dish that demands patience and rewards it with creamy, soul-warming goodness. Today, let’s embrace the gentle stir of butternut squash and sage risotto, a dish that feels like autumn in a bowl, no matter the season.
Ingredients
- 1 tbsp olive oil (or any neutral oil)
- 1 small butternut squash, peeled and diced into 1/2-inch cubes (about 2 cups)
- 1 tbsp unsalted butter
- 1 small onion, finely chopped
- 2 cloves garlic, minced
- 1 cup Arborio rice
- 1/2 cup dry white wine (optional, can substitute with more broth)
- 4 cups vegetable broth, kept warm on the stove
- 1/4 cup grated Parmesan cheese, plus more for serving
- 1 tbsp fresh sage, finely chopped
- Salt and freshly ground black pepper, adjust to taste
Instructions
- Heat olive oil in a large, deep skillet over medium heat. Add butternut squash and cook until slightly softened, about 5 minutes. Remove from skillet and set aside.
- In the same skillet, melt butter over medium heat. Add onion and garlic, sautéing until translucent, about 3 minutes.
- Stir in Arborio rice, coating it with the butter and onion mixture, until the edges of the rice become slightly translucent, about 2 minutes.
- Pour in white wine, stirring constantly until the liquid is fully absorbed.
- Begin adding warm vegetable broth, one ladle at a time, stirring frequently. Wait until each addition is nearly absorbed before adding the next. This process should take about 18-20 minutes.
- When the rice is al dente and the mixture is creamy, stir in the cooked butternut squash, Parmesan cheese, and sage. Season with salt and pepper to taste.
- Remove from heat and let sit for 2 minutes before serving.
Finished with a sprinkle of extra Parmesan, this risotto boasts a velvety texture with sweet, nutty notes from the squash, balanced by the earthy aroma of sage. For an extra touch of elegance, serve it in hollowed-out roasted butternut squash halves.
Vegan Green Bean Casserole

Wandering through the quiet of the kitchen, the thought of a warm, comforting dish comes to mind, one that wraps around you like a soft blanket on a chilly evening. Vegan Green Bean Casserole, with its creamy texture and earthy flavors, is just that—a humble yet deeply satisfying dish that feels like home.
Ingredients
- 1 lb fresh green beans, trimmed and halved (or frozen for convenience)
- 1 cup raw cashews, soaked for at least 4 hours (for creaminess)
- 1 cup vegetable broth (low sodium preferred)
- 1 tbsp olive oil (or any neutral oil)
- 1 small onion, finely diced (about 1/2 cup)
- 2 cloves garlic, minced (adjust to taste)
- 1/2 tsp salt (adjust to taste)
- 1/4 tsp black pepper (freshly ground for best flavor)
- 1 cup crispy fried onions (for topping, gluten-free if needed)
Instructions
- Preheat your oven to 375°F (190°C) to ensure it’s ready for baking.
- Blend the soaked cashews with vegetable broth until smooth, creating a rich, creamy base for the casserole.
- Heat olive oil in a large skillet over medium heat, then sauté the onion until translucent, about 5 minutes, stirring occasionally to prevent burning.
- Add the minced garlic to the skillet, cooking for another minute until fragrant, being careful not to let it brown.
- Stir in the green beans, salt, and pepper, coating them evenly with the onion and garlic mixture, then remove from heat.
- Combine the green bean mixture with the cashew cream in a baking dish, spreading it out evenly.
- Bake uncovered for 25 minutes, or until the casserole is bubbly and the green beans are tender.
- Sprinkle the crispy fried onions over the top and bake for an additional 5 minutes to crisp them up.
Resulting in a dish where the creamy cashew sauce clings to each green bean, offering a contrast to the crunchy onion topping. Serve it alongside roasted potatoes or over a bed of quinoa for a hearty meal that celebrates simplicity and flavor.
Stuffed Acorn Squash with Quinoa and Cranberries
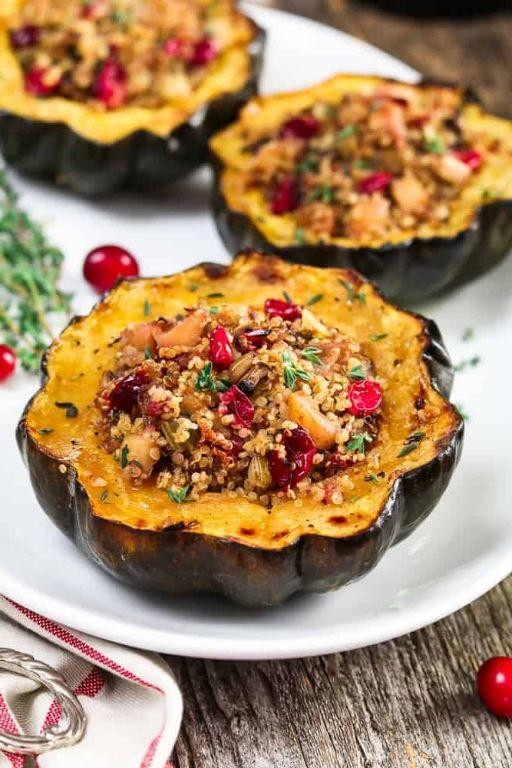
Moments like these, when the air carries a hint of autumn, call for dishes that warm the soul without haste. Stuffed acorn squash, with its hearty quinoa and sweet cranberries, is a gentle embrace of flavors and textures, perfect for savoring slowly.
Ingredients
- 2 medium acorn squashes (look for firm, unblemished skins)
- 1 cup quinoa (rinsed well to remove bitterness)
- 2 cups vegetable broth (or water for a lighter taste)
- 1/2 cup dried cranberries (soaked in warm water for 10 minutes to plump)
- 1 tbsp olive oil (or any neutral oil)
- 1/2 tsp salt (adjust to taste)
- 1/4 tsp black pepper (freshly ground preferred)
- 1/4 cup chopped pecans (toasted for extra crunch)
- 1 tbsp maple syrup (optional, for a touch of sweetness)
Instructions
- Preheat your oven to 375°F (190°C) and line a baking sheet with parchment paper.
- Cut each acorn squash in half horizontally and scoop out the seeds with a spoon.
- Brush the cut sides of the squash with olive oil and place them cut-side down on the baking sheet. Roast for 25 minutes until the flesh is tender when pierced with a fork.
- While the squash roasts, combine quinoa and vegetable broth in a saucepan. Bring to a boil, then reduce heat to low, cover, and simmer for 15 minutes until the quinoa is fluffy and the liquid is absorbed.
- Drain the cranberries and fold them into the cooked quinoa along with the pecans, salt, and pepper. For a sweeter note, drizzle in maple syrup.
- Flip the roasted squash halves cut-side up and divide the quinoa mixture among them, packing it gently.
- Return to the oven for 10 minutes to warm through and allow the flavors to meld.
Creamy quinoa against the soft, yielding squash creates a comforting contrast, while cranberries offer bursts of tartness. Serve atop a bed of arugula for a colorful, nutrient-packed meal that feels as good as it tastes.
Creamy Vegan Mashed Potatoes

Falling into the comfort of creamy vegan mashed potatoes feels like wrapping yourself in a warm blanket on a chilly evening. This dish, with its velvety texture and rich flavor, proves that indulgence doesn’t require dairy, offering a gentle reminder of the simplicity and joy found in plant-based cooking.
Ingredients
- 2 lbs Yukon Gold potatoes, peeled and quartered (their waxy texture ensures creaminess)
- 1/2 cup unsweetened almond milk, warmed (or any plant-based milk of choice)
- 1/4 cup olive oil (or any neutral oil, for richness)
- 2 tbsp nutritional yeast (adds a cheesy flavor, adjust to taste)
- 1 tsp garlic powder (for a subtle depth)
- 1/2 tsp salt (adjust to taste)
- 1/4 tsp black pepper (freshly ground preferred)
Instructions
- Place the peeled and quartered potatoes in a large pot and cover with cold water by 1 inch. Bring to a boil over high heat.
- Once boiling, reduce the heat to medium-low and simmer for 15-20 minutes, or until the potatoes are fork-tender. Tip: Start checking at 15 minutes to avoid overcooking.
- Drain the potatoes well and return them to the pot. Let them sit for 1 minute to allow excess moisture to evaporate.
- Add the warmed almond milk, olive oil, nutritional yeast, garlic powder, salt, and black pepper to the potatoes.
- Mash the potatoes with a potato masher or fork until smooth and creamy. Tip: For extra creaminess, warm the almond milk before adding it to the potatoes.
- Taste and adjust the seasoning with more salt, pepper, or nutritional yeast if needed. Tip: The nutritional yeast not only adds flavor but also a golden color reminiscent of traditional mashed potatoes.
Mashed to perfection, these vegan potatoes boast a cloud-like texture with a savory, slightly nutty flavor that’s utterly comforting. Serve them topped with a drizzle of olive oil and a sprinkle of fresh herbs for a dish that’s as beautiful as it is delicious.
Vegan Gravy

Just like the quiet moments before dawn, this vegan gravy comes together with a gentle ease, offering comfort in its simplicity and depth. It’s a testament to how plant-based ingredients can create something rich and fulfilling, perfect for drizzling over your favorite dishes.
Ingredients
- 1/4 cup olive oil (or any neutral oil)
- 1/4 cup all-purpose flour
- 2 cups vegetable broth (low sodium preferred)
- 1 tbsp soy sauce (for umami, adjust to taste)
- 1/2 tsp garlic powder
- 1/2 tsp onion powder
- 1/4 tsp black pepper (freshly ground for best flavor)
Instructions
- Heat the olive oil in a medium saucepan over medium heat until shimmering, about 2 minutes.
- Whisk in the all-purpose flour to form a roux, stirring constantly to prevent burning, for about 3 minutes until it turns a light golden color.
- Slowly pour in the vegetable broth, whisking continuously to ensure a smooth consistency without lumps.
- Add the soy sauce, garlic powder, onion powder, and black pepper to the saucepan, stirring to combine all ingredients well.
- Reduce the heat to low and simmer the gravy for 10 minutes, stirring occasionally, until it thickens to your desired consistency. If it thickens too much, add a little more broth to thin it out.
- Tip: For a smoother gravy, you can blend it with an immersion blender before serving.
- Tip: Taste and adjust the seasoning with more soy sauce or pepper if needed, but remember the flavors will deepen as it cooks.
- Tip: Keep the gravy warm on the stove until ready to serve, stirring occasionally to prevent a skin from forming on the surface.
Zesty and velvety, this vegan gravy clings lovingly to mashed potatoes or biscuits, its savory notes singing in harmony with every bite. Try drizzling it over roasted vegetables for an unexpected twist that elevates the humble to the sublime.
Spiced Pumpkin Soup

Wandering through the crisp autumn air, the thought of a warm, spiced pumpkin soup brings a sense of comfort and nostalgia. This dish, with its rich flavors and creamy texture, is a gentle reminder of the simple joys that cooking can bring.
Ingredients
- 2 cups pumpkin puree (homemade or canned)
- 1 tbsp olive oil (or any neutral oil)
- 1 small onion, diced
- 2 cloves garlic, minced
- 4 cups vegetable broth (adjust for desired thickness)
- 1/2 tsp ground cinnamon
- 1/4 tsp ground nutmeg
- 1/4 tsp ground ginger
- 1/2 cup heavy cream (optional, for richness)
- Salt and pepper (adjust to taste)
Instructions
- Heat the olive oil in a large pot over medium heat until shimmering.
- Add the diced onion and cook, stirring occasionally, until translucent, about 5 minutes.
- Stir in the minced garlic and cook for another minute until fragrant.
- Add the pumpkin puree, vegetable broth, cinnamon, nutmeg, and ginger to the pot. Stir to combine.
- Bring the mixture to a simmer, then reduce the heat to low. Cover and let it cook for 20 minutes, stirring occasionally.
- Use an immersion blender to puree the soup until smooth. Alternatively, carefully transfer the soup to a blender in batches.
- Stir in the heavy cream if using, and season with salt and pepper to taste. Heat through for another 2 minutes.
- Serve hot, garnished with a drizzle of cream or a sprinkle of cinnamon for an extra touch of warmth.
Velvety and rich, this spiced pumpkin soup wraps you in its warmth, with each spoonful offering a perfect balance of sweetness and spice. Try serving it with a side of crusty bread for dipping, or top with roasted pumpkin seeds for a delightful crunch.
Vegan Cornbread

How comforting it is to find solace in the simplicity of baking, especially when the recipe is as humble and hearty as vegan cornbread. This version, with its golden crust and tender crumb, is a testament to the joy of plant-based cooking.
Ingredients
- 1 cup cornmeal (for a coarser texture, or fine for smoother)
- 1 cup all-purpose flour (or gluten-free blend for dietary needs)
- 1 tbsp baking powder (ensure it’s fresh for best rise)
- 1/2 tsp salt (adjust to taste)
- 1 cup almond milk (or any plant-based milk, unsweetened)
- 1/4 cup maple syrup (or agave nectar for a milder sweetness)
- 1/4 cup coconut oil, melted (or any neutral oil)
Instructions
- Preheat your oven to 375°F (190°C) and lightly grease an 8-inch square baking pan with coconut oil.
- In a large bowl, whisk together the cornmeal, flour, baking powder, and salt until well combined.
- In another bowl, mix the almond milk, maple syrup, and melted coconut oil until smooth.
- Pour the wet ingredients into the dry ingredients and stir until just combined; avoid overmixing to keep the bread tender.
- Transfer the batter to the prepared pan and smooth the top with a spatula.
- Bake for 20-25 minutes, or until the edges are golden and a toothpick inserted in the center comes out clean.
- Let the cornbread cool in the pan for 10 minutes before slicing to allow it to set properly.
Vegan cornbread emerges from the oven with a delightful contrast of textures—crispy edges giving way to a moist, fluffy interior. Serve it warm with a drizzle of maple syrup or alongside a bowl of spicy chili for a comforting meal.
Cranberry Orange Relish
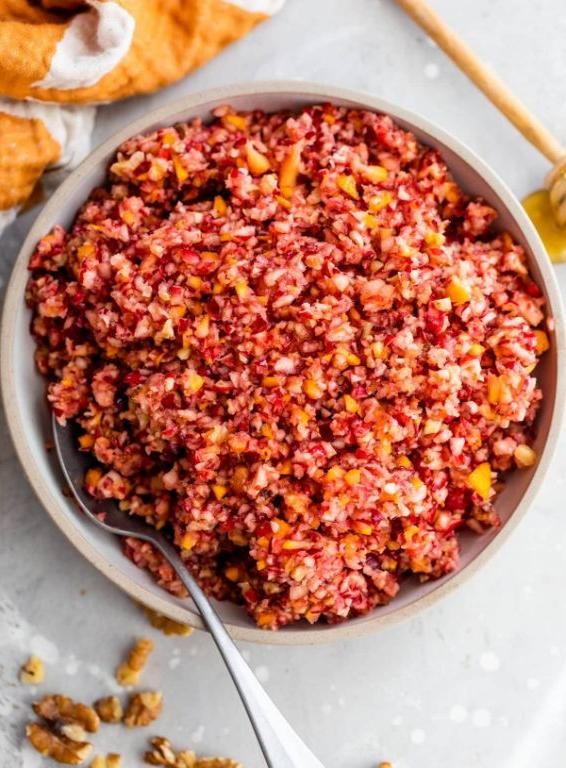
Gently, as the morning light filters through the kitchen window, the vibrant hues of cranberries and the citrusy aroma of oranges promise a relish that’s both refreshing and deeply comforting. This cranberry orange relish, with its perfect balance of tart and sweet, is a testament to the joy of simple, seasonal ingredients coming together.
Ingredients
- 12 oz fresh cranberries (or frozen, thawed)
- 1 large navel orange, zest and juice (about 1/2 cup juice)
- 1/2 cup granulated sugar (adjust to taste)
- 1/4 cup water
- 1/2 tsp ground cinnamon (optional for warmth)
Instructions
- Rinse the cranberries under cold water and pick out any stems or soft berries.
- In a medium saucepan, combine the cranberries, orange zest, orange juice, sugar, water, and cinnamon if using.
- Bring the mixture to a boil over medium-high heat, then reduce to a simmer. Stir occasionally to prevent sticking.
- Simmer for about 10 minutes, or until the cranberries have burst and the mixture has thickened slightly. Tip: The relish will continue to thicken as it cools.
- Remove from heat and let cool to room temperature. Tip: For a smoother relish, pulse briefly in a food processor.
- Transfer to a bowl, cover, and refrigerate for at least 2 hours before serving. Tip: The flavors meld beautifully overnight.
Overnight, the relish transforms, the cranberries’ sharpness mellowing into the oranges’ sweetness, creating a condiment that’s as versatile as it is vibrant. Serve it alongside roasted meats, spread it on toast, or dollop it over yogurt for a burst of flavor.
Roasted Carrots with Thyme
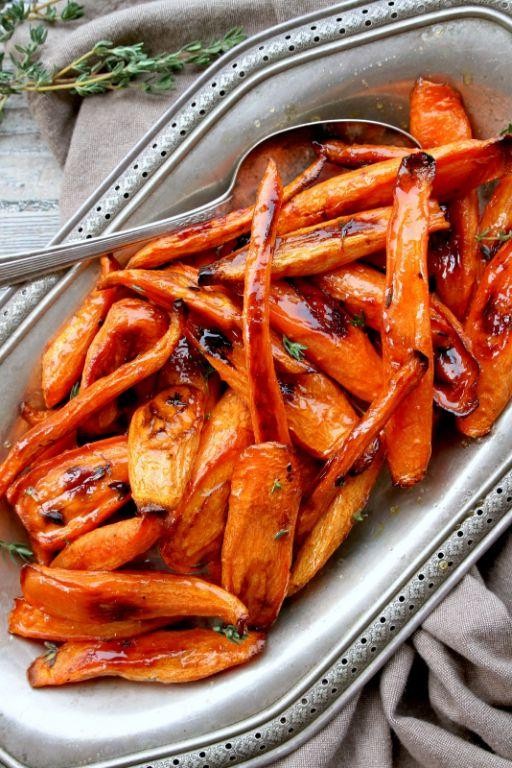
Evening light filters through the kitchen window, casting a warm glow over the simple, earthy ingredients laid out before me. There’s something deeply comforting about the act of roasting vegetables, a slow transformation that coaxes out their natural sweetness and depth.
Ingredients
- 1 lb carrots, peeled and cut into 2-inch pieces (uniform sizes ensure even cooking)
- 2 tbsp olive oil (or any neutral oil)
- 1 tbsp fresh thyme leaves (dried thyme can be substituted, use 1 tsp)
- 1/2 tsp salt (adjust to taste)
- 1/4 tsp black pepper (freshly ground preferred)
Instructions
- Preheat your oven to 400°F (200°C) to ensure it’s hot enough for roasting.
- In a large bowl, toss the carrot pieces with olive oil, ensuring each piece is lightly coated for even roasting.
- Spread the carrots in a single layer on a baking sheet, giving them space to roast rather than steam.
- Sprinkle the thyme, salt, and black pepper evenly over the carrots, adjusting the amounts to suit your taste preferences.
- Roast in the preheated oven for 25-30 minutes, stirring halfway through, until the carrots are tender and caramelized at the edges.
- Remove from the oven and let them sit for a couple of minutes before serving to allow the flavors to meld.
Now, the roasted carrots emerge from the oven, their edges crisped and glistening, the thyme’s aroma mingling with their natural sweetness. Serve them atop a creamy polenta or alongside a hearty grain for a dish that celebrates simplicity and flavor.
Vegan Pecan Pie

Just imagine the warmth of the oven filling your kitchen as the sweet, nutty aroma of vegan pecan pie begins to waft through the air. This dessert, with its rich, gooey filling and crisp, buttery crust, is a testament to the joy of plant-based baking.
Ingredients
- 1 1/2 cups all-purpose flour (for a flakier crust, use half pastry flour)
- 1/2 cup vegan butter, chilled and cubed (or coconut oil for a different flavor)
- 3-4 tbsp ice water (just enough to bring the dough together)
- 1 cup maple syrup (grade B for deeper flavor)
- 1/2 cup brown sugar, packed (light or dark, depending on preference)
- 1/3 cup coconut oil, melted (or any neutral oil)
- 1 tbsp cornstarch (for thickening)
- 2 tsp vanilla extract (pure for best flavor)
- 1/4 tsp salt (to balance the sweetness)
- 2 cups pecan halves (toasted for extra crunch)
Instructions
- Preheat your oven to 350°F (175°C) to ensure it’s ready for baking.
- In a large bowl, mix the flour and salt. Add the chilled vegan butter, using your fingers to rub it into the flour until the mixture resembles coarse crumbs.
- Gradually add ice water, one tablespoon at a time, mixing until the dough just comes together. Tip: Overworking the dough can make it tough.
- Roll out the dough on a floured surface to fit a 9-inch pie dish. Trim and crimp the edges for a decorative finish.
- In another bowl, whisk together maple syrup, brown sugar, melted coconut oil, cornstarch, and vanilla extract until smooth.
- Arrange the pecan halves in the bottom of the pie crust, then pour the syrup mixture over them, ensuring all pecans are coated.
- Bake for 45-50 minutes, or until the filling is set and the crust is golden brown. Tip: Cover the edges with foil if they brown too quickly.
- Allow the pie to cool completely on a wire rack before slicing. This patience ensures clean cuts and the perfect texture.
With its caramel-like filling and toasty pecans, this vegan pecan pie offers a delightful contrast of textures. Serve it slightly warm with a scoop of dairy-free vanilla ice cream for an indulgent treat.
Apple Cinnamon Rolls

Gently, the morning light filters through the kitchen window, casting a warm glow on the counter where flour dust dances in the air. There’s something deeply comforting about the process of making apple cinnamon rolls, a recipe that feels like a hug in edible form.
Ingredients
- 2 cups all-purpose flour (plus extra for dusting)
- 1/4 cup granulated sugar (adjust to sweetness preference)
- 1 tsp salt
- 1 packet instant yeast (about 2 1/4 tsp)
- 1/2 cup warm milk (110°F, no hotter to avoid killing the yeast)
- 1/4 cup unsalted butter, melted (or any neutral oil)
- 1 large egg
- 2 medium apples, peeled and finely diced (Granny Smith recommended for tartness)
- 1/4 cup brown sugar
- 2 tsp ground cinnamon
- 1 tbsp unsalted butter, softened (for brushing)
Instructions
- In a large bowl, whisk together 2 cups flour, granulated sugar, salt, and yeast.
- Add warm milk, melted butter, and egg to the dry ingredients. Stir until a sticky dough forms.
- Turn the dough onto a floured surface and knead for 5 minutes, until smooth and elastic. Tip: If the dough sticks, add a little more flour, but avoid adding too much to keep the rolls tender.
- Place the dough in a greased bowl, cover with a damp cloth, and let rise in a warm place for 1 hour, or until doubled in size.
- While the dough rises, mix diced apples, brown sugar, and cinnamon in a bowl. Set aside.
- After rising, punch down the dough and roll it out on a floured surface into a 12×9 inch rectangle.
- Spread softened butter over the dough, then evenly sprinkle the apple mixture over the top.
- Starting from the long side, tightly roll the dough into a log. Cut into 9 equal pieces with a sharp knife. Tip: Use dental floss to cut the rolls for cleaner edges.
- Place the rolls in a greased 9×9 inch baking pan, cover, and let rise for 30 minutes.
- Preheat the oven to 375°F. Bake the rolls for 20-25 minutes, until golden brown. Tip: Check at 20 minutes to avoid overbaking.
As the rolls cool, the aroma of cinnamon and baked apples fills the kitchen, promising a treat that’s as delightful to eat as it is to make. The texture is soft and pillowy, with pockets of sweet, spiced apples in every bite. For an extra touch, drizzle with a simple glaze or serve warm with a scoop of vanilla ice cream.
Chocolate Avocado Mousse
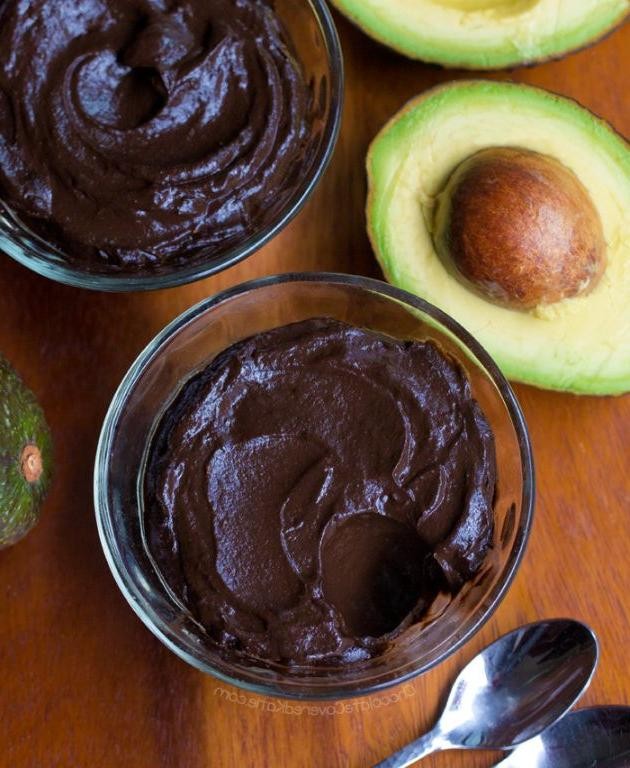
Falling into the rhythm of the evening, I find myself drawn to the simplicity and richness of a dessert that surprises with every spoonful. Chocolate avocado mousse, a blend of the expected and the unexpected, offers a moment of quiet indulgence.
Ingredients
- 2 ripe avocados, pitted and scooped (ensure they’re soft for smooth blending)
- 1/4 cup cocoa powder (unsweetened, for a deep chocolate flavor)
- 1/4 cup maple syrup (adjust to taste, or substitute with honey)
- 1 tsp vanilla extract (pure, for the best aroma)
- 1/4 cup almond milk (or any plant-based milk, to adjust consistency)
- A pinch of salt (to enhance the chocolate flavor)
Instructions
- In a blender, combine the avocados, cocoa powder, maple syrup, vanilla extract, and salt. Blend on high until the mixture is smooth, scraping down the sides as needed to ensure everything is well incorporated.
- With the blender running on low, slowly add the almond milk through the top opening. Adjust the amount until you reach a mousse-like consistency that’s thick but spoonable.
- Transfer the mousse to serving dishes. For best results, chill in the refrigerator for at least 30 minutes before serving to allow the flavors to meld and the texture to firm up slightly.
Creating this mousse is as much about the process as it is about the result. The final texture should be luxuriously smooth, with a richness that belies its simple ingredients. Serve it topped with fresh berries or a sprinkle of sea salt for a contrast that elevates the entire experience.
Vegan Pumpkin Cheesecake

Lately, I’ve found myself drawn to the comforting embrace of vegan desserts, especially those that remind me of autumn’s warmth. This vegan pumpkin cheesecake, with its creamy texture and spiced sweetness, is a delightful way to welcome any season.
Ingredients
- 1 1/2 cups raw cashews, soaked overnight (for creaminess)
- 1 cup pumpkin puree (not pumpkin pie filling)
- 1/2 cup maple syrup (adjust to sweetness preference)
- 1/4 cup coconut oil, melted (or any neutral oil)
- 2 tbsp lemon juice (for a slight tang)
- 1 tsp vanilla extract (pure for best flavor)
- 1/2 tsp cinnamon (or pumpkin pie spice for more depth)
- 1/4 tsp salt (to balance the sweetness)
- 1 cup almond flour (for the crust, can substitute with graham crackers)
- 2 tbsp coconut sugar (for the crust, adds a caramel note)
- 3 tbsp coconut oil, melted (for the crust)
Instructions
- Preheat your oven to 350°F (175°C) if making a baked crust. For a no-bake version, skip this step.
- In a food processor, combine almond flour and coconut sugar for the crust. Pulse until mixed.
- Add melted coconut oil to the crust mixture. Pulse until the mixture resembles wet sand.
- Press the crust mixture firmly into the bottom of a 7-inch springform pan. Use the back of a spoon to even it out. Tip: Chill the crust for 10 minutes to set if making a no-bake cheesecake.
- In a blender, combine soaked cashews, pumpkin puree, maple syrup, melted coconut oil, lemon juice, vanilla extract, cinnamon, and salt. Blend until smooth and creamy. Tip: Scrape down the sides as needed to ensure everything is well incorporated.
- Pour the filling over the prepared crust. Smooth the top with a spatula.
- Freeze the cheesecake for at least 4 hours, or until set. Tip: For easier slicing, let it sit at room temperature for 10 minutes before serving.
After patiently waiting, you’ll be rewarded with a cheesecake that’s luxuriously smooth, with the perfect balance of sweet and spiced. A drizzle of caramel or a sprinkle of toasted pecans can elevate this dessert to something truly special.
Maple Glazed Roasted Parsnips
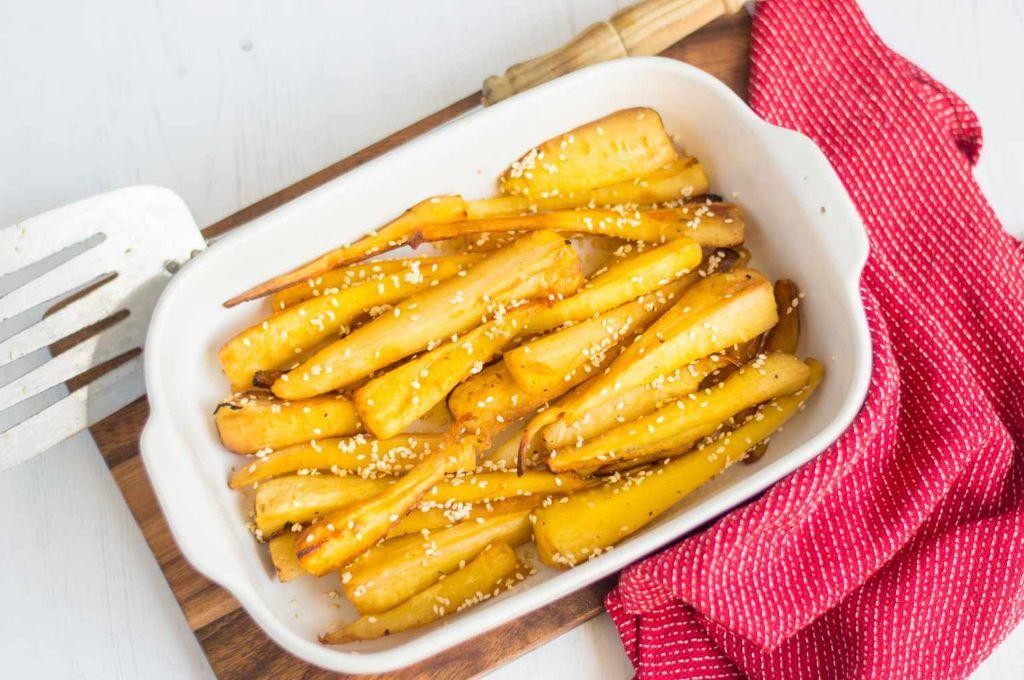
Maple glazed roasted parsnips are a humble yet transformative dish, where the natural sweetness of the parsnips is elevated by the rich, caramel notes of maple syrup. It’s a simple pleasure that feels both grounding and indulgent, perfect for those quiet evenings when you crave something sweetly satisfying.
Ingredients
- 1.5 lbs parsnips, peeled and cut into 2-inch sticks (try to keep them uniform for even cooking)
- 2 tbsp olive oil (or any neutral oil)
- 2 tbsp pure maple syrup (adjust to taste)
- 1/2 tsp salt (adjust to taste)
- 1/4 tsp black pepper (freshly ground preferred)
- 1/2 tsp smoked paprika (optional, for a subtle depth)
Instructions
- Preheat your oven to 400°F (200°C) to ensure it’s ready for roasting.
- In a large bowl, toss the parsnip sticks with olive oil, ensuring each piece is lightly coated for even roasting.
- Spread the parsnips in a single layer on a baking sheet, giving them space to caramelize rather than steam.
- Roast in the preheated oven for 20 minutes, then flip each parsnip to promote even browning.
- After flipping, drizzle the maple syrup evenly over the parsnips and sprinkle with salt, pepper, and smoked paprika if using.
- Return to the oven for another 10-15 minutes, watching closely in the last 5 minutes to prevent burning. The parsnips are done when they’re fork-tender and glazed with a sticky sweetness.
- Let them sit for a couple of minutes off the heat; this allows the glaze to set slightly for a perfect texture.
Zesty and warm, these maple glazed roasted parsnips offer a delightful contrast between their crispy edges and tender centers. Serve them alongside a sharp cheese plate for an unexpected but harmonious pairing, or simply enjoy their comforting sweetness straight from the pan.
Vegan Stuffing with Herbs and Walnuts
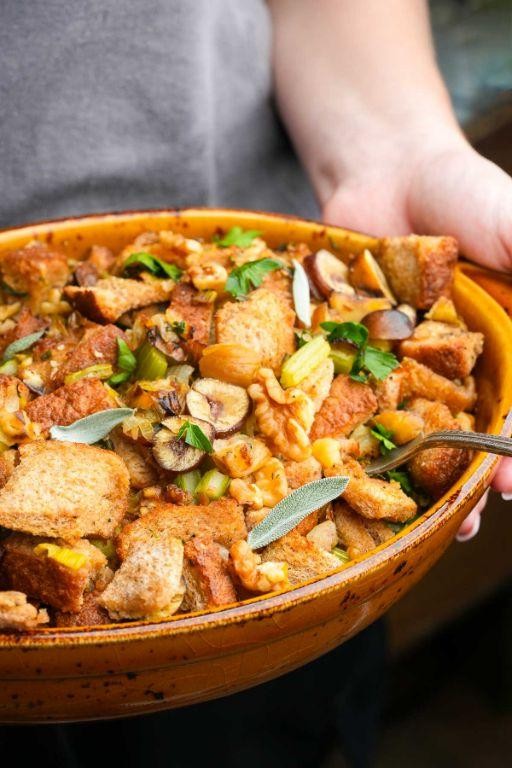
Vegan stuffing with herbs and walnuts brings a comforting warmth to any table, its aroma weaving through the kitchen like a gentle reminder of home. This dish, with its tender crumbs and crunchy walnuts, is a celebration of simple, earthy flavors that come together in harmony.
Ingredients
- 6 cups cubed day-old bread (stale bread works best for texture)
- 1/2 cup walnuts, roughly chopped (toast for deeper flavor)
- 1/4 cup olive oil (or any neutral oil)
- 1 large onion, diced (yellow for sweetness)
- 2 celery stalks, diced
- 3 garlic cloves, minced
- 1 tbsp fresh sage, chopped (dried can be used in a pinch)
- 1 tbsp fresh thyme leaves
- 2 cups vegetable broth (low sodium preferred)
- 1/2 tsp salt (adjust to taste)
- 1/4 tsp black pepper
Instructions
- Preheat your oven to 350°F (175°C) and lightly grease a baking dish with olive oil.
- Spread the bread cubes on a baking sheet and toast in the oven for 10 minutes, or until lightly golden, to dry them out further.
- In a large skillet over medium heat, warm the olive oil. Add the onion and celery, sautéing for 5 minutes until softened.
- Stir in the garlic, sage, and thyme, cooking for another minute until fragrant. Tip: Toasting the herbs briefly releases their essential oils.
- Remove the skillet from heat and gently fold in the toasted bread cubes and walnuts, ensuring they’re evenly coated with the herb mixture.
- Gradually pour in the vegetable broth, mixing until the bread is moist but not soggy. Tip: The amount of broth may vary depending on the bread’s absorbency.
- Transfer the mixture to the prepared baking dish, cover with foil, and bake for 25 minutes. Then, remove the foil and bake for an additional 10 minutes to crisp the top.
- Let the stuffing sit for 5 minutes before serving to allow the flavors to meld. Tip: This resting time helps the stuffing hold its shape when scooped.
Delightfully textured with a contrast between the soft interior and the crispy top, this vegan stuffing is fragrant with herbs and enriched by the nuttiness of walnuts. Serve it alongside roasted vegetables or as a hearty main with a drizzle of mushroom gravy for an extra layer of umami.
Cauliflower Steaks with Red Wine Reduction
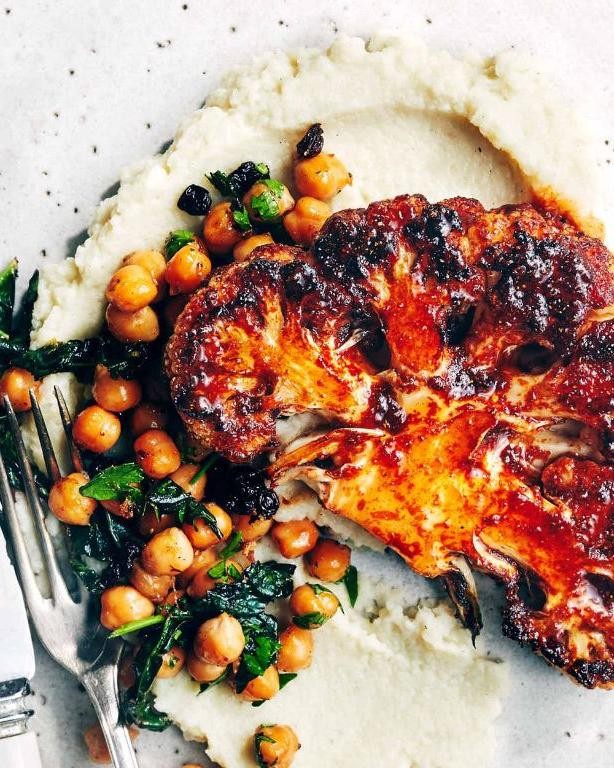
Perhaps there’s no better way to savor the simplicity and elegance of vegetables than by transforming a humble cauliflower into a dish that feels both luxurious and comforting. This recipe, with its rich red wine reduction, turns the ordinary into something extraordinary, inviting you to slow down and appreciate each bite.
Ingredients
- 1 large head cauliflower (look for tight, creamy white florets)
- 2 tbsp olive oil (or any neutral oil)
- 1/2 tsp salt (adjust to taste)
- 1/4 tsp black pepper (freshly ground preferred)
- 1 cup red wine (choose a dry variety you enjoy drinking)
- 1 tbsp butter (unsalted, for a smoother reduction)
- 1 tsp fresh thyme leaves (or 1/2 tsp dried)
Instructions
- Preheat your oven to 400°F (200°C) to ensure it’s ready for roasting.
- Trim the leaves from the cauliflower, then slice it vertically into 1-inch thick steaks, keeping the stem intact for stability.
- Brush both sides of each cauliflower steak with olive oil, then season evenly with salt and pepper.
- Place the steaks on a baking sheet lined with parchment paper, ensuring they’re not touching for even cooking.
- Roast in the preheated oven for 25 minutes, flipping halfway through, until the edges are caramelized and the center is tender.
- While the cauliflower roasts, pour the red wine into a small saucepan over medium heat, bringing it to a simmer.
- Add the thyme and let the wine reduce by half, about 10 minutes, stirring occasionally to prevent sticking.
- Remove the reduction from heat and whisk in the butter until the sauce is glossy and slightly thickened.
- Drizzle the red wine reduction over the roasted cauliflower steaks just before serving.
With each forkful, the cauliflower offers a tender bite, its natural sweetness deepened by roasting, while the red wine reduction adds a velvety contrast that’s both bold and nuanced. Consider serving these steaks atop a swirl of creamy polenta or alongside a crisp green salad for a meal that celebrates the beauty of simplicity.
Conclusion
We hope this roundup of 20 Delicious Vegan Thanksgiving Recipes inspires your holiday table with flavors everyone can enjoy. Whether you’re vegan or just vegan-curious, these dishes promise to delight. Don’t forget to try them out, share your favorites in the comments, and pin this article on Pinterest to spread the vegan love. Happy cooking and happy Thanksgiving!