Welcome to the nutty side of cooking! Whether you’re a hazelnut enthusiast or just looking to add a little crunch to your meals, we’ve got you covered with 18 Delicious Easy Hazelnut Recipes for Beginners. From cozy breakfasts to decadent desserts, these recipes are perfect for anyone looking to spice up their kitchen routine with minimal fuss. Let’s crack into these tasty ideas that promise big flavors with little effort!
Hazelnut Chocolate Spread
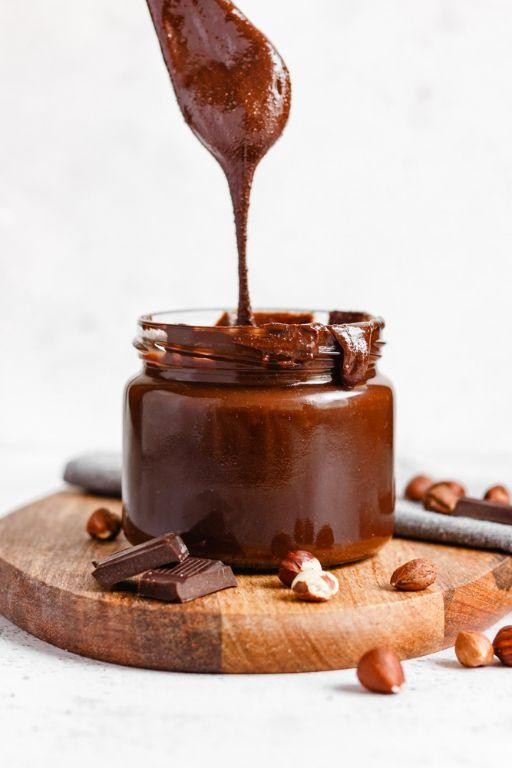
Start by gathering your ingredients and tools for this homemade Hazelnut Chocolate Spread, a delightful treat that’s surprisingly simple to make. Smooth, rich, and irresistibly chocolatey, this spread is perfect for breakfast, desserts, or a quick snack.
Ingredients
- 2 cups raw hazelnuts, toasted and skins removed
- 1/2 cup high-quality cocoa powder, unsweetened
- 1/2 cup powdered sugar, finely sifted
- 1/4 tsp pure vanilla extract
- 1/8 tsp sea salt, finely ground
- 2 tbsp coconut oil, melted and cooled slightly
Instructions
- Preheat your oven to 350°F. Spread the hazelnuts in a single layer on a baking sheet and toast for 10-12 minutes, until fragrant and the skins begin to crack.
- Transfer the warm hazelnuts to a clean kitchen towel. Rub them vigorously to remove as much of the skins as possible. Let cool completely.
- In a high-powered blender or food processor, process the cooled hazelnuts until they form a smooth, buttery paste, about 5 minutes, scraping down the sides as needed.
- Add the cocoa powder, powdered sugar, vanilla extract, and sea salt to the hazelnut paste. Process until fully combined and smooth.
- With the machine running, slowly drizzle in the melted coconut oil. Continue to process until the mixture is silky and spreadable, about 2 minutes more.
- Transfer the spread to a clean jar or container. It will thicken slightly as it cools.
Homemade Hazelnut Chocolate Spread boasts a velvety texture and a deep, nutty chocolate flavor that’s far superior to store-bought versions. Try it swirled into yogurt, spread on warm toast, or as a dip for fresh fruit for an indulgent treat.
Easy Hazelnut Butter
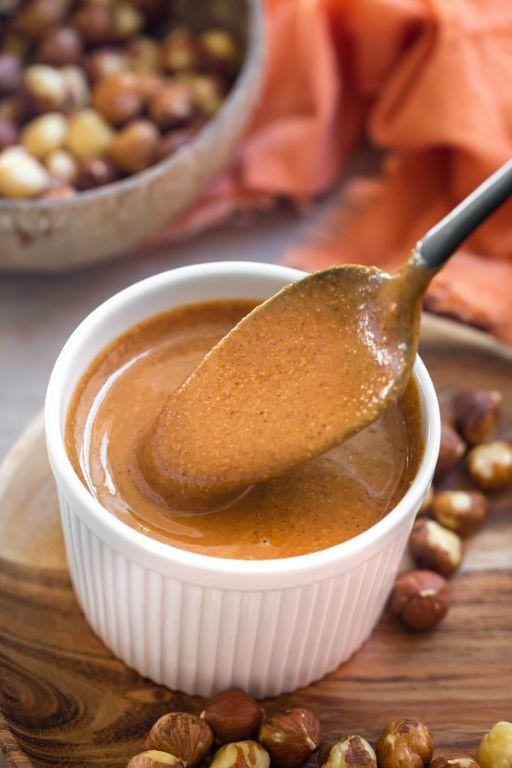
Ready to whip up a batch of homemade hazelnut butter that’s smoother than a jazz tune? This easy recipe transforms simple ingredients into a creamy, dreamy spread that’ll make your morning toast sing.
Ingredients
- 2 cups raw hazelnuts, skins on for a rustic texture
- 1 tablespoon pure maple syrup, for a hint of sweetness
- 1/2 teaspoon fine sea salt, to enhance the nuts’ natural flavors
- 1 tablespoon coconut oil, melted, for a silky smooth consistency
Instructions
- Preheat your oven to 350°F (175°C) to roast the hazelnuts, enhancing their deep, nutty aroma.
- Spread the hazelnuts in a single layer on a baking sheet. Roast for 10-12 minutes, until they’re golden and the skins start to crack. Tip: Shake the pan halfway through for even roasting.
- Let the hazelnuts cool slightly, then transfer them to a clean kitchen towel. Rub the nuts together to remove as much skin as possible. Tip: Don’t worry about getting every bit of skin off; a little adds character.
- Place the hazelnuts in a high-powered food processor. Process on high for 5 minutes, scraping down the sides as needed, until the nuts release their oils and the mixture becomes creamy.
- Add the maple syrup, sea salt, and melted coconut oil. Process for another 2-3 minutes, until the butter is ultra-smooth and glossy. Tip: If the butter seems too thick, a splash of warm water can loosen it up.
- Transfer the hazelnut butter to a clean jar, seal, and store in the refrigerator for up to 2 weeks.
Lusciously creamy with a rich, toasty flavor, this hazelnut butter is a versatile star. Swirl it into oatmeal, dollop on pancakes, or simply enjoy by the spoonful for a quick energy boost.
Hazelnut Pancakes
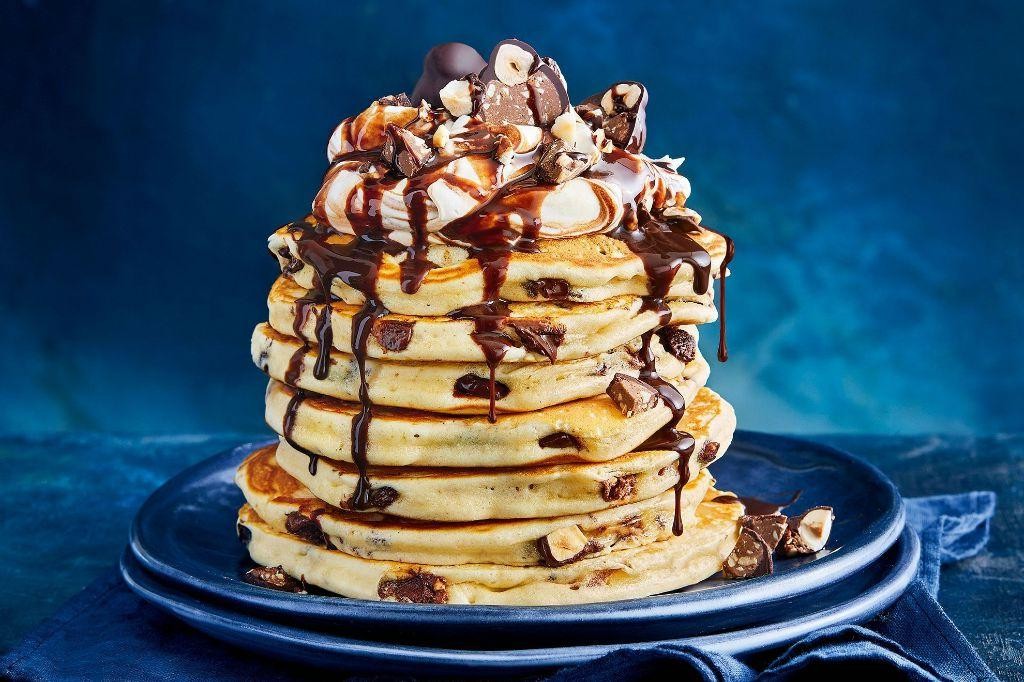
Creating the perfect hazelnut pancakes starts with understanding the balance between the nutty depth of hazelnuts and the fluffy lightness of the pancake batter. Let’s dive into making these irresistible breakfast treats that are sure to impress.
Ingredients
- 1 cup all-purpose flour, sifted for lightness
- 2 tbsp granulated sugar, for a subtle sweetness
- 1 tsp baking powder, to ensure a fluffy rise
- 1/2 tsp salt, to enhance flavors
- 1 cup whole milk, for richness
- 1 large farm-fresh egg, beaten
- 2 tbsp unsalted butter, melted and slightly cooled
- 1/2 cup finely ground hazelnuts, for that signature nutty flavor
- 1 tsp pure vanilla extract, for aromatic depth
Instructions
- In a large mixing bowl, whisk together the sifted all-purpose flour, granulated sugar, baking powder, and salt until well combined.
- In another bowl, mix the whole milk, beaten egg, melted unsalted butter, and pure vanilla extract until smooth.
- Gradually pour the wet ingredients into the dry ingredients, stirring gently to avoid overmixing. A few lumps are okay.
- Fold in the finely ground hazelnuts gently to distribute evenly throughout the batter.
- Heat a non-stick skillet or griddle over medium heat (350°F) and lightly grease with butter or cooking spray.
- Pour 1/4 cup of batter onto the skillet for each pancake. Cook until bubbles form on the surface and the edges look set, about 2-3 minutes.
- Flip the pancakes carefully and cook for another 1-2 minutes until golden brown and cooked through.
- Serve immediately with your choice of toppings, such as maple syrup, fresh berries, or a dollop of whipped cream.
These hazelnut pancakes boast a delightful crunch from the ground nuts, paired with a soft, airy texture that melts in your mouth. For an extra touch of luxury, drizzle with hazelnut spread and sprinkle with chopped hazelnuts before serving.
Roasted Hazelnut Salad
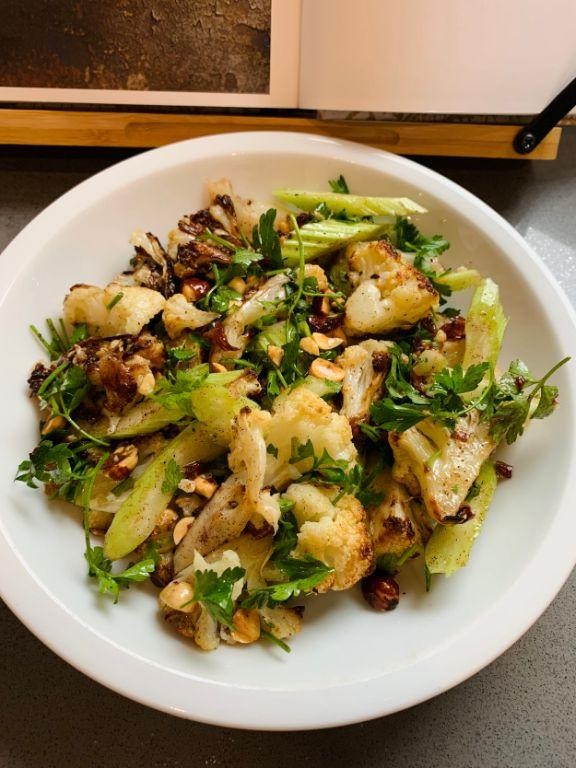
Zesty and vibrant, this Roasted Hazelnut Salad brings a delightful crunch and nutty flavor to your table, perfect for those seeking a healthy yet satisfying dish. Let’s dive into creating this simple, flavorful salad that’s sure to impress.
Ingredients
- 1 cup raw hazelnuts, skins on for a rustic texture
- 2 tbsp rich extra virgin olive oil
- 1 tbsp honey, for a touch of sweetness
- 1/2 tsp sea salt, finely ground
- 4 cups mixed greens, fresh and crisp
- 1/2 cup crumbled feta cheese, creamy and tangy
- 1/4 cup dried cranberries, for a chewy contrast
- 2 tbsp balsamic vinegar, aged and smooth
Instructions
- Preheat your oven to 350°F (175°C) to prepare for roasting the hazelnuts.
- Spread the raw hazelnuts evenly on a baking sheet and roast for 10-12 minutes, or until they’re golden and fragrant. Tip: Shake the pan halfway through to ensure even roasting.
- While the hazelnuts are roasting, whisk together the extra virgin olive oil, honey, and balsamic vinegar in a small bowl to create the dressing. Tip: Adjust the honey according to your preference for sweetness.
- Once the hazelnuts are done, let them cool for a few minutes, then roughly chop them to release their oils and enhance the salad’s texture.
- In a large salad bowl, combine the mixed greens, chopped roasted hazelnuts, crumbled feta cheese, and dried cranberries.
- Drizzle the dressing over the salad and toss gently to coat all the ingredients evenly. Tip: Add the dressing just before serving to keep the greens crisp.
Outstanding in its simplicity, this Roasted Hazelnut Salad offers a perfect balance of textures and flavors, from the crunchy nuts to the creamy feta. Serve it alongside grilled chicken or fish for a complete meal, or enjoy it as a standalone dish for a light lunch.
Hazelnut Crusted Chicken

For a dish that combines crunch and comfort in every bite, hazelnut crusted chicken is a must-try. Follow these steps to create a meal that’s as nutritious as it is delicious.
Ingredients
- 4 boneless, skinless chicken breasts (about 6 oz each)
- 1 cup finely chopped hazelnuts
- 1/2 cup panko breadcrumbs
- 1/4 cup grated Parmesan cheese
- 1 tsp garlic powder
- 1 tsp smoked paprika
- 1/2 tsp sea salt
- 1/4 tsp freshly ground black pepper
- 2 large farm-fresh eggs
- 2 tbsp whole milk
- 1/4 cup all-purpose flour
- 3 tbsp rich extra virgin olive oil
Instructions
- Preheat your oven to 375°F (190°C) and line a baking sheet with parchment paper.
- In a shallow dish, combine the finely chopped hazelnuts, panko breadcrumbs, grated Parmesan cheese, garlic powder, smoked paprika, sea salt, and freshly ground black pepper.
- In another shallow dish, whisk together the farm-fresh eggs and whole milk until fully blended.
- Place the all-purpose flour in a third shallow dish.
- Dredge each chicken breast in the flour, shaking off any excess.
- Dip the floured chicken into the egg mixture, allowing any excess to drip off.
- Coat the chicken in the hazelnut mixture, pressing gently to adhere the crust.
- Heat the rich extra virgin olive oil in a large skillet over medium-high heat until shimmering.
- Add the coated chicken breasts and cook for 2-3 minutes on each side, or until the crust is golden brown.
- Transfer the chicken to the prepared baking sheet and bake for 15-20 minutes, or until the internal temperature reaches 165°F (74°C).
Now, the hazelnut crusted chicken is ready to serve. The crust offers a delightful crunch, while the chicken remains juicy and tender inside. Pair it with a light arugula salad or roasted vegetables for a complete meal.
Hazelnut and Banana Smoothie
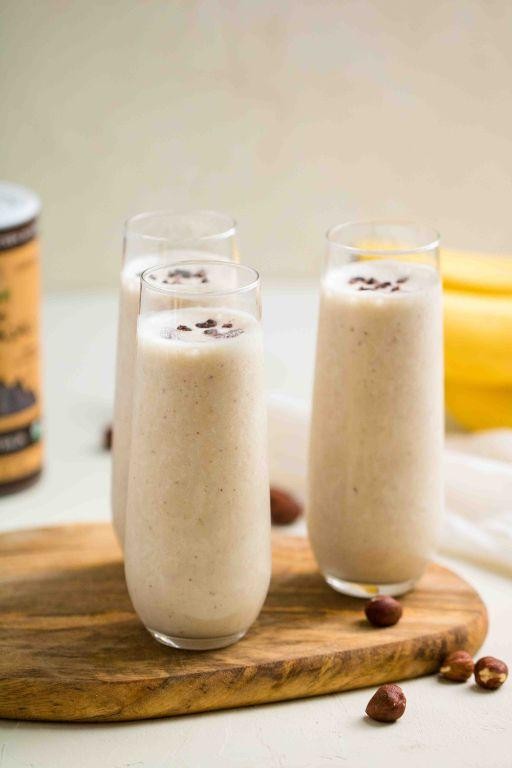
Ready to blend up something deliciously nutritious? This Hazelnut and Banana Smoothie is a creamy, dreamy concoction that’s perfect for breakfast or a midday pick-me-up, combining the rich flavors of hazelnuts with the natural sweetness of bananas.
Ingredients
- 1 cup of chilled, creamy almond milk
- 2 ripe, medium bananas, peeled and sliced
- 2 tablespoons of smooth, roasted hazelnut butter
- 1 tablespoon of golden, pure maple syrup
- 1/2 teaspoon of fragrant, ground cinnamon
- A handful of ice cubes
Instructions
- In a high-powered blender, combine the chilled almond milk, sliced bananas, hazelnut butter, maple syrup, and ground cinnamon.
- Blend on high speed for 30 seconds, or until the mixture is smooth and the bananas are fully incorporated.
- Add a handful of ice cubes to the blender and pulse until the ice is completely crushed and the smoothie reaches your desired thickness.
- Pour the smoothie into a tall glass and serve immediately for the best texture and flavor.
Kitchen tip: For an extra chill, freeze your banana slices before blending. This smoothie boasts a velvety texture with a perfect balance of nutty and sweet flavors. Try garnishing with a sprinkle of cinnamon or a drizzle of hazelnut butter on top for an Instagram-worthy presentation.
Homemade Hazelnut Milk
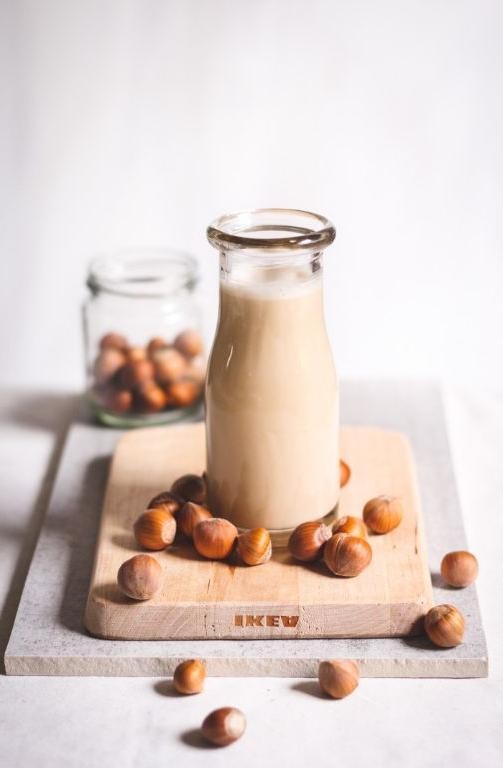
Preparing homemade hazelnut milk is simpler than you might think, offering a creamy, nutty alternative to store-bought varieties that’s both delicious and customizable to your taste preferences.
Ingredients
- 1 cup raw hazelnuts, soaked overnight for optimal creaminess
- 4 cups cold, filtered water for a pure, clean taste
- 2 tablespoons pure maple syrup for a subtle, natural sweetness
- 1 teaspoon vanilla extract for a warm, aromatic flavor
- A pinch of fine sea salt to enhance all the flavors
Instructions
- Drain and rinse the soaked hazelnuts thoroughly under cold water to remove any residual bitterness.
- Combine the hazelnuts, filtered water, maple syrup, vanilla extract, and sea salt in a high-speed blender.
- Blend on high for 1-2 minutes until the mixture is completely smooth and creamy. Tip: For an extra smooth milk, blend for an additional 30 seconds.
- Strain the mixture through a nut milk bag or fine mesh strainer into a large bowl, squeezing gently to extract all the liquid. Tip: Save the leftover hazelnut pulp for baking or adding to oatmeal.
- Transfer the strained hazelnut milk to a clean glass jar or bottle and refrigerate for up to 4 days. Tip: Shake well before each use as natural separation may occur.
Luxuriously creamy with a rich, nutty flavor, this homemade hazelnut milk is perfect poured over granola, blended into smoothies, or enjoyed straight from the glass. Its versatility and freshness outshine any store-bought version, making it a staple for any nut milk enthusiast.
Hazelnut Coffee Cake
Very few things compare to the comforting aroma of hazelnut coffee cake baking in the oven, a perfect blend of nutty and sweet flavors that promises to make any morning special. This guide will walk you through each step to create this delightful treat, ensuring even beginners can achieve bakery-quality results.
Ingredients
- 1 1/2 cups all-purpose flour, sifted for lightness
- 1/2 cup granulated sugar, for a subtle sweetness
- 1/4 cup packed brown sugar, adding a deep molasses note
- 1/2 cup unsalted butter, room temperature for easy creaming
- 2 large farm-fresh eggs, beaten
- 1/2 cup sour cream, for moist texture
- 1/4 cup whole milk, to enrich the batter
- 1 tsp pure vanilla extract, for aromatic depth
- 1/2 cup finely chopped hazelnuts, toasted for crunch
- 1 tbsp baking powder, ensuring a fluffy rise
- 1/2 tsp salt, to balance the sweetness
Instructions
- Preheat your oven to 350°F (175°C) and grease a 9-inch round cake pan with butter, ensuring even baking.
- In a large mixing bowl, cream together the room temperature butter, granulated sugar, and brown sugar until light and fluffy, about 3 minutes.
- Gradually add the beaten eggs to the butter mixture, one at a time, mixing well after each addition to incorporate air.
- Stir in the sour cream, whole milk, and vanilla extract until the mixture is smooth and homogenous.
- In a separate bowl, whisk together the sifted flour, baking powder, and salt to ensure even distribution of leavening agents.
- Fold the dry ingredients into the wet mixture gently, avoiding overmixing to keep the cake tender.
- Fold in the toasted hazelnuts, distributing them evenly throughout the batter.
- Pour the batter into the prepared cake pan, smoothing the top with a spatula for an even bake.
- Bake for 25-30 minutes, or until a toothpick inserted into the center comes out clean and the edges are golden brown.
- Allow the cake to cool in the pan for 10 minutes before transferring to a wire rack to cool completely.
When sliced, this hazelnut coffee cake reveals a tender crumb speckled with crunchy nuts, offering a perfect balance of textures. Serve it warm with a dusting of powdered sugar or a dollop of whipped cream for an extra indulgent treat.
Hazelnut Biscotti

Mastering the art of baking Hazelnut Biscotti begins with understanding the simplicity and elegance of this twice-baked Italian cookie. Let’s walk through the process together, ensuring every step is clear and achievable, even for beginners.
Ingredients
- 1 cup whole hazelnuts, toasted and roughly chopped
- 2 cups all-purpose flour, sifted for lightness
- 3/4 cup granulated sugar, for a subtle sweetness
- 1 tsp baking powder, to ensure a perfect rise
- 1/4 tsp salt, to enhance flavors
- 3 large eggs, at room temperature for better incorporation
- 1 tsp pure vanilla extract, for aromatic depth
- 1/2 tsp almond extract, for a nuanced flavor profile
Instructions
- Preheat your oven to 350°F (175°C) and line a baking sheet with parchment paper for easy cleanup.
- In a large bowl, whisk together the sifted flour, granulated sugar, baking powder, and salt until well combined.
- Add the eggs, vanilla extract, and almond extract to the dry ingredients, mixing until a dough begins to form. Tip: If the dough feels too sticky, lightly flour your hands for easier handling.
- Fold in the toasted, roughly chopped hazelnuts until evenly distributed throughout the dough.
- Divide the dough in half and shape each portion into a log approximately 12 inches long and 2 inches wide on the prepared baking sheet. Tip: Wetting your hands slightly can help smooth the dough logs without sticking.
- Bake for 25-30 minutes, or until the logs are golden and firm to the touch. Remove from the oven and let cool for 10 minutes. Tip: Reducing the oven temperature to 325°F (165°C) for the second bake ensures the biscotti dry out without over-browning.
- Using a serrated knife, slice the logs diagonally into 1/2-inch thick pieces. Lay the slices cut side down on the baking sheet and bake for an additional 10-15 minutes, turning once halfway through, until crisp and golden.
- Allow the biscotti to cool completely on a wire rack before serving.
Kicking back with a cup of coffee, you’ll appreciate the crisp texture and rich, nutty flavor of these Hazelnut Biscotti. For an extra indulgent twist, dip one end in melted dark chocolate and let it set before serving.
Hazelnut Pesto Pasta
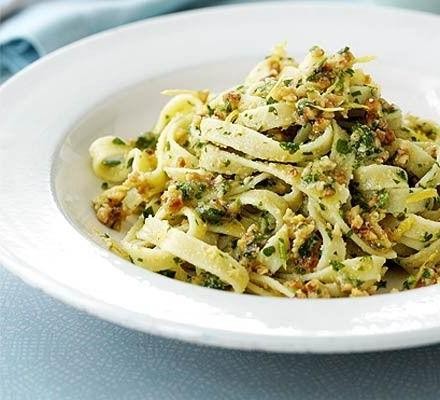
Now, let’s dive into creating a delightful Hazelnut Pesto Pasta that’s both nutty and fresh, perfect for a quick yet sophisticated meal. This recipe combines the richness of hazelnuts with the brightness of basil, resulting in a pesto that’s uniquely flavorful.
Ingredients
- 8 oz dried pasta (such as spaghetti or fettuccine)
- 1 cup fresh basil leaves, tightly packed
- 1/2 cup toasted hazelnuts, skins removed
- 1/2 cup rich extra virgin olive oil
- 1/2 cup freshly grated Parmesan cheese
- 2 cloves garlic, minced
- 1/2 tsp fine sea salt
- 1/4 tsp finely ground black pepper
Instructions
- Bring a large pot of salted water to a rolling boil over high heat.
- Add the dried pasta to the boiling water and cook according to package instructions until al dente, about 8-10 minutes, stirring occasionally to prevent sticking.
- While the pasta cooks, combine the fresh basil leaves, toasted hazelnuts, minced garlic, fine sea salt, and finely ground black pepper in a food processor.
- Pulse the mixture until finely chopped, then slowly drizzle in the rich extra virgin olive oil while the processor is running, until the pesto is smooth and well combined.
- Transfer the pesto to a large mixing bowl and stir in the freshly grated Parmesan cheese until fully incorporated.
- Once the pasta is cooked, reserve 1/2 cup of the pasta water, then drain the pasta thoroughly.
- Add the drained pasta to the bowl with the pesto, tossing to coat evenly. If the pesto is too thick, gradually add the reserved pasta water, a tablespoon at a time, until the desired consistency is achieved.
- Serve immediately, garnished with additional grated Parmesan cheese and a sprinkle of toasted hazelnuts for extra crunch.
Best enjoyed fresh, this Hazelnut Pesto Pasta offers a creamy texture with a robust nutty flavor, elevated by the aromatic basil and sharp Parmesan. For a twist, try serving it with grilled chicken or roasted vegetables to add depth to your meal.
Hazelnut and Apple Crumble
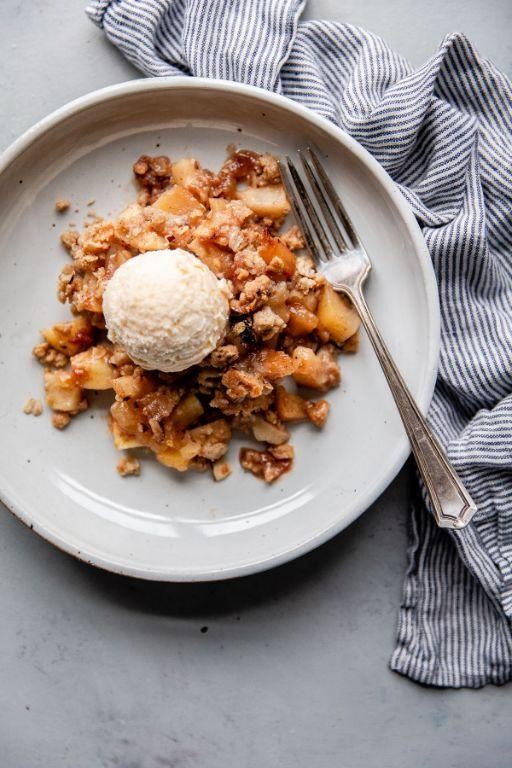
Delightfully simple yet irresistibly delicious, this Hazelnut and Apple Crumble combines the rustic charm of baked apples with the crunchy elegance of toasted hazelnuts. Perfect for beginners, this recipe walks you through each step to ensure a dessert that’s as enjoyable to make as it is to eat.
Ingredients
- 4 cups peeled, thinly sliced tart apples (like Granny Smith)
- 1/2 cup packed light brown sugar
- 1 tablespoon fresh lemon juice
- 1 teaspoon ground cinnamon
- 1/2 cup all-purpose flour
- 1/2 cup rolled oats
- 1/2 cup chopped, toasted hazelnuts
- 1/4 cup cold unsalted butter, cubed
- 1/4 teaspoon fine sea salt
Instructions
- Preheat your oven to 375°F (190°C) and lightly grease an 8-inch baking dish.
- In a large bowl, toss the sliced apples with brown sugar, lemon juice, and cinnamon until evenly coated. Spread this mixture evenly in the prepared baking dish.
- In another bowl, combine the flour, oats, hazelnuts, and sea salt. Add the cubed butter and use your fingers to rub it into the dry ingredients until the mixture resembles coarse crumbs.
- Sprinkle the crumb mixture evenly over the apples in the baking dish.
- Bake for 35-40 minutes, or until the topping is golden brown and the apples are bubbling around the edges.
- Let the crumble cool for at least 10 minutes before serving to allow the juices to thicken slightly.
Velvety soft apples and a crisp, nutty topping make this crumble a textural delight. Serve it warm with a scoop of vanilla ice cream for a comforting dessert that highlights the best of seasonal produce.
Hazelnut Energy Balls
Delightfully simple yet packed with flavor, these Hazelnut Energy Balls are the perfect pick-me-up for any time of the day. Designed with beginners in mind, this recipe walks you through each step to create these nutritious snacks.
Ingredients
- 1 cup raw hazelnuts, toasted and skins removed
- 1/2 cup creamy almond butter, unsweetened
- 1/4 cup pure maple syrup, dark and robust
- 1/4 cup unsweetened cocoa powder, rich and dark
- 1 tsp vanilla extract, pure and aromatic
- 1/4 tsp sea salt, finely ground
- 1/2 cup old-fashioned rolled oats, gluten-free if desired
Instructions
- Preheat your oven to 350°F. Spread the hazelnuts in a single layer on a baking sheet and toast for 10-12 minutes, until fragrant and skins begin to crack.
- Transfer the warm hazelnuts to a clean kitchen towel. Rub them together to remove as much skin as possible. Let cool for 5 minutes.
- In a food processor, combine the toasted hazelnuts, almond butter, maple syrup, cocoa powder, vanilla extract, and sea salt. Process on high for 1-2 minutes, until the mixture is smooth and starts to clump together.
- Add the rolled oats to the food processor. Pulse 3-4 times, just until the oats are incorporated but still provide texture.
- Using a tablespoon, scoop the mixture and roll into 1-inch balls. Place them on a parchment-lined tray.
- Chill the energy balls in the refrigerator for at least 30 minutes to firm up. Store in an airtight container for up to 2 weeks.
Now these Hazelnut Energy Balls offer a delightful crunch from the hazelnuts, a deep chocolate flavor, and a chewy texture from the oats. Serve them as a quick breakfast, a post-workout snack, or even as a healthy dessert option.
Hazelnut Granola
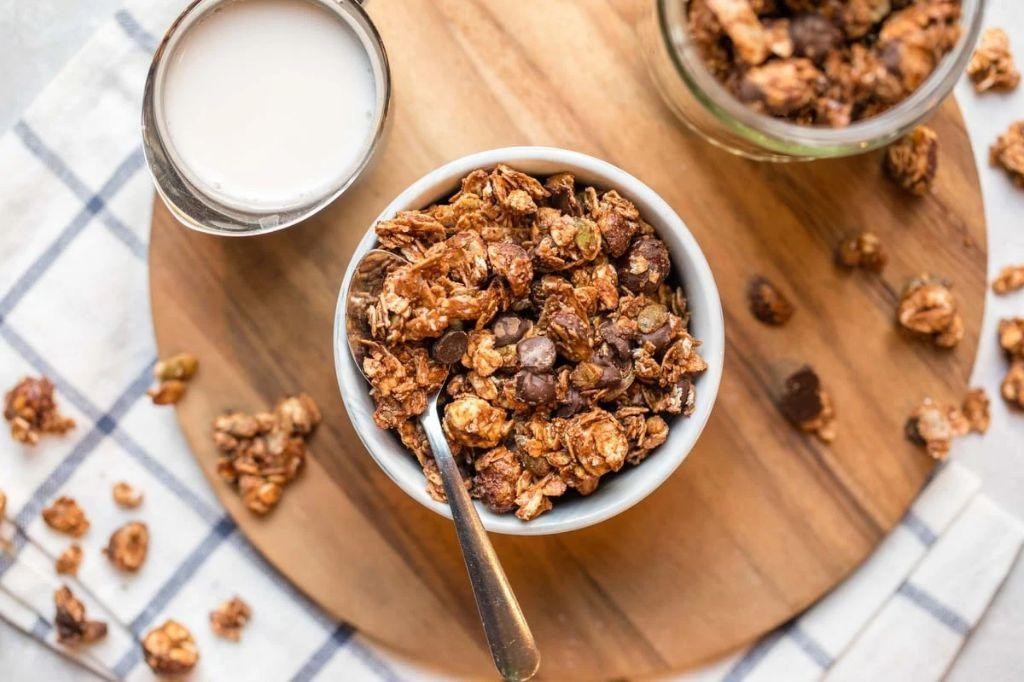
Starting your day with a homemade hazelnut granola not only fills your kitchen with an irresistible aroma but also packs your breakfast with crunch and flavor. Let’s walk through the process of making this delightful granola, ensuring every step is clear and manageable, even for beginners.
Ingredients
- 3 cups old-fashioned rolled oats (not instant)
- 1 cup raw hazelnuts, roughly chopped
- 1/2 cup pure maple syrup, dark amber for depth of flavor
- 1/4 cup rich extra virgin olive oil
- 1 tsp pure vanilla extract
- 1/2 tsp fine sea salt
- 1/2 tsp ground cinnamon, for a warm spice note
Instructions
- Preheat your oven to 300°F (150°C) and line a large baking sheet with parchment paper for easy cleanup.
- In a large mixing bowl, combine the rolled oats and roughly chopped hazelnuts, ensuring they’re evenly distributed.
- In a small saucepan over low heat, warm the maple syrup, olive oil, vanilla extract, sea salt, and cinnamon until the mixture is fluid and well combined, about 2 minutes. Tip: Warming the liquids helps them coat the dry ingredients more evenly.
- Pour the warm liquid mixture over the oats and hazelnuts, stirring thoroughly until every piece is lightly coated.
- Spread the mixture evenly onto the prepared baking sheet, pressing down lightly to help the granola clump together as it bakes.
- Bake for 40-45 minutes, stirring halfway through, until the granola is golden brown and smells toasty. Tip: For extra clumpy granola, resist stirring too much during baking.
- Remove from the oven and let cool completely on the baking sheet. Tip: Granola crisps up as it cools, so patience is key for the perfect texture.
Layers of crunchy oats and toasty hazelnuts come together in this granola, with just the right amount of sweetness and spice. Enjoy it over yogurt, with milk, or straight from the jar for a satisfying snack any time of day.
Hazelnut Chocolate Chip Cookies

Every baker knows the joy of pulling a tray of freshly baked cookies out of the oven, especially when they’re as decadent as Hazelnut Chocolate Chip Cookies. This recipe combines the rich flavors of toasted hazelnuts and melty chocolate chips in a cookie that’s crispy on the edges and chewy in the center.
Ingredients
- 1 cup unsalted butter, softened to room temperature
- 1 cup light brown sugar, packed for a moist sweetness
- 3/4 cup granulated sugar, for that perfect crisp
- 2 large farm-fresh eggs, at room temperature
- 2 tsp pure vanilla extract, for aromatic depth
- 2 1/4 cups all-purpose flour, spooned and leveled
- 1 tsp baking soda, for lift
- 1/2 tsp fine sea salt, to balance the sweetness
- 1 cup semi-sweet chocolate chips, for gooey pockets
- 1 cup toasted hazelnuts, roughly chopped for crunch
Instructions
- Preheat your oven to 375°F (190°C) and line two baking sheets with parchment paper.
- In a large bowl, cream together the softened butter, light brown sugar, and granulated sugar until light and fluffy, about 3 minutes.
- Beat in the eggs one at a time, then stir in the vanilla extract until well combined.
- In a separate bowl, whisk together the flour, baking soda, and sea salt.
- Gradually add the dry ingredients to the wet ingredients, mixing just until combined to avoid tough cookies.
- Fold in the chocolate chips and chopped hazelnuts until evenly distributed throughout the dough.
- Using a cookie scoop or tablespoon, drop dough onto the prepared baking sheets, spacing them 2 inches apart.
- Bake for 10-12 minutes, or until the edges are golden but the centers are still soft.
- Let the cookies cool on the baking sheets for 5 minutes before transferring to a wire rack to cool completely.
Ready to indulge? These Hazelnut Chocolate Chip Cookies offer a delightful contrast of textures, from the crunchy hazelnuts to the soft, chocolatey centers. Serve them warm with a glass of cold milk for the ultimate comfort food experience.
Hazelnut Frosting for Cupcakes

Here’s how to create a luscious hazelnut frosting that will elevate your cupcakes to a whole new level of deliciousness. Perfect for beginners, this guide will walk you through each step with precision.
Ingredients
- 1 cup unsalted butter, softened to room temperature for easy blending
- 4 cups powdered sugar, sifted to avoid lumps
- 1/2 cup hazelnut spread, rich and creamy for a deep nutty flavor
- 2 tsp pure vanilla extract, for a warm aromatic touch
- 2-3 tbsp heavy cream, to achieve the perfect spreadable consistency
Instructions
- In a large mixing bowl, beat the softened unsalted butter on medium speed for 2 minutes until it’s light and fluffy.
- Gradually add the sifted powdered sugar to the butter, 1 cup at a time, beating well after each addition to ensure a smooth mixture.
- Add the rich and creamy hazelnut spread and pure vanilla extract to the bowl, then beat on medium speed until fully incorporated.
- Pour in the heavy cream, 1 tablespoon at a time, and continue beating until the frosting reaches your desired consistency. Tip: For a stiffer frosting, use less cream; for a softer one, add more.
- Once all ingredients are combined, beat the frosting on high speed for an additional 2 minutes to make it extra fluffy. Tip: Scrape down the sides of the bowl occasionally to ensure even mixing.
- Use a spatula to give the frosting a final stir by hand, ensuring there are no streaks of unmixed ingredients. Tip: If the frosting is too thick, a little more cream can be added until it’s just right.
Mmm, the hazelnut frosting is now ready to adorn your cupcakes with its silky texture and irresistible nutty sweetness. For a decorative touch, pipe it using a star tip or simply spread it with a knife for a rustic look.
Hazelnut and Raspberry Tart
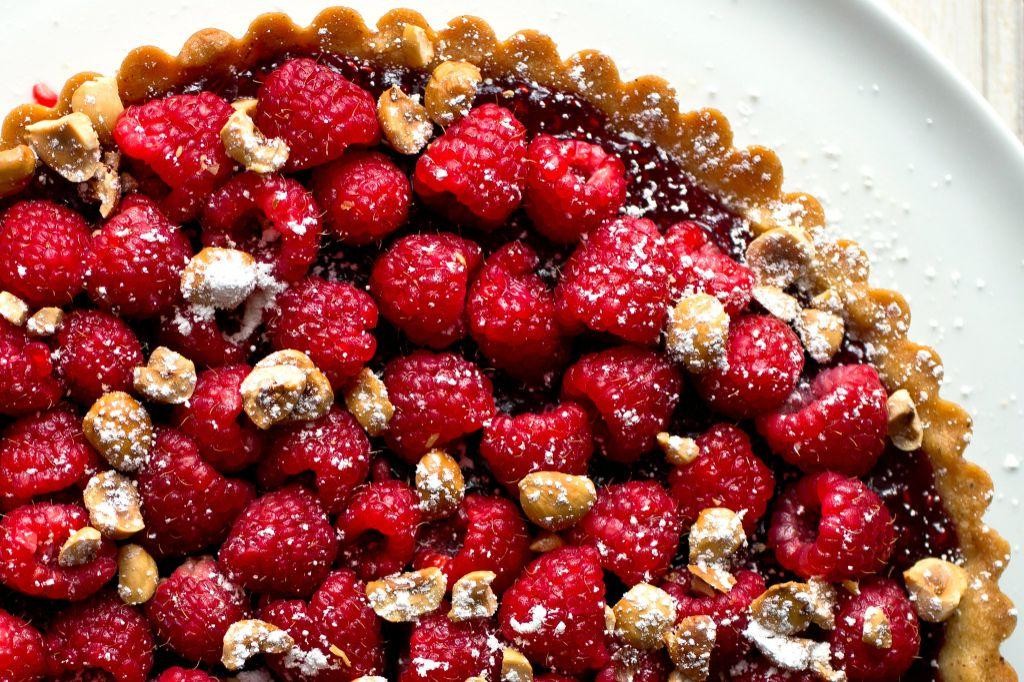
Mastering the art of baking a Hazelnut and Raspberry Tart begins with understanding the harmony between the nutty crust and the tangy fruit filling. This guide will walk you through each step, ensuring a delightful dessert that’s as beautiful as it is delicious.
Ingredients
- 1 1/2 cups finely ground hazelnuts, toasted for depth of flavor
- 1/2 cup unsalted butter, cold and cubed for a flaky crust
- 1/4 cup granulated sugar, for a subtle sweetness
- 1 large farm-fresh egg yolk, to bind the crust
- 1 cup fresh raspberries, vibrant and slightly tart
- 1/2 cup raspberry jam, seedless for a smooth glaze
- 1 tbsp lemon zest, freshly grated for a citrusy brightness
Instructions
- Preheat your oven to 350°F (175°C) to ensure it’s ready for baking.
- In a food processor, combine the ground hazelnuts, cold cubed butter, and granulated sugar. Pulse until the mixture resembles coarse crumbs.
- Add the egg yolk to the mixture and pulse again until the dough starts to come together. Tip: The dough should hold its shape when pressed between your fingers.
- Press the dough evenly into a 9-inch tart pan with a removable bottom, ensuring an even layer on the bottom and sides. Chill in the refrigerator for 30 minutes to firm up.
- Bake the chilled crust for 15 minutes, or until lightly golden. Let it cool slightly before adding the filling.
- Spread the raspberry jam evenly over the baked crust, then arrange the fresh raspberries on top in a single layer. Tip: For an elegant presentation, place the raspberries in concentric circles.
- Sprinkle the freshly grated lemon zest over the raspberries for an added layer of flavor.
- Bake the tart for another 10 minutes, just until the raspberries are soft but still hold their shape.
- Allow the tart to cool completely before slicing to ensure clean cuts. Tip: Use a sharp knife dipped in hot water for smooth slices.
Unveil a tart that boasts a crisp hazelnut crust contrasting with the juicy burst of raspberries. The lemon zest adds a refreshing twist, making each bite a complex play of textures and flavors. Serve it with a dollop of whipped cream or a scoop of vanilla ice cream for an indulgent finish.
Hazelnut Stuffed Dates
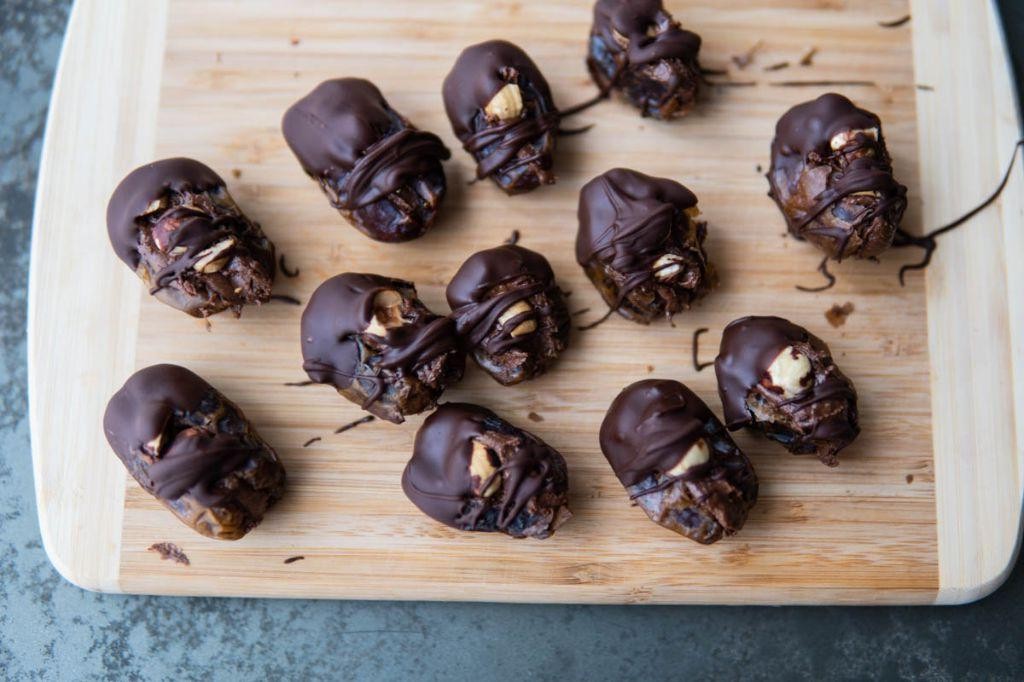
Let’s dive into creating a simple yet elegant dessert that’s perfect for any occasion. Hazelnut Stuffed Dates are a delightful treat that combines the natural sweetness of dates with the rich, nutty flavor of hazelnuts, creating a perfect balance of textures and tastes.
Ingredients
- 12 large Medjool dates, pitted but left whole
- 24 whole hazelnuts, toasted and skins removed
- 1/4 cup creamy almond butter
- 1 tbsp pure maple syrup
- 1/2 tsp vanilla extract
- A pinch of sea salt
- 1/4 cup dark chocolate chips, melted
Instructions
- Preheat your oven to 350°F and spread the hazelnuts on a baking sheet. Toast for 10 minutes, or until fragrant and the skins begin to crack.
- Remove the hazelnuts from the oven and wrap them in a clean kitchen towel. Rub vigorously to remove the skins. Let them cool completely.
- In a small bowl, mix the almond butter, maple syrup, vanilla extract, and sea salt until smooth and well combined.
- Carefully open each date and stuff with two hazelnuts. Then, spoon a small amount of the almond butter mixture over the hazelnuts, pressing gently to close the date around the filling.
- Place the stuffed dates on a parchment-lined tray and drizzle with melted dark chocolate. Allow the chocolate to set at room temperature for about 30 minutes.
- Tip: For an extra crunch, you can chop some of the hazelnuts and sprinkle them over the chocolate before it sets.
- Tip: If the almond butter mixture is too thick, warm it slightly to make it easier to work with.
- Tip: To speed up the chocolate setting process, you can place the dates in the refrigerator for 10 minutes.
Unwrap the elegance of these Hazelnut Stuffed Dates to discover a chewy, creamy, and crunchy delight. Serve them as a sophisticated snack at your next gathering or enjoy them as a decadent treat with your afternoon tea.
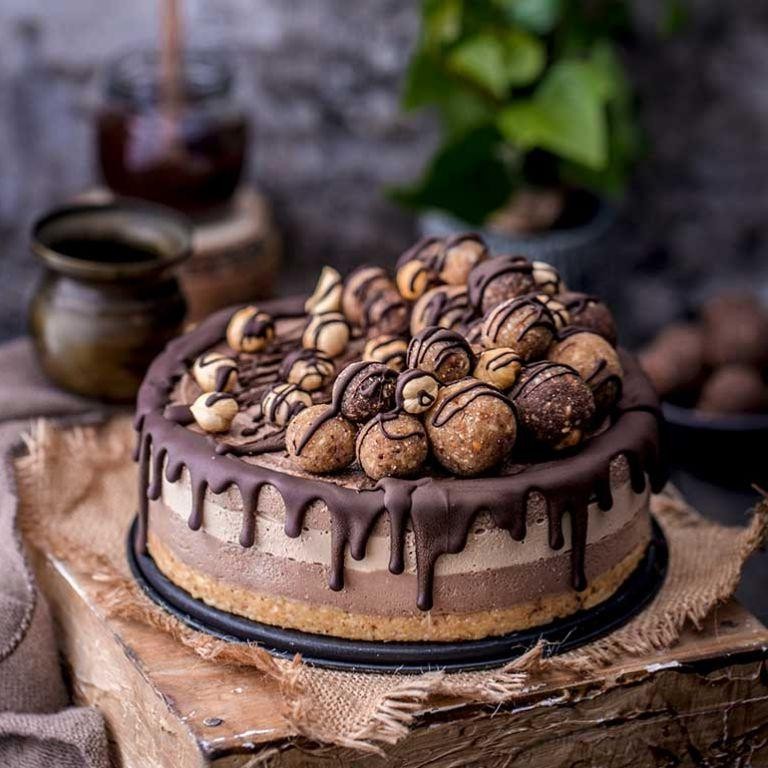
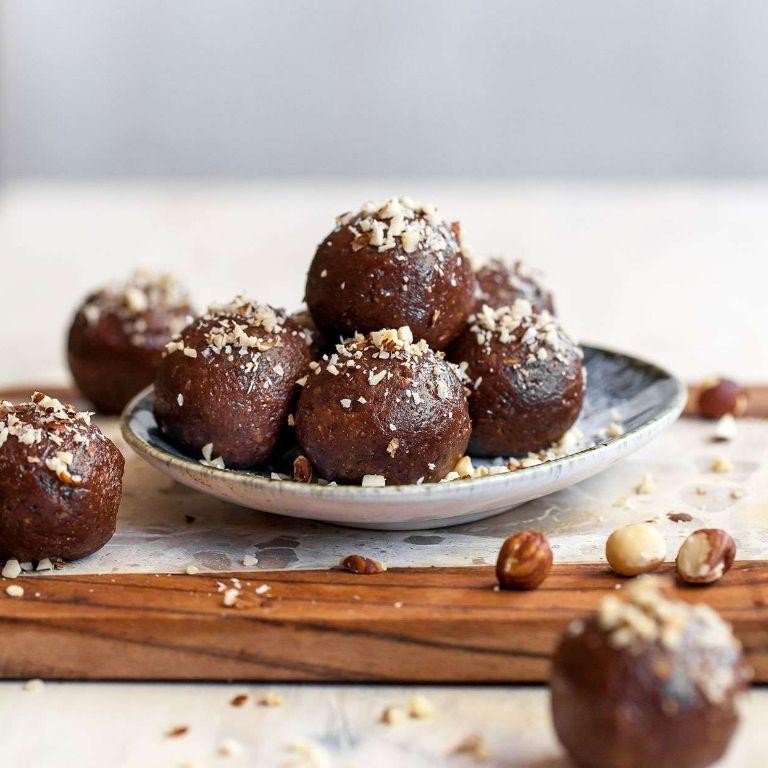
Hazelnut and Dark Chocolate Truffles
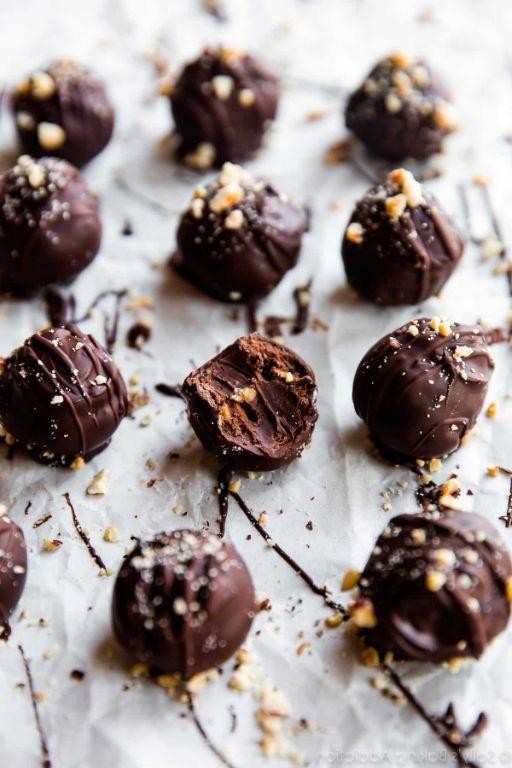
Venturing into the world of homemade truffles can seem daunting, but with this straightforward guide, you’ll be crafting decadent Hazelnut and Dark Chocolate Truffles that rival any gourmet shop’s offerings.
Ingredients
- 1 cup heavy cream, velvety and rich
- 12 oz high-quality dark chocolate, finely chopped
- 1/2 cup toasted hazelnuts, roughly chopped for crunch
- 2 tbsp unsalted butter, softened to room temperature
- 1/4 cup cocoa powder, Dutch-processed for depth
Instructions
- In a small saucepan, gently heat the heavy cream over medium heat until it begins to simmer, about 3-4 minutes. Do not let it boil.
- Place the finely chopped dark chocolate in a heatproof bowl. Pour the hot cream over the chocolate and let it sit for 2 minutes to soften.
- Stir the chocolate and cream mixture with a rubber spatula until smooth and fully combined. Tip: Ensure no water gets into the mixture to prevent seizing.
- Add the softened butter to the chocolate mixture, stirring until the butter is completely melted and the mixture is glossy.
- Cover the bowl with plastic wrap and refrigerate for at least 2 hours, or until the mixture is firm enough to scoop.
- Using a small cookie scoop or a teaspoon, form the chilled mixture into 1-inch balls. Roll each ball between your palms to smooth. Tip: Work quickly to prevent the chocolate from melting in your hands.
- Roll each truffle in the chopped hazelnuts, pressing lightly to adhere. Then, dust with cocoa powder for a classic finish. Tip: For variety, try rolling some truffles in additional cocoa powder or melted chocolate.
Rich in flavor with a melt-in-your-mouth texture, these truffles are a luxurious treat. Serve them in mini paper cups for an elegant presentation or as a surprise inside a dessert box for a loved one.
Conclusion
We hope this roundup of 18 delicious and easy hazelnut recipes inspires your next kitchen adventure! Perfect for beginners, each recipe is a simple way to bring the rich, nutty flavor of hazelnuts into your home. Don’t forget to try your favorites, share your thoughts in the comments, and pin this article on Pinterest for your next cooking session. Happy baking!