Embark on a culinary journey to the heart of the Middle East with our roundup of 18 Delicious Palestinian Recipes Authentic to tradition yet perfect for your North American kitchen. Whether you’re craving the comfort of a hearty Maqluba or the fresh zest of Fattoush salad, these dishes promise to bring warmth, flavor, and a touch of adventure to your dinner table. Let’s dive in!
Maqluba

After a long day of craving something hearty and comforting, I stumbled upon Maqluba, a dish that’s as fun to make as it is to say. It’s a traditional Middle Eastern upside-down rice and vegetable casserole that layers flavors in a way that’s both surprising and utterly delicious.
Ingredients
- 2 cups basmati rice (soaked for 30 minutes for fluffier results)
- 1 large eggplant, sliced into 1/2-inch rounds (salting them removes bitterness)
- 2 large tomatoes, sliced (ripe ones add sweetness)
- 1 lb chicken thighs (bone-in for more flavor)
- 4 cups chicken broth (homemade elevates the dish)
- 1 tsp turmeric (for that golden hue)
- 1/2 tsp cinnamon (a whisper adds warmth)
- Salt and pepper to taste (start with 1 tsp salt)
- 3 tbsp olive oil (or any neutral oil)
Instructions
- Preheat your oven to 375°F (190°C) to ensure it’s ready for baking.
- Heat olive oil in a large, oven-proof pot over medium heat. Brown the chicken thighs for 5 minutes per side, then set aside.
- In the same pot, layer the eggplant and tomato slices at the bottom, creating a colorful base.
- Drain the soaked rice and mix it with turmeric, cinnamon, salt, and pepper. Spread this over the vegetables.
- Place the browned chicken thighs on top of the rice. Gently pour the chicken broth over everything, ensuring the rice is submerged.
- Bring the pot to a simmer on the stove, then cover and transfer to the oven. Bake for 45 minutes, or until the rice is tender and the liquid is absorbed.
- Let the Maqluba rest for 10 minutes after baking. Then, carefully invert it onto a large serving platter, revealing the beautiful layers.
How the spices meld with the tender chicken and vegetables is nothing short of magical. Serve it with a side of yogurt or a crisp salad to cut through the richness, and watch as it becomes a requested favorite at your table.
Musakhan

Nothing brings me more joy than sharing a dish that’s close to my heart, and today, it’s all about Musakhan. This Palestinian classic, with its sumac-spiced chicken and caramelized onions piled high on flatbread, is a celebration of flavors that I stumbled upon during a food festival last year, and it’s been a staple in my kitchen ever since.
Ingredients
- 4 chicken thighs (bone-in, skin-on for maximum flavor)
- 2 large onions, thinly sliced (the thinner, the better they caramelize)
- 1/4 cup olive oil (or any neutral oil, but olive adds a nice depth)
- 2 tbsp sumac (adjust to taste, but it’s the star of the show)
- 1 tsp ground cumin (for that warm, earthy note)
- Salt (to taste, but don’t be shy)
- 4 pieces of flatbread (store-bought is fine, but homemade is heavenly)
- 1/4 cup pine nuts, toasted (for that crunch and nuttiness)
Instructions
- Preheat your oven to 375°F (190°C) to get it ready for the chicken.
- In a large skillet, heat the olive oil over medium heat and add the sliced onions. Cook them slowly, stirring occasionally, until they’re deeply golden and caramelized, about 20 minutes. Tip: Lower the heat if they’re browning too quickly.
- While the onions cook, season the chicken thighs with sumac, cumin, and salt, making sure to get under the skin for maximum flavor.
- Once the onions are done, remove them from the skillet and set aside. In the same skillet, sear the chicken thighs skin-side down until golden, about 5 minutes per side. Tip: Don’t overcrowd the skillet to ensure a good sear.
- Transfer the chicken to a baking dish, top with the caramelized onions, and bake in the preheated oven for 25 minutes, or until the chicken is cooked through.
- While the chicken bakes, warm the flatbread in the oven for the last 5 minutes of cooking time. Tip: Wrap them in foil to keep them soft.
- To serve, place a piece of flatbread on each plate, top with a chicken thigh and a generous heap of onions, and sprinkle with toasted pine nuts.
Musakhan is a dish where every bite is a harmony of textures and flavors—juicy chicken, sweet onions with a hint of tang from the sumac, all resting on soft flatbread with the occasional crunch of pine nuts. I love serving it with a side of yogurt mixed with cucumber and mint for a refreshing contrast.
Fattet Hummus
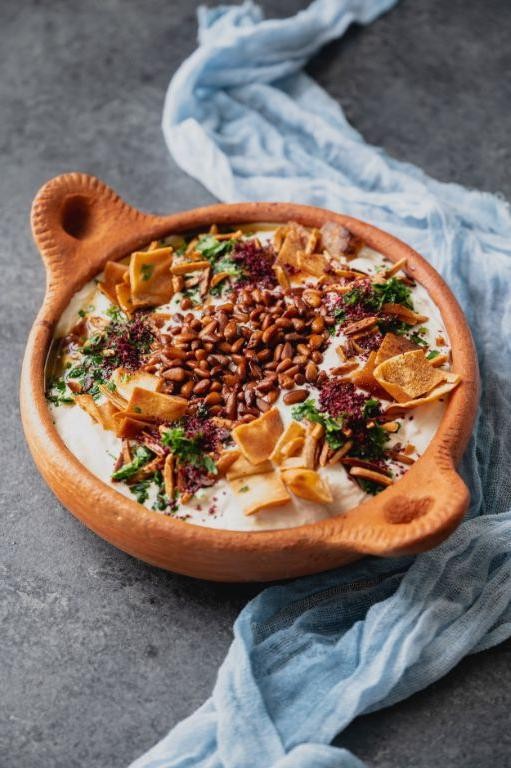
Discovering the rich flavors of Middle Eastern cuisine has been a journey of love for me, especially when it comes to Fattet Hummus. This dish, with its layers of crispy pita, creamy hummus, and tangy yogurt, is a comfort food that never fails to impress. I remember the first time I tried it at a small eatery in Brooklyn; the explosion of textures and flavors was unforgettable.
Ingredients
- 2 cups cooked chickpeas (canned is fine, but drain and rinse well)
- 1/2 cup tahini (stir well before using)
- 1/4 cup lemon juice (freshly squeezed for the best flavor)
- 2 garlic cloves (minced, adjust to taste)
- 1/2 tsp salt (adjust to taste)
- 1/4 cup olive oil (or any neutral oil)
- 2 pita breads (torn into bite-sized pieces and toasted until crispy)
- 1 cup plain yogurt (full-fat for creaminess)
- 1 tbsp sumac (for garnish, optional but adds a nice tang)
- A handful of pine nuts (toasted, for crunch)
Instructions
- Preheat your oven to 350°F. Spread the torn pita pieces on a baking sheet and toast for about 10 minutes, or until golden and crispy. Keep an eye on them to prevent burning.
- In a blender, combine the chickpeas, tahini, lemon juice, garlic, and salt. Blend until smooth, adding a little water if needed to reach your desired consistency. Tip: For extra creamy hummus, peel the chickpeas before blending.
- Heat the olive oil in a small pan over medium heat. Add the toasted pita pieces and stir to coat them in the oil. This step adds an extra layer of flavor to the dish.
- In a serving dish, start layering: first the oiled pita pieces, then the hummus, and finally the yogurt. Spread each layer evenly before adding the next.
- Garnish with sumac and toasted pine nuts. Tip: Let the dish sit for a few minutes before serving to allow the flavors to meld together.
Combining the crispiness of the pita with the smooth hummus and cool yogurt creates a delightful contrast in every bite. For a creative twist, try adding a drizzle of pomegranate molasses on top for a sweet and sour kick.
Warak Enab
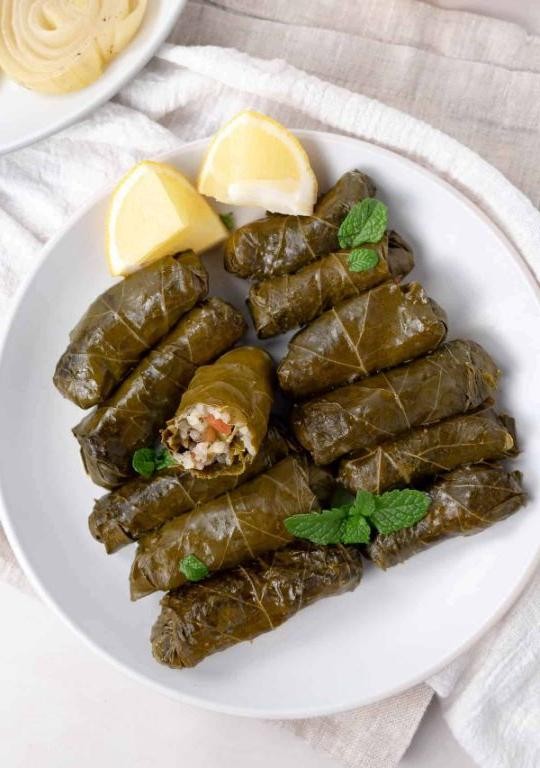
Every time I think about Warak Enab, I’m transported back to my grandmother’s kitchen, where the aroma of grape leaves stuffed with a savory filling would fill the air. It’s a dish that requires patience and love, but the result is always worth the effort.
Ingredients
- 1 jar grape leaves (about 50 leaves), rinsed and drained
- 1 lb ground lamb (or beef for a different flavor profile)
- 1 cup uncooked white rice, rinsed
- 1 large onion, finely diced
- 1/4 cup olive oil (or any neutral oil)
- 2 tbsp tomato paste
- 1 tsp allspice
- 1 tsp salt (adjust to taste)
- 1/2 tsp black pepper
- 4 cups chicken broth (for cooking)
- 1 lemon, sliced (for garnish and added flavor)
Instructions
- In a large bowl, combine the ground lamb, rice, diced onion, olive oil, tomato paste, allspice, salt, and black pepper. Mix well until all ingredients are evenly distributed.
- Lay a grape leaf flat on a clean surface, shiny side down. Place a teaspoon of the filling near the stem end, then fold the sides over the filling and roll tightly from the stem end to the tip.
- Repeat the process with the remaining leaves and filling, packing the rolls snugly in a large pot to prevent them from unraveling during cooking.
- Pour the chicken broth over the rolls, ensuring they are fully submerged. Place a heavy plate on top to keep them in place.
- Bring the broth to a boil over medium-high heat, then reduce to a simmer. Cover and cook for 45 minutes, or until the rice is tender and the leaves are soft.
- Carefully remove the rolls from the pot and arrange them on a serving platter. Garnish with lemon slices for a fresh, zesty finish.
You’ll love the tender texture of the grape leaves paired with the flavorful, spiced filling. Serve these beauties with a side of yogurt or a crisp salad for a complete meal that’s sure to impress.
Knafeh
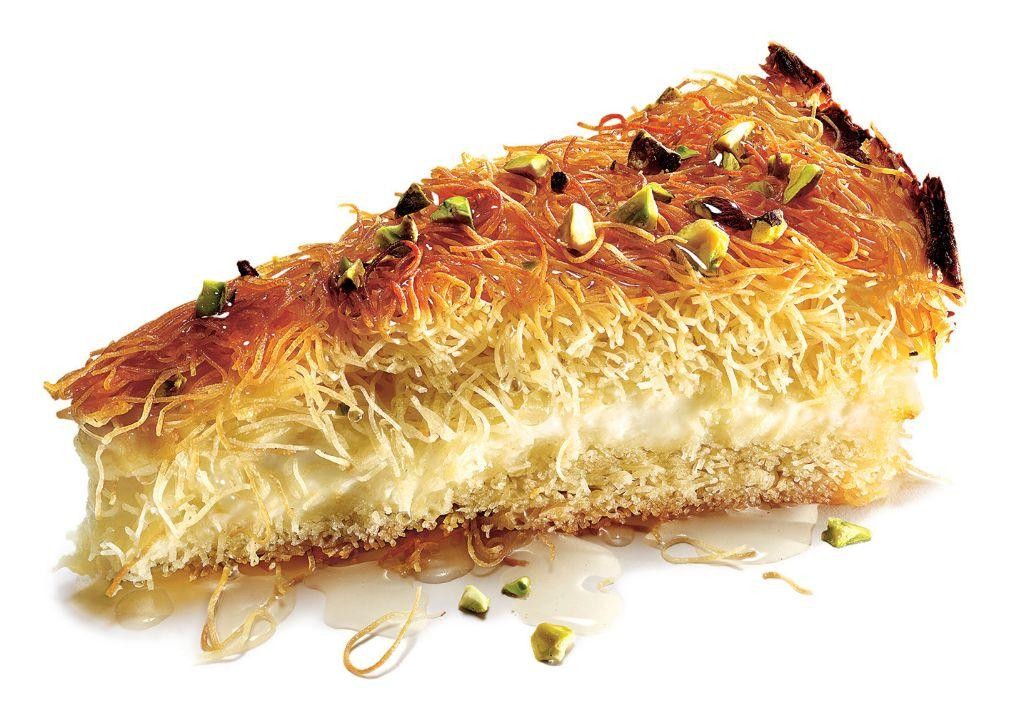
Just when I thought I’d tried every dessert under the sun, I stumbled upon Knafeh at a local Middle Eastern festival, and it was love at first bite. The crispy, cheesy, syrupy goodness had me hooked, and I knew I had to learn how to make it at home. Here’s my take on this irresistible treat, simplified for the home cook.
Ingredients
- 1 package (16 oz) shredded phyllo dough (kataifi) – find it in the freezer section of Middle Eastern stores
- 1 cup unsalted butter, melted – or use ghee for a richer flavor
- 1 lb akkawi cheese, shredded – mozzarella can be a substitute if akkawi is hard to find
- 1 cup sugar – adjust based on your sweetness preference
- 1 cup water
- 1 tbsp lemon juice – fresh is best for a bright flavor
- 1 tsp orange blossom water – adds a fragrant touch, optional but recommended
- 1/2 cup crushed pistachios – for garnish, adds a nice crunch
Instructions
- Preheat your oven to 350°F (175°C) and grease a 9×13 inch baking dish with some of the melted butter.
- In a large bowl, mix the shredded phyllo dough with the remaining melted butter until fully coated. This ensures every strand is crispy.
- Press half of the buttered phyllo dough into the bottom of the prepared baking dish, creating an even layer.
- Spread the shredded akkawi cheese evenly over the phyllo layer, then top with the remaining phyllo dough, pressing down gently.
- Bake in the preheated oven for 30-35 minutes, or until the top is golden brown and crispy.
- While the Knafeh bakes, combine sugar, water, and lemon juice in a small saucepan. Bring to a boil over medium heat, then simmer for 10 minutes until slightly thickened. Stir in orange blossom water.
- Once the Knafeh is out of the oven, immediately pour the warm syrup over the top, allowing it to soak in.
- Sprinkle with crushed pistachios before serving.
Now, the Knafeh is ready to steal the show with its perfect balance of crispy, creamy, and sweet. Serve it warm for the cheese to be delightfully stretchy, or enjoy it at room temperature when the flavors have melded beautifully. Either way, it’s a dessert that promises to impress.
Shakshuka
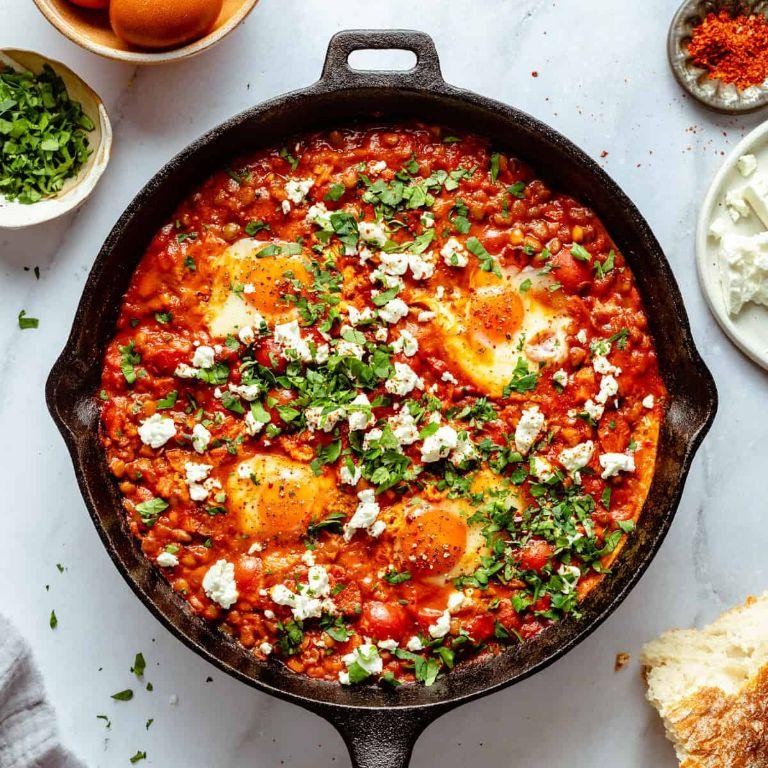
How many times have I found myself staring into the fridge, wondering what to make for brunch that’s both satisfying and a little adventurous? That’s how I stumbled upon shakshuka, a dish that’s as fun to say as it is to eat. It’s become my go-to for lazy weekends when I want something hearty without too much fuss.
Ingredients
- 2 tbsp olive oil (or any neutral oil)
- 1 medium onion, diced
- 1 red bell pepper, diced
- 3 garlic cloves, minced
- 1 tsp cumin (adjust to taste)
- 1 tsp paprika (adjust to taste)
- 1 can (28 oz) crushed tomatoes
- 4 eggs
- Salt and pepper to taste
- Fresh cilantro or parsley for garnish
Instructions
- Heat olive oil in a large skillet over medium heat until shimmering, about 2 minutes.
- Add diced onion and bell pepper, cooking until soft, about 5 minutes. Stir occasionally to prevent burning.
- Stir in minced garlic, cumin, and paprika, cooking for 1 minute until fragrant. Tip: Toasting the spices releases their flavors.
- Pour in crushed tomatoes, stirring to combine. Simmer for 10 minutes, allowing the sauce to thicken slightly.
- Create 4 small wells in the sauce with a spoon. Crack an egg into each well. Tip: Crack eggs into a small bowl first to avoid shells in your dish.
- Cover the skillet and cook for 5-7 minutes, or until eggs are set to your liking. Tip: For runnier yolks, check at 5 minutes.
- Season with salt and pepper, garnish with fresh cilantro or parsley, and serve directly from the skillet.
Absolutely nothing beats the creamy yolks mingling with the spicy, tangy tomato sauce. Serve with crusty bread to scoop up every last bit, or for a heartier meal, pair with a simple green salad.
Falafel
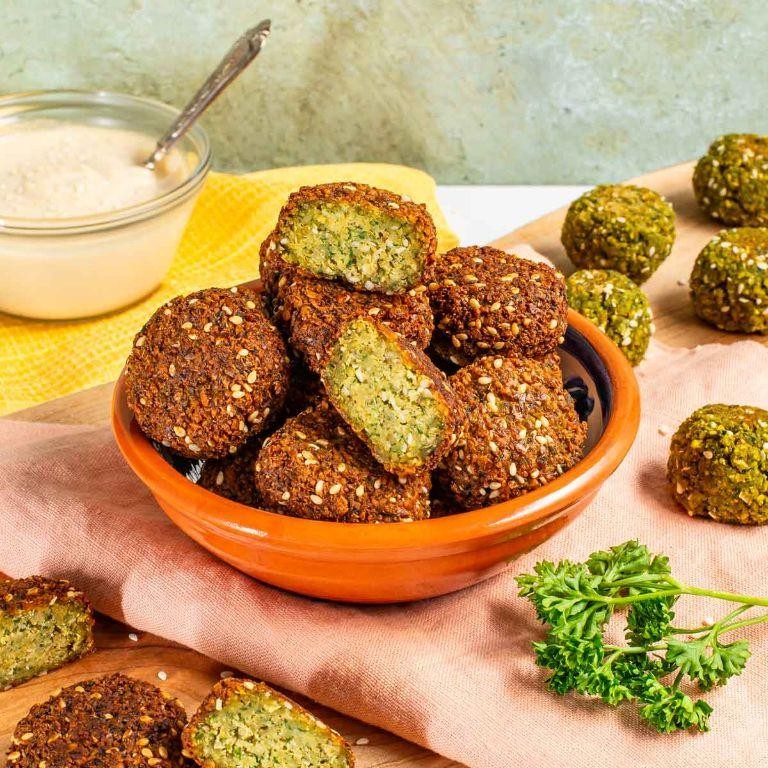
Falafel has always been my go-to when I crave something crispy yet packed with flavor. Whether it’s a lazy Sunday or I’m hosting friends, these little chickpea patties never disappoint. I remember the first time I tried making them at home; the aroma filled my kitchen, and I knew I was onto something special.
Ingredients
- 1 cup dried chickpeas (soaked overnight, do not use canned)
- 1 small onion, roughly chopped (about 1/2 cup)
- 2 garlic cloves (minced)
- 1/4 cup fresh parsley (chopped, stems removed for better texture)
- 1 tsp ground cumin (toasted for extra flavor)
- 1 tsp ground coriander
- 1/2 tsp baking soda (helps with fluffiness)
- 4 cups vegetable oil (or any neutral oil for frying)
- Salt to taste (start with 1/2 tsp)
Instructions
- Drain the soaked chickpeas and pat them dry with a clean towel to remove excess moisture.
- In a food processor, combine chickpeas, onion, garlic, parsley, cumin, coriander, and salt. Pulse until the mixture is finely ground but not pureed.
- Transfer the mixture to a bowl, stir in the baking soda, and let it rest for 15 minutes. This helps the flavors meld.
- Heat the oil in a deep fryer or large pot to 350°F. Use a candy thermometer to check the temperature for perfect frying.
- Shape the mixture into small balls or patties, about 1.5 inches in diameter. If the mixture is too wet, add a tablespoon of flour to bind it.
- Fry the falafel in batches for 3-4 minutes, or until golden brown and crispy. Avoid overcrowding the pot to ensure even cooking.
- Remove with a slotted spoon and drain on paper towels to absorb excess oil.
Serve these golden beauties hot, tucked into pita with tahini sauce or atop a salad for a lighter option. The crispy exterior gives way to a moist, herb-filled center that’s simply irresistible. Sometimes, I like to add a sprinkle of sumac for a tangy twist.
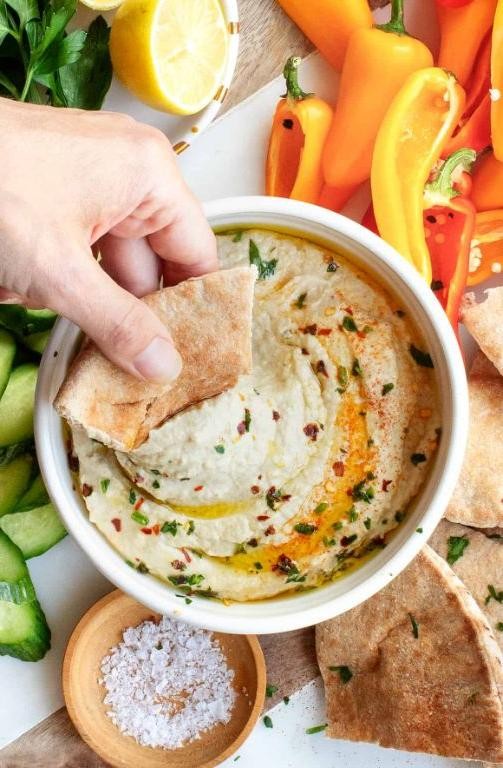
Hummus
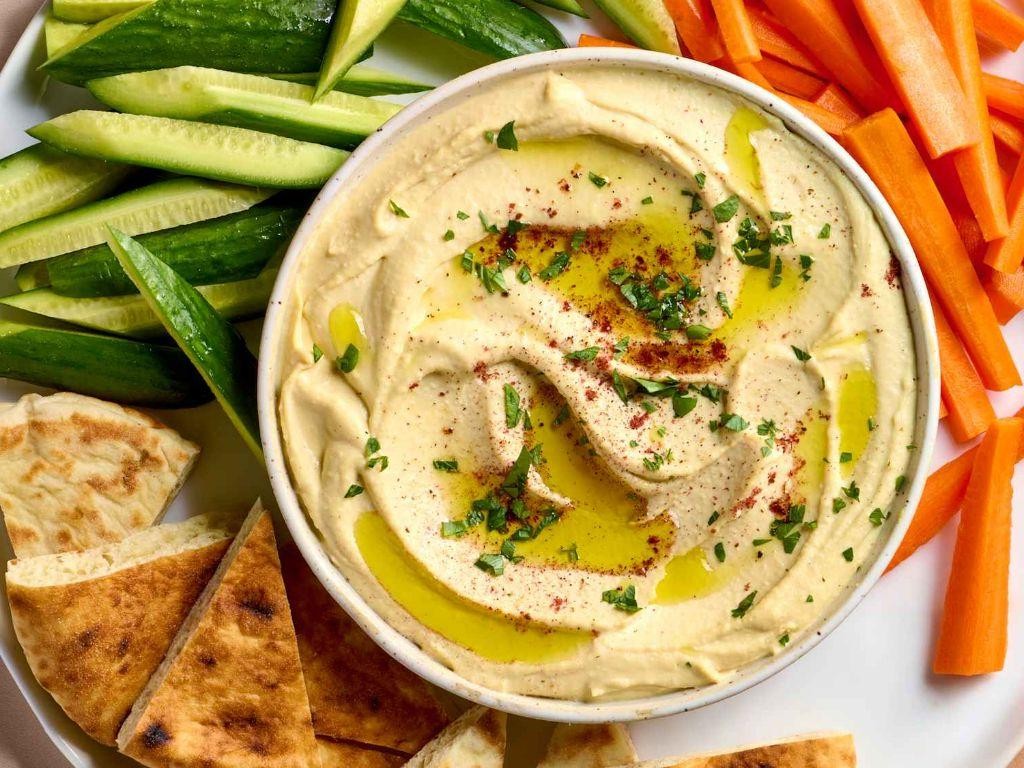
Craving something creamy, healthy, and utterly delicious? Hummus has been my go-to snack for years, especially when I need something quick that doesn’t skimp on flavor. I remember the first time I made it at home, skeptical that it could rival the store-bought versions, but oh, was I wrong!
Ingredients
- 1 can (15 oz) chickpeas, drained and rinsed (save some for garnish)
- 1/4 cup tahini (stir well before using)
- 2 tbsp lemon juice (freshly squeezed for the best flavor)
- 2 cloves garlic, minced (adjust to taste)
- 1/2 tsp cumin (toasted for extra aroma)
- 1/4 cup olive oil (or any neutral oil)
- Salt to taste (start with 1/2 tsp)
- 2-3 tbsp water (as needed for consistency)
- Paprika and olive oil for garnish
Instructions
- In a food processor, combine the chickpeas, tahini, lemon juice, garlic, cumin, and salt. Process until the mixture is coarse.
- With the processor running, slowly drizzle in the olive oil until the mixture becomes smooth and creamy. This should take about 1-2 minutes.
- If the hummus is too thick, add water one tablespoon at a time until you reach your desired consistency. Tip: The hummus will thicken slightly in the fridge, so aim for a bit looser than you’d like.
- Taste and adjust the seasoning, adding more salt, lemon juice, or garlic as needed. Tip: Letting the hummus sit for an hour before serving allows the flavors to meld beautifully.
- Transfer the hummus to a serving bowl, drizzle with olive oil, and sprinkle with paprika and reserved chickpeas for garnish.
Out of all the dips I’ve made, hummus holds a special place for its versatility and depth of flavor. The creamy texture pairs perfectly with crunchy veggies or warm pita, and it’s always a hit at gatherings. Try spreading it on toast with avocado for a quick, nutritious breakfast!
Baba Ganoush
Finally, let’s talk about Baba Ganoush, the smoky, creamy eggplant dip that’s been a staple in my kitchen for years. I remember the first time I tried it at a friend’s gathering; its rich flavor and smooth texture had me hooked, and I’ve been making it ever since, tweaking the recipe to perfection.
Ingredients
- 2 medium eggplants (about 2 lbs total)
- 1/4 cup tahini (stir well before measuring)
- 2 tbsp extra virgin olive oil (or any neutral oil)
- 2 garlic cloves, minced (adjust to taste)
- 2 tbsp lemon juice (freshly squeezed for best flavor)
- 1/2 tsp ground cumin
- Salt to taste (start with 1/2 tsp)
- 1 tbsp chopped parsley (for garnish)
Instructions
- Preheat your grill or broiler to high heat (about 500°F). If using a broiler, position the oven rack 6 inches from the heat source.
- Pierce the eggplants all over with a fork to prevent them from bursting. Place them on the grill or under the broiler.
- Cook the eggplants, turning occasionally, until the skin is charred and the flesh is very soft, about 25-30 minutes. Tip: The eggplants should collapse when pressed.
- Remove the eggplants from the heat and let them cool until they’re comfortable to handle, about 10 minutes.
- Cut the eggplants open and scoop out the flesh into a colander. Let it drain for 5 minutes to remove excess liquid.
- Transfer the eggplant flesh to a food processor. Add the tahini, olive oil, garlic, lemon juice, cumin, and salt.
- Pulse the mixture until it’s mostly smooth but still has some texture. Tip: Over-processing can make the dip too runny.
- Taste and adjust the seasoning, adding more salt, lemon juice, or garlic as needed.
- Transfer the Baba Ganoush to a serving bowl and drizzle with a little more olive oil. Garnish with chopped parsley.
Unbelievably creamy with a hint of smokiness, this Baba Ganoush is perfect as a dip with warm pita bread or as a spread on sandwiches. For an extra touch, sprinkle with smoked paprika or serve with a side of pickled vegetables.
Tabouleh
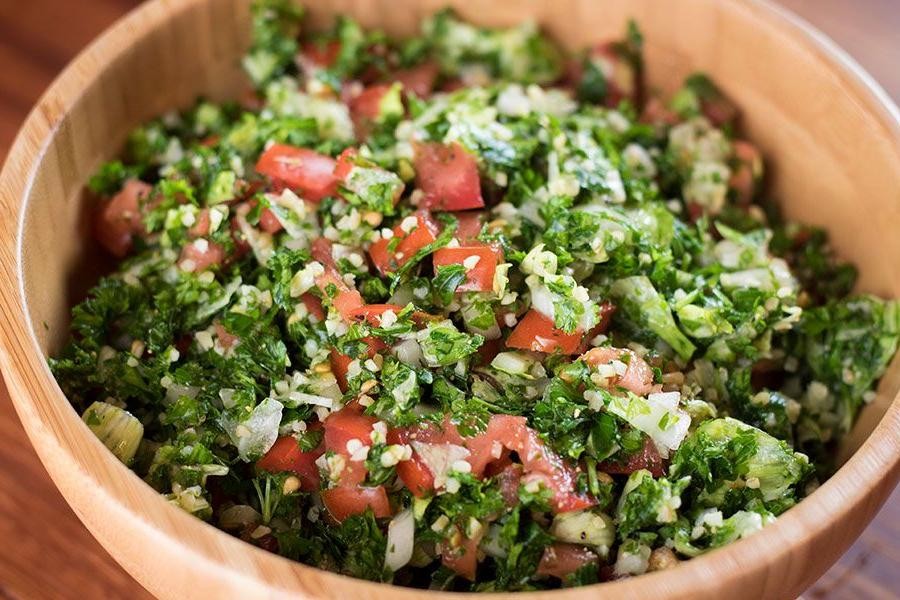
Yesterday, I found myself craving something fresh and vibrant to beat the summer heat, and that’s when tabouleh came to mind. This Middle Eastern salad is not only a feast for the eyes but also packed with flavors that dance on your palate.
Ingredients
- 1 cup bulgur wheat (fine or medium grain works best)
- 2 cups boiling water (for soaking the bulgur)
- 1 large cucumber, diced (peel if desired)
- 2 medium tomatoes, diced (remove seeds for less moisture)
- 1/2 cup fresh parsley, finely chopped (flat-leaf for more flavor)
- 1/4 cup fresh mint, finely chopped (adjust to taste)
- 1/4 cup green onions, thinly sliced (both white and green parts)
- 1/4 cup extra virgin olive oil (or any neutral oil)
- 3 tbsp fresh lemon juice (about 1 large lemon)
- 1/2 tsp salt (adjust to taste)
- 1/4 tsp black pepper (freshly ground preferred)
Instructions
- Place the bulgur wheat in a large bowl and pour the boiling water over it. Cover and let it soak for 30 minutes, or until the water is absorbed and the bulgur is tender.
- While the bulgur is soaking, dice the cucumber and tomatoes. For a less watery salad, you can remove the seeds from the tomatoes.
- Finely chop the parsley and mint, and thinly slice the green onions. The finer the chop, the better the flavors will meld together.
- Once the bulgur is ready, fluff it with a fork to separate the grains. This prevents clumping and ensures a light texture.
- Add the diced cucumber, tomatoes, chopped parsley, mint, and green onions to the bulgur. Gently toss to combine.
- In a small bowl, whisk together the olive oil, lemon juice, salt, and black pepper. Pour this dressing over the salad and toss gently to coat everything evenly.
- Let the tabouleh sit for at least 10 minutes before serving to allow the flavors to meld. For the best taste, chill in the refrigerator for an hour.
Mmm, the tabouleh is a refreshing mix of crunchy vegetables and fluffy bulgur, with a zesty lemon dressing that brings it all together. Serve it as a side dish or scoop it up with some warm pita bread for a light meal.
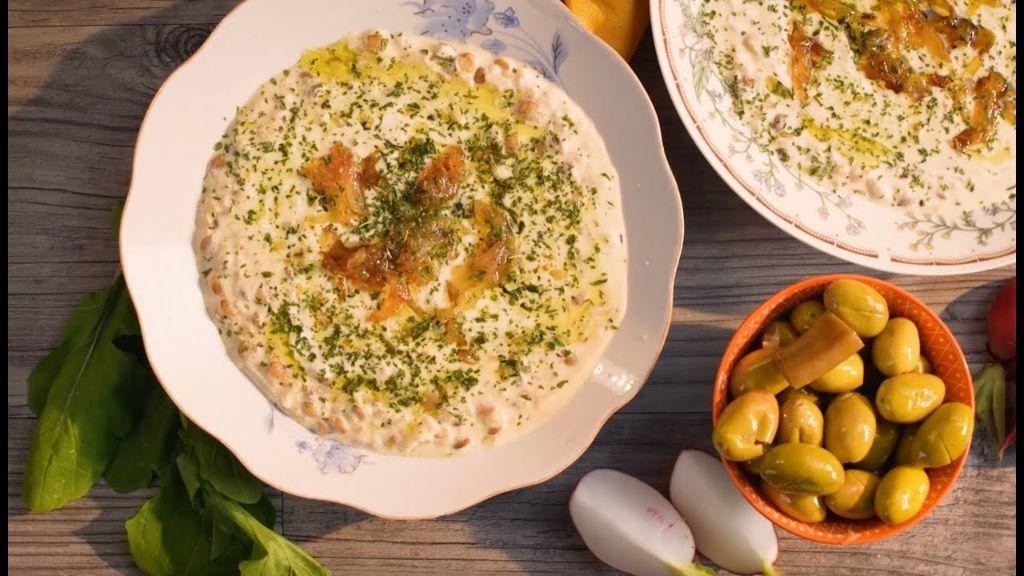
Fatteh

Sometimes, the most comforting dishes come from the simplest ingredients, and Fatteh is no exception. I remember stumbling upon this Middle Eastern gem during a lazy Sunday brunch at a friend’s house, and it’s been a staple in my kitchen ever since. It’s the perfect blend of crispy, creamy, and tangy, with a texture that’s just irresistible.
Ingredients
- 2 cups plain yogurt (full-fat for creaminess)
- 1 large pita bread, torn into bite-sized pieces (toast for extra crunch)
- 1/4 cup tahini (stir well before using)
- 2 cloves garlic, minced (adjust to taste)
- 1/4 cup lemon juice (freshly squeezed for best flavor)
- 1/2 tsp ground cumin (toast lightly to enhance aroma)
- 1/4 cup olive oil (or any neutral oil)
- 1/2 cup chickpeas, cooked (canned works fine, just rinse well)
- Salt to taste
- Fresh parsley, chopped (for garnish)
Instructions
- Preheat your oven to 350°F. Spread the torn pita pieces on a baking sheet and bake for 10-12 minutes, or until golden and crispy. Tip: Keep an eye on them to prevent burning.
- In a bowl, whisk together the yogurt, tahini, minced garlic, lemon juice, and cumin until smooth. Tip: For a smoother sauce, let it sit for 10 minutes to allow the flavors to meld.
- Heat the olive oil in a small pan over medium heat. Add the chickpeas and a pinch of salt, sautéing for 3-4 minutes until slightly crispy. Tip: Mash a few chickpeas for varied texture.
- To assemble, place the crispy pita at the bottom of a serving dish. Pour the yogurt mixture over the pita, then top with the sautéed chickpeas.
- Garnish with chopped parsley and a drizzle of olive oil before serving.
Vibrant and hearty, this Fatteh is a delightful play of textures and flavors. Serve it immediately to enjoy the contrast between the crispy pita and creamy yogurt, or get creative by adding roasted eggplant for a smoky twist.
Makdous
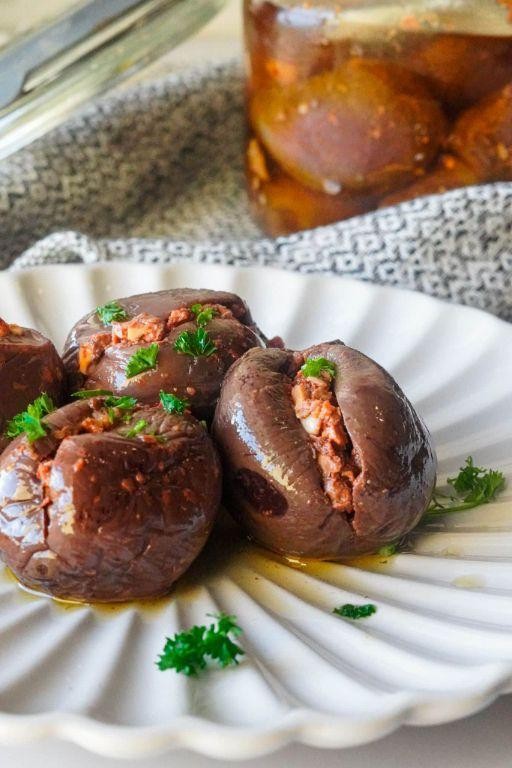
Sometimes, the most memorable dishes come from the simplest ingredients, and Makdous is no exception. I remember the first time I tried this Middle Eastern delight; its bold flavors and unique texture instantly won me over. It’s a dish that’s close to my heart, and today, I’m excited to share how you can bring this taste of tradition into your own kitchen.
Ingredients
- 10 small eggplants (about 2 inches in diameter)
- 1 cup walnuts, finely chopped (toast them for extra flavor)
- 3 cloves garlic, minced (adjust to taste)
- 1 tbsp salt (for seasoning)
- 1/2 cup olive oil (or any neutral oil)
- 1 tsp red pepper flakes (optional, for a bit of heat)
Instructions
- Wash the eggplants thoroughly and pat them dry. Poke each eggplant a few times with a fork to prevent them from bursting during cooking.
- Preheat your oven to 375°F. Place the eggplants on a baking sheet and roast for 30-40 minutes, or until they are soft and the skin is wrinkled.
- Let the eggplants cool slightly, then carefully peel off the skin. Tip: They should be cool enough to handle but still warm for easier peeling.
- Make a lengthwise slit in each eggplant, being careful not to cut all the way through. This will create a pocket for the filling.
- In a bowl, mix together the walnuts, garlic, salt, and red pepper flakes. Stuff each eggplant with this mixture, pressing gently to close.
- Arrange the stuffed eggplants in a jar or container. Pour the olive oil over them, ensuring they are completely submerged. Tip: This helps preserve them and enhances the flavor.
- Seal the jar and let it sit at room temperature for 2-3 days before serving to allow the flavors to meld together.
Rich in flavor and with a satisfyingly soft texture, Makdous is perfect as part of a mezze platter or simply enjoyed with warm bread. The walnuts add a delightful crunch, while the garlic and olive oil infuse the eggplants with a depth of flavor that’s hard to resist.
Qidreh
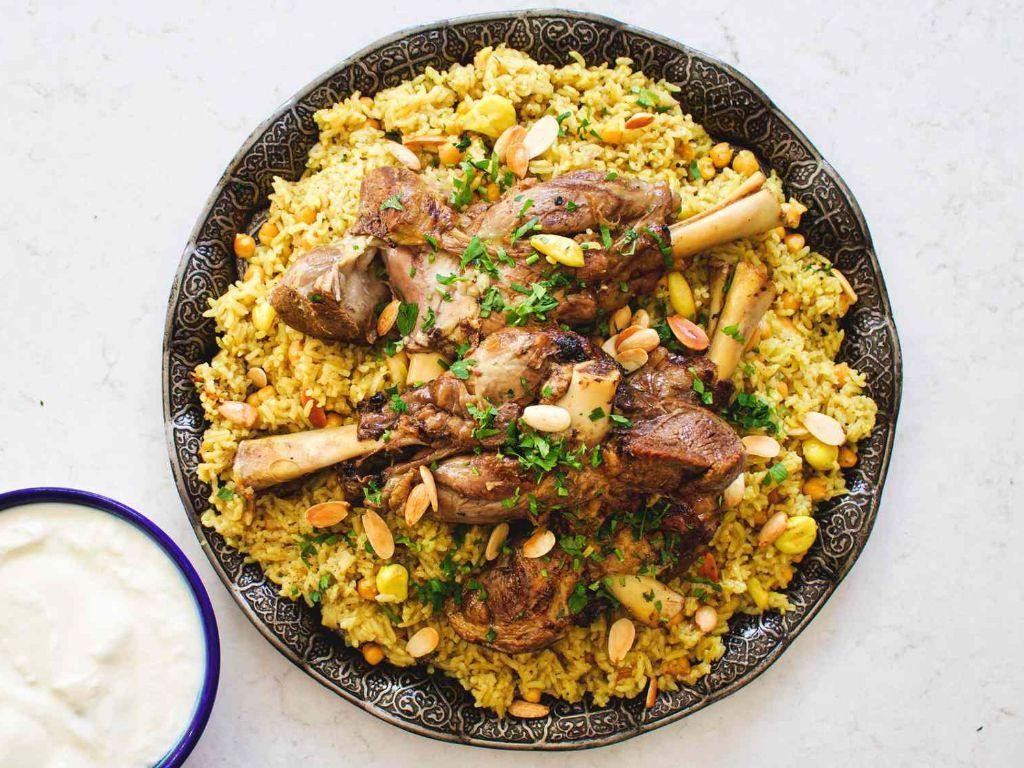
Remember the first time I stumbled upon Qidreh at a friend’s dinner party? I was instantly captivated by its rich flavors and the way it brought everyone together. It’s a dish that’s as much about the experience as it is about the taste, and today, I’m sharing my go-to recipe that’s perfect for any gathering.
Ingredients
- 2 cups basmati rice (rinsed until water runs clear)
- 1 lb lamb shoulder (cut into chunks, or substitute with chicken for a lighter version)
- 4 cups water (for a richer flavor, use chicken or lamb broth)
- 1 large onion (finely chopped, caramelizing adds depth)
- 3 tbsp ghee (or any neutral oil, but ghee adds authenticity)
- 1 tsp turmeric (adjust to taste, but it’s key for color)
- 1 tsp ground cardamom (freshly ground if possible)
- Salt (to taste, start with 1 tsp)
Instructions
- In a large pot, heat ghee over medium heat until melted. Add the chopped onion and sauté until golden brown, about 5 minutes. Tip: Stir occasionally to prevent burning.
- Add the lamb chunks to the pot, browning on all sides for about 5 minutes. This step locks in the juices.
- Stir in turmeric, cardamom, and salt, coating the meat evenly. Cook for another 2 minutes to toast the spices.
- Pour in the water or broth, bring to a boil, then reduce heat to low. Cover and simmer for 1 hour, or until the lamb is tender. Tip: Check occasionally to ensure there’s enough liquid.
- Add the rinsed basmati rice to the pot, stirring gently to mix. Cover and cook on low heat for 20 minutes, or until the rice is fluffy and has absorbed all the liquid. Tip: Resist the urge to stir the rice too much to prevent it from becoming mushy.
- Remove from heat and let it sit, covered, for 5 minutes before serving. This allows the flavors to meld beautifully.
Velvety rice paired with tender lamb makes Qidreh a comforting dish that’s hard to resist. Serve it with a side of yogurt and a sprinkle of fresh herbs for an extra layer of flavor that’ll impress your guests.
Samak Mashwi
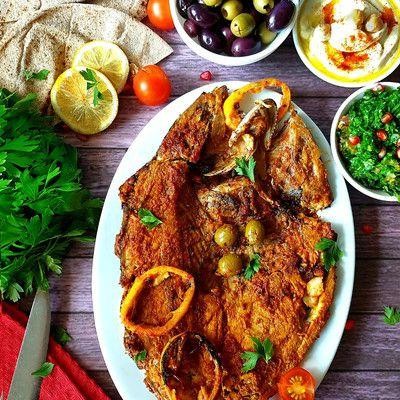
Perfectly grilled and bursting with flavor, Samak Mashwi is a dish that takes me back to summer barbecues by the beach. I remember the first time I tried it, the smoky aroma was irresistible, and the tender, flaky fish just melted in my mouth. It’s a simple yet impressive dish that’s perfect for any gathering.
Ingredients
- 2 lbs whole white fish (like sea bass or snapper), cleaned and scaled
- 3 tbsp olive oil (or any neutral oil)
- 2 tbsp lemon juice, freshly squeezed
- 4 garlic cloves, minced
- 1 tsp ground cumin
- 1 tsp paprika
- 1/2 tsp salt (adjust to taste)
- 1/4 tsp black pepper
- 1 lemon, sliced into rounds
- Fresh parsley, chopped for garnish
Instructions
- Preheat your grill to medium-high heat, about 375°F to 400°F.
- In a small bowl, mix together olive oil, lemon juice, minced garlic, cumin, paprika, salt, and black pepper to create a marinade.
- Make three diagonal cuts on each side of the fish to help the marinade penetrate and the fish cook evenly.
- Rub the marinade all over the fish, including inside the cuts and the cavity. Let it marinate for at least 15 minutes at room temperature.
- Place lemon slices inside the fish cavity and on top of the fish for extra flavor.
- Grill the fish for about 7-10 minutes on each side, or until the skin is crispy and the flesh flakes easily with a fork.
- Carefully remove the fish from the grill and let it rest for 5 minutes before serving.
- Garnish with chopped parsley and serve with additional lemon wedges on the side.
Zesty and aromatic, this Samak Mashwi is a delight with its crispy skin and succulent flesh. Serve it over a bed of couscous or with a side of grilled vegetables for a complete meal that’s sure to impress.
Rashoof
Sometimes, the simplest dishes bring the most comfort, and that’s exactly what Rashoof does for me. It’s a dish that reminds me of lazy Sunday mornings when the aroma fills the kitchen, promising a day of relaxation and good food.
Ingredients
- 2 cups all-purpose flour (for a lighter texture, you can substitute half with whole wheat flour)
- 1 tbsp sugar (adjust to taste)
- 1 tsp salt
- 1 cup warm water (about 110°F, just warm to the touch)
- 2 tbsp olive oil (or any neutral oil)
- 1 tbsp active dry yeast (make sure it’s not expired for best results)
Instructions
- In a large mixing bowl, combine the warm water, sugar, and yeast. Let it sit for 5 minutes until frothy, indicating the yeast is active.
- Add the flour, salt, and olive oil to the yeast mixture. Stir until a shaggy dough forms.
- Turn the dough onto a lightly floured surface and knead for about 10 minutes until smooth and elastic. Tip: If the dough sticks to your hands, add a little more flour, but avoid adding too much to keep the dough soft.
- Place the dough in a greased bowl, cover with a damp cloth, and let it rise in a warm place for 1 hour or until doubled in size.
- Punch down the dough and divide it into equal portions. Roll each portion into a ball, then flatten into discs about 1/2 inch thick. Tip: For extra flavor, you can brush the discs with a little more olive oil before cooking.
- Heat a non-stick skillet over medium heat. Cook each disc for about 2 minutes on each side or until golden brown spots appear. Tip: Don’t overcrowd the skillet to ensure even cooking.
This Rashoof has a wonderfully soft interior with a slightly crispy exterior, making it perfect for tearing apart and sharing. Try serving it with a drizzle of honey or a side of labneh for a delightful contrast of flavors.
Msakhan Rolls
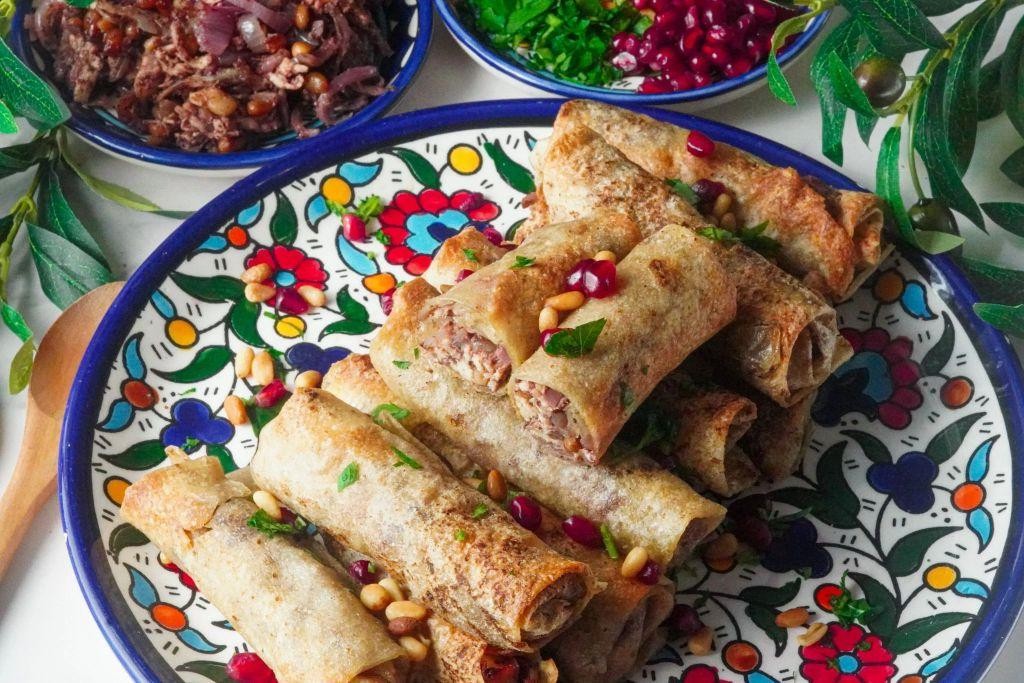
Just when I thought I couldn’t love Middle Eastern cuisine any more, I stumbled upon Msakhan Rolls during a cozy dinner at a friend’s place. The blend of sumac, onions, and chicken wrapped in warm bread was a game-changer for my taste buds, and I knew I had to recreate it at home.
Ingredients
- 2 cups shredded cooked chicken (leftover rotisserie chicken works great)
- 1 large onion, thinly sliced (the sweeter, the better)
- 2 tbsp sumac (adjust to taste)
- 1/4 cup olive oil (or any neutral oil)
- 4 pieces of flatbread (like pita or lavash)
- Salt to taste (start with 1/2 tsp)
Instructions
- Heat olive oil in a large skillet over medium heat until shimmering, about 2 minutes.
- Add the thinly sliced onions to the skillet, stirring occasionally, until they become soft and translucent, about 5 minutes.
- Sprinkle sumac and salt over the onions, stirring to combine, and cook for another 2 minutes to let the flavors meld.
- Add the shredded chicken to the skillet, mixing well with the onion mixture, and cook until everything is heated through, about 3 minutes.
- Warm the flatbread pieces in a dry skillet over low heat for about 30 seconds on each side to make them pliable.
- Divide the chicken and onion mixture evenly among the flatbread pieces, spreading it in a line down the center of each.
- Roll the flatbread tightly around the filling, tucking in the edges as you go to secure the filling inside.
- Serve the rolls immediately, or wrap them in foil to keep warm until ready to serve.
Lusciously tangy from the sumac and sweet from the caramelized onions, these Msakhan Rolls are a delightful handheld meal. For an extra touch, drizzle with tahini sauce or serve with a side of pickled vegetables to cut through the richness.
Zait and Zaatar

Having just returned from a trip to the Middle East, I couldn’t wait to recreate one of my favorite breakfast staples, Zait and Zaatar. It’s a simple yet profoundly flavorful dish that reminds me of sunny mornings and the bustling markets of Beirut.
Ingredients
- 1 cup extra virgin olive oil (or any high-quality olive oil)
- 1/2 cup zaatar spice blend (adjust to taste, some blends are saltier than others)
- 1 loaf of fresh pita bread (or any flatbread you prefer)
- 1 tbsp sesame seeds (optional, for extra crunch)
Instructions
- Preheat your oven to 350°F (175°C) to warm the pita bread slightly, making it more pliable.
- In a small bowl, mix the zaatar spice blend with the olive oil until well combined. Tip: The consistency should be paste-like; add more oil or zaatar as needed.
- Cut the pita bread into wedges or tear into pieces for a more rustic look.
- Generously brush each piece of pita with the zaatar and olive oil mixture. Tip: Don’t skimp on the mixture; the flavor is in the zaatar.
- Sprinkle sesame seeds over the top if using, for that extra crunch and nuttiness.
- Place the pita pieces on a baking sheet and bake for 5-7 minutes, just until the edges start to crisp but the center remains slightly soft. Tip: Keep an eye on them to prevent burning.
Best enjoyed warm, the Zait and Zaatar offers a delightful contrast between the crispy edges and the soft, herb-infused center. Try serving it with a side of labneh or fresh cucumbers for a refreshing twist.
Freekeh Soup
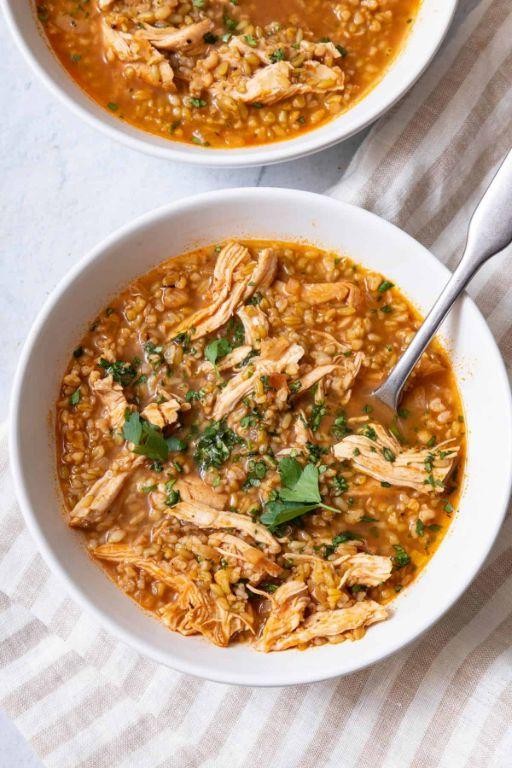
Unbelievably comforting and packed with nutrients, Freekeh Soup has become my go-to dish during these unpredictable spring evenings. Just last week, as the rain poured outside, I found myself craving something hearty yet wholesome, and this soup checked all the boxes.
Ingredients
- 1 cup cracked freekeh (rinsed under cold water)
- 2 tbsp olive oil (or any neutral oil)
- 1 medium onion, diced (about 1 cup)
- 2 carrots, diced (about 1 cup)
- 2 celery stalks, diced (about 1 cup)
- 4 garlic cloves, minced
- 6 cups vegetable broth (adjust saltiness to taste)
- 1 tsp ground cumin
- 1/2 tsp ground coriander
- Salt and pepper to taste
- 2 tbsp lemon juice (freshly squeezed for best flavor)
- 1/4 cup chopped fresh parsley (for garnish)
Instructions
- Heat olive oil in a large pot over medium heat until shimmering, about 2 minutes.
- Add diced onion, carrots, and celery. Cook, stirring occasionally, until vegetables soften, about 5 minutes.
- Stir in minced garlic, ground cumin, and ground coriander. Cook for 1 minute until fragrant.
- Add rinsed freekeh to the pot, stirring to coat with the vegetable mixture.
- Pour in vegetable broth, bringing the mixture to a boil. Then, reduce heat to low, cover, and simmer for 25 minutes, or until freekeh is tender.
- Season with salt, pepper, and lemon juice. Adjust seasoning to taste.
- Garnish with chopped fresh parsley before serving.
Hearty and aromatic, this Freekeh Soup boasts a delightful chewiness from the freekeh, balanced by the brightness of lemon. Serve it with a side of crusty bread for dipping, or top with a dollop of yogurt for extra creaminess.
Conclusion
We hope this roundup of 18 authentic Palestinian recipes inspires your next kitchen adventure! Each dish is a celebration of rich flavors and traditions, perfect for home cooks looking to explore new cuisines. Don’t forget to try these recipes, share your favorites in the comments, and pin this article on Pinterest to spread the love of Palestinian cooking. Happy cooking!


