Oh, the joy of discovering delicious, diabetic-friendly meals that don’t require a pantry overhaul! If you’re on the hunt for simplicity without sacrificing flavor, you’re in the right place. Our roundup of 17 Simple 4-Ingredient Diabetic Recipes is all about making healthy eating effortless and enjoyable. Perfect for busy weeknights or lazy weekends, these recipes promise to keep things easy and your taste buds happy. Let’s dive in!
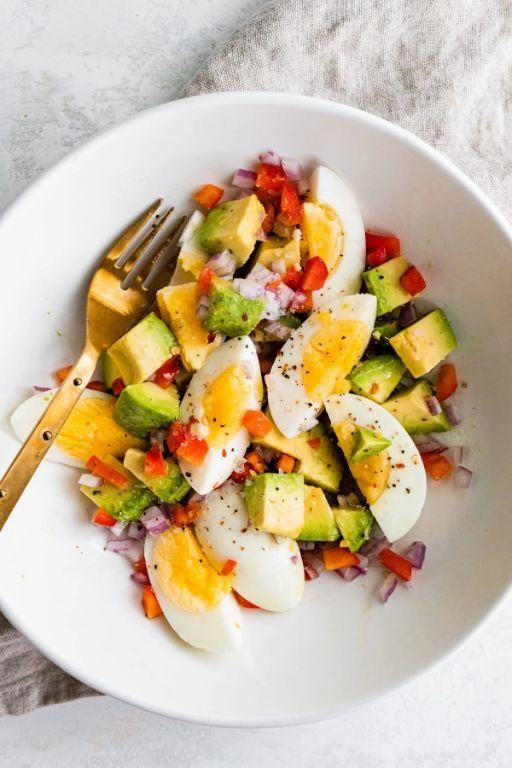
Avocado and Egg Breakfast Bowl
Lately, I’ve found myself drawn to the simplicity and nourishment of a well-made breakfast bowl, especially one that combines the creamy texture of avocado with the hearty satisfaction of eggs. It’s a quiet morning ritual that sets the tone for the day.
Ingredients
- 1 ripe avocado (I love when it’s just soft enough to mash with a fork)
- 2 large eggs (room temperature eggs blend more smoothly)
- 1 tbsp extra virgin olive oil (my go-to for its fruity notes)
- Salt and pepper (a pinch of each, but freshly ground pepper makes all the difference)
- 1/4 cup cherry tomatoes, halved (for a burst of color and sweetness)
- 1 tbsp chopped cilantro (because its freshness lifts the whole dish)
Instructions
- Heat the olive oil in a non-stick skillet over medium heat until it shimmers, about 1 minute.
- Crack the eggs into the skillet, being careful not to break the yolks. Cook for 2-3 minutes until the whites are set but the yolks are still runny.
- While the eggs cook, halve the avocado and scoop the flesh into a bowl. Mash lightly with a fork, leaving some chunks for texture.
- Season the mashed avocado with salt and pepper, then spread it evenly at the bottom of your serving bowl.
- Once the eggs are done, gently place them on top of the avocado.
- Scatter the halved cherry tomatoes and chopped cilantro over the eggs.
- Drizzle with a little more olive oil if desired, and serve immediately.
Unassuming yet deeply satisfying, this breakfast bowl offers a delightful contrast between the creamy avocado and the silky eggs, with the tomatoes adding a juicy pop. Try it with a slice of toasted sourdough for an extra layer of texture.
Spinach and Feta Stuffed Chicken Breast
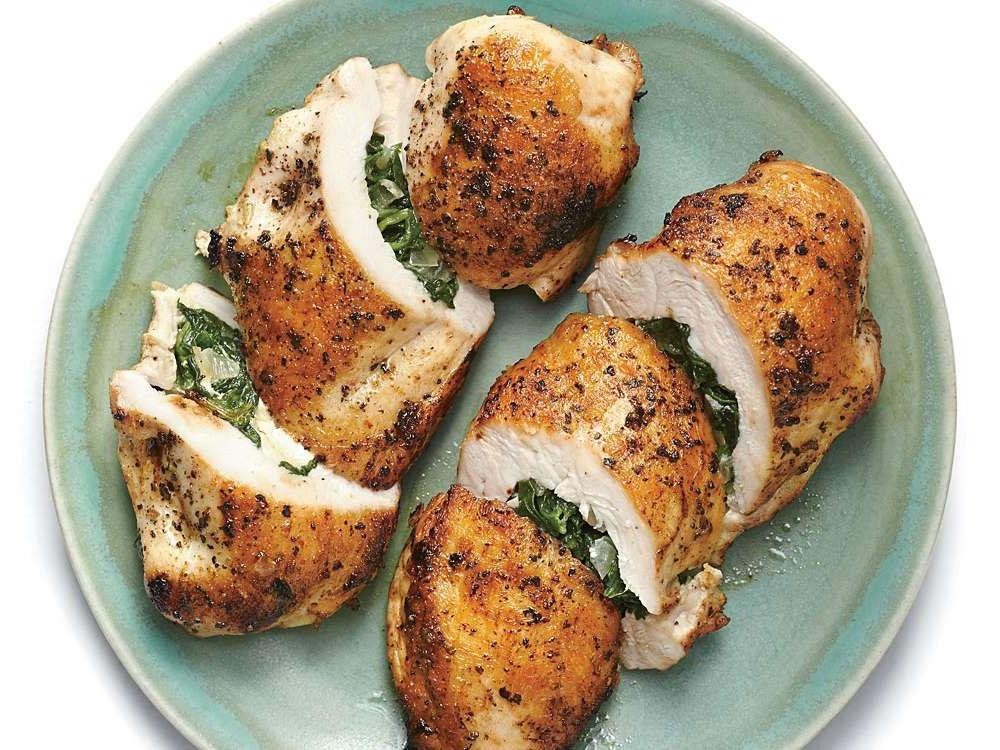
Evenings like these call for something comforting yet elegant, a dish that feels like a warm embrace after a long day. Spinach and feta stuffed chicken breast is just that—a tender, flavorful journey that starts with the first bite.
Ingredients
- 2 boneless, skinless chicken breasts (I like to pound them to an even thickness for uniform cooking)
- 1 cup fresh spinach, tightly packed (baby spinach works wonders here)
- 1/2 cup crumbled feta cheese (the tangier, the better in my book)
- 1 tbsp extra virgin olive oil (my kitchen staple for its fruity notes)
- 1 tsp garlic powder (for that subtle kick)
- 1/2 tsp salt (I prefer sea salt for its clean taste)
- 1/4 tsp black pepper (freshly ground, if you can)
Instructions
- Preheat your oven to 375°F (190°C) to ensure it’s perfectly heated for baking.
- Lay the chicken breasts flat on a cutting board and carefully slice a pocket into the side of each, being mindful not to cut all the way through.
- In a bowl, mix the spinach, feta cheese, garlic powder, salt, and pepper until well combined. This filling is forgiving, so don’t stress over exact measurements.
- Gently stuff each chicken breast with the spinach and feta mixture, using a spoon or your fingers. Secure the openings with toothpicks if necessary.
- Heat the olive oil in an oven-safe skillet over medium-high heat. Once hot, add the chicken breasts and sear for 2-3 minutes on each side, or until golden brown.
- Transfer the skillet to the preheated oven and bake for 20-25 minutes, or until the chicken reaches an internal temperature of 165°F (74°C).
- Let the chicken rest for 5 minutes before slicing. This allows the juices to redistribute, ensuring every bite is moist.
Unwrapping the flavors of this dish reveals a juicy interior with a crispy exterior, a delightful contrast. Serve it alongside a crisp salad or roasted vegetables for a meal that’s as nutritious as it is satisfying.
Greek Yogurt with Almonds and Berries
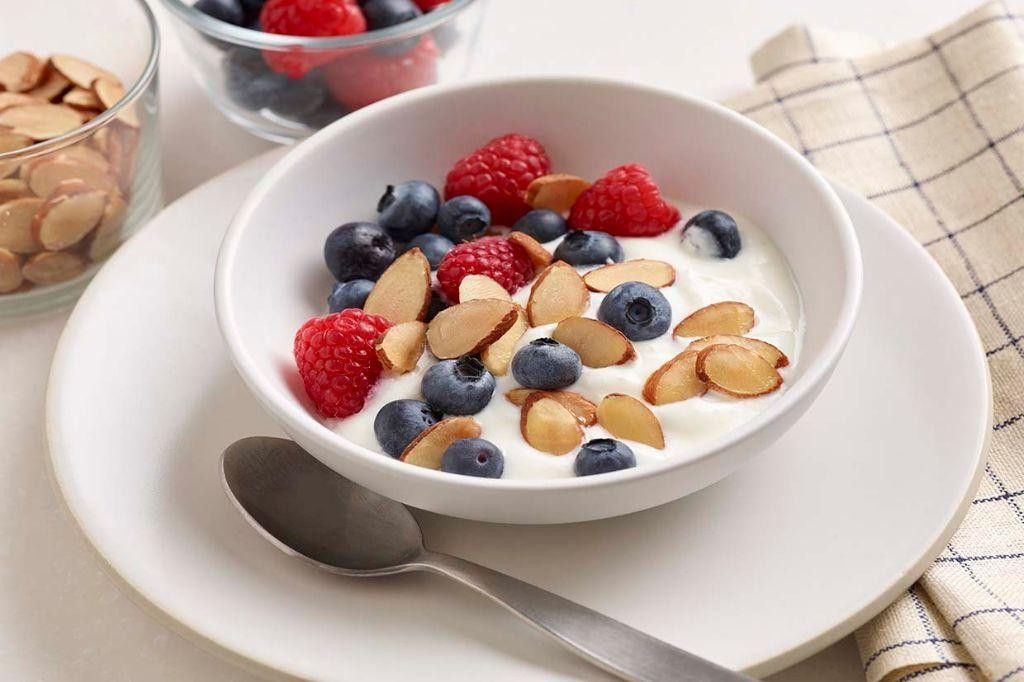
Wandering through the kitchen this morning, I found myself craving something both nourishing and comforting, a dish that feels like a gentle hug. Greek yogurt with almonds and berries emerged as the perfect answer, a symphony of textures and flavors that’s as simple to make as it is delightful to eat.
Ingredients
- 1 cup Greek yogurt (I love the creaminess of full-fat, but any type works)
- 1/4 cup almonds, roughly chopped (toasting them lightly brings out their nuttiness)
- 1/2 cup mixed berries (fresh or frozen, though I lean towards fresh for their brightness)
- 1 tbsp honey (local, if you have it, for that subtle floral note)
Instructions
- In a small bowl, measure out 1 cup of Greek yogurt, smoothing it gently with the back of a spoon to create an even layer.
- Toast the chopped almonds in a dry skillet over medium heat for 2-3 minutes, stirring frequently, until they’re golden and fragrant. Tip: Keep a close eye on them to prevent burning.
- Wash the berries under cold water and pat them dry with a paper towel. If using larger berries like strawberries, slice them into bite-sized pieces.
- Drizzle the honey over the yogurt, starting with 1 tbsp and adding more if you prefer it sweeter.
- Scatter the toasted almonds and prepared berries over the yogurt, arranging them as you like for a beautiful presentation. Tip: Layering the ingredients creates a lovely texture contrast.
- Serve immediately, or let it sit for a few minutes to allow the flavors to meld slightly. Tip: If using frozen berries, letting the dish sit for 5 minutes softens them perfectly.
Delightfully creamy with a crunch from the almonds and bursts of sweetness from the berries, this dish is a joy to eat. Try serving it in a clear glass to showcase the layers, or mix everything together for a more homely, rustic feel.
Baked Salmon with Asparagus
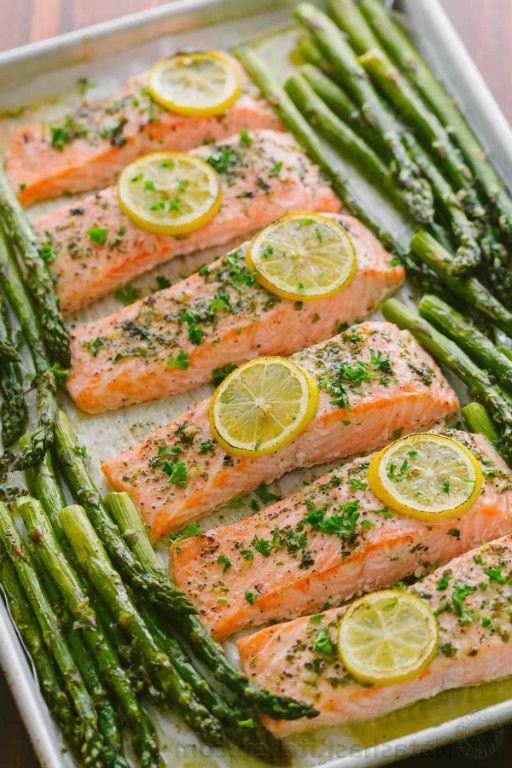
Remembering the first time I made this dish, the simplicity of its preparation and the elegance of its presentation struck me as something truly special. It’s a meal that feels both indulgent and wholesome, perfect for those evenings when you crave something nourishing yet effortless.
Ingredients
- 1 lb salmon fillet, skin-on (I find the skin gets wonderfully crispy when baked)
- 1 bunch asparagus, trimmed (look for spears that are bright green and firm)
- 2 tbsp extra virgin olive oil (my go-to for its fruity notes)
- 1 tsp sea salt (I prefer the subtle crunch it adds)
- 1/2 tsp black pepper, freshly ground
- 1 lemon, thinly sliced (for that bright, citrusy aroma)
- 2 cloves garlic, minced (because garlic makes everything better)
Instructions
- Preheat your oven to 400°F (200°C), ensuring it’s fully heated for even cooking.
- Line a baking sheet with parchment paper for easy cleanup, a little tip I always appreciate.
- Place the salmon fillet skin-side down on the prepared baking sheet, arranging the asparagus around it.
- Drizzle the olive oil over the salmon and asparagus, then sprinkle with sea salt and black pepper, massaging the seasonings gently into the salmon.
- Scatter the minced garlic and lemon slices over the salmon, allowing the flavors to meld beautifully as it bakes.
- Bake for 12-15 minutes, until the salmon flakes easily with a fork and the asparagus is tender but still crisp.
- Let it rest for a couple of minutes before serving, a step I never skip for the juiciest results.
You’ll love how the salmon’s richness pairs with the asparagus’s slight bitterness, all brightened by the lemon. Try serving it over a bed of quinoa or with a side of roasted baby potatoes for a complete meal.
Cucumber and Tomato Salad with Olive Oil
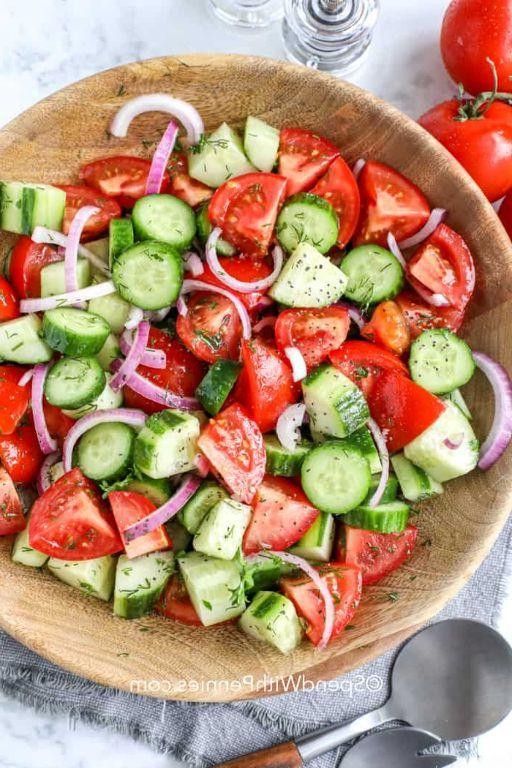
Calmly slicing through the crisp cucumber, I’m reminded of summer evenings when the air is just right, and a simple salad feels like a celebration. This cucumber and tomato salad, dressed lightly in olive oil, is my go-to for those moments when less is more, and freshness is the star.
Ingredients
- 2 medium cucumbers, thinly sliced (I leave the skin on for color and crunch)
- 4 ripe tomatoes, cut into wedges (heirloom varieties add a lovely sweetness)
- 1/4 cup extra virgin olive oil (my go-to for its fruity notes)
- 1 tbsp fresh lemon juice (a squeeze right before serving brightens everything)
- 1/2 tsp sea salt (I prefer the subtle crunch it adds)
- 1/4 tsp freshly ground black pepper (freshly ground makes all the difference)
Instructions
- Wash the cucumbers and tomatoes under cold running water to remove any dirt.
- Pat the cucumbers and tomatoes dry with a clean kitchen towel to ensure the dressing sticks well.
- Slice the cucumbers into thin rounds, about 1/8 inch thick, for the perfect bite.
- Cut the tomatoes into wedges, ensuring each piece is roughly the same size for even eating.
- In a large mixing bowl, gently toss the cucumber slices and tomato wedges together.
- Drizzle the extra virgin olive oil over the vegetables, using a spoon to evenly coat each piece.
- Add the fresh lemon juice, sea salt, and freshly ground black pepper to the bowl.
- Toss the salad gently once more to combine all the ingredients without crushing the tomatoes.
- Let the salad sit for 5 minutes before serving to allow the flavors to meld together beautifully.
Light and refreshing, this salad offers a delightful contrast between the juicy tomatoes and the crisp cucumbers. Serve it alongside grilled fish or as a standalone dish on a warm evening, and watch how quickly it disappears.
Grilled Chicken with Steamed Broccoli
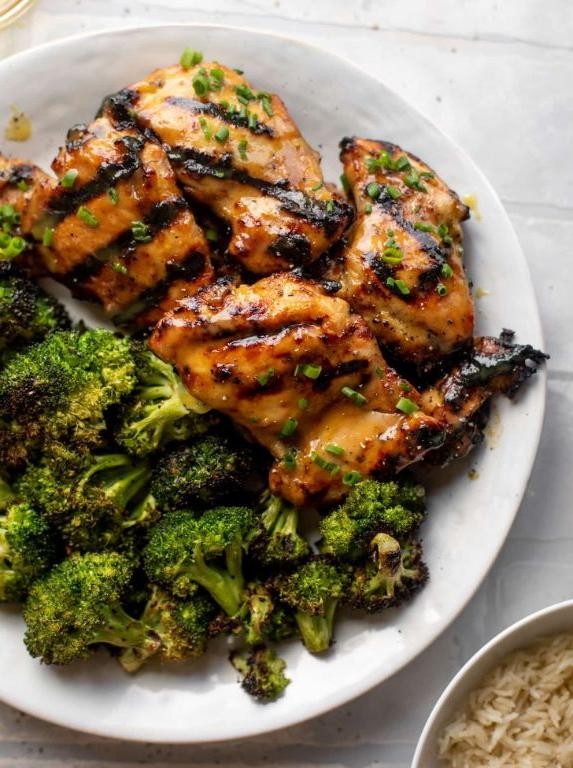
Lately, I’ve found myself returning to the simplicity of grilled chicken paired with steamed broccoli, a dish that feels both nourishing and comforting in its straightforwardness.
Ingredients
- 2 boneless, skinless chicken breasts (I like to pound them to an even thickness for uniform cooking)
- 1 tbsp extra virgin olive oil (my kitchen staple for its fruity notes)
- 1 tsp garlic powder (for that subtle, aromatic kick)
- 1/2 tsp salt (I prefer sea salt for its clean taste)
- 1/4 tsp black pepper (freshly ground makes all the difference)
- 2 cups broccoli florets (the vibrant green ones are my pick for maximum freshness)
Instructions
- Preheat your grill to medium-high heat, about 375°F, ensuring it’s hot enough to sear the chicken beautifully.
- While the grill heats, rub the chicken breasts with olive oil, then season both sides evenly with garlic powder, salt, and black pepper.
- Place the chicken on the grill. Cook for 6-7 minutes on the first side, until you see those perfect grill marks and the edges start to turn opaque.
- Flip the chicken carefully. Grill for another 5-6 minutes, or until the internal temperature reaches 165°F when checked with a meat thermometer.
- Meanwhile, steam the broccoli florets over boiling water for about 5 minutes, just until they’re bright green and tender-crisp. Tip: Don’t overcook to keep that lovely crunch.
- Remove the chicken from the grill and let it rest for 5 minutes before slicing. This keeps the juices locked in.
- Serve the sliced chicken alongside the steamed broccoli. Tip: A squeeze of lemon over the broccoli adds a refreshing zing.
Delight in the contrast of the juicy, flavorful chicken against the crisp, fresh broccoli. For a twist, try drizzling a little balsamic glaze over the chicken before serving to add a sweet and tangy dimension.
Turkey and Cheese Roll-Ups

Falling into the rhythm of the kitchen, there’s something deeply comforting about preparing Turkey and Cheese Roll-Ups. It’s a simple dish that carries the warmth of home, perfect for those moments when you crave something both easy and satisfying.
Ingredients
- 4 large flour tortillas (I find the 10-inch size works best for easy rolling)
- 1/2 cup cream cheese, softened (letting it sit out for 30 minutes makes spreading a breeze)
- 1/2 cup shredded cheddar cheese (sharp cheddar adds a nice bite)
- 8 slices of turkey breast (opt for thinly sliced for the best texture)
- 1/4 cup baby spinach leaves (a handful adds a fresh, green crunch)
- 1 tbsp olive oil (extra virgin is my go-to for its fruity notes)
Instructions
- Lay out the flour tortillas on a clean, flat surface.
- Spread 2 tablespoons of softened cream cheese evenly over each tortilla, leaving a small border around the edges.
- Sprinkle 2 tablespoons of shredded cheddar cheese over the cream cheese on each tortilla.
- Arrange 2 slices of turkey breast on top of the cheese, covering most of the tortilla.
- Scatter a few baby spinach leaves over the turkey, aiming for even distribution.
- Starting at one end, tightly roll up the tortilla, tucking in the edges as you go to secure the filling.
- Heat 1 tablespoon of olive oil in a large skillet over medium heat (350°F is ideal for a golden finish without burning).
- Place the roll-ups seam side down in the skillet and cook for 2-3 minutes on each side, or until the tortilla is golden brown and the cheese begins to melt.
- Remove from the skillet and let them rest for a minute before slicing diagonally into pieces.
Golden and crisp on the outside, these roll-ups reveal a creamy, savory interior with a hint of freshness from the spinach. Serve them sliced on a platter for sharing, or pack them whole for a satisfying lunch on the go.
Zucchini Noodles with Pesto
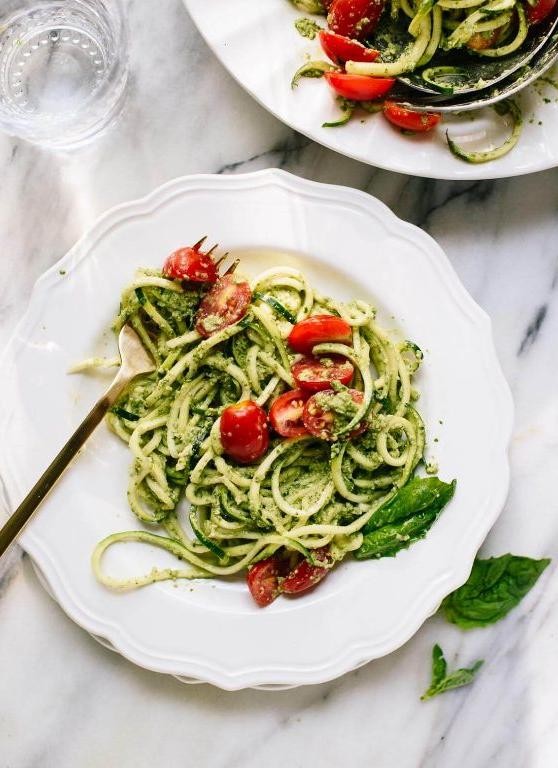
Under the soft glow of the kitchen light, there’s something deeply comforting about transforming simple zucchini into delicate noodles, especially when they’re tossed in a vibrant, homemade pesto. It’s a dish that feels both nourishing and indulgent, a perfect balance for those quiet evenings when you crave something light yet satisfying.
Ingredients
- 2 medium zucchinis (I find that organic ones have the best flavor and texture)
- 1/4 cup extra virgin olive oil (my go-to for its fruity notes)
- 1/2 cup fresh basil leaves (packed, because more basil means more joy)
- 1/4 cup grated Parmesan cheese (the real deal, please)
- 2 tbsp pine nuts (toasted lightly for that irresistible crunch)
- 1 small garlic clove (because a little goes a long way in pesto)
- 1/2 tsp sea salt (to brighten all the flavors)
Instructions
- Using a spiralizer, turn the zucchinis into noodles. If you don’t have a spiralizer, a vegetable peeler works too, creating wide, ribbon-like noodles.
- In a food processor, combine the basil, Parmesan, pine nuts, garlic, and sea salt. Pulse until finely chopped.
- With the processor running, slowly drizzle in the olive oil until the pesto is smooth and emulsified. Tip: Scrape down the sides occasionally to ensure everything is evenly incorporated.
- In a large bowl, gently toss the zucchini noodles with the pesto until evenly coated. Tip: Let it sit for 5 minutes to allow the flavors to meld and the noodles to soften slightly.
- Serve immediately, garnished with extra Parmesan and pine nuts if desired. Tip: For an extra touch of freshness, add a few whole basil leaves on top.
Delicate yet flavorful, these zucchini noodles with pesto offer a refreshing crunch that’s perfectly complemented by the creamy, herby pesto. It’s a dish that invites you to slow down and savor each bite, perhaps with a glass of crisp white wine or as a side to grilled chicken for a more substantial meal.
Hard-Boiled Eggs with Avocado
Hard-boiled eggs with avocado is a simple yet profoundly satisfying dish that speaks to the heart of minimalist cooking. Here’s how to make it with a touch of personal flair.
Ingredients
- 4 large eggs (I prefer room temp eggs here for even cooking)
- 1 ripe avocado (look for one that yields slightly to gentle pressure)
- 1 tbsp extra virgin olive oil (my go-to for its fruity notes)
- Salt and freshly ground black pepper (to elevate the flavors)
Instructions
- Place the eggs in a single layer at the bottom of a saucepan. Cover them with cold water, about an inch above the eggs.
- Bring the water to a rolling boil over high heat. Once boiling, immediately remove the pan from the heat and cover it with a lid.
- Let the eggs sit in the hot water for 12 minutes for perfectly firm yolks. Tip: Use a timer for precision.
- While the eggs are cooking, halve the avocado and remove the pit. Scoop the flesh into a bowl and drizzle with olive oil. Tip: A dash of lemon juice can prevent browning if you’re not serving immediately.
- Once the eggs are done, transfer them to a bowl of ice water for 5 minutes to cool. This makes peeling easier.
- Peel the eggs under cool running water to help remove the shells smoothly. Tip: Start peeling from the wider end where there’s an air pocket.
- Slice the eggs in half and arrange them on a plate alongside the avocado. Season generously with salt and pepper.
Mashing the avocado slightly with the back of a fork creates a creamy contrast to the firm eggs. The richness of the avocado pairs beautifully with the subtle earthiness of the eggs, making this dish a versatile base for any meal. Try sprinkling with chili flakes for a spicy kick or serve on toasted sourdough for added crunch.
Cauliflower Rice Stir-Fry
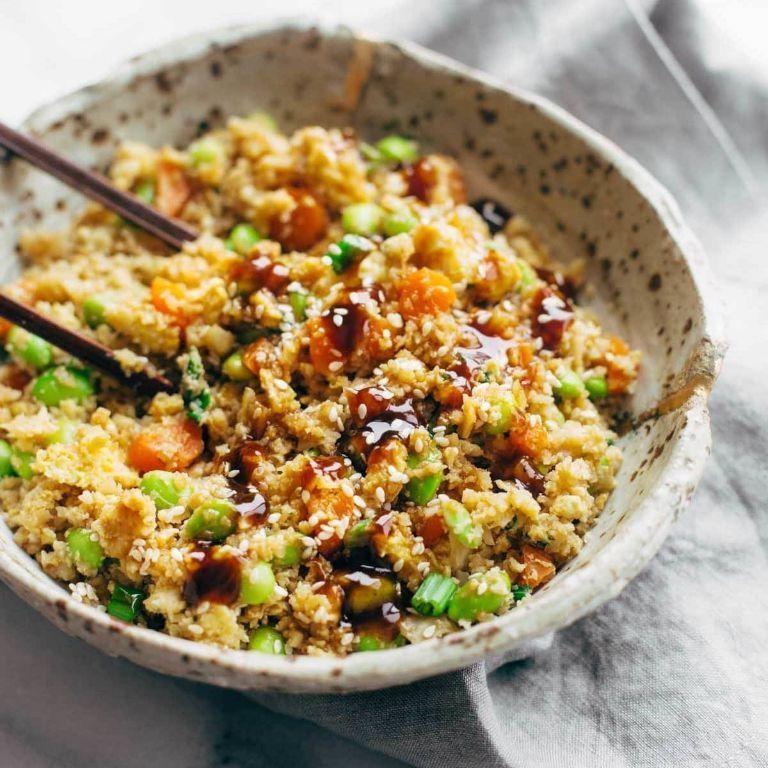
Yesterday, as the golden hues of the evening painted the kitchen in warmth, I found myself reaching for the humble cauliflower, a vegetable that never fails to surprise me with its versatility. This time, it was the star of a simple yet profoundly satisfying stir-fry, a dish that whispers of comfort and creativity in equal measure.
Ingredients
– 1 large head of cauliflower, riced (about 4 cups) – I love the texture it brings, almost like grains but lighter.
– 2 tbsp extra virgin olive oil – my kitchen staple for its fruity notes.
– 1 medium onion, diced – yellow onions are my go-to for their sweetness when cooked.
– 2 cloves garlic, minced – because what’s a stir-fry without that aromatic punch?
– 1 cup frozen peas and carrots – a colorful nod to convenience and nutrition.
– 2 tbsp soy sauce – for that umami depth.
– 1 tsp sesame oil – a drizzle at the end transforms the dish.
– Salt to taste – though I often find the soy sauce does the job.
Instructions
1. Heat the extra virgin olive oil in a large skillet over medium heat until shimmering, about 2 minutes.
2. Add the diced onion to the skillet, stirring occasionally, until translucent, about 5 minutes. Tip: Lower the heat if the onions start to brown too quickly.
3. Stir in the minced garlic and cook for just 30 seconds, until fragrant – this prevents bitterness.
4. Increase the heat to medium-high and add the riced cauliflower, spreading it evenly in the skillet. Let it cook undisturbed for 2 minutes to get a slight char. Tip: This step adds a wonderful texture contrast.
5. Add the frozen peas and carrots, stirring to combine, and cook for another 3 minutes until the vegetables are tender.
6. Drizzle with soy sauce and sesame oil, tossing everything together until well coated. Cook for an additional minute. Tip: Taste and adjust with a pinch of salt if needed, though the soy sauce usually suffices.
7. Remove from heat and let it sit for a minute before serving – this allows the flavors to meld beautifully.
Each bite of this stir-fry offers a delightful crunch from the cauliflower, a sweet earthiness from the peas and carrots, and a rich, savory depth from the soy and sesame. Serve it in a bowl with a sprinkle of green onions or a dash of chili flakes for an extra kick, turning a simple meal into a canvas of flavors.
Peanut Butter and Celery Sticks

Kindness in cooking comes in many forms, and today, it’s the simple, satisfying crunch of celery paired with the creamy embrace of peanut butter. This combination, a nostalgic nod to childhood snacks, offers a moment of quiet joy in the midst of a bustling day.
Ingredients
- 4 large celery sticks – crisp and fresh, their ridges perfect for holding onto the peanut butter.
- 1/2 cup smooth peanut butter – I find the creamy variety spreads like a dream, but chunky can add a nice texture contrast.
Instructions
- Wash the celery sticks under cold running water to ensure they’re clean and refreshing.
- Pat the celery sticks dry with a paper towel; this helps the peanut butter stick better.
- Using a butter knife, spread a generous layer of peanut butter into the groove of each celery stick. Tip: For an even spread, let the peanut butter sit at room temperature for about 10 minutes before using.
- Arrange the peanut butter-filled celery sticks on a plate. Tip: For a decorative touch, you can sprinkle a pinch of sea salt or a drizzle of honey on top before serving.
- Serve immediately, or chill in the refrigerator for up to an hour for a cooler snack. Tip: If preparing ahead, cover the plate with plastic wrap to keep the celery crisp.
Zesty yet comforting, the contrast between the cool, watery crunch of celery and the rich, velvety peanut butter is a dance of textures and flavors. Try serving these sticks alongside a glass of cold almond milk for a nostalgic snack that feels both indulgent and wholesome.
Baked Apple with Cinnamon
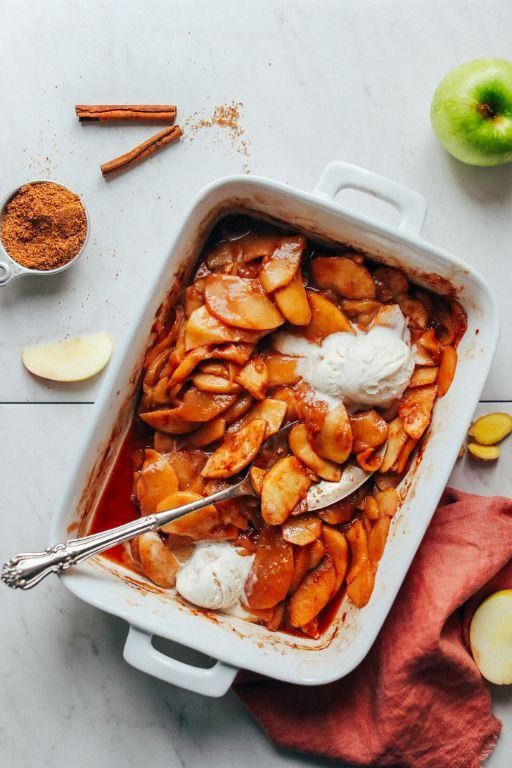
Wandering through the kitchen on a quiet afternoon, the thought of baking apples with cinnamon brings a warm, comforting feeling. It’s a simple pleasure, really, the way the sweet aroma fills the space, inviting moments of reflection and joy.
Ingredients
- 4 large apples (I find Honeycrisp or Fuji work beautifully for their balance of sweetness and tartness)
- 1/4 cup brown sugar (packed, for that deep molasses flavor)
- 1 tsp ground cinnamon (the heart of this dish, really)
- 1 tbsp unsalted butter (cut into small pieces, because everything’s better with butter)
- 1/2 cup water (just enough to keep the apples moist)
Instructions
- Preheat your oven to 375°F (190°C), letting it warm up while you prepare the apples, ensuring even baking.
- Core the apples carefully, leaving the bottom intact to hold the filling. A melon baller works wonders here for a neat job.
- In a small bowl, mix the brown sugar and cinnamon. This blend is key, so take a moment to inhale the spicy sweetness.
- Stuff each apple with the sugar-cinnamon mixture, then top with a piece of butter. The butter will melt into the filling, creating a luscious sauce.
- Place the apples in a baking dish and pour the water around them. This step prevents drying out, a little trick I learned the hard way.
- Bake for 30-40 minutes, until the apples are tender but not collapsing. The skin will wrinkle slightly, a sign they’re perfectly done.
- Let them cool for 5 minutes before serving. They’re deceptively hot inside, a lesson from my first impatient bite.
Offering these baked apples straight from the oven, the flesh soft and yielding, the cinnamon sugar melted into a syrup, is a humble yet profound joy. Serve them with a dollop of whipped cream or a scoop of vanilla ice cream for an extra touch of indulgence.
Tuna Salad with Lettuce Wraps
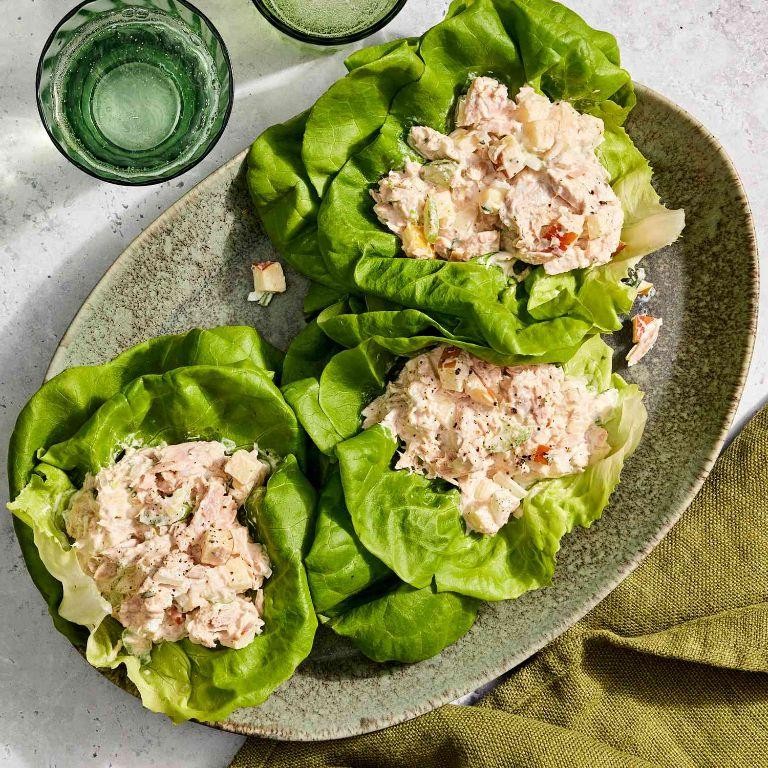
Many evenings, I find myself craving something light yet satisfying, a dish that doesn’t weigh me down but still feels like a treat. That’s when I turn to this simple tuna salad, wrapped in crisp lettuce leaves, a meal that’s as refreshing to make as it is to eat.
Ingredients
- 2 cans of tuna in water, drained (I like the chunk light for its mild flavor)
- 1/2 cup mayonnaise (Duke’s is my secret for creaminess)
- 1 tbsp Dijon mustard (adds a nice tang)
- 1/4 cup finely diced red onion (for a bit of crunch and color)
- 1 celery stalk, finely diced (I always keep celery in the fridge for recipes like this)
- Salt and pepper to taste (I’m generous with the pepper)
- 8 large lettuce leaves (butter lettuce works beautifully for its softness and pliability)
Instructions
- In a medium bowl, combine the drained tuna, mayonnaise, and Dijon mustard. Mix gently until just combined to keep the tuna from becoming too mushy.
- Add the diced red onion and celery to the tuna mixture. Stir to distribute evenly throughout the salad.
- Season the mixture with salt and pepper, adjusting to your preference. Remember, you can always add more, but you can’t take it away.
- Wash the lettuce leaves and pat them dry with a paper towel to ensure they’re ready to hold the salad without wilting.
- Spoon the tuna salad onto the center of each lettuce leaf, dividing it evenly among them.
- Fold the lettuce leaves around the tuna salad to form wraps. If you’re serving these at a gathering, a toothpick can help keep them neatly folded.
Fresh and vibrant, these tuna salad lettuce wraps offer a delightful contrast between the creamy filling and the crisp lettuce. They’re perfect for a light lunch or as an appetizer at your next dinner party, proving that simplicity often leads to the most satisfying meals.
Roasted Brussels Sprouts with Garlic
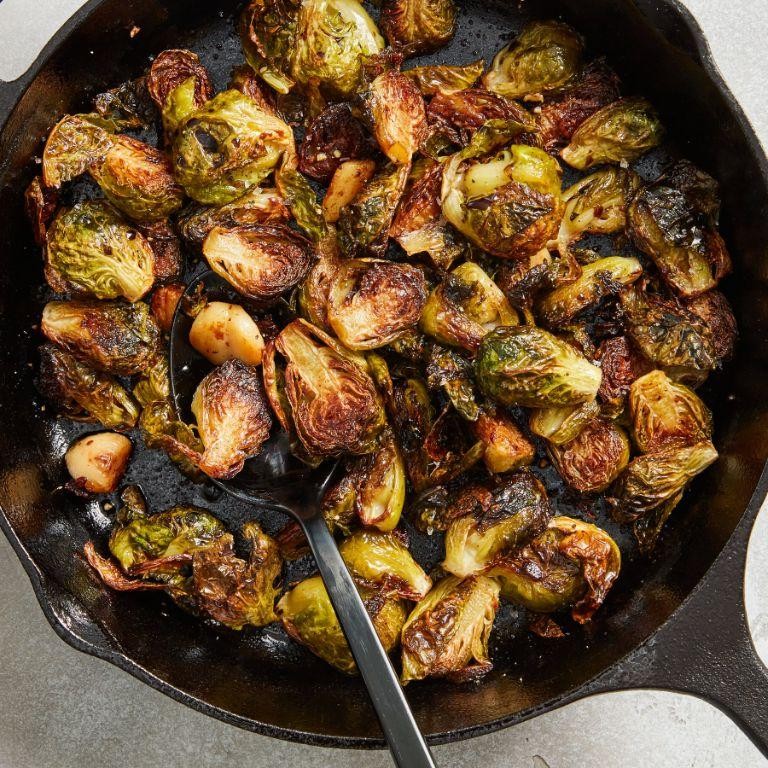
Sometimes, the simplest dishes bring the most comfort, especially when they’re as humble as roasted Brussels sprouts. This version, kissed with garlic, transforms the often-misunderstood vegetable into a caramelized, tender delight that even skeptics will love.
Ingredients
- 1 lb Brussels sprouts, halved (look for small, firm sprouts for the best texture)
- 3 tbsp extra virgin olive oil (my go-to for its fruity notes)
- 4 garlic cloves, minced (freshly minced garlic makes all the difference)
- 1/2 tsp sea salt (I love the subtle crunch it adds)
- 1/4 tsp black pepper, freshly ground (for a slight kick)
Instructions
- Preheat your oven to 400°F (200°C) to ensure it’s perfectly hot for roasting.
- In a large bowl, toss the halved Brussels sprouts with extra virgin olive oil, ensuring each piece is lightly coated for even cooking.
- Spread the sprouts in a single layer on a baking sheet, cut side down, to maximize caramelization.
- Roast in the preheated oven for 20 minutes, then sprinkle the minced garlic, sea salt, and black pepper over the sprouts.
- Gently stir the sprouts to distribute the garlic and seasonings, then return to the oven for another 10 minutes, or until the edges are crispy and golden.
- Tip: For an extra flavor boost, add a sprinkle of grated Parmesan cheese in the last 5 minutes of roasting.
- Tip: If your sprouts vary in size, cut the larger ones into quarters to ensure uniform cooking.
- Tip: Let the sprouts sit for a minute after roasting; they’ll crisp up even more as they cool slightly.
Velvety on the inside with a satisfying crunch on the outside, these Brussels sprouts carry a deep, nutty flavor that’s beautifully balanced by the sharpness of garlic. Serve them alongside a creamy risotto or as a standout side to your favorite roast for a meal that feels both rustic and refined.
Chia Seed Pudding with Coconut Milk
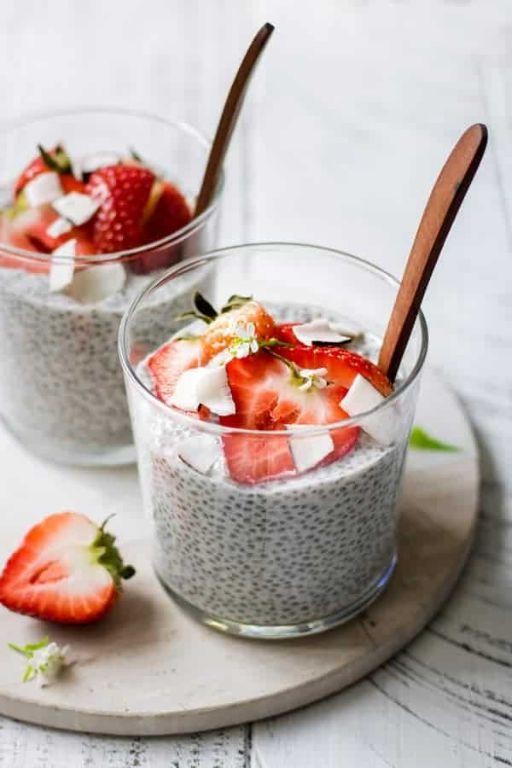
Perhaps there’s no simpler joy than stirring together a few humble ingredients the night before, only to wake up to a creamy, dreamy breakfast waiting in the fridge. This chia seed pudding with coconut milk is my quiet morning ritual, a gentle start to the day that feels both nourishing and indulgent.
Ingredients
- 1/4 cup chia seeds (I love the texture they add, like tiny pearls)
- 1 cup coconut milk (full-fat for that luxurious creaminess)
- 1 tbsp maple syrup (or honey, if you prefer a deeper sweetness)
- 1/2 tsp vanilla extract (a splash of warmth)
- A pinch of salt (to balance the flavors)
Instructions
- In a medium bowl, combine the chia seeds and coconut milk, whisking thoroughly to prevent any clumps.
- Add the maple syrup, vanilla extract, and a pinch of salt to the mixture, stirring until everything is well incorporated.
- Cover the bowl with plastic wrap, ensuring it touches the surface of the pudding to prevent a skin from forming.
- Refrigerate the mixture for at least 4 hours, or overnight, until the pudding has thickened to your liking.
- Before serving, give the pudding a good stir to fluff it up and check the consistency. If it’s too thick, a splash of coconut milk or water can loosen it.
Overnight, the chia seeds swell, creating a pudding that’s wonderfully thick yet soft, with a subtle coconut flavor that’s not too sweet. Serve it layered with fresh mango or a drizzle of peanut butter for a twist that feels special any day of the week.
Grilled Shrimp with Lemon
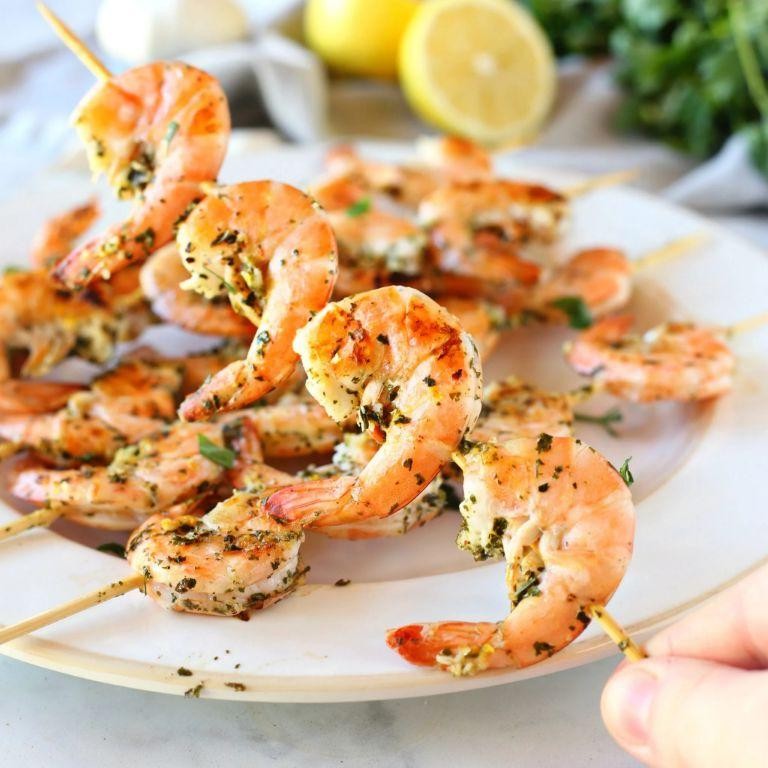
Moments like these, when the evening air carries the scent of the sea and the grill is just starting to warm, remind me why I love simple dishes that speak volumes. Grilled shrimp with lemon is one such dish, where each bite is a reminder of summer’s effortless beauty.
Ingredients
- 1 lb large shrimp, peeled and deveined (I like to leave the tails on for a pretty presentation)
- 2 tbsp extra virgin olive oil (my go-to for its fruity notes)
- 1 tsp sea salt (the coarse grains add a nice texture)
- 1/2 tsp freshly ground black pepper (freshly ground makes all the difference)
- 2 cloves garlic, minced (because garlic is life)
- 1 lemon, zested and juiced (for that bright, citrusy kick)
- 1 tbsp chopped fresh parsley (a sprinkle adds a fresh finish)
Instructions
- Preheat your grill to medium-high heat, about 375°F, ensuring the grates are clean and lightly oiled to prevent sticking.
- In a large bowl, combine the shrimp, olive oil, sea salt, black pepper, minced garlic, lemon zest, and lemon juice. Toss gently to coat the shrimp evenly, then let marinate for 10 minutes at room temperature.
- Thread the shrimp onto skewers, leaving a little space between each to ensure even cooking. If using wooden skewers, soak them in water for 30 minutes beforehand to prevent burning.
- Place the skewers on the grill and cook for 2-3 minutes per side, or until the shrimp turn pink and opaque, flipping once halfway through. Avoid overcooking to keep them juicy.
- Remove the skewers from the grill and sprinkle with chopped parsley for a fresh, herby note.
The texture of the shrimp should be firm yet tender, with a slight char from the grill that contrasts beautifully with the bright lemon and garlic. Try serving them over a bed of arugula with extra lemon wedges on the side for a light, summery meal that’s as pleasing to the eye as it is to the palate.
Berry Smoothie with Spinach
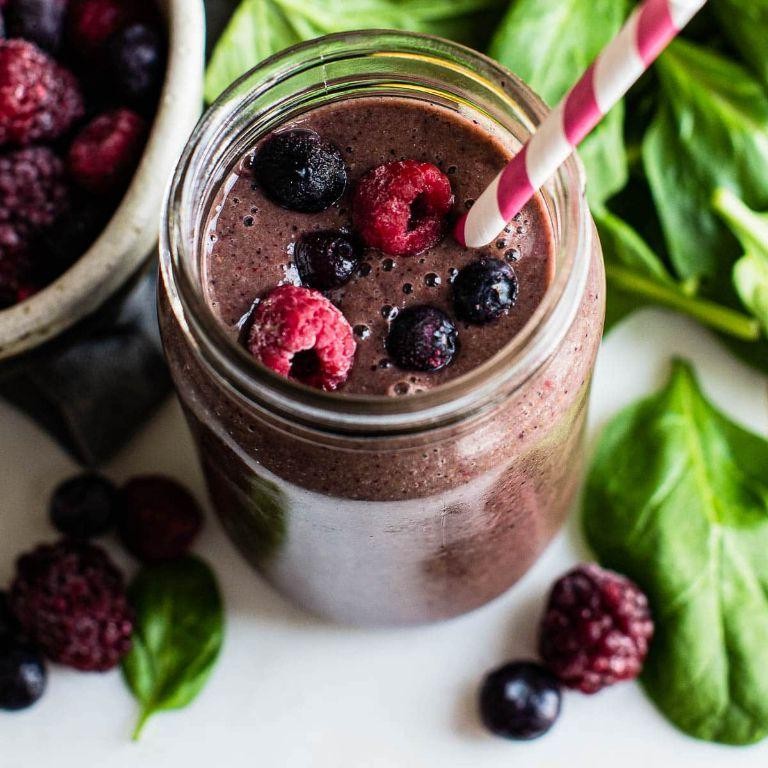
Venturing into the quiet of the morning, there’s something deeply comforting about blending a smoothie that’s both nourishing and vibrant. This Berry Smoothie with Spinach is my gentle nod to starting the day with intention, a liquid hug packed with flavors that dance between sweet and earthy.
Ingredients
- 1 cup frozen mixed berries (I find the mix of strawberries, blueberries, and raspberries adds a lovely depth)
- 1 ripe banana, peeled (the spottier, the sweeter, in my experience)
- 1 cup fresh spinach, tightly packed (I like to give it a quick rinse even if it’s pre-washed)
- 1/2 cup almond milk (unsweetened is my preference, but any milk works)
- 1 tbsp honey (local if you have it, for that extra touch of sweetness and support for local bees)
- 1/2 cup ice cubes (because I enjoy my smoothie extra frosty)
Instructions
- In a high-powered blender, combine the frozen mixed berries, banana, spinach, almond milk, and honey.
- Blend on high for 30 seconds, then pause to scrape down the sides with a spatula to ensure everything is incorporated evenly.
- Add the ice cubes and blend again on high for another 30 seconds, or until the mixture is smooth and no chunks remain. Tip: If the smoothie is too thick, add a splash more almond milk to reach your desired consistency.
- Pour into a tall glass and serve immediately. Tip: For an extra touch, garnish with a few fresh berries or a spinach leaf on top. Tip: If you’re not drinking it right away, storing it in the fridge with a lid can keep it fresh for a few hours, though it’s best enjoyed fresh.
Blending these ingredients creates a smoothie that’s luxuriously creamy with a perfect balance of sweetness from the berries and banana, subtly grounded by the spinach. It’s a delightful way to sneak in some greens, and serving it in a mason jar with a striped straw makes it feel like a special treat.
Conclusion
Absolutely delightful and easy to whip up, these 17 simple 4-ingredient diabetic recipes are a treasure trove for anyone looking to maintain a healthy lifestyle without sacrificing flavor. We hope you find these recipes as enjoyable and beneficial as we do. Don’t forget to try them out, share your favorites in the comments, and spread the love by pinning this article on Pinterest. Happy cooking!